
Create successful ePaper yourself
Turn your PDF publications into a flip-book with our unique Google optimized e-Paper software.
Technical Specifi cation Bulletin Number<br />
Fuel Type Date of Issue Edition<br />
Multifuel April 2001 1<br />
<strong>7.5kW</strong> <strong>Boiler</strong> Installation <strong>Harmony</strong> III Multifuel<br />
TB91<br />
Page Number<br />
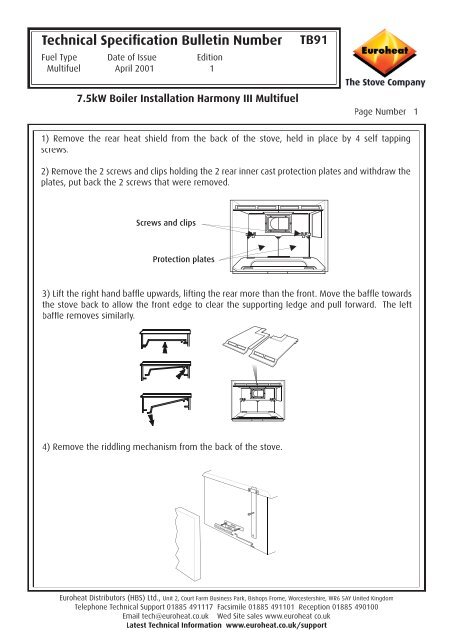
1) Remove the rear heat shield from the back of the stove, held in place by 4 self tapping<br />
screws.<br />
2) Remove the 2 screws and clips holding the 2 rear inner cast protection plates and withdraw the<br />
plates, put back the 2 screws that were removed.<br />
<br />
<br />
3) Lift the right hand baffl e upwards, lifting the rear more than the front. Move the baffl e towards<br />
the stove back to allow the front edge to clear the supporting ledge and pull forward. The left<br />
baffl e removes similarly.<br />
4) Remove the riddling mechanism from the back of the stove.<br />
<strong>Euroheat</strong> Distributors (HBS) Ltd., Unit 2, Court Farm Business Park, Bishops Frome, Worcestershire, WR6 5AY United Kingdom<br />
Telephone Technical Support 01885 491117 Facsimile 01885 491101 Reception 01885 490100<br />
Email tech@euroheat.co.uk Wed Site sales www.euroheat co.uk<br />
Latest Technical Information www.euroheat.co.uk/support<br />
1
Technical Specifi cation Bulletin Number<br />
Fuel Type Date of Issue Edition<br />
Multifuel April 2001 1<br />
<strong>7.5kW</strong> <strong>Boiler</strong> Installation <strong>Harmony</strong> III Multifuel<br />
TB91<br />
Page Number<br />
5) Remove the grate, grate frame and the 2 side cheeks. Withdraw through the front of the stove<br />
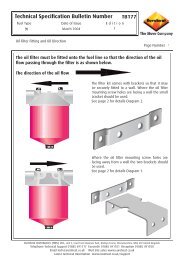
6) Measure the position where holes are to be drilled and mark ( See diagram below). Grind the<br />
number 0 from the casting number on the back plate of the stove.<br />
Using a 3mm drill, from the outside, drill pilot holes through the back casting of the stove, then<br />
enlarge to 6mm.Then using a 44mm hole saw cut the two holes for the inlet and outlet pipes.<br />
60<br />
685<br />
160<br />
394 394 394 96 96 96 010 010 010 10 10 10<br />
75<br />
7) The boiler then can be inserted through the furnace door. This is best achieved if the bottom of<br />
the boiler is placed through the door fi rst and then raise upward, putting the return pipe through the<br />
back casting fi rst. Hold the boiler then in position using a G clamp, which passes through the direct<br />
draught assembly.<br />
8) The pipes can then be secured in place. The return pipe using a felt washer, steel washer and<br />
brass nut, the fl ow pipe using a felt washer, steel washer and socket (MS 9032).<br />
9) The back panel will need to be modifi ed to accept the two pipes. The fl ow using a jigsaw and the<br />
return a 86mm hole saw. File the sharp edges smooth to avoid the risk of injury.<br />
10) Replace the 2 side cheeks, grate frame and grate. The riddling mechanism can now be replaced,<br />
check that it is moving freely. Replace the rear heat shield.<br />
<strong>Euroheat</strong> Distributors (HBS) Ltd., Unit 2, Court Farm Business Park, Bishops Frome, Worcestershire, WR6 5AY United Kingdom<br />
Telephone Technical Support 01885 491117 Facsimile 01885 491101 Reception 01885 490100<br />
Email tech@euroheat.co.uk Wed Site sales www.euroheat co.uk<br />
Latest Technical Information www.euroheat.co.uk/support<br />
300<br />
Remove 0 from the<br />
casting number with<br />
a grinder<br />
2