

flint knapping 20 - StoneBreaker-FSC
flint knapping 20 - StoneBreaker-FSC
flint knapping 20 - StoneBreaker-FSC

Create successful ePaper yourself
Turn your PDF publications into a flip-book with our unique Google optimized e-Paper software.
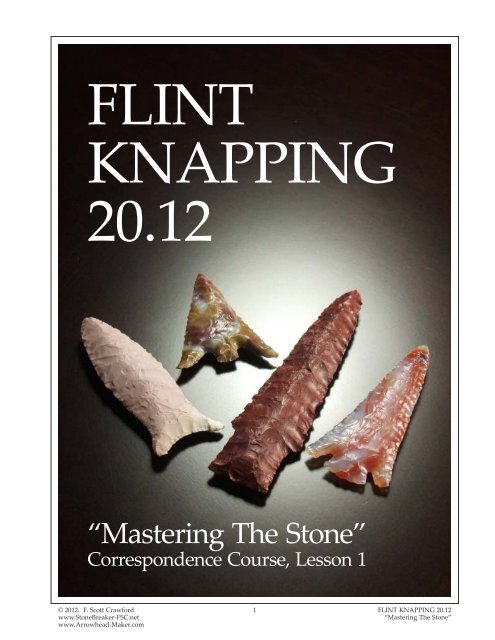
FLINT<br />
KNAPPING<br />
<strong>20</strong>.12<br />
“Mastering The Stone”<br />
Correspondence Course, Lesson 1<br />
© <strong>20</strong>12. F. Scott Crawford<br />
www.<strong>StoneBreaker</strong>-<strong>FSC</strong>.net<br />
www.Arrowhead-Maker.com<br />
1<br />
FLINT KNAPPING <strong>20</strong>.12<br />
“Mastering The Stone”
FLINT KNAPPING <strong>20</strong>.12<br />
FLINT KNAPPING <strong>20</strong>.12<br />
“Mastering The Stone”<br />
“Mastering The Stone”<br />
Correspondence Course, Lesson 1<br />
You and I might have been born into the era of<br />
flight and the beginning of the Space Age, but for<br />
many of us, our hearts and souls yearn for a simpler<br />
time. For a time when survival and accomplishment<br />
depended on our own effort and skill, on our<br />
mastery of the world around us and the resources<br />
which it offers to us.<br />
Rooted Deep In Our Ancient Past<br />
One way this deep desire manifests itself in our<br />
lives is this interest and obsession with<br />
making stone tools and weapons ... just<br />
like our ancestors did all over the<br />
world, for thousands of all-too-often<br />
forgotten generations.<br />
Maybe that’s why we gotta break rock!<br />
I say “Go for it!”<br />
Let’s Master Flint Knapping<br />
Let’s learn to master this ancient craft<br />
and art which we call “Flint<br />
Knapping”.<br />
Enjoy your new-found ability to turn<br />
rock and stone into useful tools and<br />
hunting weapons!<br />
Rebuild your link with the creative<br />
and resourceful human beings who<br />
have gone before us all.<br />
That’s why I wrote “FLINT<br />
KNAPPING <strong>20</strong>.12” ... to help us all<br />
make those connections to our history<br />
and to our past.<br />
by F. Scott Crawford<br />
Each twice-monthly lesson of<br />
“FLINT KNAPPING <strong>20</strong>.12”<br />
is designed to introduce <strong>flint</strong><br />
<strong>knapping</strong> methods and ideas in<br />
an additive order so you will<br />
learn and use them<br />
progressively to begin making<br />
arrowheads for yourself, with<br />
increasing skill and confidence<br />
as you learn and practice.<br />
2<br />
So, welcome to “FLINT KNAPPING <strong>20</strong>.12”!<br />
This is where you will get on that “Fast Track” to<br />
learn the ancient and honorable art and craft of<br />
creating tools and hunting weapons out of stone ...<br />
“Flint Knapping”.<br />
I appreciate the opportunity to share this craft with<br />
intelligent and curious people, such as yourself,<br />
from around the world, who are interested in make<br />
their own effort to preserve one of the important<br />
skills of the past and to enjoy the<br />
beauty of the natural stone materials<br />
utilized by our ancestors for many<br />
thousands of years in all corners of the<br />
world.<br />
A Debt Of Gratitude Expressed<br />
A word of thanks and a debt of gratitude<br />
is also due to several knappers<br />
from whom I have learned much over<br />
the years, as mentors and friends; chief<br />
among them are Craig Ratzat and<br />
Greg Nunn. Both are masters of their<br />
craft and outstanding teachers.<br />
Let’s Look At Methods & Then<br />
We’ll Set Some Goals<br />
In this first lesson if “FLINT<br />
KNAPPING <strong>20</strong>.12”, I’ll show you<br />
several aspects of <strong>flint</strong> <strong>knapping</strong> and<br />
work with you to set some “Arrowhead<br />
Making” goals for you to complete<br />
in the next few weeks and<br />
months. Let’s get started.<br />
© <strong>20</strong>12. F. Scott Crawford<br />
www.<strong>StoneBreaker</strong>-<strong>FSC</strong>.net<br />
www.Arrowhead-Maker.com
“FLINT KNAPPING <strong>20</strong>.12” Will Show You Basic & Advanced<br />
Percussion And Pressure Flaking For Reduction & Finishing.<br />
A large blade made from “Obsidian”, a volcanic glass<br />
from eastern Oregon. This piece was a ground preform,<br />
finished with parallel oblique pressure flaking.<br />
It is in a stylized form of a large Midwestern style<br />
“Dalton” or Western/Great Basin style “Humboldt”<br />
spear or lance point.<br />
© <strong>20</strong>12. F. Scott Crawford<br />
www.<strong>StoneBreaker</strong>-<strong>FSC</strong>.net<br />
www.Arrowhead-Maker.com<br />
3<br />
A large blade made from “Novaculite”, a waterdeposited<br />
<strong>flint</strong>-like material from Arkansas. This is<br />
the fine-grained, “porcelain” Novaculite. Coarser<br />
grained material also knaps well. Much Novaculite<br />
requires heat treatment prior to <strong>knapping</strong>. This piece<br />
was made by soft hammer percussion, with a little<br />
pressure flaking trim.<br />
FLINT KNAPPING <strong>20</strong>.12<br />
“Mastering The Stone”
We Will Explore The Methods & Tools For Working With<br />
Common & Readily Available Types Of Stone For Knapping.<br />
Before we can make finished hunting weapon<br />
projectile points such as arrowheads, we need to<br />
learn how to produce<br />
small pieces of workable<br />
stone in the right form and<br />
size for the tool we want.<br />
Then we will learn to<br />
modify those small pieces<br />
of stone into the specific<br />
shape we want. Plus, we’ll<br />
learn how to prepare the<br />
shaped stone to bind it to<br />
its intended shaft or<br />
handle for use.<br />
It’s First Things First<br />
However, to get to those<br />
ultimate finishing steps,<br />
we must first learn how to<br />
break large pieces of stone<br />
most effectively into useful<br />
smaller pieces.<br />
Only then will we be<br />
prepared to concern<br />
ourselves with actually<br />
shaping the small pieces.<br />
FLINT KNAPPING <strong>20</strong>.12<br />
“Mastering The Stone”<br />
4<br />
This is a “Quartzite” Hammerstone found by the<br />
author in the west Texas Panhandle north of Amarillo<br />
near the Canadian River in 1989. You can see the wear<br />
around the edge, caused by using this hammerstone to<br />
chip the “Alibates Chert” which was quarried in that<br />
region since the Clovis cultural period. Alibates<br />
Chert was traded across much of the midwest.<br />
Therefore, we will practice the effective use of<br />
special “hammer stones” to reduce a large chunk of<br />
the proper kind of rock.<br />
Which means we will need<br />
to consider how the choice<br />
of tool making stone is so<br />
important to the success of<br />
our rock breaking work.<br />
Controlled Fracturing<br />
Not only do we need rock<br />
which can break with a<br />
sharp edge, but the way<br />
the stone breaks makes a<br />
difference. The best stone<br />
for <strong>knapping</strong> breaks in a<br />
“conchoidal” style of<br />
fracture. We will learn<br />
what kinds of stone have<br />
this important and reliable<br />
characteristic which makes<br />
<strong>flint</strong> <strong>knapping</strong> possible.<br />
Oh, and then, “FLINT<br />
KNAPPING <strong>20</strong>.12” will<br />
introduce you to “soft<br />
hammers”!<br />
© <strong>20</strong>12. F. Scott Crawford<br />
www.<strong>StoneBreaker</strong>-<strong>FSC</strong>.net<br />
www.Arrowhead-Maker.com
“FLINT KNAPPING <strong>20</strong>.12” Will Teach You To Make Preforms<br />
From Larger Pieces Of Stone, Ready To Finish As Desired.<br />
The initial phase of our Flint Knapping process will<br />
begin with a chunk of stone. It can be a large lump<br />
of rock as it is found on the ground, or it could be a<br />
fair sized piece broken from a large chunk.<br />
In “FLINT KNAPPING <strong>20</strong>.12” you will learn how<br />
to break a useable size piece of stone from a large<br />
chunk. This piece is often called a “spall”. You will<br />
learn how to use a heavy hammerstone or large<br />
“soft hammer” tool to properly strike a large chunk<br />
in the best places and<br />
angles to break off<br />
“spalls” to work with.<br />
ALWAYS USE THE<br />
SAFETY EQUIPMENT<br />
In conjunction with this<br />
specialized step in the<br />
<strong>knapping</strong> process, you<br />
will also be reminded<br />
of the vital and important<br />
protective use of<br />
gloves, leather pads<br />
and safety glasses.<br />
As you learn how to<br />
continue the percussion<br />
process with a hammer<br />
© <strong>20</strong>12. F. Scott Crawford<br />
www.<strong>StoneBreaker</strong>-<strong>FSC</strong>.net<br />
www.Arrowhead-Maker.com<br />
An Obsidian projectile point or knife finished with Pressure Flaking.<br />
5<br />
An<br />
Obsidian<br />
“Pre-Form”<br />
produced by<br />
Soft Hammer<br />
Percussion.<br />
stone or a “soft hammer”, you will remove medium<br />
and small size chips from the “spall” or chunk.<br />
Preliminary Tool Forms ... Called “Pre-Forms”<br />
This process will provide you with the opportunity<br />
to pre-plan what you want to make out of the stone.<br />
And it supplies many chips which can be made into<br />
small tools or projectile points. The main piece of<br />
the spall which remains is considered a “core” since<br />
it is a source for those<br />
smaller, useful chips.<br />
This “core” can now be<br />
further shaped by<br />
percussion into the<br />
preliminary shape for a<br />
large tool or blade or<br />
projectile ... known as a<br />
“pre-form”.<br />
“Scott makes some of the<br />
smoothest percussion preforms<br />
I’ve ever seen” ~ Craig<br />
Ratzat, <strong>20</strong>07 Glass Buttes<br />
Knappers’ Workshop. Here<br />
is a 6-1/2” Dacite pre-form.<br />
The percussion “debitage”<br />
provides many chips used to<br />
make smaller arrow points.<br />
FLINT KNAPPING <strong>20</strong>.12<br />
“Mastering The Stone”
“I Guarantee It!”<br />
If, after 180 days (six months ~ 12 issues) of<br />
“FLINT KNAPPING <strong>20</strong>.12” you can not use<br />
the recommended methods and tools to make<br />
stone arrowheads you are proud to show your<br />
friends, just send an e-mail to me,<br />
(fscottcrawford@aol.com), the author, and I will<br />
refund every penny of your subscription paid to<br />
that point in time. Keep the personalized<br />
notebook and lessons you have received as my<br />
gift to you. No questions. No problems.<br />
Period. That’s my “Chiseled in Granite &<br />
Chipped in Flint Guarantee!” to you ~ it’s<br />
tougher than any old Bronze, Iron or even<br />
Space Age refined sugar warranty.<br />
F. Scott Crawford, Carrollton, Texas<br />
email: fscottcrawford@aol.com<br />
From Beginning The Cortex Removal On This Texas Flint<br />
Nodule To Finishing This Knife: 1 Hour <strong>20</strong> Minutes.<br />
FLINT KNAPPING <strong>20</strong>.12<br />
“Mastering The Stone”<br />
6<br />
© <strong>20</strong>12. F. Scott Crawford<br />
www.<strong>StoneBreaker</strong>-<strong>FSC</strong>.net<br />
www.Arrowhead-Maker.com
Extraordinary Works Of Flint Knapping Art & Craftsmanship<br />
Can Intimidate Us, Yet Inspire Our Efforts At The Same Time.<br />
Many of us who are interested in “<strong>flint</strong> <strong>knapping</strong>”<br />
got our start on this journey when we found an<br />
arrowhead at some time in our lives. That was<br />
what first inspired us to wonder: “How was this<br />
stone arrowhead created?” and “Who made it?”<br />
The next step for each of us was: “I wonder if I can<br />
make an arrowhead?”<br />
Now, it’s your turn.<br />
“FLINT KNAPPING <strong>20</strong>.12” will help<br />
you accomplish this objective in a<br />
confident and fulfilling manner. With<br />
study and practice, you will learn to<br />
succeed at making stone arrowheads.<br />
This will be a satisfying achievement.<br />
HERE’S YOUR FIRST<br />
HOMEWORK ASSIGNMENT<br />
If you have an arrowhead collection<br />
or access to the collection of a friend,<br />
spend some time examining the<br />
arrowheads which you like.<br />
See if there is a particular shape or<br />
style of projectile point which you<br />
would really like to be able to make<br />
for yourself.<br />
© <strong>20</strong>12. F. Scott Crawford<br />
www.<strong>StoneBreaker</strong>-<strong>FSC</strong>.net<br />
www.Arrowhead-Maker.com<br />
7<br />
This matching pair of red & tan Jasper<br />
“Gunther Barbed” style arrowheads<br />
was discovered in an apparent cache,<br />
in 1970 in Siskiyou County of<br />
northern California, by Pat Welch.<br />
The larger arrowhead measures<br />
1-1/2” long by 3/4” wide at the base.<br />
YOUR MISSION, SHOULD YOU CHOSE TO<br />
ACCEPT IT: MAKE AN ARROWHEAD LIKE IT<br />
Make a photograph of the arrowhead if you can, or<br />
a drawing. Both sides if possible. Hold it, get a feel<br />
for its weight and size. What kind of stone is it?<br />
Note the shape of the base notches or the tang<br />
which was attached to the arrow shaft. Imagine the<br />
diameter of the shaft, and consider how the arrow<br />
point was secured in place.<br />
Now, examine the tip or the barbs. Is<br />
there damage, perhaps created by<br />
impact when the arrow was used?<br />
With all of these details in mind,<br />
perhaps you would be thrilled to<br />
make an arrowhead like that one.<br />
YOUR INSPIRATION!<br />
Harness this example as your inspiration!<br />
We will refer back to this special<br />
personal goal in future lessons of<br />
“FLINT KNAPPING <strong>20</strong>.12”.<br />
Here is a modern-made arrowhead, knapped<br />
in the style of the “Gunther Barbed” points<br />
above, made from a slice of Chalcedony/Agate.<br />
FLINT KNAPPING <strong>20</strong>.12<br />
“Mastering The Stone”
In “FLINT KNAPPING <strong>20</strong>.12” We’ll Study Examples Of<br />
Ancient Points To Select Patterns To Model In Your Work.<br />
By examining ancient arrowheads we will see<br />
different styles of form and design, as well as<br />
different methods and sequences of work used in<br />
the <strong>knapping</strong> process.<br />
When we look at the surface of a finished projectile<br />
point, we can often discover evidence of the original<br />
“chip” or “blade” from which the point was manufactured.<br />
This can give us a clue to the method of<br />
creating the original small piece.<br />
A CHIP OFF THE OLD BLOCK<br />
Two basic ways were used to make the small pieces.<br />
One was to break a small “chip” off of the face or<br />
side of a larger piece. This<br />
was more of a random<br />
process, and resulted in a<br />
relatively wide, fairly flat<br />
surfaced, thin piece.<br />
A PREPARED CORE<br />
The other method utilized<br />
greater planning and<br />
controlled application of<br />
force to a prepared surface<br />
on one side or end of the<br />
source stone, the core. This<br />
FLINT KNAPPING <strong>20</strong>.12<br />
“Mastering The Stone”<br />
An Obsidian “Northern Side Notched”<br />
dart point, found in Modoc County of<br />
northern California in the early 1960’s<br />
by Pat Welch. It measures 2-7/16” long<br />
by 1-1/16” wide at the base. This could<br />
be an arrowhead, but it is a little large<br />
at the neck between the notches, which<br />
measures almost 7/16” across.<br />
8<br />
method created relatively longer, more uniform<br />
“blades”. Either direct or indirect percussion was<br />
used to apply the force of the strike.<br />
Close examination of an ancient arrow or dart point<br />
sometimes shows the original form or type of piece.<br />
BLADES HAVE A FULL LENGTH RIDGE<br />
If one side or surface is essentially flat, and the<br />
other has a more pronounced midline ridge along<br />
the full length of the other face, the original piece<br />
may have been a “blade”. Blades are usually flat on<br />
one side with a ridge line along the length of the<br />
other face. They tend to be straighter for a greater<br />
portion of their length; and<br />
narrow. This leads to a<br />
long, narrow arrow point.<br />
Points made from “chips”<br />
tend to be relatively wider<br />
and flat on both faces of the<br />
finished projectile point.<br />
Here is an obsidian core, with<br />
some blades which were removed<br />
from the core by percussion on a<br />
single striking surface at one end<br />
of the core (inset). The core is<br />
standing on the striking surface.<br />
© <strong>20</strong>12. F. Scott Crawford<br />
www.<strong>StoneBreaker</strong>-<strong>FSC</strong>.net<br />
www.Arrowhead-Maker.com
A Popular Arrowhead Style Which We Will Make Is A Smaller<br />
Version Of The Ancient “Northern Side Notch” Dart Point.<br />
Once you have learned to make useful chips and<br />
blades from a core piece of stone, we will<br />
move on to preparing the initial stages of a<br />
small projectile point. Progress at last!<br />
You will learn to visualize your arrowhead<br />
when you look at a “chip” or “blade”.<br />
Then you’ll plan the multiple steps used to<br />
accomplish your intended creation.<br />
You’ll produce the pre-form of your point.<br />
Next, you will prepare the edges of the<br />
pre-form to make possible the thinning<br />
flake removals to create the delicate but<br />
deadly form of the finished arrowhead.<br />
© <strong>20</strong>12. F. Scott Crawford<br />
www.<strong>StoneBreaker</strong>-<strong>FSC</strong>.net<br />
www.Arrowhead-Maker.com<br />
9<br />
Side notched arrowheads made from<br />
several colors of Obsidian, Flint,<br />
Agate and Dacite. They<br />
were pressure flaked<br />
from flat “chips”<br />
and from long,<br />
narrow “blades”.<br />
And you will master notching ... after you break<br />
your fair share of points in the process.<br />
A WORTHY OBJECTIVE FOR YOU<br />
One projectile point project which we will<br />
accomplish together is to produce your<br />
own side notched arrowheads like these.<br />
This side notched arrowhead is made from colorful<br />
Picture Jasper from Oregon. The style is similar to<br />
those arrowheads made by “Ishi”, a Yahi Indian<br />
from northern California, while he lived the last few<br />
years of his life at the University of California from<br />
1911, when he, as the last of his people, wandered<br />
into a small rural town and out of the “Stone Age”.<br />
FLINT KNAPPING <strong>20</strong>.12<br />
“Mastering The Stone”
You’ll Learn To Create Stone Tools From Natural Rock And<br />
Even Master Exotic Forms Of Man-Made Glass & Crystal.<br />
The natural world has many kinds of stone which<br />
can be made into useful tools and hunting weapons.<br />
The primary characteristic of useful <strong>knapping</strong> stone<br />
is the way it breaks. This fracturing needs to be<br />
controllable and repeatable. From a practical standpoint,<br />
the ideal stone will break in any direction<br />
(this makes for better control), and it will be able to<br />
hold a sharp edge (this makes it useful).<br />
So, what helps us identify these materials?<br />
UNIFORMITY<br />
An internal structure<br />
which is<br />
smoothly uniform<br />
enables a stone to<br />
be broken in any<br />
direction. This can<br />
be either a noncrystalline<br />
or<br />
micro-crystalline<br />
structure. For<br />
instance, “Flint” is<br />
a crystalline form of<br />
water deposited<br />
quartz, but the<br />
crystals are micro-<br />
FLINT KNAPPING <strong>20</strong>.12<br />
“Mastering The Stone”<br />
10<br />
scopic in size, and thus it allows forced fracturing in<br />
any direction. Chert, Novaculite, Hornstone,<br />
Jasper, Agate, some Petrified Woods and fine<br />
grained Quartzite fall into this category. Some of<br />
these materials benefit from initial heat treatment.<br />
The other major category is non-crystalline, glassy<br />
material, primarily volcanic in origin. This includes<br />
Obsidian, Dacite, Rhyolite and man-made Glass<br />
produced from high silica content material. These<br />
have already been heat treated! They’re born ready.<br />
These Dalton style dart<br />
points are made from<br />
quartz crystal, created<br />
for the telecommunications<br />
industry. It did<br />
not pass their Quality<br />
Control, but it works<br />
fine for <strong>knapping</strong>.<br />
Quartz crystal is a challenge<br />
because of the<br />
natural fracture planes<br />
of its molecular structure.<br />
Pressure flaking<br />
creates a uniquely<br />
rippled scar, a key to<br />
identifying crystal as<br />
opposed to glass.<br />
© <strong>20</strong>12. F. Scott Crawford<br />
www.<strong>StoneBreaker</strong>-<strong>FSC</strong>.net<br />
www.Arrowhead-Maker.com
What Tools Will You Need To Begin “Flint Knapping”?<br />
Where Can You Get Them? I Use & Recommend These:<br />
Fine or Medium Grit Carborundum<br />
Grindstone, to prepare edges<br />
or isolated platforms on<br />
knapped stone before<br />
percussion or pressure<br />
flaking. $5.00 each.<br />
4” x 2” x 1/2”.<br />
Native sandstone,<br />
quartzite, or other<br />
gritty stone can<br />
be used for the<br />
same purpose.<br />
6” x 3/4” wooden handled<br />
3/16” copper-rod tipped<br />
Pressure Flaking Tool.<br />
$3.00 each. Hammer<br />
the tip to resharpen.<br />
© <strong>20</strong>12. F. Scott Crawford<br />
www.<strong>StoneBreaker</strong>-<strong>FSC</strong>.net<br />
www.Arrowhead-Maker.com<br />
Deer antler tines for pressure<br />
flakers. $3.00 each.<br />
Wooden handled, lead-filled copper cap percussion tools,<br />
known as “copper boppers” for fine percussion work.<br />
SMALL, 1” diameter, 4-1/2” long, $7.00 each.<br />
LARGE, 1-1/4” diameter, 4-3/4” long, $9.00 each.<br />
11<br />
2-1/2” x 5” Cowhide leather Hand Pad, for use with<br />
pressure flaking held in the hand or on a bench.<br />
Can be made from larger pieces such as the Lap<br />
Pad, or ordered separately at $1.00 each.<br />
Hand Pads are also available in<br />
3” x 5” Buffalo Hide, in single layer or<br />
double layer hand pads.<br />
Single Layer Buffalo Hand Pad, $4.50.<br />
Double Layer Buffalo Hand Pad, $9.00.<br />
10” x 10” Cowhide<br />
Leather Lap Pad,<br />
draped over thigh<br />
during percussion<br />
work. $2.50 each.<br />
6” by 7/8” Nylon or Dalron handled Robust Pressure<br />
Flaker, drilled for a 3/16” copper flaking tool. For<br />
heavy duty pressure flaking. Adjusted with 1/8”<br />
Allen wrench. Set comes with 3 extra 4” by 3/16”<br />
copper nails for flaking tool and Allen wrench.<br />
Hammer the tip to resharpen. Touch up form with a<br />
file. $16.95 for the Robust Pressure Flaker with<br />
3/16” copper tool Set.<br />
Also available drilled for 1/8” copper tip for pressure<br />
flaking use on small points or as a notching tool.<br />
Set comes with 3 extra 3” by 1/8” copper nails and<br />
Allen wrench. $14.95 for the Robust Pressure Flaker<br />
with 1/8” copper tool Set.<br />
Your “FLINT KNAPPER’S PRESSURE FLAKING<br />
& PERCUSSION TOOL REQUISITION”<br />
for any of these tools is included with this Lesson.<br />
Send your requisition, with check or money order, to:<br />
F. Scott Crawford, 3661 Stockton Drive,<br />
Carrollton, Texas 75010<br />
FLINT KNAPPING <strong>20</strong>.12<br />
“Mastering The Stone”
Twice each month “FLINT KNAPPING <strong>20</strong>.12”<br />
brings to you another in a 24-issue series of fullyillustrated,<br />
comprehensive lessons about an<br />
important aspect of creating tools and hunting<br />
weapons from stone.<br />
These give you the methods and techniques.<br />
How much you accomplish with it all is up to you.<br />
Prepare, practice and produce!<br />
Here is the list of topics prepared for<br />
your complete series of lessons in<br />
“FLINT KNAPPING <strong>20</strong>.12”.<br />
• Mastering The Stone (THIS ISSUE)<br />
• Hammer Stone Percussion (NEXT)<br />
• Soft Hammer Percussion<br />
• Spalls Of Stone<br />
• Chips Off The Old Block<br />
• Heat Treatment<br />
• Percussion Cores<br />
• Chips & Blades<br />
• Indirect Percussion<br />
• Pressure Flaking<br />
• Edge Preparation<br />
• Platform Preparation<br />
• Perfecting A Practice Piece<br />
FLINT KNAPPING <strong>20</strong>.12<br />
“Mastering The Stone”<br />
FLINT KNAPPING <strong>20</strong>.12TM<br />
www.<strong>StoneBreaker</strong>-<strong>FSC</strong>.net/FLINT_KNAPPING_<strong>20</strong>-12.html<br />
12<br />
A “Scottsbluff” style lance or dart point made from a<br />
cut slab of heat treated Gemfield Jasper from Nevada.<br />
You Will Learn The Secrets To Build A Solid Foundation In<br />
The Essential Aspects Of The Ancient “Flint Knapping” Craft.<br />
• Percussion Pre-Forms<br />
• Preforms & Slabs ~ Ready To Finish Now<br />
• The Secret To More Powerful Pressure Flaking<br />
• Notch Your Stuff & Better Notching Tools<br />
• Small Point Pressure Flaking<br />
• Working With Core & Blades<br />
• Completing A Percussion-Only Project<br />
• Gunther Style Arrowhead ~ Northwest<br />
• Cahokia Style Arrowhead ~ Midwest<br />
• Dalton & Humboldt ~ Early Archaic<br />
Period<br />
• Necessity Is The Mother Of Invention<br />
• Stone Sources In The Space Age &<br />
Stone By Mail<br />
• Clovis & Agate Basin ~ Paleo Period*<br />
• Ishi Arrow Points ~ End Of The<br />
Stoneage*<br />
• Folsom & Cumberland ~ Indirect<br />
Percussion*<br />
*Bonus Editions<br />
Read, study and practice what you<br />
learn in each edition. Do this and you<br />
will indeed be on the ‘Fast Track’ to<br />
learn, enjoy and master the challenging<br />
art and craft of <strong>flint</strong> <strong>knapping</strong>.<br />
© <strong>20</strong>12. F. Scott Crawford<br />
www.<strong>StoneBreaker</strong>-<strong>FSC</strong>.net<br />
www.Arrowhead-Maker.com