Connecting an iOS Device via Router - Furuno USA
Connecting an iOS Device via Router - Furuno USA
Connecting an iOS Device via Router - Furuno USA

Create successful ePaper yourself
Turn your PDF publications into a flip-book with our unique Google optimized e-Paper software.
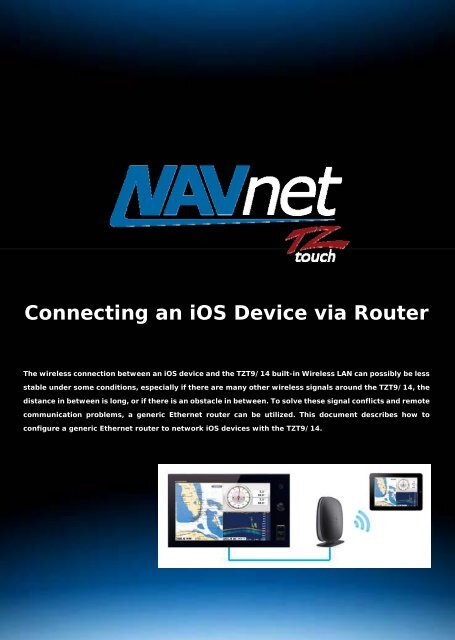
<strong>Connecting</strong> <strong>an</strong> <strong>iOS</strong> <strong>Device</strong> <strong>via</strong> <strong>Router</strong><br />
The wireless connection between <strong>an</strong> <strong>iOS</strong> device <strong>an</strong>d the TZT9/14 built-in Wireless LAN c<strong>an</strong> possibly be less<br />
stable under some conditions, especially if there are m<strong>an</strong>y other wireless signals around the TZT9/14, the<br />
dist<strong>an</strong>ce in between is long, or if there is <strong>an</strong> obstacle in between. To solve these signal conflicts <strong>an</strong>d remote<br />
communication problems, a generic Ethernet router c<strong>an</strong> be utilized. This document describes how to<br />
configure a generic Ethernet router to network <strong>iOS</strong> devices with the TZT9/14.<br />
1
1. Summary<br />
<strong>iOS</strong> devices c<strong>an</strong> be wirelessly networked with the TZT9/14 <strong>via</strong> <strong>an</strong> Ethernet router with the following settings on the<br />
router:<br />
1-1. (M<strong>an</strong>datory) Fix <strong>an</strong> IP address to “192.168.252.2” to “192.168.252.99” (e.g. 192.168.252.2)<br />
1-2. (M<strong>an</strong>datory) Set the Subnet Mask to “255.255.255.0”<br />
1-3. (M<strong>an</strong>datory) Activate the DHCP server function<br />
1-4. (M<strong>an</strong>datory) Set the security mode to other th<strong>an</strong> Open or Disabled<br />
1-5. (Recommended) Set the wireless ch<strong>an</strong>nel to Auto, instead of fixing to one ch<strong>an</strong>nel *<br />
1-6. (Recommended) Rename the router’s SSID to easily find the router with <strong>an</strong> <strong>iOS</strong> device **<br />
1-7. (If necessary) Ch<strong>an</strong>ge the router’s Password **<br />
Note:<br />
* Setting the router’s wireless ch<strong>an</strong>nel to Auto will have <strong>an</strong> effect on avoiding signal conflicts between m<strong>an</strong>y wireless<br />
devices.<br />
** The original SSID <strong>an</strong>d password are usually stated on a sticker pasted on a router.<br />
Tips on TZT9/14 Built-in Wireless LAN<br />
For <strong>iOS</strong> connection (ad-hoc):<br />
When the TZT9/14 is networked with <strong>iOS</strong> devices <strong>via</strong> the built-in Wireless LAN, a wireless ch<strong>an</strong>nel is fixed to CH10. The<br />
TZT9/14 works as a server <strong>an</strong>d communicates with <strong>iOS</strong> devices with CH10 signals.<br />
For Internet connection:<br />
On the other h<strong>an</strong>d, when the TZT9/14 is connected to the Internet <strong>via</strong> the built-in Wireless LAN, a wireless ch<strong>an</strong>nel is<br />
variable (auto), depending on <strong>an</strong> access point’s wireless ch<strong>an</strong>nel because the TZT9/14 works as a client.<br />
2
2. Setting up a <strong>Router</strong><br />
This section shows <strong>an</strong> example of settings with the Belkin N300.<br />
http://www.belkin.com/us/p/P-F9K1002<br />
If <strong>an</strong>other type of router is used, open its setup page <strong>an</strong>d make all the necessary settings shown in 1. Summary.<br />
2-1. Connect a router to a PC with a LAN cable.<br />
Note: The LAN cable should be connected to one of the LAN ports on the router, not the WAN port.<br />
WAN<br />
LAN<br />
2-2. Install the Setup driver on a PC. (A driver CD is included with the product.)<br />
3
2-3. Launch the Setup page.<br />
2-4. Click [Adv<strong>an</strong>ced Tools].<br />
2-5. Click [Network Name & Security] to make detailed settings such as IP address.<br />
The Login page opens.<br />
2-6. Click [Submit] to open the detailed setup page.<br />
4
2-7. (Ref. Summary 1-1.)<br />
In the [LAN Settings] page, fix <strong>an</strong> IP address to “192.168.252.2” to “192.168.252.99”. In this example, the IP<br />
address is fixed to “192.168.252.2”.<br />
2-8. (Ref. Summary 1-2.)<br />
Set the subnet mask to “255.255.255.0”.<br />
2-9. (Ref. Summary 1-3.)<br />
Set the DHCP on.<br />
Note:<br />
If the message ”The LAN IP address c<strong>an</strong>not be<br />
in the DHCP address pool.” appears as shown at<br />
left, see troubleshooting on Page 7-8.<br />
5
2-10. (Ref. Summary 1-6.)<br />
In the [Ch<strong>an</strong>nel <strong>an</strong>d SSID] page, rename the SSID to <strong>an</strong> easy-to-recognize name.<br />
This setting is recommended in order to easily find the router with <strong>an</strong> <strong>iOS</strong> device.<br />
In this example, the original SSID is renamed to “NNTZT <strong>Router</strong> 1”.<br />
2-11. (Ref. Summary 1-5.)<br />
Set wireless ch<strong>an</strong>nel to [Auto].<br />
Wireless ch<strong>an</strong>nels will then automatically switch to avoid surrounding wireless signals. This setting is recommended to<br />
avoid conflicts between m<strong>an</strong>y wireless ch<strong>an</strong>nels from other devices.<br />
2-12. (Ref. Summary 1-4.)<br />
IP address:<br />
192.168.252.2<br />
Subnet Mask:<br />
255.255.255.0<br />
DHCP: ON<br />
Wireless Ch<strong>an</strong>nel: Auto<br />
SSID renamed to<br />
“NNTZT_<strong>Router</strong> 1”<br />
6
In the [Security] page, set the security mode to other th<strong>an</strong> Open or Disabled.<br />
In this example, it is set to “WPA/WPA2-Personal (PSK)”.<br />
2-13. (Ref. Summary 1-7.)<br />
Ch<strong>an</strong>ge the password to <strong>an</strong> easier-to-remember one if necessary.<br />
Note: When <strong>an</strong> <strong>iOS</strong> device is connected to the built-in Wireless LAN of the TZT9/14 in ad-hoc, the security setting on the<br />
TZT9/14 should be WEP. When connecting <strong>iOS</strong> devices to a router, however, the router’s security setting should be<br />
<strong>an</strong>ything other th<strong>an</strong> Open or Disabled.<br />
2-14. Check all the ch<strong>an</strong>ges made.<br />
Security Mode:<br />
WPA/WPA2-Personal (PSK)<br />
Ch<strong>an</strong>ge the password.<br />
7
Troubleshooting<br />
If the error message “The LAN IP address c<strong>an</strong>not be in the DHCP address<br />
pool” appears, ch<strong>an</strong>ge the [IP Pool Starting Address] or [IP Pool<br />
Ending Address]. See the following steps for solution.<br />
Tips:<br />
The router (DHCP Server) will allocate <strong>an</strong> IP address to a connected device (Client) in the IP r<strong>an</strong>ge set in IP Pool Starting<br />
Address <strong>an</strong>d IP Pool Ending Address. When the error message above appears, the IP address you tried to enter must be<br />
in that r<strong>an</strong>ge.<br />
Steps:<br />
In this example, after you try to fix the router’s IP address to “192.168.252.2”, the error message appeared.<br />
1. Check the IP Pool Starting Address <strong>an</strong>d IP Pool Ending Address.<br />
The present settings are:<br />
IP Pool Starting Address – 192.168.252.2<br />
IP Pool Ending Address – 192.168.252.100<br />
You c<strong>an</strong> see that the IP address “192.168.252.2” you tried to enter is in the IP r<strong>an</strong>ge for clients. In order to be able to<br />
fix the router’s IP address to “192.168.252.2”, the IP Pool Starting Address should be ch<strong>an</strong>ged.<br />
2. Ch<strong>an</strong>ge the IP Pool Starting Address to “192.168.252.3”.<br />
After you tried to set the router’s IP address<br />
to “192.168.252.2”, the error message<br />
appeared.<br />
1. IP Pool Starting Address: 192.168.252.2<br />
IP Pool Ending Address: 192.168.252.100<br />
8
3. Now you c<strong>an</strong> ch<strong>an</strong>ge the router’s IP address to “192.168.252.2”.<br />
3. Checking Wireless Connection between <strong>Router</strong> <strong>an</strong>d<br />
<strong>iOS</strong> <strong>Device</strong><br />
After fixing the IP address, setting the security mode, etc, check if the connection c<strong>an</strong> be established between the router<br />
<strong>an</strong>d <strong>an</strong> <strong>iOS</strong> device.<br />
3-1. With <strong>an</strong> <strong>iOS</strong> device, in [Settings] – [Wi-Fi], find the renamed SSID “NNTZT_<strong>Router</strong> 1” or the name you selected<br />
for your router (Ref. Setting up a <strong>Router</strong> 2-10.)<br />
3. Now you c<strong>an</strong> ch<strong>an</strong>ge the router’s IP address to<br />
“192.168.252.2”.<br />
2. Ch<strong>an</strong>ge IP Pool Starting Address to<br />
“192.168.252.3”<br />
9
3-2. Select NNTZT <strong>Router</strong> 1 <strong>an</strong>d enter its password. If the password is ch<strong>an</strong>ged in the Step 2-13, enter the same one<br />
here.<br />
3-3. Check that the connection is established. To confirm the connection, tap the [ > ] icon to verify that <strong>an</strong> IP address<br />
[192.168.252.x] <strong>an</strong>d subnet mask [255.255.255.0] are shown in the DHCP tab.<br />
10
4. <strong>Connecting</strong> TZT9/14, <strong>Router</strong>, <strong>an</strong>d <strong>iOS</strong> <strong>Device</strong><br />
4-1. Connect the router to the TZT9/14 or <strong>an</strong> Ethernet hub <strong>an</strong>d install the router in a convenient place onboard.<br />
Direct connection between one TZT9/14 <strong>an</strong>d a router:<br />
Multiple TZT9/14 units connected to router’s LAN ports:<br />
A router connected to <strong>an</strong> Ethernet hub on the TZT9/14 network:<br />
4-2. Connect <strong>an</strong> <strong>iOS</strong> device to the router following the Step 3-1 to 3-3.<br />
4-3. Launch the NavNet Remote app <strong>an</strong>d NavNet Viewer app.<br />
4-4. Confirm that images <strong>an</strong>d data are shown on the devices.<br />
Note: In the interconnections described above, the TZT9/14’s built-in Wireless LAN does not have to be ON because <strong>iOS</strong><br />
devices are networked <strong>via</strong> the router. However, in order to fully make use of the built-in Wireless LAN, you c<strong>an</strong> connect<br />
the TZT9/14 to the Internet while networking <strong>iOS</strong> devices <strong>via</strong> a router as follows:<br />
11
--- END ---<br />
12