ROTARY - SM18 INSTALLATION MANUAL.pdf - Atlantic Auto ...
ROTARY - SM18 INSTALLATION MANUAL.pdf - Atlantic Auto ...
ROTARY - SM18 INSTALLATION MANUAL.pdf - Atlantic Auto ...

You also want an ePaper? Increase the reach of your titles
YUMPU automatically turns print PDFs into web optimized ePapers that Google loves.
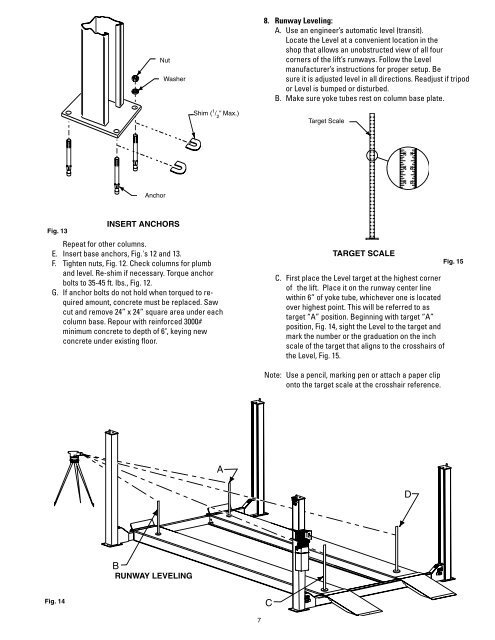
Fig. 13<br />
Fig. 14<br />
Nut<br />
Anchor<br />
Washer<br />
INSERT ANCHORS<br />
Shim ( 1 / 2 ” Max.)<br />
Repeat for other columns.<br />
E. Insert base anchors, Fig.'s 12 and 13.<br />
F. Tighten nuts, Fig. 12. Check columns for plumb<br />
and level. Re-shim if necessary. Torque anchor<br />
bolts to 35-45 ft. lbs., Fig. 12.<br />
G. If anchor bolts do not hold when torqued to re-<br />
quired amount, concrete must be replaced. Saw<br />
cut and remove 24” x 24” square area under each<br />
column base. Repour with reinforced 3000#<br />
minimum concrete to depth of 6", keying new<br />
concrete under existing floor.<br />
B<br />
RUNWAY LEVELING<br />
A<br />
7<br />
8. Runway Leveling:<br />
A. Use an engineer’s automatic level (transit).<br />
Locate the Level at a convenient location in the<br />
shop that allows an unobstructed view of all four<br />
corners of the lift’s runways. Follow the Level<br />
manufacturer’s instructions for proper setup. Be<br />
sure it is adjusted level in all directions. Readjust if tripod<br />
or Level is bumped or disturbed.<br />
B. Make sure yoke tubes rest on column base plate.<br />
Target Scale<br />
TARGET SCALE<br />
C. First place the Level target at the highest corner<br />
of the lift. Place it on the runway center line<br />
within 6” of yoke tube, whichever one is located<br />
over highest point. This will be referred to as<br />
target “A” position. Beginning with target “A”<br />
position, Fig. 14, sight the Level to the target and<br />
mark the number or the graduation on the inch<br />
scale of the target that aligns to the crosshairs of<br />
the Level, Fig. 15.<br />
Note: Use a pencil, marking pen or attach a paper clip<br />
onto the target scale at the crosshair reference.<br />
C<br />
23 24 25 11 12 13<br />
D<br />
Fig. 15