Configuring Thunderbird for Flinders Mail at home.
Configuring Thunderbird for Flinders Mail at home.
Configuring Thunderbird for Flinders Mail at home.

Create successful ePaper yourself
Turn your PDF publications into a flip-book with our unique Google optimized e-Paper software.
<strong>Configuring</strong> <strong>Thunderbird</strong> <strong>for</strong><br />
<strong>Flinders</strong> <strong>Mail</strong> <strong>at</strong> <strong>home</strong>.<br />
Downloading<br />
<strong>Thunderbird</strong> can be downloaded from the Mozilla web site loc<strong>at</strong>ed <strong>at</strong><br />
http://www.mozilla.org/download.html<br />
This web site also contains links to system requirements, install<strong>at</strong>ion<br />
instructions and frequently asked questions.<br />
New Account Setup<br />
When <strong>Thunderbird</strong> is started <strong>for</strong> the first time the account wizard will start.<br />
If the wizard has been closed, it can be restarted from the ‘Tools’ menu, clicking on<br />
‘Account Settings’ and then click the ‘Add Account’ button.<br />
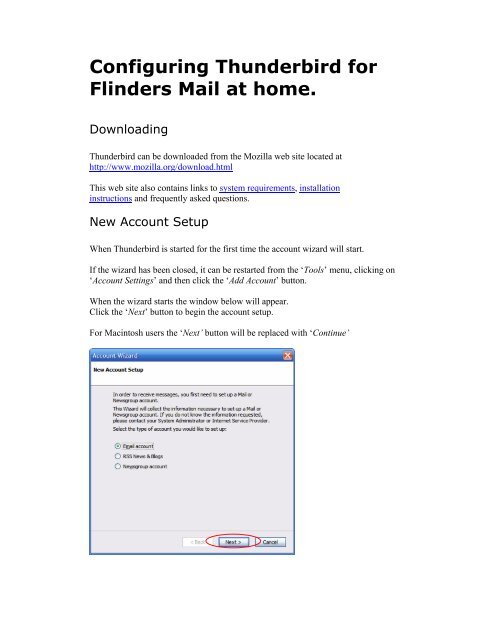
When the wizard starts the window below will appear.<br />
Click the ‘Next’ button to begin the account setup.<br />
For Macintosh users the ‘Next’ button will be replaced with ‘Continue’
Enter your personal details in the appropri<strong>at</strong>e fields as below<br />
Click ‘next’ when details have been entered<br />
Choose the ‘IMAP’ radio button option<br />
For <strong>Flinders</strong> University email, the Incoming Server is<br />
‘post.flinders.edu.au’<br />
If you are using the <strong>Flinders</strong> modem pool to connect to the internet the Outgoing<br />
Server will also be ‘post.flinders.edu.au’
If you are not using the <strong>Flinders</strong> University modem pool to connect to the internet, the<br />
Outgoing Server will be provided by your Internet provider.<br />
Check your internet provider’s web site <strong>for</strong> this in<strong>for</strong>m<strong>at</strong>ion.<br />
Click ‘next’ when the server details have been entered.<br />
Enter your <strong>Flinders</strong> Authentic<strong>at</strong>ion Name in the username field and click ‘next’
Enter a name <strong>for</strong> the account as shown below. This is a personal preference and<br />
anything can be entered here to identify the account.<br />
Click ‘next’ to continue.<br />
A summary will be provided <strong>at</strong> the end of the wizard.<br />
Check th<strong>at</strong> the details are correct and click ‘finish’ to complete the account wizard.<br />
Macintosh users will see ‘Done’ instead of ‘finish’ to complete the account wizard.
At the completion of the account wizard <strong>Thunderbird</strong> will <strong>at</strong>tempt to connect to the<br />
<strong>Flinders</strong> incoming mail server. The alert window will pop up as shown below.<br />
This is because <strong>Flinders</strong> email uses a secure connection and we will need to tell<br />
<strong>Thunderbird</strong> about this. Click ‘OK’ to continue set up.<br />
From the ‘Tools’ menu choose ‘Account Settings’<br />
The window will appear as below with your personal details entered.
Highlight the ‘Server Settings’ in the left pane.<br />
Choose the ‘SSL’ radio button option under security settings in the right pane.<br />
Tick the ‘Expunge’ checkbox under server settings in the right pane.<br />
Click the ‘Advanced’ button and another window will appear.<br />
The Advanced Account Settings window will appear as below.<br />
Enter ‘INBOX.’ in the IMAP server directory (Don’t <strong>for</strong>get to enter the full stop)<br />
Un-tick the ‘Show only subscribed folders’ option.<br />
Click ‘OK’ to continue.
Highlight ‘Composition & Addressing’ in the left pane<br />
In the right pane choose ‘start the reply above the quote’ from the drop down menu<br />
Then click OK when done<br />
Windows users choose ‘Options’ from the ‘Tools’ menu to configure the<br />
functionality.<br />
Macintosh users choose ‘Preferences’ from the ‘<strong>Thunderbird</strong>’ menu.
To set <strong>Thunderbird</strong> as the default mail client you must have Administr<strong>at</strong>or privileges.<br />
If you do not have Administr<strong>at</strong>or privileges you can still set the option, although the<br />
option will not be saved.<br />
If you use the <strong>Flinders</strong> Modem Pool to connect to the internet you will need to<br />
configure the proxy settings to view mail th<strong>at</strong> contains web content.<br />
If you connect to the internet via a different Internet provider, DO NOT complete this<br />
step. Proceed to ‘Composition’ options<br />
Click the ‘Connection Settings’ button to configure the proxy settings<br />
Choose the radio button as below and enter ‘http://www.flinders.edu.au/proxy.pac’<br />
Click ‘OK’ when details have been entered
Choose ‘Composition’ from the icons along the top of the window<br />
Choose ‘Inline’ from the drop down menu<br />
Click the ‘Send Options’ button and a window will appear<br />
Choose the option below from the drop down menu and then click OK.<br />
This will return you to the previous window
Choose the ‘Addressing’ tab and change the outgoing email addresses to ‘Collected<br />
Addresses’ This will save any addresses th<strong>at</strong> are typed when sending new mail to the<br />
collected address book.<br />
Click OK and this will save and complete the option settings.<br />
For Macintosh users closing the window will save the option settings.<br />
Click the ‘Get <strong>Mail</strong>’ button and this will prompt you <strong>for</strong> a password.<br />
Enter your password and click OK
Ensure you have a Sent, Drafts and Templ<strong>at</strong>es folder. If you do not then you will<br />
need to cre<strong>at</strong>e these to store your sent mail and save drafts.<br />
If you do have these folders then your set up is complete.<br />
From the ‘File’ menu choose ‘New > Folder’ and a pop up window will appear
Enter ‘Sent’ in the folder name, ensuring th<strong>at</strong> an Uppercase ‘S’ is used.<br />
Also ensure th<strong>at</strong> the correct account is selected in the drop down menu.<br />
Click OK to cre<strong>at</strong>e the folder.<br />
Repe<strong>at</strong> these steps <strong>for</strong> ’Drafts’ and ‘Templ<strong>at</strong>es’<br />
The folders should appear as below with special icons.<br />
If they do not, try refreshing the folder list by compressing and expanding the folders<br />
(click on the ‘-‘ icon and it will change to ‘+’ click again to open folders)<br />
This completes the configur<strong>at</strong>ion <strong>for</strong> <strong>Thunderbird</strong> <strong>at</strong> <strong>home</strong>