Installing the oven - Fisher & Paykel
Installing the oven - Fisher & Paykel
Installing the oven - Fisher & Paykel

You also want an ePaper? Increase the reach of your titles
YUMPU automatically turns print PDFs into web optimized ePapers that Google loves.
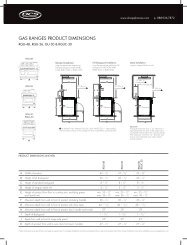
2 Product and cabinetry dimensions<br />
Single <strong>oven</strong> models<br />
H<br />
A<br />
C E<br />
Installation diagrams for illustration purposes only<br />
Product and cabinetry dimensions (mm)<br />
B<br />
G<br />
F<br />
D<br />
L<br />
K<br />
BI453<br />
models<br />
J<br />
BI603<br />
models<br />
A overall height of product 450 595<br />
B overall width of product 595 595<br />
C overall depth of product (without handle) 562 562<br />
D height of chassis 433 578<br />
E width of chassis 550 550<br />
F depth of chassis 542 542<br />
G depth of <strong>oven</strong> frame and control panel (excl. knobs) 20 20<br />
H depth of <strong>oven</strong> door (open) (measured from front of <strong>oven</strong> frame) 320 465<br />
I minimum inside width of cavity 560 560<br />
I I overall width of cavity 600 600<br />
J inside height of cavity 438 583<br />
J I overall height of cavity 455 600<br />
K minimum inside depth of cavity 550 550<br />
L flush fitting cabinetry clearance 20 20<br />
Note: If installing a cooktop above <strong>the</strong> <strong>oven</strong> ensure adequate clearance is provided for <strong>the</strong> cooktop as per <strong>the</strong><br />
cooktop manufacturer’s instructions.<br />
I<br />
I I<br />
L<br />
J I<br />
16-20 mm<br />
2.5 mm<br />
Ensure <strong>the</strong> cavity is completely sealed with no gaps