CASE YELLOW CLARIFICATIONS AND ERRATA - GMT Games
CASE YELLOW CLARIFICATIONS AND ERRATA - GMT Games
CASE YELLOW CLARIFICATIONS AND ERRATA - GMT Games
You also want an ePaper? Increase the reach of your titles
YUMPU automatically turns print PDFs into web optimized ePapers that Google loves.
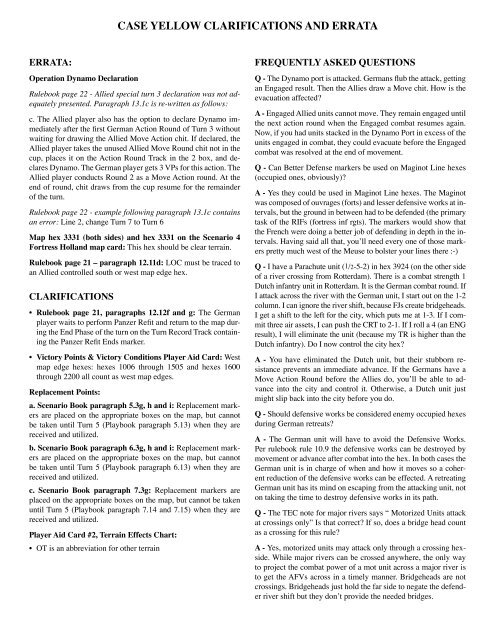
<strong>CASE</strong> <strong>YELLOW</strong> <strong>CLARIFICATIONS</strong> <strong>AND</strong> <strong>ERRATA</strong><br />
<strong>ERRATA</strong>:<br />
Operation Dynamo Declaration<br />
Rulebook page 22 - Allied special turn 3 declaration was not adequately<br />
presented. Paragraph 13.1c is re-written as follows:<br />
c. The Allied player also has the option to declare Dynamo immediately<br />
after the first German Action Round of Turn 3 without<br />
waiting for drawing the Allied Move Action chit. If declared, the<br />
Allied player takes the unused Allied Move Round chit not in the<br />
cup, places it on the Action Round Track in the 2 box, and declares<br />
Dynamo. The German player gets 3 VPs for this action. The<br />
Allied player conducts Round 2 as a Move Action round. At the<br />
end of round, chit draws from the cup resume for the remainder<br />
of the turn.<br />
Rulebook page 22 - example following paragraph 13.1c contains<br />
an error: Line 2, change Turn 7 to Turn 6<br />
Map hex 3331 (both sides) and hex 3331 on the Scenario 4<br />
Fortress Holland map card: This hex should be clear terrain.<br />
Rulebook page 21 – paragraph 12.11d: LOC must be traced to<br />
an Allied controlled south or west map edge hex.<br />
<strong>CLARIFICATIONS</strong><br />
• Rulebook page 21, paragraphs 12.12f and g: The German<br />
player waits to perform Panzer Refit and return to the map during<br />
the End Phase of the turn on the Turn Record Track containing<br />
the Panzer Refit Ends marker.<br />
• Victory Points & Victory Conditions Player Aid Card: West<br />
map edge hexes: hexes 1006 through 1505 and hexes 1600<br />
through 2200 all count as west map edges.<br />
Replacement Points:<br />
a. Scenario Book paragraph 5.3g, h and i: Replacement markers<br />
are placed on the appropriate boxes on the map, but cannot<br />
be taken until Turn 5 (Playbook paragraph 5.13) when they are<br />
received and utilized.<br />
b. Scenario Book paragraph 6.3g, h and i: Replacement markers<br />
are placed on the appropriate boxes on the map, but cannot<br />
be taken until Turn 5 (Playbook paragraph 6.13) when they are<br />
received and utilized.<br />
c. Scenario Book paragraph 7.3g: Replacement markers are<br />
placed on the appropriate boxes on the map, but cannot be taken<br />
until Turn 5 (Playbook paragraph 7.14 and 7.15) when they are<br />
received and utilized.<br />
Player Aid Card #2, Terrain Effects Chart:<br />
• OT is an abbreviation for other terrain<br />
FREQUENTLY ASKED QUESTIONS<br />
Q - The Dynamo port is attacked. Germans flub the attack, getting<br />
an Engaged result. Then the Allies draw a Move chit. How is the<br />
evacuation affected?<br />
A - Engaged Allied units cannot move. They remain engaged until<br />
the next action round when the Engaged combat resumes again.<br />
Now, if you had units stacked in the Dynamo Port in excess of the<br />
units engaged in combat, they could evacuate before the Engaged<br />
combat was resolved at the end of movement.<br />
Q - Can Better Defense markers be used on Maginot Line hexes<br />
(occupied ones, obviously)?<br />
A - Yes they could be used in Maginot Line hexes. The Maginot<br />
was composed of ouvrages (forts) and lesser defensive works at intervals,<br />
but the ground in between had to be defended (the primary<br />
task of the RIFs (fortress inf rgts). The markers would show that<br />
the French were doing a better job of defending in depth in the intervals.<br />
Having said all that, you’ll need every one of those markers<br />
pretty much west of the Meuse to bolster your lines there :-)<br />
Q - I have a Parachute unit (1/2-5-2) in hex 3924 (on the other side<br />
of a river crossing from Rotterdam). There is a combat strength 1<br />
Dutch infantry unit in Rotterdam. It is the German combat round. If<br />
I attack across the river with the German unit, I start out on the 1-2<br />
column. I can ignore the river shift, because FJs create bridgeheads.<br />
I get a shift to the left for the city, which puts me at 1-3. If I commit<br />
three air assets, I can push the CRT to 2-1. If I roll a 4 (an ENG<br />
result), I will eliminate the unit (because my TR is higher than the<br />
Dutch infantry). Do I now control the city hex?<br />
A - You have eliminated the Dutch unit, but their stubborn resistance<br />
prevents an immediate advance. If the Germans have a<br />
Move Action Round before the Allies do, you’ll be able to advance<br />
into the city and control it. Otherwise, a Dutch unit just<br />
might slip back into the city before you do.<br />
Q - Should defensive works be considered enemy occupied hexes<br />
during German retreats?<br />
A - The German unit will have to avoid the Defensive Works.<br />
Per rulebook rule 10.9 the defensive works can be destroyed by<br />
movement or advance after combat into the hex. In both cases the<br />
German unit is in charge of when and how it moves so a coherent<br />
reduction of the defensive works can be effected. A retreating<br />
German unit has its mind on escaping from the attacking unit, not<br />
on taking the time to destroy defensive works in its path.<br />
Q - The TEC note for major rivers says “ Motorized Units attack<br />
at crossings only” Is that correct? If so, does a bridge head count<br />
as a crossing for this rule?<br />
A - Yes, motorized units may attack only through a crossing hexside.<br />
While major rivers can be crossed anywhere, the only way<br />
to project the combat power of a mot unit across a major river is<br />
to get the AFVs across in a timely manner. Bridgeheads are not<br />
crossings. Bridgeheads just hold the far side to negate the defender<br />
river shift but they don’t provide the needed bridges.
Q - Assume player A has just drawn the dreaded third consecutive<br />
action chit from the cup. What happens to that chit (or other consecutive<br />
chits) once one of player B’s chits is drawn?<br />
A - The chit is not lost. The third chit goes back in the cup and,<br />
as do any other of Player A’s chits that are drawn until a player B<br />
chit is drawn.<br />
Q - Does the 22LL Division use all of the drop modifiers, or just<br />
the +3 for an eliminated parachute regiment?<br />
A - 22LL uses just the one DRM for the eliminated parachute regiment,<br />
if it applies. If the parachute regiment has been eliminated,<br />
that one DRM will be quite enough to cause the 22LL Division a<br />
lot of trouble unless you are blessed with a very good die roll.<br />
Q - What is the significance of Lines of Communication vs. Lines<br />
of Supply?<br />
A - Line of Communication (LOC) is used primarily for VP determination:<br />
connecting the French Channel ports to the rest of<br />
France, for Paris and Maginot isolation and also for Better Defense<br />
marker removal. Line of Supply (LoS) is critical to movement<br />
and combat functions.<br />
Q - Once any red star unit enters to the Dyle Plan area, does it<br />
have to stay there till release by Dynamo?<br />
A - Yes it does.<br />
Q - What about other, non-red star units? Do they have to stay<br />
there too if they enter the Dyle zone?<br />
A - The non-red star units do not have to remain if they enter.<br />
Q - If German units enter the Dyle Plan area from the eastern<br />
border can they exit to the south or west?<br />
A - Yes, they can. The prohibition applies to only to German units<br />
entering from the south or west.<br />
THINGS TO REMEMBER<br />
Gamer: ZOC rules, especially the panzers ignoring ZOC in many<br />
cases: I’m not used to *some* units being able to ignore. In the<br />
past, it’s been all or nothing for this.<br />
Ignoring ZOCs: Vacant hexes between Allied units become magnets<br />
for German panzers to motor through. It’s not that most Allied<br />
units did not have the means for putting down defensive fire<br />
to slow or stop such movement, but that the Germans moved too<br />
quickly for Allied WWI era command and control to make it happen<br />
in most cases.<br />
Gamer: The limit on the combat shifts is something I overlooked<br />
too. I realized after a couple combat phases that 3 or 4 column<br />
shifts are not allowed for the Germans. I *thought* it was too easy<br />
to break through, now I know why.<br />
Combat shifts: It still pays to mass for an attack. That basic military<br />
tenet is rewarded here because you need decent initial odds<br />
to raise the final odds to 5-1 or 6-1 with the two net shifts. The<br />
Germans do have the luxury of utilizing armor shifts plus multiple<br />
stuka air assets to neutralize multiple Allied defensive terrain<br />
shifts and still obtain the net two shifts. The Allies are less fortunate,<br />
both in that their armor is less effective and air units are less<br />
plentiful, and that they only get a one column net shift.<br />
Gamer: I forgot about the German’s ability to create bridgeheads<br />
“on the fly” for use during combat if they succeed.<br />
Bridgeheads: Creating bridgeheads is a big plus for the Germans,<br />
and is absolutely vital along the Meuse where terrain shifts heavily<br />
favor the Allies. My rule of thumb was that a bridgehead equaled<br />
one Stuka Air Asset saved that I could use elsewhere.<br />
.


