LEYBOLD DIDACTIC GMBH Gebrauchsanweisung 541 71 ...
LEYBOLD DIDACTIC GMBH Gebrauchsanweisung 541 71 ...
LEYBOLD DIDACTIC GMBH Gebrauchsanweisung 541 71 ...

You also want an ePaper? Increase the reach of your titles
YUMPU automatically turns print PDFs into web optimized ePapers that Google loves.
Physik Chemie ⋅ Biologie Technik <strong>LEYBOLD</strong> <strong>DIDACTIC</strong> <strong>GMBH</strong><br />
11/96<br />
<strong>Gebrauchsanweisung</strong> <strong>541</strong> <strong>71</strong><br />
Instruction Sheet<br />
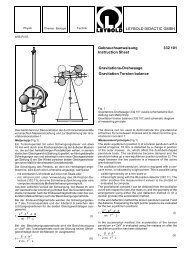
Bandgenerator 100 kV/15 µA<br />
Van de Graaff Generator<br />
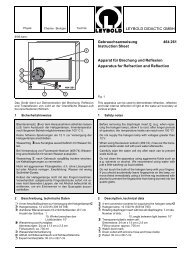
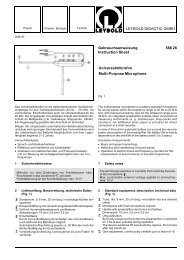
Fig. 1<br />
Der Bandgenerator ist ein elektrostatischer Ladungserzeuger<br />
für sehr hohe Spannungen (bis 100 kV bei optimalen Versuchsbedingungen),<br />
die wegen des sehr kleinen Kurzschlußstromes<br />
(bis 15 µA) nicht gefährlich sind.<br />
1 Sicherheitshinweise<br />
• Bandgenerator unter mitgelieferter Staubschutzhülle an einem<br />
trockenen Ort ohne unmittelbare Wärmeeinwirkung<br />
(Sonne, Heizung) aufbewahren!<br />
• Transportband bei längerem Nichtgebrauch abnehmen<br />
und lichtgeschützt aufbewahren!<br />
• Bandgenerator nie länger als 15 min ohne Unterbrechung<br />
betreiben, um eine Überhitzung des Motors auszuschließen.<br />
Danach mindestens 5 min abkühlen lassen!<br />
Maximale Betriebsdaten des Motors beachten!<br />
• Kunststoffrollen vor jeder Inbetriebnahme sorgfältig mit<br />
Waschbenzin reinigen.<br />
• Kunststoffteile (Isolator, Umlenkrollen, Antriebsrolle) ausschließlich<br />
mit Waschbenzin reinigen!<br />
• Vorsicht! Gefährdung empfindlicher elektronischer Geräte<br />
(Computer, Taschenrechner, Digital-Meßgeräte) durch<br />
hochfrequente Störspitzen, die durch Spannungsüberschläge<br />
erzeugt werden.<br />
2 Beschreibung, technische Daten<br />
1 Metallkugel (19 cm Ø), abnehmbar, mit 4-mm-Bohrung<br />
(1.1) zum Abgreifen der Spannung<br />
2 Obere Schneide<br />
3 Obere Umlenkrolle<br />
4 Gummiband, endlos, 5 cm breit<br />
5 Untere Schneide<br />
6 Untere Umlenkrolle<br />
7 Antriebsrolle mit Drehrichtungsangabe, fest mit der Motorwelle<br />
verbunden<br />
8 Anschlußbuchsen für die Motorspannung<br />
9 Erdungsbuchse<br />
The van de Graaff generator is an electrostatic charge generator<br />
for extremely high voltages (up to 100 kV under optimum<br />
experiment conditions), which are non-hazardous due to the<br />
extremely low short-circuit currents (to 15 µA).<br />
1 Safety notes<br />
• Always store the van de Graaff generator under the supplied<br />
dust cover in a dry place protected against direct heat<br />
sources (sunlight, heater)!<br />
• When the device is not used for longer periods, remove the<br />
transport belt and store it protected from exposure to light.<br />
• Never operate the van de Graaff generator for more than<br />
15 minutes without interruption, to prevent overheating of<br />
the motor. Be sure to allow it to cool for at least 5 minutes<br />
before restarting!<br />
Observe the maximum operating data of the motor!<br />
• Carefully clean the plastic rollers with petroleum benzine<br />
before each use.<br />
• Use only petroleum benzine to clean plastic parts (insulator,<br />
deflection roller, drive roller)!<br />
• Caution: danger to sensitive electronic devices (computers,<br />
pocket calculators, digital measuring instruments)<br />
due to high-frequency interference peaks, which can cause<br />
voltage spikes.<br />
2 Description, technical data<br />
1 Metal sphere (19 cm dia.), detachable, with 4-mm hole<br />
(1.1) for tapping the voltage<br />
2 Top edge<br />
3 Top deflection roller<br />
4 Rubber belt, endless, 5 cm wide<br />
5 Bottom edge<br />
6 Bottom deflection roller<br />
7 Drive roller with indication of rotational direction, permanently<br />
mounted on motor shaft.<br />
8 Connection sockets for motor voltage<br />
9 Ground socket
A Antriebsmotor<br />
Versorgungsspannung: 0 bis max. 24 V(<br />
Strom:<br />
1,5 A<br />
max. Betriebsdauer ohne<br />
Unterbrechung:<br />
15 min<br />
Abkühlpause:<br />
mind. 5 min<br />
B Feststehender Isolator aus Acrylglas<br />
C Halterung für Metallkugel 1<br />
D Schrauben zum Nachspannen des Bandes 4<br />
Leerlaufspannung: ca. 100 kV; abhängig von der<br />
Drehzahl des Antriebsmotors A<br />
Kurzschlußstrom: ca. 10 bis 15 µA<br />
Abmessungen:<br />
22 cm x 22 cm x 56 cm<br />
Masse:<br />
3,9 kg<br />
Im Lieferumfang: Staubschutzhülle<br />
3 Bedienung<br />
3.1 Inbetriebnahme<br />
Erforderliche Spannungsversorgung:<br />
Stellbare Gleichspannungsquelle 0 bis 24 V/1,5 A z.B. Kleinspannungsstelltrafo<br />
(521 39)<br />
Motorspannung polrichtig an Buchsen 8 anschließen (rote<br />
Buchse "+").<br />
Stellung der Schneiden 2 und 5 gemäß Fig. 1 beachten.<br />
Kugel bei ordnungsgemäßen Betriebsbedingungen positiv gegen<br />
Erde, andernfalls Hinweise unter Abschnitt 3.3 beachten.<br />
Hinweis: Eine definierte Erzeugung negativer Spannungen gegen<br />
Erde ist nicht möglich.<br />
Bandgenerator zweckmäßigerweise beim Betrieb immer erden.<br />
3.2 Polaritätsprüfung; Spannungs- und Strommessung<br />
Zur Polaritätsprüfung Kugel bei freilaufendem Bandgenerator<br />
mit Glimmlampe (z.B. 540 41) berühren: Aufleuchten der von<br />
der Kugel abgewandten Elektrode bei positiver Kugel.<br />
Empfehlenswert zur Strom- und Spannungsmessung:<br />
Demo-Multimeter, Nullpunkt Mitte (531 915) mit Hochspannungstastkopf<br />
(531 93).<br />
Zur Messung des Kurzschlußstroms Buchse (1.1) über Demo-<br />
Multimeter (Meßbereich 10 µA( oder 30 µA() mit Erdungsbuchse<br />
9 verbinden;<br />
zur Spannungsmessung (Meßbereich 100 kV( oder 300 kV()<br />
Kugel mit Hochspannungstastkopf berühren.<br />
3.3 Beseitigung von Störungen (unzureichende Spannung<br />
bzw. Ladung; negative Ladung auf der Kugel)<br />
A Drive motor<br />
Supply voltage:<br />
Current:<br />
Max. continuous operation period:<br />
Cool-down time:<br />
B Fixed acrylic glass insulator<br />
C Mount for metal sphere 1<br />
D Screws for tensioning belt 4<br />
0 up to max. 24 V DC<br />
1.5 A<br />
15 min<br />
at least 5 min<br />
No-load voltage:<br />
approx. 100 kV, depending on<br />
speed of drive motor A<br />
Short-circuit current: approx. 10 to 15 µA<br />
Dimensions:<br />
22 cm x 22 cm x 56 cm<br />
Weight:<br />
3.9 kg<br />
Included in scope of supply: Dust cover<br />
3 Operation<br />
3.1 Putting into operation<br />
Required voltage supply:<br />
adjustable DC voltage source 0 to 24 V/1.5 A e.g. variable extra-low<br />
voltage transformer (521 39)<br />
Connect the motor voltage to sockets 8 with the correct polarity<br />
(red socket "+")<br />
Make sure edges 2 and 5 are adjusted as shown in Fig. 1.<br />
For normal operating conditions connect the sphere positively<br />
to ground; otherwise observe the notes under section 3.3.<br />
Note: it is not possible to generate defined negative voltages<br />
with respect to earth.<br />
For best results, always ground (earth) the van de Graaff<br />
generator during operation.<br />
3.2 Checking the polarity; measuring current and voltage<br />
To check the polarity, touch a glow lamp (e.g. 540 41) to the<br />
sphere of the van de Graaff generator running without load;<br />
when the electrode away from the sphere lights up, the sphere<br />
is positive.<br />
Recommended for current and voltage measurement:<br />
demo-multimeter, zero-point middle (531 915) with high-tension<br />
probe (531 93).<br />
To measure the short-circuit current, connect socket (1.1) to<br />
ground socket 9 via the demo-multimeter (measuring range<br />
10 µA DC or 30 µA DC).<br />
For voltage measurement (measuring range 100 kV DC or<br />
300 kV DC), touch the sphere with the high-tension probe.<br />
3.3 Trouble-shooting problems (insufficient voltage or<br />
change, negative charge on sphere)<br />
Symptom/Ursache<br />
Feuchtigkeit<br />
Bandflattern<br />
Schneidenstellung<br />
Verschmutzung<br />
Abhilfe<br />
Bandgenerator mit Warmluft (z.B. aus einem<br />
Fön) trocknen<br />
Nach Abnahme der Kugel 1 und Lösen der<br />
Schrauben D Band nachspannen<br />
Schneiden 2 und 5 auf richtige Stellung<br />
überprüfen (siehe Fig. 1). Obere Schneide 2<br />
so nahe wie möglich an das Band<br />
heranbringen, ohne es jedoch zu berühren.<br />
Verschmutzte Antriebs- und Umlenkrollen<br />
(Bandantrieb) und den Isolator B von Zeit zu<br />
Zeit mit einem benzingetränkten Lappen<br />
säubern.<br />
Niemals Lösungsmittel (Nitroverdünnung,<br />
Aceton o.ä.) zur Reinigung verwenden!<br />
Symptom/cause<br />
Moisture<br />
Shaking belt<br />
Edge positions<br />
Dirt<br />
Remedy<br />
Dry van de Graaff generator with hot air (e.g.<br />
from a hair drier or blower)<br />
After removing sphere 1 and loosening<br />
screws D<br />
Check to be sure edges 2 and 5 are<br />
positioned correctly (see Fig. 1). Set the top<br />
edge 2 as close as possible to the belt<br />
without touching it<br />
Occasionally clean dirty drive and deflection<br />
rollers (belt drive) and the insulator B with<br />
cloth soaked in petroleum benzine.<br />
Never use solvents (thinner, acetone or<br />
similar) for cleaning!<br />
<strong>LEYBOLD</strong> <strong>DIDACTIC</strong> <strong>GMBH</strong> ⋅ Leyboldstrasse 1 ⋅ D-50354 Hürth ⋅ Phone (02233) 604-0 ⋅ Telefax (02233) 604-222 ⋅ Telex 17 223 332 LHPCGN D<br />
© by Leybold Didactic GmbH, Printed in the Federal Republic of Germany<br />
Technical alterations reserved
![[667 359] Labor-Refraktometer - LD DIDACTIC](https://img.yumpu.com/24788329/1/184x260/667-359-labor-refraktometer-ld-didactic.jpg?quality=85)