
You also want an ePaper? Increase the reach of your titles
YUMPU automatically turns print PDFs into web optimized ePapers that Google loves.
5<br />
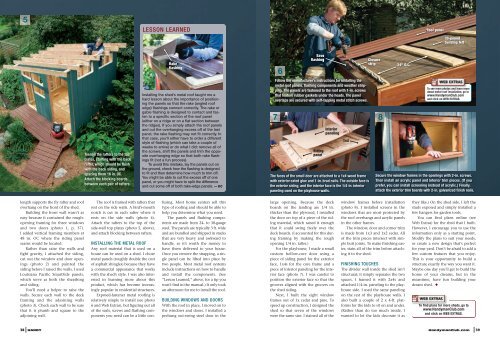
LESSON LEARNED<br />
Ro<strong>of</strong> panel<br />
30-pound<br />
building felt<br />
Toenail the rafters to the top<br />
plates, starting with the back<br />
rafter, which should be flush<br />
with the back siding, and<br />
spacing them 16 in. OC.<br />
Attach the blocking boards<br />
between each pair <strong>of</strong> rafters.<br />
Rake<br />
flashing<br />
Installing the shed’s metal ro<strong>of</strong> taught me a<br />
hard lesson about the importance <strong>of</strong> positioning<br />
the panels so that the rake (angled ro<strong>of</strong><br />
edge) flashings connect correctly. The rake or<br />
gable flashing is designed to contact and fasten<br />
to a specific section <strong>of</strong> the ro<strong>of</strong> panel<br />
(either on a ridge or on a flat section between<br />
the ridges). If you simply attach the ro<strong>of</strong> panels<br />
and cut the overhanging excess <strong>of</strong>f <strong>of</strong> the last<br />
panel, the rake flashing may not fit correctly. In<br />
that case, you’ll either have to order a different<br />
style <strong>of</strong> flashing (which can take a couple <strong>of</strong><br />
weeks to arrive) or do what I did: remove all <strong>of</strong><br />
the screws, shift the panels and trim the opposite<br />
overhanging edge so that both rake flashings<br />
fit (not a fun process).<br />
To avoid this mistake, lay the panels out on<br />
the ground, check how the flashing is designed<br />
to fit and then determine how much to trim <strong>of</strong>f.<br />
You might be able to cut the excess <strong>of</strong>f <strong>of</strong> one<br />
panel, or you might have to split the difference<br />
and cut some <strong>of</strong>f <strong>of</strong> both rake-edge panels. — DC<br />
6<br />
Eave<br />
flashing<br />
Follow the manufacturer’s instructions for installing the<br />
metal ro<strong>of</strong> panels, flashing components and weather stripping.<br />
The panels are fastened to the ro<strong>of</strong> with 1-in. screws<br />
that feature rubber gaskets under the heads. The panel<br />
overlaps are secured with self-tapping metal stitch screws.<br />
7 8<br />
Siding<br />
panel<br />
Interior<br />
paneling<br />
1x4<br />
The faces <strong>of</strong> the small door are attached to a 1x4 wood frame<br />
with exterior-rated glue and 1-in. brad nails. The outside face is<br />
the exterior siding, and the interior face is the 1/4-in. interior<br />
paneling used on the playhouse walls.<br />
Closure<br />
strip<br />
24" O.C.<br />
To see more photos and learn more<br />
about metal-ro<strong>of</strong> installation, go to<br />
www.<strong>Handyman</strong><strong>Club</strong>.com<br />
and click on WEB EXTRAS.<br />
Secure the window frames in the openings with 2-in. screws.<br />
Then install an acrylic panel and interior trim pieces. (If you<br />
prefer, you can install screening instead <strong>of</strong> acrylic.) Finally,<br />
attach the exterior trim boards with 2-in. galvanized finish nails.<br />
length supports the fly rafter and ro<strong>of</strong><br />
overhang on the front <strong>of</strong> the shed.<br />
Building the front wall wasn’t as<br />
easy because it contained the roughopening<br />
framing for three windows<br />
and two doors (photo 1, p. 37).<br />
I added vertical framing members at<br />
48 in. OC where the siding panel<br />
seams would be located.<br />
Rather than raise the walls and<br />
fight gravity, I attached the siding,<br />
cut out the window and door openings<br />
(photo 2) and painted the<br />
siding before I raised the walls. I used<br />
Louisiana Pacific SmartSide panels,<br />
which serve as both the sheathing<br />
and siding.<br />
You’ll need a helper to raise the<br />
walls. Secure each wall to the deck<br />
framing and the adjoining walls<br />
(photo 3). Check each wall to be sure<br />
that it is plumb and square to the<br />
adjoining wall.<br />
The ro<strong>of</strong> is framed with rafters that<br />
rest on the side walls. A bird’s-mouth<br />
notch is cut in each rafter where it<br />
rests on the side walls (photo 4).<br />
Attach the rafters to the top <strong>of</strong> the<br />
side-wall top plates (photo 5, above),<br />
and attach blocking between rafters.<br />
INSTALLING THE METAL ROOF<br />
Any ro<strong>of</strong> material that is used on a<br />
house can be used on a shed. I chose<br />
metal panels (roughly double the cost<br />
<strong>of</strong> asphalt shingles) because they have<br />
a commercial appearance that works<br />
with the shed’s style. I was also interested<br />
in learning more about this<br />
product, which has become increasingly<br />
popular in residential structures.<br />
Exposed-fastener metal ro<strong>of</strong>ing is<br />
relatively simple to install (see photo<br />
6 and Web Extras), but figuring out all<br />
<strong>of</strong> the seals, screws and flashing components<br />
you need can be a little confusing.<br />
Most home centers sell this<br />
type <strong>of</strong> ro<strong>of</strong>ing and should be able to<br />
help you determine what you need.<br />
The panels and flashing components<br />
are made from 24- to 30-gauge<br />
steel. The panels are typically 3 ft. wide<br />
and are bundled and shipped in stacks<br />
that are very heavy and awkward to<br />
handle, so it’s worth the money to<br />
have them delivered to your house.<br />
Once you remove the strapping, a single<br />
panel can be lifted into place by<br />
two people. Most metal ro<strong>of</strong> systems<br />
include instructions on how to handle<br />
and install the components. (See<br />
“Lesson Learned,” above, for a tip you<br />
won’t find in the manual.) It only took<br />
an afternoon for me to install the ro<strong>of</strong>.<br />
BUILDING WINDOWS AND DOORS<br />
With the ro<strong>of</strong> in place, I moved on to<br />
the windows and doors. I installed a<br />
prehung out-swing steel door in the<br />
large opening. Because the deck<br />
boards on the landing are 1/4 in.<br />
thicker than the plywood, I installed<br />
the door on top <strong>of</strong> a piece <strong>of</strong> the siding<br />
material, which raised it enough<br />
that it could swing freely over the<br />
deck boards. (I accounted for this during<br />
framing by making the rough<br />
opening 1/4 in. taller.)<br />
For the playhouse, I made a small<br />
custom hollow-core door using a<br />
piece <strong>of</strong> siding panel for the exterior<br />
face, 1x4s for the core frame and a<br />
piece <strong>of</strong> interior paneling for the interior<br />
face (photo 7). I was careful to<br />
position the exterior face so that the<br />
grooves aligned with the grooves on<br />
the shed siding.<br />
Next, I built the eight window<br />
frames out <strong>of</strong> 1x cedar and pine. To<br />
speed up construction, I designed the<br />
shed so that seven <strong>of</strong> the windows<br />
were the same size. I stained all <strong>of</strong> the<br />
window frames before installation<br />
(photo 8). I installed screens in the<br />
windows that are most protected by<br />
the ro<strong>of</strong> overhangs and acrylic panels<br />
in the other frames.<br />
The window, door and corner trim<br />
is made from 1x3 and 1x2 cedar. All<br />
<strong>of</strong> the trim pieces intersect with simple<br />
butt joints. To make finishing easier,<br />
stain all <strong>of</strong> the trim before attaching<br />
it to the shed.<br />
FINISHING TOUCHES<br />
The divider wall inside the shed isn’t<br />
structural; it simply separates the two<br />
spaces. I framed it with 2x4s and<br />
attached 1/4-in. paneling to the playhouse<br />
side. I used the same paneling<br />
on the rest <strong>of</strong> the playhouse walls. I<br />
also built a couple <strong>of</strong> 2 x 4-ft. platforms<br />
for the kids to sit on and under.<br />
(Rather than do too much inside, I<br />
wanted to let the kids decorate it as<br />
they like.) On the shed side, I left the<br />
studs exposed and simply installed a<br />
few hangers for garden tools.<br />
You can find plans online (see<br />
Web Extras) for the shed that I built.<br />
However, I encourage you to use the<br />
information only as a starting point.<br />
Modify the plans to suit your needs,<br />
or create a new design that’s perfect<br />
for your yard. Don’t be afraid to add a<br />
few custom features that you enjoy.<br />
This is your opportunity to build a<br />
structure exactly the way you want it.<br />
Maybe one day you’ll get to build the<br />
home <strong>of</strong> your dreams, but in the<br />
meantime, have fun building your<br />
dream shed. u<br />
To find plans for more sheds, go to<br />
www.<strong>Handyman</strong><strong>Club</strong>.com<br />
and click on WEB EXTRAS.<br />
38 HANDY<br />
<strong>Handyman</strong><strong>Club</strong>.com 39