MAX-450 - Advance Acoustic ⢠Advance Acoustic
MAX-450 - Advance Acoustic ⢠Advance Acoustic
MAX-450 - Advance Acoustic ⢠Advance Acoustic

Create successful ePaper yourself
Turn your PDF publications into a flip-book with our unique Google optimized e-Paper software.
<strong>MAX</strong>-<strong>450</strong><br />
Integrated stereo amplifier<br />
Amplificateur intégré stéréophonique<br />
QuickStart
RECYCLING IN EUROPEAN UNION COUNTRIES<br />
Disposal of your old appliance<br />
English<br />
This symbol on the product or on its packaging means that<br />
your electrical and electronic equipment should be disposed<br />
at the end of life separately from your household wastes.<br />
There are separate coilection systems for recycling in EU.<br />
For more information, please contact the local authority or<br />
the dealer where you purchased the product.<br />
French<br />
Ce symbole figurant sur le produit ou son emballage signifie<br />
que votre équipement électrique et électronique doit être<br />
mis au rebut séparément de vos déchets ménagers lorsqu’il<br />
atteint Ia fin de sa durée de vie.II existe des systèmes de<br />
collecte séparée pour le recyclage dans l’UE.<br />
Pour pius d’informations, veuiliez prendre contact avec les<br />
autorités locales ou le revendeur auquel vous avez acheté<br />
ce produit.<br />
German<br />
Das auf dem Produkt oder auf der Verpackung angebrachte<br />
Symbol bedeutet, dass Ihre elektrischen und elektronischen<br />
Geräte nicht mit dem Haushaltsmüll entsorgt werden sollen.<br />
Es existieren separate Recycling-Sammelsysteme in der<br />
EU. Für mehr Informationen wenden Sie sich bitte an Ihre<br />
òrtiichen Behörden oder an den Fachhändier, bei dem Sie<br />
das Produkt erworben haben.<br />
Italian<br />
Questo simbolo sul prodotto o sull’imballaggio indica<br />
che 1’apparato elettrico o elettronico alia fine dei suo<br />
periodo di vita dovrebbe essere smaltito separatamente<br />
dai rifiuti domestici. Nell’UE esistono altri sistemi<br />
di raccolta differenziata. Per ulteriori infor-mazioni,<br />
contattare lê autorità locali o il rivenditore presso il<br />
quale è stato acquistato il prodotto.<br />
Spanish<br />
Este simbolo en el producto o en su embalaje significa que<br />
deberfa deshacerse de su equipo eléctrico o electrônico, al<br />
final de su vida util, de forma separada del resto de los<br />
residuos domésticos. Para estos productos hay sistemas de<br />
recogida selectiva para reciclarlos en la Union Europea.<br />
Para mas informaciôn, rogamos contacte con la autoridad<br />
local o el distribuidor donde adquirio el producto.<br />
Portuguese<br />
Este sîmbolo no produto ou na respectiva embalagem,<br />
significa que o equipamento eléctrico ou electrônico deverà<br />
ser descartado no fim da sua vida util separadamente do<br />
lixo doméstico. Existem diverses sistemas de recolha separada<br />
para reciclagem na Uniào Europeia.Para mais<br />
informaçôes, queira contactar as autoridades locais ou o<br />
revendedor onde adquiriu o produto.<br />
Swedish<br />
Märkningen av produkter och fôrpackningar med denna<br />
symbol betyder att elektrisk och elektronisk utrustning<br />
maste tasom hand séparât fràn hushàlissopor nàr utrustningen<br />
har förbrukats. EU har sàrskilda àtervinningsanlàggningar<br />
för denna typ av utrustning.Kontakta de lokala<br />
myndigheterna eller àterförsäijaren dàr produkten har köpts<br />
för mer information.<br />
Danish<br />
Dette symbol pà produktet eller pâ emballagen betyder, at<br />
dit elektriske og elektroniske udstyr ved afslutningen af dets<br />
levetid ikke skaï bortskaffes sammen med dit hushoidningsaffald.<br />
Derfindes separate opsamiingssystemer til genbrug<br />
i EU. For mere information bedes du venligst kontakte de<br />
lokale myndigheder eller forhandieren, hvor du har kebt<br />
produktet.<br />
Dutch<br />
Dit symbool op het product of op zijn verpakking betekent<br />
dat uw elektrische of elektronische apparatuur na het verstrijken<br />
van de levensduur gescheiden van het huisvuil moet<br />
worden weggegooid. Er zijn afzonderlijke ophaalsystemen<br />
voor recyclage in de E.U. Voor meer informatie neemt u<br />
contact op met de plaatselijke overheid of de dealer waar u<br />
het product hebt gekocht.<br />
Norwegian<br />
Dersom produktet eller emballasjen er merket med<br />
dette symbolet, bor ditt elektriske eller elektroniske<br />
utstyr kasseres atskilt fra ditt hushoidningsavfall nàr<br />
det er utsiitt. 1 Norgefinnes det egne innsamiingssystemer<br />
for resirkulering. Venniigst ta kontakt med<br />
lokale myndigheter eller forhandieren hvor du kjepte<br />
produktet for mer informasjon.<br />
Finnish<br />
Jos tuotteessa tai sen pakkauksessa on tämä symboli, se<br />
tarkoittaa, että kyseiset sähköisetja elektroniset laitteet pitää<br />
hävittää niiden käytön loputtua erillään kotitalousjätteistä.<br />
EU:ssa on erillisiä keräysjärjestelmiä. Jos haluat lisätietoja,<br />
ota yhteyttä paikallisiin viranomaisiin tai tuotteen myyjään.<br />
Polish<br />
Ten symbol na produkcie lub na jego opakowaniu oznacza,<br />
ze. Pahstwa urzadzenie elektryczne lub elektroniczne po<br />
zakohczeniu uzytkowania musi zostac poddane utylizacji<br />
oddzieinie od odpadôw z gospodarstwa domowego. W Unii<br />
Europejskiej istnieja^ oddzieine systemy zbierania odpadô<br />
w poddawanych recykiingowi. Aby uzyskaô wiecej informacji,<br />
proszç skontaktowac sic z lokainymi wtadzami lub<br />
sprzedawca, u ktôrego zakupiono produkt.
WARNING<br />
ATTENTION<br />
ATTENTION: afin de réduire tout risque de choc électrique<br />
ou de feu, ne pas exposer votre appareil à l’humidité ou à<br />
toutes sortes de liquides<br />
WARNING: to reduce the risk of fire or electric shock, do not<br />
expose this appliance to rain or moisture.<br />
AVERTISSEMENT<br />
Pour prévenir tout risques de chocs électriques, ne pas<br />
ouvrir l’appareil. Si un problème apparait, faites réparer votre<br />
appareil par un technicien qualifié.<br />
CAUTION: To prevent the risk of electric shock, do not<br />
remove cover (or back); no user serviceable parts inside.<br />
Refer servicing to qualified service personnel.<br />
LE POINT D’EXCLAMATION vous indiquera la présence<br />
d’informations importantes, tant au niveau utilisation que<br />
maintenance de votre appareil.<br />
THE LIGHTNING FLASH with arrow-head symbo is intended<br />
to alert the user to the presence of uninsulated «dangerous<br />
voltage» within the product’s enclosure that may be<br />
of sufficient magnitude to constitute a risk of electric shock<br />
to persons.<br />
Si vous souhaitez déplacer ou transporter votre appareil,<br />
nous vous conseillons dans le cas d’un déménagement,<br />
d’un retour pour réparation, etc...de réemballer dans son<br />
emballage d’origine votre appareil.<br />
An appliance and cart combination should be moved with<br />
care. Before any transportation, your product must be packed<br />
correctly in order to avoid any damage.<br />
IMPORTANT<br />
* POUR PREVENIR LES CHOCS ELECTRIQUES NE<br />
PAS UTILISER CETTE FICHE POLARISEE AVEC UN<br />
PROLONGATEUR, UNE PRISE DE COURANT OU UNE<br />
AUTRE SORTIE DE COURANT, SAUF SI LES LAMES<br />
PEUVENT ETRE INSEREES A FOND SANS EN LAISSER<br />
AUCUNE PARTIE A DECOUVERT.<br />
* TO PREVENT ELECTRIC SHOCK, DO NOT USE THIS<br />
PLUG WITH AN EXTENSION CORD, RECEPTACLE OR<br />
OTHER OUTLET UNLESS THE BLADES CAN BE FULLY<br />
INSERTED TO PREVENT BLADE EXPOSURE.
CONSIGNES DE SECURITE<br />
LIRE LES INSTRUCTIONS<br />
Toutes les consignes de sécurité et instructions<br />
quant à l’utilisation de notre produit doivent<br />
faire l’objet d’une lecture attentive.<br />
MEMORISER CES INSTRUCTIONS<br />
Les consignes de sécurité et instructions<br />
doivent être retenues pour un usage futur de<br />
votre produit<br />
TENEZ COMPTE DES ALERTES<br />
Les mises en garde inscrites sur votre appareil<br />
ou imprimées dans ce manuel doivent être<br />
respectées.<br />
SUIVRE LES INSTRUCTIONS<br />
Toutes les instructions concernant l’utilisation<br />
et le fonctionnement de votre appareils doivent<br />
être suivies.<br />
EAU ET MOISISSURE<br />
Votre appareil ne doit pas être utilisé prés d’un<br />
point d’eau ou dans un environnement trop<br />
humide.<br />
VENTILATION<br />
Votre appareil doit être installé de telle façon<br />
que sa ventilation ne soit en aucun cas entravée.<br />
Il ne faut pas l’utiliser sur un lit, un sofa<br />
ou une surface similaire qui obstrurait ses<br />
grilles de ventilation. Dans tous les cas, il<br />
convient de vérifier que votre appareil puisse<br />
être ventilé naturellement. Ne pas l’encastrer.<br />
SOURCES DE CHALEUR<br />
Il est conseillé d’éloigner votre appareil d’une<br />
source de chaleur type radiateur ou autres<br />
sources produisant une source de chaleur.<br />
ALIMENTATION ELECTRIQUE<br />
Le branchement de votre appareil doit se faire<br />
en respectant les indications contenues dans<br />
ce manuel. Votre installation électrique doit<br />
être en conformité afin de permettre une utilisation<br />
en toute sécurité de votre appareil.<br />
MASSE ET POLARITÉ<br />
Des précautions doivent être prises afin de<br />
respecter la polarité et la mise à la terre de<br />
votre appareil.<br />
PROTECTION DU CORDON SECTEUR<br />
Votre cordon d’alimentation doit être correctement<br />
installée afin qu’il ne soit pas piétiner<br />
ou arracher.<br />
NETTOYAGE<br />
Votre appareil doit être néttoyée seulement<br />
avec les produits préconisés par le fabricant.<br />
Des produits trop agressifs contenant des<br />
acides peuvent endommagés les différentes<br />
surfaces de votre appareil.<br />
AUTRES SOURCES D’ALIMENTATION<br />
Dans le cas d’une utilisation d’une antenne<br />
externe, vous devez l’éloigner d’une ligne<br />
électrique.<br />
PERIODE D’INUTILISATION<br />
Si vous quittez votre domicile pour une longue<br />
pèriode, nous vous conseillons de débrancher<br />
votre appareil.<br />
PÉNÉTRATION D’OBJETS OU DE LIQUIDE<br />
Des précautions doivent être prises afin d’empécher<br />
la pénétration d’objets ou de liquide à<br />
l’intérieur de votre appareil.<br />
DOMMAGES NECESSITANT UNE<br />
INTERVENTION<br />
Votre appareil doit être dépanné par une personne<br />
qualifiée quand:<br />
• La prise d’alimentation ou son cordon a subi<br />
une détèrioration, ou<br />
• Un objet ou un liquide a pénétré à l’intérieur<br />
de votre appareil, ou<br />
• Votre appareil a pris la pluie, ou<br />
• Votre appareil ne semble pas fonctionner<br />
correctement ou présente des modifications<br />
quand à ses performances habituelles, ou<br />
• Votre appareil est tombé ou son capot a été<br />
endommagé.<br />
SERVICE<br />
Votre appareil doit être impérativement<br />
dépanné par du personnel compétent et qualifié.<br />
Afin de connaitre la station technique la<br />
plus proche, merci de contacter votre distributeur<br />
national.
SAFETY INSTRUCTIONS<br />
READ INSTRUCTIONS<br />
All the safety and operating instructions<br />
should be read before the appliance is<br />
operated.<br />
RETAIN INSTRUCTIONS<br />
The safety anil operating instructions<br />
should be retained for future use.<br />
HEED WARNINGS<br />
All warnings on the appliance and in the<br />
operating instructions should be adhered<br />
to.<br />
FOLLOW INSTRUCTIONS<br />
All operating and use instructions should<br />
be followed.<br />
WATER AND MOISTURE<br />
The appliance should not be used near<br />
water for example, near a bathtub,<br />
washbowl, kitchen sink, laundry tub, in<br />
a wet basement, or near a swimming<br />
pool, etc.<br />
VENTILATION<br />
The appliance should be situated so that<br />
its location or position does not interfere<br />
with its proper ventilation. For example,<br />
the appliance should not be situated on a<br />
bed. sofa, rug, or similar surface that may<br />
block the ventilation openings; or,<br />
placed in a built-in installation, such as a<br />
bookcase or cabinet that may impede the<br />
flow of air through the ventilation<br />
openings.<br />
HEAT<br />
The appliance should be situated away<br />
from heat sources such as radiators, heat<br />
registers, stoves, or other appliance<br />
(including amplifiers) that produce heat.<br />
POWER SOURCES<br />
The appliance should be connected to a<br />
power supply only of the type described<br />
in the operating instructions or as marked<br />
on the appliance.<br />
GROUNDING OR<br />
POLARIZATION<br />
POWER-CORD PROTECTION<br />
Power-supply cords should be routed so<br />
that they are not likely to be walked on<br />
or pinched by paying particular attention<br />
to cords at plugs, convenience<br />
receptacles, and the point where they exit<br />
from the appliance.<br />
CLEANING<br />
The appliance should be cleaned only as<br />
recommended by the manufacturer.<br />
POWER LINES<br />
An outdoor antenna should be located<br />
away from power lines.<br />
NON-USE PERIODS<br />
The power cord of the appliance should<br />
be unplugged from the outlet when left<br />
unused for a long period of time.<br />
OBJECT AND LIQUID ENTRY<br />
Care should be taken so that objects do<br />
not fall and liquids are not spilled into the<br />
enclosure through openings.<br />
DAMAGE REQUIRING SERVICE<br />
The appliance should be serviced by<br />
qualified service personnel when:<br />
• The power-supply cord or the plug<br />
has been damaged; or<br />
• Objects have fallen, or liquids have<br />
spilled into the appliance; or<br />
• The appliance has been. exposed to<br />
rain: or<br />
• The appliance does not appear to operate<br />
normally or exhibits a marked<br />
change in performance; or<br />
• The appliance has been dropped, or<br />
the enclosure damaged.<br />
SERVICING<br />
The user should not attempt to service<br />
the appliance beyond that described in<br />
the operating instructions. All other<br />
servicing should be referred to qualified<br />
service personnel.<br />
Precautions should be taken so that the<br />
grounding or polarization means of an<br />
appliance is not defeated.
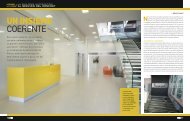
RÉGLAGES FACE AVANT<br />
FRONT PANEL CONTROLS<br />
w e q l r t y u<br />
i<br />
;<br />
o a s d f g h j k<br />
RÉGLAGES FACE AVANT<br />
FRONT PANEL CONTROLS<br />
C<br />
A B<br />
F G<br />
H<br />
I<br />
D E
q<br />
o<br />
AFFICHEUR GENERAL<br />
Cet afficheur vous indiquera différentes informations: niveau du volume, réglages de tonalité,<br />
sources en entrée, sorties haut-parleurs, etc...<br />
GENERAL DISPLAY<br />
This display will indicate different informations: level of the volume, tone control, input<br />
sources, speaker indicators, etc...<br />
BOUTON MARCHE/ARRET<br />
Appuyez sur ce bouton pour mettre en marche votre appareil (éclairage bleu de l’afficheur<br />
au dessus du bouton). La mise en marche de votre appareil ne doit se faire qu’après<br />
vérification de votre tension d’utilisation. Votre amplificateur <strong>MAX</strong>-<strong>450</strong> est prévu pour une<br />
utilsation en 230V ou 115V.<br />
ON/OFF POWER BUTTON<br />
Press this button to turn ON your appliance, power is supplied to your unit and it becomes<br />
operational, the LED blue display on top of the volume button will switch ON. Please note<br />
that your appliance could work in 230V or 115V.<br />
a<br />
ENTRÉE CD<br />
Appuyez sur ce bouton pour sélectionner l’entrée CD et écouter votre platine CD. Le<br />
signal audio d’un lecteur de CD est de type stéréo, les connecteurs utilisés sont de type<br />
RCA analogiques. Cette entrée bénéficie d’un niveau normalisé d’entrée vous permettant<br />
de connecter d’autres sources: tuner, magnétophone, MD, etc...<br />
CD INPUT<br />
Press this button to select the CD as your listen source. The audio signal of CD is an analog<br />
RCA type connector. Also on this input, you have the possibility to use others sources<br />
with same audio signal output like tuner, tape, MD, etc...<br />
s<br />
ENTRÉE TUNER<br />
Appuyez sur ce bouton pour sélectionner l’entrée tuner et écouter vos stations de radio<br />
préférées. Le signal audio d’un tuner est de type stéréo, les connecteurs utilisés sont de<br />
type RCA analogiques. Cette entrée bénéficie d’un niveau normalisé d’entrée vous permettant<br />
de connecter d’autres sources: tuner, magnétophone, MD, etc...<br />
TUNER INPUT<br />
Press this button to select the tuner as your listen source. The audio signal of CD is an<br />
analog RCA type connector. Also on this input, you have the possibility to use others<br />
sources with same audio signal output like tuner, tape, MD, etc...<br />
d<br />
BOUTON DE VOLUME ET DE REGLAGES<br />
Votre amplificateur utilise un bouton de volume unique à la fois pour le canal droit et le
canal gauche. Tourner ce bouton dans le sens des aiguilles d’une montre pour augmenter<br />
le niveau sonore et tourner dans le sens opposé pour réduire le niveau sonore. Permet<br />
aussi le réglage des correcteurs de tonalité grave/medium/aigu. Indicateur de niveau de<br />
volume C , indicateur de niveau de tonalité, mode tone activé C, indicateur de tonalité,<br />
B Grave, M Medium et T Aigu G<br />
VOLUME AND CONTROL<br />
Your amplifier used a rotary type knob to control the 2 channel output sound level (left<br />
and right). Turn this volume knob clockwise to increase the ouput sound level and turn<br />
this volume knob counterclockwise to decrease the output sound level. In tone mode, you<br />
can control the level of bass/medium/treble. Display volume level indicator C, Display<br />
tonality level indicator C , Display tone indicator C B Bass, M Medium and T Treble.<br />
f<br />
ENTRÉES AUXILIAIRES AUX1, AUX2, AUX3 ET AUX4<br />
Appuyez sur ce bouton pour sélectionner l’entrée auxiliaire 1, 2, 3 ou 4 et écouter la<br />
source correspondante. Le signal audio auxiliaire est de type stéréo, les connecteurs utilisés<br />
sont de type RCA analogiques. Cette entrée bénéficie d’un niveau normalisé d’entrée<br />
vous permettant de connecter d’autres sources. Afficheur H<br />
AUXILIARIES INPUTS AUX1, AUX2, AUX3 AND AUX4<br />
Press this button to select the Auxiliary 1, 2, 3 or 4 as your listening source. The audio<br />
signal of Aux.1, 2, 3 or 4 are analog RCA type connector. Also on this input, you have the<br />
possibility to use others sources with same audio signal output like tuner, tape, MD, etc...<br />
Indicator H<br />
g<br />
ENTRÉES DIGITALES<br />
Appuyez sur ce bouton pour sélectionner les entrées numériques suivantes: Coaxial 1,<br />
Coaxial 2, Optique ou USB B et écouter la source correspondante. Afficheur I<br />
DIGITAL INPUTS<br />
Press this button to select the Coaxial 1, Coaxial 2, Optical or USB B input as your listening<br />
source. Indicator I<br />
h<br />
ENTRÉE PHONO<br />
Appuyez sur ce bouton pour sélectionner l’entrée phono et écouter votre platine disque.<br />
Le signal audio d’un lecteur de disque est de type stéréo plus masse, les connecteurs<br />
utilisés sont de type RCA analogiques et d’une vis de masse. Cette entrée phono est<br />
de type “MM” (aimant mobile), aussi la cellule qui équipe votre platine disque doit être à<br />
aimant mobile “MM“. Afficheur H<br />
PHONO INPUT<br />
Press this button to select the phono input as your listen source. The audio signal of<br />
phono is an analog RCA type connector plus an additional ground. This phono input is
compatible with a moving magnet cartridge (MM). Indicator H<br />
k<br />
ENTRÉE USB A<br />
L’entrée USB type A (MP3) située sur la face avant permet de lire les fichiers musicaux<br />
de votre lecteur MP3 précedemment chargés. Afficheur H<br />
USB A INPUT<br />
The USB type A (MP3 only) port allows you to hook up your MP3 Player or MP3 drive<br />
to play back your downloaded MP3 music library directly thru the <strong>MAX</strong>-<strong>450</strong> amplifier.<br />
Indicator H<br />
j<br />
CASQUE STEREOPHONIQUE<br />
Vous pouvez connecter un casque stéréophonique sur la prise jack située sur la façade<br />
de l’appareil. Les sorties haut-parleurs sont automatiquement déconnectées dès l’introduction<br />
du jack dans la prise casque de votre amplificateur.<br />
HEADPHONE<br />
You can connect a stereo headphones to the phone jack for private listening.<br />
Notes: always turn down the volume before connecting your headphones. Please note<br />
that all connected speakers are turned off automatically while the headphones plug is<br />
inserted in the phone jack.<br />
w<br />
SELECTEUR D’ENCEINTES<br />
Votre <strong>MAX</strong>-<strong>450</strong> comporte deux jeux de bornes pour haut-parleurs A et B. Il est possible<br />
de les activer ou de les désactiver ensemble ou séparément. Appuyer sur le bouton speakers<br />
pour accéder successivement aux quatre sélections de haut-parleurs: Off, paire A,<br />
paire B et A+B. Relâcher le bouton speakers pour arrêter la séquence. Afficheur A B<br />
SPEAKERS SELECTOR<br />
The <strong>MAX</strong>-<strong>450</strong> has two sets of speaker terminals A and B. One may switch on or off<br />
both sets together or separately. Press the speakers button to toggle through the four<br />
speaker selections: Off, pair A, pair B and pairs A+B. Release the speakers button to stop<br />
the sequence. Afficheur A B<br />
e<br />
REGLAGE DE TONALITE<br />
Appuyer sur le bouton tone pour activer ou désactiver les réglages de tonalité. Appuyer<br />
sur le bouton Tone pour accéder successivement aux quatre sélections: Off, B (réglage<br />
des graves), M (réglage des médiums / (Attention le réglage du niveau des médiums<br />
n’est perceptible qu’après une seconde) et T (réglage des aigus) Indicateur G. A l’aide<br />
du bouton de volume/control ajuster le niveau des graves médiums et aigus entre +10 et<br />
-10. Indicateur C. Lorsque ces réglages vous satisfont, patientez environ 5 secondes pour<br />
qu’ils soient automatiquement enregistrés.
Pour activer le mode direct qui permet de respecter le signal originel, appuyer à nouveau<br />
sur le bouton Tone afin qu’il affiche Off.<br />
TONE SELECTOR<br />
Press the Tone button to toggle through the four selections: Off, B (Bass), M (Medium)<br />
and T (Treble) indicator G. Adjust the level of B, M (Attention, you can listen the medium<br />
adjustment after one second) and T with the volume/control button from -10 to +10 (indicator<br />
C) When the adjustment is done, wait 5 secondes and your adjustments will be<br />
memorised automatically. The <strong>MAX</strong>-<strong>450</strong> integrates a direct mode signal that could be activate<br />
by pushing the Tone button (the display will show Off). When the direct Tone is on,<br />
the tone controls are bypassed, so you can enjoy a pure sound.<br />
y<br />
ENTRÉES PC1, PC2, iPod AND USB<br />
Appuyer sur le bouton PC/iPod/USB pour accéder successivement aux quatre sélections<br />
suivantes: PC1, PC2, iPod ou USB. Relâcher le bouton lorsque la source recherchée s’affiche.<br />
Afficheur H Les entrées PC1, iPod et USB sont situées sur la face avant, l’entree<br />
PC est située sur la face arrière.<br />
PC1, PC2, iPod AND USB INPUTS<br />
Press the PC/iPod/USB button to toggle through the four selections: PC1, PC2, iPod and<br />
USB. Indicator H. PC1, iPod and USB inputs are located on the front panel. PC2 inputs<br />
are located on the rear panel.<br />
t<br />
OPTIMISEUR AUDIO POUR PC1 ET iPod<br />
Appuyer sur le bouton PC/iPod Equalizer pour accéder successivement aux cinq sélections<br />
suivantes: Off, 1, 2, 3 et 4. En mode Off, le signal d’entrée de votre PC1 ou iPod est<br />
restitué sans optimisation. En mode 1, 2, 3 ou 4, le signal audio en provenance de votre<br />
PC ou iPod subit un traitement audio afin d’assurer une restitution “plus audiophile“. Mode<br />
Off (indicateur D ) et mode 1,2,3 ou 4 (indicateur E )<br />
AUDIO OPTIMIZER FOR PC1 AND iPod<br />
Press the PC/iPod Equalizer button to toggle through the five selections: Off, 1, 2, 3 and<br />
4. In Off mode, the audio signal coming from your PC1 or iPod is not going thru the optimizer<br />
processor. In mode 1, 2, 3 and 4, the audio signal coming from your PC or iPod is<br />
optimised to obtain a more “audiophile“ sound.<br />
Mode Off (indicator D ) and mode 1,2,3 and 4 (indicator E )<br />
r<br />
REGLAGE DU NIVEAU PC1 ET iPod<br />
Appuyez sur ce bouton pour augmenter (Led bleu s’allume) le niveau du signal en provenance<br />
de votre PC1 ou iPod.
LEVEL PC1/iPod<br />
Press this button to boost the audio signal coming from your PC1 or iPod.<br />
l<br />
VOYANT HIGH BIAS<br />
Ce voyant indique que la fonction High Bias est active. (Mode ass. Class’A)<br />
HIGH BIAS LIGHT INDICATOR<br />
This light indicator is ON when High Bias function is active. (Sim. Mode Class’A)<br />
u<br />
ENTREE MINIJACK PC1<br />
Connectez ici un ordinateur à l’aide d’un cordon minijack male 3,5mm.<br />
PC1 MINIJACK INPUT<br />
Connect your PC with a minijack cable (3,5mm)<br />
i<br />
ENTREE MINIJACK iPod<br />
Connectez ici la sortie casque de votre iPhone, iPod à l’aide d’un cordon minijack male<br />
3,5mm. Vous pouvez aussi utiliser un cordon spécifique 30pins / mini jack 3,5mm.<br />
iPod MINIJACK INPUT<br />
You can connect your iPhone or iPod with a minijack (3,5mm) male cable. Also, you can<br />
use a specific 30pins/minijack 3,5mm cable.<br />
;<br />
ENTRÉE USB B<br />
L’entrée USB type B située sur la face avant permet de lire les fichiers musicaux de votre<br />
ordinateur MAC ou PC sans driver. Afficheur I<br />
Sur votre PC, l’installation est automatique et aucun pilote n’est nécessaire. Après quelques<br />
secondes, le message “ Votre nouveau dispositif ou périphèrique a été installé et<br />
est prêt à l’emploi“ apparaîtra pour confirmer que l’installation est réussie. La description<br />
s’affichera comme USB Audio CODEC.<br />
Sur MAC dans les préférences Son de votre votre logiciel système, sélectionner dans<br />
l’onglet “sortie“ puis USB Audio CODEC.<br />
USB B AUDIO INPUT (MAC OR PC)<br />
The USB audio input can be used to play audio files from your PC or MAC. Installation<br />
should be automatic and no driver disc is required. Afficheur I<br />
When connecting your PC on the USB B audio input, the description will be displayed as<br />
“USB Audio CODEC”. Installation should be automatic and no driver disc is required. After<br />
a few seconds the message that new hardware is installed and ready to use should<br />
appear to confirm that installation has been successful.<br />
The USB B audio input is compatible MAC without driver. Navigate to SYSTEM<br />
PREFERENCES, then SON, Outputs and select “USB Audio CODEC“
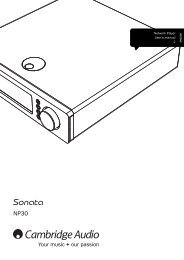
RÉGLAGES & CONNEXIONS FACE ARRIÈRE<br />
REAR PANEL CONNECTIONS & CONTROLS<br />
a<br />
s<br />
o<br />
e rty u i<br />
q w<br />
q<br />
w<br />
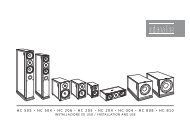
BORNIER HAUT-PARLEURS<br />
Paire d’enceinte A: Brancher des enceintes ayant une impédance minimale de 4 ohms.<br />
Brancher l’enceinte droite aux bornes repérées ‘R +’ et ‘R-’ en s’assurant que ‘R+’ est<br />
reliée à la borne ‘+’ de l’enceinte et ‘R-’ est reliée à la borne ‘-’ de cette même enceinte.<br />
Brancher le haut-parleur gauche aux bornes repérées ‘L+’ et ‘L-’ en<br />
procédant de la même manière. Si les bornes SPEAKERS A et B sont utilisées<br />
simultanément, ne raccorder que des haut-parleurs ayant une impédance minimale de 8<br />
ohms.<br />
Pour la deuxième paire d’enceinte (B) procéder de la même façon que la paire B.<br />
On peut utiliser les bornes serre-fils pour courants élevés comme bornes à vis pour les<br />
câbles comportant des cosses plates, des broches, des prises “banane“, ou pour des<br />
câbles comportant des fils nus.<br />
Les fils nus et les broches s’insèrent dans le trou diamétral percé dans la tige de la borne.<br />
Desserrer la bague en plastique jusqu’à ce que le trou dans la tige soit visible. Insérer la<br />
broche ou le fil nu dans le trou, puis fixer le câble en vissant la bague de la borne.<br />
Eviter tout risque que le métal nu des câbles de haut-parleurs ne touche la face arrière ou<br />
un autre connecteur. S’assurer que la longueur dénudée ou la longueur de la broche ne<br />
dépasse pas 1/2” (1 cm) et qu’il n’y a aucun brin libre.
q<br />
w<br />
SPEAKER TERMINALS<br />
SPEAKERS A: Connect speakers with impedance of 4 Ohms or greater. Connect the right<br />
speaker to the terminals market ‘R +’ and ‘R-’ ensuring that the ‘R+’ is connected to the<br />
‘+’ terminal on your loudspeaker and the ‘R-’ is connected to the loudspeaker’s ‘-’ terminal.<br />
Connect the terminals marked ‘L+’ and ‘L-’ to the left speaker in the same way. When<br />
using both SPEAKERS A and SPEAKERS B connect speakers of impedance 8 Ohms or<br />
greater.<br />
SPEAKERS B: use same method to connect the B pair.<br />
The high current binding post terminals can be used as a screw terminal for cables<br />
terminating in spade or pin connectors or for cables with bare wire ends.<br />
SPADE CONNECTORS<br />
These should be slotted under the terminal’s screw bushing, which is then fully tightened.<br />
Ensure the connector is tightly secured and there is no danger of bare metal from spade<br />
connectors touching the back panel or another connector as this may cause damage.<br />
BARE WIRES AND PIN CONNECTORS<br />
Bare wires and pin connectors should be inserted into the hole in the shaft of the terminal.<br />
Unscrew the speaker terminal’s plastic bushing until the hole in the screw shaft is revealed.<br />
Insert the pin or bare cable end into the hole and secure the cable by tightening down<br />
the terminal’s bushing.<br />
BANANA CONNECTORS<br />
You also can use banana connectors on the speakers terminal.<br />
Avoid any danger of bare metal from the speaker cables touching the back panel or<br />
another connector. Ensure that<br />
e<br />
e<br />
ENTRÉES DES SOURCES<br />
Vous devez connecter vos sources sur les entrées stéréo correspondantes. Ces entrées<br />
sont identiques à l’exception de l’entrée stéréophonique Phono qui est spécifique.<br />
Servez-vous d’un câble audio analogique pour relier les prises L/R de l’ampli aux prises<br />
de sortie audio analogique de vos sources.<br />
INPUTS<br />
You can connect your stereo sources on those inputs. All those inputs are similar except<br />
phono input.<br />
Use an analog audio cable to connect the amplifier’s inputs L/R jacks to the analog audio<br />
output jacks of your different sources.<br />
o<br />
ENTRÉE PHONO<br />
Les prises d’entrée PHONO de l’ampli servent à brancher des platines disque à cellules à<br />
aimant mobile (MM). Utilisez un câble audio analogique pour brancher les<br />
prises PHONO L/R de l’ampli aux prises de sortie audio de la platine.<br />
Remarques : Si la platine disque a un câble de terre, branchez-le à la borne de masse de
l’ampli. Avec certaines platines, le branchement d’un câble de terre peut<br />
causer un ronflement. Dans ce cas, débranchez-le. Si la platine a une cartouche de type<br />
MC (à bobine mobile), vous devez utiliser un préamplificateur phono MC du commerce.<br />
Dans ce cas, branchez la platine disque à l’entrée phono du préamplificateur et<br />
branchez la sortie phono du préamplificateur aux prises PHONO L/R de l’ampli.<br />
o<br />
PHONO INPUT<br />
The amplifier’s PHONO input jacks are for use with moving-magnet (MM) type cartridges.<br />
Use an analog audio cable to connect the amplifier’s PHONO L/R jacks to the audio output<br />
jacks on the turntable.<br />
Notes: if the turntable has a ground wire, connect it to amplifier’s ground terminal. With<br />
some turntables, connecting the ground wire may cause hum, in which case it should be<br />
disconnected. If the turntable has a moving-coil (MC) type cartridge, you’ll need to add a<br />
MC phono preamp. In this case, connect the turntable to the phono preamp’s input, and<br />
connect the phono preamp’s output to the amplifier’s PHONO L/R jacks.<br />
r<br />
r<br />
PRE OUT / SORTIES PREAMPLIFICATEUR<br />
Si vous souhaitez utiliser un amplificateur de puissance plus puissant et utiliser le<br />
<strong>MAX</strong>-<strong>450</strong> comme préamplificateur, branchez-le aux prises PRE OUT et connectez toutes<br />
les enceintes et le caisson de grave à l’amplificateur de puissance.<br />
PRE OUT / PREAMPLIFIER OUTPUTS<br />
If you want to use a more powerful power amplifier and use the <strong>MAX</strong>-<strong>450</strong> as a preamplifier,<br />
connect it to the PRE OUT jacks, and connect all speakers to the power amplifier.<br />
y<br />
y<br />
PRE OUT 2 / CONNECTER UN SUBWOOFER OU AUTRE AMPLI DE PUISSANCE<br />
Vous pouvez brancher un autre amplificateur de puissance ou un caisson de grave actif<br />
(caisson amplifié). Cette sortie stéréophonique est ajustable par le bouton de volume<br />
général.<br />
PRE OUT 2 / CONNECTING ANOTHER POWER AMPLIFIER OR SUBWOOFER<br />
These jacks allow you to connect another power amplifier or an active subwoofer<br />
(subwoofer with built-in amplifier). To connect them use an analog audio cable to connect<br />
the amplifier’s L/R PRE OUT 2 jacks to the analog audio input jacks of your powered<br />
subwoofer or power stereo amplifier.<br />
t<br />
AMP. IN / POWER AMPLIFIER IN<br />
Si vous souhaitez utiliser uniquement la section amplificateur de puissance de votre<br />
<strong>MAX</strong>-<strong>450</strong>, connecter sur les prises L/R AMP IN votre autre préamplificateur ou table de
mixage audio.<br />
t<br />
AMP. IN / POWER AMPLIFIER IN<br />
If you only want to use the power amplifier section of your <strong>MAX</strong>-<strong>450</strong>, you can connect<br />
another preamplifier or audio mixer on L/R AMP. IN jacks.<br />
u<br />
u<br />
SELECTEUR HIGH BIAS<br />
En mode High Bias (ON), votre amplificateur est assimilable à un amplificateur en Classe<br />
A sur les premiers watts d’utilisation. L’utilisation de ce mode se traduit par un échauffement<br />
important, aussi votre amplificateur doit rester correctement ventilé.<br />
HIGH BIAS SELECTOR<br />
By switching the High Bias mode in ON mode, your amplifier will be similar as a Class’A<br />
amplifier of the first watts of use. In this mode, the temperature of your amplifier will be<br />
important, also, it’s important that there should be enough clear space around the amplifier<br />
to permit a free flow of air.<br />
i<br />
i<br />
a<br />
s<br />
a<br />
s<br />
PRISE D’ALIMENTATION / SÉLECTEUR DE TENSION<br />
Vérifier la tension d’alimentation. Si votre tension est de 115V vous devez changer la<br />
position du sélecteur de voltage. Pour alimenter votre appareil, commuter l’interrupteur<br />
général sur ON.<br />
POWER CORD / VOLTAGE SELECTOR<br />
You need to be sure about the voltage of your country. In case that you need to use your<br />
appliance in 115V, you need to change the position of the voltage.<br />
Before plugging in the amplifier, its master power switch must be in the OFF position.<br />
ENTRÉES DIGITALES COAXIALES (2) ET OPTIQUE (1)<br />
Votre amplificateur est équipé de 3 entrées numériques dont 2 coaxiales et une optique.<br />
Vous pouvez connecter ici la sortie numérique de votre lecteur Cd, MD, etc... et profiter<br />
de l’excellente qualité du convertisseur intégré.<br />
COAXIAL DIGITAL (2) AND OPTICAL (1) INPUTS<br />
Your amplifier integrate a DAC (Digital audio converter) with 3 inputs, 2 are coaxials and<br />
1 is optical. You can connect the digital output of you CD, MD, etc... and use the high<br />
quality DAC converter of your amplifier
TELECOMMANDE<br />
REMOTE CONTROL<br />
TELECOMMANDE <strong>MAX</strong>-<strong>450</strong><br />
La télécommande de votre <strong>MAX</strong>-<strong>450</strong> regroupe les principales commandes de<br />
votre amplificateur. De plus, elle vous permet de contrôler d’autres appareils<br />
de la black line comme les lecteurs CD, tuner, etc...<br />
<strong>MAX</strong>-<strong>450</strong> REMOTE CONTROL<br />
With the <strong>MAX</strong>-<strong>450</strong> remote control, you can control major functions of your<br />
amplifier. You also can control functions of others components of the black<br />
line (cd player, tuner, etc...)
SPECIFICATIONS ET PERFORMANCES<br />
PERFORMANCE SPECIFICATIONS<br />
POWER OUTPUT 8 ohms<br />
POWER OUTPUT 4 ohms<br />
FREQUENCY RESPONSE (-3dB)<br />
TONE CONTROL<br />
2x120W<br />
2x160W<br />
10Hz-65kHz<br />
+/- 10 dB<br />
DISTORSION < 0,08%<br />
S/N RATIO<br />
CHANNEL SEPARATION<br />
INPUT IMPEDANCE<br />
INPUT IMPEDANCE PHONO<br />
IN LEVEL (CD/AUX...)<br />
IN LEVEL (iPod High Level)<br />
> 90 dB<br />
> 100 dB<br />
10KΩ<br />
47K ohms<br />
< 550mV<br />
< 55mV<br />
IN LEVEL AMPLIFIER < 1,25V<br />
INPUT LEVEL PHONO MM<br />
USB CONVERTER<br />
AUDIO CONVERTER<br />
2,5mV<br />
Texas instrument<br />
24Bits/kHz Cirrus Logic<br />
AC INPUT 115-230V<br />
POWER CONSUMPTION <strong>MAX</strong>
Design and development in France by <strong>Advance</strong> Paris Sarl<br />
13 rue du coq gaulois - 77390 Brie Comte Robert - FRANCE<br />
Tel. +33 (0) 160 185 900 - Fax +33 (0) 160 185 895<br />
email: info@advance-acoustic.com<br />
www.advance-acoustic.com


![Product Brochure [pdf] - Audio Classics](https://img.yumpu.com/22280099/1/190x245/product-brochure-pdf-audio-classics.jpg?quality=85)