Manual - Casada
Manual - Casada
Manual - Casada

You also want an ePaper? Increase the reach of your titles
YUMPU automatically turns print PDFs into web optimized ePapers that Google loves.
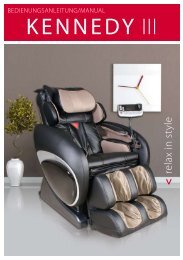
Kennedy lV<br />
Bedienungsanleitung | <strong>Manual</strong>
deutsch<br />
Wir Gratulieren<br />
Mit dem Kauf dieses Massagesessels haben Sie Gesundheitsbewusstsein<br />
bewiesen.<br />
Damit Sie auf lange Zeit die Vorzüge dieses Sessels genießen können,<br />
möchten wir Sie bitten, die Sicherheitshinweise aufmerksam zu lesen<br />
und zu beachten.<br />
Wir wünschen Ihnen viel Freude mit Ihrem persönlichen Kennedy lV.<br />
Seit der Gründung im Jahr 2000 steht der Name CASADA für hochwertige<br />
Produkte im Bereich Wellness und Fitness.<br />
Heute sind CASADA - Produkte in weltweit 37 Ländern erhältlich.<br />
Kontinuierliche Weiterentwicklung, unverwechselbares Design und<br />
die strikte Ausrichtung auf eine Verbesserung der Lebensqualität<br />
zeichnen die CASADA-Produkte ebenso aus, wie die zuverlässige und<br />
hervorragende Qualität.<br />
2<br />
www.casada.com 3
Inhaltsverzeichnis<br />
Die Massage<br />
5 die Massage<br />
6 sicherheitshinweise<br />
7 installation<br />
7 aufbau<br />
14 Inbetriebnahme<br />
15 Technische Daten<br />
15 EU - Konformitätserklärung<br />
Jeder kennt die wohltuende Lockerung verspannter Muskeln durch<br />
eine Massage. Die Vorgänge innerhalb der Muskeln, Blutgefäße und<br />
Nervenstränge lassen sich einleuchtend erklären.<br />
16 Ausstattung/Funktionen<br />
18 Fernbedienung<br />
22 Massagetechniken<br />
Im Körper existieren zwei Kreislaufsysteme. Der Blutkreislauf, ausgehend<br />
vom Herzen, versorgt das Gehirn, die Organe und die Muskulatur<br />
mit Nährstoffen und dem lebenswichtigen Sauerstoff, während das<br />
Lymphsystem dafür sorgt, dass Stoffwechselprodukte, Schlacken und<br />
Gifte aus dem Körper ausgespült werden können.<br />
Inhaltsverzeichnis<br />
24 Störungssuche<br />
24 Pflegehinweise<br />
24 Lagerung<br />
25 Gewährleistungsbestimmungen<br />
50 Notizen<br />
Wird unser Immunsystem durch Infektionen und Viren beansprucht,<br />
tastet der Arzt zunächst die Lymphknoten ab, da diese Abwehrzellen<br />
produzieren und auf diese Belastung durch Anschwellen reagieren.<br />
Jede Massage regt dieses System an und fördert so den Abtransport<br />
schädlicher Stoffe und die Versorgung mit Sauerstoff und Nährstoffen.<br />
Die Massage<br />
4 5
Sicherheitshinweise<br />
Sicherheitshinweise<br />
Bevor Sie diesen Massagesessel in Betrieb nehmen, lesen Sie bitte<br />
sorgfältig die folgenden Hinweise, um die einwandfreie Funktion und<br />
optimale Wirkungsweise zu gewährleisten. Bitte bewahren Sie diese<br />
Bedienungsanleitung sorgsam auf!<br />
• Der Massagesessel entspricht den anerkannten Grundsätzen der<br />
Technik und den aktuellen Sicherheitsbestimmungen.<br />
• Der Sessel ist wartungsfrei. Evtl. anfallende Reparaturen dürfen nur<br />
von einer autorisierten Fachkraft durchgeführt werden. Unsachgemäßer<br />
Gebrauch sowie unautorisierte Reparaturen sind aus Sicherheitsgründen<br />
untersagt und führen zum Garantieverlust.<br />
• Um Unfälle zu vermeiden, greifen Sie nicht mit den Fingern zwischen<br />
die Massageköpfe.<br />
• Massagen während der Schwangerschaft oder bei einer/mehreren<br />
der folgende Beschwerden im Massagebereich sind untersagt:<br />
Frische Verletzungen, thrombotische Erkrankungen, Ent zündungen<br />
und Schwellungen aller Art, sowie Krebs. Bei Behandlung von Gebrechen<br />
und Leiden ist vor einer Massage die Absprache mit Ihrem Arzt<br />
empfohlen.<br />
• Bei Hilfsmitteln, wie z.B. Herzschrittmachern, konsultieren Sie auf<br />
jeden Fall vor der Massage ärztlichen Rat.<br />
Aufbau<br />
• Berühren Sie den Netzstecker niemals mit nassen Händen.<br />
• Vermeiden Sie den Kontakt des Sessels mit Wasser, hohen Temperaturen<br />
sowie direkter Sonneneinstrahlung.<br />
8 Airbags<br />
• Ziehen Sie bei längerer Nichtbenutzung das Netzkabel aus der Steckdose,<br />
um die Gefahr eines Kurzschlusses zu vermeiden.<br />
Sicherheitshinweise<br />
• Benutzen Sie keine beschädigten Stecker, Schnüre oder lose Fassungen.<br />
Wenn Stecker oder Schnüre beschädigt sind, müssen diese vom<br />
Hersteller, vom Service-Vertreter oder von qualifiziertem Personal<br />
ersetzt werden. Bei Funktionsstörung trennen Sie bitte sofort die Verbindung<br />
zur Stromzufuhr. Zweckentfremdung oder falsche Nutzung<br />
schließt Haftung für Schäden aus.<br />
• Kinder sollten den Massagesessel nur unter entsprechender Aufsicht<br />
benutzen.<br />
• Um eine übermäßige Strapazierung der Muskulatur und der Nerven<br />
zu vermeiden, sollten Sie die täglich empfohlene Massagezeit von 30<br />
Minuten nicht überschreiten.<br />
• Verwenden Sie niemals spitze oder scharfe Gegenstände.<br />
20 Airbags<br />
2 Heizelemente<br />
22 Airbags<br />
4 Fußrollen<br />
Sicherheitshinweise / Aufbau<br />
6 7
Aufbau<br />
Aufbau<br />
[1]<br />
[10]<br />
• Wenn Sie den Sessel aufstellen, achten Sie bitte darauf, dass<br />
hinter dem Sessel genug Platz ist, um die volle Liegepo sition zu<br />
erreichen.<br />
[2]<br />
[9]<br />
[8]<br />
[7]<br />
• Legen Sie bei empfindlichen Fußböden eine Unterlage unter<br />
den Sessel, um Beschädigungen zu vermeiden.<br />
[3]<br />
[6]<br />
[4]<br />
[5]<br />
Hinweis:<br />
• Achten Sie darauf, dass der Sessel während des Aufbaus vom<br />
Strom-netz getrennt ist.<br />
[1] Nackenkissen<br />
[2] Rückenlehne<br />
[3] Seitenteil<br />
[4] Rollen<br />
[5] Fußteil<br />
[6] Sitzkissen<br />
[7] Handauflage<br />
[8] Fernbedienung<br />
[9] Schulterkissen<br />
[10] Lautsprecher<br />
• Die zusammen gehörenden Luftschläuche sind farblich gekennzeichnet.<br />
01. Den Sessel Auspacken<br />
• Nehmen Sie den Sessel und die Seitenteile aus dem Karton.<br />
Hinweis:<br />
Für die Montage des Sessels immer eine weitere Personen hinzuziehen.<br />
Aufbau<br />
Aufbau<br />
8 9
Aufbau<br />
Aufbau<br />
02. Luftschläuche verbinden<br />
• Verbinden Sie die Luftschläuche<br />
am Seitenteile, mit denen am<br />
Sitzteil. (Siehe Skizze)<br />
04.<br />
• Wiederholen Sie Schritt 2 und Schritt 3 für die Installation<br />
des anderen Seitenteils.<br />
05. Befestigen der Fernbedienung<br />
Seitenteil<br />
• Befestigen Sie die Steuereinheit<br />
an der dafür vorgesehenen<br />
Position und ziehen Sie<br />
die Schrauben fest.<br />
(siehe Skizze)<br />
03. Seitenteile verbinden<br />
• Stecken Sie die Armlehnen in einem Winkel von 90° in den<br />
Sessel. Schieben Sie dazu die Befestigungsbügel (D) ganz in die<br />
Querstange (C). (siehe Skizze)<br />
• Justieren Sie die Löcher (A) in den Seitenteilen parallel zu der<br />
Fassung, um diese am Rahmen festzuschrauben. (siehe Skizze)<br />
06.<br />
• Schneiden Sie den Kabelbinder,<br />
der den Stopper mit der Rückenlehne<br />
verbindet, ab und entfernen<br />
Sie das Verpackungsmaterial<br />
vom Bedienteil der Rückenlehne<br />
(beide befinden sich unter dem<br />
Sitzpolster).<br />
Hinweis: Achten Sie auf eine sorgfältige Installation um Kratzer zu<br />
vermeiden.<br />
Aufbau<br />
(A)<br />
Dichtung (0 6 x 18 x 2)<br />
Sechskantschraube (M 6 x 55)<br />
Federscheibe (0 6)<br />
Aufbau<br />
10 11
Aufbau<br />
Aufbau<br />
07. Anbringen der Rückenlehne<br />
• Heben Sie die Rückenlehne an und lassen Sie diese in die Sitzhalterungen<br />
sinken. Verriegeln Sie die Flachkopfschrauben (A)<br />
auf beiden Seiten (B) des Sessels. (siehe Skizze)<br />
09.<br />
• Entfernen Sie das Verpackungsmaterial von den Anschlüssen<br />
und schließen Sie die Stecker entsprechend der Markierungen<br />
an die jeweilige Stelle im Sitz an. (siehe Skizze)<br />
A. Flachkopfschraube (am Rückenteil)<br />
B. Halterung (am Sitz)<br />
Vorher<br />
08.<br />
Nachher<br />
• Bringen Sie die Flachkopfniete an der Verbindungsstange und<br />
der Stützgabel in der Rückenlehne an und befestigen Sie beides<br />
mit einem Splint. Verbinden Sie das Kabel, welches vom Rückenteil<br />
ausgeht, mit dem vom Sitzteil. (siehe Skizze)<br />
10. Befestigen der Rücken- und Sitzpolster<br />
1. Befestigen Sie das Rückenpolster<br />
mit Hilfe des Klett- und Reißverschlusses<br />
an der Rückenlehne.<br />
2. Befestigen Sie das Nackenkissen<br />
mit dem Klettverschluss an der<br />
Rückenlehne.<br />
A. Verbindungsstange (an der Rückenlehne)<br />
B. Stützgabel (am Sitz)<br />
C. Flachkopfniete<br />
D. Splint<br />
Kabel<br />
(Musik)<br />
11. Rückenpolster<br />
• Ein separates Rückenpolster zum abdämpfen<br />
der Massage ist bereits im Rückenteil eingefügt.<br />
Sollten Sie eine stärkere Massage bevorzugen,<br />
entfernen Sie dieses vorher.<br />
Aufbau<br />
Aufbau<br />
12 13
Aufbau<br />
Technische Daten<br />
12. Bewegen und verschieben des Sessels<br />
• Heben Sie das Fußteil hoch.<br />
• Heben Sie den Stuhl um 45° an, um ihn dann mit Hilfe der<br />
Rollen am hinteren Teil bewegen zu können.<br />
Maße aufrecht:<br />
Maße liegend:<br />
Gewicht:<br />
Spannung:<br />
Nennleistung:<br />
145 x 91 x 32 cm<br />
187 x 91 x 94 cm<br />
115 kg<br />
AC 220 -240 V ~ 50 / 60 Hz<br />
300 W<br />
Laufzeit:<br />
Automatisch: 15 minutes<br />
Manuell: 30 minutes<br />
Farbe:<br />
Zertifikate:<br />
Creme or Black<br />
Aufbau / Inbetriebnahme<br />
• Bewegen Sie den Stuhl niemals wenn jemand darin sitzt.<br />
• Legen Sie bei empfindlichen Fußböden eine Unterlage unter<br />
den Sessel, um Beschädigungen zu vermeiden.<br />
Inbetriebnahme<br />
AnschlieSSen der Kabel<br />
• Überprüfen Sie vor Inbetriebnahme den Netzstecker. Verbinden<br />
Sie das Netzkabel mit dem Sessel (A) und stecken Sie anschließend<br />
den Netzstecker in die Steckdose. Schalten Sie nun den<br />
Sessel ein, indem Sie die den Schalter auf „I“ stellen (B).<br />
(A)<br />
(B)<br />
EU-Konformitätserklärung<br />
Entspricht den europäischen Richtlinien 2006/95/EC.<br />
Technische Daten / EU-Konformitätserklärung<br />
14 15
Ausstattung / Funktionen<br />
Ausstattung / Funktionen<br />
Der Kennedy lV ist die perfekte Kombination aus innovativer Technologie,<br />
exklusivem Design und einem Soundsystem. Gut durchdachte<br />
Massageprogramme sowie die Zero Gravity Funktion aus der Raumfahrt<br />
zur Entlastung der Wirbelsäule machen ihn zu einem zuverlässigen<br />
und attraktiven Partner.<br />
Mit der Akkupressurmassage an Rücken-, Sitz-, Waden- und Fußbereich<br />
kommen Sie in den Genuss einer auf Ihren Körper abgestimmten,<br />
individuellen Massage. Dank der innovativen 3D Massagetechnik ist<br />
eine Massage vom Nacken bis hin zum Steißbein garantiert. Ein Massagesessel<br />
der keine Wünsche offen lässt und Ihnen die Entspannung<br />
schenkt die Sie verdient haben.<br />
Der Massagesessel hat eine speziell auf die menschliche Wirbelsäule<br />
abgestimmte Massageeinheit.<br />
Die Massagerollen verfügen über einen Verriegelungsmechanismus,<br />
welcher die Wirkung der Akupressur-Punkt Massage bestärkt.<br />
Das eigens angepasste Rückenteil des Massagesessels ist von 115° bis<br />
160° automatisch verstellbar. Gleichermaßen lässt sich die Fußstütze<br />
von 0° bis 90° verstellen.<br />
Mit der Zeitfunktion können Sie nach Belieben die gewünschte Dauer<br />
der Massage einstellen.<br />
Die LCD Anzeige leuchtet im Dunkeln und gewährt Ihnen somit jederzeit<br />
die Möglichkeit die verschiedenen Programme zu bedienen.<br />
Nach 15 Minuten schaltet sich der Massagebetrieb selbstständig ab.<br />
Um die Lebensdauer der Motoren zu erhöhen, schalten Sie die Massageköpfe<br />
erst wieder ein, wenn mindestens 30 Minuten vergangen sind.<br />
So haben die Motoren Zeit wieder abzukühlen.<br />
Auch Ihrem Körper sollten Sie eine solche Ruhepause gönnen. Wir<br />
empfehlen Ihnen, die Massage nur maximal dreimal am Tag durchzuführen,<br />
um auch die Muskulatur nicht zu stark zu beanspruchen.<br />
Ausstattung / Funktionen<br />
Zu Ihrer Sicherheit statten wir alle Geräte mit einem Überhitzungsschutz<br />
aus. Unter starker Belastung und hohem Anpressdruck entsteht<br />
Wärme in den Motoren. Bevor dies zu einer Gefahrenquelle werden<br />
kann, schalten sich die Geräte automatisch aus und lassen sich auch<br />
erst nach einer angemessenen Wartezeit, die zwischen 30 und 50<br />
Minuten liegt, wieder einschalten.<br />
Ausstattung / Funktionen<br />
16 17
Fernbedienung<br />
Fernbedienung<br />
[19]<br />
[3] Zero-G<br />
Mit dieser Taste fahren Sie den Massagesessel in eine vollständige Liegeposition.<br />
Füße und Kopf befinden sich in einer Linie. Die Massage ist so am Stärksten,<br />
da nun das ganze Körpergewicht auf den Massageeinheiten ruht.<br />
[17]<br />
[18]<br />
[20]<br />
[21]<br />
Hinweis:<br />
Die ZERO-G Funktion ist nicht mit den automatischen Programmen Slumber<br />
und Thai kombinierbar.<br />
[1]<br />
[3]<br />
[22/23]<br />
[29]<br />
[33]<br />
[35]<br />
[24/25]<br />
[26/27]<br />
[28]<br />
[30]<br />
[32]<br />
[37]<br />
[4] Pause<br />
Während der Massage können Sie das Programm jederzeit mit der Pause-Taste<br />
kurz unterbrechen. Gleichzeitig stoppt die Zeitschaltuhr und die LCD Anzeige<br />
blinkt. Der Massagesessel befindet sich in dieser Zeit im Leerlauf, nur die Liegeposition<br />
und das Fußteil lassen sich verstellen. Um die Massage fortzusetzen<br />
betätigen Sie die PAUSE-Taste erneut.<br />
[2] [4]<br />
[7]<br />
[5]<br />
[8]<br />
[6]<br />
[36]<br />
[31]<br />
[38]<br />
[34]<br />
[5] FuSSteil<br />
Winkelanpassung Fußteil<br />
Durch Drücken dieser Tasten können Sie den Winkel des Fußteils optimal einstellen.<br />
Haben Sie die gewünschte Position erreicht, betätigen Sie erneut die<br />
Taste um den Vorgang zu stoppen.<br />
[12]<br />
[9] [14]<br />
[10]<br />
[11]<br />
[15]<br />
[16]<br />
[13]<br />
Längenanpassung Fußteil<br />
Durch gedrückt halten dieser Tasten stellen Sie das Fußteil auf Ihre jeweilige<br />
Körpergröße ein. (Bei der Auswahl eines Automatik Programms passt sich das<br />
Fußteil Ihrer Körperlänge voll automatisch an.)<br />
[6] Liegeposition<br />
Mit diesen Tasten können Sie die jeweils gewünschte Liege- bzw. Sitzposition<br />
auswählen.<br />
Fernbedienung<br />
[1] Start/Stop<br />
Mit dieser Taste schalten Sie die Steuereinheit ein – die Kontrolllampen blinken,<br />
der Sessel befindet sich jetzt im Leerlauf. Zum Starten wählen Sie eine beliebige<br />
Massagefunktion aus. Die Zeitschaltuhr startet automatisch eine 15 minütige<br />
Laufzeit. Um die Massage zu stoppen drücken Sie diese Taste erneut. Die Massageköpfe<br />
fahren dann automatisch in die Ausgangsposition zurück.<br />
[2] Timer<br />
Ist eine Funktion ausgewählt, beträgt die Laufzeit automatisch 15 Minuten. Durch<br />
drücken der Timer Taste ändern Sie die Intervalle “20>25>30>5>10>15>20”<br />
Minuten.<br />
Hinweis:<br />
Um die Signaltöne auszuschalten halten Sie die Timer Taste 5 Sekunden lang gedrückt,<br />
um die Töne zu aktivieren drücken Sie die Taste erneut 5 Sekunden lang.<br />
[7] Massageköpfe positionieren<br />
Die Position der Massageköpfe können Sie über die Tasten / variieren. Für<br />
noch mehr Komfort während der Massage kann der Anwender weitere Anpassungen<br />
in der Höhe der Massage durch Drücken dieser Tasten nach dem Scan-<br />
Programm vornehmen. Die Massagerollen bewegen sich nach oben oder unten,<br />
bis die am Besten geeignete Position erreicht ist und Sie die Taste loslassen.<br />
[8] 3D Einstellung<br />
Über diese Tasten regulieren Sie den Druckpunkt der Massageköpfe. Drücken<br />
Sie „+“, um die Massageköpfe rauszufahren und „–“, um die Massageköpfe einzufahren.<br />
Automatische Programme für den gesamten Rücken<br />
Wenn Sie eines der 10 automatischen Programme starten, beginnt der „Auto<br />
Scan“ Ihre Körperstruktur abzutasten. Währenddessen haben Sie die Möglichkeit,<br />
alle Größeneinstellungen manuell vorzunehmen und den Massagesessel<br />
auf Ihre Bedürfnisse einzustellen.<br />
[9] REFRESH [10] SLUMBER [11] BALINESE [12] DEEP TISSUE [13] THAI<br />
[14] CALM [15] RECOVERY [16] CHINESE [17] SHOULDER [18] LUMBAR<br />
Hinweis:<br />
18 19<br />
Fernbedienung
Fernbedienung<br />
Fernbedienung<br />
Die Programme SLUMBAR und THAI sind für ältere Menschen nicht geeignet.<br />
[19] Reflexzonenmassage im FuSSbereich<br />
Mit dieser Taste starten bzw. stoppen Sie die Reflexzonenmassage im Fußbereich.<br />
Hinweis:<br />
Während der Automatischen Programme kann die Rollenmassage aktiviert<br />
oder deaktiviert werden.<br />
[20] VIBRATION<br />
Mit dieser Taste starten bzw. stoppen Sie die Vibrationsmassage im Sitzbereich.<br />
Hinweis:<br />
Während der Automatischen Programme kann die Vibration aktiviert oder deaktiviert<br />
werden.<br />
[21] HEAT<br />
Mit dieser Taste aktivieren bzw. deaktivieren Sie die Wärme im Lendenbereich.<br />
Hinweis:<br />
Während der Automatischen Programme kann die Wärme aktiviert oder deaktiviert<br />
werden.<br />
[29] SPOT/PARTIAL<br />
Durch einmaliges Drücken der Taste aktivieren Sie die Spot Massage. Durch<br />
erneutes Drücken wechseln Sie zur partiellen Massage.<br />
Mit diesen Tasten / können Sie die Massagerollen während der<br />
punktuellen bzw. partiellen Massage an dem gewünschten Rückenabschnitt<br />
positionieren.<br />
Hinweis:<br />
Mit der partiellen Funktion können Sie verschiedene Abschnitte in einem<br />
Bereich von ca. 8 cm massieren lassen: Nacken-, Lendenwirbel- oder Unterkörperbereich.<br />
[30] WIDTH<br />
Regulieren Sie den Abstand der Massagerollen während der jeweiligen Anwendungen<br />
wie, Tapping, Clapping, Rolling oder Shiatsu.<br />
(Schmal > Mittel > Breit)<br />
[31] SPEED<br />
Mit dieser Taste regulieren Sie die Geschwindigkeit während der jeweiligen<br />
Anwendungen wie, Tapping, Clapping, Swedish oder Shiatsu.<br />
(Level 1 > Level 2 > Level 3 > Level 4 > Level 5)<br />
Fernbedienung<br />
Partielle / Manuelle Massage<br />
[22] | [23] KNEADING Modus 1, 2 | Swedish Modus 1, 2<br />
Durch einmaliges drücken dieser Taste aktivieren Sie die Kneading Funktion<br />
Modus 1, durch erneutes drücken Kneading Modus 2. Drücken Sie die<br />
Taste ein drittes mal, stoppt die Kneading Funktion und wechselt in den<br />
Swedish Modus 1. Um in den Swedish Modus 2 zu gelangen drücken Sie erneut<br />
die Taste.<br />
[24] | [25] Tapping 1, 2 | SHIATSU 1, 2<br />
Durch einmaliges drücken dieser Taste aktivieren Sie die Tapping Funktion<br />
Modus 1, durch erneutes drücken Tapping Modus 2. Drücken Sie die<br />
Taste ein drittes mal, stoppt die Tapping Funktion und wechselt in den<br />
Shiatsu Modus 1. Um in den Shiatsu Modus 2 zu gelangen drücken Sie erneut<br />
die Taste.<br />
[26] | [27] Clapping 1, 2 | Rolling 1<br />
Durch einmaliges drücken dieser Taste aktivieren Sie die Clapping Funktion<br />
Modus 1, durch erneutes drücken Clapping Modus 2. Drücken Sie die<br />
Taste ein drittes mal, stoppt die Clapping Funktion und wechselt in den<br />
Rolling Modus 1.<br />
Hinweis:<br />
Diese Funktion kann nicht mit der Spot Funktion kombiniert werden.<br />
[28] Dehnen<br />
Drücken Sie diese Taste um die Dehn-Funktion zu starten. Um die Massage zu<br />
beenden drücken Sie erneut die Taste. Sie können den Abstand (WIDTH) der<br />
Massagerollen in jeweils 3 Stufen einstellen. (Schmal > Mittel > Breit)<br />
[32] STRENGTH<br />
Starten/Stoppen der Kneading Funktion. Hierbei können Sie die Massagestärke<br />
in 5 Stufen einstellen. Diese Funktion kann kombiniert werden mit Tapping,<br />
Clapping und Shiatsu.<br />
Einstellungen Luftdruckmassage<br />
[33] Intensität<br />
Mit dieser Taste können Sie die verschiedenen Intensitätsstufen der Luftdruckfunktion<br />
einstellen. (Level 1 > Level 2 > Level 3 > Level 4 > Level 5)<br />
[34] Kompressionsmassage (Ganzer Körper)<br />
Mit dieser Taste starten bzw. stoppen Sie die Kompressionsmassage am ganzen<br />
Körperbereich.<br />
[35] Schultern<br />
Mit dieser Taste starten bzw. stoppen Sie die Kompressionsmassage im Schulterbereich.<br />
[36] Rücken- und Sitzbereich<br />
Mit dieser Taste starten bzw. stoppen Sie die Kompressionsmassage im Rückenuns<br />
Sitzbereich.<br />
[37] Arme<br />
Mit dieser Taste starten bzw. stoppen Sie die Kompressionsmassage im Armbereich.<br />
[38] Waden<br />
Mit dieser Taste starten bzw. stoppen Sie die Kompressionsmassage im Wadenbereich.<br />
20 21<br />
Fernbedienung
Massagetechniken<br />
Massagetechniken<br />
Mit den verschiedenen Programmen simuliert der Sessel die Techniken einer<br />
traditionellen Handmassage:<br />
ROLLING<br />
Das Rolling ist eine angenehme Abwechslung zwischen Spannung und Lösung<br />
der Muskulatur und wirkt daher besonders beruhigend und entspannend.<br />
Diese Technik wird häufig zum Abschluss der Massage, zur Entspannung der<br />
Muskulatur und zur Erholung angewendet.<br />
SHiaTSU<br />
Shiatsu (Fingerdruck) ist eine in Japan entwickelte Form der Körpertherapie.<br />
Die Massagetechnik besteht aus sanften rhythmischen tiefer wirkenden Dehnungen<br />
und Rotationen. Shiatsu hat das Ziel, einzelne Punkte am Körper zu stimulieren<br />
und die Muskulatur zu mobilisieren.<br />
KNEADING<br />
Haut und Muskulatur werden entweder zwischen Daumen und Zeigefinger<br />
oder mit beiden Händen gefasst und geknetet. Diese Massagetechnik wird vor<br />
allem zum Lösen von Verspannungen verwendet.<br />
SWEDISH<br />
Ist eine Kombination aus Tapping und Clapping.<br />
KOMPRESSION<br />
Auf- und abschwellende Luftkissen bewirken eine pumpende Bewegung, die<br />
natürliche Muskelreflexe erzeugt. Besonders wohltuend auch im Waden- und<br />
Fußbereich.<br />
Music<br />
Zusätzlich entspannen und genießen mit der Musikfunktion.<br />
HEATING<br />
Eine tiefenwirksame und wärmeausstrahlende Wirkung bei der man perfekt<br />
entspannen kann. Durch die tief reichende Wirkung ist diese Funktion besonders<br />
wohltuend bei Muskelverspannungen.<br />
VIBRATION<br />
Die Vibration versetzt ganze Körperregionen in gleichmäßige Schwingungen<br />
die sich bis in die Tiefe fortsetzen. Anregend für den Kreislauf, wärmend und<br />
entspannend für die Muskulatur.<br />
Massagetechniken<br />
Tapping<br />
Beim TAPPING werden mit der Hand kante, der flachen Hand oder der Faust kurze<br />
klopfende Bewegungen ausgeführt. Dies fördert die Durchblutung der Haut<br />
und erweicht die angespannte der Muskulatur. Wird das Tapping auf höhe der<br />
Lunge durchgeführt verbessert dies die Schleimlösung in der Lunge.<br />
CLAPPING<br />
Beim CLAPPING wird durch leichtes Klopfen mit der hohlen Hand die Durchblutung<br />
der Muskulatur in der Tiefe gefördert. Gleichzeitig regt diese Massagetechnik<br />
das Nervensystem an. Das Clapping vermindert Spannungen und fördert die<br />
Straffung des Bindegewebes. Diese sanfte Massageart regt den Organismus an.<br />
Massagetechniken<br />
22 23
Störungssuche<br />
Gewährleistungsbestimmungen<br />
Störung<br />
Der Sessel ist am Stromnetz<br />
angeschlossen, aber weder<br />
Sessel noch Fernbedienung<br />
funktionieren.<br />
Behebung<br />
• Kontrollieren Sie die Verbindung<br />
vom Stromkabel<br />
• Vergewissern Sie sich, dass<br />
der Schalter am Sessel auf<br />
„I“ steht.<br />
Der Händler gewährt auf das umseitig beschriebene Produkt eine gesetzlich<br />
vorgeschriebene Gewährleistungszeit. Die Gewährleistung gilt<br />
ab dem Kaufdatum. Das Kaufdatum ist mit dem Kaufbeleg nachzuweisen.<br />
Der Händler wird die innerhalb Deutschlands erfassten Produkte, bei<br />
denen Fehler festgestellt wurden, kostenlos reparieren bzw. ersetzen.<br />
Hiervon nicht betroffen sind Verschleißteile wie z.B. Stoffabdeckungen.<br />
Voraussetzung dafür ist die Einsendung des fehlerhaften Gerätes mit<br />
Kaufbeleg vor Ablauf der Gewährleistungszeit.<br />
Störungssuche / Pflegehinweise / Lagerung<br />
Die Fernbedienung<br />
funktioniert, aber der Sessel<br />
reagiert nicht.<br />
Pflegehinweise<br />
• Bei zu langem Gebrauch<br />
kann der Sessel überhitzen.<br />
Schalten Sie ihn aus<br />
und lassen Sie ihn 30-50<br />
Minuten abkühlen.<br />
Sie haben ein aus hochwertigen Materialien hergestelltes Produkt erworben.<br />
Das erfordert eine entsprechende Pflege. Behandeln Sie die<br />
Oberflächen regelmäßig mit empfohlenen Pflegeprodukten, damit Sie<br />
lange Freude an Ihrem Sessel haben. Fragen Sie Ihren Händler nach<br />
Kunstleder- und Lederpflegeprodukten.<br />
Lagerung<br />
1. Empfohlene Lagerung: Trocken, staubfrei. Bitte Kabel aufwickeln.<br />
2. Nicht neben einer Heizung oder offenen Flamme lagern. Nicht der<br />
unmittelbaren Sonne aussetzen.<br />
Der Gewährleistungsanspruch entfällt, sofern nach Feststellung eines<br />
Fehlers, dieser z.B. durch äußere Einwirkung oder als Folge von Reparatur<br />
oder Änderung, die nicht vom Hersteller oder einem autorisierten<br />
Vertragshändler vorgenommen wurde, aufgetreten ist.<br />
Die Gewährleistung vom Händler beschränkt sich auf Reparatur bzw.<br />
Austausch des Produktes. Im Rahmen dieser Gewährleistung übernimmt<br />
der Hersteller bzw. Verkäufer keine weitergehende Haftung<br />
und ist nicht verantwortlich für Schäden, die durch die Missachtung<br />
der Bedienungsanleitung und /oder missbräuchliche Anwendung des<br />
Produktes entstanden sind.<br />
Stellt sich bei Überprüfung des Produktes durch den Hersteller heraus,<br />
dass das Gewährleistungsverlangen einen nicht von der Gewährleistung<br />
erfassten Fehler betrifft oder dass die Gewährleistungsfrist abgelaufen<br />
ist, sind die Kosten der Überprüfung und Reparatur vom Kunden<br />
zu tragen.<br />
<strong>Casada</strong> International GmbH<br />
Obermeiers Feld 3<br />
33104 Paderborn, Germany<br />
tel. (+49) (0 52 54) 9 30 98 - 0<br />
fax (+49) (0 52 54) 9 30 98 - 30<br />
info@casada.com<br />
www.casada.com<br />
Copyright Bilder und Texte unterstehen dem Copyright von CASADA<br />
International GmbH und dürfen ohne ausdrückliche Bestätigung nicht<br />
weiterverwendet werden.<br />
Copyright (c) 2013 CASADA International GmbH.<br />
Alle Rechte vorbehalten.<br />
Gewährleistungsbestimmungen<br />
24 25
congratulations!<br />
english<br />
With the purchase of this massage chair you have shown awareness of<br />
your health.<br />
In order for you to enjoy the advantages of your massage chair in the<br />
long term, we ask you to read and adhere to the instruction manual<br />
carefully.<br />
We wish you a lot of fun with your personal Kennedy IV.<br />
Since being established in 2000, the name CASADA stands for high<br />
quality products on the health-spa and fitness market. Today, CASADAequipment<br />
is available in 37 countries world-wide.<br />
Constant further development, an unmistakeable design and a focused<br />
orientation towards a better quality of life are what characterize CASADAproducts,<br />
as much as their unbeatable and reliable quality.<br />
26<br />
www.casada.com 27
Table of contents<br />
The Massage<br />
29 The Massage<br />
30 Safety instructions<br />
31 Installation<br />
38 Start up<br />
39 Technical data<br />
39 Conformity declaration<br />
We are all familiar with the soothing relaxation of tense muscles by a<br />
massage. There are obvious explanations for these processes inside the<br />
muscles, blood vessels and nerve fibres.<br />
table of contents<br />
40 Equipment/functions<br />
42 Remote control<br />
46 Massage techniques<br />
48 Troubleshooting<br />
48 Care instructions<br />
48 Storage<br />
49 Warranty conditions<br />
50 Notes<br />
In the body, there are two circulatory systems. The bloodstream, starting<br />
from the heart, supplies brain, organs and the muscular system<br />
with nutrients, whilst the lymphatic system ensures that metabolic<br />
products, dross and toxins can be washed out of the body.<br />
When the immune system is attacked by infections and viruses, the<br />
first thing the doctor does is palpating the lymph nodes, as these produce<br />
defence cells and react to this strain by swelling.<br />
Every massage stimulates this system, causes the body fluids to move,<br />
and thereby promotes the evacuation of harmful substances and the<br />
supply of oxygen and nutrients.<br />
The Massage<br />
28 29
safety instructions<br />
safety instructions<br />
Before using this massage chair, please read the instructions carefully<br />
to ensure perfect functioning and optimal effect. Please keep this instruction<br />
manual in a safe place!<br />
• The massage chair complies with the recognised principles of technology<br />
and the current security regulations.<br />
swelling of any kind as well as cancer. Consultation of your physician<br />
is recommended prior to any treatment of afflictions and ailments.<br />
• If you depend on electrical aids such as a pace maker, please consult<br />
your physician prior to usage in any case.<br />
• The equipment is maintenance free. Any incidental repairs may only<br />
be executed by an authorised expert. Inappropriate usage as well as<br />
unauthorised repairs are prohibited due to reasons of safety and will<br />
lead to the loss of warranty.<br />
• For safety reasons, do not put your fingers inside the massage heads.<br />
• Avoid touching the plug with wet hands.<br />
Installation<br />
• Avoid contact with water, high temperatures as well as direct exposure<br />
to sunlight and open fire.<br />
safety instructions<br />
• In case of a longer period of non-usage please unplug the equipment<br />
from the power supply to avoid risk of short circuit.<br />
• Do not use any damaged plugs, cables or loose sockets. If the plug<br />
or the cables are damaged they have to be replaced by the manufacturer,<br />
the service representative or qualified personnel. In case of<br />
malfunction please immediately interrupt the connection with the<br />
power supply. Misappropriation or wrongful usage will void all liability<br />
for damages.<br />
• Children should only use the massage chair under appropriate supervision.<br />
• In order to prevent excessive stress on muscles and nerves the recommended<br />
massage time of 30 minutes should not be exceeded.<br />
• Never use pointy or sharp objects near the massage chair.<br />
• Any massage – also massage by hand – has to be avoided during<br />
pregnancy and/or in case of one or more complaints in the area of<br />
the massage: recent injuries, thrombotic illnesses, inflammations and<br />
8 Airbags<br />
20 Airbags<br />
2 Heaters<br />
22 Airbags<br />
4 Reflexology rollers<br />
safety instructions / Installation<br />
30 31
Installation<br />
Installation<br />
[1]<br />
[2]<br />
[10]<br />
[9]<br />
[8]<br />
[7]<br />
• When you erect the armchair, please pay attention that the<br />
armchair has enough space in order to reach its lying position.<br />
• Placing a mat underneath the massage chair is advisable since<br />
the moving process might leave scratches on the floor surface.<br />
[3]<br />
[6]<br />
[4]<br />
[5]<br />
Note:<br />
• Unplug from outlet when installing the chair parts.<br />
[1] Neck Pad<br />
[2] Back Pad<br />
[3] Sidepanel<br />
[4] Rollers<br />
[5] Foodrest<br />
[6] Seat Pad<br />
[7] Armrest<br />
[8] Remote Control<br />
[9] Shoulder Pad<br />
[10] Speaker<br />
01. Unpacking the chair<br />
• Take the seat and the side panels out of the cardboard box.<br />
Installation<br />
Note:<br />
Always ask someone else to help when assembling the chair.<br />
Installation<br />
32 33
Installation<br />
Installation<br />
02. Connect the air hoses<br />
• Connect the air hoses on the<br />
side parts to those on the seat.<br />
(See sketch)<br />
04.<br />
• Repeat steps 2 and 3 for the installation of the other side parts.<br />
05. Attaching the remote control<br />
Sidepanel<br />
• Attach the control unit to<br />
the correct position and<br />
tighten the screws. (See<br />
sketch)<br />
03. Connect side panels<br />
• Insert the armrests into the chair at a 90° angle. Then push the<br />
mounting brackets (D) fully into the crossbar (C). (See sketch)<br />
06.<br />
• Adjust the holes (A) in the side parts so that they are parallel<br />
to the mount in order to screw them tightly to the frame. (see<br />
sketch)<br />
• Cut the cable ties which connect<br />
the stopper with the backrest and<br />
remove the packaging material<br />
from the control panel of the backrest<br />
(both can be found under the<br />
seat cushion).<br />
Installation<br />
Note: Make sure the installation is done carefully in order to<br />
prevent scratching<br />
(A)<br />
Gasket (0 6 x 18 x 2)<br />
Hexagon head screw (M 6 x 55)<br />
Spring washer (0 6)<br />
Installation<br />
34 35
Installation<br />
Installation<br />
07. Attaching the backrest<br />
• Lift the backrest and let it drop into the seat mount. Screw the<br />
flat-head screws (A) to both sides (B) of the chair. (See sketch)<br />
A. Flat-head screw (on the backrest)<br />
B. Mount (on the seat)<br />
09.<br />
• Remove the packaging material from the connections and insert<br />
the plugs in the correct position in the seat according to the<br />
markings. (See sketch)<br />
Bevor<br />
08.<br />
After<br />
• Bring the flat-head rivet together with the connecting rod and<br />
the support fork in the backrest, and attach both with a splint.<br />
Connect the cable which comes out of the backrest with the one<br />
from the seat part. (see sketch)<br />
10. Attaching the back and seat cushion<br />
1. Attach the back cushion using the<br />
velcro and zipper on the backrest.<br />
2. Attach the neck cushion using the<br />
velcro on the backrest.<br />
A. Connecting rod (on the backrest)<br />
B. Supporting fork (on the seat)<br />
C. Flat-head rivet<br />
D. Splint<br />
Cable<br />
(Music)<br />
11. Back Cushion<br />
• A separate back cushion to weaken the massage<br />
is already inserted into the backrest of the<br />
chair. If you prefer a stronger massage, remove<br />
this beforehand.<br />
Instalaltion<br />
Installation<br />
36 37
Installation<br />
Technical Data<br />
12. Moving and pushing the chair<br />
• Lift the footrest up.<br />
• Lift the chair at a 45° angle in order to move it using the<br />
rollers on the rear part of the chair.<br />
Measurements upright:<br />
Measurements reclined:<br />
Weight:<br />
Power source:<br />
Rated power:<br />
Operating time:<br />
automatic:<br />
manual:<br />
Colour:<br />
Certificates:<br />
145 x 91 x 32 cm<br />
187 x 91 x 94 cm<br />
115 kg<br />
AC 220 -240 V ~ 50 / 60 Hz<br />
300 W<br />
15 minutes<br />
30 minutes<br />
Creme or Black<br />
• Never move the chair when someone is sat on it.<br />
Instalaltion / Start up<br />
• Lay some padding under the chair on delicate floors in order to<br />
prevent damage.<br />
Start up<br />
Connect the cables<br />
• Please check the power plug before activation. If not already<br />
done, please connect the power cable with the chair (A) and<br />
subsequently plug the power plug into the power socket. Now<br />
turn on the chair by switching the switch to „I“ (B).<br />
(A)<br />
(B)<br />
Conformity Declaration<br />
Corresponds to the European guidelines 2006/95/EC.<br />
Technical Data / Conformity Declaration<br />
38 39
equipment / Functions<br />
equipment / Functions<br />
The Kennedy lV is the perfect combination of innovative technology,<br />
exclusive design and a sound system. Well-thought-out massage programs<br />
like the Zero Gravity Function from space technology to relieve<br />
the spine make it a reliable and attractive partner.<br />
With the Akkupressurmassage to back, seat, calves and feet you will<br />
enjoy a tailored to your body, individual massage. Thanks to the innovative<br />
3D massage technology a massage from the neck to the tailbone<br />
is guaranteed. A massage chair that leaves nothing to be desired<br />
and gives you the relaxation you deserve.<br />
The massage chair has a special massage unit adjusted to the human<br />
spine. The massage rollers possess a locking mechanism which enhances<br />
the effect of the acupressure massage.<br />
The individually designed back part of the massage chair is automatically<br />
adjustable between 115° - 160°. Similarly, also the footrest can be<br />
adjusted from 0° - 90°.<br />
With the timer function you can optionally adjust the desired duration<br />
of the massage.<br />
The LCD display will light up in the dark which provides you with the<br />
opportunity to activate different programs at any time.<br />
The massage function will switch off automatically after 15 minutes.<br />
In order to increase the lifespan of the motors, please only switch on<br />
the massage functions again after a minimum of 30 minutes rest has<br />
passed. This gives the motors time to cool down.<br />
Also, you should allow your body a period of rest. We recommend a<br />
maximum of only three massages a day in order to not overstress your<br />
muscles.<br />
equipment / Functions<br />
For your own safety we equip the machines with a protection against<br />
overheating. Heat is created in the motors when under great stress and<br />
excessive pressure. Before this could create any kind of danger the machines<br />
will switch off automatically and will only switch on again after<br />
an appropriate rest of 30 to 50 minutes.<br />
equipment / Functions<br />
40 41
emote control<br />
remote control<br />
[19]<br />
[3] Zero-G<br />
You can move the massage chair into a complete lying position with this button.<br />
Feet and head are in line. The massage is at its strongest in this position as the<br />
whole body weight is resting on the massage units.<br />
Note:<br />
The ZERO-G function cannot be combined with the Slumber and Thai automatic<br />
programs.<br />
[17]<br />
[18]<br />
[20]<br />
[21]<br />
[24/25]<br />
[26/27]<br />
[1]<br />
[3]<br />
[22/23]<br />
[29]<br />
[33]<br />
[35]<br />
[28]<br />
[30]<br />
[32]<br />
[37]<br />
[4] Pause<br />
You can briefly interrupt a program during a massage at any time by using the<br />
pause button. At the same time the timer stops and the LCD display flashes. The<br />
massage chair is in standby mode at this time so only the lying position and the<br />
foot rest may be adjusted. In order to continue the massage press the PAUSE<br />
button again.<br />
[2] [4]<br />
[7]<br />
[5]<br />
[8]<br />
[6]<br />
[36]<br />
[31]<br />
[38]<br />
[34]<br />
[5] Footrest<br />
Footrest angle adjustment<br />
By pressing this button you can adjust the angle of the footrest to an optimal<br />
position. Once you have found the best position, press the button again in order<br />
to stop the process.<br />
[12]<br />
[9] [14]<br />
[10]<br />
[11]<br />
[15]<br />
[16]<br />
[13]<br />
Footrest length adjustment<br />
By pressing and holding these buttons you can adjust the footrest to your individual<br />
body size. (When selecting an automatic program, the footer of your<br />
body length adjusts automatically.)<br />
[6] Lying position<br />
You can select the desired lying and sitting position with this button.<br />
[7] Positioning the massage heads<br />
You can select / vary the position of the massage heads using the buttons.<br />
For even more comfort during the massage the user can make further adjustments<br />
to the height of the massage by pressing this button after the scan<br />
program is carried out. The massage rollers move up and down until the best<br />
position is reached and you release the button.<br />
remote control<br />
[1] Start/Stop<br />
You can switch on the control unit with this button. When the control lights<br />
flash, the chair is now on standby. To start, select any massage function. The<br />
timer automatically starts a 15 minute run time. To stop the massage, press this<br />
key again. The massage heads then automatically move back to the starting position.<br />
[2] Timer<br />
Once a function is selected there is an automatic run time of 15 minutes. By pressing<br />
the timer button you can change the intervals to “20>25>30>5>10>15>20”<br />
minutes.<br />
Note:<br />
To switch off the signal tones press the timer button for 5 seconds. To activate<br />
the tones press the button again for 5 buttons.<br />
[8] 3D setting<br />
You can regulate the pressure point of the massage heads with this button.<br />
Press the “+” in order to move the massage heads out and “-” to move the massage<br />
heads in.<br />
Automatic program for the whole back<br />
When you start one of the 10 automatic programs the “Auto Scan” starts to scan<br />
your body structure. During this process you have the option to manually make<br />
size settings and adjust the massage seat to your requirements.<br />
[9] REFRESH [10] SLUMBER [11] BALINESE [12] DEEP TISSUE [13] THAI<br />
[14] CALM [15] RECOVERY [16] CHINESE [17] SHOULDER [18] LUMBAR<br />
Note:<br />
The SLUMBAR and THAI programs are not suitable for older people.<br />
remote control<br />
42 43
emote control<br />
remote control<br />
remote control<br />
[19] Reflexology for the foot area<br />
You can start and stop reflexology in the foot area with this button.<br />
Note:<br />
During the automatic program the rolling massage can be activated or deactivated.<br />
[20] VIBRATION<br />
You can start and stop the vibration massage in the seat area with this button.<br />
Note:<br />
During the automatic program the vibration can be activated or deactivated.<br />
[21] HEAT<br />
You can activate and deactivate the warmth in the lumbar area with this button.<br />
Note:<br />
During the automatic program the heat can be activated or deactivated.<br />
Partial / manual massage<br />
[22] | [23] KNEADING Modus 1, 2 | Swedish Modus 1, 2<br />
By pressing this button once, you activate Kneading function mode 1, by pressing<br />
it again you activate Kneading mode 2. If you press the button a third time<br />
the Kneading function stops and switches to Swedish mode 1. To reach Swedish<br />
mode 2 press the button again.<br />
[24] | [25] Tapping 1, 2 | SHIATSU 1, 2<br />
By pressing this button once, you activate Tapping function mode 1, by pressing<br />
it again you activate Tapping mode 2. If you press the button a third time the<br />
Tapping function stops and switches to Shiatsu mode 1. To reach Shiatsu mode<br />
2 press the button again.<br />
[26] | [27] Clapping 1, 2 | Rolling 1<br />
By pressing this button once, you activate Clapping function mode 1, by pressing<br />
it again you activate Clapping mode 2. If you press the button a third time<br />
the Clapping function stops and switches to<br />
Rolling mode 1.<br />
Note:<br />
This function cannot be combined with the Spot function.<br />
[28] Stretching<br />
Press this button to start the Stretch function. To end the massage press this key<br />
again. You can adjust the distance (WIDTH) of the massage rollers in 3 different<br />
levels. (Narrow > medium > broad)<br />
[29] SPOT/PARTIAL<br />
Press the button once to activate the Spot Massage. Press the button again<br />
to switch to partial massage. You can position the massage rollers during the<br />
selective or partial masage at the desired section of the back. /<br />
You can massage different sections in an area of approx. 8 cm with the partial<br />
function: Neck, lumber vertebrae or lower body area.<br />
[30] WIDTH<br />
You can regulate the distance between the massage rollers during the respective<br />
settings such as Tapping, Clapping, Rolling or Shiatsu.<br />
(Narrow > medium > broad)<br />
[31] SPEED<br />
With this button you can regulate the speed during the respective<br />
settings such as Tapping, Clapping, Rolling or Shiatsu.<br />
(Level 1 > Level 2 > Level 3 > Level 4 > Level 5)<br />
[32] STRENGTH<br />
Starting/stopping the kneading function. You can set the strength of the massage<br />
at 5 different levels here. This function can be combined with Tapping, Clapping<br />
and Shiatsu.<br />
Air pressure massage settings<br />
[33] Intensity<br />
You can adjust the different intensity levels of the air pressure function with this<br />
button. (Level 1 > Level 2 > Level 3 > Level 4 > Level 5)<br />
[34] Compression massage (whole body)<br />
You can start and stop the compression massage of the whole body with this<br />
button.<br />
[35] Shoulders<br />
You can start and stop the compression massage of the shoulder area with this<br />
button.<br />
[36] Back and seat area<br />
You can start and stop the compression massage of the back and seat area with<br />
this button.<br />
[37] Arms<br />
You can start and stop the compression massage of the arm area with this button.<br />
[38] Calves<br />
You can start and stop the compression massage of the calf area with this button.<br />
Note:<br />
44 45<br />
remote control
massage Techniques<br />
massage Techniques<br />
With the different programs the chair imitates the techniques of a traditional<br />
hand massage:<br />
ROLLING<br />
The Rolling is a pleasant change between tension and release of the muscles<br />
and therefore is especially calming and relaxing. This technique is often used as<br />
a conclusion of the massage for relaxation of the muscles and for regeneration.<br />
CLAPPING<br />
During Clapping the circulation in the deep muscles is improved by light knocking<br />
with the hollow hand. Simultaneously this massage technique also stimulates<br />
the nerve system. The Clapping reduces tension and promotes the<br />
tightening of the connective tissue. This gentle kind of massage stimulates the<br />
organism.<br />
KNEADING<br />
Skin and muscles are either captured or kneaded between thumb and index<br />
finger or with both hands. This massage technique is especially used to relieve<br />
tension.<br />
Music<br />
Additionally, relax and enjoy the music function.<br />
KOMPRESSION<br />
Swelling and deflating of the air bags causes a pumping motion, which creates<br />
natural muscle reflexes. This is especially pleasant in the calf- and foot area.<br />
SWEDISH<br />
Combination of TAPPING und CLAPPING.<br />
HEATING<br />
A deep and warmth-radiating effect, where one can relax perfectly. This function<br />
is especially enjoyable in case of muscle tension due to its deep effect.<br />
SHiaTSU<br />
SHIATSU (finger pressure) is a form of body therapy developed in Japan. The<br />
massage technique consists out of gentle rhythmic twists and rotations with<br />
a deep effect. SHIATSU aims to stimulate individual points in the body and to<br />
mobilise the muscles.<br />
massage Techniques<br />
VIBRATION<br />
The Vibration transforms entire body regions into even vibrations, which continue<br />
all the way into the depths. Stimulating for circulation, warming and relaxing<br />
for the muscles.<br />
Tapping<br />
During the Tapping short knocking movements are performed with the edge of<br />
the hand, the flat hand or the fist. They enhance the circulation of the skin and<br />
change the tension in the muscles. If Tapping is performed at the level of the<br />
lungs, it will relieve mucus build-up in the lungs.<br />
massage Techniques<br />
46 47
Troubleshooting<br />
warranty conditions<br />
Troubleshooting / Care Instructions / Storage<br />
Error<br />
The massage chair cannot<br />
operate even though it<br />
has been connected to the<br />
power supply.<br />
During operation, the remote<br />
control is working but not<br />
the Massage Chair.<br />
Adjustment<br />
Care instructions<br />
• Check whether the plug<br />
is well connected and<br />
working properly.<br />
• Check whether the switch<br />
of the massager chair is<br />
on “I”.<br />
• The massage chair<br />
might be overheated<br />
after prolonged use. It will<br />
automatically cool down<br />
and return to its normal<br />
condition. Please turn OFF<br />
the power and let the chair<br />
cool down for 30 to 50<br />
minutes.<br />
You have purchased a product made from high-quality materials.<br />
It requires appropriate care. Regularly treat the surfaces with the recommended<br />
care products to be able to enjoy your chair for a long<br />
time. Contact your supplier about synthetic leather and leather care<br />
products.<br />
Storage<br />
1. Recommended storage: dry, dust-free. Please roll up the wire.<br />
2. Do not store next to a heater or open fire. Do not expose to direct<br />
sunlight.<br />
The dealer grants the statutory warranty period on the product described<br />
overleaf. The warranty applies from the date of purchase. The date<br />
of purchase is demonstrated by the sales receipt.<br />
The dealer is to repair or replace products registered within Germany<br />
which are found to be defective free of charge. Parts subject to wear<br />
and tear such as cloth covers are not covered. To assert your claim, simply<br />
return the defective product with the sales receipt before the end<br />
of the warranty period.<br />
The warranty claim does not apply if it is established that a defect has<br />
occurred e.g. through external influence or as a result of repair or alteration<br />
not carried out by the manufacturer or an authorized dealer.<br />
The warranty granted by the seller is limited to repair or replacement<br />
of the product. Under this warranty, the manufacturer or seller has no<br />
further liability and is not responsible for damage caused by disregard<br />
of the operating instructions and/or improper use of the product.<br />
If inspection of the product by the seller reveals that the warranty claim<br />
relates to a defect not covered by the warranty or that the warranty period<br />
has expired, the cost of the inspection and repair are to be borne<br />
by the customer.<br />
<strong>Casada</strong> International GmbH<br />
Obermeiers Feld 3<br />
33104 Paderborn, Germany<br />
phone (+49) (0 52 54) 9 30 98 - 0<br />
fax (+49) (0 52 54) 9 30 98 - 30<br />
info@casada.com<br />
www.casada.com<br />
Copyright Images and texts are subject to the copyright of <strong>Casada</strong><br />
International GmbH and may not be used for other purposes without<br />
express confirmation.<br />
Copyright (c) 2013 <strong>Casada</strong> International GmbH.<br />
All rights reserved.<br />
warranty conditions<br />
48 49
Notizen / Notes<br />
Notizen / Notes<br />
50 51