Operating Instructions Run Around⢠11-BA201, 11-BA202 - Instep.net
Operating Instructions Run Around⢠11-BA201, 11-BA202 - Instep.net
Operating Instructions Run Around⢠11-BA201, 11-BA202 - Instep.net

Create successful ePaper yourself
Turn your PDF publications into a flip-book with our unique Google optimized e-Paper software.
<strong>Operating</strong> <strong>Instructions</strong> <strong>Run</strong> Around <strong>11</strong>-<strong>BA201</strong>, <strong>11</strong>-<strong>BA202</strong>...page 2<br />
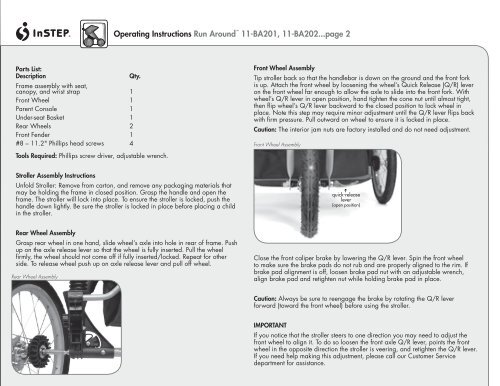
Parts List:<br />
Description<br />
Frame assembly with seat,<br />
canopy, and wrist strap 1<br />
Front Wheel 1<br />
Parent Console 1<br />
Under-seat Basket 1<br />
Rear Wheels 2<br />
Front Fender 1<br />
#8 – <strong>11</strong>.2" Phillips head screws 4<br />
Qty.<br />
Tools Required: Phillips screw driver, adjustable wrench.<br />
Front Wheel Assembly<br />
Tip stroller back so that the handlebar is down on the ground and the front fork<br />
is up. Attach the front wheel by loosening the wheel’s Quick Release (Q/R) lever<br />
on the front wheel far enough to allow the axle to slide into the front fork. With<br />
wheel’s Q/R lever in open position, hand tighten the cone nut until almost tight,<br />
then flip wheel’s Q/R lever backward to the closed position to lock wheel in<br />
place. Note this step may require minor adjustment until the Q/R lever flips back<br />
with firm pressure. Pull outward on wheel to ensure it is locked in place.<br />
Caution: The interior jam nuts are factory installed and do not need adjustment.<br />
Front Wheel Assembly<br />
Stroller Assembly <strong>Instructions</strong><br />
Unfold Stroller: Remove from carton, and remove any packaging materials that<br />
may be holding the frame in closed position. Grasp the handle and open the<br />
frame. The stroller will lock into place. To ensure the stroller is locked, push the<br />
handle down lightly. Be sure the stroller is locked in place before placing a child<br />
in the stroller.<br />
quick-release<br />
lever<br />
(open position)<br />
Rear Wheel Assembly<br />
Grasp rear wheel in one hand, slide wheel’s axle into hole in rear of frame. Push<br />
up on the axle release lever so that the wheel is fully inserted. Pull the wheel<br />
firmly, the wheel should not come off if fully inserted/locked. Repeat for other<br />
side. To release wheel push up on axle release lever and pull off wheel.<br />
Rear Wheel Assembly<br />
Close the front caliper brake by lowering the Q/R lever. Spin the front wheel<br />
to make sure the brake pads do not rub and are properly aligned to the rim. If<br />
brake pad alignment is off, loosen brake pad nut with an adjustable wrench,<br />
align brake pad and retighten nut while holding brake pad in place.<br />
Caution: Always be sure to reengage the brake by rotating the Q/R lever<br />
forward (toward the front wheel) before using the stroller.<br />
IMPORTANT<br />
If you notice that the stroller steers to one direction you may need to adjust the<br />
front wheel to align it. To do so loosen the front axle Q/R lever, points the front<br />
wheel in the opposite direction the stroller is veering, and retighten the Q/R lever.<br />
If you need help making this adjustment, please call our Customer Service<br />
department for assistance.<br />
M3_double_Platform.indd 3<br />
9/26/05 3:54:17 PM