230ee/300ee 230ee/300ee - Invacare
230ee/300ee 230ee/300ee - Invacare
230ee/300ee 230ee/300ee - Invacare

You also want an ePaper? Increase the reach of your titles
YUMPU automatically turns print PDFs into web optimized ePapers that Google loves.
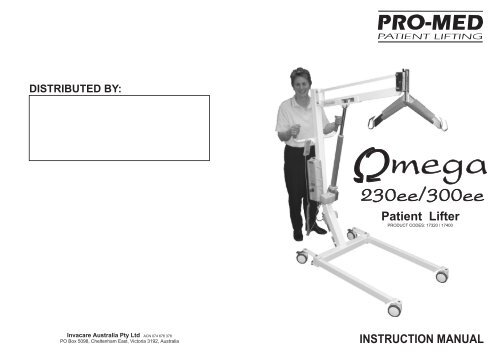
DISTRIBUTED BY:<br />
mega<br />
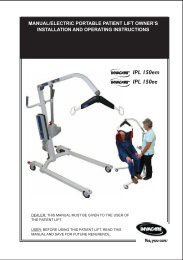
<strong>230ee</strong>/<strong>300ee</strong><br />
Patient Lifter<br />
PRODUCT CODES: 17320 / 17400<br />
<strong>Invacare</strong> Australia Pty Ltd ACN 074 676 378<br />
PO Box 5098, Cheltenham East, Victoria 3192, Australia<br />
INSTRUCTION MANUAL
Notes<br />
Contents<br />
Preface ................................................... 3<br />
Intended Purpose.......................... 4<br />
Pro-Med Credentials...................... 5<br />
Warranty ..................................... 6<br />
Key to Symbols........................... 7<br />
Getting Started ....................................... 9<br />
Documentation.......................... 10<br />
Assembly Instructions .............. 11<br />
Fitting Spreader or Pivot...............12<br />
Features ............................................... 13<br />
Overview ................................... 14<br />
Specifications <strong>230ee</strong> ................ 15<br />
Specifications <strong>300ee</strong> ................ 16<br />
Mechanical Features ................ 17<br />
Attachment Options .................. 18<br />
Lifting Cradle / Frame ......... 19-20<br />
Floor Lift / Frame ................. 21-22<br />
Weighing Device ...................... 23<br />
Slings ....................................... 24<br />
Lifting ................................................... 25<br />
Safety Precautions ................... 26<br />
General Purpose Slings<br />
Selecting the Sling .............. 27-29<br />
Lifting Procedures ............... 30-33<br />
Pivot Slings<br />
Selecting the Sling .............. 34-35<br />
Lifting Procedures ............... 36-40<br />
Maintenance ........................................ 41<br />
Mobilette Control Unit............ 42-45<br />
Recharging............................... 46<br />
Sling Care ................................ 47<br />
Lifter Maintenance ............... 48-50<br />
Trouble Shooting ...................... 51<br />
Spare Parts............................ 52-56<br />
Distributors .................................... 57-60<br />
Log Book ........................................ 61-67<br />
Notes .................................................... 68<br />
68<br />
1
Log Book<br />
TO BE COMPLETED AFTER EACH INSPECTION/SERVICE<br />
Service Type<br />
Condition Report<br />
Pre-Delivery<br />
Periodic<br />
Inspection<br />
Minor<br />
Major<br />
Date<br />
Inspected By<br />
Action Taken<br />
Signature<br />
Service Type<br />
Condition Report<br />
Pre-Delivery<br />
Periodic<br />
Inspection<br />
Minor<br />
Major<br />
Date<br />
Inspected By<br />
Action Taken<br />
Signature<br />
2 67
Log Book<br />
TO BE COMPLETED AFTER EACH INSPECTION/SERVICE<br />
Service Type<br />
Pre-Delivery<br />
Periodic<br />
Inspection<br />
Date<br />
Minor<br />
Major<br />
Condition Report<br />
Preface<br />
Intended Purpose............................ 4<br />
Pro-Med Credentials...................... 5<br />
Warranty...................................... 6<br />
Key to Symbols............................... 7<br />
Inspected By<br />
Action Taken<br />
Signature<br />
Service Type<br />
Condition Report<br />
Pre-Delivery<br />
Minor<br />
Periodic<br />
Inspection<br />
Major<br />
Date<br />
Inspected By<br />
Action Taken<br />
Signature<br />
66<br />
3
Preface<br />
Log Book<br />
Following intended purpose is as declared for the ARTG Listing.<br />
FLOOR LIFTERS ARTG LISTING: 98422<br />
Intended Purpose of Patient Lifting Devices:<br />
Is to be operated by a qualified carer in conjunction with an appropriate<br />
Pro Med sling and accessories to move or transfer patients with<br />
disabilities who are within the capacity indicated on the device and the<br />
carer using the device to guidelines identified in the relevant device<br />
instruction manual.<br />
TO BE COMPLETED AFTER EACH INSPECTION/SERVICE<br />
Service Type<br />
Pre-Delivery<br />
Periodic<br />
Inspection<br />
Date<br />
Minor<br />
Major<br />
Condition Report<br />
Stand up Lifters: ARTG LISTING: 98427<br />
Inspected By<br />
Action Taken<br />
Intended Purpose of Patient Stand up Lifter Devices:<br />
Is to be operated by a qualified carer in conjunction with an appropriate<br />
Pro Med sling and accessories to assist a patient with disabilities in<br />
standing from a sitting position transferring the patient to another device<br />
and assist the carer to reseat the patients who is within the capacity<br />
indicated on the device and the usage guidelines identified in the<br />
relevant device instruction manual. Other devices i.e. the walking tutor<br />
can be fitted to these devices to assist patients with walking with the<br />
assistance of a qualified carer to operate the device within its specified<br />
capabilities identified in relevant device instruction manuals.<br />
Signature<br />
Service Type<br />
Pre-Delivery<br />
Periodic<br />
Inspection<br />
Minor<br />
Major<br />
Condition Report<br />
Date<br />
Slings And Accessories: ARTG LISTING: 98421<br />
Intended Purpose of the Slings and Accessories Device:<br />
Is to be used by a qualified carer in conjunction with an appropriate Pro<br />
Med patient lifting device to support patients with disabilities who are<br />
within the capacity indicated on the sling from one device to another and<br />
the carer adhering to the usage guidelines identified in the relevant<br />
slings instruction manual.<br />
Inspected By<br />
Signature<br />
Action Taken<br />
4<br />
65
Log Book<br />
TO BE COMPLETED AFTER EACH INSPECTION/SERVICE<br />
Service Type<br />
Pre-Delivery<br />
Periodic<br />
Inspection<br />
Date<br />
Inspected By<br />
Signature<br />
Minor<br />
Major<br />
Condition Report<br />
Action Taken<br />
Preface<br />
PRO-MED Credentials<br />
• Australian Therapeutic Goods Listing, Certificate of Listing AUST L 42882<br />
• FDA Listing A804934 (USA)<br />
• FDA Registration 9613615 (USA)<br />
• CE Mark (European Union Listing)<br />
• Global operations for in-warranty and out-of-warranty service support.<br />
• Each finished lifter is individually tested in our laboratory. No lifter is<br />
delivered without a signed Quality Test Certificate bearing the serial<br />
number of that unit.<br />
• Lifting capacities 127kg/280lb to 300kg/660lb. Engineering safety factor<br />
exceeds European Standards.<br />
• Each machine is operated by leading edge electrical or hydraulic technology.<br />
• Complete range of slings and supports designed and manufactured by<br />
Pro-Med using medical quality padding and fabrics.<br />
• The Australian Government endorses <strong>Invacare</strong> Australia for its medical<br />
equipment<br />
export marketing program.<br />
Service Type<br />
Condition Report<br />
Pre-Delivery<br />
Periodic<br />
Inspection<br />
Minor<br />
Major<br />
Date<br />
Inspected By<br />
Action Taken<br />
Signature<br />
64<br />
5
Warranty<br />
Preface<br />
<strong>Invacare</strong> Australia Pty Ltd warrants its products to be free from defects in<br />
material and workmanship under normal use and service and will, within the<br />
periods stated below from the date of purchase, repair or replace, without cost<br />
to the original customer, any part, assembly, or portion thereof which shall be<br />
returned to Pro-Med and from our inspection, shows to be defective.<br />
Patient Lifter including Electronics / Hydraulics .. 2 years<br />
Weighing Devices ................................................ 1 year<br />
Accessories on Lifter ........................................... 2 years<br />
Slings ................................................................... 1 year<br />
Batteries ............................................................... 3 months<br />
Log Book<br />
TO BE COMPLETED AFTER EACH INSPECTION/SERVICE<br />
Service Type<br />
Pre-Delivery<br />
Periodic<br />
Inspection<br />
Date<br />
Minor<br />
Major<br />
Condition Report<br />
No warranty claim shall apply where the product or any part thereof has been<br />
altered, varied, modified, or damaged either accidentally or through improper<br />
or negligent use, or repaired or serviced by any persons not accredited by the<br />
Authorised Distributor. Pro-Med Slings void warranty if not laundered as per<br />
instructions on the Sling Label.<br />
It is the responsibility of the Purchaser to train and instruct new staff on the<br />
proper use of the products. Warning: It is the responsibility of the Purchaser to<br />
select the appropriate Pro-Med Lifter and Pro-Med Sling to address the lifting<br />
needs of an individual. An incorrect selection may cause injury. If in doubt,<br />
seek input from a suitably qualified therapist.<br />
<strong>Invacare</strong> Australia disclaims any responsibility for accidents, mishaps or injury<br />
caused by the combination of Pro-Med products with another manufacturer’s<br />
equipment.<br />
Inspected By<br />
Signature<br />
Service Type<br />
Pre-Delivery<br />
Minor<br />
Action Taken<br />
Condition Report<br />
Periodic<br />
Inspection<br />
Major<br />
Date<br />
Inspected By<br />
Action Taken<br />
Signature<br />
6<br />
63
Log Book<br />
TO BE COMPLETED AFTER EACH INSPECTION/SERVICE<br />
Preface<br />
Key to Symbols<br />
The following symbols are used on lifter and attachment labels:<br />
Service Type<br />
Pre-Delivery<br />
Minor<br />
Condition Report<br />
The symbol required to be displayed on regulated products for<br />
sale on the European Market. It indicates that the product<br />
complies with applicable European Directives related to health,<br />
safety, environment and consumer protection.<br />
Periodic<br />
Inspection<br />
Date<br />
Major<br />
Safe Working Load. Represents the maximum load the lifter is<br />
SWL rated at for safe operation.<br />
The following symbols are used on sling labels and relate to washing<br />
instructions:<br />
Inspected By<br />
Action Taken<br />
Wash at maximum<br />
temperature 60 o C<br />
(140 o F) permanent<br />
press cycle.<br />
Do not dry clean.<br />
Signature<br />
Wash at maximum<br />
temperature 85 o C<br />
(198 o F) permanent<br />
press cycle.<br />
Dry cleanable.<br />
Do not tumble dry.<br />
Service Type<br />
Condition Report<br />
Do not use bleach.<br />
Do not iron.<br />
Pre-Delivery<br />
Periodic<br />
Inspection<br />
Minor<br />
Major<br />
Please refer to individual sling labels for complete instructions regarding<br />
washing and laundering.<br />
Date<br />
Inspected By<br />
Action Taken<br />
Signature<br />
62<br />
7
Log Book<br />
Customer Name<br />
Customer Address<br />
Product Name Serial No<br />
Date of Purchase Warranty Period<br />
Distributed By<br />
Owner:<br />
• Ensure the patient lifter is serviced regularly<br />
(refer Lifter Maintenance, page 33).<br />
• Contact an Authorised Pro-Med Distributor /<br />
Service Agent immediately if there are any<br />
problems with the operation of the patient<br />
lifter.<br />
• Ensure the Log Book is completed and<br />
signed.<br />
• Record any repairs required.<br />
• Withdraw the patient lifter from service if<br />
inspection reveals that user safety is<br />
jeopardised in any way from use of the<br />
patient lifter.<br />
• Ensure ongoing servicing after the Warranty<br />
Period is maintained by agreement between<br />
you and an Authorised Pro-Med Distributor /<br />
Service Agent.<br />
Check List<br />
Authorised Pro-Med Distributor /<br />
Service Agent:<br />
• Ensure the patient lifter is serviced in<br />
accordance with the Manufacturer’s<br />
recommendations.<br />
• Ensure the Log Book is completed and<br />
signed.<br />
• Record any repairs required.<br />
• Advise the Owner to withdraw the patient<br />
lifter from service if inspection reveals that<br />
user safety is jeopardised in any way from<br />
use of the patient lifter.<br />
• Ensure ongoing servicing after the Warranty<br />
Period is maintained by agreement between<br />
you and the Owner.<br />
8 61
Distributors<br />
INTERNATIONAL<br />
Canada<br />
Blue Leaf Healthcare<br />
Unit 2, 6104-82 Avenue, Edmonton, Alberta T6B OE7<br />
Tel: 1780 435 4951 Fax: 1780 468 1946<br />
Korea<br />
Pro-Med Korea Pty Ltd<br />
401 Hando Building, 942 Donopk Dong, Kangnam-GU, Seoul<br />
Tel: 822 3462 9601 Fax: 822 3462 9373<br />
Getting Started<br />
Documentation.......................... 10<br />
Assembly Instructions .............. 11<br />
Fitting Spreader or Pivot...............12<br />
New Zealand<br />
Active Rehab Equipment<br />
25 Rennie Drive, Airport Oaks, Mangere<br />
Tel: 649 256 4800 Fax: 649 256 0055<br />
Rehab Equipment Company<br />
260 King Edward Street, Dunedin<br />
Tel: 643 455 3321 Fax: 643 455 3322<br />
South Africa<br />
G.I.S. PTY LTD<br />
26 William Campbell Drive, La Lucia, KwaZulu Natal 4051<br />
Tel: (031) 5628875 Fax: (031) 5723799<br />
United Kingdom<br />
Park House Healthcare<br />
Bradford Road, Birstall, Batley West, Yorkshire WF17 9PH<br />
Tel: 44 845 0600 333 Fax: 44 845 3442 640<br />
USA<br />
Alpha Modalities<br />
700 NW 42nd Street Suite 207, Seattle, Washington 98107<br />
Tel: 1800 273 5749 Fax: 1206 374 2476<br />
60<br />
9
Getting Started<br />
Documentation<br />
With each lifter you should receive the following<br />
documents:<br />
• this Instruction Manual;<br />
• a Test Certificate; and<br />
• a Warranty / Registration Card.<br />
Victoria<br />
Linds Rehabilitation Equipment<br />
58-60 Star Crescent, Hallam VIC, 3803<br />
Tel: (03) 9796 3399 Fax: (03) 9796 3313<br />
Western Australia<br />
River Abilities<br />
29 Alexandra Place, Bentley WA, 6102<br />
Tel: (08) 9350 6600 Fax: (08) 9350 5299<br />
Distributors<br />
Warranty/Registration Card<br />
The tear-off Registration Card must be completed and<br />
returned to Pro-Med within fourteen days of purchase.<br />
10<br />
59
Distributors<br />
AUSTRALIA<br />
New South Wales / ACT<br />
Active Mobility Systems<br />
30 James Street, Lidcombe, NSW, 2141<br />
Tel: (02) 9649 2111 Fax: (02) 9649 8506<br />
Northern Territory<br />
Mobility & Rehabilitation Services (North)<br />
3/6 Beresford Road, Yarrawonga NT, 0810<br />
Tel: (08) 8932 1900 / 1966 Fax: (08) 8932 1922<br />
Mobility & Rehabilitation Services (South)<br />
6 Fogarty Street, Alice Springs, NT, 0870<br />
Tel: (08) 8952 3599 Fax: (08) 8952 4833<br />
South Australia<br />
Grajen Medical<br />
376-380 South Road, Richmond SA, 5033<br />
Tel: (08) 8344 0100 Fax: (08) 8234 8883<br />
Queensland<br />
Active Medical Supplies<br />
35 Southgate Avenue, Cannon Hill, Qld, 4170<br />
Tel: (07) 3899 8887 Fax: (07) 3899 8825<br />
Independent Living Solutions<br />
8 Keane Street, Currajong, Townsville, Qld, 4812<br />
Tel: (07) 4728 1200 Fax: (07) 4728 1201<br />
Medtech Mobility Equipment<br />
18 Prescott Street, Toowoomba, Qld, 4350<br />
Tel: (07) 4639 3977 Fax: (07) 4659 5953<br />
Tasmania<br />
Tasmanian Medical Supplies<br />
40 Brisbane Street, Hobart, Tas, 7000<br />
Tel: (03) 6234 9777 Fax: (03) 6234 8452<br />
Assembly Instructions<br />
All Pro-Med lifters are fully assembled, load tested and certified at the factory<br />
before being partially dismantled for shipping. Follow these instructions to<br />
assemble your Omega <strong>230ee</strong> / <strong>300ee</strong>.<br />
Tools required: Spanners - 17mm AF, 16mm AF, 2 x 13mm AF<br />
Hexagon Wrench - 3.00mm AF<br />
1. Remove lifter components from packing and lay out on carpeted area.<br />
2. Fit Mast Assembly into Mast Holder of chassis. Ensure that the Mast is<br />
fully engaged in the Mast Holder. Tighten the Clamp Screw to prevent<br />
movement of the Mast.<br />
3. Attach Push Handle with M8 Screws, Nuts and Washers packed with<br />
the handle.<br />
4. Assemble Boom to Mast with M10 x 75 Bolt and Washer. Assistance<br />
may be required to support the outer end of the Boom whilst fitting.<br />
Tighten nuts to clamp inner bush to clevis.<br />
5. Attach Boom to top of Actuator with M10 Hex Bolt, Nut and Washer.<br />
Tighten, taking care not to crush top Actuator hole.<br />
6. Attach electrics Mounting Rail to the Mast if required. Loosen the three<br />
screws in the left side of the Mast, fit the Rail and re-tighten the Screws.<br />
7. Mount the Control Box by sliding it down firmly onto the lower lugs of the<br />
Mounting Rail. Secure with M5 Socket Head Cap Screw.<br />
8. Plug the Main Actuator into Port 1 on the underside of the Control Box<br />
and the Leg Spreading Actuator into Port 2<br />
9. Plug the Handset Lead into the large socket on the underside of the<br />
Control Box. Note, this socket is keyed so that the plug must be<br />
correctly orientated before it will enter. When aligned, press home<br />
firmly. A smear of Vaseline on the O-Ring may assist if the plug is tight.<br />
10. Clip Battery Pack onto Control Box and check operation of the Actuators.<br />
The Red Emergency Stop Button must be released for the Actuators to<br />
function properly. Turn the Knob 1/4 turn clockwise to release.<br />
Refer diagram overleaf.<br />
Getting Started<br />
58<br />
11
Getting Started<br />
Distributors<br />
Fitting a Spreader Bar or Pivoting Frame<br />
1. Remove the spreader bar shaft from the boom end fitting.<br />
2. Insert the spreader bar shaft through the spreader bar or Pivoting Frame.<br />
3. Attach spreader bar cover (Pivoting Frame only).<br />
4. Insert bolt through clevis and shaft.<br />
5. Fit nut and tension to allow easy movement of spreader bar shaft.<br />
12<br />
57
Maintenance<br />
SPARE PARTS<br />
Features<br />
Overview ................................... 14<br />
Specifications <strong>230ee</strong> ................ 15<br />
Specifications <strong>300ee</strong> ................ 16<br />
Mechanical Features ................ 17<br />
Attachment Options .................. 18<br />
Lifting Cradle / Frame ......... 19-20<br />
Floor Lift / Frame ................. 21-22<br />
Weighing Device ...................... 23<br />
Slings ....................................... 24<br />
56<br />
13
Features<br />
Overview<br />
The Omega range of Pro-Med lifters are designed to lift patients safely and<br />
securely in a wide range of slings.<br />
The Omega <strong>230ee</strong> / <strong>300ee</strong> are a multi-use, heavy duty patient lifter that may be<br />
supplied with the following lifting attachment options:<br />
• Spreader Bar - for use with standard slings;<br />
• Pivoting Frame - for use with Banana Slings;<br />
• Cradle - for lifting Pro-Med Lifting Frames; and<br />
• Weighing Device - for effortless, accurate, electronic weighing.<br />
The Omega <strong>230ee</strong> is an electric powered general purpose unit with a safe<br />
working load of 230kg.<br />
The Omega <strong>300ee</strong> is an electric powered general purpose unit with a safe<br />
working load of 300kg.<br />
SPARE PARTS<br />
Maintenance<br />
14<br />
55
Maintenance<br />
Features<br />
SPARE PARTS<br />
Specifications Omega <strong>230ee</strong><br />
Model Omega <strong>230ee</strong><br />
Product Code 17320<br />
Capacity 230kg (500lb)<br />
Configuration<br />
Boom Length 92.5cm (36.5in)<br />
Base size, max open<br />
13 x 126 x 115.5cm (5 x 49.5 x 45.5in)<br />
H x W x L<br />
Base size, closed<br />
13 x 70 x 115.5cm (5 x 27.5 x 45.5in)<br />
H x W x L<br />
Minimum storage space 160 x 70 x 115.5cm (63 x 27.5 x 45.5in)<br />
H x W x L<br />
Frame Material Epoxy coated steel<br />
Castors Twin Wheel<br />
Size 10cm (4in)<br />
Brakes Yes – Rear<br />
Weight 62kg (136lb)<br />
Safe for Bathroom Use Yes<br />
Lift Range<br />
Spreader Bar: Low 58cm (23in)<br />
High 170cm (67in)<br />
Pivot: Low 41cm (16in)<br />
High 153cm (60in)<br />
Other Specifications Provides rigid stretcher attachment for single carer supine lifting<br />
Floor lift possible<br />
54<br />
15
Features<br />
Maintenance<br />
Specifications Omega <strong>300ee</strong><br />
SPARE PARTS<br />
Model Omega <strong>300ee</strong><br />
Product Code 17400<br />
Capacity 300kg (660lb)<br />
Configuration<br />
Boom Length 92.5cm (36.5in)<br />
Base size, max open<br />
13 x 126 x 115.5cm (5 x 49.5 x 45.5in)<br />
H x W x L<br />
Base size, closed<br />
13 x 70 x 115.5cm (5 x 27.5 x 45.5in)<br />
H x W x L<br />
Minimum storage space 160 x 70 x 115.5cm (63 x 27.5 x 45.5in)<br />
H x W x L<br />
Frame Material Epoxy coated steel<br />
Castors Twin Wheel<br />
Size 10cm (4in)<br />
Brakes Yes – Rear<br />
Weight 62kg (136lb)<br />
Safe for Bathroom Use Yes<br />
Lift Range<br />
Spreader Bar: Low 58cm (23in)<br />
High 170cm (67in)<br />
Pivot: Low 41cm (16in)<br />
High 153cm (60in)<br />
Other Specifications Provides rigid stretcher attachment for single carer supine lifting<br />
Floor lift possible<br />
16<br />
53
Maintenance<br />
SPARE PARTS<br />
Features<br />
Mechanical Features<br />
Sling Attachment<br />
Standard slings are attached to the hooks on a<br />
spreader bar via webbing straps.<br />
Pivot slings are attached via key-hole buckles to studs<br />
located on the pivoting frame.<br />
Locking Castors<br />
The Omega <strong>230ee</strong> / <strong>300ee</strong> comes with high quality<br />
locking castors at the rear. These castors are easily<br />
operated by foot and keep the lifter stationary when<br />
required.<br />
52<br />
17
Features<br />
Attachment Options<br />
The Safe Working Load (SWL) of the Omega <strong>230ee</strong> /<br />
<strong>300ee</strong> is determined by the stated SWL of the<br />
boom-end attachment.<br />
The lowest stated SWL determines the ultimate load<br />
carrying capacity.<br />
Trouble Shooting<br />
Before trouble shooting ensure that:<br />
• the actuator is not in operation<br />
• the actuator is free from load, and<br />
• that maintenance procedures have been<br />
checked and followed.<br />
Mechanical<br />
Maintenance<br />
Trouble shooting should be<br />
performed by someone that is<br />
familiar with both the use and<br />
mechanism of the lifter and<br />
general electrics. If in doubt,<br />
contact your supplier to arrange a<br />
service call.<br />
Spreader Bar<br />
The Spreader Bar is the standard attachment for<br />
general purpose lifters for use with the following<br />
slings:<br />
• General Purpose Sling;<br />
• General Purpose Sling with Head Support;<br />
• General Purpose Hygiene Sling with Head<br />
Support; and<br />
• Hammock Sling<br />
Spreader Bar Safe Working Load SWL 300kg (660lb)<br />
Pivot Frame/Pivot Sling<br />
The Pivot Frame/Pivot Sling Option allows a patient<br />
to be lifted in either a sitting or lying position. The<br />
frame spreads the sling attachment points to<br />
ensure the patient’s hips are not excessively<br />
flexed, avoiding the discomfort obese patients<br />
sometimes experience with standard slings.<br />
The ability to position a patient in the sitting<br />
posture greatly assists correct seating. The<br />
reclining position is ideal for lifting on or off a bed<br />
or off the floor. The unique additional pivot at the<br />
end of the boom allows the whole frame to be<br />
rocked back and forth.<br />
Pivot Frame Safe Working Load SWL 205kg (451lb)<br />
Symptom Possible Causes Action<br />
Actuator makes creaking noise No free movement at actuator Loosen mounting bolts slightly<br />
during lift<br />
mounting bolts<br />
Lifter tracks incorrectly Castor brakes faulty Check both castor brakes are<br />
releasing properly<br />
Electrical<br />
Symptom Possible Causes Action<br />
Buzzer sounds from within Flat battery<br />
Recharge battery<br />
control box Defective battery Replace battery<br />
Battery charger power indicator Not connected to the mains Connect to mains<br />
does not light up<br />
The fuse has blown<br />
Replace fuse or send the<br />
system for repair<br />
Battery charger is defective Send battery charger for repair<br />
Actuator does not run but relays<br />
in control box are heard clicking<br />
Actuator plug not pushed into<br />
control box properly<br />
Push plug into control box<br />
properly<br />
Actuator defective<br />
Replace actuator<br />
Control box defective<br />
Replace control box<br />
Actuator does not run and no Control box defective<br />
Replace control box<br />
relay noise is heard from Handset defective<br />
Replace handset<br />
control box<br />
Actuator cannot lift full load Motor is damaged Send actuator for repair<br />
Control box completely dead on Emergency stop button pressed Release button<br />
battery; no relay clicking is Battery completely flat<br />
Charge battery<br />
heard<br />
Battery defective<br />
Replace battery<br />
Actuator works in one direction Handset defective<br />
Send handset for repair<br />
only Control box defective Send control box for repair<br />
Actuator works with some but Handset defective<br />
Send handset for repair<br />
not all handset buttons<br />
No motor sound or movement The actuator is not connected Connect actuator to control box<br />
of piston rod<br />
to the control box<br />
Blown fuse in the control box Change fuse<br />
Cable damaged<br />
Send actuator for repair<br />
Motor runs but piston rod does Gear wheel or spindle damaged Send actuator for repair<br />
not move<br />
Piston rod will only move<br />
inwards and not outwards<br />
Safety nut has operated Send actuator for repair<br />
18<br />
51
Maintenance<br />
Features<br />
Lifting Cradle/Frame - SWL 230kg (506lb)<br />
A Major Service undertaken by an authorised service agent every<br />
12 months is a minimum requirement.<br />
Note: LOAD TEST TO SAFE WORKING LOAD (SWL) ONLY<br />
Repairs and Spare Parts<br />
Faulty components or workmanship covered by warranty will be repaired<br />
where appropriate and replaced when necessary. Defects due to mistreatment<br />
or neglect will not be covered by warranty but repair can be arranged by<br />
Pro-Med’s authorised agents at the request of the User.<br />
Spare parts are available for purchase and are itemised by part number. The<br />
list and diagrams following allow easy reference to part numbers for ordering:<br />
The cradle attachment is designed to allow the Omega<br />
<strong>230ee</strong> / <strong>300ee</strong> to lift a patient supported in the PRO-<br />
MED Lifting Frame.<br />
If the cradle is not already attached to the lifter, then the<br />
existing attachment will first have to be removed.<br />
Removing an attachment<br />
Hold the attachment firmly by one hand and with the<br />
other hand, use the thumb to pull back the release tab<br />
on the boom end of the lifter. Lift the attachment up and<br />
away from the lifter.<br />
Attaching the cradle<br />
Slide the cradle down over the<br />
boom end. The release tab will<br />
click into its location hole when<br />
properly fitted.<br />
Frame<br />
Assemble the frame by locking the two halves together<br />
and place over the patient. If the patient is attached to<br />
apparatus such as drips, monitor, etc, the<br />
unassembled frame needs to be placed around the<br />
patient before assembly.<br />
Gliders - Do not use a glider that is damaged. Pass the single hole end of a<br />
glider under the patient. If skin is exposed, apply talcum powder to the glider<br />
first. Attach to a support peg on the frame at a strategic point. Tension the<br />
glider by selecting the appropriate hole at the glider’s other end. Employ a<br />
sufficient number of gliders to provide a cradle support. It is recommended<br />
that a minimum of 9 standard gliders and 1 head glider be used for patients<br />
exceeding 70kg. Gliders can be fitted diagonally to avoid injured areas.<br />
Similarly, a glider can be left out for toileting or wound dressing.<br />
Removal of Gliders - To release a glider from a stud, pull the glider gently so<br />
that the stud clears the keyhole and lift. Should the glider be difficult to<br />
remove, employ a twising motion.<br />
50<br />
19
Features<br />
Lifting a patient supported in a Lifting Frame<br />
Wheel the lifter under the bed of the patient supported<br />
in the Lifting Frame. Lower the boom so that the<br />
elasticised cradle straps will easily stretch to the sides<br />
of the frame. Cradle straps are attached by hooking the<br />
white plastic buckle of each strap over a group of three<br />
studs located on the sides of the Lifting Frame.<br />
Because the human body is slightly top heavy, to achieve a balanced support<br />
of the lifting frame, each cradle strap must be hooked onto the first stud<br />
closest to the head end of the Lifting Frame (see diagram).<br />
For head down (Trendelenburg) lifting, reverse or other combinations can be<br />
used. Be sure that both sides of the Lifting Frame are symmetrical with regard<br />
to cradle strap-stud selection.<br />
Raise the patient with the lifter, checking that he/she is well supported and<br />
comfortable. If not, lower immediately and adjust or add more Lifting Frame<br />
Gliders.<br />
Maintenance<br />
• Inspect surfaces for scratches/chips<br />
• Retard rusting by applying spray paint (Dulux ‘Special White’ Code: 81880)<br />
• Clean surfaces with mild soap and water and remove any adhesive tape<br />
marks with eucalyptus oil<br />
• Examine all moving parts and fasteners for wear and fatigue and lubricate<br />
and/or adjust as required<br />
• Arrange repair/replacement of any faulty parts<br />
• Complete and sign log book<br />
Major Service: (After Every 6 Months of Service)<br />
• General inspection of lifter<br />
• Check castors are tightly attached to legs<br />
• Check castors for free running wheels (remove any fluff and/or hair)<br />
• Check castor brakes operate efficiently<br />
• Overhaul castors and repack with grease<br />
• Inspect surfaces for scratches/chips<br />
• Retard rusting by applying spray paint (Dulux ‘Special White’ Code: 81880)<br />
• Clean surfaces with mild soap and water and remove any adhesive tape<br />
marks with eucalyptus oil<br />
• Examine all moving parts and fasteners for wear and fatigue and lubricate<br />
and/or adjust as required<br />
• Check tightness of bolt in leg bushes<br />
• Check linkages are secure in leg adjuster ball joints<br />
• Check all electrical components, including battery chargers for correct<br />
operation<br />
• Actuator:<br />
• Remove dust and dirt from actuator with cloth<br />
• Repack actuator clevis’ with grease *Top actuator bolts must not be over<br />
tightened.<br />
• Wipe actuator shaft with oiled rag (DO NOT use lubricants such as WD40<br />
or RP7)<br />
20<br />
49
Maintenance<br />
Lifter Maintenance<br />
Safety Inspections<br />
Periodic inspections should be performed by a person who is suitably and<br />
properly qualified and well acquainted with the design, use and care of the<br />
hoist.<br />
Inspections should be carried out both routinely (at least as often as specified)<br />
and, as necessary. All defects and damages that have lead to corrective action<br />
should be noted in a log book (see page 45) and signed and dated by the<br />
inspector. Defects and resulting actions should be reported in writing to your<br />
supplier.<br />
If inspection reveals that the safety of the hoist is jeopardised in any way, the<br />
Owner should be notified immediately, the hoist should be taken out of service<br />
and not used again until the problem has been rectified. Contact the supplier<br />
to arrange servicing.<br />
Floor Lift / Frame<br />
USING THE FLOOR LIFT STRAP KIT* IN COMBINATION WITH THE 4 POINT<br />
SPREADER BAR ATTACHMENT<br />
PRO-MED recommends that two carers assist with a floor lift<br />
using a Floor Lift Strap Kit and 4 Point Spreader Bar Combination.<br />
1. Assemble the Pro-Med Lifting Frame:<br />
#<br />
LIFTING FRAME<br />
Assemble lifting frame by locking the two halves together<br />
(see diagram) and place over the patient. If the patient is<br />
attached to apparatus such as drips, monitors etc., the<br />
unassembled frame needs to be placed around the<br />
patient first before assembly.<br />
Features<br />
3. Lower the boom of the lifter towards the patient<br />
stopping about a metre above the patient, allowing<br />
enough space to attach the straps.<br />
4. Connect the Floor Lift Straps to the 4 Point Spreader:<br />
Place the BLUE loops over the yoke hooks at the<br />
head end of the lifting frame, and place the RED<br />
loops over the yoke hooks at the foot end of the<br />
lifting frame.<br />
A Guide to Maintenance Procedures<br />
A regular visual check of the hoist and attachments is essential.<br />
Ideally, <strong>Invacare</strong> Australia Pty Ltd recommends servicing by an authorised<br />
service agent in accordance with the following schedule of Service Types:<br />
Pre-Delivery Inspection<br />
· Confirm all components are included<br />
· Inspect parts for possible damage in transit<br />
· Ensure all components are in working order<br />
· Arrange repair/replacement of any faulty parts<br />
· Complete and sign log book<br />
Minor Service: (After Every 3 Months of Service)<br />
· General inspection of lifter<br />
· Check castors are tightly attached to legs<br />
· Check castors for free running wheels (remove any fluff and/or hair)<br />
· Check castor brakes operate efficiently<br />
· Overhaul castors and repack with grease<br />
· Inspect surfaces for scratches/chips<br />
· Retard rusting by applying spray paint (Dulux ‘Special White’ Code: 81880)<br />
· Clean surfaces with mild soap and water and remove any adhesive tape<br />
marks with eucalyptus oil<br />
· Examine all moving parts and fasteners for wear and fatigue and lubricate<br />
and/or adjust as required<br />
· Arrange repair/replacement of any faulty parts<br />
· Complete and sign log book<br />
# Pro-Med Lifting Frame Safe Working Load: 230kg.<br />
GLIDERS<br />
Caution: Do not use a glider that is damaged.<br />
Pass the single hole end of a glider under the patient. If<br />
skin is exposed, apply talcum powder to the glider first.<br />
Attach to a support peg on the frame at a strategic point.<br />
Tension the glider by selecting the appropriate hole at<br />
the glider's other end. Employ a sufficient number of<br />
gliders to provide a cradle support. It is recommended<br />
that a minimum of 9 standard gliders and 1 head glider be<br />
used for patients exceeding 70kg.<br />
Gliders can be fitted diagonally to avoid injured areas.<br />
Similarly, a glider can be left out for toileting or wound<br />
dressing etc.<br />
Assembling a lifting frame is easier with two people,<br />
one either side of the patient.<br />
2. Widen the leg base of the lifter and position the lifter<br />
around the head of the frame.<br />
5. Attach the Floor Lift Straps to the Frame<br />
Use the longest straps. Attach keyhole buckles to<br />
the inner most studs at both ends.<br />
Make sure all gliders, attachments,<br />
and straps are fitted correctly before<br />
lifting the patient.<br />
48<br />
21
Features<br />
6. Lift the frame with the brakes on the lifter ON. One<br />
person is required at the foot end of the lifting frame to<br />
pull, and guide the frame clear of the lifter legs and<br />
electrics during the lift.<br />
NB: The frame will lift on an incline so that the<br />
lifter does not over-balance (i.e. the head end of<br />
the frame will be higher than the foot end). This is<br />
unavoidable.<br />
7. Raise the lifting frame about one metre off the ground<br />
or until clear of hospital bed. With the assistance of<br />
two carers, rotate frame to 90 degrees.<br />
8. Adjust the base width of the lifter appropriately<br />
and position the frame slowly over the bed.<br />
9. Lower the lifting frame until there is no tension on<br />
the straps.<br />
• Remove the straps<br />
• Remove the patient lifter<br />
• Remove the lifting frame from the patient.<br />
REMOVAL OF GLIDERS<br />
To release a glider from a stud, pull the glider<br />
gently so that the stud clears the keyhole and lift. If<br />
the glider is difficult to remove, employ a twisting<br />
motion.<br />
HIGH LIFT MANOEUVRE<br />
A lift from bed-to-bed can be achieved by using the BLUE<br />
loops attached to all hooks on the 4 Point Spreader and the<br />
shorter keyhole buckles straps attached to the frame.<br />
When undertaking a high lift manoeuvre, make sure the<br />
head end keyhole buckles are connected to the outer<br />
most studs. The keyhole buckles at the foot end should<br />
be connected to the inner most stud.<br />
Sling Care<br />
Maintenance<br />
General External Wear - In normal use, this is unavoidable and is shown by a<br />
fluffiness of the surface fibres of fabrics.<br />
Local Abrasion - This may be caused by the passage of webbing over sharp<br />
edges or protrusions whilst under tension.<br />
Cuts, Holes or Burns in the webbing - These are potentially dangerous and<br />
must lead to instant rejection of the product.<br />
Chemical Attack - If contamination is suspected, wash out well in warm water.<br />
Avoid contact with excessive heat which is likely to affect the product.<br />
Examination of Fittings (Buckles, "D" Rings, etc)<br />
Carefully examine buckles for ease of adjustment and absence of sharp<br />
edges or burrs likely to abrade the webbing.<br />
Examination of Stitch Patterns<br />
Examine stitch patterns for broken, worn, pulled or unraveled stitches. Reject<br />
any product where the thread has become subject to excessive abrasion or<br />
broken stitches.<br />
Cleaning<br />
For normal washing and cleaning, follow the care instructions on the label of<br />
the product.<br />
Storage<br />
Slings should be stored away from direct sunlight where they are not<br />
subjected to unnecessary strain, stress or pressure or to excessive heat or<br />
humidity.<br />
Washing Instructions<br />
Mild soap solution only, temp to 85C Max. followed by rinse. Do not use<br />
bleach, cleaning solvents or harsh detergents. Do not iron. Do not dry clean.<br />
Do not tumble dry. Avoid UV light & heat. Do not dry in sunshine. Do not place<br />
on heaters or steam pipes. Do not autoclave. Dry in warm room only.<br />
IF IN DOUBT ABOUT THE CONDITION OF A SLING DO NOT USE IT.<br />
Contact your distributor for inspection of the product for advice regarding replacement.<br />
*Pro-Med Product Code: 17397<br />
22<br />
47
Maintenance<br />
Recharging<br />
Battery packs should be recharged as frequently as possible after use to<br />
maintain a healthy battery and to extend the battery life. If the lifter is used daily,<br />
recharge the Battery Pack at least daily, preferably at all times when the lifter is<br />
not in use.<br />
Please Note: The batteries utilized in this battery pack are Sealed Lead Gel<br />
Rechargeable batteries and do not suffer from overcharging.<br />
Features<br />
Weighing Device<br />
The PRO-MED weighing device is rated to 300 kg (660 lb) Safe Working<br />
Load, and suits all Pro-Med and Voyager lifting systems.<br />
!<br />
WARNING: Do not flatten the battery excessively<br />
as this will dramatically reduce the battery life.<br />
Removal of Battery Pack<br />
Remove the battery pack by pulling up with the<br />
handle and then lifting away. Carry battery pack to<br />
charging station and insert in the same manner<br />
as clipping onto the Control Unit.<br />
A quick release mechanism<br />
provides easy inter-change<br />
of lifters and attachments.<br />
SPECIFICATIONS:<br />
MAX WEIGHING CAPACITY:.... 350kg<br />
DISPLAY RESOLUTION:........... 0.2kg<br />
DISPLAY TYPE:....................... Liquid Crystal with upto 15.2mm height<br />
POWER SUPPLY:..................... 9 V standard Battery<br />
BATTERY LIFE:........................ `3000 Readings.<br />
MODES:...................................... kg or lb<br />
ENCLOSURE:........................... Powder Coated Stainless Steel<br />
46<br />
23
Features<br />
Slings<br />
Sizing<br />
Each lifter unit has a sling identification colour code sticker prominently<br />
displayed. Sling straps colour match these for quick selection. Standard<br />
sizes are available for most slings. Each label states the SWL (Safe Working<br />
Load).<br />
Please refer to sling brochure for detailed specifications.<br />
Materials<br />
All PRO-MED slings are manufactured from the highest quality materials<br />
available. Both the mesh and solid fabrics are 100% polyester and are woven<br />
specifically for the application.<br />
Labels<br />
Every Pro-Med sling comes with a sewn on label. Refer to this label if you are<br />
unsure of the style of sling you have. Washing instructions are also detailed<br />
on the label.<br />
EMERGENCY STOP function<br />
Pressing the EMERGENCY STOP button interrupts the power supply to the<br />
actuators<br />
and causes the actuator to stop immediately. The EMERGENCY OFF switch<br />
should only be used in cases of immediate danger.<br />
Pressing the EMERGENCY STOP<br />
Press the red button (A). The button<br />
engages. The actuator stops and<br />
can no longer be controlled by the<br />
control device while the EMER-<br />
GENCY STOP button is locked in<br />
position.<br />
Unlocking the EMERGENCY STOP<br />
Maintenance<br />
Turn the red button in the direction of the arrow (B). The EMERGENCY STOP<br />
button is unlocked. The actuator can be controlled as before.<br />
EMERGENCY LOWERING<br />
In contrast to the EMERGENCY STOP button,<br />
the EMERGENCY LOWERING option is<br />
intended for when faults occur. A faulty<br />
control unit can be bypassed using the<br />
EMERGENCY LOWERING button. This<br />
allows electrical lowering (retraction) of<br />
the actu-ator. This is only possible for<br />
actuators on channel 1.<br />
Custom Slings<br />
PRO-MED design and manufacture a comprehensive range of lifting and<br />
support slings. PRO-MED can also make custom slings to meet specific<br />
requirements.<br />
Pressing EMERGENCY LOWERING<br />
Press the yellow button (1).<br />
24<br />
45
Maintenance<br />
Instructions for use<br />
Controlling an actuator<br />
The actuator is controlled using the UP and DOWN buttons on the control<br />
device.<br />
When the button is pressed, the LED on the control device lights up green.<br />
The battery status can be checked as follows during any motor movement via<br />
an LED on the control unit (1).<br />
Lifting<br />
Safety Precautions ................... 26<br />
General Purpose Slings<br />
Selecting the Sling .............. 27-29<br />
Lifting Procedures ............... 30-33<br />
Pivot Slings<br />
Selecting the Sling .............. 34-35<br />
Lifting Procedures ............... 36-40<br />
LED unlit..........................Batteries are ready for operation.<br />
LED flashes yellow..........Batteries must be charged, since they are currently<br />
only charged to around 20%<br />
A beep is heard................The battery capacity is less than 20%, but there is<br />
still sufficient capacity for at least a double stroke.<br />
The batteries must be charged immediately, other<br />
wise the actuator’s deep-discharge protection will<br />
block further use (See also Troubleshooting).<br />
44<br />
25
Lifting<br />
Maintenance<br />
!<br />
Safety Precautions<br />
Connecting the actuator(s)<br />
Insert the actuator plug into the corresponding<br />
socket (2) on the control unit.<br />
Please read and understand the following<br />
before using a PRO-MED patient lifter:<br />
• PRO-MED patient lifters are designed to<br />
transfer people distances spanning no more<br />
than a few metres - typically bed to chair or<br />
chair to chair, i.e. transfers occurring in the<br />
same room. To transport a patient distances<br />
further than a few metres, PRO-MED advises<br />
the user to transfer the patient to a wheelchair<br />
or trolley first.<br />
• PRO-MED patient lifters are designed to be<br />
operated on level surfaces. Operating a<br />
PRO-MED patient lifter on an incline can be<br />
very dangerous as the lifter becomes<br />
difficult to handle and the load unstable.<br />
• Do not use Pro-Med products with other<br />
brands of patient lifters / slings unless<br />
specified.<br />
Then proceed as follows:<br />
(1) Insert the plug (the sealing<br />
rings must not be visible).<br />
Ensure that the groove on the<br />
plug is aligned with the mark on<br />
the control unit.<br />
(2) Use the special plug disassembling<br />
tool to turn the plug<br />
approx. 30° to the right up against<br />
the stop in order to lock it in<br />
position.<br />
Repeat steps (1) to (2) if you wish to connect an (optional) second actuator.<br />
Otherwise, the actuator output which is not used is closed with a watertight<br />
blanking plug at the factory. This plug must not be removed.<br />
Ensure that the groove on the plug is aligned with the<br />
mark on the housing. Otherwise, the plug cannot be<br />
connected properly.<br />
26<br />
43
Maintenance<br />
MOBILETTE Mobil Control Unit<br />
General Purpose Slings<br />
Lifting<br />
Inserting the battery pack<br />
Insert the battery pack into the mounted<br />
control unit as shown in diagram below.<br />
Ensure that the cams (1) are pushed right into<br />
the guides (2). A locking spring on the rear of<br />
the system carrier fixes the battery pack to the<br />
control unit.<br />
Pro-Med General Purpose and Hygiene Range Slings are designed to be simple<br />
and safe to use for both home and institutional patient lifting. The slings are<br />
manufactured from polyester fabric or mesh (suitable for bathing) with internal<br />
padding in pressures areas and utilises webbing attachment loops instead of<br />
chains and hooks. The webbing loops are colour coded for sizing to allow easy<br />
sling selection and identification.<br />
Webbing loops of varying lengths are provided at each connection point to allow<br />
a lay back posture for the patient or, by using the shortest loops, a higher lift.<br />
Sling SWL: XS - M = 205kg SWL & L - XXL = 300kg SWL<br />
Sling Options - Standard Range<br />
General Purpose Sling<br />
Available in in six sizes in choice of fabric or mesh.<br />
The slings provide easy fitting and good support for<br />
patients with some upper body control. Recommended<br />
for general lifting.<br />
Colour: Navy<br />
Connecting the actuator and the control device<br />
Connecting the control device<br />
Insert the D-SUB plug of the control device into<br />
the corresponding socket (1) on the control<br />
unit. The cables are strain-relieved and sealed<br />
by means of the cast cams when plugged into<br />
the socket. The cams engage in the retaining<br />
clips.<br />
General Purpose with Head Support Sling<br />
Available in six sizes in choice of fabric or mesh The<br />
Sling provides easy fit to a patient in bed or a chair,<br />
providing excellent upper body and head support.<br />
Recommended for lifting from the floor and general<br />
lifting of the less secure patient.<br />
Colour: Navy<br />
Ensure that the plugs are<br />
inserted with the correct<br />
alignment, otherwise the<br />
device socket can be<br />
damaged. Ensure the plug<br />
type is correct (arrows<br />
must be on top).<br />
General Purpose Hygienie Sling With Head Support<br />
Available in six sizes in choice of fabric or mesh. The<br />
slings provide easy removal of clothing for toilet<br />
transfers. Recommended for general toilet transfers<br />
for the less secure patient.<br />
Colour: Navy<br />
42<br />
27
Lifting<br />
Paediatric Sling<br />
Available in three sizes in mesh only. The slings<br />
provide easy fitting and good support for children or<br />
small adults. Recommended for general lifting with<br />
children or small adults.<br />
Colour: Navy<br />
Maintenance<br />
The Quick Fit Sling<br />
Available in three sizes in fabric only. The slings are<br />
perfectly suited for bariatric patients with large hips or<br />
thighs. Recommended for general lifting for the larger<br />
patient.<br />
Colour: Green<br />
Mobilette Control Unit............ 42-45<br />
Recharging............................... 46<br />
Sling Care ................................ 47<br />
Lifter Maintenance ............... 48-50<br />
Trouble Shooting ...................... 51<br />
Spare Parts............................ 52-56<br />
Hammock Sling<br />
Available in two sizes in choice of fabric or mesh with<br />
commode hole. The sling provides ultimate support<br />
and security for lifting from a bed or the floor. The<br />
patient must roll on to, and off, the sling. When fitted<br />
full head support is provided. Recommended for<br />
single or double lower limb amputees and lifting from<br />
the floor, and because weight is not taken by the<br />
patient's thighs.<br />
Colour: Navy<br />
The Hammock Sling<br />
Available in three sizes in fabric only. The sling incorporates<br />
a head support and a unique strap system that<br />
keeps the patient secure, which helps to reduce friction<br />
and allows for easy placement and removal around a<br />
person in a sitting, semi-reclined or fully reclined<br />
position, without having to lift manually.<br />
Recommended for general lifting including bathing<br />
Colour: Green<br />
28<br />
41
Lifting<br />
Hygiene Range<br />
Lifting<br />
Warning: Supreme Hygiene and The Hygienic Sling should only be used if the<br />
patient has sufficient trunk and upper limb control to maintain balance. The top of<br />
the sling must pass below the armpits to maximise stability. Excessive pressure<br />
under the armpits should be avoided.<br />
Hygiene Sling<br />
Available in three sizes and comes in fully quilted<br />
fabric only. This sling is excellent for transfers onto a<br />
toilet as it provides an open area from the middle of<br />
the back to the middle of the thigh. This sling has a<br />
buckle waist strap and features generous padding<br />
around the patient's midsection and under arms.<br />
Recommended for general toilet transfers.<br />
Colour: Green<br />
40<br />
29
Lifting<br />
Lifting Procedures<br />
Fitting the Sling<br />
Warning: Please refer to your local Physiotherapist or Occupational Therapist for<br />
advice regarding suitability of sling/hoist/and specific attachment requirements to<br />
suit patient needs.<br />
Three Ways to Fit a General Purpose Sling<br />
1... Leg straps<br />
passing under<br />
each thigh and<br />
back to the<br />
hook on the<br />
same side.<br />
This provides<br />
a “legs apart”<br />
posture which<br />
is suitable for<br />
Hygiene and<br />
washing.<br />
2... Leg straps<br />
passing under<br />
both thighs<br />
and onto opposite<br />
hooks.<br />
The “seat”<br />
formed with<br />
this technique<br />
provides a<br />
comfortable,<br />
dignified posture<br />
suitable for<br />
general lifting<br />
and transferring.<br />
3... Leg straps<br />
passing under<br />
each thigh and<br />
onto the opposite<br />
hooks. This<br />
is the safest<br />
technique, the<br />
patient is well<br />
supported and<br />
prevented from<br />
tipping forward<br />
by the crossing<br />
straps. Suitable<br />
for general lifting<br />
and transferring.<br />
Lowering the Patient<br />
<br />
Position the patient over chair/bed correctly and slowly lower. Make<br />
sure the patient remains comfortable during descent. Handles on back<br />
allow the carer to pull the patient back into the correct position for<br />
seating while maintaining an ergonimically sound posture.<br />
Removing the Sling<br />
<br />
Sling removal is reverse of fitting. In some cases, the patient may be<br />
rolled, but usually the sling can be slid out from under the patient.<br />
Monitor patients legs, feet and head when lifting so they cannot come<br />
into contact with the mast and yoke of the lifter.<br />
The Pro-Med Pivot Sling is compatible only with the<br />
Pro-Med Pivoting Frame. An incorrect selection may cause injury.<br />
DO NOT USE PIVOT SLINGS WITH THE PRO-MED YOKE.<br />
Lifting<br />
Hygiene Sling Usage<br />
Warning:<br />
Supreme Hygiene and The Hygienic Sling should<br />
be used only if the patient has sufficient trunk and<br />
upper limb control to maintain balance. The top of<br />
the sling must pass below the armpits to<br />
maximise stability. Excessive pressure under the<br />
armpits should be avoided.<br />
See sling drawing<br />
30<br />
39
Lifting<br />
Lifting the Patient<br />
<br />
Understand workings of lifter: Be confident/familiar with equipment,<br />
and the patient will feel safer and likely to cooperate with you.<br />
Monitor patients legs, feet and head when lifting so they cannot come<br />
into contact with the mast and pivot frame of the lifter.<br />
Be aware of any patient apprehension toward the lifting procedure: By<br />
reassuring the patient during the transfer.<br />
Manoeuvring the lifter carefully not to bump the head with the yoke.<br />
Watch for toes and property when wheeling lifter towards a patient.<br />
Never leave patient in the lifter unattended<br />
Ensure that the brakes of the chair, bed or trolley the patient is being<br />
lifted from are locked. The brakes of the lifter must be OFF to allow the<br />
lifter to establish its own centre of gravity over the weight of the patient.<br />
This may result in the lifter moving slightly when the patient is first lifted.<br />
Before raising the patient, check that the sling attachments are still in<br />
place on the pivot frame. Slings must be properly positioned and aligned<br />
under the patient.<br />
When using Pivot Toileting Slings, ensure the upright positioning buck<br />
les are fastened around the vertical white bar of the pivoting frame.<br />
If the patient looks uncomfortable or unbalanced, stop immediately.<br />
Lower the patient and adjust the sling. It usually takes only a matter of<br />
seconds to correct a poorly positioned sling and the patient will gain<br />
confidence from your care and the transfer will be far safer.<br />
Once the patient is clear of the chair or bed he/she may be rotated to the<br />
correct position to complete the transfer.<br />
Moving the Patient<br />
If you must move a patient while supported in a lifter follow these rules:<br />
Lower the patient so the feet are just off the ground, this makes him/her<br />
feel more secure.<br />
When manoeuvring in a small area, two carer's will make the job much<br />
easier.<br />
Changing direction or steering around corners, walk the back of the<br />
machine around so that it is heading in the new direction.<br />
Always look at the patient during the transfer, be aware that some<br />
patients who are new to the sling lifting may become distressed.<br />
38<br />
Fit the sling to the patient before wheeling the lifter into position to carry out the<br />
lift.<br />
Patient in Chair<br />
<br />
<br />
<br />
<br />
Hold up sling with handles away from<br />
patient.<br />
Slide sling down patient’s back until<br />
base of sling is level with base of spine.<br />
If possible have the patient lean away<br />
from you to work the leg section under<br />
the patients hips and upper thigh. Posi<br />
tion leg sections of the sling under each<br />
thigh. Under each thigh allowing as<br />
much support to both legs and hips as<br />
possible. To achieve this pull each<br />
strap firmly under the leg.<br />
Leg Section<br />
To achieve proper leg strap positioning, kneel on one knee in front of<br />
patient placing patient’s foot on carer’s thigh. Sling then passes freely under<br />
patient’s leg/hip for greater comfort.<br />
Warning: Preparing lift from a chair, position the lifter by approaching from the<br />
front Take care to ensure not to push the yoke into the patient’s head or face.<br />
Patient Lying on Floor or Bed<br />
Sling must be placed under the patient’s back. If the patient is in bed he/she<br />
must be rolled or sat up to allow positioning. To assist, some patients may lean<br />
forward or you may adjust back of bed.<br />
If patient must be rolled, process is similar to changing sheets with patient in<br />
bed.<br />
<br />
<br />
Roll patient toward you, easing sling underneath so<br />
evenly spaced under the back.<br />
Bend patient’s knees up, one at a time, pass leg straps<br />
underneath each leg.<br />
Lifting<br />
Warning: Preparing a lift from the floor. Spread base of lifter bending patient’s<br />
knees so one leg of lifter can pass under the bent knees. If patient has fragile skin<br />
protect this with a towel/pillow. Also placing a pillow at patient’s head for comfort so<br />
to prevent injury from accidentally bumping the leg of the lifter.<br />
31
Lifting<br />
Attaching the Sling<br />
Lower the yoke. Attach straps of sling over the hooks of the yoke.<br />
Lifting the Patient<br />
<br />
Understand workings of lifter: Be confident/familiar with equipment,<br />
and the patient will feel safer and likely to cooperate with you.<br />
Monitor patients legs, feet and head when lifting so they cannot come<br />
into contact with the mast and yoke of the lifter.<br />
Be aware of any patient apprehension toward the lifting procedure: By<br />
reassuring the patient during the transfer.<br />
Manoeuvring the lifter carefully not to bump the head with the yoke.<br />
Watch for toes and property when wheeling lifter towards a patient.<br />
Never leave patient in the lifter unattended<br />
<br />
<br />
Ensure that the brakes of the chair, bed or trolley the patient is being<br />
lifted from are locked. The brakes of the lifter must be OFF to allow the<br />
lifter to establish its own centre of gravity over the weight of the patient.<br />
This may result in the lifter moving slightly when the patient is first lifted.<br />
<br />
Before raising the patient, check that the sling attachments are still in<br />
place on the yoke. Slings must be properly positioned and aligned the<br />
patient.<br />
If the patient looks uncomfortable or unbalanced, stop immediately.<br />
Lower the patient and adjust the sling. It usually takes only a matter of<br />
seconds to correct a poorly positioned sling and the patient will gain<br />
confidence from your care and the transfer will be far safer.<br />
Once the patient is clear of the chair or bed he/she may be rotated to the<br />
correct position to complete the transfer.<br />
Moving the Patient<br />
If you must move a patient while supported in a lifter follow these rules:<br />
Lower the patient so the feet are just off the ground, this makes him/her<br />
feel more secure.<br />
When manoeuvring in a small area, two carer's will make the job much<br />
easier.<br />
Changing direction or steering around corners, walk the back of the<br />
machine around so that it is heading in the new direction.<br />
Always look at the patient during the transfer, be aware that some<br />
patients who are new to the sling lifting may become distressed.<br />
32<br />
Attaching the Sling<br />
Lower the Pivot Frame and attach keyhole buckles of sling over the hooks of the<br />
pivot frame<br />
Hygiene Sling Usage<br />
Warning: This sling provides buckles<br />
which must be fastened around the vertical<br />
white bar of the pivoting frame to ensure<br />
the patient remains in an upright position.<br />
See drawing<br />
Tips for Lifting with a Pivot Frame & Pivot Sling<br />
Push down on<br />
handle when<br />
lowering a patient<br />
into a chair.<br />
The patient’s centre<br />
of gravity ensures a<br />
comfortable, reclined<br />
position during<br />
Lifting<br />
Lifting the legs will<br />
swing a patient into<br />
a reclining position<br />
for lowering onto a<br />
bed.<br />
37
Lifting<br />
Lifting Procedures<br />
Fitting the Sling<br />
Fit the sling to the patient before wheeling the lifter into position to carry out the lift.<br />
Patient in chair<br />
Hold up sling with handles away from patient.<br />
Slide sling down patient’s back until base of<br />
sling is level with base of spine.<br />
If possible have the patient lean away from you<br />
to work the leg section under the patients hips<br />
and upper thigh. Position leg sections of the<br />
sling under each thigh. Under each thigh<br />
allowing as much support to both legs and hips<br />
as possible. To achieve this pull each strap<br />
firmly under the leg.<br />
To achieve proper leg strap positioning, kneel on one knee in front of<br />
patient placing patient’s foot on carer’s thigh. Sling then passes freely<br />
under patient’s leg/hip for greater comfort.<br />
Warning: Preparing lift from a chair, position the lifter by approaching from<br />
the front Take care to ensure not to push the pivot frame into the patient’s<br />
head or face.<br />
Patient Lying on Floor or Bed<br />
Sling must be placed under the patient’s back. If the patient is in bed he/she<br />
must be rolled or sat up to allow positioning. To assist, some patients may lean<br />
forward or you may adjust back of bed.<br />
If patient must be rolled, process is similar to changing sheets with patient in<br />
bed.<br />
<br />
Roll patient toward you, easing sling<br />
underneath so evenly spaced under the<br />
back.<br />
Bend patient’s knees up, one at a time,<br />
pass leg straps underneath each leg.<br />
Lowering the Patient<br />
<br />
Position the patient over chair/bed correctly and slowly lower. Make<br />
sure the patient remains comfortable during descent.<br />
Handles on back allow the carer to pull the patient back into the correct<br />
position for seating while maintaining an ergonimically sound posture.<br />
Removing the Sling<br />
<br />
Lifting<br />
Sling removal is reverse of fitting. In some cases, the patient may be<br />
rolled, but usually the sling can be slid out from under the patient.<br />
Monitor patients legs, feet and head when lifting so they cannot come<br />
into contact with the mast and yoke of the lifter.<br />
Warning: Preparing a lift from the floor. Spread base of lifter bending patient’s<br />
knees so one leg of lifter can pass under the bent knees. If patient has fragile skin<br />
protect this with a towel/pillow. Also placing a pillow at patient’s head for comfort so<br />
to prevent injury from accidentally bumping the leg of the lifter.<br />
36<br />
33
Lifting<br />
Pivot Slings<br />
Special slings known as Pivot Slings are required for use with the Pivot Frame<br />
and Hi Lift Pivot Frame. The slings are manufactured from polyester fabric or<br />
mash (suitable for bathing). These slings allow the patient to be lifted in either a<br />
sitting or lying position, ideal for lifting on and off a bed or the floor.<br />
The unique pivot with anti-lock at the end of the boom allows the whole frame to<br />
be rocked back and forward to assist correct positioning of the patient. The frame<br />
spreads the sling attachment points to ensure the patients hips are not excessively<br />
flexed, avoiding the discomfort obese patients sometimes experience<br />
with standard slings.<br />
Sling SWL: XS - XXL = 205kg SWL<br />
Sling Options<br />
- Standard Range<br />
Lifting<br />
Pivot Sling<br />
Pivot Sling is available in six sizes in choice in fabric<br />
or mesh. The sling allows a patient to be lifted in<br />
either a sitting or lying position. The ability to position<br />
a patient in the sitting posture greatly assists correct<br />
seating.<br />
A more open lift. Recommended for general lifting<br />
including floor lifting.<br />
Colour: Navy<br />
- Hygiene Range<br />
Warning: The Pivot Hygiene Sling should only be used if the patient has sufficient<br />
trunk and upper limb control to maintain balance. The top of the sling must pass<br />
below the armpits to maximise stability. Excessive pressure under the armpits<br />
should be avoided.<br />
Pivot Hygiene Sling<br />
Pivot Hygiene Sling is available in six sizes in choice<br />
in fabric or mesh. The slings provide easy removal of<br />
clothing for toilet transfers and bathing.<br />
Recommended for general toilet transfers and<br />
bathing.<br />
Colour: Navy<br />
Important Note: This sling provides<br />
buckles which must be fastened<br />
around the vertical white bar of the<br />
pivoting frame to ensure the patient<br />
remains in an upright position.<br />
34<br />
35