#CFBR-GL1800 - J&M Motorcycle Audio
#CFBR-GL1800 - J&M Motorcycle Audio
#CFBR-GL1800 - J&M Motorcycle Audio

You also want an ePaper? Increase the reach of your titles
YUMPU automatically turns print PDFs into web optimized ePapers that Google loves.
Bluetooth® Cell/Smart-Phone/<br />
GPS/Radar Integration Kit for<br />
<strong>GL1800</strong> Driver Headset Position<br />
#<br />
CFBR-<strong>GL1800</strong><br />
© 2012 J&M Corporation. All rights reserved. 3/12<br />
Installation<br />
and Operation<br />
Instructions
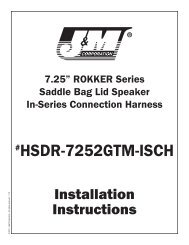
Installation Instructions<br />
Installing the Integration Terminal<br />
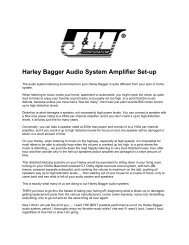
►Diagram A<br />
1. Remove:<br />
left fairing pocket (a)<br />
ignition switch cover (b)<br />
wiring cover plate under left handlebar (c)<br />
2. Clean the surface inside the left fairing pocket mounting area<br />
with denatured alcohol.<br />
3. Remove the backing from the double-sided mounting tape and<br />
mount the CFBR-<strong>GL1800</strong> on to the inner surface of the outer fairing<br />
shell directly beside the fairing pocket location, making sure<br />
that the fairing pocket can be reinstalled properly. Diagram A.<br />
Note: The CFBR-<strong>GL1800</strong> should be mounted as far rearward as<br />
possible with the connection cables exiting forward toward the<br />
front of the fairing.<br />
(c)<br />
Diagram A<br />
(a)<br />
(b)<br />
Mounting the Multifunction/volume switch<br />
assembly.<br />
►Diagram A<br />
1. Mount the multifunction/volume switch assembly by installing<br />
the bracket/clamp assembly around the exposed handlebar,<br />
between the left-side handlebar grip and switch housing.<br />
2. Route the wire alongside the stock wiring down the handlebar,<br />
under the ignition switch cover and into the left fairing pocket area<br />
of the fairing.<br />
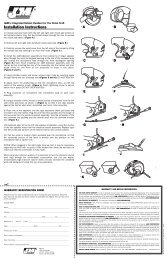
3. Make connections as shown in Diagram B. Note: Disconnect<br />
the factory Driver’s headset lead and plug the corresponding connectors<br />
from the CBFR-<strong>GL1800</strong> in-line between the factory (RED)<br />
6-pin plugs.<br />
Operation Instructions<br />
Pairing the CFBR-<strong>GL1800</strong> to Bluetooth Enabled<br />
Devices.<br />
1. To Pair To a Cell/Smart Phone.<br />
a. Turn on the CFBR-<strong>GL1800</strong> by switching the ignition switch to the<br />
ACC or ON position. The LED on the multifunction switch assembly<br />
will flash slow blue.<br />
b. Press and hold down on the multifunction button for approximately<br />
10 seconds. When the LED goes off, release the button.<br />
c. Press and hold down on the multifunction button again continuously<br />
for about 35 seconds, cycling thru the slow flashing blue,<br />
to rapid flashing blue, to flashing red & back to rapid blue flashing,<br />
at which point the CBFR-<strong>GL1800</strong> is in pairing mode.<br />
d. In the phone menu select Bluetooth and “search for devices”.<br />
e. Once the JM_CORP_CFBR01 shows up on the phone’s display<br />
select it and when asked for a PIN code type in “0000”.<br />
f. The cell phone should now pair to the CFBR-<strong>GL1800</strong> and the<br />
blue LED should flash slowly.<br />
2. To pair to a Bluetooth Enabled GPS.<br />
a. Turn on the CFBR-<strong>GL1800</strong> by switching the ignition switch to<br />
the ACC or ON position. The LED on the multifunction button<br />
assembly will flash slow blue.<br />
b. Press and hold down on the multifunction button for approximately<br />
10 seconds. When the LED goes off, release the button.<br />
c. Press and hold down on the multifunction button again continuously<br />
for about 35 seconds, cycling thru the slow flashing blue,<br />
to rapid flashing blue, to flashing red & back to rapid blue flashing,<br />
at which point the CBFR-<strong>GL1800</strong> is in pairing mode.<br />
d. Turn on the Bluetooth enabled GPS and select Bluetooth headset<br />
in the menu. Then select “search for devices”.<br />
e. Once the JM_CORP_CFBR01 shows up on the GPS display select<br />
it and when asked for a PIN code type in “0000”<br />
f. The GPS should now pair to the CFBR-<strong>GL1800</strong> and the blue LED<br />
should flash slowly.<br />
Note: The CFBR-<strong>GL1800</strong> does not require re-pairing each time the<br />
motorcycle is turned off. After initial pairing, the Cell Phone or GPS<br />
unit should automatically reconnect with the CFBR-<strong>GL1800</strong> each<br />
time the ignition switch is turned on.<br />
Operation of the CFBR-<strong>GL1800</strong> with a cell phone.<br />
1. After successfully pairing your cell phone with the J&M CFBR-<br />
<strong>GL1800</strong>, make a phone call. During the phone call adjust the volume<br />
control on the cell phone to maximum. Make further volume<br />
adjustments using the handlebar mounted volume control.<br />
2. When receiving an incoming call the “incoming call indicatorsound”<br />
will override all other audio in the drivers headset and will<br />
be heard in the helmet speakers. If the phone is set to Auto Answer<br />
the incoming call will automatically be connected. If the phone is<br />
not set to Auto Answer the call can be answered by briefly depressing<br />
the multifunction button one time. To reject the call depress the<br />
multifunction button twice or simply ignore the ring tone.<br />
3. To end the call depress the Multifunction Button briefly or wait<br />
for the caller to hang up and the drivers headset will automatically<br />
return to the GL-1800 audio system.<br />
4. To redial the last number called, press the Multifunction Button<br />
twice.<br />
5. To initiate “Voice Command” dial on the cell phone, briefly press<br />
the Multifunction Button once. The cell phone must support this<br />
feature in order to use “Voice Command” dialing.
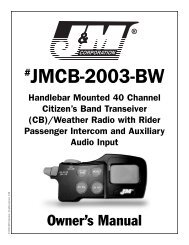
Diagram B<br />
Handlebar<br />
multifunction<br />
switch assembly<br />
Radar Detector<br />
J&M Plug-and-Play Radar<br />
Detector Connection Harness<br />
(Not Included)<br />
Radar connection<br />
harness<br />
CFBR-<strong>GL1800</strong><br />
CMXB-GL18<br />
8-pin<br />
plugs<br />
Driver's<br />
helmet headset<br />
(not included)<br />
Factory driver’s headset<br />
extension lead<br />
<strong>Motorcycle</strong>’s<br />
ACC power<br />
plug<br />
Red 6-pin<br />
plugs<br />
Red<br />
3-pin plug<br />
Black<br />
3-pin plug<br />
Red 6-pin<br />
plugs<br />
Factory driver’s<br />
headset harness<br />
under fairing pocket<br />
Operation of the CFBR-<strong>GL1800</strong> with a Stereo<br />
Bluetooth music capable cell phone.<br />
1. After successfully pairing your cell phone with the J&M CFBR-<br />
<strong>GL1800</strong>, activate the Bluetooth music function of your cell phone.<br />
2. Using the volume control on the phone adjust the music volume<br />
to maximum. Make further volume adjustments using the handlebar<br />
mounted volume control.<br />
Operation of the CFBR-<strong>GL1800</strong> with a Bluetooth<br />
Enabled GPS.<br />
1. Both music and Cell Phone can be streamed to the CFBR-<br />
<strong>GL1800</strong> terminal from a Bluetooth Enabled GPS.<br />
2. The Cell Phone is paired to the GPS and the Cell Phone functions<br />
will be controlled by the GPS or the phone itself. (to answer, reject<br />
or dial a call). Note: The Multifunction Button will not control the<br />
Cell Phone in this configuration.<br />
3.To end a call the GPS can be used or simply wait for the caller to<br />
hang up.<br />
4. The music from the GPS, if initiated, will resume when the call<br />
has ended.<br />
5. The GPS music volume should be adjusted as described above<br />
in “Operation of the CFBR-<strong>GL1800</strong> with a Stereo Bluetooth capable<br />
Cell Phone” using the volume controls on the GPS.<br />
Note: For simultaneous use of a Cell/Smart Phone and GPS with<br />
the CFBR-<strong>GL1800</strong> you must pair the GPS to the CFBR-<strong>GL1800</strong> and<br />
the Cell/Smart Phone to the GPS.
Operation of Radar Detector function.<br />
1. A radar detector can also be added using one of J&M’s Plugand-Play<br />
Radar Connection Harnesses (extra cost item). The<br />
beeps/braps from the radar detector will be heard momentarily in<br />
the right-side speaker of the drivers helmet headset regardless of<br />
what other functions are being heard.<br />
Noise and Interference<br />
<strong>Motorcycle</strong> audio systems by their very nature are noisy. While we<br />
do not guarantee this system to be completely free from electrical<br />
noises and interference, we have taken many steps to achieve that<br />
goal: the power supply system is well filtered, the unit is shielded<br />
in its metal container, and the cables associated with the unit are<br />
shielded.<br />
Industry Canada Notice to Users<br />
Operation is subject to the following two conditions: (1) This device<br />
may not cause interference and (2) This device must accept any<br />
interference, including interference that may cause undesired operation<br />
of the device Ref IC RSS 210 Sec. 5.11. The term”IC:” before<br />
the certification/registration number only signifies that registration<br />
was performed based on a Declaration of Conformity indicating<br />
that Industry Canada technical specifications were met. It does not<br />
imply that Industry Canada approved the equipment.<br />
Changes or modifications not expressly approved by the party<br />
responsible for compliance could void the user’s authority to<br />
operate the equipment.<br />
FCC Regulations<br />
This device complies with 15 of the FCC Rules. Operation is subject<br />
to the following two conditions: (1) This device may not cause<br />
harmful interference, and (2) this device must accept any interference<br />
received, including interference that may cause undesired<br />
operation.<br />
J&M Corporation<br />
Tucson, Arizona, U.S.A.<br />
Tel. 1-800-358-0881<br />
www.jmcorp.com<br />
audio@jmcorp.com<br />
Thank you for the confidence you have shown in J & M by purchasing one<br />
of our innovative products. It will give you many hours of riding pleasure. If<br />
you have any questions during installation or require more information about<br />
this product, you may call our Customer service Department (English only,<br />
please) at 1-800-358-0881, Monday through Friday, 8:00 a.m. to 5:00 p.m.<br />
Mountain Standard Time, U.S.A.<br />
WARRANTY REGISTRATION FORM Please fill out this card completely and mail it immediately after purchase. Please be sure that your zip code<br />
and serial number (if applicable) are legible. This will help us to serve you better.<br />
(PLEASE PRINT)<br />
Name_______________________________________________________________________________________________________________________________________________________<br />
Address______________________________________________________________________________________________________________________________________________________<br />
City _______________________________ _________________________________State __________________________ Zip ______________________________________________________<br />
<strong>Motorcycle</strong> m Other m E-mail ______________________________________________________________________________________________________<br />
Make ___________________________________________ Model ______________________________________<br />
Year __________________<br />
Product part number ______________________________________________________________________<br />
Serial number (if applicable)________________________________________________________________<br />
Date of purchase _________________________________________________<br />
Mail to:<br />
J&M Corporation<br />
1415 S. Cherry Avenue<br />
Tucson, AZ 85713<br />
U.S.A.<br />
Name of dealer it was purchased from ____________________________________________________________________________________
WARRANTY AND REPAIR INFORMATION<br />
TWO YEAR LIMITED WARRANTY In order to facilitate the servicing of this warranty, the Warranty Registration Form should be filled out and<br />
returned within 10 days of the date of purchase. However, return of the Warranty Registration Form is not a precondition of this warranty,<br />
and this Warranty will be observed by J&M CORPORATION whether or not the Warranty Registration Form is returned,<br />
on the condition that other satisfactory evidence of the date of the original purchase is provided to J&M CORPORATION.<br />
WHO PROVIDES THE WARRANTY? This warranty is provided by J&M CORPORATION.<br />
WHO IS PROTECTED? This warranty is extended only to the original owner of this J&M CORPORATION product and may not be transferred<br />
or assigned.<br />
WHAT IS COVERED AND HOW LONG? This warranty covers all defects in material or workmanship of our product for a period of<br />
2 years from date of original retail purchase. At its option, J&M CORPORATION will repair or replace any defective part(s) or<br />
equipment.<br />
The provisions of the warranty shall not apply to any unit which has been subjected to misuse, neglect, incorrect mechanical or<br />
electrical installation, unauthorized modifications, accident, nor to units which have been repaired or altered outside of our factory.<br />
PROCEDURE FOR OBTAINING PERFORMANCE OF WARRANTY In the event that the product does not conform to this warranty, the product<br />
should be shipped prepaid to the J&M CORPORATION service facility. Transportation charges, insurance fees, and labor costs for shipment,<br />
removal, or reinstallation of our product are not covered by this warranty. Loss or damage in shipment is the sole responsibility of the freight<br />
carrier.<br />
FOR YOUR INFORMATION Repair as provided under this warranty is the exclusive remedy of the consumer. J&M CORPORATION shall<br />
not be liable for any incidental or consequential damages or for breach of any express or implied warranty on this product. Except to the<br />
extent prohibited by applicable law, any implied warranty of merchantability or fitness for a particular purpose on this product is limited<br />
in duration to the duration of the warranty. Some states do not allow the exclusion or limitation of incidental or consequential damages,<br />
or allow limitations on how long an implied warranty lasts, so the above limitations or exclusion may not apply to you. This warranty gives<br />
you specific legal rights which vary from state to state.<br />
J&M CORPORATION reserves the right to make changes in design and to make improvements in its products without the obligation to<br />
incorporate the changes or improvements in any of its previously manufactured products.<br />
J&M CORPORATION has not authorized anyone to make representations or warranties other than the warranty contained herein.<br />
The above warranty is effective for all products manufactured after 10/01/86.<br />
NON-WARRANTY REPAIR RATES J&M CORPORATION reserves the right to change the labor repair rates without prior notice. At the time<br />
of this printing the out-of- warranty repair is $40 per hour for labor only. However, the customer is advised to verify the<br />
current rate when he/she calls customer service to obtain the return authorization number.<br />
FACTORY SERVICE ADDRESS J&M Corporation, 1415 S. Cherry Avenue, Tucson, Arizona, 85713, U.S.A. Tel: 1-800-358-0881 audio@<br />
jmcorp.com www.jmcorp.com<br />
CUSTOMER SERVICE NUMBER 1-800-358-0881<br />
Please complete<br />
WARRANTY REGISTRATION FORM<br />
on the reverse side and send to J&M Corporation