Alesis SR18 Reference Manual - RevD - Just Music
Alesis SR18 Reference Manual - RevD - Just Music
Alesis SR18 Reference Manual - RevD - Just Music

You also want an ePaper? Increase the reach of your titles
YUMPU automatically turns print PDFs into web optimized ePapers that Google loves.
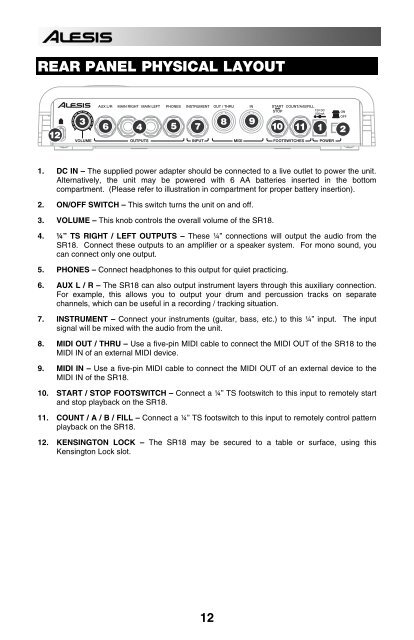
REAR PANEL PHYSICAL LAYOUT<br />
12<br />
3<br />
VOLUME<br />
AUX L/R MAIN RIGHT MAIN LEFT PHONES INSTRUMENT OUT / THRU IN START COUNT/A/B/FILL<br />
STOP<br />
ON<br />
8 9<br />
6 4 5 7<br />
OUTPUTS INPUT<br />
MIDI FOOTSWITCHES POWER<br />
OFF<br />
10 11 1 2<br />
1. DC IN – The supplied power adapter should be connected to a live outlet to power the unit.<br />
Alternatively, the unit may be powered with 6 AA batteries inserted in the bottom<br />
compartment. (Please refer to illustration in compartment for proper battery insertion).<br />
2. ON/OFF SWITCH – This switch turns the unit on and off.<br />
3. VOLUME – This knob controls the overall volume of the <strong>SR18</strong>.<br />
4. ¼” TS RIGHT / LEFT OUTPUTS – These ¼” connections will output the audio from the<br />
<strong>SR18</strong>. Connect these outputs to an amplifier or a speaker system. For mono sound, you<br />
can connect only one output.<br />
5. PHONES – Connect headphones to this output for quiet practicing.<br />
6. AUX L / R – The <strong>SR18</strong> can also output instrument layers through this auxiliary connection.<br />
For example, this allows you to output your drum and percussion tracks on separate<br />
channels, which can be useful in a recording / tracking situation.<br />
7. INSTRUMENT – Connect your instruments (guitar, bass, etc.) to this ¼” input. The input<br />
signal will be mixed with the audio from the unit.<br />
8. MIDI OUT / THRU – Use a five-pin MIDI cable to connect the MIDI OUT of the <strong>SR18</strong> to the<br />
MIDI IN of an external MIDI device.<br />
9. MIDI IN – Use a five-pin MIDI cable to connect the MIDI OUT of an external device to the<br />
MIDI IN of the <strong>SR18</strong>.<br />
10. START / STOP FOOTSWITCH – Connect a ¼” TS footswitch to this input to remotely start<br />
and stop playback on the <strong>SR18</strong>.<br />
11. COUNT / A / B / FILL – Connect a ¼” TS footswitch to this input to remotely control pattern<br />
playback on the <strong>SR18</strong>.<br />
12. KENSINGTON LOCK – The <strong>SR18</strong> may be secured to a table or surface, using this<br />
Kensington Lock slot.<br />
12
![203280_d_man.pdf [23,41 MB] - Just Music](https://img.yumpu.com/23736901/1/184x260/203280-d-manpdf-2341-mb-just-music.jpg?quality=85)


![244712_d_man.pdf [266,60 kB] - Just Music](https://img.yumpu.com/23736779/1/190x133/244712-d-manpdf-26660-kb-just-music.jpg?quality=85)