
You also want an ePaper? Increase the reach of your titles
YUMPU automatically turns print PDFs into web optimized ePapers that Google loves.
MENU<br />
ENTER<br />
THEATER LIVE CLUB DANCE CLUB HALL PAVILION<br />
TUNER/SEA MEMORY<br />
SOUND SELECT<br />
INPUT ATT.<br />
FM MODE<br />
BASS BOOST ONE TOUCH OPERATION<br />
SOURCE NAME<br />
DVD<br />
TV SOUND/DBS<br />
VCR<br />
D I G I T A L<br />
CD<br />
PHONO<br />
TAPE/MD<br />
FM<br />
AM<br />
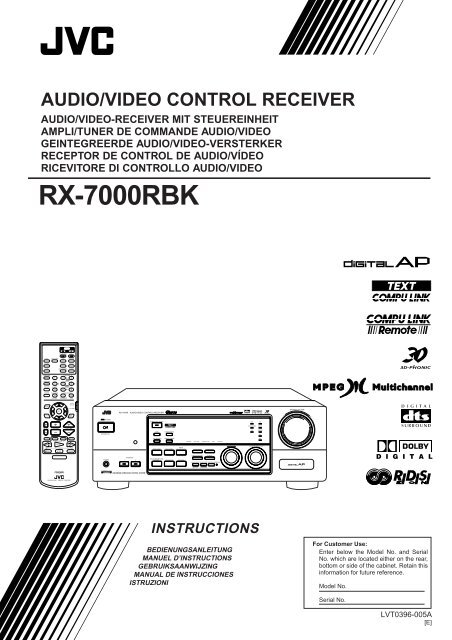
AUDIO/VIDEO CONTROL RECEIVER<br />
AUDIO/VIDEO-RECEIVER MIT STEUEREINHEIT<br />
AMPLI/TUNER DE COMMANDE AUDIO/VIDEO<br />
GEINTEGREERDE AUDIO/VIDEO-VERSTERKER<br />
RECEPTOR DE CONTROL DE AUDIO/VÍDEO<br />
RICEVITORE DI CONTROLLO AUDIO/VIDEO<br />
<strong>RX</strong>-<strong>7000RBK</strong><br />
TV/CATV/DBS<br />
VCR<br />
DVD DVD MUILTI CD TAPE/MD<br />
TV/DBS PHONO FM/AM<br />
VCR<br />
ANALOG/DIGITAL SLEEP<br />
SURROUND<br />
CENTER<br />
ON/OFF 1 2 3<br />
SURROUND TEST REAR-L<br />
MODE 4 5 6<br />
CD-DISC EFFECT<br />
REAR-R<br />
7/P 8 9<br />
SOUND SEA MODE SUBWOOFER<br />
10 0 +10<br />
RETURN FM MODE 100+<br />
MENU<br />
EXIT<br />
SET<br />
AUDIO/<br />
TV/VCR<br />
CATV/DBS<br />
TEXT<br />
DISPLAY<br />
<strong>RX</strong>-7000R<br />
AUDIO/VIDEO CONTROL RECEIVER<br />
–<br />
MASTER VOLUME<br />
+<br />
STANDBY<br />
SURROUND ON/OFF<br />
TV VOL<br />
CHANNEL<br />
VOLUME<br />
EON<br />
TA/NEWS/INFO<br />
STANDBY/ON<br />
TV/VIDEO VCR TAPE/MD MUTING<br />
PTY SEARCH<br />
DISPLAY MODE<br />
CONTROL<br />
/REW<br />
PTY<br />
REC<br />
PLAY<br />
PTY SEARCH<br />
STOP<br />
FF/<br />
PTY<br />
PAUSE<br />
PHONES<br />
SPEAKERS<br />
1 2<br />
DSP MODE SEA MODE<br />
BALANCE/SURROUND<br />
ADJUST SEA ADJUST<br />
INPUT<br />
ANALOG/DIGITAL FM/AM TUNING TUNER PRESET<br />
SETTING<br />
MULTI JOG<br />
SOURCE SELECTOR<br />
D I G I T A L<br />
COMPULINK<br />
Remote<br />
ENHANCED COMPULINK CONTROL SYSTEM<br />
RM-S<strong>RX</strong>7000R REMOTE CONTROL<br />
INSTRUCTIONS<br />
BEDIENUNGSANLEITUNG<br />
MANUEL D’INSTRUCTIONS<br />
GEBRUIKSAANWIJZING<br />
MANUAL DE INSTRUCCIONES<br />
ISTRUZIONI<br />
For Customer Use:<br />
Enter below the Model No. and Serial<br />
No. which are located either on the rear,<br />
bottom or side of the cabinet. Retain this<br />
information for future reference.<br />
Model No.<br />
Serial No.<br />
LVT0396-005A<br />
[E]
Warnings, Cautions and Others/Warnung, Achtung und sonstige Hinweise/<br />
Mises en garde, précautions et indications diverses/Waarschuwingen,<br />
voorzorgen en andere mededelingen/Avisos, precauciones y otras notas/<br />
Avvertenze e precauzioni da osservare<br />
IMPORTANT for the U.K.<br />
DO NOT cut off the mains plug from this equipment. If the plug<br />
fitted is not suitable for the power points in your home or the<br />
cable is too short to reach a power point, then obtain an<br />
appropriate safety approved extension lead or consult your<br />
dealer.<br />
BE SURE to replace the fuse only with an identical approved<br />
type, as originally fitted.<br />
If nonetheless the mains plug is cut off ensure to remove the<br />
fuse and dispose of the plug immediately, to avoid a possible<br />
shock hazard by inadvertent connection to the mains supply.<br />
If this product is not supplied fitted with a mains plug then follow<br />
the instructions given below:<br />
IMPORTANT.<br />
DO NOT make any connection to the terminal which is marked<br />
with the letter E or by the safety earth symbol or coloured green<br />
or green-and-yellow.<br />
The wires in the mains lead on this product are coloured in<br />
accordance with the following code:<br />
Blue : Neutral<br />
Brown : Live<br />
As these colours may not correspond with the coloured<br />
markings identifying the terminals in your plug proceed as<br />
follows:<br />
The wire which is coloured blue must be connected to the<br />
terminal which is marked with the letter N or coloured black.<br />
The wire which is coloured brown must be connected to the<br />
terminal which is marked with the letter L or coloured red.<br />
IF IN DOUBT - CONSULT A COMPETENT ELECTRICIAN.<br />
Per I’ltalia:<br />
“Si dichiara che il questo prodotto di marca <strong>JVC</strong> è conforme<br />
alle prescrizioni del Decreto Ministeriale n.548 del 28/08/95<br />
pubblicato sulla Gazzetta Ufficiale della Repubblica Italiana<br />
n.301 del 28/12/95.”<br />
Caution –– STANDBY/ON switch!<br />
Disconnect the mains plug to shut the power off completely. The<br />
STANDBY/ON switch in any position does not disconnect the<br />
mains line. The power can be remote controlled.<br />
Achtung –– STANDBY/ON -Schalter!<br />
Den Netzstecker aus der Steckdose ziehen, um die Stromversorgung<br />
vollkommen zu unterbrechen. Der Schalter STANDBY/ON<br />
unterbrichet in keiner Stellung die Stromversorgung vollkommen. Die<br />
Stromversorgung kann mit der Fernbedienung ein- und ausgeschaltet<br />
werden.<br />
Attention –– Commutateur STANDBY/ON !<br />
Déconnecter la fiche de secteur pour couper complètement le courant.<br />
Le commutateur STANDBY/ON ne coupe jamais complètement la<br />
ligne de secteur, quelle que soit sa position. Le courant peut être<br />
télécommandé.<br />
Voorzichtig –– STANDBY/ON schakelaar!<br />
Om de stroomtoevoer geheel uit te schakelen, trekt u de stekker uit het<br />
stopkontakt. Anders zal er altijd een geringe hoeveelheid stroom naar<br />
het apparaat lopen, ongeacht de stand van de STANDBY/ON<br />
schakelaar. U kunt het apparaat ook met de afstandsbediening aanen<br />
uitschakelen.<br />
Precaución –– Interruptor STANDBY/ON !<br />
Desconectar el cable de alimentación para desactivar la alimentación<br />
totalmente. Cualquier que sea la posición de ajuste del interruptor<br />
STANDBY/ON , la alimentación no es cortada completamente. La<br />
alimentación puede ser controlada remotamente.<br />
Attenzione –– L’interruttore STANDBY/ON !<br />
Disinserire la spina del cavo di alimentazione dalla presa della rete<br />
elettrica per staccare completamente l’alimentazione. L’interruttore<br />
STANDBY/ON in nessuna posizione stacca la linea di alimentazione<br />
elettrica principale. È possibile il controllo remoto dell’alimentazione.<br />
CAUTION<br />
To reduce the risk of electrical shocks, fire, etc.:<br />
1. Do not remove screws, covers or cabinet.<br />
2. Do not expose this appliance to rain or moisture.<br />
ACHTUNG<br />
Zur Verhinderung von elektrischen Schlägen, Brandgefahr, usw:<br />
1. Keine Schrauben lösen oder Abdeckungen enternen und nicht<br />
das Gehäuse öffnen.<br />
2. Dieses Gerät weder Regen noch Feuchtigkeit aussetzen.<br />
VOORZICHTIG<br />
Ter vermindering van gevaar voor brand, elektrische schokken, enz.:<br />
1. Verwijder geen schroeven, panelen of de behuizing.<br />
2. Stel dit toestel niet bloot aan regen of vocht.<br />
PRECAUCIÓN<br />
Para reducir riesgos de choques eléctricos, incendio, etc.:<br />
1. No extraiga los tornillos, los cubiertas ni la caja.<br />
2. No exponga este aparato a la lluvia o a la humedad.<br />
ATTENTION<br />
Afin d’éviter tout risque d’électrocution, d’incendie, etc.:<br />
1. Ne pas enlever les vis ni les panneaux et ne pas ouvrir le coffret<br />
de l’appareil.<br />
2. Ne pas exposer l’appareil à la pluie ni à l’humidité.<br />
ATTENZIONE<br />
Per ridurre il rischio di scosse elettriche, incendi, ecc...<br />
1. Non togliere viti, coperchi o la scatola.<br />
2. Non esporre l’apparecchio alla piogggia e all’umidità.<br />
G-1
Caution: Proper Ventilation<br />
To avoide risk of electric shock and fire and to protect from damage.<br />
Locate the apparatus as follows:<br />
Front: No obstructions open spacing.<br />
Sides: No obstructions in 10 cm from the sides.<br />
Top: No obstructions in 10 cm from the top.<br />
Back: No obstructions in 15 cm from the back<br />
Bottom: No obstructions, place on the level surface.<br />
In addition, maintain the best possible air circulation as illustrated.<br />
Achtung: Angemessene Ventilation<br />
Stellen Sie das Gerät zur Verhütung von elektrischem Schlag und<br />
Feuer und zum Schutz gegen Beschädigung wie folgt auf:<br />
Vorderseite: Offener Platz ohne Hindernisse.<br />
Seiten: Keine Hindernisse innerhalb 10 cm von den Seiten.<br />
Oberseite: Keine Hindernisse innerhalb 10 cm von der Oberseite.<br />
Rückseite: Keine Hindernisse innerhalb 15 cm von der Rückseite.<br />
Unterseite: Keine Hindernisse. Auf eine ebene Oberfläche stellen.<br />
Zusätzlich die bestmögliche Luftzirkulation wie gezeigt erhalten.<br />
Attention: Ventilation Correcte<br />
Pour éviter les chocs électriques, l’incendie et tout autre dégât.<br />
Disposer l’appareil en tenant compte des impératifs suivants<br />
Avant: Rien ne doit gêner le dégagement<br />
Flancs: Laisser 10 cm de dégagement latéral<br />
Dessus: Laisser 10 cm de dégagement supérieur<br />
Arrière: Laisser 15 cm de dégagement arrière<br />
Dessous: Rien ne doit obstruer par dessous; poser l’appareil sur<br />
une surface plate.<br />
Veiller également à ce que l’air circule le mieux possible comme<br />
illustré.<br />
Voorzichtig: Zorg Voor Goede Ventilatie<br />
Om gevaar voor brand of een elektrische schok te voorkomen, dient u<br />
bij opstelling van het apparaat op de volgende punten te letten:<br />
Voorkant: Voldoende ruimte vrij houden.<br />
Zijkanten: Minstens 10 cm aan weerszijden vrij houden.<br />
Bovenkant: Niets bovenop plaatsen; 10 cm speling geven.<br />
Achterkant: Minstens 15 cm ruimte achteraan vrij houden.<br />
Onderkant: Opstellen op een egaal horizontaal oppervlak.<br />
Bovendien moet er rondom voldoende luchtdoorstroming zijn, zoals in<br />
de afbeelding aangegeven.<br />
Precaución: Ventilación Adecuada<br />
Para evitar el riesgo de choque eléctrico e incendio y para proteger el<br />
aparato contra daños.<br />
Ubique el aparato de la siguiente manera:<br />
Frente: Espacio abierto sin obstrucciones<br />
Lados: 10 cm sin obstrucciones a los lados<br />
Parte superior: 10 cm sin obstrucciones en la parte superior<br />
Parte trasera: 15 cm sin obstrucciones en la parte trasera<br />
Fondo: Sin obstrucciones, colóquelo sobre una superficie<br />
nivelada<br />
Además, mantenga la mejor circulación de aire posible como se<br />
ilustra.<br />
Attenzione: Problemi di Ventilazione<br />
Per evitare il rischio di folgorazioni ed incendi e proteggere l’unità da<br />
danni, installarla nel modo seguente.<br />
Davanti: Nessun ostacolo, spazio libero<br />
Lati:<br />
Nessun ostacolo per almeno 10 cm<br />
Sopra: Nessun ostacolo per almeno 10 cm<br />
Retro: Nessun ostacolo per almeno 15 cm<br />
Fondo: Libero ed in piano<br />
Inoltre, mantenere il più possibile la circolazione dell’aria.<br />
Nederlands Français Deutsch English<br />
Wall or obstructions<br />
Wand oder Hindernisse<br />
Mur, ou obstruction<br />
Wand of meubilair<br />
Pared u obstrucciones<br />
Parete o ostacol<br />
Spacing 15 cm or more<br />
Abstand von 15 cm oder mehr<br />
Dégagement de 15 cm ou plus<br />
Minstens 15 cm tussenruimte<br />
Espacio de 15 cm o más<br />
15 cm di distanza o più<br />
<strong>RX</strong>-<strong>7000RBK</strong><br />
Front<br />
Vorderseite<br />
Avant<br />
Voorkant<br />
Frente<br />
Davanti<br />
Stand height 15 cm or more<br />
Standhöhe 15 cm oder mehr<br />
Hauteur du socle: 15 cm ou plus<br />
Standard op minstens 15 cm van de vloer<br />
Allura del soporte 15 cm o más<br />
Altezza del tavolino 15 cm p plù<br />
Italiano Español<br />
Floor<br />
Boden<br />
Plancher<br />
Vloer<br />
Piso<br />
Pavimento<br />
G-2
English<br />
Table of Contents<br />
Parts Identification ...................................... 2<br />
Getting Started ........................................... 3<br />
Before Installation ...................................................................... 3<br />
Checking the Supplied Accessories ........................................... 3<br />
Connecting the FM and AM (MW/LW) Antennas ..................... 3<br />
Connecting the Speakers ............................................................ 4<br />
Connecting Audio/Video Components ....................................... 5<br />
Connecting the Power Cord ....................................................... 9<br />
Putting Batteries in the Remote Control .................................... 9<br />
Using the DSP Modes ................................ 25<br />
Available DSP Modes According to the Speaker Arrangement .. 27<br />
Adjusting the 3D-PHONIC Modes .......................................... 28<br />
Adjusting the DAP Modes ....................................................... 28<br />
Adjusting the Surround Modes ................................................ 29<br />
Activating the DSP Modes ....................................................... 31<br />
Using the DVD MULTI Playback Mode .......... 33<br />
Activating the DVD MULTI Playback Mode .......................... 33<br />
Basic Operations ....................................... 10<br />
Turning the Power On and Off (Standby) ................................ 10<br />
Selecting the Source to Play ..................................................... 10<br />
Adjusting the Volume ............................................................... 11<br />
Selecting the Front Speakers .................................................... 11<br />
Muting the Sound ..................................................................... 12<br />
Reinforcing the Bass ................................................................ 12<br />
Attenuating the Input Signal .................................................... 12<br />
Adjusting the Subwoofer Output Level.................................... 12<br />
Basic Settings ........................................... 13<br />
Recording a Source .................................................................. 13<br />
Adjusting the Front Speaker Output Balance ........................... 13<br />
Changing the Source Name ...................................................... 13<br />
Setting the Subwoofer Information .......................................... 13<br />
Setting the Speakers for the DSP Modes ................................. 14<br />
Digital Input (DIGITAL IN) Terminal Setting ......................... 16<br />
Selecting the Analog or Digital Input Mode ............................ 16<br />
Showing the Text Information on the Display ......................... 17<br />
Storing the Basic Settings and Adjustments — One Touch<br />
Operation ........................................................................... 18<br />
Using the Sleep Timer .............................................................. 18<br />
Receiving Radio Broadcasts ........................ 19<br />
Tuning in Stations Manually .................................................... 19<br />
Using Preset Tuning ................................................................. 19<br />
Selecting the FM Reception Mode ........................................... 20<br />
Assigning Names to Preset Stations ......................................... 20<br />
Using the RDS (Radio Data System) to Receive FM Stations ... 21<br />
Searching for a Program by PTY Codes .................................. 21<br />
Switching to a Broadcast Program of Your Choice<br />
Temporarily ........................................................................ 23<br />
Using the SEA Modes ................................ 24<br />
Selecting Your Favorite SEA Mode ........................................... 24<br />
Creating Your Own SEA Mode ................................................ 24<br />
Using the On-Screen Menus ........................ 34<br />
Selecting the Source to Play ..................................................... 34<br />
Selecting Different Sources for Picture and Sound .................. 34<br />
Activating the DSP Modes ....................................................... 34<br />
Selecting the Analog or Digital Input Mode ............................ 34<br />
Adjusting the Front Speaker Output Balance ........................... 35<br />
Reinforcing the Bass ................................................................ 35<br />
Attenuating the Input Signal .................................................... 35<br />
Adjusting the Subwoofer Output Level.................................... 35<br />
Adjusting the DSP Modes ........................................................ 35<br />
Activating the DVD MULTI Playback Mode .......................... 36<br />
Selecting Your Favorite SEA Mode ......................................... 36<br />
Creating Your Own SEA Mode ................................................ 36<br />
Setting the Basic Setting Items ................................................ 37<br />
Operating the Tuner .................................................................. 37<br />
Storing the Preset Stations ....................................................... 38<br />
Assigning Names to Preset Stations ......................................... 38<br />
COMPU LINK Remote Control System ......... 39<br />
TEXT COMPU LINK Remote Control System .. 40<br />
Showing the Disc Information on the TV Screen .................... 41<br />
Searching for a Disc (Only for the CD player) ........................ 42<br />
Entering the Disc Information .................................................. 43<br />
Operating <strong>JVC</strong>’s Audio/Video Components ... 45<br />
Operating Audio Components .................................................. 45<br />
Operating Video Components .................................................. 47<br />
Operating Other Manufacturers’ Video<br />
Equipment ............................................ 48<br />
Troubleshooting ......................................... 54<br />
Specifications ............................................ 55<br />
1
Parts Identification<br />
Become familiar with the buttons and controls on the receiver before use.<br />
Refer to the pages in parentheses for details.<br />
1 2 3 4 5 67 8 9 p<br />
English<br />
<strong>RX</strong>-7000R AUDIO/VIDEO CONTROL RECEIVER<br />
D I G I T A L<br />
–<br />
MASTER VOLUME<br />
+<br />
STANDBY<br />
SURROUND ON/OFF<br />
DVD<br />
CD<br />
TV SOUND/DBS<br />
PHONO<br />
EON<br />
TA/NEWS/INFO<br />
VCR<br />
TAPE/MD<br />
STANDBY/ON<br />
FM<br />
PTY SEARCH<br />
DISPLAY MODE<br />
AM<br />
DSP MODE<br />
SEA MODE<br />
INPUT<br />
ANALOG/DIGITAL FM/AM TUNING TUNER PRESET<br />
MULTI JOG<br />
SOURCE SELECTOR<br />
TUNER/SEA MEMORY<br />
FM MODE<br />
PHONES<br />
SPEAKERS<br />
1 2<br />
BALANCE/SURROUND<br />
ADJUST<br />
SEA ADJUST<br />
SETTING<br />
SOUND SELECT BASS BOOSTONE TOUCH OPERATION<br />
INPUT ATT.<br />
SOURCE NAME<br />
COMPULINK<br />
Remote<br />
ENHANCED COMPULINK CONTROL SYSTEM<br />
q<br />
w<br />
e r t<br />
y<br />
u i o<br />
;<br />
a<br />
s<br />
d<br />
f<br />
1<br />
2<br />
3<br />
4<br />
5<br />
6<br />
7<br />
8<br />
9<br />
TV VOL<br />
/REW<br />
CHANNEL<br />
RM-S<strong>RX</strong>7000R<br />
CONTROL<br />
PTY SEARCH<br />
STOP<br />
DISPLAY MODE<br />
VOLUME<br />
TV/VIDEO VCR TAPE/MD MUTING<br />
PTY<br />
REC<br />
PLAY<br />
TV/CATV/DBS<br />
FF/<br />
PTY<br />
REMOTE CONTROL<br />
VCR<br />
DVD DVD MUILTI CD TAPE/MD<br />
TV/DBS PHONO FM/AM<br />
VCR<br />
SURROUND<br />
ON/OFF<br />
ANALOG/DIGITAL<br />
CENTER<br />
MENU<br />
SURROUND TEST REAR-L<br />
MODE<br />
CD-DISC<br />
EFFECT<br />
ENTER<br />
REAR-R<br />
SOUND SEA MODE SUBWOOFER<br />
MENU<br />
EXIT<br />
RETURN<br />
SET<br />
SLEEP<br />
1 2 3<br />
4 5 6<br />
7/P 8 9<br />
10 0 +10<br />
FM MODE 100+<br />
AUDIO/<br />
TV/VCR<br />
CATV/DBS<br />
TEXT<br />
DISPLAY<br />
PAUSE<br />
p<br />
q<br />
w<br />
e<br />
r<br />
t<br />
y<br />
u<br />
i<br />
o<br />
Remote Control<br />
1 TV/CATV/DBS button (47 – 49)<br />
2 Source selecting buttons (10)<br />
DVD, DVD MULTI, CD, TAPE/MD, TV/DBS,<br />
PHONO, FM/AM, VCR<br />
3 SURROUND ON/OFF button (29, 31)<br />
4 SURROUND MODE button (28, 29)<br />
5 CD-DISC button (46)<br />
6 SOUND button (24, 28, 33)<br />
7 On-screen operation buttons (34, 41)<br />
MENU, SET, EXIT, %, fi, @, #<br />
8 TV VOL +/– buttons (47, 48)<br />
9 • RDS operation buttons (21 – 23)<br />
PTY SEARCH, PTY –/+, DISPLAY MODE<br />
• Operating buttons for audio/video components<br />
(45 – 49)<br />
p AUDIO buttons (10)<br />
,<br />
q VCR button (47, 49)<br />
w SLEEP button (18)<br />
e ANALOG/DIGITAL button (17)<br />
r • 10 keys for selecting preset channel (20)<br />
• 10 keys for adjusting sound (24, 28 – 31, 33)<br />
• 10 keys for operating audio/video components<br />
(45 – 49)<br />
t Remote control mode selector (10, 45, 48)<br />
y TEXT DISPLAY button (41)<br />
u CHANNEL +/– buttons (47 – 49)<br />
i VOLUME +/– buttons (11)<br />
o MUTING button (12)<br />
Front Panel<br />
1 STANDBY/ON button and STANDBY<br />
lamp (10)<br />
2 Remote sensor (9)<br />
3 SURROUND ON/OFF button and lamp (30, 31)<br />
4 SEA MODE button (24)<br />
5 INPUT ANALOG/DIGITAL button (16)<br />
6 FM/AM TUNING button (19)*<br />
7 FM MODE button (20)<br />
8 Display (10)<br />
9 Source lamps (10)<br />
p MASTER VOLUME control (11)<br />
q PHONES jack (12)<br />
w SPEAKERS 1/2 buttons and lamps (11)<br />
e RDS operation buttons (21 – 23)<br />
EON, TA/NEWS/INFO, PTY SEARCH,<br />
DISPLAY MODE<br />
r DSP MODE button (28)<br />
t<br />
BALANCE/SURROUND ADJUST button<br />
(12, 13, 28)*<br />
y SEA ADJUST button (24)*<br />
u SETTING button (13 – 17)*<br />
i TUNER/SEA MEMORY button (19, 20, 24)<br />
o SOUND SELECT/INPUT ATT. button<br />
(11, 12)<br />
; BASS BOOST/SOURCE NAME button<br />
(12, 13)<br />
a ONE TOUCH OPERATION button and lamp<br />
(18)<br />
s TUNER PRESET button (20)*<br />
d MULTI JOG control<br />
What this control actually does depends on<br />
which function you are trying to adjust. Before<br />
using this control, select the function by pressing<br />
one of the buttons marked with *.<br />
f SOURCE SELECTOR control (10)<br />
2
English<br />
Getting Started<br />
This section explains how to connect audio/video components and speakers to the receiver, and how to connect the<br />
power supply.<br />
Before Installation<br />
General<br />
• Be sure your hands are dry.<br />
• Turn the power off to all components.<br />
• Read the manuals supplied with the components you are going to<br />
connect.<br />
Locations<br />
• Install the receiver in a location that is level and protected from<br />
moisture.<br />
• The temperature around the receiver must be between –5˚C and<br />
35˚ C (23˚F and 95˚ F).<br />
• Make sure there is good ventilation around the receiver. Poor<br />
ventilation could cause overheating and damage the receiver.<br />
Handling the receiver<br />
• Do not insert any metal object into the receiver.<br />
• Do not disassemble the receiver or remove screws, covers, or<br />
cabinet.<br />
• Do not expose the receiver to rain or moisture.<br />
Connecting the FM and AM (MW/LW)<br />
Antennas<br />
FM Antenna Connections<br />
A<br />
AM<br />
LOOP<br />
ANTENNA<br />
FM 75<br />
COAXIAL<br />
AM<br />
EXT<br />
FM Antenna<br />
AM<br />
LOOP<br />
ANTENNA<br />
ANTENNA Extend the supplied FM antenna horizontally.<br />
FM 75<br />
COAXIAL<br />
B<br />
FM 75<br />
COAXIAL<br />
AM<br />
EXT<br />
Checking the Supplied Accessories<br />
AM<br />
LOOP<br />
Outdoor FM Antenna Cable<br />
Check to be sure you have all of the following items, which are<br />
supplied with the receiver.<br />
The number in the parentheses indicates quantity of the pieces<br />
supplied.<br />
• Remote Control (1)<br />
• Batteries (2)<br />
• AM (MW/LW) Loop Antenna (1)<br />
• FM Antenna (1)<br />
If anything is missing, contact your dealer immediately.<br />
AM<br />
EXT<br />
A. Using the Supplied FM Antenna<br />
The FM antenna provided can be connected to the FM 75 Ω<br />
COAXIAL terminal as temporary measure.<br />
B. Using the Standard Type Connector (Not Supplied)<br />
A standard type connector (IEC or DIN45325) should be<br />
connected to the FM 75 Ω COAXIAL terminal.<br />
Note:<br />
If reception is poor, connect the outdoor antenna.<br />
Before attaching a 75 Ω coaxial cable (the kind with a round wire<br />
going to an outdoor antenna), disconnect the supplied FM antenna.<br />
3
RIGHT<br />
RIGHT<br />
+ –<br />
RIGHT<br />
AM (MW/LW) Antenna Connections<br />
ANTENNA<br />
FM 75<br />
COAXIAL<br />
Snap the tabs on the loop into the<br />
slots of the base to assemble the<br />
AM (MW/LW) loop.<br />
Basic connecting procedure<br />
1<br />
2<br />
3<br />
1<br />
1<br />
4<br />
1<br />
English<br />
1<br />
AM<br />
LOOP<br />
AM<br />
EXT<br />
AM (MW/LW) Loop Antenna<br />
2 3<br />
1 Cut, twist and remove the insulation at the end of<br />
each speaker signal cable (not supplied).<br />
2 Turn the knob counterclockwise.<br />
3 Insert the speaker signal cable.<br />
4 Turn the knob clockwise.<br />
Connecting the front speakers<br />
Outdoor single vinyl-covered wire<br />
You can connect two pairs of front speakers (one pair to the FRONT<br />
SPEAKERS 1 terminals, and another pair to the FRONT<br />
SPEAKERS 2 terminals).<br />
Right speaker<br />
FRONT SPEAKERS 1<br />
Left speaker<br />
Turn the loop until you have the best reception.<br />
Notes:<br />
• Make sure the antenna conductors do not touch any other<br />
terminals, connecting cords and power cord. This could cause poor<br />
reception.<br />
• If reception is poor, connect an outdoor single vinyl-covered wire to<br />
the AM EXT terminal. (Keep the AM (MW/LW) loop antenna<br />
connected.)<br />
1<br />
+ –<br />
1<br />
Connecting the Speakers<br />
2<br />
2<br />
You can connect the following speakers:<br />
• Two pairs of front speakers to produce normal stereo sound.<br />
• One pair of rear speakers to enjoy the surround effect.<br />
• One center speaker to produce more effective surround effect (to<br />
emphasize human voices).<br />
• One subwoofer to enhance the bass.<br />
RIGHT<br />
LEFT<br />
FRONT SPEAKERS<br />
IMPORTANT:<br />
After connecting the speakers listed above, set the speaker<br />
setting information properly to obtain the best possible DSP<br />
effect. For details, see page 14.<br />
Right speaker<br />
FRONT SPEAKERS 2<br />
Left speaker<br />
For each speaker (except for a subwoofer), connect the (–) and (+)<br />
terminals on the rear panel to the (–) and (+) terminals marked on<br />
the speakers. For connecting a subwoofer, see page 5.<br />
CAUTION:<br />
Use speakers with the SPEAKER IMPEDANCE indicated by the<br />
speaker terminals.<br />
4
–<br />
+<br />
English<br />
About the speaker impedance<br />
The required speaker impedance of the front speakers does differ<br />
depending on whether both the FRONT SPEAKERS 1 and FRONT<br />
SPEAKERS 2 terminals are used or only one of them is used.<br />
CASE 1<br />
When you connect only one set of front speakers<br />
Connecting the subwoofer speaker<br />
You can enhance the bass by connecting a subwoofer.<br />
Connect the input jack of a powered subwoofer to the<br />
SUBWOOFER OUT jack on the rear panel, using a cable with RCA<br />
pin plugs (not supplied).<br />
Front<br />
speaker<br />
1<br />
Front<br />
speaker<br />
1<br />
Powered subwoofer<br />
SUBWOOFER<br />
OUT<br />
Connecting Audio/Video Components<br />
CASE 2<br />
Front<br />
speaker<br />
1<br />
Use front speakers with 4 Ω – 16 Ω impedance.<br />
When you connect two sets of front speakers<br />
Front<br />
speaker<br />
2<br />
Front<br />
speaker<br />
2<br />
Use front speakers 8 Ω – 16 Ω impedance.<br />
Front<br />
speaker<br />
1<br />
Connecting the rear and center speakers<br />
Connect rear speakers to the REAR SPEAKERS terminals and a<br />
center speaker to the CENTER SPEAKER terminals.<br />
You can connect the following audio/video components to this<br />
receiver. Refer also to the manuals supplied with your components.<br />
Audio Components<br />
• Turntable<br />
• CD player*<br />
• Cassette deck<br />
or MD recorder*<br />
Analog connections<br />
Audio component connections<br />
Use the cables with RCA pin plugs (not supplied).<br />
Connect the white plug to the audio left jack, and the red plug to the<br />
audio right jack.<br />
CAUTION:<br />
If you connect a sound-enhancing device such as a graphic equalizer<br />
between the source components and this receiver, the sound output<br />
through this receiver may be distorted.<br />
Turntable<br />
Video Components<br />
• DVD player*<br />
• TV*<br />
• DBS tuner*<br />
• VCR<br />
* You can connect these components using the methods described<br />
in “Analog connections” (below) or in “Digital connections” (see<br />
page 8).<br />
1 2<br />
If an earth cable is provided for your<br />
turntable, connect the cable to the<br />
screw marked (H) on the rear panel.<br />
Turntable<br />
RIGHT<br />
LEFT<br />
AUDIO<br />
PHONO<br />
Left rear<br />
speaker<br />
Center<br />
speaker<br />
Right rear<br />
speaker<br />
CENTER<br />
SPEAKER<br />
+<br />
REAR<br />
SPEAKERS<br />
RIGHT LEFT<br />
To audio output<br />
CD<br />
OUT<br />
(REC)<br />
TAPE<br />
/MD<br />
IN<br />
(PLAY)<br />
–<br />
Note:<br />
Any turntables incorporating a small-output cartridge such as an MC<br />
(moving-coil type) must be connected to this receiver through a<br />
commercial head amplifier or step-up transformer. Direct connection<br />
may result in insufficient volume.<br />
5
CD player<br />
CD player<br />
Cassette deck or MD recorder<br />
To audio input<br />
To audio output<br />
Cassette deck<br />
RIGHT<br />
LEFT<br />
AUDIO<br />
PHONO<br />
CD<br />
RIGHT<br />
LEFT<br />
AUDIO<br />
PHONO<br />
CD<br />
OUT<br />
(REC)<br />
TAPE<br />
/MD<br />
IN<br />
(PLAY)<br />
To audio output<br />
Video component connections<br />
Use the cables with RCA pin plugs (not supplied).<br />
Connect the white plug to the audio left jack, the red plug to the<br />
audio right jack, and the yellow plug to the video jack.<br />
If your video components have S-video (Y/C-separation) terminals,<br />
connect them using S-video cables (not supplied). Connecting these<br />
video components through the S-video input/output terminals will<br />
give you better picture playback (or recording) quality.<br />
IMPORTANT:<br />
This receiver is equipped with both the composite video and S-video<br />
input/output terminals for connecting video components.<br />
You do not have to connect both the composite video and S-video<br />
terminals.<br />
However, remember that the video signals from the composite<br />
video input terminals are output only through the composite<br />
video output terminals, while the ones from the S-video input<br />
terminals are output only through the S-video output terminals.<br />
Therefore, if a recording video component and a playing video<br />
component are connected to the receiver through the different video<br />
terminals, you cannot record the picture from the playing component<br />
on the recording component. In addition, if the TV and a playing video<br />
component are connected to the receiver through the different video<br />
terminals, you cannot view the playback picture from the playing<br />
component on the TV.<br />
English<br />
OUT<br />
(REC)<br />
TAPE<br />
/MD<br />
IN<br />
(PLAY)<br />
VCR<br />
To audio input<br />
MD recorder<br />
To audio output<br />
A<br />
S-VHS (or VHS) VCR<br />
C<br />
D<br />
Note:<br />
You can connect either a cassette deck or an MD recorder to the<br />
TAPE/MD jacks. When connecting an MD recorder to the TAPE/MD<br />
jacks, change the source name, which will be shown on the display<br />
when selected as the source, to “MD.” See page 13 for details.<br />
AUDIO<br />
B<br />
RIGHT<br />
LEFT<br />
DVD<br />
TV SOUND<br />
/DBS<br />
OUT<br />
(REC)<br />
VIDEO<br />
VIDEO<br />
S-VIDEO<br />
E<br />
F<br />
If your audio components have a COMPU LINK-3 or TEXT<br />
COMPU LINK jack<br />
• See also page 39 for detailed information about the connection and<br />
the COMPU LINK-3 remote control system.<br />
• See also page 40 for detailed information about the connection and<br />
the TEXT COMPU LINK remote control system.<br />
VCR<br />
IN<br />
(PLAY)<br />
Å To left/right channel audio output<br />
ı To left/right channel audio input<br />
Ç To S-video output<br />
Î To composite video output<br />
‰ To composite video input<br />
Ï To S-video input<br />
6
English<br />
TV and/or DBS tuner<br />
When connecting the TV, DO NOT connect the<br />
TV’s video outputs to these video input terminals.<br />
DVD player<br />
• When you connect the DVD player with stereo output jacks:<br />
A DVD player B C<br />
AUDIO RIGHT<br />
RIGHT<br />
LEFT<br />
VIDEO<br />
VIDEO<br />
S-VIDEO<br />
DVD<br />
DVD<br />
To audio<br />
output<br />
TV SOUND<br />
/DBS<br />
AUDIO<br />
RIGHT<br />
LEFT<br />
VIDEO<br />
VIDEO<br />
S-VIDEO<br />
TV<br />
Connect the TV to the MONITOR<br />
OUT jack to view the playback<br />
picture from the other connected<br />
video components.<br />
OUT<br />
(REC)<br />
VCR<br />
IN<br />
(PLAY)<br />
MONITOR<br />
OUT<br />
Å To front left/right channel audio output (or to audio mixed<br />
output if necessary)<br />
ı To S-video output<br />
Ç To composite video output<br />
• When you connect the DVD player with its analog discrete output<br />
(5.1 CH reproduction) jacks:<br />
DVD<br />
To composite video input<br />
A<br />
B<br />
DVD player<br />
C<br />
To S-video input<br />
DVD<br />
Note:<br />
Use a TV of the PAL- or multi-color system.<br />
D<br />
AUDIO<br />
RIGHT<br />
E<br />
LEFT<br />
VIDEO<br />
VIDEO<br />
S-VIDEO<br />
F<br />
DVD<br />
AUDIO RIGHT<br />
RIGHT<br />
LEFT<br />
VIDEO<br />
VIDEO<br />
S-VIDEO<br />
TV SOUND<br />
/DBS<br />
To audio<br />
output<br />
DBS tuner<br />
DVD<br />
TV SOUND<br />
/DBS<br />
OUT<br />
(REC)<br />
SUB<br />
WOOFER<br />
CENTER<br />
DVD<br />
OUT<br />
(REC)<br />
VCR<br />
IN<br />
(PLAY)<br />
DBS<br />
IN<br />
(PLAY)<br />
To composite video output<br />
OUT<br />
(REC)<br />
VCR 2<br />
Note:<br />
To S-video output<br />
IN<br />
(PLAY)<br />
When connecting the DBS tuner to the TV SOUND/DBS jacks,<br />
change the source name, which will be shown on the display when<br />
selected as the source, to “DBS.” See page 13 for details.<br />
Å To center channel audio output<br />
ı To subwoofer audio output<br />
Ç To S-video output<br />
Î To front left/right channel audio output<br />
‰ To rear left/right channel audio output<br />
Ï To composite video output<br />
7
Digital connections<br />
This receiver is equipped with three DIGITAL IN terminals — one<br />
digital coaxial terminal and two digital optical terminals, and one<br />
DIGITAL OUT terminal.<br />
You can connect any digital equipment such as —<br />
• DBS tuner,<br />
• Digital TV broadcast tuner,<br />
• DVD player,<br />
• CD player,<br />
• and MD recorder.<br />
IMPORTANT:<br />
• When connecting the DVD player, digital TV broadcast tuner or DBS<br />
tuner using the digital terminals, you also need to connect it to the<br />
video jack (either composite video terminal or S-video terminal) on<br />
the rear. Without connecting it to the video jack, you can view no<br />
playback picture.<br />
• After connecting the components using the DIGITAL IN terminals,<br />
set the following correctly if necessary.<br />
–Set the digital input (DIGITAL IN) terminal setting correctly. For<br />
details, see “Digital Input (DIGITAL IN) Terminal Setting” on page<br />
16.<br />
– Select the digital input mode correctly. For details, see “Selecting<br />
the Analog or Digital Input Mode” on page 16.<br />
Notes:<br />
• When shipped from the factory, the DIGITAL IN terminals have<br />
been set for use with the following components.<br />
– DIGITAL 1 (coaxial): For DVD player<br />
– DIGITAL 2 (optical): For CD player<br />
– DIGITAL 3 (optical): For digital TV broadcast tuner<br />
• When you want to operate the CD player or MD recorder using the<br />
COMPU LINK remote control system, connect the target<br />
component also as described in “Analog connections” (see page 6).<br />
• When you want to operate the DVD player using the AV COMPU<br />
LINK remote control system, connect the DVD player also as<br />
described in “Analog connections” (see page 7).<br />
Digital output terminal<br />
MD recorder, etc.<br />
Digital optical cable (not supplied)<br />
between digital optical terminals<br />
English<br />
Digital input terminals<br />
DBS tuner<br />
DVD player<br />
DBS<br />
CD player<br />
DVD<br />
MD recorder<br />
When the digital recording<br />
equipment such as an MD recorder<br />
has a digital optical input terminal,<br />
connecting it to the DIGITAL OUT<br />
terminal enables you to perform<br />
digital-to-digital recording.<br />
DIGITAL OUT<br />
PCM/DOLBY DIGITAL/MPEG/DTS<br />
Digital coaxial cable (not supplied)<br />
between digital coaxial terminals<br />
Digital optical cable (not supplied)<br />
between digital optical terminals<br />
When the component has a digital<br />
coaxial output terminal, connect it to the<br />
DIGITAL 1 (DVD) terminal, using the<br />
digital coaxial cable (not supplied).<br />
When the component has a digital<br />
optical output terminal, connect it to the<br />
DIGITAL 2 (CD), or DIGITAL 3 (TV)<br />
terminal, using the digital optical cable<br />
(not supplied).<br />
DIGITAL IN<br />
PCM / DOLBY DIGITAL<br />
MPEG/ DTS<br />
DIGITAL 1 (DVD)<br />
DIGITAL 2 (CD)<br />
Before connecting a digital<br />
optical cable, unplug the<br />
protective plug.<br />
DIGITAL 3 (TV)<br />
8
English<br />
Connecting the Power Cord<br />
Putting Batteries in the Remote Control<br />
Before plugging the receiver into an AC outlet, make sure that all<br />
connections have been made.<br />
Plug the power cord into an AC outlet.<br />
Keep the power cord away from the connecting cables and the<br />
antenna. The power cord may cause noise or screen interference. We<br />
recommend that you use a coaxial cable to connect the antenna,<br />
since it is well-shielded against interference.<br />
Note:<br />
The preset settings such as preset channels and sound adjustment<br />
may be erased in a few days in the following cases:<br />
– When you unplug the power cord.<br />
– When a power failure occurs.<br />
CAUTIONS:<br />
• Do not touch the power cord with wet hands.<br />
• Do not pull on the power cord to unplug the cord. When unplugging<br />
the cord, always grasp the plug so as not to damage the cord.<br />
Before using the remote control, put two supplied batteries first.<br />
When using the remote control, aim the remote control directly at<br />
the remote sensor on the receiver.<br />
1<br />
2<br />
R6P(SUM-3)/AA(15F)<br />
3<br />
1. On the back of the remote control, remove the<br />
battery cover.<br />
2. Insert batteries. Make sure to match the polarity:<br />
(+) to (+).<br />
3. Replace the cover.<br />
If the range or effectiveness of the remote control decreases, replace<br />
the batteries. Use two R6P(SUM-3)/AA(15F) type dry-cell batteries.<br />
CAUTION:<br />
Follow these precautions to avoid leaking or cracking cells:<br />
• Place batteries in the remote control so they match the polarity: (+)<br />
to (+).<br />
• Use the correct type of batteries. Batteries that look similar may<br />
differ in voltage.<br />
• Always replace both batteries at the same time.<br />
• Do not expose batteries to heat or flame.<br />
9
Basic Operations<br />
The following operations are commonly used when you play any sound source.<br />
IMPORTANT:<br />
When using the remote control, check to see if its<br />
remote control mode selector is set to the correct<br />
position:<br />
To operate this receiver, set it to “AUDIO/TV/<br />
VCR.”<br />
AUDIO/<br />
TV/VCR<br />
CATV/DBS<br />
From the remote control:<br />
Press one of the source selecting buttons.<br />
DVD DVD MUILTI CD TAPE/MD<br />
TV/DBS PHONO FM/AM<br />
English<br />
Turning the Power On and Off (Standby)<br />
VCR<br />
On the front panel:<br />
To turn on the power, press STANDBY/ON .<br />
The STANDBY lamp goes off. The name of the<br />
current source (or station frequency) appears on<br />
the display.<br />
Current source name appears<br />
STANDBY<br />
STANDBY/ON<br />
Selected source name appears<br />
Current volume level is shown here<br />
To turn off the power (into standby mode),<br />
press STANDBY/ON again.<br />
The STANDBY lamp lights up. A small amount<br />
of power is consumed in standby mode. To turn<br />
the power off completely, unplug the AC power<br />
cord.<br />
From the remote control:<br />
To turn on the power, press AUDIO .<br />
The STANDBY lamp goes off. The name of<br />
the current source (or station frequency)<br />
appears on the display.<br />
To turn off the power (into standby mode),<br />
press AUDIO .<br />
The STANDBY lamp lights up.<br />
STANDBY<br />
STANDBY/ON<br />
DVD<br />
DVD MULTI<br />
CD*<br />
TAPE/MD*<br />
TV/DBS<br />
PHONO*<br />
FM/AM*<br />
VCR<br />
Select the DVD player.<br />
Select the DVD player for viewing the digital video<br />
disc using the analog discrete output mode (5.1CH<br />
reproduction) on the DVD player.<br />
To enjoy the DVD MULTI playback, see page 33.<br />
Select the CD player.<br />
Select the cassette deck (or the MD recorder).<br />
Select TV sounds (or the DBS tuner).<br />
Select the turntable.<br />
Select an FM or AM (MW/LW) broadcast.<br />
• Each time you press the button, the band alternates<br />
between FM and AM (MW/LW).<br />
Select the video component connected to the VCR<br />
jacks.<br />
Notes:<br />
• When connecting an MD recorder (to the TAPE/MD jacks), and a<br />
DBS tuner (to the TV SOUND/DBS jacks), change the source name<br />
shown on the display. For details, see page 13.<br />
• When you press one of the source selecting buttons on the remote<br />
control marked above with an asterisk (*), the receiver<br />
automatically turns on.<br />
Selecting the Source to Play<br />
On the front panel:<br />
Turn SOURCE SELECTOR until the source<br />
name you want appears on the display.<br />
• As you turn the selector, the source changes as<br />
follows:<br />
SOURCE SELECTOR<br />
CD O PHONO O TAPE (or MD) O FM O<br />
AM O DVD O DVD MULTI O<br />
TV SOUND (or DBS) O VCR O<br />
(back to the beginning)<br />
The selected source lamp also lights up.<br />
• The DVD lamp lights up both for “DVD” and<br />
“DVD MULTI.”<br />
DVD<br />
TV SOUND/DBS<br />
VCR<br />
CD<br />
PHONO<br />
TAPE/MD<br />
FM<br />
AM<br />
10
English<br />
Signal and speaker indicators on the display<br />
• The signal indicators light up to indicate the incoming channel<br />
signals.<br />
– Only the indicators for the incoming signals light up.<br />
• The frame of the signal indicator (except for “LFE” and “S”)<br />
lights up if the corresponding speaker is set to “LARGE” or<br />
“SMALL” (for subwoofer, “YES”).<br />
– The frames of “L” and “R” indicators always light up.<br />
L<br />
C<br />
SUBWFR<br />
LS<br />
S<br />
L: • When digital input is selected: Lights up when the left<br />
channel signal comes in.<br />
• When analog input is selected: Always lights up.<br />
R: • When digital input is selected: Lights up when the right<br />
channel signal comes in.<br />
• When analog input is selected: Always lights up.<br />
C: Lights up when the center channel signal comes in.<br />
LS: Lights up when the left rear channel signal comes in.<br />
RS: Lights up when the right rear channel signal comes in.<br />
S: Lights up when the monaural rear channel signal comes in.<br />
LFE: Lights up when the LFE channel signal comes in.<br />
R<br />
LFE<br />
RS<br />
Adjusting the Volume<br />
On the front panel:<br />
To increase the volume, turn MASTER<br />
VOLUME clockwise.<br />
To decrease the volume, turn it<br />
counterclockwise.<br />
• When you turn MASTER VOLUME rapidly,<br />
the volume level also changes rapidly.<br />
• When you turn MASTER VOLUME slowly,<br />
the volume level also changes slowly.<br />
From the remote control:<br />
To increase the volume, press VOLUME +.<br />
To decrease the volume, press VOLUME –.<br />
CAUTION:<br />
Always set the volume to the minimum before starting any source. If<br />
the volume is set at its high level, the sudden blast of sound energy<br />
can permanently damage your hearing and/or ruin your speakers.<br />
Note:<br />
The volume level can be adjusted within the range of “0” (minimum) to<br />
“90” (maximum).<br />
–<br />
MASTER VOLUME<br />
VOLUME<br />
+<br />
Notes:<br />
• When “SUBWOOFER” is set to “YES,” SUBWFR lights up.<br />
• When you select “DVD MULTI,” all the signal indicators except “S”<br />
light up.<br />
Selecting different sources for picture and<br />
sound<br />
You can watch picture from a video component while listening to<br />
sound from another component.<br />
On the front panel:<br />
1. Press SOUND SELECT (INPUT<br />
ATT.) briefly while viewing the<br />
picture from a video component<br />
such as the VCR or DVD player,<br />
etc.<br />
“SOUND SELECT” appears on the display.<br />
SOUND SELECT<br />
INPUT ATT.<br />
Selecting the Front Speakers<br />
On the front panel ONLY:<br />
When you have connected two pairs of the front speakers, you can<br />
select which to use.<br />
Press SPEAKERS 1 or SPEAKERS 2 to select<br />
the speaker to use.<br />
• Each time you press the button, the lamp on<br />
the respective button turns on and off. When<br />
the lamp on either button lights up, the<br />
respective speakers are activated.<br />
SPEAKERS<br />
1 2<br />
Note:<br />
If you use any of the DSP modes other than the 3D-PHONIC modes<br />
with both front speakers activated, the speakers connected to the<br />
FRONT SPEAKERS 2 terminals are deactivated.<br />
2. Turn SOURCE SELECTOR to<br />
select the sound (except the TV<br />
sound), while the indication of the<br />
above step is still on the display.<br />
SOURCE SELECTOR<br />
From the remote control:<br />
Press one of the audio source selecting buttons (CD, TAPE/MD,<br />
PHONO, FM/AM, TV/DBS*), while viewing the picture from a<br />
video component such as the VCR or DVD player, etc.<br />
Notes:<br />
• Once you have selected a video source, pictures of the selected<br />
source are sent to the TV until you select another video source.<br />
* The TV/DBS button only works for selecting “DBS” as the source<br />
but not for selecting “TV SOUND.” When you use the DBS tuner,<br />
change the source name correctly (see page 13).<br />
11
Listening only with headphones<br />
You can listen with the headphones without deactivating both pairs<br />
of speakers; however, if you want to use the HEADPHONE mode<br />
(see below), you must turn off both pairs of speakers.<br />
1. Connect a pair of headphones to the PHONES jack on the front<br />
panel.<br />
2. Press SPEAKERS 1 and/or 2 so that no lamps on the buttons are<br />
turned on.<br />
This cancels the surround mode or DSP mode currently selected,<br />
and activates the HEADPHONE mode (see below).<br />
• The HEAD PHONE indicator lights up on the display.<br />
HEADPHONE mode:<br />
This mode can reproduce the LFE channel signals, mixing them<br />
with the front channel signals. So you will not miss the<br />
subwoofer sounds even if you listen to a source using the<br />
headphones.<br />
Notes:<br />
• While in the HEADPHONE mode, you cannot use any other DSP<br />
modes (see page 25.)<br />
• Activating the speaker cancels the HEADPHONE mode and turns<br />
on the DSP mode previously selected.<br />
CAUTION:<br />
Be sure to turn down the volume before connecting or putting on<br />
headphones, as high volume can damage both the headphones and<br />
your hearing.<br />
Attenuating the Input Signal<br />
When the input level of the playing source is too high, the sounds<br />
will be distorted. If this happens, you need to attenuate the input<br />
signal level to prevent the sound distortion.<br />
On the front panel ONLY:<br />
Press and hold INPUT ATT. (SOUND<br />
SELECT) so that the ATT indicator lights up<br />
on the display.<br />
• Each time you press and hold the button, the<br />
Input Attenuator mode turns on (“INPUT ATT<br />
ON”) or off (“INPUT NORMAL”).<br />
SOUND SELECT<br />
INPUT ATT.<br />
Notes:<br />
• This function is available only for the sources connected using the<br />
analog terminals.<br />
• This function takes effect when the DSP mode is in use.<br />
• When selecting “DVD MULTI” as the source, this effect does not<br />
work.<br />
Adjusting the Subwoofer Output Level<br />
You can adjust the subwoofer output level if you have selected<br />
“YES” for the “SUBWOOFER” (see page 13).<br />
Once it has been adjusted, the receiver memorizes the adjustment.<br />
English<br />
Muting the Sound<br />
From the remote control ONLY:<br />
Press MUTING to mute the sound through all<br />
speakers and headphones connected.<br />
“MUTING” appears on the display and the<br />
volume turns off (the volume level indicator goes<br />
off).<br />
To restore the sound, press MUTING again so that “OFF” appears<br />
on the display.<br />
• Turning MASTER VOLUME on the front panel or pressing<br />
VOLUME +/– on the remote control also restores the sound.<br />
Reinforcing the Bass<br />
You can boost the bass level.<br />
On the front panel ONLY:<br />
Press BASS BOOST (SOURCE NAME)<br />
BASS BOOST<br />
briefly to select the bass boost function.<br />
• Each time you press the button, the bass boost<br />
SOURCE NAME<br />
function turns on (“BASSBOOST ON”) and<br />
off (“BASSBOOST OFF”).<br />
– Select “BASSBOOST ON” to activate the bass boost function.<br />
The BASS BOOST indicator lights up on the display.<br />
– Select “BASSBOOST OFF” to cancel it. The indicator goes off.<br />
Note:<br />
This function affects the front speaker sounds only.<br />
MUTING<br />
Before you start, remember...<br />
• There is a time limit in doing the following steps. If the setting is<br />
canceled before you finish, start from step 1 again.<br />
• When the front speakers are all deactivated, the subwoofer level<br />
cannot be adjusted.<br />
On the front panel:<br />
1. Press (BALANCE/) SURROUND<br />
ADJUST repeatedly until<br />
“SUBWFR LEVEL” appears on<br />
the display.<br />
The display changes to show the current setting.<br />
2. Turn MULTI JOG to adjust the<br />
subwoofer output level (–10 dB to<br />
+10 dB).<br />
From the remote control:<br />
1. Press SOUND.<br />
The 10 keys are activated for sound adjustments.<br />
2. Press SUBWOOFER –/+ to adjust<br />
the subwoofer output level (–10 dB<br />
to +10 dB).<br />
BALANCE/SURROUND<br />
ADJUST<br />
MULTI JOG<br />
SOUND<br />
SUBWOOFER<br />
0 +10<br />
FM MODE 100+<br />
12
English<br />
Basic Settings<br />
Some of the following settings are required after connecting and positioning your speakers in your listening room, while<br />
others will make operations easier.<br />
IMPORTANT:<br />
When using the remote control, check to see if its<br />
remote control mode selector is set to the correct<br />
position:<br />
To operate this receiver, set it to “AUDIO/TV/<br />
VCR”<br />
AUDIO/<br />
TV/VCR<br />
CATV/DBS<br />
Changing the Source Name<br />
When you have connected an MD recorder to the TAPE/MD jacks<br />
or the DBS tuner to the TV SOUND/DBS jacks on the rear panel,<br />
change the source name which will be shown on the display when<br />
you select the MD recorder or DBS tuner as the source.<br />
Recording a Source<br />
For analog-to-analog recording<br />
You can record any analog source through the receiver to —<br />
• the cassette deck (or MD recorder) connected to the TAPE/MD<br />
jacks,<br />
• and the VCR connected to the VCR jacks<br />
— at the same time.<br />
For digital-to-digital recording<br />
You can record the currently selected digital input through the<br />
receiver to a digital recording device connected to the DIGITAL<br />
OUT terminal.<br />
Notes:<br />
• Analog-to-digital and digital-to-analog recordings are not possible.<br />
• The output volume level, bass boost (see page 12), SEA modes<br />
(see page 24), and DSP modes (see page 25) cannot affect the<br />
recording.<br />
• The test tone signal (see pages 29 and 30) does not come out<br />
through the DIGITAL OUT terminal.<br />
Adjusting the Front Speaker Output<br />
Balance<br />
If the sounds you hear from the front right and left speakers are<br />
unequal, you can adjust the speaker output balance.<br />
Before you start, remember...<br />
• There is a time limit in doing the following steps. If the setting is<br />
canceled before you finish, start from step 1 again.<br />
On the front panel ONLY:<br />
1. Press BALANCE (/SURROUND)<br />
ADJUST repeatedly until “L/R<br />
BALANCE” appears on the<br />
display.<br />
The display changes to show the current setting.<br />
2. Turn MULTI JOG to adjust the<br />
balance.<br />
• Turning it clockwise decreases the left<br />
channel output.<br />
• Turning it counterclockwise decreases the<br />
right channel output.<br />
BALANCE/SURROUND<br />
ADJUST<br />
MULTI JOG<br />
On the front panel ONLY:<br />
1. When changing the source name<br />
from “TAPE” to “MD”:<br />
• Turn SOURCE SELECTOR<br />
until “TAPE” appears.<br />
When changing the source name from “TV<br />
SOUND” to “DBS”:<br />
• Turn SOURCE SELECTOR until “TV<br />
SOUND” appears.<br />
2. Press and hold SOURCE NAME<br />
(BASS BOOST) until “ASSGN.<br />
MD” or “ASSGN. DBS” appears<br />
on the display.<br />
To change the source name to “TAPE” or “TV SOUND,” repeat<br />
the same procedure above — in step 1, select “MD” or “DBS” then<br />
press and hold SOURCE NAME (BASS BOOST).<br />
Note:<br />
Without changing the source name, you can still use the connected<br />
components. However, there may be some inconvenience.<br />
– “TAPE” or “TV SOUND” will appear on the display when you select<br />
the MD recorder or DBS tuner.<br />
– You cannot use the digital input (see page 16) for the MD recorder.<br />
– You cannot use the COMPU LINK remote control system (see page<br />
39) to operate the MD recorder.<br />
Setting the Subwoofer Information<br />
Register whether or not you have connected a subwoofer.<br />
Before you start, remember...<br />
• There is a time limit in doing the following steps. If the setting is<br />
canceled before you finish, start from step 1 again.<br />
On the front panel ONLY:<br />
1. Press SETTING repeatedly until<br />
“SUBWOOFER” appears on the<br />
display.<br />
The display changes to show the current setting.<br />
SOURCE SELECTOR<br />
BASS BOOST<br />
SOURCE NAME<br />
SETTING<br />
MULTI JOG<br />
2. Turn MULTI JOG to register<br />
whether you have connected a<br />
subwoofer or not.<br />
• As you turn it, the subwoofer setting alternates between<br />
“YES” and “NO.”<br />
13<br />
YES:<br />
NO:<br />
Select this when a subwoofer is used. SUBWFR<br />
lights up on the display (see page 11).<br />
Select this when no subwoofer is used.
Setting the Speakers for the DSP Modes<br />
To obtain the best possible surround sound of the DSP modes, you<br />
have to register the information about the speakers arrangement after<br />
all connections are completed.<br />
Before you start, remember...<br />
• There is a time limit in doing the following steps. If the setting is<br />
canceled before you finish, start from step 1 again.<br />
Center Delay Time Setting<br />
Register the delay time of the sound from the center speaker,<br />
comparing to that of the sound from the front speakers.<br />
If the distance from your listening point to the center speaker is<br />
equal to that to the front speakers, select 0 msec. As the distance to<br />
the center speaker becomes shorter, increase the delay time.<br />
• 1 msec increase (or decrease) in delay time corresponds to 30 cm<br />
(11 13 /16 inches) decrease (or increase) in distance.<br />
• When shipped from the factory, delay time is set to 0 msec.<br />
English<br />
Front, Center, and Rear Speaker Setting<br />
Register the sizes of all the connected speakers.<br />
• When you change your speakers, you need to register the<br />
information about the speakers again.<br />
On the front panel ONLY:<br />
1. Press SETTING repeatedly until<br />
“FRONT SPK” (Front Speaker),<br />
“CENTER SPK” (Center<br />
Speaker) or “REAR SPK” (Rear<br />
Speaker) appears on the display.<br />
The display changes to show the current setting.<br />
2. Turn MULTI JOG to select the<br />
appropriate item about the speaker<br />
selected in the above step.<br />
• As you turn it, the display changes to show the following:<br />
LARGE SMALL NONE<br />
LARGE: Select this when the speaker size is relatively large.<br />
SMALL: Select this when the speaker size is relatively small.<br />
NONE:<br />
SETTING<br />
MULTI JOG<br />
Select this when you have not connected a speaker.<br />
(Not selectable for the front speakers)<br />
3. Repeat steps 1 and 2 to select the appropriate<br />
items for the other speakers.<br />
Notes:<br />
• Keep the following comment in mind as reference when adjusting.<br />
– If the size of the cone speaker unit built in your speaker is greater<br />
than 12 cm (4 3 /4 inches), select “LARGE,” and if it is smaller than<br />
12 cm (4 3 /4 inches), select “SMALL.”<br />
• If you have selected “NO” for the subwoofer setting, you can only<br />
select “LARGE” for the front speaker setting.<br />
• If you have selected “SMALL” for the front speaker setting, you<br />
cannot select “LARGE” for the center and rear speaker settings.<br />
On the front panel ONLY:<br />
1. Press SETTING repeatedly until<br />
“CENTER DELAY” appears on<br />
the display.<br />
The display changes to show the current setting.<br />
2. Turn MULTI JOG to select the<br />
delay time of the center speaker<br />
output.<br />
• Turn it clockwise to increase the delay time from 0 msec (“C.<br />
DELAY: 0ms”) to 5 msec (“C. DELAY: 5ms”).<br />
• Turn it counterclockwise to decrease the delay time from 5<br />
msec (“C. DELAY: 5ms”) to 0 msec (“C. DELAY: 0ms”).<br />
Notes:<br />
• Center delay time setting is not valid for the DVD MULTI playback<br />
mode.<br />
• You cannot adjust the center delay time when you have set<br />
“CENTER SPK” to “NONE”.<br />
Rear Delay Time Setting<br />
Register the delay time of the sound from the rear speakers,<br />
comparing to that of the sound from the front speakers.<br />
If the distance from your listening point to the rear speakers is equal<br />
to that to the front speakers, select 0 msec. As the distance to the<br />
rear speakers becomes shorter, increase the delay time.<br />
• 1 msec increase (or decrease) in delay time corresponds to 30 cm<br />
(11 13 /16 inches) decrease (or increase) in distance.<br />
• Rear delay time for Dolby Digital, DTS Digital Surround, and<br />
MPEG Multichannel is to be set to 5 msec.<br />
• When shipped from the factory, delay time is set to 5 msec.<br />
On the front panel ONLY:<br />
1. Press SETTING repeatedly until<br />
“REAR DELAY” appears on the<br />
display.<br />
The display changes to show the current setting.<br />
SETTING<br />
MULTI JOG<br />
SETTING<br />
MULTI JOG<br />
2. Turn MULTI JOG to select the<br />
delay time of the rear speaker<br />
output.<br />
• Turn it clockwise to increase the delay time from 0 msec (“R.<br />
DELAY: 0ms”) to 15 msec (“R. DELAY: 15ms”).<br />
• Turn it counterclockwise to decrease the delay time from 15<br />
msec (“R. DELAY: 15ms”) to 0 msec (“R. DELAY: 0ms”).<br />
Notes:<br />
• Rear delay time setting is not valid for the DVD MULTI playback<br />
mode.<br />
• You cannot adjust the rear delay time when you have set “REAR<br />
SPK” to “NONE”.<br />
14
English<br />
Crossover Frequency Setting<br />
Small speakers cannot reproduce the bass sound very well. So, if<br />
you have used a small speaker for any of the front, center, or rear<br />
channels, this receiver automatically reallocates the bass elements,<br />
originally assigned to the channel for which you have connected the<br />
small speaker, to another channel (for which you have connected the<br />
large speaker).<br />
To use this function properly, you need to set the crossover<br />
frequency level according to the size of the small speaker connected.<br />
• If you have selected “LARGE” for all speakers (see page 14), this<br />
function is set to “OFF” and can not be adjusted.<br />
On the front panel ONLY:<br />
1. Press SETTING repeatedly until<br />
“CROSSOVER FRQ” (Crossover<br />
Frequency) appears on the display.<br />
The display changes to show the current setting.<br />
MULTI JOG<br />
2. Turn MULTI JOG to select the<br />
crossover frequency level<br />
according to the size of the small<br />
speaker connected.<br />
• As you turn it, the display changes to show the following:<br />
80Hz 100Hz 120Hz<br />
Note:<br />
• Use the following comments as reference when adjusting.<br />
80Hz:<br />
100Hz:<br />
120Hz:<br />
Select this when the cone speaker unit built in the<br />
speaker is about 12 cm (4 3 /4 inches).<br />
Select this when the cone speaker unit built in the<br />
speaker is about 10 cm (3 15 /16 inches).<br />
Select this when the cone speaker unit built in the<br />
speaker is about 8 cm (3 3 /16 inches).<br />
Crossover frequency setting is not valid for the DVD MULTI playback<br />
mode, 3D-PHONIC mode and HEADPHONE mode.<br />
Low Frequency Effect Attenuator Setting<br />
If the bass sound is distorted while playing back a source using<br />
Dolby Digital, DTS Digital Surround, or MPEG Multichannel,<br />
follow the procedure below.<br />
On the front panel ONLY:<br />
1. Press SETTING repeatedly until<br />
“LFE ATT” (Low Frequency<br />
Effect Attenuator) appears on the<br />
display.<br />
The display changes to show the current setting.<br />
SETTING<br />
SETTING<br />
2. Turn MULTI JOG to select the<br />
low frequency effect attenuator<br />
level.<br />
• As you turn it, the display changes to show<br />
the following:<br />
0dB 10dB<br />
Note:<br />
0dB:<br />
10dB:<br />
Normally select this.<br />
Select this when the bass sound is distorted.<br />
Low frequency effect attenuator setting is not valid for the DVD MULTI<br />
playback mode.<br />
Dynamic Range Compression Setting<br />
You can compress the dynamic range (difference between maximum<br />
sound and minimum sound) of the reproduced sound. This is useful<br />
when enjoying surround sound at night.<br />
• This function takes effect only when playing back a source using<br />
Dolby Digital.<br />
On the front panel ONLY:<br />
1. Press SETTING repeatedly until<br />
“D. RANGE COMP.” (Dynamic<br />
Range Compression) appears on<br />
the display.<br />
The display changes to show the current setting.<br />
2. Turn MULTI JOG to select the<br />
appropriate item about the<br />
compression level.<br />
• As you turn it, the display changes to show<br />
the following:<br />
OFF MID MAX<br />
Note:<br />
OFF:<br />
MID:<br />
MAX:<br />
MULTI JOG<br />
SETTING<br />
MULTI JOG<br />
Select this when you want to enjoy surround with its<br />
full dynamic range. (No effect applied)<br />
Select this when you want to reduce the dynamic<br />
range a little. (Factory setting)<br />
Select this when you want to apply the compression<br />
effect fully. (Useful at night)<br />
Dynamic Range Compression setting is not valid for the DTS Digital<br />
Surround, MPEG Multichannel and DVD MULTI playback mode.<br />
15
Digital Input (DIGITAL IN) Terminal<br />
Setting<br />
Selecting the Analog or Digital Input<br />
Mode<br />
English<br />
When you use the digital input terminals, you have to register what<br />
components are connected to which terminals (DIGITAL IN 1/2/3).<br />
Before you start, remember...<br />
• There is a time limit in doing the following steps. If the setting is<br />
canceled before you finish, start from step 1 again.<br />
On the front panel ONLY:<br />
1. Press SETTING repeatedly until<br />
“DIGITAL IN” appears on the<br />
display.<br />
The display changes to show the current setting.<br />
DIGITAL 1 terminal setting<br />
DIGITAL 2 terminal setting<br />
DIGITAL 3 terminal setting<br />
2. Turn MULTI JOG to select the<br />
appropriate digital terminal<br />
setting.<br />
• As you turn it, the display changes to show the following:<br />
1 DVD 2 CD 3 TV (or DBS*) “<br />
1 DVD 2 CD 3 MD “<br />
1 DVD 2 MD 3 TV (or DBS*) “<br />
1 CD 2 DVD 3 TV (or DBS*) “<br />
1 CD 2 DVD 3 MD “<br />
1 CD 2 MD 3 TV (or DBS*) “<br />
1 TV (or DBS*) 2 CD 3 DVD “<br />
1 TV (or DBS*) 2 CD 3 MD “<br />
1 TV (or DBS*) 2 DVD 3 MD “<br />
1 MD 2 CD 3 TV (or DBS*) “<br />
1 MD 2 CD 3 DVD “<br />
1 MD 2 DVD 3 TV (or DBS*) “<br />
(back to the beginning)<br />
SETTING<br />
MULTI JOG<br />
* If you have changed the source name from “TV SOUND” to<br />
“DBS,” “DBS” appears.<br />
Note:<br />
When shipped from the factory, the DIGITAL IN terminals can be used<br />
as the digital input for the following components.<br />
• DIGITAL 1 (coaxial): For DVD player<br />
• DIGITAL 2 (optical): For CD player<br />
• DIGITAL 3 (optical): For digital TV broadcast tuner<br />
When you have connected some digital source components using the<br />
digital terminals (see page 8), you need to change the input mode for<br />
these components to the appropriate digital input mode correctly —<br />
AUTO/PCM, DOLBY DIGITAL, DTS or MPEG.<br />
Before you start, remember...<br />
• The digital input (DIGITAL IN) terminal setting should be<br />
correctly done for the sources you want to select the digital<br />
input mode for. Without setting this digital input terminal<br />
correctly, you cannot change the input mode from analog input to<br />
digital input even if you follow the procedure below.<br />
On the front panel:<br />
1. Turn SOURCE SELECTOR until<br />
the source (CD, MD, TV SOUND,<br />
DBS, or DVD)* for which you<br />
want to change the input mode<br />
appears on the display.<br />
Note:<br />
* Among the sources listed above, you can select the digital input<br />
only for the sources which you have selected the digital input<br />
terminals for. (See “Digital Input (DIGITAL IN) Terminal Setting.”)<br />
2. Press INPUT ANALOG/DIGITAL<br />
repeatedly until the digital input<br />
mode you want appears on the<br />
display.<br />
• Each time you press the button, the input mode changes as<br />
follows:<br />
ANALOG<br />
MPEG<br />
(Digital)<br />
DTS<br />
(Digital)<br />
AUTO/PCM<br />
(Digital)<br />
DOLBY DIGITAL<br />
(Digital)<br />
SOURCE SELECTOR<br />
INPUT<br />
ANALOG/DIGITAL<br />
Normally select “AUTO/PCM,” so the receiver automatically<br />
detects the incoming digital signal format. (The DIGITAL<br />
AUTO indicator lights up on the display.)<br />
– When the receiver can recognize the digital signal format<br />
coming into the receiver, the frame of the digital signal<br />
indicator for the detected signal lights up automatically.<br />
– When the receiver cannot recognize the incoming signal<br />
format correctly, the frame of the digital signal indicator<br />
flashes.<br />
If this happens, select the same digital input mode with the<br />
incoming digital signal — “DOLBY DIGITAL”, “DTS” or<br />
“MPEG.”<br />
To change the input mode back to analog input, select<br />
“ANALOG.”<br />
16
English<br />
From the remote control:<br />
1. Press the source selecting button<br />
(CD, TAPE/MD, TV/DBS, or<br />
DVD)* for which you want to<br />
change the input mode.<br />
Note:<br />
* Among the sources listed above, you can select the digital<br />
input only for the sources which you have selected the digital<br />
input terminals for. (See “Digital Input (DIGITAL IN) Terminal<br />
Setting.”)<br />
2. Press ANALOG/DIGITAL to<br />
change the input mode.<br />
• Each time you press the button, the<br />
input mode changes as follows:<br />
ANALOG<br />
MPEG<br />
(Digital)<br />
DTS<br />
(Digital)<br />
AUTO/PCM<br />
(Digital)<br />
DOLBY DIGITAL<br />
(Digital)<br />
DVD DVD MUILTI CD TAPE/MD<br />
TV/DBS PHONO FM/AM<br />
VCR<br />
ANALOG/DIGITAL<br />
Showing the Text Information on the<br />
Display<br />
When you have connected an MD recorder or CD player equipped<br />
with TEXT COMPU LINK remote control system (see page 40),<br />
you can show the text information, such as disc title or track title, on<br />
the display of this receiver. To show it on the display, follow the<br />
procedure below.<br />
Before you start, remember...<br />
• There is a time limit in doing the following steps. If the setting is<br />
canceled before you finish, start from step 1 again.<br />
On the front panel ONLY:<br />
1. Press SETTING repeatedly until<br />
“FL DISPLAY” appears on the<br />
display.<br />
The display changes to show the current setting.<br />
SETTING<br />
MULTI JOG<br />
2. Turn MULTI JOG to select either<br />
Notes:<br />
the source name or the text<br />
• Noise may come out of the speakers while searching or skipping a<br />
multi-sound source encoded with Dolby Digital, DTS Digital<br />
information to be shown on the<br />
Surround or MPEG Multichannel. If this happens, select “DOLBY display.<br />
DIGITAL”, “DTS” or “MPEG” for digital input mode.<br />
• As you turn it, the display changes to show the following:<br />
• When you change the source, the digital input mode will be<br />
automatically reset to “AUTO/PCM.” NORMAL TEXT<br />
NORMAL: Source name appears during play.<br />
TEXT:<br />
Text information appears during play.<br />
Note:<br />
Though you have selected “TEXT,” the source name such as “CD” or<br />
“MD” appears if a playing disc has no text information.<br />
17
Storing the Basic Settings and<br />
Adjustments — One Touch Operation<br />
<strong>JVC</strong>’s One Touch Operation function is used to assign and store<br />
different sound settings for each different playing source. By using<br />
this function, you do not have to change the settings every time you<br />
change the source. The stored settings for the newly selected source<br />
are automatically recalled.<br />
The following can be stored for each source:<br />
• Volume level (see page 11)<br />
• Bass boost (see page 12)<br />
• Input attenuator mode (see page 12)<br />
• Subwoofer output level (see page 12)<br />
• Balance (see page 13)<br />
• SEA modes (see page 24)<br />
• DSP modes<br />
– 3D-PHONIC mode settings (see page 28)<br />
– DAP mode settings (see page 28)<br />
– Surround mode settings (see page 29)<br />
• DVD MULTI playback mode settings (see page 33)<br />
On the front panel ONLY:<br />
To store the sound settings<br />
1. Press ONE TOUCH OPERATION.<br />
The ONE TOUCH OPERATION lamp lights<br />
up, then the previously memorized settings<br />
are recalled.<br />
ONE TOUCH OPERATION<br />
2. Adjust the sound using the functions listed above.<br />
The newly adjusted settings are memorized.<br />
Using the Sleep Timer<br />
Using the Sleep Timer, you can fall asleep to music and know the<br />
receiver will turn off by itself rather than play all night.<br />
From the remote control ONLY:<br />
Press SLEEP repeatedly.<br />
The SLEEP indicator lights up on the display,<br />
and the shut-off time changes as follows (in<br />
minutes):<br />
SLEEP<br />
10 20 30 40 50 60 70 80 90<br />
00 (Canceled)<br />
When the shut-off time comes<br />
The receiver turns off automatically.<br />
To check or change the time remaining until the shut-off time<br />
Press SLEEP once.<br />
The remaining time until the shut-off time appears in minutes.<br />
• To change the shut-off time, press SLEEP repeatedly.<br />
To cancel the Sleep Timer<br />
Press SLEEP repeatedly until “SLEEP 00min.” appears on the<br />
display. (The SLEEP indicator goes off.)<br />
• Turning off the power also cancels the Sleep Timer.<br />
English<br />
To recall the sound settings<br />
With the ONE TOUCH OPERATION lamp lit, the settings for the<br />
currently selected source are recalled when the source is selected.<br />
To cancel the One Touch Operation function<br />
Press ONE TOUCH OPERATION so that the lamp goes off.<br />
(Even though the One Touch Operation function is canceled, the<br />
recalled sound effects remain active.)<br />
Notes:<br />
• If the source is FM or AM (MW/LW), you can assign a different<br />
setting for each band.<br />
• The DSP modes and DVD MULTI playback mode cannot be used at<br />
the same time.<br />
18
English<br />
Receiving Radio Broadcasts<br />
You can browse through all the stations or use the preset function to go immediately to a particular station.<br />
IMPORTANT:<br />
When using the remote control, check to see if its<br />
remote control mode selector is set to the correct<br />
position:<br />
To operate this receiver, set it to “AUDIO/TV/<br />
VCR”.<br />
AUDIO/<br />
TV/VCR<br />
CATV/DBS<br />
Using Preset Tuning<br />
Once a station is assigned to a channel number, the station can be<br />
quickly tuned. You can preset up to 30 FM and 15 AM (MW/LW)<br />
stations.<br />
Tuning in Stations Manually<br />
On the front panel ONLY:<br />
1. Turn SOURCE SELECTOR to<br />
select the band (FM or AM —<br />
MW/LW).<br />
The last received station of the selected band<br />
is tuned in.<br />
SOURCE SELECTOR<br />
To store the preset stations<br />
Before you start, remember...<br />
• There is a time limit in doing the following steps. If the setting is<br />
canceled before you finish, start from step 1 again.<br />
On the front panel ONLY:<br />
1. Tune in the station you want to preset (see<br />
“Tuning in Stations Manually”).<br />
• If you want to store the FM reception mode for this station,<br />
select the FM reception mode you want. See “Selecting the<br />
FM Reception Mode” on page 20.<br />
2. Press FM/AM TUNING.<br />
3. Turn MULTI JOG until you find<br />
the frequency you want.<br />
• Turning it clockwise increases the<br />
frequency.<br />
• Turning it counterclockwise decreases the<br />
frequency.<br />
• When you turn MULTI JOG quickly, the<br />
frequency keeps changing until a station is<br />
tuned in.<br />
FM/AM TUNING<br />
MULTI JOG<br />
2. Press TUNER (/SEA) MEMORY.<br />
TUNER/SEA MEMORY<br />
“CH-” appears and the channel number position starts flashing<br />
on the display for about 10 seconds.<br />
Note:<br />
When a station of sufficient signal strength is tuned in, the TUNED<br />
indicator lights up on the display.<br />
When an FM stereo program is received, the STEREO indicator also<br />
lights up.<br />
3. Turn MULTI JOG to select a<br />
channel number while the channel<br />
number position is flashing.<br />
MULTI JOG<br />
Note:<br />
You can use the 10 keys on the remote control to select the preset<br />
number. When using the 10 keys, be sure that they are activated<br />
for the tuner, not for the CD and others. (See page 45.)<br />
4. Press TUNER (/SEA) MEMORY<br />
again while the selected channel<br />
number is flashing on the display.<br />
The selected channel number stops flashing.<br />
The station is assigned to the selected channel number.<br />
TUNER/SEA MEMORY<br />
5. Repeat steps 1 to 4 until you store all the stations<br />
you want.<br />
To erase a stored preset station<br />
Storing a new station on a used number erases the previously stored<br />
one.<br />
19
To tune in a preset station<br />
On the front panel:<br />
1. Turn SOURCE SELECTOR to<br />
select the band (FM or AM —<br />
MW/LW).<br />
The last received station of the selected band<br />
is tuned in.<br />
2. Press TUNER PRESET.<br />
3. Turn MULTI JOG until you find<br />
the channel you want.<br />
• Turning it clockwise increases the channel<br />
numbers.<br />
• Turning it counterclockwise decreases the<br />
channel numbers.<br />
From the remote control:<br />
1. Press FM/AM.<br />
• Each time you press the button, the band<br />
alternates between FM and AM (MW/LW).<br />
2. Press the 10 keys to select a preset<br />
channel number.<br />
• For channel number 5, press 5.<br />
• For channel number 15, press +10 then 5.<br />
• For channel number 20, press +10 then 10.<br />
• For channel number 30, press +10, +10,<br />
then 10.<br />
CNTR TONE<br />
SOURCE SELECTOR<br />
TUNER PRESET<br />
MULTI JOG<br />
Note:<br />
When you use the 10 keys on the remote control, be sure that they<br />
are activated for the tuner, not for the CD and others. (See page 45.)<br />
TEST<br />
EFFECT<br />
FM/AM<br />
CENTER<br />
1 2 3<br />
MENU<br />
REAR-L<br />
4 5 6<br />
ENTER<br />
REAR-R<br />
7/P 8 9<br />
SEA MODE<br />
SUBWOOFER<br />
10 0 +10<br />
RETURN FM MODE 100+<br />
Note:<br />
When using the FM MODE button on the remote control, be sure that<br />
the 10 keys are activated for the tuner, not for the CD and others.<br />
(See page 45.)<br />
Assigning Names to Preset Stations<br />
You can assign a name of up to four characters to each preset<br />
station. When a preset station is tuned in, its assigned name will<br />
appear on the display.<br />
Before you start, remember...<br />
• There is a time limit in doing the following steps. If the setting is<br />
canceled before you finish, start from step 1 again.<br />
• You can use the following characters: Space (_), A – Z, and 0 – 9.<br />
On the front panel ONLY:<br />
1. Tune in a preset station.<br />
See the left.<br />
2. Press TUNER (/SEA) MEMORY.<br />
The preset channel number starts flashing for<br />
about 10 seconds.<br />
• If you turn MULTI JOG while the preset channel number is<br />
flashing, you can change the preset channel number.<br />
3. Press TUNER PRESET, while the<br />
preset channel number is flashing.<br />
The first character position starts flashing.<br />
TUNER/SEA MEMORY<br />
TUNER PRESET<br />
English<br />
Selecting the FM Reception Mode<br />
When an FM stereo broadcast is hard to<br />
receive or noisy<br />
You can change the FM reception mode while receiving an FM<br />
broadcast.<br />
• You can store the FM reception mode for each preset station.<br />
Press FM MODE on the front panel or on the remote control.<br />
• Each time you press the button, the FM reception mode alternates<br />
between “AUTO MUTING” and “MONO.”<br />
4. Turn MULTI JOG to select the<br />
first character, while the first<br />
character position is flashing.<br />
5. Press TUNER PRESET, while a<br />
character you want is flashing.<br />
The next character position starts flashing.<br />
MULTI JOG<br />
TUNER PRESET<br />
FM MODE<br />
On the front panel<br />
SUBWOOFER<br />
0<br />
FM MODE<br />
On the remote control<br />
AUTO MUTING: When a program is broadcasted in stereo,<br />
you will hear stereo sound; when in monaural, you will<br />
hear monaural sounds. This mode is also useful to<br />
suppress static noise between stations. The AUTO<br />
MUTING indicator lights up on the display.<br />
MONO: Reception will be improved although you will lose the<br />
stereo effect. In this mode, you will hear noise while<br />
tuning into the stations. The AUTO MUTING indicator<br />
goes off on the display.<br />
6. Repeat steps 4 and 5 to enter up to four<br />
characters.<br />
7. Press TUNER (/SEA) MEMORY<br />
while the last selected character is<br />
flashing after you have assigned a<br />
name.<br />
To erase the input characters<br />
Insert spaces using the same procedure described above.<br />
TUNER/SEA MEMORY<br />
20
English<br />
Using the RDS (Radio Data System) to<br />
Receive FM Stations<br />
RDS allows FM stations to send an additional signal along with their<br />
regular program signals. For example, the stations send their station<br />
names, as well as information about what type of program they<br />
broadcast, such as sports or music, etc.<br />
When tuned to an FM station which provides the RDS service, the<br />
RDS indicator lights up on the display.<br />
With the receiver, you can receive the following types of RDS<br />
signals.<br />
You can also show the RDS information on the TV screen.<br />
To use this function, you need to connect the TV to the MONITOR<br />
OUT jack on the rear panel (see page 7), and set the TV’s input<br />
mode to the proper position to which the receiver is connected.<br />
• When the TV’s input mode is incorrect; for example, a different<br />
video input or TV tuner mode is selected, you cannot show the<br />
RDS information on the TV screen.<br />
Press TEXT DISPLAY while listening to an FM<br />
station.<br />
The following information appears on the TV screen.<br />
TEXT<br />
DISPLAY<br />
PS (Program Service): Shows commonly known station names<br />
PTY (Program Type): Shows types of broadcast programs<br />
RT (Radio Text): Shows text messages the station sends<br />
EON (Enhanced Other Network): See page 23.<br />
Selected station<br />
Program service<br />
Program type<br />
Radio text<br />
Notes:<br />
• RDS is not available for AM (MW/LW) broadcasts.<br />
• RDS may not operate correctly if the station tuned is not<br />
transmitting RDS signal properly or if the signal strength is weak.<br />
What information can RDS signals provide?<br />
You can see the RDS signals the station sends on the display.<br />
To show the RDS signals<br />
Press DISPLAY MODE while listening to an FM station.<br />
• Each time you press the button, the display changes to show you<br />
the following information:<br />
PS (Program Service):<br />
While searching, “PS” appears and then the station names will be<br />
displayed. “NO PS” appears if no signal is sent.<br />
PTY (Program Type):<br />
While searching, “PTY” appears and then the type of the broadcast<br />
program will be displayed. “NO PTY” appears if no signal is sent.<br />
RT (Radio Text):<br />
While searching, “RT” appears and then text messages the station<br />
sends will be displayed. “NO RT” appears if no signal is sent.<br />
Frequency:<br />
Station frequency (non-RDS service)<br />
Notes:<br />
DISPLAY MODE<br />
On the front panel<br />
PS<br />
Frequency<br />
STOP<br />
DISPLAY MODE<br />
On the remote<br />
PTY<br />
RT<br />
To erase the RDS information, press EXIT.<br />
Note:<br />
The on-screen display will disappear in the following case:<br />
– if no operation is done for about 10 minutes.<br />
– if you do any operation other than explained in this section.<br />
Searching for a Program by PTY Codes<br />
One of the advantages of the RDS service is that you can locate a<br />
particular kind of program from the preset channels (see page 19) by<br />
specifying the PTY codes.<br />
To search for a program using the PTY codes<br />
Before you start, remember...<br />
• The PTY Search is only applicable to preset stations.<br />
• To stop searching any time during the process, press PTY<br />
SEARCH while searching.<br />
• There is a time limit in doing the following steps. If the setting is<br />
canceled before you finish, start from step 1 again.<br />
• When pressing the buttons on the remote control, make sure that<br />
you have selected the FM station using the remote control. If not,<br />
the RDS operation buttons do not work for RDS operation.<br />
(Pressing FM/AM activates the remote control for RDS<br />
operation.)<br />
FM/AM<br />
/REW<br />
PTY<br />
PLAY<br />
PTY SEARCH<br />
STOP<br />
DISPLAY MODE<br />
EXIT<br />
FF/<br />
PTY<br />
• When pressing DISPLAY MODE on the remote control, make sure<br />
that you have selected FM station using the remote control. If not,<br />
the DISPLAY MODE button does not work for tuner operation.<br />
(Pressing FM/AM activates the remote control for tuner operation.)<br />
• If searching finishes at once, “PS,” “PTY,” and “RT” will not appear<br />
on the display.<br />
On the front panel:<br />
1. Press PTY SEARCH while<br />
listening to an FM station.<br />
“PTY SELECT” flashes on the display.<br />
PTY SEARCH<br />
21
MULTI JOG<br />
2. Turn MULTI JOG until the PTY<br />
code you want appears on the<br />
display, while “PTY SELECT” is<br />
flashing.<br />
The display gives you the PTY codes described to the right.<br />
PTY codes<br />
Alarm !<br />
TEST<br />
None<br />
News<br />
Affairs<br />
English<br />
3. Press PTY SEARCH again, while PTY SEARCH<br />
the PTY code selected in the<br />
previous step is still on the display.<br />
While searching, “SEARCH” and the<br />
selected PTY code alternate on the display.<br />
The receiver searches 30 preset FM stations, stops when it finds<br />
the one you have selected, and tunes in that station.<br />
Documemt<br />
Folk M (Music)<br />
Oldies<br />
Nation M (Music)<br />
Info (Information)<br />
Sport<br />
Educate (Education)<br />
Drama<br />
To continue searching after the first stop<br />
Press PTY SEARCH again while the indications on the display are<br />
flashing.<br />
If no program is found, “NOTFOUND” appears on the display.<br />
From the remote control:<br />
1. Press PTY SEARCH while<br />
listening to an FM station.<br />
“PTY SELECT” flashes on the display.<br />
2. Press and hold PTY –/+ until the<br />
PTY code you want appears on the<br />
display, while “PTY SELECT” is<br />
flashing.<br />
The display gives you the PTY codes<br />
described to the right.<br />
PLAY<br />
PTY SEARCH<br />
PTY SEARCH<br />
3. Press PTY SEARCH again, while<br />
PLAY<br />
the PTY code selected in the<br />
previous step is still on the display.<br />
PTY SEARCH<br />
While searching, “SEARCH” and the<br />
selected PTY code alternate on the display.<br />
The receiver searches 30 preset FM stations, stops when it finds<br />
the one you have selected, and tunes in that station.<br />
To continue searching after the first stop<br />
Press PTY SEARCH again while the indications on the display are<br />
flashing.<br />
If no program is found, “NOTFOUND” appears on the display.<br />
/REW<br />
PTY<br />
FF/<br />
PTY<br />
PTY SEARCH<br />
Country<br />
Jazz<br />
Leisure<br />
Travel<br />
Phone In<br />
Religion<br />
Social<br />
Children<br />
Finance<br />
Weather<br />
Culture<br />
Science<br />
Varied<br />
Pop M (Music)<br />
Rock M (Music)<br />
Easy M (Music)<br />
Light M (Music)<br />
Classics<br />
Other M (Music)<br />
When an emergency broadcast (Alarm ! signal) is sent from an<br />
FM station:<br />
The receiver automatically tunes in the station except in the<br />
following cases:<br />
• When you are listening to non-RDS stations (all AM — MW/LW<br />
and some FM stations).<br />
• When the receiver is in standby mode.<br />
While receiving an emergency broadcast, “Alarm !” appears on the<br />
display.<br />
The TEST signal is used for equipment test — whether it can<br />
receive the Alarm ! signal correctly.<br />
The TEST signal makes the receiver work in the same way as the<br />
Alarm ! signal does. If the TEST signal is received, the receiver<br />
automatically switches to the station broadcasting the TEST signal.<br />
While receiving the test signal, “TEST” appears on the display.<br />
22
English<br />
Switching to a Broadcast Program of<br />
Your Choice Temporarily<br />
CASE 2<br />
If there is a station broadcasting the program<br />
you have selected<br />
Another convenient RDS service is called “EON (Enhanced Other<br />
Network).”<br />
The EON indicator lights up while receiving a station with the EON<br />
code.<br />
This allows the receiver to switch temporarily to a broadcast<br />
program of your choice (NEWS, TA, and/or INFO) from a different<br />
station except in the following cases:<br />
• When you are listening to non-RDS stations (all AM — MW/LW<br />
and some FM stations).<br />
• When the last received FM station is a non-RDS station.<br />
• When the receiver is in standby mode.<br />
Before you start, remember...<br />
• The EON function is only applicable to preset stations.<br />
On the front panel ONLY:<br />
EON<br />
1. Press EON so that the last selected<br />
program type appears on the<br />
display.<br />
The receiver enters EON standby mode. When the receiver is in<br />
EON standby mode, the receiver is ready to receive the EON<br />
data (TA/NEWS/INFO) you select.<br />
TA/NEWS/INFO<br />
2. Press TA/NEWS/INFO until the<br />
program type you want appears on<br />
the display.<br />
• Each time you press the button, the display changes to show<br />
the following:<br />
TA NEWS/INFO TA/INFO TA/NEWS<br />
TA:<br />
NEWS:<br />
INFO:<br />
CASE 1<br />
NEWS<br />
INFO<br />
Traffic Announcement in your area.<br />
News.<br />
Program the purpose of which is to impart advice in<br />
the widest sense.<br />
If there is no station broadcasting the program<br />
you have selected<br />
The receiver continues playing the current source (all sources<br />
except AM — MW/LW).<br />
‘<br />
When a station starts broadcasting the program you have<br />
selected, the receiver automatically switches to the station. The<br />
indicator of received PTY code starts flashing.<br />
‘<br />
TA/NEWS/INFO<br />
When the program is over, the receiver goes back to the<br />
previously selected source, but still remains in EON standby<br />
mode. The indicator of received PTY code stops flashing and<br />
remains lit.<br />
The receiver changes the source (all sources except AM —<br />
MW/LW), and tunes in the station. The indicator of received<br />
PTY code starts flashing.<br />
‘<br />
When the program is over, the receiver goes back to the<br />
previously selected source, but still remains in EON standby<br />
mode. The indicator of received PTY code stops flashing and<br />
remains lit.<br />
CASE 3<br />
If the FM station you are listening to is<br />
broadcasting the program you have selected<br />
The receiver continues to receive the station, but the indicator<br />
of received PTY code starts flashing.<br />
‘<br />
When the program is over, the indicator of received PTY code<br />
stops flashing and remains lit, but the receiver remains in EON<br />
standby mode.<br />
To stop listening to the program selected by EON<br />
Press EON so that the program type (TA/NEWS/INFO) indicator<br />
goes off from the display. The receiver enters EON off mode and<br />
goes back to the previously selected source.<br />
• Each time you press EON, the EON mode alternates between<br />
standby mode and off mode.<br />
Notes:<br />
• EON data sent from some stations may not be compatible with this<br />
receiver.<br />
• In EON standby mode, if you change the source to AM (MW/LW) or<br />
if you carry out synchronized recording (see page 39), EON<br />
standby mode is canceled temporarily. The receiver goes back to<br />
EON standby mode again when you have finished that operation.<br />
• While listening to a program tuned in by the EON function, you<br />
cannot use source selecting buttons and PTY SEARCH button.<br />
• While listening to a program tuned in by the EON function, you<br />
cannot perform the on-screen operations (pages 34 and 41).<br />
CAUTION:<br />
When the source alternates intermittently between the station tuned in<br />
by the EON function and the currently selected source, press EON to<br />
cancel the EON function.<br />
If you do not press the button, the currently tuned station is received<br />
finally, and the indication of the EON program type flashing on the<br />
display disappears.<br />
23
Using the SEA Modes<br />
The SEA (Sound Effect Amplifier) modes give you control of the way your music sounds.<br />
IMPORTANT:<br />
When using the remote control, check to see if its<br />
remote control mode selector is set to the correct<br />
position:<br />
To operate this receiver, set it to “AUDIO/TV/<br />
VCR”.<br />
Selecting Your Favorite SEA Mode<br />
On the front panel:<br />
Press SEA MODE repeatedly until the SEA<br />
mode you want appears on the display.<br />
• Each time you press the button, the SEA mode<br />
changes as follows:<br />
SEA ROCK SEA MUSICAL SEA MOVIE<br />
SEA OFF<br />
SEA USERMODE<br />
AUDIO/<br />
TV/VCR<br />
CATV/DBS<br />
SEA MODE<br />
SEA COUNTRY<br />
SEA JAZZ<br />
Creating Your Own SEA Mode<br />
You can adjust and store your own SEA adjustment into memory<br />
(SEA USERMODE).<br />
Before you start, remember...<br />
• There is a time limit in doing the following steps. If the setting is<br />
canceled before you finish, start from step 1 again.<br />
On the front panel ONLY:<br />
If you do not want to store your adjustment, but rather want to adjust<br />
the SEA temporarily, skip step 4 below.<br />
1. Press SEA ADJUST repeatedly<br />
until the frequency range (100 Hz,<br />
1 kHz or 10 kHz) you want<br />
appears on the display.<br />
SEA ADJUST<br />
English<br />
SEA ROCK:<br />
SEA MUSICAL:<br />
SEA MOVIE:<br />
SEA COUNTRY:<br />
SEA JAZZ:<br />
SEA USERMODE:<br />
SEA OFF:<br />
Notes:<br />
Gives a heavy sound. Both high and low<br />
frequencies are boosted.<br />
Enhances the mid-frequency range, which<br />
the human voice is mostly made up of.<br />
Adds breadth to sounds so you feel like<br />
you are in a movie theater.<br />
Enhances the high-frequency range so that<br />
instruments such the violin and banjo are<br />
emphasized.<br />
Gives a feeling of a live atmosphere.<br />
Good for acoustic music.<br />
Your original SEA adjustment (see the<br />
right).<br />
No SEA mode is applied (see below).<br />
• The SEA modes cannot be used for recording.<br />
• When the SEA mode is turned on, the SEA indicator lights up on<br />
the display.<br />
• When the SEA mode is used with the DAP mode (see page 28),<br />
sounds may be distorted. If this happens, turn off the DAP mode or<br />
decrease the effect level of the DAP mode.<br />
To cancel the SEA mode<br />
Press SEA MODE repeatedly until “SEA OFF” appears. The SEA<br />
indicator goes off from the display.<br />
From the remote control:<br />
1. Press SOUND.<br />
The 10 keys are activated for sound adjustments.<br />
2. Press SEA MODE repeatedly until<br />
the SEA mode you want appears<br />
on the display.<br />
SOUND<br />
SEA MODE<br />
RETURN<br />
To cancel the SEA mode<br />
Press SEA MODE repeatedly until “SEA OFF” appears in step 2<br />
above. The SEA indicator goes off from the display.<br />
10<br />
2. Turn MULTI JOG to adjust the<br />
SEA level of the selected frequency<br />
range.<br />
• Turning it clockwise increases the level.<br />
• Turning it counterclockwise decreases the level.<br />
3. Repeat steps 1 and 2 to adjust other frequency<br />
ranges if necessary.<br />
4. Press (TUNER/) SEA MEMORY.<br />
Your adjustment is stored into the SEA<br />
USERMODE.<br />
To recall your own SEA adjustment<br />
Press SEA MODE repeatedly until “SEA USERMODE” appears.<br />
To erase a stored adjustment<br />
Storing a new adjustment into SEA USERMODE erases the<br />
previously stored one.<br />
MULTI JOG<br />
TUNER/SEA MEMORY<br />
24
English<br />
Using the DSP Modes<br />
The built-in Surround Processor provides three types of the DSP (Digital Signal Processor) mode — 3D-PHONIC mode,<br />
DAP (Digital Acoustic Processor) mode and Surround mode.<br />
3D-PHONIC modes<br />
The 3D-PHONIC mode gives you such a nearly surround effect as is<br />
reproduced through the Dolby Surround decoder, which is widely<br />
used to reproduce sounds with a feeling of movement like those<br />
experienced in movie theaters. The 3D-PHONIC mode is the result<br />
of research on sound localization technology carried out at <strong>JVC</strong> for<br />
many years. This mode can be used when the front speakers are<br />
connected to this receiver (without respect to the rear/center<br />
speaker connection).<br />
3D ACTION: Best for action and war movies — where the<br />
action is fast and explosive.<br />
3D THEATER: Reproduces the sound field of a large theater. This<br />
mode can be selected when only front speakers are<br />
connected to this receiver and “REAR SPK” and<br />
“CENTER SPK” are set to “NONE” (see page 14).<br />
DAP modes<br />
The sound heard in a concert hall or club consists of direct sound<br />
and indirect sound — early reflections and reflections from behind.<br />
Direct sounds reach the listener directly without any reflection. On<br />
the other hand, indirect sounds are delayed by the distances of the<br />
ceiling and walls. These direct sounds and indirect sounds are the<br />
most important elements of the acoustic surround effects. The DAP<br />
mode can create these important elements, and gives you a real<br />
“being there” feeling. This mode can be used when the front<br />
speakers are connected to this receiver (without respect to the<br />
rear/center speaker connection).<br />
You can select one of the following to your preference while playing<br />
an analog or linear PCM source.<br />
LIVE CLUB: Gives the feeling of a live music club with a low<br />
ceiling.<br />
DANCE CLUB: Gives a throbbing bass beat.<br />
HALL:<br />
PAVILION:<br />
Gives clear vocal and the feeling of a concert hall.<br />
Gives the spacious feeling of a pavilion with a high<br />
ceiling.<br />
Early reflections<br />
Reflections from<br />
behind<br />
Direct sounds<br />
25
Surround modes<br />
With this receiver, you can use four types of the Surround mode.<br />
Following modes cannot be used when only the front speakers<br />
are connected to this receiver (without the rear speakers or<br />
center speaker).<br />
<strong>JVC</strong> Theater Surround<br />
In order to reproduce a more realistic sound field in your listening<br />
room while playing soundtracks of software encoded with Dolby<br />
Surround (bearing the mark DOLBY SURROUND ) you can use <strong>JVC</strong><br />
Theater Surround.<br />
English<br />
Dolby Surround (Dolby Digital and Dolby Pro Logic) *<br />
Used to watch the soundtracks of software encoded with Dolby<br />
Digital (bearing the mark<br />
D I G I T A L<br />
) or with Dolby Surround<br />
(bearing the mark DOLBY SURROUND ).<br />
Dolby Surround encoding format records the left front channel, right<br />
front channel, center channel, and rear channel (total 4 channels)<br />
signals into 2 channels. The Dolby Pro Logic decoder built in this<br />
receiver decode these 2 channel signals into original 4 channel<br />
signals — matrix-based multichannel reproduction, and allows you<br />
to enjoy the realistic stereo sounds in your listening room.<br />
On the other hand, Dolby Digital encoding method (so called a<br />
discrete 5.1 channel digital audio format) records and compresses<br />
the left front channel, right front channel, center channel, left rear<br />
channel, right rear channel, and LFE channel (total 6 channels, but<br />
LFE channel is counted as 0.1 channel, therefore called 5.1<br />
channels) signals digitally. Each channel is completely independent<br />
from other channel signals to avoid interference, therefore, you can<br />
obtain much better sound quality with much stereo and surround<br />
effects.<br />
The Dolby Digital decoder built in this receiver can create much<br />
more realistic sound field in your listening room. You may feel as if<br />
you were in a real theater.<br />
In addition, Dolby Digital enables stereo rear sounds, and sets the<br />
cutoff frequency of the rear treble at 20 kHz, comparing to 7 kHz for<br />
Dolby Pro Logic. These facts enhance the sound movement and<br />
being-there feelings much more than Dolby Pro Logic.<br />
• To enjoy the software encoded with Dolby Digital, you must<br />
connect the source component using the digital terminal on the<br />
rear of this receiver. (See page 8.)<br />
DTS Digital Surround **<br />
DTS Digital Surround is another discrete 5.1 channel digital audio<br />
format available on CD, LD, and DVD software.<br />
Comparing to Dolby Digital, audio compression rate is relatively<br />
low. This fact allows DTS Digital Surround format to have more<br />
data recorded than Dolby Digital even using the same media, and to<br />
add breadth and depth to the reproduced sounds. As a result, DTS<br />
Digital Surround features natural, solid and clear sound.<br />
• To enjoy the software encoded with DTS Digital Surround, you<br />
must connect the source component using the digital terminal on<br />
the rear of this receiver. (See page 8.)<br />
MPEG Multichannel<br />
MPEG Multichannel is another discrete 5.1 channel digital audio<br />
format available on DVD software, and uses encoding method called<br />
MPEG2-Audio. (MPEG stands for “Motion Picture Expert Group”<br />
and has been originally developed for compressing video signals.)<br />
To watch the soundtracks of video software bearing the mark<br />
, the receiver can provide you with MPEG<br />
Multichannel decoder.<br />
MPEG Multichannel is automatically selected according to software<br />
played back and the speaker arrangement you have done.<br />
• To enjoy the software encoded with MPEG Multichannel, you<br />
must connect the source component using the digital terminal on<br />
the rear of this receiver. (See page 8.)<br />
Notes:<br />
• The DSP modes have no effect on monaural sources.<br />
• When you select “DVD MULTI” as the source to play, you cannot<br />
select or adjust the DSP modes.<br />
• The Ÿ PRO LOGIC indicator lights up when the Dolby Pro Logic<br />
decoder built in this receiver is activated.<br />
DVD MULTI Playback Mode<br />
This receiver provides the DVD MULTI playback mode for<br />
reproducing the analog discrete 5.1 channel output mode of the<br />
DVD player or other equipment.<br />
You can adjust the DVD MULTI playback mode while playing<br />
back a video software such as a DVD using the analog discrete<br />
5.1 channel output mode.<br />
• For the DVD MULTI playback mode connection, see page 7.<br />
• For details on the DVD MULTI playback mode, see page 33.<br />
* Manufactured under license from Dolby Laboratories. “Dolby,”<br />
“Pro Logic,” and the double-D symbol are trademarks of Dolby<br />
Laboratories. Confidential Unpublished Works. ©1992–1997<br />
Dolby Laboratories, Inc. All rights reserved.<br />
**Manufactured under license from Digital Theater Systems, Inc.<br />
US Pat. No. 5,451,942 and other world-wide patents issues and<br />
pending. “DTS” and “DTS Digital Surround” are trademarks of<br />
Digital Theater Systems, Inc. ©1996 Digital Theater Systems, Inc.<br />
All rights reserved.<br />
26
English<br />
Available DSP Modes According to the Speaker Arrangement<br />
Available DSP modes will vary depending on how many speakers are used with this receiver.<br />
Make sure that you have set the speaker information correctly (see page 14).<br />
Speaker arrangements<br />
Available DSP modes<br />
Front<br />
speaker<br />
TV<br />
Front<br />
speaker<br />
Each time you press DSP MODE on the front panel or SURROUND MODE on<br />
the remote control, the DSP modes change as follows:<br />
• 3D THEATER<br />
• LIVE CLUB<br />
• DANCE CLUB<br />
• HALL<br />
• PAVILION<br />
• 3D ACTION<br />
• DSP OFF (DSP mode is canceled)<br />
Front<br />
speaker<br />
Front<br />
speaker<br />
Rear<br />
speaker<br />
Front<br />
speaker<br />
TV<br />
Center speaker<br />
TV<br />
TV<br />
Center speaker<br />
Front<br />
speaker<br />
Front<br />
speaker<br />
Rear<br />
speaker<br />
Front<br />
speaker<br />
Each time you press DSP MODE on the front panel or SURROUND MODE on<br />
the remote control, the DSP modes change as follows:<br />
By pressing DSP MODE:<br />
• THEATER<br />
• LIVE CLUB<br />
• DANCE CLUB<br />
• HALL<br />
• PAVILION<br />
• 3D ACTION<br />
• DSP OFF (DSP mode is canceled)<br />
To activate the Surround<br />
mode, press SURROUND ON/<br />
OFF button so that the lamp on<br />
the button lights up.<br />
By pressing SURROUND MODE:<br />
• DOLBY/DTS/MPEG SURROUND<br />
(DOLBY PRO LOGIC, DOLBY<br />
DIGITAL*, DTS SURROUND**, or<br />
MPEG SURROUND***)<br />
• THEATER<br />
• LIVE CLUB<br />
• DANCE CLUB<br />
• HALL<br />
• PAVILION<br />
• 3D ACTION<br />
• DSP OFF (DSP mode is canceled)<br />
To activate the Surround<br />
mode, you can also use the<br />
SURROUND ON/OFF button.<br />
* Activated automatically only when “AUTO/PCM” is selected as the digital input<br />
and playback source is encoded with Dolby Digital.<br />
**Activated automatically only when “AUTO/PCM” is selected as the digital input<br />
and playback source is encoded with DTS Digital Surround.<br />
***Activated automatically only when “AUTO/PCM” is selected as the digital input<br />
and playback source is encoded with MPEG Multichannel.<br />
Notes:<br />
• If Surround mode is canceled while playing back a multichannel source such as<br />
Dolby Digital, DTS Digital Surround and MPEG Multichannel, all channel<br />
signals are mixed with left and right front channels and are output through the<br />
front speakers.<br />
• While playing back a multichannel source such as Dolby Digital, DTS Digital<br />
Surround and MPEG Multichannel, Theater Surround, DAP modes, and 3D-<br />
PHONIC modes cannot be used. On the other hands, if you select a Dolby<br />
Digital, DTS Digital Surround and MPEG Multichannel as the source to play<br />
while using any of Theater Surround, DAP modes, and 3D-PHONIC modes, the<br />
currently selected mode will be canceled and Dolby Digital, DTS Digital<br />
Surround or MPEG multichannel mode will be activated.<br />
Rear<br />
speaker<br />
Rear<br />
speaker<br />
27
IMPORTANT:<br />
When using the remote control, check to see if its<br />
remote control mode selector is set to the correct<br />
position:<br />
To operate this receiver, set it to “AUDIO/TV/<br />
VCR”.<br />
Adjusting the 3D-PHONIC Modes<br />
AUDIO/<br />
TV/VCR<br />
CATV/DBS<br />
Once you have adjusted the 3D-PHONIC modes, the adjustment is<br />
memorized for each 3D-PHONIC mode.<br />
Before you start, remember...<br />
• Make sure that you have set the speaker information correctly<br />
(see page 14).<br />
• There is a time limit in doing the following steps. If the setting is<br />
canceled before you finish, start from step 1 again.<br />
On the front panel:<br />
1. Press DSP MODE repeatedly until<br />
“3D ACTION” or “3D<br />
THEATER” appears on the<br />
display.<br />
The 3D-PHONIC, DSP and Ÿ PRO LOGIC indicators<br />
also light up on the display.<br />
2. Adjust the effect level.<br />
1) Press (BALANCE/) SURROUND<br />
ADJUST repeatedly until “DSP<br />
EFFECT” appears on the display.<br />
The display changes to show the current<br />
setting.<br />
2) Turn MULTI JOG to select the effect<br />
level.<br />
• As you turn it, the effect level changes<br />
as follows:<br />
DSP MODE<br />
BALANCE/SURROUND<br />
ADJUST<br />
MULTI JOG<br />
DSP EFFECT 1 DSP EFFECT 2 DSP EFFECT 3<br />
DSP EFFECT 5 DSP EFFECT 4<br />
As the number increases, the selected 3D-PHONIC mode<br />
becomes stronger.<br />
From the remote control:<br />
1. Press SURROUND MODE<br />
SURROUND<br />
MODE<br />
repeatedly until “3D ACTION” or<br />
“3D THEATER” appears on the<br />
display.<br />
The 3D-PHONIC, DSP, and Ÿ PRO LOGIC indicators also<br />
light up on the display.<br />
3. Press EFFECT to select an effect<br />
level you want.<br />
• Each time you press the button, the effect<br />
level changes as follows:<br />
DSP EFFECT 1 DSP EFFECT 2 DSP EFFECT 3<br />
DSP EFFECT 5 DSP EFFECT 4<br />
As the number increases, the selected 3D-PHONIC mode<br />
becomes stronger.<br />
Adjusting the DAP Modes<br />
Once you have adjusted the DAP modes, the adjustment is<br />
memorized for each DAP mode.<br />
Before you start, remember...<br />
• Make sure that you have set the speaker information correctly<br />
(see page 14).<br />
• There is a time limit in doing the following steps. If the setting is<br />
canceled before you finish, start from step 1 again.<br />
• You cannot adjust the rear speaker output level when you have set<br />
“REAR SPK” to “NONE.” See page 14.<br />
• When the DAP mode is used with the SEA mode (see page 24),<br />
sounds may be distorted. If this happens, turn off the SEA mode.<br />
On the front panel:<br />
1. Press DSP MODE repeatedly until<br />
the DAP mode — LIVE CLUB,<br />
DANCE CLUB, HALL, or<br />
PAVILION — appears on the<br />
display.<br />
The DSP indicator also lights up on the display.<br />
• When you have set “REAR SPK” to “NONE,” the 3D-<br />
PHONIC indicator also lights up.<br />
2. Adjust the speaker output levels.<br />
1) Press (BALANCE/) SURROUND<br />
ADJUST repeatedly until one of the<br />
indications appears on the display.<br />
“REAR L LEVEL”:<br />
To adjust the left rear speaker level.<br />
“REAR R LEVEL”:<br />
To adjust the right rear speaker level.<br />
2) Turn MULTI JOG to adjust the<br />
selected speaker output level (from –10<br />
dB to +10 dB).<br />
3) Repeat 1) and 2) to adjust the other<br />
speaker output level.<br />
EFFECT<br />
7/P<br />
DSP MODE<br />
BALANCE/SURROUND<br />
ADJUST<br />
MULTI JOG<br />
English<br />
2. Press SOUND.<br />
The 10 keys are activated for sound adjustments.<br />
SOUND<br />
28
English<br />
3. Adjust the effect level.<br />
1) Press (BALANCE/) SURROUND<br />
ADJUST repeatedly until “DSP<br />
EFFECT” appears on the display.<br />
The display changes to show the current<br />
setting.<br />
2) Turn MULTI JOG to select the effect<br />
level.<br />
• As you turn it, the effect level changes<br />
as follows:<br />
BALANCE/SURROUND<br />
ADJUST<br />
MULTI JOG<br />
DSP EFFECT 1 DSP EFFECT 2 DSP EFFECT 3<br />
DSP EFFECT 5 DSP EFFECT 4<br />
As the number increases, the selected DAP mode becomes<br />
stronger.<br />
Adjusting the Surround Modes<br />
Once you have adjusted the Surround modes, the adjustment is<br />
memorized for each Surround mode.<br />
Dolby/DTS/MPEG Surround adjustments<br />
Before you start, remember...<br />
• Make sure that you have set the speaker information correctly<br />
(see page 14).<br />
• There is a time limit in doing the following steps. If the setting is<br />
canceled before you finish, start from step 1 again.<br />
• You cannot adjust the rear speaker output levels when you have set<br />
“REAR SPK” to “NONE.” See page 14.<br />
• You cannot adjust the center speaker output level when you have<br />
set “CENTER SPK” to “NONE.” See page 14.<br />
From the remote control:<br />
1. Press SURROUND MODE<br />
repeatedly until the DAP mode —<br />
LIVE CLUB, DANCE CLUB,<br />
HALL, or PAVILION — appears<br />
on the display.<br />
The DSP indicator also lights up on the display.<br />
• When you have set “REAR SPK” to “NONE,” the 3D-<br />
PHONIC indicator also lights up.<br />
SURROUND<br />
MODE<br />
From the remote control:<br />
1. Press SURROUND ON/OFF to<br />
SURROUND<br />
ON/OFF<br />
activate an appropriate surround<br />
mode — PRO LOGIC, DOLBY<br />
DIGITAL, DTS SURROUND, or<br />
MPEG SURROUND.<br />
• Each time you press the button, the Surround mode turns on<br />
and off alternately<br />
• When “PRO LOGIC” is selected, the Ÿ PRO LOGIC<br />
indicator lights up on the display.<br />
2. Press SOUND.<br />
The 10 keys are activated for sound adjustments.<br />
SOUND<br />
Note:<br />
You can also press SURROUND MODE to activate an appropriate<br />
Surround mode.<br />
3. Adjust the speaker output levels.<br />
• To adjust the left rear speaker level, press<br />
REAR•L –/+ (from –10 dB to +10 dB).<br />
• To adjust the right rear speaker level, press<br />
REAR•R –/+ (from –10 dB to +10 dB).<br />
REAR•L<br />
5 6<br />
ENTER<br />
REAR•R<br />
8 9<br />
2. Press SOUND.<br />
The 10 keys are activated for sound adjustments.<br />
3. Press TEST to check the speaker<br />
output balance.<br />
“TEST TONE L” starts flashing on the<br />
display, and a test tone comes out of the<br />
speakers in the following order:<br />
SOUND<br />
TEST<br />
4<br />
4. Press EFFECT to select an effect<br />
level you want.<br />
• Each time you press the button, the effect<br />
level changes as follows:<br />
EFFECT<br />
7/P<br />
DSP EFFECT 1 DSP EFFECT 2 DSP EFFECT 3<br />
DSP EFFECT 5 DSP EFFECT 4<br />
As the number increases, the selected DAP mode becomes<br />
stronger.<br />
TEST TONE L<br />
(Left front speaker)<br />
Notes:<br />
TEST TONE LS<br />
(Left rear speaker)<br />
TEST TONE C<br />
(Center speaker)<br />
TEST TONE R<br />
(Right front speaker)<br />
TEST TONE RS<br />
(Right rear speaker)<br />
• You can adjust the speaker output levels without outputting the<br />
test tone.<br />
• No test tone comes out of the center speaker when “CENTER<br />
SPK” is set to “NONE” (see page 14).<br />
• No test tone comes out of the rear speakers when “REAR SPK”<br />
is set to “NONE” (see page 14).<br />
• If the TV is turned on and the proper video input is selected on<br />
the TV, the test tone screen will appear on the TV.<br />
29
4. Adjust the speaker output levels.<br />
• To adjust the center speaker level, press CENTER –/+ (from<br />
–10 dB to +10 dB).<br />
• To adjust the left rear speaker level, press REAR•L –/+ (from<br />
–10 dB to +10 dB).<br />
• To adjust the right rear speaker level, press REAR•R –/+ (from<br />
–10 dB to +10 dB).<br />
CENTER<br />
2 3<br />
MENU<br />
REAR•L<br />
5 6<br />
ENTER<br />
REAR•R<br />
8 9<br />
<strong>JVC</strong> Theater Surround adjustments<br />
Before you start, remember...<br />
• Make sure that you have set the speaker information correctly<br />
(see page 14).<br />
• There is a time limit in doing the following steps. If the setting is<br />
canceled before you finish, start from step 1 again.<br />
• You cannot adjust the rear speaker output levels when you have set<br />
“REAR SPK” to “NONE.” See page 14.<br />
• You cannot adjust the center speaker output level when you have<br />
set “CENTER SPK” to “NONE.” See page 14.<br />
English<br />
5. Press TEST again to stop the test tone.<br />
On the front panel:<br />
You can also use the buttons on the front panel to adjust the<br />
Surround modes. However, no test tone is available when using the<br />
buttons on the front panel. So, make adjustments while listening to<br />
the sound of the source played back.<br />
1. Press SURROUND ON/OFF to SURROUND ON/OFF<br />
activate an appropriate Surround<br />
mode — PRO LOGIC, DOLBY<br />
DIGITAL, DTS SURROUND or<br />
MPEG SURROUND.<br />
• Each time you press the button, the Surround mode turns on<br />
and off alternately.<br />
• When “PRO LOGIC” is selected, the Ÿ PRO LOGIC<br />
indicator lights up on the display.<br />
2. Adjust the speaker output levels.<br />
1) Press (BALANCE/) SURROUND<br />
ADJUST repeatedly until one of the<br />
indications appears on the display.<br />
“CENTER LEVEL”:<br />
To adjust the center speaker level.<br />
“REAR L LEVEL”:<br />
To adjust the left rear speaker level.<br />
“REAR R LEVEL”:<br />
To adjust the right rear speaker level.<br />
2) Turn MULTI JOG to adjust the<br />
selected speaker output level (from –10<br />
dB to +10 dB).<br />
3) Repeat 1) and 2) to adjust the other<br />
speaker output levels.<br />
TEST<br />
4<br />
BALANCE/SURROUND<br />
ADJUST<br />
MULTI JOG<br />
From the remote control:<br />
SURROUND<br />
1. Press SURROUND MODE<br />
MODE<br />
repeatedly until “THEATER”<br />
appears on the display.<br />
• The Ÿ PRO LOGIC and DSP indicators also light up on the<br />
display.<br />
2. Press SOUND.<br />
The 10 keys are activated for sound adjustments.<br />
3. Press TEST to check the speaker<br />
output balance.<br />
“TEST TONE L” starts flashing on the<br />
display, and a test tone comes out of the<br />
speakers in the following order:<br />
TEST TONE L<br />
(Left front speaker)<br />
TEST TONE LS<br />
(Left rear speaker)<br />
TEST TONE C<br />
(Center speaker)<br />
SOUND<br />
TEST<br />
4<br />
TEST TONE R<br />
(Right front speaker)<br />
TEST TONE RS<br />
(Right rear speaker)<br />
Notes:<br />
• You can adjust the speaker output levels without outputting the<br />
test tone.<br />
• No test tone comes out of the center speaker when “CENTER<br />
SPK” is set to “NONE” (see page 14).<br />
• No test tone comes out of the rear speakers when “REAR SPK”<br />
is set to “NONE” (see page 14).<br />
• If the TV is turned on and the proper video input is selected on<br />
the TV, the test tone screen will appear on the TV.<br />
4. Adjust the speaker output levels.<br />
• To adjust the center speaker level, press CENTER –/+ (from<br />
–10 dB to +10 dB).<br />
• To adjust the left rear speaker level, press REAR•L –/+ (from<br />
–10 dB to +10 dB).<br />
• To adjust the right rear speaker level, press REAR•R –/+ (from<br />
–10 dB to +10 dB).<br />
CENTER<br />
2 3<br />
MENU<br />
REAR•L<br />
5 6<br />
ENTER<br />
REAR•R<br />
8 9<br />
30
English<br />
5. Press TEST again to stop the test tone.<br />
TEST<br />
4<br />
Activating the DSP Modes<br />
6. Press EFFECT to select an effect<br />
level you want.<br />
• Each time you press the button, the effect<br />
level changes as follows:<br />
EFFECT<br />
7/P<br />
You can use only one DSP mode at a time. When a DSP mode is<br />
activated, another DSP mode is canceled if in use.<br />
For Dolby Pro Logic, Dolby Digital, DTS Digital<br />
Surround and MPEG Multichannel<br />
DSP EFFECT 1 DSP EFFECT 2 DSP EFFECT 3<br />
DSP EFFECT 5 DSP EFFECT 4<br />
As the number increases, <strong>JVC</strong> Theater Surround becomes<br />
stronger.<br />
On the front panel:<br />
You can also use the buttons on the front panel to adjust the<br />
Surround modes. However, no test tone is available when using the<br />
buttons on the front panel. So, make adjustments while listening to<br />
the sound of the source played back.<br />
1. Press DSP MODE repeatedly until<br />
“THEATER” appears on the<br />
display.<br />
The Ÿ PRO LOGIC and DSP indicators also<br />
light up on the display.<br />
2. Adjust the speaker output levels.<br />
1) Press (BALANCE/) SURROUND<br />
ADJUST repeatedly until one of the<br />
indications appears on the display.<br />
“CENTER LEVEL”:<br />
To adjust the center speaker level.<br />
“REAR L LEVEL”:<br />
To adjust the left rear speaker level.<br />
“REAR R LEVEL”:<br />
To adjust the right rear speaker level.<br />
2) Turn MULTI JOG to adjust the<br />
selected speaker output level (from<br />
–10 dB to +10 dB).<br />
3) Repeat 1) and 2) to adjust the other<br />
speaker output levels.<br />
DSP MODE<br />
BALANCE/SURROUND<br />
ADJUST<br />
MULTI JOG<br />
1. Press SURROUND ON/OFF so that the lamp on<br />
the front panel button lights up.<br />
• Each time you press the button, the Dolby/DTS/MPEG<br />
Surround turns on and off alternately.<br />
SURROUND ON/OFF<br />
On the front panel<br />
2. Select and play a sound source.<br />
• To enjoy Dolby Pro Logic, play back a software encoded with<br />
Dolby Surround and labeled with DOLBY SURROUND mark.<br />
• To enjoy Dolby Digital, play back a software encoded with<br />
Dolby Digital and labeled with D I G I T A L<br />
mark.<br />
• To enjoy DTS Digital Surround, play back a software encoded<br />
with DTS Digital Surround and labeled with mark.<br />
• To enjoy MPEG Multichannel, play back a software encoded<br />
with MPEG Multichannel and labeled with<br />
mark.<br />
To cancel the Dolby/DTS/MPEG Surround mode<br />
Press SURROUND ON/OFF again so that the lamp on the front<br />
panel button goes off. (“SURROUND OFF” appears on the display.)<br />
SURROUND ON/OFF<br />
On the front panel<br />
SURROUND<br />
ON/OFF<br />
On the remote control<br />
SURROUND<br />
ON/OFF<br />
On the remote control<br />
3. Adjust the effect level.<br />
1) Press (BALANCE/) SURROUND<br />
ADJUST repeatedly until “DSP<br />
EFFECT” appears on the display.<br />
The display changes to show the current<br />
setting.<br />
2) Turn MULTI JOG to select the effect<br />
level.<br />
As you turn it, the effect level changes as<br />
follows:<br />
BALANCE/SURROUND<br />
ADJUST<br />
MULTI JOG<br />
DSP EFFECT 1 DSP EFFECT 2 DSP EFFECT 3<br />
DSP EFFECT 5 DSP EFFECT 4<br />
As the number increases, <strong>JVC</strong> Theater Surround becomes<br />
stronger.<br />
31
For the other DSP modes<br />
On the front panel:<br />
1. Press DSP MODE repeatedly until<br />
the mode you want appears on the<br />
display.<br />
• Each time you press the button, the DSP<br />
modes change. (See page 27 for more<br />
details.)<br />
DSP MODE<br />
––––––––––––––– MEMO –––––––––––––––<br />
Use this column to write down your DSP mode adjustments for<br />
your future reference.<br />
English<br />
2. Select and play a sound source.<br />
• To enjoy 3D-PHONIC and <strong>JVC</strong> Theater Surround, play back a<br />
software encoded with Dolby Surround and labeled with<br />
DOLBY SURROUND mark.<br />
To cancel the DSP mode<br />
Press DSP MODE repeatedly until “DSP OFF”<br />
appears on the display.<br />
DSP MODE<br />
From the remote control:<br />
1. Press SURROUND MODE<br />
repeatedly until the DSP mode you<br />
want appears on the display.<br />
• Each time you press the button, the DSP<br />
modes change.<br />
SURROUND<br />
MODE<br />
2. Select and play a sound source.<br />
• To enjoy 3D-PHONIC and <strong>JVC</strong> Theater Surround, play back a<br />
software encoded with Dolby Surround and labeled with<br />
DOLBY SURROUND mark.<br />
To cancel the DSP mode<br />
Press SURROUND MODE repeatedly until<br />
“DSP OFF” appears on the display.<br />
SURROUND<br />
MODE<br />
Note:<br />
While playing back MPEG Multichannel or Dolby Digital source<br />
through a digital input terminal, you can neither select nor adjust any<br />
DSP mode. If any DSP mode is in use, it is temporarily canceled, and<br />
normal stereo sounds are reproduced.<br />
To enjoy the MPEG Multichannel and Dolby Digital source with DSP<br />
mode, change the input mode from the digital input to the analog input<br />
(see page 16.)<br />
32
English<br />
Using the DVD MULTI Playback Mode<br />
This receiver provides the DVD MULTI playback mode for reproducing the analog discrete output mode of the DVD<br />
player. Before playing back a DVD, refer also to the manual supplied with the DVD player.<br />
IMPORTANT:<br />
When using the remote control, check to see if its<br />
remote control mode selector is set to the correct<br />
position:<br />
To operate this receiver, set it to “AUDIO/TV/<br />
VCR”.<br />
AUDIO/<br />
TV/VCR<br />
CATV/DBS<br />
Activating the DVD MULTI Playback Mode<br />
You can adjust the DVD MULTI playback mode while playing back<br />
a DVD using the analog discrete output mode on the DVD player.<br />
Once you have made adjustments, the receiver memorizes the<br />
adjustments until you change them. You also need to set the DVD<br />
player to the analog discrete output mode.<br />
Before you start, remember...<br />
• There is a time limit in doing the following steps. If the setting is<br />
canceled before you finish, start from step 1 again.<br />
From the remote control:<br />
1. Press DVD MULTI so that “DVD<br />
MULTI” appears on the display.<br />
Note:<br />
When you select “DVD MULTI” as the source to play, the DSP<br />
mode is canceled temporarily, and the SURROUND ON/OFF and<br />
SURROUND MODE buttons do not work.<br />
2. Select the analog discrete output mode on the<br />
DVD player, and start playing a DVD.<br />
• Refer to the manual supplied with the DVD player.<br />
If you need to make any adjustment, go to the following<br />
steps.<br />
3. Press SOUND.<br />
The 10 keys are activated for adjusting the sound.<br />
DVD MUILTI<br />
SOUND<br />
On the front panel:<br />
1. Turn SOURCE SELECTOR until<br />
“DVD MULTI” appears on the<br />
display.<br />
SOURCE SELECTOR<br />
Note:<br />
When you select “DVD MULTI” as the source to play, the DSP<br />
mode is canceled temporarily, and the SURROUND ON/OFF and<br />
DSP MODE buttons do not work.<br />
2. Select the analog discrete output mode on the<br />
DVD player, and start playing a DVD.<br />
• Refer to the manual supplied with the DVD player.<br />
4. Adjust the speaker output levels.<br />
• To adjust the center speaker level, press CENTER –/+ (from<br />
–10 dB to +10 dB).<br />
• To adjust the left rear speaker level, press REAR•L –/+ (from<br />
–10 dB to +10 dB).<br />
• To adjust the right rear speaker level, press REAR•R –/+ (from<br />
–10 dB to +10 dB).<br />
CENTER<br />
2 3<br />
MENU<br />
REAR•L<br />
5 6<br />
ENTER<br />
REAR•R<br />
8 9<br />
If you need to make any adjustment, go to the following<br />
steps.<br />
3. Adjust the speaker output levels.<br />
1) Press (BALANCE/) SURROUND<br />
ADJUST repeatedly until one of the<br />
indications appears on the display.<br />
“CENTER LEVEL”:<br />
To adjust the center speaker level.<br />
“REAR L LEVEL”:<br />
To adjust the left rear speaker level.<br />
“REAR R LEVEL”:<br />
To adjust the right rear speaker level.<br />
2) Turn MULTI JOG to adjust the<br />
selected speaker output level (from –10<br />
dB to +10 dB).<br />
3) Repeat 1) and 2) to adjust the other<br />
speaker output levels.<br />
BALANCE/SURROUND<br />
ADJUST<br />
MULTI JOG<br />
33
MENU<br />
ENTER<br />
Using the On-Screen Menus<br />
You can use the Menus on the TV screen to control the receiver.<br />
To use this function, you need to connect the TV to the MONITOR OUT jack on the rear panel (see page 7), and set the<br />
TV’s input mode to the proper position to which the receiver is connected.<br />
• When the TV’s input mode is incorrect; for example, a different video input or TV tuner mode is selected, you<br />
cannot show the Menus on the TV screen.<br />
English<br />
On-Screen Operation buttons (on the remote control)<br />
TV/CATV/DBS VCR<br />
DVD DVD MUILTI CD TAPE/MD<br />
TV/DBS PHONO FM/AM<br />
Selecting Different Sources for Picture and<br />
Sound (Also see page 11)<br />
1. Press MENU.<br />
The MAIN MENU appears on the TV.<br />
• Pressing one of the % / fi / @ / # buttons also displays the<br />
MAIN MENU.<br />
VCR<br />
SURROUND<br />
CENTER<br />
ON/OFF 1 2 3<br />
SURROUND TEST REAR-L<br />
MODE 4 5 6<br />
CD-DISC EFFECT<br />
REAR-R<br />
7/P 8 9<br />
SOUND SEA MODE SUBWOOFER<br />
10 0 +10<br />
RETURN FM MODE 100+<br />
MENU<br />
EXIT<br />
ANALOG/DIGITAL SLEEP<br />
SET<br />
AUDIO/<br />
TV/VCR<br />
CATV/DBS<br />
TEXT<br />
DISPLAY<br />
MENU<br />
EXIT<br />
SET<br />
2. Press % / fi to move<br />
to “VISUAL.”<br />
3. Press @ / # to select a<br />
different video source.<br />
MAIN MENU<br />
SOURCE :PHONO<br />
VISUAL :VCR<br />
MODE :OFF<br />
<br />
SOUND CONTROL<br />
TUNER CONTROL<br />
SETTING <br />
<br />
<br />
:OPERATE<br />
VOLUME : 20<br />
TV VOL<br />
CHANNEL<br />
VOLUME<br />
TV/VIDEO VCR TAPE/MD MUTING<br />
CONTROL<br />
4. When you finish, press EXIT.<br />
The menu disappears from the TV.<br />
/REW<br />
PTY<br />
REC<br />
Selecting the Source to Play (Also see page 10)<br />
1. Press MENU.<br />
The MAIN MENU appears on the TV.<br />
• Pressing one of the % / fi / @ / # buttons also displays the<br />
MAIN MENU.<br />
MAIN MENU<br />
PLAY<br />
PTY SEARCH<br />
STOP<br />
DISPLAY MODE<br />
RM-S<strong>RX</strong>7000R REMOTE CONTROL<br />
SOURCE :CD<br />
VISUAL :VCR<br />
MODE :OFF<br />
INPUT :ANALOG<br />
SOUND CONTROL<br />
TUNER CONTROL<br />
SETTING <br />
<br />
<br />
VOLUME : 20<br />
FF/<br />
PTY<br />
PAUSE<br />
:OPERATE<br />
Shows the buttons you<br />
can use on the current<br />
menu.<br />
In this case, use % / fi to<br />
move up and down,<br />
and @ / # to select,<br />
adjust or set the item.<br />
Notes:<br />
• “INPUT” appears only when the digital input (DIGITAL IN)<br />
terminal setting has been correctly done for the digital source<br />
currently selected. (See page 16.)<br />
• If your TV is not of the PAL-or multi-color system, the TV screen<br />
will be distorted.<br />
• The on-screen display will disappear if no operation is done for<br />
about 1 minute.<br />
2. Press % / fi to move to “SOURCE.”<br />
3. Press @ / # to select the source.<br />
4. When you finish, press EXIT.<br />
The menu disappears from the TV.<br />
Activating the DSP Modes (Also see page 31)<br />
1. Press MENU.<br />
The MAIN MENU appears on the TV.<br />
• Pressing one of the % / fi / @ / # buttons also displays the<br />
MAIN MENU.<br />
MAIN MENU<br />
2. Press % / fi to move<br />
SOURCE :VCR <br />
to “MODE.”<br />
VISUAL :VCR <br />
3. Press @ / # to select the<br />
DSP mode you want to<br />
use.<br />
4. When you finish, press EXIT.<br />
The menu disappears from the TV.<br />
Selecting the Analog or Digital Input Mode<br />
(Also see page 16)<br />
This selection is only possible when the digital input (DIGITAL IN)<br />
terminal setting has been correctly done for the digital source<br />
currently selected.<br />
1. Press MENU.<br />
The MAIN MENU appears on the TV.<br />
• Pressing one of the % / fi / @ / # buttons also displays the<br />
MAIN MENU.<br />
2. Press % / fi to move<br />
MAIN MENU<br />
to “INPUT.”<br />
3. Press @ / # to select the<br />
digital or analog input<br />
you want.<br />
For details, see page 16.<br />
4. When you finish, press EXIT.<br />
The menu disappears from the TV.<br />
MODE :PRO LOGIC<br />
<br />
SOUND CONTROL<br />
TUNER CONTROL<br />
SETTING <br />
<br />
<br />
VOLUME : 20<br />
SOURCE :CD<br />
VISUAL :VCR <br />
MODE :OFF<br />
INPUT :ANALOG<br />
SOUND CONTROL<br />
TUNER CONTROL<br />
SETTING <br />
<br />
<br />
VOLUME : 20<br />
:OPERATE<br />
:OPERATE<br />
34
English<br />
Adjusting the Front Speaker Output Balance<br />
(Also see page 13)<br />
1. Press MENU.<br />
The MAIN MENU appears on the TV.<br />
• Pressing one of the % / fi / @ / # buttons also displays the<br />
MAIN MENU.<br />
2. Press % / fi to move to “SOUND<br />
CONTROL,” then press @ / #.<br />
The SOUND CONTROL menu appears.<br />
3. Press % / fi to move<br />
to “BAL.” (Balance).<br />
4. Press @ / # to adjust<br />
the balance.<br />
SOUND CONTROL<br />
SURROUND <br />
LEVEL<br />
SEA<br />
<br />
BAL.:R-21<br />
BASS BOOST : OFF<br />
INPUT ATT : NORMAL<br />
SUBWFR LEVEL: 0dB<br />
<br />
NEXT PAGE<br />
:OPERATE<br />
Adjusting the Subwoofer Output Level<br />
(Also see page 12)<br />
1. Press MENU.<br />
The MAIN MENU appears on the TV.<br />
• Pressing one of the % / fi / @ / # buttons also displays the<br />
MAIN MENU.<br />
2. Press % / fi to move to “SOUND<br />
CONTROL,” then press @ / #.<br />
The SOUND CONTROL menu appears.<br />
3. Press % / fi to move<br />
to “SUBWFR LEVEL.”<br />
4. Press @ / # to adjust<br />
the subwoofer output<br />
level.<br />
SOUND CONTROL<br />
SURROUND <br />
LEVEL<br />
SEA<br />
<br />
BAL.:R-21<br />
BASS BOOST : OFF<br />
INPUT ATT : NORMAL<br />
SUBWFR LEVEL: 0dB<br />
<br />
NEXT PAGE<br />
:OPERATE<br />
5. When you finish, press EXIT repeatedly until the<br />
menu disappears from the TV.<br />
Reinforcing the Bass<br />
(Also see page 12)<br />
1. Press MENU.<br />
The MAIN MENU appears on the TV.<br />
• Pressing one of the % / fi / @ / # buttons also displays the<br />
MAIN MENU.<br />
2. Press % / fi to move to “SOUND<br />
CONTROL,” then press @ / #.<br />
The SOUND CONTROL menu appears.<br />
3. Press % / fi to move<br />
to “BASS BOOST.”<br />
4. Press @ / # to turn the<br />
bass boost function<br />
“ON” or “OFF.”<br />
5. When you finish, press EXIT repeatedly until the<br />
menu disappears from the TV.<br />
Attenuating the Input Signal<br />
(Also see page 12)<br />
1. Press MENU.<br />
The MAIN MENU appears on the TV.<br />
• Pressing one of the % / fi / @ / # buttons also displays the<br />
MAIN MENU.<br />
2. Press % / fi to move to “SOUND<br />
CONTROL,” then press @ / #.<br />
The SOUND CONTROL menu appears.<br />
3. Press % / fi to move<br />
to “INPUT ATT.”<br />
4. Press @ / # to turn the<br />
Input Attenuator mode<br />
“ATT ON” or<br />
“NORMAL.”<br />
5. When you finish, press EXIT repeatedly until the<br />
menu disappears from the TV.<br />
35<br />
SOUND CONTROL<br />
SURROUND <br />
LEVEL<br />
SEA<br />
<br />
BAL.:R-21<br />
BASS BOOST : OFF<br />
INPUT ATT : NORMAL<br />
SUBWFR LEVEL: 0dB<br />
<br />
NEXT PAGE<br />
:OPERATE<br />
SOUND CONTROL<br />
SURROUND <br />
LEVEL<br />
SEA<br />
<br />
BAL.:R-21<br />
BASS BOOST : OFF<br />
INPUT ATT : NORMAL<br />
SUBWFR LEVEL: 0dB<br />
<br />
NEXT PAGE<br />
:OPERATE<br />
5. When you finish, press EXIT repeatedly until the<br />
menu disappears from the TV.<br />
Adjusting the DSP Modes<br />
(Also see pages 28 – 31)<br />
1. Press MENU.<br />
The MAIN MENU appears on the TV.<br />
• Pressing one of the % / fi / @ / # buttons also displays the<br />
MAIN MENU.<br />
2. Press % / fi to move to “MODE.”<br />
3. Press @ / # to select the<br />
DSP mode you want to<br />
adjust.<br />
• In this example,<br />
“THEATER” is selected.<br />
4. Press % / fi to move<br />
to “SOUND<br />
CONTROL,” then press<br />
@ / #.<br />
The SOUND CONTROL<br />
menu appears.<br />
5. Press % / fi to move<br />
to “SURROUND<br />
LEVEL,” then press<br />
@ / #.<br />
The SURROUND LEVEL<br />
menu appears.<br />
MAIN MENU<br />
SOURCE :VCR <br />
VISUAL :VCR <br />
MODE :THEATER<br />
<br />
SOUND CONTROL<br />
TUNER CONTROL<br />
SETTING <br />
<br />
<br />
:OPERATE<br />
VOLUME : 20<br />
SOUND CONTROL<br />
SURROUND <br />
LEVEL<br />
SEA<br />
<br />
BAL.:R-21<br />
BASS BOOST : OFF<br />
INPUT ATT : NORMAL<br />
SUBWFR LEVEL: 0dB<br />
<br />
NEXT PAGE<br />
:ENTER<br />
SURROUND LEVEL<br />
TEST TONE : OFF<br />
CENTER LEVEL: 0dB<br />
REAR L LEVEL: +6dB<br />
REAR R LEVEL: 4dB<br />
DSP EFFECT : 3<br />
6. Press % / fi to move to the item you want to<br />
set or adjust, then press @ / #.<br />
On these adjustment menus, you can do the following:<br />
For 3D-PHONIC (3D ACTION, 3D THEATER):<br />
“DSP EFFECT”: Select the effect level.<br />
:OPERATE
For DAP (LIVE CLUB, DANCE CLUB, HALL, PAVILION):<br />
“REAR L LEVEL”: Adjust the left rear speaker output<br />
level.*<br />
“REAR R LEVEL”: Adjust the right rear speaker output<br />
level.*<br />
“DSP EFFECT”: Select the effect level.<br />
For Dolby Pro Logic:<br />
“TEST TONE”: Output a test tone.<br />
“CENTER LEVEL”: Adjust the center speaker output<br />
level.**<br />
“REAR L LEVEL”: Adjust the left rear speaker output<br />
level.*<br />
“REAR R LEVEL”: Adjust the right rear speaker output<br />
level.*<br />
For Dolby Digital, DTS Digital Surround and MPEG<br />
Multichannel:<br />
“TEST TONE”: Output a test tone.<br />
“CENTER LEVEL”: Adjust the center speaker output<br />
level.**<br />
“REAR L LEVEL”: Adjust the left rear speaker output<br />
level.*<br />
“REAR R LEVEL”: Adjust the right rear speaker output<br />
level.*<br />
For <strong>JVC</strong> Theater Surround:<br />
“TEST TONE”: Output a test tone.<br />
“CENTER LEVEL”: Adjust the center speaker output<br />
level.**<br />
“REAR L LEVEL”: Adjust the left rear speaker output<br />
level.*<br />
“REAR R LEVEL”: Adjust the right rear speaker output<br />
level.*<br />
“DSP EFFECT”:<br />
Select the effect level.<br />
6. Press % / fi to move to the item you want to<br />
set or adjust, then press @ / #.<br />
On this adjustment menu, you can do the following:<br />
“CENTER LEVEL”: Adjust the center speaker output level.<br />
“REAR L LEVEL”: Adjust the left rear speaker output<br />
level.<br />
“REAR R LEVEL”: Adjust the right rear speaker output<br />
level.<br />
7. When you finish, press EXIT repeatedly until the<br />
menu disappears from the TV.<br />
Selecting Your Favorite SEA Mode<br />
(Also see page 24)<br />
1. Press MENU.<br />
The MAIN MENU appears on the TV.<br />
• Pressing one of the % / fi / @ / # buttons also displays the<br />
MAIN MENU.<br />
2. Press % / fi to move to “SOUND<br />
CONTROL,” then press @ / #.<br />
The SOUND CONTROL menu appears.<br />
3. Press % / fi to move<br />
to “SEA,” then press<br />
@ / #.<br />
The SEA menu appears.<br />
4. Press % / fi to move<br />
to “SEA MODE.”<br />
SEA<br />
SEA MODE :ROCK<br />
SEA ADJUST<br />
<br />
<br />
<br />
<br />
<br />
<br />
<br />
<br />
<br />
<br />
100 1k 10kHz<br />
:OPERATE<br />
English<br />
Notes:<br />
* Not displayed when “REAR SPK” is set to “NONE” (see page<br />
14).<br />
**Not displayed when “CENTER SPK” is set to “NONE” (see<br />
page 14).<br />
7. When you finish, press EXIT repeatedly until the<br />
menu disappears from the TV.<br />
Activating the DVD MULTI Playback Mode<br />
(Also see page 33)<br />
1. Press MENU.<br />
The MAIN MENU appears on the TV.<br />
• Pressing one of the % / fi / @ / # buttons also displays the<br />
MAIN MENU.<br />
2. Press % / fi to move to “SOURCE.”<br />
3. Press @ / # to select “DVD MULTI.”<br />
4. Press % / fi to move to “SOUND<br />
CONTROL,” then press @ / #.<br />
The SOUND CONTROL menu appears.<br />
5. Press % / fi to move<br />
to “SURROUND<br />
LEVEL,” then press<br />
@ / #.<br />
The SURROUND LEVEL<br />
menu appears.<br />
SURROUND LEVEL<br />
CENTER LEVEL:<br />
REAR L LEVEL:<br />
REAR R LEVEL:<br />
0dB<br />
+6dB<br />
4dB<br />
:OPERATE<br />
5. Press @ / # to select the SEA mode you want.<br />
6. When you finish, press EXIT repeatedly until the<br />
menu disappears from the TV.<br />
Creating Your Own SEA Mode<br />
(Also see page 24)<br />
1. Press MENU.<br />
The MAIN MENU appears on the TV.<br />
• Pressing one of the % / fi / @ / # buttons also displays the<br />
MAIN MENU.<br />
2. Press % / fi to move to “SOUND<br />
CONTROL,” then press @ / #.<br />
The SOUND CONTROL menu appears.<br />
3. Press % / fi to move to “SEA,” then press<br />
@ / #.<br />
The SEA menu appears.<br />
36
English<br />
4. Press % / fi to move<br />
to “SEA ADJUST.”<br />
The SEA ADJUST menu<br />
appears.<br />
5. Press % / fi / @ / # to<br />
adjust the SEA mode as<br />
you want.<br />
@ / # : Select the frequency ranges.<br />
% / fi : Adjust the frequency levels.<br />
6. Press SET to store the setting into the SEA<br />
USERMODE.<br />
• If you press EXIT, without pressing SET in this step, you can<br />
return to the SEA menu. (The adjustment you have made is<br />
active but not stored.)<br />
7. When you finish, press EXIT repeatedly until the<br />
menu disappears from the TV.<br />
Setting the Basic Setting Items (Also see<br />
pages 13 – 17)<br />
1. Press MENU.<br />
The MAIN MENU appears on the TV.<br />
• Pressing one of the % / fi / @ / # buttons also displays the<br />
MAIN MENU.<br />
2. Press % / fi to move<br />
SETTING 1<br />
to “SETTING,” then<br />
SUBWOOFER : NO<br />
FRONT SPK : LARGE<br />
press @ / #.<br />
CENTER SPK : SMALL<br />
The SETTING 1 or SETTING<br />
REAR SPK : LARGE<br />
CNTR DELAY : 3msec<br />
REAR DELAY : 5msec<br />
2 menu appears.<br />
CROSSOVER :100Hz<br />
NEXT PAGE<br />
3. Press % / fi to move<br />
:ENTER<br />
to the item you want to<br />
set or adjust, then press SETTING 2<br />
LFE ATT. : 0dB<br />
@ / #.<br />
COMP.<br />
: MID<br />
• To go to the SETTING 2<br />
DIGITAL 1<br />
DIGITAL 2<br />
: DVD<br />
: CD<br />
menu, move to “NEXT<br />
DIGITAL 3<br />
FL DISP.<br />
: TV<br />
: NORMAL<br />
PAGE,” then press @ / #.<br />
• To go back to the SETTING<br />
<br />
PREVIOUS <br />
PAGE<br />
:ENTER<br />
1 menu, move to<br />
“PREVIOUS PAGE,” then<br />
press @ / #.<br />
On the SETTING 1 and 2 menus, you can do the following:<br />
“SUBWOOFER”:<br />
“FRONT SPK”:<br />
“CENTER SPK”:<br />
“REAR SPK”:<br />
“CNTR DELAY”:<br />
“REAR DELAY”:<br />
“CROSSOVER”:<br />
SEA ADJUST<br />
SEA USERMODE<br />
100 1k 10kHz<br />
SET:MEMORY<br />
Set the subwoofer information (see<br />
page 13).<br />
Set the front speaker information (see<br />
page 14).<br />
Set the center speaker information (see<br />
page 14).<br />
Set the rear speaker information (see<br />
page 14).<br />
Adjust the delay time of the center<br />
speaker output (see page 14).*<br />
Adjust the delay time of the rear<br />
speaker output (see page 14).**<br />
Set the crossover frequency<br />
(see page 15).<br />
“LFE ATT.”:<br />
“COMP.”:<br />
“DIGITAL 1/2/3”:<br />
“FL DISP.”:<br />
Set the low frequency effect attenuator<br />
level (see page 15).<br />
Set the dynamic range compression<br />
(see page 15).<br />
Set the digital input terminals<br />
(see page 16).<br />
Shows the disc text information on the<br />
display (see page 17).<br />
Notes:<br />
* Not adjustable when “CENTER SPK” is set to “NONE” (see<br />
page 14).<br />
**Not adjustable when “REAR SPK” is set to “NONE” (see page<br />
14).<br />
4. When you finish, press EXIT repeatedly until the<br />
menu disappears from the TV.<br />
Operating the Tuner (Also see pages 19 and 20)<br />
1. Press MENU.<br />
The MAIN MENU appears on the TV.<br />
• Pressing one of the % / fi / @ / # buttons also displays the<br />
MAIN MENU.<br />
2. Press % / fi to move<br />
TUNER CONTROL<br />
to “TUNER<br />
<br />
PRESET CH : 1<br />
CONTROL,” then<br />
BAND<br />
:FM<br />
FREQUENCY : 87.50MHz<br />
press @ / #.<br />
FM MODE :AUTO MUTING<br />
<br />
PRESET <br />
MEMORY<br />
The TUNER CONTROL<br />
menu appears.<br />
:OPERATE<br />
3. Press % / fi to move to the item you want to<br />
set or adjust, then press @ / #.<br />
On the TUNER CONTROL menu, you can do the following:<br />
“PRESET CH”: Select a preset channel station.<br />
“BAND”: Select the band.<br />
“FREQUENCY”: Tune in a station manually.<br />
“FM MODE”: Select the FM reception mode.*<br />
“PRESET MEMORY”: See “Storing the Preset Stations” on<br />
the next page.<br />
Note:<br />
* Not displayed when an AM (MW/LW) station is selected.<br />
4. When you finish, press EXIT repeatedly until the<br />
menu disappears from the TV.<br />
37
Storing the Preset Stations (Also see page 19)<br />
1. Press MENU.<br />
The MAIN MENU appears on the TV.<br />
• Pressing one of the % / fi / @ / # buttons also displays the<br />
MAIN MENU.<br />
2. Press % / fi to move to “TUNER<br />
CONTROL,” then press @ / #.<br />
The TUNER CONTROL menu appears.<br />
3. Tune into a station on the TUNER CONTROL<br />
menu, referring to “Operating the Tuner” on the<br />
previous page.<br />
4. Press % / fi to move<br />
PRESET MEMORY<br />
FM 87.50MHz:AUTO MUTING<br />
to “PRESET<br />
<br />
PRESET CH : CH 1<br />
MEMORY,” then press PRESET NAME: WABC<br />
@ / #.<br />
<br />
The PRESET MEMORY<br />
menu appears.<br />
SET :MEMORY<br />
5. Press @ / # to select a<br />
preset station number you want.<br />
6. Press SET to store the setting.<br />
7. When you finish, press EXIT repeatedly until the<br />
menu disappears from the TV.<br />
Assigning Names to Preset Stations<br />
(Also see page 20)<br />
1. Press MENU.<br />
The MAIN MENU appears on the TV.<br />
• Pressing one of the % / fi / @ / # buttons also displays the<br />
MAIN MENU.<br />
2. Press % / fi to move to “TUNER<br />
CONTROL,” then press @ / #.<br />
The TUNER CONTROL menu appears.<br />
3. Press % / fi to move to “PRESET CH.”<br />
4. Press @ / # to select a preset station.<br />
5. Press % / fi to move<br />
to “PRESET<br />
PRESET MEMORY<br />
FM<br />
MEMORY,” then press <br />
PRESET CH<br />
@ / #.<br />
The PRESET MEMORY<br />
<br />
menu appears.<br />
87.50MHz:AUTO MUTING<br />
: CH 1<br />
PRESET NAME: WABC<br />
:OPERATE<br />
SET :MEMORY<br />
:OPERATE<br />
6. Press % / fi to move<br />
to “PRESET NAME,”<br />
then press SET.<br />
The character entry screen<br />
appears.<br />
7. Press % / fi / @ / # to<br />
move in front of a<br />
character you want.<br />
You can also select the following:<br />
: To enter space<br />
: To erase the character<br />
: To go back to the previous character position or go<br />
to the next character position<br />
8. Press SET to enter the<br />
selected character.<br />
9. Repeat steps 7 and 8 to<br />
enter up to four<br />
characters.<br />
10.Press % / fi / @ / # to<br />
move to “PRESET<br />
NAME,” then press<br />
SET to store the setting.<br />
The TUNER CONTROL<br />
menu appears again.<br />
PRESET MEMORY<br />
FM 87.50MHz:AUTO MUTING<br />
<br />
PRESET CH : CH 1<br />
PRESET NAME: <br />
A B C D E F G H I J K<br />
L M N O P Q R S T U V<br />
W X Y Z<br />
1 2 3 4 5 6 7 8 9 0<br />
SPACE<br />
CANCEL<br />
SET :ENTER<br />
:OPERATE<br />
PRESET MEMORY<br />
FM 87.50MHz:AUTO MUTING<br />
<br />
PRESET CH : CH 1<br />
PRESET NAME: ABCD<br />
A B C D E F G H I J K<br />
L M N O P Q R S T U V<br />
W X Y Z<br />
1 2 3 4 5 6 7 8 9 0<br />
SPACE<br />
CANCEL<br />
SET :MEMORY<br />
:OPERATE<br />
TUNER CONTROL<br />
<br />
PRESET CH : 1 ABCD<br />
BAND<br />
:FM<br />
FREQUENCY : 87.50MHz<br />
FM MODE :AUTO MUTING<br />
<br />
PRESET <br />
MEMORY<br />
:ENTER<br />
11.When you finish, press EXIT repeatedly until the<br />
menu disappears from the TV.<br />
You can show the RDS information on the TV screen.<br />
For details, see page 21.<br />
English<br />
38
COMPU LINK Remote Control System<br />
English<br />
The COMPU LINK remote control system allows you to operate <strong>JVC</strong> audio components through the remote sensor on<br />
the receiver.<br />
To use this remote control system, you need to connect <strong>JVC</strong> audio<br />
components through the COMPU LINK-3 (SYNCHRO) jacks (see<br />
below) in addition to the connections using cables with RCA pin<br />
plugs (see pages 5 and 6).<br />
• Make sure that the AC power cords of these components are<br />
unplugged before connection. Plug the AC power cords only after<br />
all connections are complete.<br />
COMPU LINK – 3<br />
(SYNCHRO)<br />
CD player<br />
Cassette deck<br />
or<br />
MD recorder<br />
Turntable<br />
Notes:<br />
• If your audio component has two COMPU LINK-3 (SYNCHRO)<br />
jacks, you can use either one. If it has only one COMPU LINK-3<br />
(SYNCHRO) jack, connect it so that it is the last item in the series<br />
of components. (For example, the turntable or CD player in the<br />
diagram above.)<br />
• To operate the cassette deck or MD recorder using the COMPU<br />
LINK remote control system, set the source name correctly. (See<br />
page 13.)<br />
• Refer also to the manuals supplied with your audio components.<br />
This remote control system allows you to use four functions listed<br />
below.<br />
Remote Control through the Remote Sensor on the<br />
Receiver<br />
You can control the connected audio components through the remote<br />
sensor on the receiver using this remote control. Aim the remote<br />
control directly at the remote sensor on the receiver. For details, see<br />
pages 45 and 46.<br />
Automatic Power On/Off (Standby): only possible<br />
with the COMPU LINK-3 connection<br />
Both the CD player and cassette deck (or MD recorder) turn on and<br />
off (standby) along with the receiver.<br />
When you turn on the receiver, the CD player or cassette deck (or<br />
MD recorder) will turn on automatically, depending on which<br />
component has been previously selected.<br />
When you turn off the receiver, both the CD player and cassette<br />
deck (or MD recorder) will turn off (standby).<br />
Synchronized Recording<br />
Synchronized recording means the cassette deck (or MD recorder)<br />
starts recording as soon as a CD or a record begins playing.<br />
To use synchronized recording, follow these steps:<br />
1. Put a tape in the cassette deck (or an MD in the<br />
MD recorder), and a disc in the CD player (or a<br />
record on the turntable).<br />
2. Press the record () button and the pause (8)<br />
button on the cassette deck (or MD recorder) at<br />
the same time.<br />
This puts the cassette deck (or MD recorder) into recording<br />
pause.<br />
If you do not press the record () button and pause (8) button at<br />
the same time, the synchronized recording feature will not<br />
operate.<br />
3. Press the play (3) button on the CD player or on<br />
the turntable.<br />
The source changes on the receiver, and as soon as play starts,<br />
the cassette deck (or MD recorder) starts recording. When the<br />
play ends, the cassette deck (or MD recorder) enters recording<br />
pause, and stops about 4 seconds later.<br />
Notes:<br />
• During synchronized recording, the selected source cannot be<br />
changed.<br />
• If the power of any component is shut off during synchronized<br />
recording, the COMPU LINK remote control system may not<br />
operate properly. In this case, you must start again from the<br />
beginning.<br />
Automatic Source Selection<br />
When you press the play (3) button on a connected component or<br />
on its own remote control, the receiver automatically turns on and<br />
changes the source to the component. On the other hand, if you<br />
select a new source on the receiver or on the remote control, the<br />
selected component begins playing immediately.<br />
In both cases, the previously selected source continues playing<br />
without sound for a few seconds.<br />
39
TEXT COMPU LINK Remote Control System<br />
The TEXT COMPU LINK remote control system has been newly developed to deal with the disc information recorded in<br />
the CD Text* and MDs. Using these information in the discs, you can operate the CD player or MD recorder equipped<br />
with the TEXT COMPU LINK remote control system through the receiver.<br />
English<br />
CONNECTIONS:<br />
To use this remote control system, you need to connect the CD<br />
player and/or MD recorder you want to operate, following the<br />
procedures below.<br />
1. If you have already plugged your CD player, MD<br />
recorder, and this receiver into the AC outlets,<br />
unplug their AC power cords first.<br />
2. Connect your CD player, MD recorder, and this<br />
receiver as follows, through the COMPU LINK-3<br />
(SYNCHRO) jacks and TEXT COMPU LINK<br />
jacks.<br />
1) COMPU LINK-3 (SYNCHRO) jacks: Use the cables with<br />
the monaural mini-plugs (not supplied with this receiver).<br />
CD player<br />
FUNCTIONS:<br />
This remote control system allows you to use the functions listed<br />
below.<br />
Displaying the Disc Information on the TV screen<br />
Disc information such as its performer and disc title (and track titles<br />
only when a CD Text is selected) is shown on the TV screen.<br />
Disc Search: Only for CD Player<br />
This remote control system can allow you to search discs by the<br />
performer, disc title, and music genre.<br />
With this disc search, you can easily find the disc you want to play.<br />
Disc Title Input:<br />
If your CD player or MD recorder has the disc memory function,<br />
you can input the following information about the normal audio CDs<br />
or MDs on the TV screen.<br />
• For CDs: Performer, disc title, and music genre<br />
• For MDs: Disc title and song titles<br />
MD recorder<br />
COMPU LINK – 3<br />
(SYNCHRO)<br />
2) TEXT COMPU LINK jacks: Use the cables with the<br />
stereo mini-plugs (not supplied with this receiver).<br />
CD player<br />
MD recorder<br />
TEXT<br />
COMPU LINK<br />
3. Connect your CD player, MD recorder and this<br />
receiver, using the cables with RCA pin plugs (see<br />
pages 5 and 6).<br />
4. Plug the AC power cords of these components<br />
above into the AC outlets.<br />
5. When turning on these components for the first<br />
time, turn on the connected components first,<br />
then turn on this receiver.<br />
*What is a CD Text?<br />
In a CD Text, some information about the disc (its disc title, performer,<br />
composer, arranger, etc.) is recorded.<br />
Notes:<br />
• If your audio component has two COMPU LINK-3 (SYNCHRO)<br />
jacks, you can use either one. If it has only one COMPU LINK-3<br />
(SYNCHRO) jack, connect it so that it is the last item in the series<br />
of components. (For example, the CD player in the diagram to the<br />
left.)<br />
• If your audio component has two TEXT COMPU LINK jacks, you<br />
can use either one. If it has only one TEXT COMPU LINK jack,<br />
connect it so that it is the last item in the series of components. (For<br />
example, the CD player in the diagram to the left.)<br />
• “TEXT COMPULINK SOURCE NOT CONNECTED” appears on the<br />
display in the following cases:<br />
–When the connections explained to the left are not correctly done.<br />
–When you try to use the TEXT COMPU LINK function a few<br />
seconds after you turn on the connected equipment. This is not a<br />
malfunction of the units.<br />
• Refer also to the manuals supplied with your CD player or MD<br />
recorder.<br />
IMPORTANT:<br />
If you turn on the receiver before turning on the other components<br />
after connecting the components, the TEXT COMPU LINK remote<br />
control system does not work correctly.<br />
If this happens:<br />
1. Turn off all the components including this receiver.<br />
2. Turn on the connected components.<br />
3. Turn on this receiver.<br />
40
MENU<br />
ENTER<br />
English<br />
OPERATIONS<br />
To use this remote control system, you need to connect the TV to the<br />
MONITOR OUT jack on the rear panel (see page 7), and set the<br />
TV’s input mode to the proper position to which the receiver is<br />
connected. Make sure you have connected the CD player or<br />
MD recorder equipped with the TEXT COMPU LINK<br />
remote control system. If not, you cannot use the<br />
following functions.<br />
On-Screen Operation buttons (on the remote control)<br />
TV VOL<br />
CHANNEL<br />
VOLUME<br />
TV/VIDEO VCR TAPE/MD MUTING<br />
CONTROL<br />
/REW<br />
PTY<br />
REC<br />
PLAY<br />
PTY SEARCH<br />
STOP<br />
TV/CATV/DBS<br />
DISPLAY MODE<br />
FF/<br />
PTY<br />
RM-S<strong>RX</strong>7000R REMOTE CONTROL<br />
VCR<br />
DVD DVD MUILTI CD TAPE/MD<br />
TV/DBS PHONO FM/AM<br />
VCR<br />
SURROUND<br />
CENTER<br />
ON/OFF 1 2 3<br />
SURROUND TEST REAR-L<br />
MODE 4 5 6<br />
CD-DISC EFFECT<br />
REAR-R<br />
7/P 8 9<br />
SOUND SEA MODE SUBWOOFER<br />
10 0 +10<br />
RETURN FM MODE 100+<br />
MENU<br />
EXIT<br />
ANALOG/DIGITAL SLEEP<br />
SET<br />
AUDIO/<br />
TV/VCR<br />
CATV/DBS<br />
TEXT<br />
DISPLAY<br />
PAUSE<br />
MENU<br />
EXIT<br />
SET<br />
TEXT<br />
DISPLAY<br />
1 Source name: CD or MD<br />
2 Select or , then press SET to change the disc.<br />
3 Track numbers and track titles.<br />
• The current playing (selected) track is indicated in<br />
yellow.<br />
• When you move to a track number, you can<br />
change the track information by pressing @ / #. Each<br />
time you press the button, track information alternates<br />
between its track title and its performer. (You can also<br />
start playing the track by pressing SET.)<br />
4 Select this (move in front), then press SET to go to<br />
the DISC SEARCH screen (see page 42).<br />
5 Select this (move in front), then press SET to go to<br />
the TITLE INPUT screen (see page 43).<br />
6 This appears only when a CD Text is selected.<br />
7 Disc information such as the disc title, performer, and<br />
music genre.<br />
When this is selected ( in front), you can change the<br />
disc information by pressing @ / #. Each time you press<br />
the button, disc information (see “Note on 7”) changes.<br />
8 Select or , then press SET to change the track.<br />
9 Usable buttons and their functions for the current<br />
selection.<br />
Indication here will be changed according to what is<br />
currently selected ( in front) on the screen. See “Note<br />
on 9.”<br />
Note on 7:<br />
The following information will appear on the display:<br />
• For CD Texts — Disc title, Performer, Genre, Song writer,<br />
Composer, Arranger, Message<br />
Only recorded information will be shown. If there is no data, “NO<br />
DATA” will appear.<br />
• For MDs — Disc title<br />
If there is no data, “NO DATA” will appear.<br />
Showing the Disc Information on the TV<br />
Screen<br />
Press TEXT DISPLAY while “CD” or “MD” is<br />
selected as the source.<br />
The Disc Information screen appears on the TV.<br />
1<br />
2<br />
3<br />
<br />
6<br />
7<br />
8<br />
Note on 9:<br />
For example, the SET button will be used to start play (PLAY), to go to<br />
the next screen (ENTER), and to determine the selection (ENTER).<br />
To exit from the Disc information screen:<br />
Press EXIT.<br />
Notes:<br />
• The on-screen display will disappear in the following cases:<br />
– if no operation is done for about 10 minutes.<br />
– if you do any operation other than explained in this section.<br />
• To control the MD recorder using the TEXT COMPU LINK remote<br />
control system, you have to change the source name shown on the<br />
display from “TAPE” to “MD.” (See page 13.)<br />
• Some special characters and marks cannot be displayed correctly.<br />
4<br />
5<br />
9<br />
41
Searching for a Disc (Only for the CD player)<br />
Search for a disc by its performer:<br />
1. Press TEXT DISPLAY while “CD” is selected as<br />
the source.<br />
The Disc Information screen appears on the TV.<br />
2. Press % / fi to move<br />
to “SEARCH,” then<br />
press SET.<br />
The DISC SEARCH screen<br />
appears .<br />
Search for a disc by its disc title:<br />
1. Press TEXT DISPLAY while “CD” is selected as<br />
the source.<br />
The Disc Information screen appears on the TV.<br />
2. Press % / fi to move<br />
to “SEARCH,” then<br />
press SET.<br />
The DISC SEARCH screen<br />
appears.<br />
English<br />
3. Press % / fi to move<br />
to “PERFORMER”,<br />
then press SET.<br />
The PERFORMER SEARCH<br />
screen appears.<br />
4. Press % / fi / @ / # to move in front of the<br />
first character of the performer you want to<br />
search, then press SET.<br />
To correct the incorrect entry, press % / fi / @ / # to move<br />
in front of the correct character, then press SET.<br />
Note:<br />
Symbols such as @, # or $ cannot be available for search.<br />
5. Press SET again.<br />
Disc search starts, then the<br />
SEARCH RESULT screen,<br />
showing the performers,<br />
appears.<br />
6. On the SEARCH RESULT screen, you can do the<br />
following:<br />
• Changing the indication of the disc information: Press % /<br />
fi to move to a searched disc, then press @ / #. Each time<br />
you press @ / #, the disc information alternates between its<br />
performer and its disc title.<br />
• Starting a disc play and going to the Disc Information<br />
screen (see page 41): Press % / fi to move to a searched<br />
disc, then press SET.<br />
• Showing unseen disc information (if more than 5 discs are<br />
listed as a result of the search): Press % / fi until they<br />
appear.<br />
• Going back to the PERFORMER SEARCH screen: Press<br />
EXIT.<br />
<br />
<br />
3. Press % / fi to move<br />
to “DISC TITLE,<br />
then press SET.<br />
The DISC TITLE SEARCH<br />
screen appears.<br />
4. Press % / fi / @ / # to move in front of the<br />
first character of the disc title you want to search,<br />
then press SET.<br />
To correct the incorrect entry, press % / fi / @ / # to move<br />
in front of the correct character, then press SET.<br />
Note:<br />
Symbols such as @, # or $ cannot be available for search.<br />
5. Press SET again.<br />
Disc search starts, then the<br />
SEARCH RESULT screen,<br />
showing the disc titles,<br />
appears.<br />
6. On the SEARCH RESULT screen, you can do the<br />
following:<br />
• Changing the indication of the disc information: Press % /<br />
fi to move to a searched disc, then press @ / #. Each time<br />
you press @ / #, the disc information alternates between its<br />
disc title and its performer.<br />
• Starting a disc play and going to the Disc Information<br />
screen (see page 41): Press % / fi to move to a searched<br />
disc, then press SET.<br />
• Showing unseen disc information (if more than 5 discs are<br />
listed as a result of the search): Press % / fi until they<br />
appear.<br />
• Going back to the DISC TITLE SEARCH screen: Press<br />
EXIT.<br />
<br />
<br />
42
English<br />
Search for a disc by its genre:<br />
1. Press TEXT DISPLAY while “CD” is selected as<br />
the source.<br />
The Disc Information screen appears on the TV.<br />
2. Press % / fi to move<br />
to “SEARCH,”<br />
then press SET.<br />
The DISC SEARCH screen<br />
appears.<br />
Entering the Disc Information<br />
For the CD Player with the disc memory function:<br />
You can use the disc memory function through this receiver.<br />
The disc information (its performer, disc title, and music genre) of<br />
normal audio CDs will be stored into the memory built in the CD<br />
player.<br />
For the disc memory function, refer to the manual supplied with your<br />
CD player.<br />
• The performer, disc title, and music genre information are usually<br />
recorded in a CD Text. However, if a CD Text has no genre<br />
information recorded in the disc itself, you can input its music<br />
genre by yourself.<br />
3. Press % / fi to move<br />
to “GENRE”, then<br />
press SET.<br />
The GENRE SEARCH<br />
screen appears.<br />
4. Press % / fi to move to the genre you want to<br />
search, then press SET.<br />
To show the unseen genres, press % / fi until they appear.<br />
Disc search starts, then the<br />
SEARCH RESULT screen,<br />
showing the disc titles,<br />
appears.<br />
<br />
5. On the SEARCH<br />
RESULT screen, you<br />
can do the following:<br />
• Changing the indication of the disc information: Press % /<br />
fi to move to a searched disc, then press @ / #. Each<br />
time you press @ / #, the disc information alternates<br />
between its disc title and its performer.<br />
• Starting a disc play and going to the Disc Information<br />
screen (see page 41): Press % / fi to move to a searched<br />
disc, then press SET.<br />
• Showing unseen disc information (if more than 5 discs are<br />
listed as a result of the search): Press % / fi until they<br />
appear.<br />
• Going back to the GENRE SEARCH screen: Press EXIT.<br />
<br />
Note:<br />
You can enter the TITLE INPUT screens for a CD Text and input its<br />
titles. However, you cannot store the titles you have input for a CD<br />
Text.<br />
Example: Entering the following information for Disc 1<br />
Performer: “MICHAEL”<br />
Disc title: “MY FAVORITE”<br />
1. Press TEXT DISPLAY while “CD” is selected as<br />
the source.<br />
The Disc Information screen appears on the TV.<br />
2. Press % / fi to move<br />
to “TITLE INPUT,”<br />
then press SET.<br />
The TITLE INPUT:<br />
PERFORMER screen appears.<br />
3. Press % / fi / @ / # to move in front of a<br />
character you want, then press SET to enter the<br />
character.<br />
• If the current CD is a CD Text, go to step 5 without entering the<br />
performer.<br />
To use the lower case letters, press % / fi / @ / # to move<br />
to , then press SET.<br />
To use the upper case letters again, press % / fi / @ / # to<br />
move to , then press SET.<br />
<br />
43
4. Repeat step 3 until you<br />
finish putting a<br />
performer name (up to <br />
32 characters).<br />
To insert a space, press % / fi<br />
/ @ / # to move to<br />
, then press SET.<br />
To correct an incorrect character:<br />
1) Press % / fi / @ / # to move to + or =, then press<br />
SET until the incorrect character is selected.<br />
2) Press % / fi / @ / # to move to , then press SET<br />
to erase the character.<br />
3) Press % / fi / @ / # to move in front of the correct<br />
character, then press SET to enter the correct character.<br />
5. Press % / fi / @ / # to<br />
move to “DISC 1:<br />
MICHAEL (in this<br />
example),” then press<br />
SET.<br />
The TITLE INPUT: DISC<br />
TITLE screen appears.<br />
6. Enter the disc title,<br />
referring to steps 3 and<br />
4.<br />
• If the current CD is a CD<br />
Text, go to the next step<br />
without entering the disc<br />
title.<br />
7. Press % / fi / @ / # to<br />
move to “DISC 1:<br />
MY FAVORITE (in this<br />
example),” then press<br />
SET.<br />
The TITLE INPUT: DISC 1<br />
GENRE screen appears.<br />
8. Press % / fi to move to the genre you want,<br />
then press SET.<br />
The Disc Information screen appears again.<br />
To show the unseen genres, press % / fi until they appear.<br />
<br />
<br />
<br />
For the MD recorder:<br />
You can write the disc information (disc title and song titles) into the<br />
disc. You can only write the song title for the song currently<br />
selected.<br />
• If you have the CD-MD combination deck, you can also enter the<br />
disc information (its performer, disc title, and its music genre) of<br />
normal audio CDs into the memory built in the CD-MD<br />
combination deck. (To do this, follow the procedure of “For the<br />
CD Player with the disc memory function” on the page 43.)<br />
• If you change the disc or song title with more than 32 characters,<br />
the characters following the 32nd will be erased from the title.<br />
1. Press TEXT DISPLAY while “MD” is selected as<br />
the source.<br />
The Disc Information screen appears on the TV.<br />
2. Press % / fi to move<br />
to “TITLE INPUT,”<br />
then press SET.<br />
The DISC TITLE INPUT<br />
screen appears.<br />
3. Enter the title, referring<br />
to steps 3 and 4 of “For<br />
the CD Player with the<br />
disc memory function”<br />
on page 43.<br />
• You can enter up to 32<br />
characters for the disc title.<br />
4. Press % / fi / @ / # to<br />
move to the disc title<br />
you have just entered, <br />
then press SET.<br />
The disc title is stored into the<br />
memory, and the SONG<br />
TITLE INPUT screen for the<br />
currently selected song<br />
appears.<br />
• You can enter a song title for the song currently selected<br />
(indicated in yellow on the TV screen).<br />
5. Enter the song title, referring to steps 3 and 4 of<br />
“For the CD Player with the disc memory<br />
function” on page 43.<br />
• You can enter up to 32 characters for the song title.<br />
<br />
<br />
English<br />
6. Press % / fi / @ / # to move to the song title<br />
you have just entered, then press SET.<br />
The song title is stored into the memory, and the Disc<br />
Information screen appears again.<br />
44
English<br />
Operating <strong>JVC</strong>’s Audio/Video Components<br />
You can operate <strong>JVC</strong>’s audio and video components with this receiver’s remote control, since control signals for <strong>JVC</strong><br />
components are preset in the remote control.<br />
Operating Audio Components<br />
IMPORTANT:<br />
To operate <strong>JVC</strong>’s audio components using this remote control:<br />
• You need to connect <strong>JVC</strong> audio components through the COMPU<br />
LINK-3 (SYNCHRO) jacks (see page 39) in addition to the<br />
connections using cables with RCA pin plugs (see pages 5 and 6).<br />
• Aim the remote control directly at the remote sensor on the receiver.<br />
• If you use the buttons on the front panel or the menu function to<br />
choose a source, the remote control will not operate that source. To<br />
operate a source with the remote control, the source must be<br />
selected using source selecting buttons on the remote control.<br />
• To operate the cassette deck or MD recorder using the COMPU<br />
LINK remote control system, set the source name correctly. (See<br />
page 13.)<br />
• Refer also to the manuals supplied with your components.<br />
Tuner<br />
You can always perform the following operations (with the remote<br />
control mode selector set to “AUDIO/TV/VCR”):<br />
FM/AM:<br />
Alternates between FM and AM (MW/LW).<br />
After pressing FM/AM (with the remote control mode selector set to<br />
“AUDIO/TV/VCR”), you can perform the following operations:<br />
1 – 10, +10: Selects a preset channel number directly.<br />
For channel number 5, press 5.<br />
For channel number 15, press +10, then 5.<br />
For channel number 20, press +10, then 10.<br />
FM MODE: Changes the FM reception mode.<br />
PTY SEARCH: Searches for a program by PTY codes.<br />
PTY – / +: Selects the PTY codes.<br />
DISPLAY MODE: Shows the RDS signals.<br />
TV/CATV/DBS VCR<br />
DVD DVD MUILTI CD TAPE/MD<br />
TV/DBS PHONO FM/AM<br />
VCR<br />
ANALOG/DIGITAL SLEEP<br />
Sound control section (Amplifier)<br />
You can always perform the following operations (with the remote<br />
control mode selector set to “AUDIO/TV/VCR”):<br />
SURROUND ON/OFF: Turns on or off the Surround modes —<br />
Dolby Pro Logic, Dolby Digital, DTS<br />
Digital Surround and MPEG<br />
Multichannel.<br />
SURROUND MODE: Selects the DSP modes.<br />
SURROUND<br />
CENTER<br />
1 2 3<br />
ON/OFF<br />
MENU<br />
SURROUND TEST REAR-L<br />
4 5 6<br />
MODE<br />
ENTER<br />
CD-DISC EFFECT<br />
REAR-R<br />
7/P 8 9<br />
SOUND SEA MODE SUBWOOFER<br />
10 +10 0<br />
RETURN FM MODE 100+<br />
MENU<br />
EXIT<br />
TV VOL<br />
CHANNEL<br />
VOLUME<br />
VCR<br />
TV/VIDEO TAPE/MD MUTING<br />
CONTROL<br />
/REW<br />
PTY<br />
REC<br />
SET<br />
PLAY<br />
PTY SEARCH<br />
STOP<br />
DISPLAY MODE<br />
AUDIO/<br />
TV/VCR<br />
CATV/DBS<br />
FF/<br />
TEXT<br />
DISPLAY<br />
PTY<br />
PAUSE<br />
AUDIO/<br />
TV/VCR<br />
CATV/DBS<br />
Check to see if the remote<br />
control mode selector is set<br />
to the correct position.<br />
To operate the audio<br />
system, TVs, VCRs, and<br />
DVD players, set it to<br />
“AUDIO/TV/VCR.”<br />
After pressing SOUND (with the remote control mode selector set to<br />
“AUDIO/TV/VCR”), you can perform the following operations:<br />
SEA MODE: Changes the SEA modes.<br />
SUBWOOFER – / +: Adjusts the subwoofer output level.<br />
CENTER – / +: Adjusts the center speaker output level.<br />
REAR•L – / +: Adjusts the left rear speaker output level.<br />
REAR•R – / +: Adjusts the right rear speaker output level.<br />
EFFECT:<br />
Selects the effect level.<br />
TEST:<br />
Turns on or off the test tone output.<br />
Note:<br />
After adjusting sounds, press the corresponding source selecting<br />
button or CD-DISC to operate your target source by using the 10<br />
keys; otherwise, the 10 keys cannot be used for operating your target<br />
source.<br />
RM-S<strong>RX</strong>7000R<br />
REMOTE CONTROL<br />
CD player<br />
After pressing CD (with the remote control mode selector set to<br />
“AUDIO/TV/VCR”), you can perform the following operations on<br />
the CD player:<br />
PLAY: Starts playing.<br />
4: Returns to the beginning of the current (or<br />
previous) track.<br />
¢: Skips to the beginning of the next track.<br />
STOP: Stops playing.<br />
PAUSE: Pauses playing. To release it, press PLAY.<br />
1 – 10, +10: Selects a track number directly.<br />
For track number 5, press 5.<br />
For track number 15, press +10, then 5.<br />
For track number 20, press +10, then 10.<br />
For track number 30, press +10, +10, then 10.<br />
45
CD player-changer<br />
After pressing CD-DISC (with the remote control mode selector set<br />
to “AUDIO/TV/VCR”), you can perform the following operations<br />
on a CD player-changer:<br />
Cassette deck<br />
After pressing TAPE/MD or TAPE/MD CONTROL (with the<br />
remote control mode selector set to “AUDIO/TV/VCR”), you can<br />
perform the following operations on a cassette deck:<br />
English<br />
PLAY: Starts playing.<br />
4: Returns to the beginning of the current (or previous)<br />
track.<br />
¢: Skips to the beginning of the next track.<br />
STOP: Stops playing.<br />
PAUSE: Pauses playing. To release it, press PLAY.<br />
1 – 6, 7/P: Selects the number of a disc installed in a CD<br />
player-changer.<br />
After pressing CD (with the remote control mode selector set to<br />
“AUDIO/TV/VCR”), you can perform the following operations on<br />
the CD player-changer:<br />
1 – 10, +10: Selects a track number directly.<br />
For track number 5, press 5.<br />
For track number 15, press +10, then 5.<br />
For track number 20, press +10, then 10.<br />
For track number 30, press +10, +10, then 10.<br />
Turntable<br />
After pressing PHONO (with the remote control mode selector set to<br />
“AUDIO/TV/VCR”), you can perform the following operations on a<br />
turntable:<br />
PLAY:<br />
STOP:<br />
Starts playing.<br />
Stops operations.<br />
PLAY: Starts playing.<br />
1: Fast winds the tape from right to left.<br />
¡: Fast winds the tape from left to right.<br />
STOP: Stops operations.<br />
PAUSE: Pauses playing. To release it, press PLAY.<br />
REC: Press this button with the PLAY button to start<br />
recording.<br />
Press this button with the PAUSE button to enter<br />
recording pause.<br />
MD recorder<br />
After pressing TAPE/MD or TAPE/MD CONTROL (with the<br />
remote control mode selector set to “AUDIO/TV/VCR”), you can<br />
perform the following operations on the MD recorder:<br />
PLAY: Starts playing.<br />
4: Returns to the beginning of the current (or previous)<br />
track.<br />
¢: Skips to the beginning of the next track.<br />
STOP: Stops playing.<br />
PAUSE: Pauses playing. To release it, press PLAY.<br />
REC: Press this button with the PLAY button to start<br />
recording.<br />
Press this button with the PAUSE button to enter<br />
recording pause.<br />
Note:<br />
You can use either TAPE/MD button or the TAPE/MD CONTROL<br />
button to activate the buttons listed above. If you press TAPE/MD, the<br />
playing source also changes. On the other hand, if you press TAPE/<br />
MD CONTROL, the playing source does not change.<br />
46
English<br />
Operating Video Components<br />
IMPORTANT:<br />
To operate <strong>JVC</strong>’s video components using this remote control:<br />
• Aim the remote control directly at the remote sensor on the VCR,<br />
DVD player or TV, not on the receiver.<br />
• Some <strong>JVC</strong> VCRs can accept two types of the control signals —<br />
remote code “A” and “B.” Before using this remote control, make<br />
sure that the remote control code of the target VCR is set to code<br />
“A.”<br />
VCR<br />
You can always perform the following operations (with the remote<br />
control mode selector set to “AUDIO/TV/VCR”):<br />
VCR : Turns on or off the VCR.<br />
After pressing VCR or VCR CONTROL (with the remote control<br />
mode selector set to “AUDIO/TV/VCR”), you can perform the<br />
following operations on the VCR:<br />
1 – 9, 0: Selects the TV channels on VCR.<br />
PLAY: Starts playing.<br />
1: Rewinds a tape.<br />
¡: Fast winds a tape.<br />
STOP: Stops operations.<br />
PAUSE: Pauses playing. To release it, press PLAY.<br />
REC: Press this button with the PLAY button to start<br />
recording.<br />
Press this button with the PAUSE button to enter<br />
recording pause.<br />
CHANNEL +/–: Changes the TV channels on the VCR.<br />
TV VOL<br />
/REW<br />
CHANNEL<br />
RM-S<strong>RX</strong>7000R<br />
CONTROL<br />
PTY SEARCH<br />
STOP<br />
DISPLAY MODE<br />
VOLUME<br />
TV/VIDEO VCR TAPE/MD MUTING<br />
PTY<br />
REC<br />
PLAY<br />
TV/CATV/DBS<br />
FF/<br />
PTY<br />
REMOTE CONTROL<br />
VCR<br />
DVD DVD MUILTI CD TAPE/MD<br />
TV/DBS PHONO FM/AM<br />
VCR<br />
ANALOG/DIGITAL<br />
SURROUND<br />
CENTER<br />
1 2 3<br />
ON/OFF<br />
MENU<br />
SURROUND TEST REAR-L<br />
4 5 6<br />
MODE<br />
ENTER<br />
CD-DISC EFFECT<br />
REAR-R<br />
7/P 8 9<br />
SOUND SEA MODE SUBWOOFER<br />
10 +10 0<br />
RETURN FM MODE 100+<br />
MENU<br />
EXIT<br />
SET<br />
SLEEP<br />
AUDIO/<br />
TV/VCR<br />
CATV/DBS<br />
TEXT<br />
DISPLAY<br />
PAUSE<br />
AUDIO/<br />
TV/VCR<br />
CATV/DBS<br />
Check to see if the remote<br />
control mode selector is set<br />
to the correct position.<br />
To operate the audio<br />
system, TVs, VCRs, and<br />
DVD players, set it to<br />
“AUDIO/TV/VCR.”<br />
Note:<br />
You can use either VCR button or the VCR CONTROL button to<br />
activate the buttons listed above. If you press VCR, the playing source<br />
also changes. On the other hand, if you press VCR CONTROL, the<br />
playing source does not change.<br />
DVD player<br />
After pressing DVD or DVD MULTI (with the remote control mode<br />
selector set to “AUDIO/TV/VCR”), you can perform the following<br />
operations on a DVD player:<br />
PLAY: Starts playing.<br />
4: Returns to the beginning of the current (or previous) track.<br />
¢: Skips to the beginning of the next track.<br />
STOP: Stops playing.<br />
PAUSE: Stops playing temporarily. To release it, press PLAY.<br />
After pressing DVD or DVD<br />
MULTI, these buttons can be used<br />
for the DVD menu operations.<br />
TEST<br />
CENTER<br />
2 3<br />
MENU<br />
REAR-L<br />
Note:<br />
4 5 6<br />
ENTER<br />
REAR-R<br />
For detailed menu operations, refer to the<br />
instructions supplied with the discs or the 8<br />
DVD player.<br />
TV<br />
You can always perform the following operations (with the remote<br />
control mode selector set to “AUDIO/TV/VCR”):<br />
TV/CATV/DBS : Turns on or off the TV.<br />
TV VOL +/–: Adjusts the volume.<br />
TV/VIDEO: Sets the input mode (either TV or VIDEO).<br />
After pressing TV/DBS (with the remote control mode selector set<br />
to “AUDIO/TV/VCR”), you can perform the following operations<br />
on a TV:<br />
CHANNEL +/–: Changes the channels.<br />
1 – 9, 0, 100+: Selects the channels.<br />
RETURN:<br />
Alternates between the previously selected<br />
channel and the current channel.<br />
47
Operating Other Manufacturers’ Video Equipment<br />
This remote control supplied with the receiver can transmit control<br />
signals for other manufacturers’ VCRs, TVs, CATV converters and<br />
DBS tuners. By changing the transmittable signals from preset ones<br />
to the other manufacturers’, you can operate the other<br />
manufacturer’s components using this remote control.<br />
When operating the other manufacturers’ components, refer also to<br />
the manuals supplied with them. To operate these components with<br />
the remote control, first you need to set the manufacturer’s code<br />
each for VCR, TV, CATV converters and DBS tuners.<br />
TV VOL<br />
CHANNEL<br />
TV/CATV/DBS<br />
VCR<br />
DVD DVD MUILTI CD TAPE/MD<br />
TV/DBS PHONO FM/AM<br />
VCR<br />
ANALOG/DIGITAL<br />
SURROUND<br />
CENTER<br />
1 2 3<br />
ON/OFF<br />
MENU<br />
SURROUND TEST REAR-L<br />
4 5 6<br />
MODE<br />
ENTER<br />
CD-DISC EFFECT<br />
REAR-R<br />
7/P 8 9<br />
SOUND SEA MODE SUBWOOFER<br />
10 +10 0<br />
RETURN FM MODE 100+<br />
MENU<br />
EXIT<br />
SET<br />
SLEEP<br />
AUDIO/<br />
TV/VCR<br />
CATV/DBS<br />
TEXT<br />
DISPLAY<br />
VOLUME<br />
AUDIO/<br />
TV/VCR<br />
CATV/DBS<br />
To change the transmittable signals for<br />
operating another manufacturer’s TV<br />
1. Set the remote control mode to “AUDIO/TV/<br />
VCR.”<br />
2. Press and hold TV/CATV/DBS .<br />
3. Press TV/DBS.<br />
4. Enter manufacturer’s code (three digits) using<br />
buttons 1 – 9, and 0.<br />
See the list on pages 50 and 51 to find the code.<br />
Examples: For a <strong>JVC</strong> product, press 0, 3, then 6.<br />
For a Hitachi product, press 0, 3, then 2.<br />
5. Release TV/CATV/DBS .<br />
The following buttons can be used for operating the TV (with<br />
the remote control mode selector set to “AUDIO/TV/VCR”):<br />
TV/CATV/DBS : Turns on and off the TV.<br />
TV VOL +/–:<br />
Adjusts the volume.<br />
TV/VIDEO:<br />
Sets the input mode (either TV<br />
or VIDEO).<br />
After pressing TV/DBS (with the remote control mode selector<br />
set to “AUDIO/TV/VCR”), you can perform the following<br />
operations on a TV:<br />
English<br />
TV/VIDEO VCR TAPE/MD MUTING<br />
/REW<br />
PTY<br />
REC<br />
RM-S<strong>RX</strong>7000R<br />
CONTROL<br />
PLAY<br />
PTY SEARCH<br />
STOP<br />
DISPLAY MODE<br />
FF/<br />
PTY<br />
REMOTE CONTROL<br />
PAUSE<br />
Check to see if the remote<br />
control mode selector is set<br />
to the correct position.<br />
To operate the audio<br />
system, TVs, and VCRs,<br />
set it to “AUDIO/TV/VCR.”<br />
To operate the CATV<br />
converter and DBS tuner,<br />
set it to “CATV/DBS.”<br />
CHANNEL +/–: Changes the channels.<br />
1 – 10, 0, 100+ (+10): Selects the channels.<br />
The 100+ (+10) button will function<br />
as the ENTER button if your TV<br />
requires pressing ENTER after<br />
selecting a channel number.<br />
Note:<br />
Refer to the manual supplied with your TV.<br />
6. Try to operate your TV by pressing TV/CATV/<br />
DBS .<br />
When your TV turns on or off, you have entered the correct<br />
code.<br />
If there are more than one code listed for your brand of TV,<br />
try each one until the correct one is entered.<br />
48
English<br />
To change the transmittable signals for<br />
operating a CATV converter or a DBS tuner<br />
To change the transmittable signals for<br />
operating another manufacturer’s VCR<br />
1. Set the remote control mode to “CATV/DBS.”<br />
2. Press and hold TV/CATV/DBS .<br />
3. Press TV/DBS.<br />
4. Enter manufacturer’s code (three digits) using<br />
buttons 1 – 9, and 0.<br />
See the list on pages 51 and 52 to find the code.<br />
Examples: For a British Telecom product, press 0, 0, then 3.<br />
For a Zenith product, press 0, 0, then 0.<br />
5. Release TV/CATV/DBS .<br />
After setting the remote control mode selector to “CATV/DBS,”<br />
you can perform the following operations on the CATV<br />
convertor or on the DBS tuner:<br />
TV/CATV/DBS : Turns on and off the CATV converter<br />
or the DBS tuner.<br />
CHANNEL +/–: Changes the channels.<br />
1 – 10, 0, 100+ (+10): Selects the channels.<br />
The 100+ (+10) button will function as<br />
the ENTER button if your equipment<br />
requires pressing ENTER after<br />
selecting a channel number.<br />
Note:<br />
Refer to the manual supplied with your CATV converter or DBS<br />
tuner.<br />
6. Try to operate your CATV converter or DBS<br />
tuner by pressing TV/CATV/DBS .<br />
When your CATV converter or DBS tuner turns on or off, you<br />
have entered the correct code.<br />
If there are more than one code listed for your brand of<br />
CATV converter or DBS tuner, try each one until the correct<br />
one is entered.<br />
1. Set the remote control mode to “AUDIO/TV/<br />
VCR.”<br />
2. Press and hold VCR .<br />
3. Press VCR.<br />
4. Enter manufacturer’s code (three digits) using<br />
buttons 1 – 9, and 0.<br />
See the list on pages 52 and 53 to find the code.<br />
Examples: For a <strong>JVC</strong> product, press 0, 0, then 8.<br />
For an NEC product, press 0, 3, then 8.<br />
5. Release VCR .<br />
The following button can be used for operating the VCR (with<br />
the remote control mode selector set to “AUDIO/TV/VCR”):<br />
VCR : Turns on and off the VCR.<br />
After pressing VCR or VCR CONTROL (with the remote<br />
control mode selector set to “AUDIO/TV/VCR”), you can<br />
perform the following operations on the VCR:<br />
CHANNEL +/–: Changes the TV channels on the VCR.<br />
1 – 10, 0, 100+ (+10): Selects the TV channels.<br />
The 100+ (+10) button will function as<br />
the ENTER button if your VCR<br />
requires pressing ENTER after<br />
selecting a channel number.<br />
PLAY:<br />
Starts playback.<br />
1: Rewinds a video tape.<br />
¡: Fast winds a video tape.<br />
STOP:<br />
Stops operation.<br />
PAUSE:<br />
Pauses.<br />
REC: Starts recording or enters recording<br />
pause.<br />
Notes:<br />
• Refer to the manual supplied with your VCR.<br />
• You can use either VCR button or the VCR CONTROL button to<br />
activate the buttons listed above. If you press VCR, the playing<br />
source also changes. On the other hand, if you press VCR<br />
CONTROL, the playing source does not change.<br />
6. Try to operate your VCR by pressing VCR .<br />
When your VCR turns on or off, you have entered the correct<br />
code.<br />
If there are more than one code listed for your brand of<br />
VCR, try each one until the correct one is entered.<br />
49
Manufacturers’ codes for TV<br />
Acura 009<br />
Admiral 087, 163, 213<br />
Adyson 032, 217<br />
AGB 516<br />
Akai 208, 361, 516<br />
Akura 218, 264, 369<br />
Alba 009, 036, 037, 211, 218, 235, 371<br />
Allorgan 294<br />
Amplivision 217, 400<br />
Amstrad 009, 037, 171, 177, 354, 362, 369, 371,<br />
412, 433, 516<br />
Anitech 009, 068, 076<br />
Arcam 216, 217<br />
ASA 087<br />
Asberg 076<br />
Asuka 218<br />
Atlantic 206<br />
Audiosonic 037, 109<br />
Autovox 076, 087, 206, 336<br />
Baird 343, 557<br />
Bang & Olufsen 087<br />
Barco 380<br />
Basic Line 009, 218<br />
Baur 010, 037, 349, 361, 505, 512, 535, 554<br />
Beko 370, 486<br />
Beon 037<br />
Binatone 217<br />
Blaupunkt 191, 195, 200, 213, 327, 328, 535, 554<br />
Blue Sky 218<br />
Blue Star 282<br />
Bondstec 247<br />
Boots 217<br />
BPL 282<br />
Brandt 109, 196, 198, 205, 333, 335<br />
Brionvega 087, 362<br />
Britannia 216<br />
Bruns 087<br />
BSR 294<br />
BTC 218<br />
Bush 009, 036, 037, 211, 218, 282, 294, 349,<br />
355, 371, 374, 519<br />
Carrefour 036<br />
Cascade 009<br />
Cathay 037<br />
Centurion 037<br />
Century 087, 213<br />
CGE 074, 076, 084, 247, 306<br />
Cimline 009<br />
Clarivox 037<br />
Clatronic 076, 247, 370<br />
Clayton 385<br />
Condor 320, 370<br />
Contec 009, 036, 216<br />
Continental Edison 196, 198, 205, 333, 399<br />
Crosley 074, 076, 084, 087, 213<br />
Crown 009, 037, 076, 370, 418, 579<br />
Crystal 431<br />
CS Electrinics 216<br />
CTC 247<br />
Cybertron 218<br />
Daewoo 009, 037, 374, 499<br />
Dainichi 215, 218<br />
Dansai 037<br />
Dayton 009<br />
De Graaf 208, 227, 548<br />
Decca 037, 072, 249, 516<br />
Dixi 009, 037<br />
Dual 336, 352, 519<br />
Dual Tec 217<br />
Dumont 070, 087<br />
Elbe 259<br />
Elin 037, 548<br />
Elite 218, 320<br />
Elta 009<br />
Emerson 087, 213, 361<br />
Erres 012, 037<br />
Europhon 516<br />
Expert 206<br />
Ferguson 005, 037, 073, 109, 190, 238, 287, 335,<br />
343<br />
Fidelity 216, 361, 372<br />
Finlandia 208, 346, 359<br />
Finlux 037, 070, 072, 087, 105, 179, 346, 411,<br />
516<br />
Firstline 009, 216, 217, 247, 294, 321<br />
Fisher 208, 217, 303, 370<br />
Flint 455<br />
Formenti 037, 087, 213, 320<br />
Frontech 163, 247, 264, 431, 448<br />
Fujitsu 072, 206<br />
Funai 179, 264, 294, 303<br />
GEC 037, 043, 072, 205, 217, 516, 557<br />
Geloso 009, 213<br />
Genexxa 163, 218<br />
Goldstar 037, 109, 217, 290<br />
Goodmans 036, 037, 072, 179, 217, 235, 257, 317,<br />
343, 371, 374, 499<br />
Gorenje 370<br />
GPM 218<br />
Graetz 163, 361, 557<br />
Granada 037, 072, 146, 201, 208, 217, 339, 359,<br />
516<br />
Grandin 282<br />
Grundig 070, 191, 195, 205, 487, 535, 554<br />
Hanseatic 037, 320, 361, 556<br />
Hantarex 516<br />
Harwood 257<br />
HCM 009, 282, 412<br />
Hinari 009, 036, 037, 179, 218<br />
Hisawa 282, 400, 455<br />
Hitachi 032, 036, 043, 044, 105, 109, 163, 196,<br />
198, 217, 225, 227, 306, 349, 481, 548,<br />
557<br />
Huanyu 216, 374<br />
Hypson 037, 264, 282<br />
ICE 217, 264, 371<br />
ICeS 218<br />
Imperial 074, 076, 084, 247, 370, 418<br />
Indiana 037<br />
Ingelen 163, 557<br />
Inno Hit 072, 516<br />
Interbuy 068<br />
Interfunk 037, 163, 247, 361, 512, 557<br />
Intervision 037, 068, 102, 217, 264<br />
Isukai 218<br />
ITS 371<br />
ITT 163, 361, 548, 557<br />
<strong>JVC</strong> 036, 053, 094, 190, 192, 371, 800<br />
Kaisui 009, 216, 217, 218, 282<br />
Kapsch 163, 206, 557<br />
Kathrein 556<br />
Kendo 037, 235, 362<br />
Kingsley 216<br />
Kneissel 259, 435<br />
Korpel 037<br />
Korting 087<br />
Koyoda 009<br />
Leyco 037, 072, 264, 294<br />
Liesenk & Tter 037<br />
Lloytron 032<br />
Loewe 075, 087, 512<br />
Luma 206<br />
Luxor 349, 361<br />
M Electronic 009, 037, 068, 105, 109, 163, 217, 287,<br />
346, 374, 480<br />
Magnadyne 087, 102, 247, 516<br />
Magnafon 076, 102, 213, 516<br />
Manesth 217, 235, 264, 320<br />
Marantz 037, 556<br />
Marelli 087<br />
Mark 037<br />
Matsui 009, 011, 035, 036, 037, 072, 177, 208,<br />
211, 217, 235, 294, 354, 355, 371, 443,<br />
487, 516, 579<br />
50<br />
English
English<br />
McMichael 043<br />
Mediator 012, 037<br />
Memorex 009<br />
Memphis 337<br />
Metz 087, 213, 367, 535<br />
Minerva 070, 487, 535, 554<br />
Minoka 369, 412<br />
Mitsubishi 036, 087, 108, 150, 201, 354, 512, 535<br />
Mivar 216, 290, 291, 292, 516<br />
Motion 076<br />
MTC 349, 512<br />
Multitech 009, 076, 102, 216<br />
Neckermann 037, 087, 191, 213, 349, 505, 554, 556<br />
NEI 037, 337, 431<br />
Nesco 179<br />
Nikkai 032, 035, 037, 072, 216, 218, 264, 337<br />
Nobliko 076, 102<br />
Nokia 361, 480, 548<br />
Nordmende 109, 196, 198, 213, 287, 343<br />
Oceanic 163, 215, 361<br />
Onwa 433<br />
Orion 037, 177, 235, 294, 320, 321, 355, 443,<br />
516<br />
Osaki 032, 072, 217, 218, 257, 264, 412<br />
Oso 218<br />
Osume 032, 072, 157<br />
Otake 317<br />
Otto Versand 010, 036, 037, 191, 213, 217, 320, 343,<br />
349, 505, 512, 535, 554, 556<br />
Palladilum 370, 418<br />
Panama 217, 264<br />
Panasonic 100, 126, 163, 213, 214, 226, 250, 340<br />
367, 557<br />
Pathe Cinema 213, 216, 238, 320<br />
Pathe Marconi 196, 198, 205, 333<br />
Pausa 009<br />
Perdio 320<br />
Phase 032<br />
Philco 074, 076, 084, 087, 213, 247<br />
Philips 012, 037, 043, 087, 323, 374, 554, 556<br />
Phoenix 087<br />
Phonola 012, 037, 087<br />
Pioneer 109, 163, 287<br />
Prandoni Prince 516<br />
Profex 009 ,076, 361<br />
Proline 321<br />
Protech 009, 037, 102, 217, 247, 264, 337, 418,<br />
431<br />
Pye 012<br />
Quelle 010, 011, 037, 070, 074, 084, 200, 213,<br />
306, 327, 328, 361, 505, 512, 535, 554<br />
Questa 036<br />
R-Line 037<br />
Radiola 012, 037, 323<br />
Radiomarelli 087, 516<br />
Rank Arena 036<br />
RBM 070, 089<br />
Rediffusion 201, 361<br />
Revox 037<br />
Rex 163, 206, 259, 264<br />
RFT 087<br />
Roadstar 009, 218, 264, 418<br />
Saba 075, 087, 109, 163, 196, 198, 205, 213,<br />
287, 335, 343, 557<br />
Saccs 238<br />
Saikou 257<br />
Saisho 009, 011, 177, 211, 235, 264, 354, 431,<br />
516<br />
Salora 163, 349, 359, 361, 548<br />
Sambers 076, 102, 213, 516<br />
Samsung 009, 037, 090, 217, 264, 290, 370, 488,<br />
556<br />
Sandra 216<br />
Sanyo 011, 036, 072, 146, 157, 208, 213, 339<br />
Schaub Lorenz 361, 557<br />
SBR 012, 037, 043<br />
Schneider 037, 218, 247, 303, 323, 336, 352, 371,<br />
394<br />
51<br />
SEG 036, 076, 217, 264<br />
SEI 087, 102, 177, 213, 294<br />
Sei-Sinudyne 010, 516<br />
Seleco 163, 206, 259, 362, 411<br />
Sentra 035<br />
Sharp 036, 093<br />
Shorai 294<br />
Siarem 087, 102, 213, 516<br />
Siemens 037, 157, 191, 195, 200, 213, 327, 328,<br />
535, 554<br />
Silver 036<br />
Singer 087<br />
Sinudyne 087, 102, 177, 213, 235, 294<br />
Solavox 032, 163<br />
Sonitron 208<br />
Sonoko 009, 037<br />
Sonolor 163, 208, 215<br />
Sontec 037<br />
Sony 010, 011, 036, 505<br />
Soundwave 037, 418<br />
Standard 009, 217, 218<br />
Stern 163, 206, 259<br />
Sunkai 294, 321, 355<br />
Susumu 218<br />
Sysline 037<br />
Tandy 072, 163, 217, 218<br />
Tashiko 036, 043, 217, 359<br />
Tatung 037, 072, 217, 249, 516<br />
Tec 217, 247<br />
Technema 320<br />
Technics 250<br />
Technol Ace 179<br />
Teleavia 205, 333, 343<br />
Telefunken 005, 074, 084, 101, 109, 213, 262, 306,<br />
335, 343, 471, 498, 625<br />
Telemeister 320<br />
Teletech 009<br />
Teleton 206, 217, 349<br />
Tensai 218, 294, 317, 320<br />
Texet 216, 218<br />
Thomson 109, 196, 198, 205, 287, 333, 343, 349,<br />
399<br />
Thorn 035, 037, 072, 074, 084, 190, 192, 343,<br />
361, 499, 505, 512, 535, 553<br />
Tomashi 282<br />
Toshiba 035, 036, 070, 089, 243, 508, 553<br />
Triumph 177, 243, 516<br />
Uher 206, 303, 320<br />
Ultra 192<br />
Ultravox 102<br />
Universum 037, 105, 264, 346, 370, 421, 492, 535<br />
Vestel 037<br />
Videosat 247<br />
Videotechnic 217<br />
Vision 320<br />
Voxson 087, 163<br />
Waltham 217<br />
Watson 037, 320<br />
Watt Radio 102<br />
Wega 036, 087<br />
White Westinghouse 037, 216, 320<br />
Yoko 037, 217, 264, 431<br />
Zanussi 206<br />
Manufacturers’ codes for DBS tuner<br />
Akai 515<br />
Alba 362, 421, 455, 515, 613<br />
Aldes 288<br />
Amstrad 080, 252, 345, 461, 501, 509, 689<br />
Ankaro 220, 288, 369, 519<br />
Anttron 183, 421<br />
Armstrong 243<br />
AST 351<br />
Astra 108<br />
Astro 173, 501, 520<br />
Avalon 396<br />
Axis 369, 530<br />
BT 515, 668
Beko 189<br />
Best 369<br />
Blaupunkt 173<br />
Boca 243, 513<br />
Brain Wave 332<br />
Bush 067, 522<br />
Cambridge 344, 515<br />
Channel Master 362<br />
CNT 520<br />
Commlink 288<br />
Connexions 396<br />
Conrad 607<br />
Crown 243<br />
Cyrus 200<br />
DDC 362<br />
DNT 200, 396<br />
Echostar 396, 713<br />
Emanon 421<br />
Ferguson 067, 183, 189, 336<br />
Fidelity 252<br />
Finlux 108, 344, 397, 455<br />
Freecom 421<br />
Fuba 369, 396, 421<br />
G-Sat 183<br />
Galaxis 288<br />
Gooding 571<br />
Goodmans 189<br />
Grundig 173, 189, 328, 571, 750<br />
Hinari 183<br />
Hirschmann 173, 397, 501, 502, 573<br />
Hitachi 455<br />
Houston 668<br />
Huth 220, 243, 288, 346<br />
IRTE 609<br />
Intervision 592<br />
ITT 108<br />
Johansson 332<br />
<strong>JVC</strong> 515, 571<br />
Kathrein 092, 173, 200, 442, 504, 622, 658<br />
Kreiselmeyer 173<br />
Kyostar 421<br />
La Sat 513, 520, 607<br />
Lenco 421<br />
Lennox 592<br />
Lupus 369<br />
Luxor 108, 573<br />
Manhattan 455, 520, 592<br />
Marantz 200<br />
Maspro 092, 328, 336, 750<br />
Matsui 344, 571<br />
Mediamarkt 243<br />
Minerva 571<br />
Mintec 578<br />
Morgan’s 243, 513<br />
Navex 332<br />
Neuhaus 501<br />
Newhaus 220<br />
Nikko 360, 713<br />
Nokia 108, 328, 397, 455, 573<br />
Nordmende 362<br />
Orbitech 501<br />
Orion 522<br />
Oxford 344<br />
Pace 067, 183, 328, 336, 455, 795<br />
Palladium 571<br />
Palsat 501<br />
Panda 455<br />
Philips 200, 292, 328, 455, 571, 750<br />
Phonotrend 288, 592<br />
Promax 455<br />
Prosat 288<br />
Quadral 362, 519, 628<br />
Radiola 200<br />
Radix 396<br />
RFT 200, 220, 288<br />
Saba 336, 520<br />
Sabre 455<br />
Salora 108<br />
SAT 351, 461<br />
Satcom 346, 605<br />
Satec 183, 328<br />
Satmaster 346<br />
SatPartner 332, 421, 502, 520<br />
Schwaiger 183, 504<br />
Seemann 396, 530, 578, 626<br />
SEG 369, 421<br />
Siemens 173<br />
Skymaster 288, 519, 605, 628<br />
SM Electronic 713<br />
Sony 704<br />
Sunstar 513<br />
Tantec 336, 455<br />
TechniSat 501<br />
Techniland 346<br />
Telefunken 421<br />
Teleka 243, 613<br />
Telesat 605<br />
Thomson 455<br />
Tonna 346, 668<br />
Triad 351<br />
Triasat 501<br />
Unitor 332<br />
Universum 173, 571<br />
Ventana 200<br />
Vortec 421<br />
Vtech 351<br />
Winersat 332<br />
Wisi 173, 351, 396, 455<br />
Zehnder 520<br />
Manufacturers’ codes for CATV converters<br />
Brigminghan Cable Communications 276<br />
British Telecom 003, 105<br />
Decsat 423<br />
Filmnet 443<br />
France Telecom 451<br />
Jerrold 003, 276<br />
MNet 443<br />
PVP Stereo Visual Matrix 003<br />
Salora 382<br />
Scientific Atlanta 008, 277<br />
Tele+1 443<br />
United Cable 003<br />
Westminster 105<br />
Zenith 000<br />
Manufacturers’ codes for VCR<br />
Aiwa 000, 307, 348, 352<br />
Akai 041, 049, 053, 106, 281, 288, 315<br />
Akiba 072<br />
Akura 271<br />
Alba 020, 072, 209, 278, 295, 315, 333, 334,<br />
352<br />
Ambassador 020<br />
Amstrad 000, 278, 325, 332<br />
Anitech 072<br />
ASA 037, 081<br />
Asuka 037<br />
Baird 000, 041, 104, 107<br />
Basic Line 020, 072, 278<br />
Blaupunkt 003, 006, 016, 034, 154, 162, 195, 226,<br />
227, 403<br />
Brandt 187, 320, 321<br />
Brandt Electronic 041<br />
Brionvega 344<br />
Bush 072, 209, 278, 333, 334, 352<br />
Catron 020<br />
CGE 000<br />
Cimline 072<br />
Clatronic 020<br />
Combitech 352<br />
52<br />
English
English<br />
Condor 020<br />
Crown 020, 072, 278<br />
Cyrus 081<br />
Daewoo 020, 278<br />
Dansai 072<br />
De Graaf 042, 166<br />
Decca 000, 081<br />
Denon 042<br />
Dual 041<br />
Dumont 000, 081, 104, 105<br />
Elbe 038<br />
Elcatech 072<br />
ESC 240, 278<br />
Ferguson 041, 084, 098, 107, 320, 321<br />
Fidelity 000<br />
Finlandia 081, 104<br />
Finlux 000, 042, 081, 104, 105<br />
Firstline 037, 043, 045, 072, 209<br />
Fisher 046, 047, 054, 104<br />
Frontech 020<br />
Funai 000<br />
GEC 081<br />
General 020<br />
GoldHand 072<br />
GoldStar 037, 225<br />
Goodmans 000, 020, 037, 072, 278, 403<br />
Graetz 005, 041, 104, 240, 344<br />
Granada 046, 081, 104<br />
Grandin 000, 037, 072<br />
Grundig 003, 006, 007, 016, 072, 081, 195, 207,<br />
226, 347, 349, 403<br />
Hanseatic 037<br />
HCM 072<br />
Hinari 004, 072, 208, 240, 352<br />
Hitachi 000, 004, 041, 042, 105, 166, 235, 240<br />
Hypson 072<br />
Imperial 000<br />
Ingersol 004<br />
Interfunk 081<br />
ITT 005, 041, 046, 104, 106, 240, 344, 384<br />
ITV 037, 278<br />
<strong>JVC</strong> 008, 041, 067, 084, 206, 207, 384, 486<br />
Kaisui 072<br />
Kendo 106, 209<br />
Kenwood 041<br />
Korpel 072<br />
Lenco 278<br />
Leyco 072<br />
Loewe 004, 006, 037, 081<br />
Logik 004, 240<br />
Luxor 043, 046, 048, 104, 106<br />
M Electronic 000<br />
Manesth 045, 072<br />
Marantz 003, 006, 081, 295<br />
Matsui 004, 036, 088, 208, 209, 295, 348, 352<br />
Melectronic 038<br />
Memorex 000, 037, 046, 104<br />
Memphis 072<br />
Metz 003, 006, 037, 162, 195, 227, 347<br />
Minerva 006, 016, 195<br />
Mitsubishi 043, 067, 081<br />
Multitech 000, 072<br />
Murphy 000<br />
NEC 038, 041, 067<br />
Neckermann 081, 344<br />
Nesco 072<br />
Nokia 041, 046, 104, 106, 240, 344<br />
Nordmende 041, 297, 320, 321, 384<br />
Oceanic 000, 041<br />
Okano 315, 348<br />
Orion 004, 036, 088, 208, 209, 295, 333, 334,<br />
348, 352<br />
Osaki 000, 037, 072<br />
Otto Versand 081<br />
Palladium 006, 037, 041, 072<br />
Panasonic 162, 226, 227<br />
Pathe Cinema 036<br />
53<br />
Pathe Marconi 041<br />
Pentax 042, 105<br />
Perdio 000<br />
Philco 038<br />
Philips 081, 384, 403<br />
Phonola 081<br />
Pioneer 067, 081, 235<br />
Portland 020<br />
Profex 322<br />
Profitronic 240<br />
Proline 000<br />
Pye 081<br />
Quartz 046<br />
Quelle 081, 344<br />
Radiola 081<br />
Rex 041, 384<br />
RFT 403<br />
Roadstar 037, 072, 240, 278<br />
Saba 041, 206, 207, 297, 320, 321, 384<br />
Saisho 004, 036, 088, 208, 209<br />
Salora 043, 046, 106<br />
Samsung 240, 432<br />
Sansui 041, 067, 271<br />
Sanyo 046, 104<br />
Saville 352<br />
SBR 081<br />
Schaub Lorenz 000, 005, 041, 104, 344<br />
Schneider 000, 072, 081<br />
SEG 240, 322<br />
SEI 004, 081<br />
Seleco 041<br />
Sentra 020<br />
Sharp 048<br />
Shintom 072, 104<br />
Shorai 004<br />
Siemens 003, 006, 016, 037, 054, 081, 104, 195<br />
Silva 037<br />
Singer 045<br />
Sinudyne 004, 081<br />
Solavox 020<br />
Sonolor 046<br />
Sontec 037<br />
Sony 011, 032, 033, 034<br />
Sunkai 348<br />
Sunstar 000<br />
Suntronic 000<br />
Tashiko 000<br />
Tatung 000, 041, 081<br />
Tec 020<br />
Technics 162, 226<br />
Teleavia 041<br />
Telefunken 041, 187, 320, 321, 384<br />
Tenosal 072<br />
Tensai 000, 322<br />
Thomson 041, 320, 384<br />
Thorn 036, 041, 084, 104<br />
Toshiba 041, 043, 045, 081, 384<br />
Towada 322<br />
Triumph 208<br />
Uher 240, 344<br />
Ultravox 049, 344<br />
Universum 000, 006, 016, 037, 049, 081, 106, 195,<br />
240, 325<br />
White Westinghouse 344<br />
Yamishi 072<br />
Yokan 072<br />
Yoko 020, 240<br />
Manufacturers’ codes listed on pages 50 to 53 are subject<br />
to change without notice. If they are changed, this<br />
remote control cannot operate the equipment.
Troubleshooting<br />
Use this chart to help you solve daily operational problems. If there is any problem you cannot solve, contact your <strong>JVC</strong><br />
service center.<br />
PROBLEM<br />
POSSIBLE CAUSE<br />
SOLUTION<br />
English<br />
The display does not light up.<br />
No sound from speakers.<br />
Sound from one speaker only.<br />
Continuous hiss or buzzing during FM<br />
reception.<br />
Occasional cracking noise during FM<br />
reception.<br />
No colors on the on-screen display.<br />
Howling during record playing.<br />
“OVERLOAD” starts flashing on the<br />
display.<br />
Remote control does not work.<br />
The power cord is not plugged in.<br />
Speaker signal cables are not connected.<br />
The SPEAKERS 1 and 2 buttons are not<br />
set correctly.<br />
An incorrect source is selected.<br />
Muting is activated.<br />
Speaker signal cables are not connected<br />
properly.<br />
The balance is set to one extreme.<br />
Incoming signal is too weak.<br />
The station is too far away.<br />
An incorrect antenna is used.<br />
Antennas are not connected properly.<br />
Ignition noise from automobiles.<br />
The color system of the connected TV is<br />
not PAL.<br />
Your turntable is too close to speakers.<br />
Speakers are overloaded because of high<br />
volume.<br />
Speakers are overloaded because of short<br />
circuit of speaker terminals.<br />
The remote control mode selector is not<br />
set correctly.<br />
There is an obstruction in front of the<br />
remote sensor on the receiver.<br />
Batteries are weak.<br />
Plug the power cord into an AC outlet.<br />
Check speaker wiring and reconnect if<br />
necessary.<br />
Press SPEAKERS 1 and 2 correctly.<br />
Select the correct source.<br />
Press MUTING to cancel the mute.<br />
Check speaker wiring and reconnect if<br />
necessary.<br />
Adjust the balance properly (see page 13).<br />
Connect an outdoor FM antenna or contact<br />
your dealer.<br />
Select a new station.<br />
Check with your dealer to be sure you have<br />
the correct antenna.<br />
Check connections.<br />
Move the antenna farther from automobile<br />
traffic.<br />
Connect PAL- or multi-color system TV.<br />
Move speakers away from the turntable.<br />
1. Press STANDBY/ON on the front<br />
panel to turn off the receiver.<br />
2. Stop the playback source.<br />
3. Turn on the receiver again, and adjust the<br />
volume.<br />
Press STANDBY/ON on the front panel,<br />
then check the speaker wiring.<br />
If “OVERLOAD” does not disappear, unplug<br />
the AC power cord, then plug it back again.<br />
If speaker wiring is not short-circuited, contact<br />
your dealer.<br />
Set the selector correctly either to “AUDIO/<br />
TV/VCR” or to “CATV/DBS.”<br />
Remove the obstruction.<br />
Replace batteries.<br />
54
English<br />
Amplifier<br />
Specifications<br />
Output Power<br />
At Stereo operation:<br />
Front channels: 100 W per channel, min. RMS, both channels driven into 4 Ω, at<br />
1 kHz with no more than 0.9% total harmonic distortion.<br />
(IEC268-3/DIN)<br />
At Surround operation:<br />
Front channels: 100 W per channel, min. RMS, driven into 4 Ω at 1 kHz, with no<br />
more than 0.8% total harmonic distortion.<br />
Center channel: 100 W, min. RMS, driven into 4 Ω at 1 kHz, with no more than<br />
0.8% total harmonic distortion.<br />
Rear channels: 100 W per channel, min. RMS, driven into 4 Ω at 1 kHz, with no<br />
more than 0.8% total harmonic distortion.<br />
Total Harmonic Distortion (8 Ω): 0.02% at 50 W output (at 1 kHz)<br />
Audio<br />
Audio Input Sensitivity/Impedance (1 kHz): PHONO (MM): 2.5 mV/47 kΩ<br />
CD, TAPE/MD, TV SOUND/DBS, VCR, DVD: 200 mV/47 kΩ<br />
Audio Input (DIGITAL IN)* : Coaxial: DIGITAL 1 (DVD): 0.5 V(p-p)/75 Ω<br />
Optical: DIGITAL 2 (CD), DIGITAL 3 (TV): –21 dBm to –15 dBm (660 nm ±30 nm)<br />
* Corresponding to Linear PCM, Dolby Digital, DTS Digital Surround and MPEG<br />
Multichannel (with sampling frequency — 32 kHz, 44.1 kHz, 48 kHz).<br />
Audio Output Level: TAPE/MD, VCR: 200 mV<br />
Digital output: Optical: DIGITAL OUTPUT<br />
Signal wave length:<br />
660 nm<br />
Output level: –21 dBm to –15 dBm<br />
Signal-to-Noise Ratio (’66 IHF/DIN): PHONO: 70 dB/66 dB (at REC OUT)<br />
CD, TAPE/MD, TV SOUND/DBS, VCR, DVD: 87 dB/67 dB<br />
Frequency Response (8 Ω): PHONO: 20 Hz to 20 kHz (±1 dB)<br />
CD, TAPE/MD, TV SOUND/DBS, VCR, DVD: 20 Hz to 20 kHz (±1 dB)<br />
RIAA Phono Equalization: ±1.0 dB (20 Hz to 20 kHz)<br />
Bass Boost: +6 dB ±1.0 dB at 100 Hz (Volume Control at –30 dB)<br />
SEA: Center frequencies: 100 Hz, 1 kHz, 10 kHz<br />
Control range: ±10 dB ±2 dB<br />
Video<br />
Video Input Sensitivity/Impedance:<br />
Composite video: TV SOUND/DBS, VCR, DVD: 1 V(p-p)/75 Ω<br />
S-video: TV SOUND/DBS, VCR, DVD: (Y: luminance): 1 V(p-p)/75 Ω<br />
(C: chrominance, burst): 0.286 V(p-p)/75 Ω<br />
Video Output Level:<br />
Composite video: VCR, MONITOR OUT: 1 V(p-p)/75 Ω<br />
S-video: VCR, MONITOR OUT: (Y: luminance): 1 V(p-p)/75 Ω<br />
(C: chrominance, burst): 0.286 V(p-p)/75 Ω<br />
Synchronization: Negative<br />
Signal-to-Noise Ratio: 45 dB<br />
On-Screen Color System: PAL<br />
55
FM tuner (IHF)<br />
Tuning Range: 87.50 MHz to 108.00 MHz<br />
Usable Sensitivity: Monaural: 17.0 dBf (1.95 µV/75 Ω)<br />
50 dB Quieting Sensitivity: Monaural: 21.3 dBf (3.2 µV/75 Ω)<br />
Stereo: 41.3 dBf (31.5 µV/75 Ω)<br />
Signal-to-Noise Ratio (IHF-A weighted): Monaural: 78 dB at 85 dBf<br />
Stereo:<br />
73 dB at 85 dBf<br />
Total Harmonic Distortion: Monaural: 0.4% at 1 kHz<br />
Stereo:<br />
0.6% at 1 kHz<br />
Stereo Separation at REC OUT: 35 dB at 1 kHz<br />
Alternate Channel Selectivity: 60 dB: (±400 kHz)<br />
Frequency Response: 30 Hz to 15 kHz: (+0.5 dB, –3 dB)<br />
English<br />
AM (MW/LW) tuner<br />
Tuning Range: MW: 522 kHz to 1 629 kHz<br />
LW:<br />
144 kHz to 288 kHz<br />
Usable Sensitivity: Loop antenna: 400 µV/m<br />
Signal-to-Noise Ratio:<br />
50 dB (100 mV/m)<br />
General<br />
Power Requirements: AC 230 V , 50 Hz<br />
Power Consumption: 210 W (at operation)<br />
2 W (in standby mode)<br />
Dimensions (W x H x D): 435 mm x 157 mm x 412.5 mm<br />
(17 3 /16 in. x 6 3 /16 in. x 16 1 /4 in.)<br />
Mass: 11.3 kg (25.0 lbs)<br />
Designs & specifications are subject to change without notice.<br />
56
VICTOR COMPANY OF JAPAN, LIMITED<br />
EN, GE, FR, NL, SP, IT <strong>JVC</strong> 0400HIMMDWJEIN


![TH-V70R[B] revision - JVC](https://img.yumpu.com/23738839/1/184x260/th-v70rb-revision-jvc.jpg?quality=85)