Betriebsanleitung Betriebsanleitung - Bio-Circle
Betriebsanleitung Betriebsanleitung - Bio-Circle
Betriebsanleitung Betriebsanleitung - Bio-Circle

Create successful ePaper yourself
Turn your PDF publications into a flip-book with our unique Google optimized e-Paper software.
Technical Support:<br />
Telefon: +49 (0)5241 9443-0<br />
Telefax: +49 (0)5241 9443-44<br />
E-Mail: service@cb-chemie.de<br />
AL5 3/2009<br />
CB Chemie und <strong>Bio</strong>technologie GmbH<br />
CB Chemie und <strong>Bio</strong>technologie GmbH<br />
Berensweg 200 • D-33334 Gütersloh<br />
Telefon: +49 (0)5241 9443-0<br />
Telefax: +49 (0)5241 9443-44<br />
E-Mail: service@cb-chemie.de<br />
www.cb-chemie.de<br />
bio-chem SEPRO Surface Technology GmbH<br />
Winetzhammerstraße 4 • A-4030 Linz<br />
Telefon: +43 (0)732 376262<br />
Telefax: +43 (0)732 376260<br />
E-Mail: service@bio-chem.at<br />
www.bio-chem.at<br />
WALTER CB-AG<br />
Lettenstrasse 6 • CH-6343 Rotkreuz<br />
Telefon: +41 (0)41 8781166<br />
Telefax: +41 (0)41 8781347<br />
E-Mail: info@walter-cb.ch<br />
www.walter-cb.ch<br />
<strong>Betriebsanleitung</strong><br />
Operating Instructions<br />
Mode d´emploi<br />
Libretto d’istruzioni<br />
G40026-03<br />
G40026-03
Thank you for purchasing the <strong>Bio</strong>-<strong>Circle</strong>.<br />
This operating instructions have been designed to give you all information on the <strong>Bio</strong>-<strong>Circle</strong>.<br />
To ensure perfect functioning of your <strong>Bio</strong>-<strong>Circle</strong>, carefully read them before using<br />
the machine.<br />
Familiarize yourself with this unit's operation, its particular features, applications and<br />
limitations. You will also find useful tips on safety and maintenance.<br />
CB Chemie und <strong>Bio</strong>technologie GmbH<br />
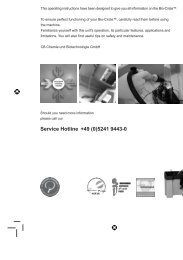
Should you need more information<br />
please call our<br />
Service Hotline +49 (0)5241 9443-0<br />
ED<br />
D<br />
18 19
Operating instructions <strong>Bio</strong>-<strong>Circle</strong> – English<br />
Table of Contents<br />
1. General Points<br />
1.<br />
2.<br />
3.<br />
General Points<br />
1.1 Key to Safety Instructions<br />
Basic Safety Instructions<br />
Product Description<br />
3.1 Assembly and Mode of Operation<br />
3.2 Intended Use<br />
21<br />
21<br />
21<br />
22<br />
24<br />
<br />
information necessary for its correct handling and usage and covers the initial set up, operation, maintenance,<br />
shut down and waste disposal. The warnings, advice and instructions mentioned in this manual<br />
are to be observed and adhered to. If the product is used in accordance to the regulations corresponding<br />
to these operating instructions, we will be held liable as mentioned in our guarantee conditions.<br />
Keep these operating instructions in a safe place. They are designed to help you with the practical<br />
usage of the Parts Washer and shall be at the user’s disposal near the Parts Washer at all times.<br />
4.<br />
5.<br />
Technical Data<br />
Start Up<br />
25<br />
26<br />
<br />
<br />
authorisation, otherwise the guarantee will then expire and cease to be valid.<br />
6.<br />
Operation<br />
27<br />
1.1 Key to Safety Instructions<br />
7.<br />
8.<br />
Maintenance<br />
Notes for Waste Disposal<br />
28<br />
28<br />
Danger symbol<br />
<br />
material damage). Take note of this instruction and behave cautiously!<br />
9.<br />
Optional Accessories<br />
9.1 Filter Set<br />
9.2 Drain valve<br />
9.3 Lid<br />
29<br />
30<br />
31<br />
Prohibition symbol<br />
<br />
result in direct personal injury and material damage.<br />
It is imperative that prohibition symbols are complied with!<br />
10.<br />
11.<br />
12.<br />
13.<br />
Trouble Shooting Guide<br />
Diagram Showing Electrical Connections<br />
Regulations<br />
Terms of Guarantee<br />
32<br />
33<br />
33<br />
34<br />
2. Basic Safety Instructions<br />
Every person who works with the product must be familiar with the content of the operating instructions<br />
booklet. These operating instructions are part of the apparatus and must be placed at the<br />
disposal of the operating staff at all times.<br />
The operating staff are to be shown the operating instructions; the danger symbols and prohibition<br />
symbols in particular must be pointed out to them.<br />
The apparatus is to be protected with a protective circuit (ELCB - Earth Leakage Circuit Breaker - F1<br />
switch) provided by the customer. Please have this checked and tested by a specialist in electrics!<br />
The apparatus must only be operated by people authorised to do so.<br />
E<br />
D<br />
20 21
Operating instructions <strong>Bio</strong>-<strong>Circle</strong> – English<br />
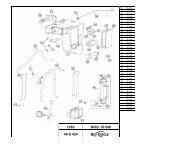
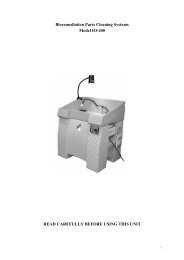
3. Product Description<br />
3.1 Assembly and Mode of Operation<br />
3<br />
19<br />
10<br />
2<br />
13<br />
6<br />
19<br />
23<br />
17<br />
20/21<br />
26<br />
9<br />
12<br />
11<br />
15<br />
5<br />
24/25<br />
18<br />
8<br />
7<br />
1.<br />
2.<br />
3.<br />
4.<br />
5.<br />
6.<br />
7.<br />
8.<br />
9.<br />
10.<br />
11.<br />
12.<br />
13.<br />
14.<br />
15.<br />
16.<br />
17.<br />
18.<br />
19.<br />
20./21.<br />
22.<br />
23.<br />
24./25.<br />
26.<br />
Base with tank<br />
Sink<br />
3-Way ball valve<br />
Control panel<br />
Heater<br />
Fluid pump<br />
Level switch<br />
Temperature sensor PT 100<br />
Flow-through brush<br />
<br />
Plastic Filter sieve 600 µm<br />
<br />
<br />
Filter housing (optional)<br />
Mounting plate for heater/level switch/ temperature sensor<br />
Temperature monitor<br />
Lid (optional)<br />
Air pump<br />
<br />
Screw-in connector (outer thread)<br />
Feed cable 230 V<br />
Screw-in connector (inner thread)<br />
Air sprinkler incl. tube (800 mm)<br />
<br />
Order No.<br />
G24826<br />
G27226<br />
G23826<br />
G20126<br />
G24126<br />
G24226<br />
G20726<br />
G23626<br />
G23126<br />
G20926<br />
G23526<br />
G25026<br />
G23726<br />
G28026<br />
G24726<br />
G23926<br />
G23326<br />
G23226<br />
G24326<br />
G25926<br />
G24026<br />
G23026<br />
20/21<br />
14<br />
4<br />
16<br />
1<br />
22<br />
E<br />
D<br />
22 23
Operating instructions <strong>Bio</strong>-<strong>Circle</strong> – English<br />
The pump is electrically operated and pumps the cleaning liquid through the connecting tube to the<br />
3-way ball valve. Depending on its position the cleaner can either be propelled to the sink via the tube<br />
with the brush or via the versatile jointed hose. The work piece is located in the interior of the table<br />
<br />
the container. Microorganisms then break down the oil and fat impurities.<br />
Comparison between conventional Parts Cleaner with Cold Cleaner and <strong>Bio</strong>-<strong>Circle</strong> Parts Cleaner<br />
What is the effect of increased<br />
contamination?<br />
What contaminations<br />
can be removed ?<br />
Organic, apolar (grease, oil)<br />
Inorganique, polar (salts)<br />
Inorganique, apolar (iron fillings, dust)<br />
What materials can be cleaned with?<br />
Stainless steel<br />
Steel<br />
Aluminium<br />
Non-ferrous heavy metals<br />
Safety and health provisions for workers<br />
Cold<br />
Cleaner<br />
saturation of the cleaning liquid<br />
– cleaning effect falls off<br />
Very good results<br />
Poor results<br />
Poor results<br />
Very good results<br />
Very good results<br />
Very good results<br />
Very good results<br />
<strong>Bio</strong>-<strong>Circle</strong><br />
<strong>Bio</strong>-<strong>Circle</strong> L<br />
good stable<br />
results the<br />
whole time<br />
Very good results<br />
Very good results<br />
Good results<br />
Very good results<br />
Very good results<br />
Very good results<br />
Very good results<br />
4. Technical Data<br />
Dimensions<br />
Weight when empty<br />
Power input<br />
Electrical connection<br />
Fuse protection<br />
Working Height<br />
Load capacity<br />
Tank<br />
<br />
<br />
Usable workspace<br />
Heating<br />
Level switch<br />
Temperature sensor<br />
Pump<br />
1010 x 785 x 1140 mm<br />
55 kg<br />
1,1 kW<br />
1/N/PE 230 V~<br />
10 A<br />
950 mm<br />
250 kg<br />
Material PE LD<br />
100 l<br />
60 l<br />
930 mm x 545 mm<br />
Stainless steel heater output 1 kW<br />
55 l<br />
Factory set to 41 °C<br />
approx. 380 l/h<br />
Health damage<br />
(Source: Reinigen und Entfetten, BG Maschinenbau- und Metall-BG 1997)<br />
Cold<br />
Cleaner<br />
<strong>Bio</strong>-<strong>Circle</strong><br />
<strong>Bio</strong>-<strong>Circle</strong> L<br />
Damage to the nervous system<br />
Damage to the skin<br />
Toluene, Xylenes, Trichlorethylene, no<br />
Benzenes (Hexane isomers, Pentane,<br />
Heptane, Octane)<br />
Yes<br />
no<br />
Damage to the liver<br />
Dichlormethane, Trichlorethylene,<br />
Toluene, Xylenes, Methanol, Ethanol<br />
no<br />
Damage to the kidneys<br />
Damage to the blood cells<br />
Trichlorethylene, Kerosene, Petrol/gasoline,<br />
Hexane, Heptane,<br />
Toluene, Xylene, Alcohols<br />
Toluene, Benzine<br />
no<br />
no<br />
Mutagens and teratogenes<br />
Organic solvents<br />
no<br />
Cancerogen<br />
Benzene<br />
no<br />
3.2 Intended Use<br />
* The used micro-organisms are non-pathogen bacteria of group 1 acc. to Directive 2000/54/EC.<br />
(Group 1 means that they are unlikely to cause human disease.)<br />
The <strong>Bio</strong>-<strong>Circle</strong> parts washer is an environmentally<br />
<br />
clean machine parts, motors, casings or other parts<br />
covered in oil and grease with the aid of <strong>Bio</strong>-<strong>Circle</strong><br />
Liquid, a biological cleaning liquid.<br />
<strong>Bio</strong>-<strong>Circle</strong> Liquid<br />
A02026 <strong>Bio</strong>-<strong>Circle</strong>L 20 L jerrycan<br />
A20026 <strong>Bio</strong>-<strong>Circle</strong>L 200 L drum<br />
E<br />
D<br />
24 25
Operating instructions <strong>Bio</strong>-<strong>Circle</strong> – English<br />
5. Start Up<br />
After removing the packaging, check the casing and control for any possible transport damage.<br />
Should any transport damage be detected, do not connect the apparatus to the mains. Instead, report<br />
the damage to the carrier and to CB Chemie und <strong>Bio</strong>technologie GmbH. The original packaging<br />
must be retained. Place the unit in a dry and stable place of your choice.<br />
The ground must be level. If it is necessary level the ground out with suitable material.<br />
<br />
<br />
Connect the unit to the electricity supply.<br />
<br />
not be used!<br />
Please ensure that the current entry provided by the customer is furnished with an ELCB<br />
(Earth Leakage Circuit Breaker - FI switch).<br />
Control Panel<br />
1. Connect the machine to power supply.<br />
Heating system starts warming up the solution to its proper working temperature of 41°C (105.8°F).<br />
2. <br />
switch again. The pump will stop automatically after one hour.<br />
3. If needed, press the ON/OFF switch for 3 seconds to set unit into standby mode.<br />
Attention: The circuit board is still energized.<br />
4. When solution level falls below minimum (60 liters), the display indicates „LO”.<br />
<br />
Never turn off the <strong>Bio</strong>-<strong>Circle</strong> unit unless for servicing or longer periods of non-use (more<br />
<br />
skim off or absorb any accumulation of oil.<br />
6. Operation<br />
<br />
any brushes prior to cleaning; this will prevent grease and dirt from sticking to the surfaces.<br />
The maximum load of 250 kg must not be exceeded!<br />
Depending on the positioning of the 3-way ball valve, cleaning can occur via:<br />
Washing by means of a versatile jointed hose with nozzle<br />
<br />
Note: In centre position both outlets are open.<br />
Note: Any parts susceptible to oxidation should not be left in the sink after cleaning.<br />
As with all parts cleaners, excess grease and oil should be disposed of prior to washing. Do<br />
not use this unit as a waste dump. Do not introduce<br />
coolant, chlorinated, acidic or alkaline solutions into this system. Do not add water.<br />
Activate the pump with the help of the on/off switch with the cleaning symbol.<br />
After the cleaning process has ended ON/OFF switch off the pump again.<br />
Display<br />
ON/OFF<br />
Switch<br />
Note:<br />
To re-start press the ON/OFF switch.<br />
Depending on the initial temperature of the liquid, the heating process can take approx. 2,5 hours.<br />
The temperature is set by the factory to maintain the solution at 41°C.<br />
Once the correct temperature has been reached, the unit is ready for use.<br />
The optimal temperature for the activity of micro-organisms and therefore for the breakdown of oil<br />
is approximately 41°C. Therefore leave the apparatus switched on all the time.<br />
For optimal activity of microorganisms and thus of the breakdown of oil, it is essential that the<br />
micro-organisms have a constant supply of oxygen. This is why an air sprinkler is permanently<br />
switched on, which guarantees the required oxygen supply for the microorganisms. If the unit is<br />
switched off, or fails because of a defect, the result is that the microorganisms become inactive.<br />
E<br />
D<br />
26 27
Operating instructions <strong>Bio</strong>-<strong>Circle</strong> – English<br />
7. Maintenance<br />
<br />
the plug from the mains! Check that the apparatus has no current!<br />
For maintenance purposes the table can be opened sideways. For that purpose, raise on the right<br />
half of the table and support the table by means of the in-lying metal pole.<br />
Fill Level<br />
<br />
<br />
and heating switch off automatically for safety reasons. The “LO” shows this visually. The display will<br />
show the actual liquid temperature until 41°C is reached again.<br />
Filters<br />
<br />
<br />
<br />
9. Optional Accessories<br />
9.1 Filter Set<br />
<br />
<br />
-<br />
<br />
care that the o-ring sits correctly.<br />
Assembly instructions<br />
1. Assembling filter holding plate with the 4 lens head screw on the filter body.<br />
2. Filter has to be fixed with 2 lens head screws in the intended, deepened sites on the basic part.<br />
3. Attend to central adjustment of the gland (see picture below).<br />
4. Connecting tube has to be disconnected at the exit- and entry points of the filter.<br />
5. Push the tube on the tube mandrel and the tube with hose clamps.<br />
Periodic maintenance<br />
It is recommended that your <strong>Bio</strong>-<strong>Circle</strong> is inspected and cleaned at least once a year to perform at<br />
<br />
the bottom of the tank over time, which can negatively affect the bioremediation activity.<br />
To facilitate the removal of the sludge turn off the unit and unplug it. Open the sink and empty the unit<br />
from all the cleaning solution using a hand pump until the sludge becomes visible. If cleaning solution<br />
is still cleaning well, save it for re-use. Remove the sludge and clean the tank walls and pumps.<br />
If a drain valve (optional accessories) is installed, connect a hose to drain valve and fully open the<br />
valve, wait a few seconds and then close the valve. Repeat these steps 3 times to remove most<br />
<br />
temperature of 41°C before cleaning parts. Visually inspect pumps, tubing and connections. Replace<br />
parts that show excessive wear.<br />
1 screw-in sleeve R3/8"<br />
2 filter<br />
3 screw-in connector R 3/8"<br />
4 pipe plug mandrel AD 3/8"-ID 3/8"<br />
5 filter holding plate<br />
6 slotted pan head screw 4,8x16 A2<br />
to 3-Way ball valve<br />
from pump<br />
8. Notes for Waste Disposal<br />
For this product, no waste disposal key, according to the European Waste Catalogue (EWC) can be<br />
<br />
code number has to be determined in accordance with the local waste disposer.<br />
Take unused <strong>Bio</strong>-<strong>Circle</strong> Liquid to a sewage plant in accordance with federal, state and local<br />
environmental regulations. Consider pH-value.<br />
E<br />
D<br />
28 29
Operating instructions <strong>Bio</strong>-<strong>Circle</strong> – English<br />
9.2 Drain valve<br />
9.3 Lid<br />
Install drain valve in accordance with the assembly instructions.<br />
1.<br />
For mounting the lid, please use the contemplated screw threads M8 on the table. The lid set contains<br />
two allen screws for that purpose. Attention: Tighten screws softly to allow smooth moving of<br />
the lid.<br />
Assembly instruction<br />
1. Screw off hexagonal nut (1)<br />
in the tank bottom (inside)<br />
2. Pull banjo bolt (2) out of the tank<br />
3. Dismantle screw-cap (3) off the banjo bolt<br />
4. Connect drain valve (4) with banjo bolt<br />
5. Install it bottom-up in the tank<br />
6. Fasten it with the hexagonal nut<br />
in the tank bottom (inside)<br />
7. Check leak tightness<br />
1 hexagonal nut<br />
tank bottom inside<br />
tank bottom outside<br />
2 banjo bolt<br />
3 screw-cap<br />
4 drain valve<br />
E<br />
D<br />
30 31
Operating instructions <strong>Bio</strong>-<strong>Circle</strong> – English<br />
10. Trouble Shooting Guide<br />
11. Diagram Showing Electrical Connections<br />
<br />
Pull the plug from the mains! Check that the apparatus has no current!<br />
Work on fixtrures are only allowed to be done by trained persons.<br />
<strong>Bio</strong>-<strong>Circle</strong> control board<br />
Errors will be indicated on the display by codes F1 to F7.<br />
F1: Heater is out of order.<br />
Possible cause: cable break, defective fuse (fuse 10 A T 6,3 x 32 mm)<br />
or temperature control release.<br />
The temperature monitor can be found in space between the two<br />
tank walls, glued in the lower third of the wall. For the reset it is<br />
inevitable to disconnect the machine from the current, remove<br />
the front panel and push the red button.<br />
F2: Fluid pump is out of order.<br />
Possible cause: cable break or defective fuse (fuse 1 A T 5 x 20 mm).<br />
F3: Air pump is out of order.<br />
Possible cause: cable break or defective fuse (fuse 100 mA T 5 x 20 mm).<br />
electrical network<br />
heater<br />
pump<br />
membrane pump<br />
level<br />
foot switch<br />
F4: Float switch is not connected.<br />
F5: <br />
thermo switch<br />
F6: Heat sensor PT100 is not connected<br />
F7: Short circuit at the heat sensor PT100.<br />
Overheating:<br />
To prevent damage by impact of overheating <strong>Bio</strong>-<strong>Circle</strong> is equipped with a temperature control.<br />
Heater will stop when the temperature has risen above 41 °C .<br />
12. Regulations<br />
The units are subject to strict safety regulations. Therefore, faulty parts must be replaced by original<br />
spare parts only. A spare parts list is available on request.<br />
<strong>Bio</strong>-<strong>Circle</strong> comply with the CE criteria. The declaration of conformity is available on request.<br />
E<br />
D<br />
32 33
Operating instructions <strong>Bio</strong>-<strong>Circle</strong> – English<br />
13. Terms of Guarantee<br />
All CB Chemie und <strong>Bio</strong>technologie GmbH articles are inspected and tested before shipment and are<br />
warranted to be free from any defect in material and faulty workmanship. CB Chemie und <strong>Bio</strong>technologie<br />
GmbH gives guarantee of 12 months on the machines, except wear parts. This warranty<br />
does not apply when normal maintenance is required, repairs or replacements have been made by<br />
anyone other than CB Chemie und <strong>Bio</strong>technologie GmbH authorized personnel, and does not cover<br />
<br />
If an examination shows that the malfunction was caused by defective material or faulty workmanship,<br />
CB Chemie und <strong>Bio</strong>technologie GmbH will repair (or at our option, replace).<br />
Garantie starts with the date of delivery at the costumer or date of invoice.<br />
E<br />
D<br />
34 35