Explorerfix Child Car Seat - Kiddicare
Explorerfix Child Car Seat - Kiddicare
Explorerfix Child Car Seat - Kiddicare

You also want an ePaper? Increase the reach of your titles
YUMPU automatically turns print PDFs into web optimized ePapers that Google loves.
<strong>Explorerfix</strong> <strong>Child</strong> <strong>Car</strong> <strong>Seat</strong><br />
Group 1 & 2<br />
Suitable for use from 9kgs (20lbs) to 25kgs (55lbs)<br />
Approximately 9 months to 6 years<br />
Instructions<br />
Important: Keep for future reference<br />
Please read these instructions carefully before using your new <strong>Explorerfix</strong><br />
Keep them in a safe place so that you may use them in the future
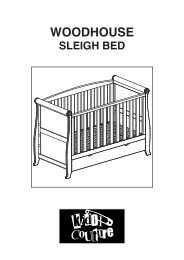
USER INSTRUCTIONS Keep for future reference. Read carefully.<br />
1 2 3<br />
4 5 6<br />
7 8 9<br />
10 11 12
13 14 15<br />
16 17 18<br />
19 20 21<br />
22 23 24<br />
A<br />
A<br />
A<br />
B<br />
B<br />
B<br />
C<br />
C
25 26 27<br />
28 29 30<br />
1<br />
1<br />
2<br />
2<br />
31 32 33<br />
34 35 36
CONGRATULATIONS PARENTS<br />
Silver Cross would like to thank you for purchasing this safety seat.<br />
This product has been designed, manufactured and approved in accordance with the<br />
strictest safety regulations. It has been designed for easy installation and use, but we<br />
need your attention to ensure it is installed correctly and functions perfectly.<br />
Please read these instructions carefully before installing the seat in the vehicle.<br />
The safety of your child depends on the correct use of the seat.<br />
Do not hesitate to contact us if you have any queries (Tel., e-mail, see the back of<br />
these instructions).<br />
WARNING<br />
1. This is a “UNIVERSAL” retention system. It is certified under Regulation nº44, amendments series 04,<br />
for general use in vehicles and appropriate for the majority of car seats although not all.<br />
2. Correct installation is required if the vehicle manufacturer has stated in the instructions manual that the<br />
vehicle is suitable for a “UNIVERSAL” retention system for this age group to be installed.<br />
3. This retention system has been classified as “UNIVERSAL” according to stricter conditions than those<br />
that are applied to previous designs that do not carry this warning.<br />
4. If you have any queries contact the seat manufacturer or retailer.<br />
WARNING<br />
1. This is an ISOFIX SYSTEM FOR CHILDREN. It is certified under Regulation nº 44, Supplement 5,<br />
amendments series 04, for general use in vehicles equipped with ISOFIX fastening system.<br />
2. It will adapt to vehicles with positions that have been approved as “ISOFIX positions” (as detailed in<br />
the vehicle manual), depending on the category of the child seat and the fastenings.<br />
3. The ISOFIX weight group and size class for which the article is designed is: 9 - 18 kg and Class B1.
BEAT FIX + TO P TETHER<br />
P<br />
D<br />
I<br />
E<br />
CAT<br />
GB<br />
F<br />
GROUP 1<br />
ISOFIX<br />
9 - 18 Kg<br />
INSTRU CIONES<br />
INSTRU CIONS<br />
INSTRUCTIONS<br />
INSTRUCTIONS<br />
ANLEITUNG<br />
INSTRU ZIONI<br />
INSTRUÇÕES<br />
GROUP 1 - 2<br />
9 - 25 Kg<br />
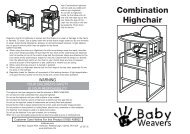
KNOWING THE EXPLORERFIX<br />
1. Isofix connector unlocking button<br />
2. Installation instructions<br />
3. Front slots for Support Bar<br />
4. Isofix connector adjustment knob<br />
5. Harness adjustment strap<br />
6. Harness adjustment button (TMS)<br />
7. Position changing device (UNDER THE SEAT)<br />
8. Harness buckle<br />
9. Upholstery<br />
10. Headrest<br />
11. Group 2 belt guide<br />
12. Chest protectors<br />
13. Headrest adjusting knob<br />
14. Protector fastening clip<br />
15. <strong>Seat</strong> belt route label<br />
16. Certification label<br />
17. Isofix seat classification label<br />
18. Top Tether ring<br />
19. Instructions manual<br />
20. Harness strap<br />
21. Distribution metal plate<br />
22. Isofix connector<br />
23. Group 1 belt guide<br />
24. <strong>Seat</strong> belt clip<br />
25. Top Tether. Adjuster side<br />
26. Support Leg
WARNINGS AND SAFETY NOTES<br />
IMPORTANT WARNING: *DO NOT USE ON PASSENGER SEATS FITTED WITH A<br />
FRONT AIRBAG UNLESS YOUR VEHICLE MANUFACTURER CONFIRMS IT IS SAFE<br />
THIS INSTRUCTION MANUAL SHOULD BE KEPT WITH THE EXPLORERFIX<br />
WHILE IT IS IN USE.<br />
• Read these instructions carefully before using the <strong>Explorerfix</strong> and keep them for any<br />
future reference. The safety of the child may be at risk if these instructions are not followed.<br />
• The <strong>Explorerfix</strong> is a child seat belonging to Group 1 (from 9 to 18 kg.) and Group 2<br />
(from 15 to 25 kg.).<br />
• This seat can be installed in the vehicle using a three-point seatbelt with or without a<br />
retractor fitted in the actual vehicle, complying with UN/ECE-16 regulations or equivalent<br />
standards; or with the Isofix connectors and the Top Tether or Support Leg.<br />
• The original equipment must not be altered.<br />
• After an accident the seat must be changed.<br />
• Make sure that the folding seat or the doors of the vehicle can not cause damage to<br />
any elements of the seat.<br />
• Protect all the metallic parts that come into contact with the child from sunlight.<br />
• The straps should never be twisted.<br />
• Always use the seat, even on short journeys and never leave the child unattended in the<br />
vehicle.<br />
• Remove the seat from the vehicle if it is not going to be used and keep it out of the<br />
reach of children.<br />
• It is advisable to secure luggage and objects that may cause injury in the case of a<br />
crash.<br />
• We guarantee the safety of the product when it is used by the original buyer.<br />
• Do not use second-hand safety products.<br />
• The other passengers in the vehicle must also be fastened in with seatbelts as in the<br />
case of an accident they may be flung about and injure the baby.<br />
• If the seat is in the car and is not going to be used, always secure it with the seat belt,<br />
or connect the Isofix and the Top Tether or Support Leg.<br />
• Regularly check the different parts of the product.<br />
• The seat should not be used without its upholstery.<br />
• Only the upholstery supplied by the seat manufacturer should be used, as it is an<br />
important part of the product<br />
• You are responsible for the child’s safety.<br />
IMPORTANT: CONSULT THE VEHICLE HANDBOOK TO LOCATE THE FASTENING<br />
POINTS FOR THE ISOFIX SYSTEM AND THE TOP TETHER RING AS WELL AS THOSE VE-<br />
HICLES AUTHORISED FOR THE INSTALLATION WITH THE SUPPORT LEG. IF IN DOUBT,<br />
CONSULT YOUR VEHICLE DEALER.
GENERAL INSTRUCTIONS<br />
GROUP 1 (9 - 18 KG.)<br />
Installation of the <strong>Explorerfix</strong> seat facing forwards with Isofix<br />
fastening system (see illustrations 01 - 07)<br />
• Fasten the two centering points of the Isofix fastening system hooks, whose normal<br />
position is the intersection between the rear part of the seat and the lower part of the<br />
backrest (fig. 01).<br />
• Place the safety seat on the rear vehicle seat facing forwards opposite the fasteners<br />
(fig. 02).<br />
• Pull the front knob (fig. 03) outwards and turn it to the right (fig. 04) to obtain the<br />
maximum length of the connectors.<br />
• Use both hands to press the seat towards the fasteners until it clicks indicating that both<br />
sides are fastened (fig. 05).<br />
• If the installation is correct, a green line will appear on the outer part of both connector<br />
release devices (fig. 06).<br />
• Lastly, adjust the space between the safety seat and the backrest of the vehicle by<br />
pulling the knob outwards and turning it to the left (fig. 07).<br />
WARNING: The seat can never be installed on the front seat of the vehicle with the Isofix<br />
fastening system plus the Top Tether.<br />
CONSULT THE LIST OF VEHICLES FOR THE INSTALLATION WITH THE SUPPORT LEG.<br />
Fitting the Top Tether (see illustrations 08 - 10)<br />
• The Top Tether strap is in the pocket on the back of the frame (fig. 08).<br />
• Hook the Top Tether karabiner (adjuster side) into the ring on the free end of the strap<br />
that is fastened onto the frame and the other end to the corresponding fastening point of<br />
the vehicle (fig. 09).<br />
• Tighten the strap until the adjuster clicks, indicating that it is at the correct tension<br />
(fig. 10).<br />
WARNING: CONSULT THE VEHICLE HANDBOOK TO LOCATE THE POSITION OF<br />
THE TOP TETHER RING.<br />
Removing the <strong>Explorerfix</strong> seat with Top Tether (see illustrations 11 - 13)<br />
• Pull the front knob outwards (fig. 03) and turn it to the right to obtain a space between<br />
the seat and the backrest of the vehicle (fig. 04).<br />
• Disconnect the Isofix system, pulling the buttons on both sides of the connector release<br />
devices. A red line will appear on one of them if it is correct (fig. 11).<br />
• Dismantle the Top Tether loosening the adjuster (fig. 12) and unhooking the karabiner<br />
from the upper part of the strap (fig. 13).
Fitting the Support Leg (see illustrations 14 - 16)<br />
• Once the safety seat has been fastened onto the vehicle seat using the Isofix system and<br />
its correct installation has been checked (see green line on the outer side of both of the<br />
connector release devices).<br />
• Remove the two stoppers from the front part of the base (fig. 14).<br />
• Simultaneously press the two pivot pins on the upper tubes of the support leg.<br />
• Insert both of them into the front slots making sure they go in simultaneously to stop them<br />
from blocking (fig. 15). When they click they are fastened correctly.<br />
• Pull the red release catch outwards with one hand, while, with the other hand, press the<br />
telescopic support of the leg against the floor of the vehicle. Release this part and check<br />
that the leg is not in-between two locking positions (fig. 16).<br />
• If the leg is in-between two positions, pull the red release catch outwards again and<br />
lengthen or shorten the leg to the upper or lower locking position to obtain the maximum<br />
support possible.<br />
Removing the <strong>Explorerfix</strong> seat with Support Leg (see illustrations 17 - 18)<br />
• Pull the red release catch outwards with one hand, while the other hand folds up the<br />
telescopic support (fig. 17).<br />
• Simultaneously press the two buttons on the upper part of the base and at the same time<br />
pull the upper tubes of the support leg (fig. 18).<br />
• Next, loosen the <strong>Explorerfix</strong> seat by pulling the front knob outwards and turning it to the<br />
right to create a space between the seat and the backrest of the vehicle.<br />
• Disconnect the Isofix system by pulling the buttons on both sides of the connector release<br />
devices. A red line will appear on them if it is correct.<br />
• Remove the seat from the vehicle seat.<br />
IMPORTANT WARNING: *DO NOT USE ON PASSENGER SEATS FITTED WITH A<br />
FRONT AIRBAG UNLESS YOUR VEHICLE MANUFACTURER CONFIRMS IT IS SAFE<br />
GROUP 1 (9 - 18 KG.)<br />
Installation of the <strong>Explorerfix</strong> seat facing forwards with three-point<br />
seat belt (car seat belt) (see illustrations 19 - 22)<br />
• Place the seat on the front* or rear seat of the car.<br />
• Pass the lap section of the seat belt through the guides on both sides (fig. 19), fasten<br />
the buckle and tighten the belt.<br />
• Next, pull the chest part of the seat belt passing it through the clip (fig. 20 - 21).<br />
• Fasten the safety catch (fig. 22).<br />
Adjusting the crotch strap (see illustration 23)<br />
• Press the adjuster and at the same time place it in the desired position (fig. 23),<br />
making sure that the lap section of the harness is positioned as low as possible so the<br />
pelvis is firmly secured.
Adjusting the harness for the size of the child (see illustrations 24 - 25)<br />
• Use the knobs on the sides of the headrest to adjust the harness to the height of the child<br />
(fig. 24 - 25).<br />
• The correct position of the shoulder straps is never above or below the child’s neck.<br />
Operating the harness<br />
• Fasten the buckle.<br />
• Tighten the shoulder straps by pulling the end of the harness adjustment strap until it fits<br />
correctly, taking care to always leave some room for movement.<br />
• To loosen the seat straps, press the TMS forwards and pull the shoulder straps with the<br />
other hand.<br />
IMPORTANT: Make sure that the straps of the seat are not twisted when the child is<br />
using it. It is very important to make sure that the lap section of the harness is positioned as<br />
low as possible so the pelvis is firmly secured.<br />
Adjusting the seat (see illustrations 26 - 27)<br />
• The position of the seat can be changed easily with just one hand by pressing the lever<br />
situated on the front part of it (fig. 26 - 27)<br />
IMPORTANT: Make sure that the seat is not in-between two positions, a click will<br />
indicate that it is in the right position.<br />
Closing the harness buckle (see illustrations 28)<br />
• To fasten the harness buckle of the seat put the two parts together and insert them into<br />
the female part with the red button, pressing until it clicks (fig. 28).<br />
• Press the red button to open it.<br />
• Check that the straps are not twisted.<br />
GROUP 2 (15 - 25 KG.)<br />
Dismantling the harness (see illustrations 29 - 30)<br />
• For easier access to the metal distribution plate, press the TMS forward and pull the<br />
shoulder straps with the other hand (fig. 29).<br />
• Unhook both shoulder straps from the metal distribution plate (fig. 30).<br />
• Next, detach the chest protectors, removing the clips that fasten them, from the rear part<br />
of the frame.<br />
• Release the lap section of the harness from the buckle.
Installation of the <strong>Explorerfix</strong> seat facing forwards with three-point<br />
seat belt (car seat belt) (see illustrations 31 - 33)<br />
WARNING: NEVER USE THE ISOFIX SYSTEM ON GROUP 2. DO NOT SECURE THE<br />
CHILD WITH THE SEAT HARNESS. ALWAYS USE THE THREE-POINT SEAT BELT OF THE<br />
CAR. ALWAYS USE THE SEAT IN ITS LOWEST RECLINING POSITION.<br />
• Pass the buckle through the crotch strap slot. Fit the upper part so it does not get lost<br />
and make sure that it is hidden under the frame.<br />
• Place the seat on the vehicle seat pressing it firmly against the backrest.<br />
• Position the child in the seat and fasten him/her in with the three-point seat belt of<br />
the vehicle. Check that the lap section of the seat belt is as low as possible and that the<br />
diagonal part secures the child’s chest (fig. 31).<br />
• Fasten the buckle by passing the male part through the side opening of the frame<br />
(fig. 32). Next, pull the chest part passing it through the upper belt guides of the<br />
seat (fig. 33).<br />
Removing the seat cover (see illustrations 29 - 30)<br />
• Undo the harness. Loosen the harness by pressing the TMS button. Remove the shoulder<br />
straps from the metal distribution plate. Remove the chest pads (fig. 29 - 30).<br />
• Release the rubber bands that fit the cover onto the seat.<br />
IMPORTANT: Never remove the absorbant material of the inner protection.<br />
Fitting the seat cover (see illustrations 34 - 36)<br />
• Cover the frame with the seat cover.<br />
• Pass the harness strap under the seat checking that it is not twisted. Pass the ends<br />
through the side spaces and through the buckle (fig. 34) without twisting the strap.<br />
• Pass the chest protectors over the straps with the straight side facing outwards.<br />
• Pass the shoulder straps through the openings in the backrest (fig. 35). Secure both<br />
chest pads with the fastening clips (fig. 36).<br />
• Fit the ends of the straps into the metal distribution plate.<br />
• Tighten the harness using the TMS button.<br />
Washing instructions (see illustrations 34 - 36)<br />
• Machine wash the upholstery at a maximum temperature of 30º and without spinning.<br />
The painted parts should be cleaned using a non-abrasive polish that does not contain<br />
solvents.<br />
WARRANTY<br />
This Silver Cross product is guaranteed for a period of twelve months against faulty<br />
workmanship.
Micklethorn<br />
Broughton<br />
Skipton<br />
BD23 3JA<br />
Tel: 01756 702214 Fax 01756 702411<br />
E-mail: info@silvercross.co.uk