Solosele KB Hydro fitting guide - James Walker
Solosele KB Hydro fitting guide - James Walker
Solosele KB Hydro fitting guide - James Walker

Create successful ePaper yourself
Turn your PDF publications into a flip-book with our unique Google optimized e-Paper software.
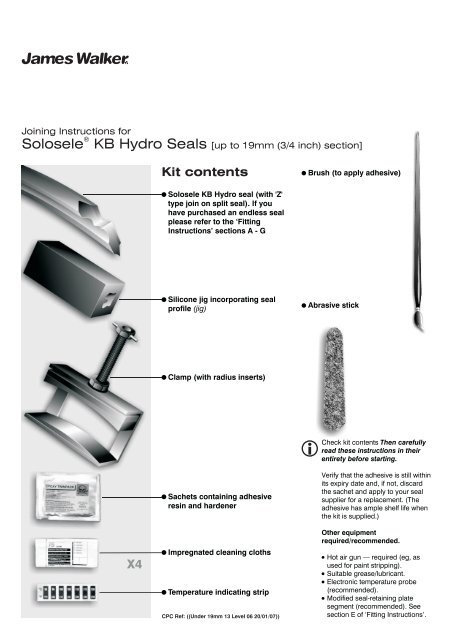
Joining Instructions for<br />
®<br />
<strong>Solosele</strong> <strong>KB</strong> <strong>Hydro</strong> Seals [up to 19mm (3/4 inch) section]<br />
Kit contents<br />
Brush (to apply adhesive)<br />
<strong>Solosele</strong> <strong>KB</strong> <strong>Hydro</strong> seal (with 'Z'<br />
type join on split seal). If you<br />
have purchased an endless seal<br />
please refer to the ‘Fitting<br />
Instructions’ sections A - G<br />
Silicone jig incorporating seal<br />
profile (jig)<br />
Abrasive stick<br />
Clamp (with radius inserts)<br />
Check kit contents Then carefully<br />
read these instructions in their<br />
entirety before starting.<br />
X4<br />
Sachets containing adhesive<br />
resin and hardener<br />
Impregnated cleaning cloths<br />
Temperature indicating strip<br />
CPC Ref: ((Under 19mm 13 Level 06 20/01/07))<br />
Verify that the adhesive is still within<br />
its expiry date and, if not, discard<br />
the sachet and apply to your seal<br />
supplier for a replacement. (The<br />
adhesive has ample shelf life when<br />
the kit is supplied.)<br />
Other equipment<br />
required/recommended.<br />
Hot air gun — required (eg, as<br />
used for paint stripping).<br />
Suitable grease/lubricant.<br />
Electronic temperature probe<br />
(recommended).<br />
Modified seal-retaining plate<br />
segment (recommended). See<br />
section E of ‘Fitting Instructions’.
Joining Instructions for<br />
®<br />
<strong>Solosele</strong> <strong>KB</strong> <strong>Hydro</strong> Seals [up to 19mm (3/4 inch) section]<br />
Before preparing the ends of the seal and applying adhesive, assemble the contents of the kit in accordance with the<br />
instructions below to become familiar with the procedure.<br />
The success of this joining method is dependent upon the bond itself. Therefore it is of paramount importance to ensure<br />
that the seal surfaces are absolutely clean prior to applying the adhesive and that no contamination occurs during the<br />
joining operation.<br />
Direction<br />
of pressure<br />
Place the seal over the shaft with the join<br />
above the blade and the rubber 'grooved'<br />
side facing the required sealing direction.<br />
GB<br />
D<br />
F<br />
FIN<br />
I<br />
Place seal around shaft<br />
Dichtung um die Welle legen<br />
Poser le joint autour de l'axe<br />
Aseta tiiviste akselin ympärille<br />
Posizionare la tenuta attorno<br />
all'albero<br />
Clean the inside of the jig groove with the<br />
impregnated cleaning cloth, to ensure no<br />
subsequent contamination of the join<br />
area.<br />
GB<br />
D<br />
F<br />
FIN<br />
I<br />
Clean jig groove<br />
Rille der Spannvorrichtung reinigen<br />
Nettoyer la gorge du gabarit de<br />
montage<br />
Puhdista jigin ura<br />
Pulire la scanalatura della sagoma<br />
di fissaggio<br />
Slide the jig over one end of the seal.<br />
GB<br />
D<br />
F<br />
FIN<br />
I<br />
Slide jig over seal<br />
Spannvorrichtung über Dichtung<br />
schieben<br />
Enfiler le gabarit sur le joint<br />
Liu'uta jigi tiivisteen päälle<br />
Fare scorrere la sagoma di<br />
fissaggio sopra la tenuta
Joining Instructions for<br />
®<br />
<strong>Solosele</strong> <strong>KB</strong> <strong>Hydro</strong> Seals [up to 19mm (3/4 inch) section]<br />
Open up the join and with the coarse side<br />
of the abrasive stick, lightly abrade the cut<br />
faces of the seal to roughen them, in<br />
order to produce a good key for the<br />
adhesive. Care must be taken to avoid<br />
over-abrading the faces as this could<br />
result in rounding the edges or tearing the<br />
seal lip.<br />
GB<br />
D<br />
F<br />
FIN<br />
I<br />
Roughen the cut ends<br />
Abgeschnittene Enden aufrauen<br />
Limer les extrémités<br />
Karhenna päät<br />
Abradere le estremita del taglio<br />
Clean the surfaces of the join with the<br />
impregnated cleaning cloth to remove dirt<br />
and grease, etc. Ensure no residual fibres<br />
from the cloth remain on the join area.<br />
GB<br />
D<br />
F<br />
FIN<br />
I<br />
Clean join<br />
Verbindungsstelle reinigen<br />
Nettoyer les surfaces à encoller<br />
Puhdista liitos<br />
Pulire il punto di giunzione<br />
1 2<br />
1 + 2<br />
6.1 Cut open the silver-coloured outer<br />
sachet at one end, taking care not to<br />
puncture the inner twin-pack.<br />
6.2 Remove the twin-pack and the centre<br />
clip.<br />
6.3 Mix the two components by persistent<br />
hand kneading of the pack until they are<br />
uniformly blended.<br />
6.4 Then place the pack on a smooth<br />
surface and use the centre clip to scrape<br />
the two components from the sides and<br />
corners of the pack into the middle.<br />
6.5 Now knead the contents together<br />
again by hand for three minutes.<br />
If in doubt — mix again, as insufficient<br />
mixing will result in soft spots of<br />
uncured material in the final product.<br />
GB<br />
D<br />
F<br />
FIN<br />
I<br />
Mix adhesive<br />
Klebstoff mischen<br />
Mélanger l'adhésif<br />
Sekoita liima<br />
Mescolare l'adesivo<br />
= 3 minutes<br />
Apply a thin and even layer of adhesive,<br />
with the brush supplied, to both surfaces<br />
of the ends of the seals to be joined.<br />
GB<br />
D<br />
F<br />
FIN<br />
I<br />
Apply adhesive<br />
Klebstoff auftragen<br />
Appliquer l'adhésif<br />
Levitä liima<br />
Applicare l’adesivo
Joining Instructions for<br />
®<br />
<strong>Solosele</strong> <strong>KB</strong> <strong>Hydro</strong> Seals [up to 19mm (3/4 inch) section]<br />
Push the ends of the seal together and<br />
align the join.<br />
GB<br />
D<br />
F<br />
FIN<br />
I<br />
Align join<br />
Verbindungsstelle korrekt ausrichten<br />
Aligner les extrémités<br />
Aseta liitettävät pinnat kohdakkain<br />
Allineare il punto di giunzione<br />
Wipe clean any excess adhesive from the<br />
join area.<br />
GB<br />
D<br />
F<br />
FIN<br />
I<br />
Clean<br />
Reinigen<br />
Nettoyer<br />
Puhdista<br />
Pulire<br />
Slide the jig over the join taking care not<br />
to disturb the join and that the ends<br />
remain interlocked.<br />
GB<br />
D<br />
F<br />
FIN<br />
I<br />
Slide jig over join<br />
Spannvorrichtung über<br />
Verbindungsstelle schieben<br />
Faire glisser le gabarit sur le raccord<br />
Liu'uta jigi liitoskohdan päälle<br />
Fare scorrere la sagoma di fissaggio<br />
sopra il punto di giunzione<br />
While holding the jig place the clamp over<br />
the whole assembly, ensure that the<br />
radius on the support pads is in the same<br />
orientation as the seal.<br />
Check the join alignment through the<br />
window in the clamp and jig — adjust if<br />
necessary.<br />
The join alignment can be viewed through<br />
the window in the jig.<br />
GB<br />
D<br />
F<br />
FIN<br />
I<br />
Check join, tighten clamp<br />
Verbindungsstelle überprüfen,<br />
Klemmbacke anziehen<br />
Vérifier le raccord et serrer le<br />
serre-joint<br />
Tarkista liitos, kiristä puristin<br />
Controllare il giunto e stringere il<br />
morsetto<br />
Close the clamp to hand tight while still<br />
holding the ends of the seal in place.<br />
Wipe away any excess adhesive.<br />
GB<br />
D<br />
F<br />
FIN<br />
I<br />
Clean<br />
Reinigen<br />
Nettoyer<br />
Puhdista<br />
Pulire
Joining Instructions for<br />
®<br />
<strong>Solosele</strong> <strong>KB</strong> <strong>Hydro</strong> Seals [up to 19mm (3/4 inch) section]<br />
If an electronic temperature probe is<br />
not available, adhere the temperature<br />
indicator strip to the seal<br />
(approximately 20mm (3/4 inch) from<br />
the clamp) aligned with the<br />
lowest temperature panel<br />
toward the join<br />
GB<br />
D<br />
F<br />
FIN<br />
I<br />
Heat join area<br />
Verbindungsstelle erhitzen<br />
Chauffer le raccord<br />
Kuumenna liitosalue<br />
Scaldare l’area da giuntare<br />
150 — 200mm<br />
20mm<br />
Do not allow the hot air flow to<br />
dwell on the temperatureindicating<br />
strip for more than a<br />
few seconds, or it will be<br />
destroyed.<br />
In order to avoid burning or<br />
scorching, the hot air gun should<br />
be held 150mm to 200mm (6 - 8<br />
inches) away from the join and<br />
waved over the join area rather<br />
than pointed at one single point.<br />
Using a hot air gun, warm the seal surfaces in the join area to between 100°C and<br />
115°C. This temperature should be maintained as follows:<br />
=<br />
19mm (3/4 inch)<br />
20minutes<br />
25minutes<br />
40minutes<br />
50minutes<br />
Note the extended heating time in cold conditions. It is essential that at no time<br />
should the surface temperature at any point exceed 120°C. A temperature of 115°C at<br />
the join can be achieved by activating the 100°C panel continuously (mainly green,<br />
fleetingly brown) and the 105°C - 115°C panel intermittently (mainly blue, fleetingly<br />
green).
Joining Instructions for<br />
®<br />
<strong>Solosele</strong> <strong>KB</strong> <strong>Hydro</strong> Seals [up to 19mm (3/4 inch) section]<br />
Allow the seal to cool naturally for at least<br />
30 minutes (ideally leave for 12 hours)<br />
depending on seal size and ambient<br />
temperature.<br />
Remove the clamp, and gently remove<br />
the jig and temperature indicator. The jig<br />
can be removed by carefully opening up<br />
the split in the block and sliding it off the<br />
seal.<br />
GB<br />
D<br />
F<br />
FIN<br />
I<br />
Allow to cool, remove clamps, jigs,<br />
etc<br />
Abkühlen lassen, Klemmbacken,<br />
Spannvorrichtungen usw. entfernen<br />
Laisser refroidir, enlever le serrejoint,<br />
le gabarit, etc<br />
Anna jäähtyä, poista puristimet,<br />
jigit yms<br />
Attendere che l’area si raffreddi,<br />
rimuovere i morsetti, le sagome di<br />
fissaggio, ecc<br />
Remove excess adhesive from the join,<br />
with the fine abrasive stick, being careful<br />
not to damage the seal — do not put too<br />
much strain on the join.<br />
GB<br />
D<br />
F<br />
FIN<br />
I<br />
Remove excess adhesive<br />
Überschüssigen Klebstoff<br />
entfernen<br />
Oter l'excès de colle<br />
Poista ylimääräinen liima<br />
Rimuovere l’adesivo in eccesso<br />
Fitting Instructions for<br />
®<br />
<strong>Solosele</strong> <strong>KB</strong> <strong>Hydro</strong> Seals<br />
A<br />
Ensure that the housing is clean, smooth<br />
and free from sharp edges.<br />
GB<br />
D<br />
F<br />
FIN<br />
I<br />
Clean housing<br />
Gehäuse und Welle reinigen<br />
Nettoyer le logement du joint<br />
Puhdista pesä<br />
Pulire l'alloggiamento<br />
B<br />
Lightly smear the seal with a suitable<br />
grease/lubricant.<br />
GB<br />
D<br />
F<br />
FIN<br />
I<br />
Lubricate<br />
Schmieren<br />
Lubrifier<br />
Voitele<br />
Lubrificare
Fitting Instructions for<br />
®<br />
<strong>Solosele</strong> <strong>KB</strong> <strong>Hydro</strong> Seals [up to 19mm (3/4 inch) section]<br />
C<br />
If filling-up rings are required decide on their position (see diagram).<br />
Seal<br />
retaining<br />
plate<br />
Blade<br />
Root<br />
GB<br />
D<br />
F<br />
FIN<br />
I<br />
Filling-up rings?<br />
Füllringe?<br />
Bagues de garnissage?<br />
Täyterenkaat?<br />
Anelli di riempimento?<br />
Bolt<br />
Seal<br />
Filling-up rings<br />
Hub<br />
D<br />
1<br />
3 4<br />
2<br />
Fit filling-up rings if required (see<br />
diagrams in section C.).<br />
Slide the seal into the housing, pushing in<br />
diametrically opposed sections of the<br />
seal, rather than working round the seal<br />
GB<br />
D<br />
F<br />
FIN<br />
I<br />
Press seal into housing<br />
Dichtung in Gehäuse drücken<br />
Enfoncer le joint dans son<br />
logement<br />
Paina tiiviste pesään<br />
Premere la tenuta dentro<br />
l’alloggiamento<br />
E<br />
Lead in Chamfer<br />
smooth all sharp edges<br />
Where the housing is inaccessible due to<br />
blade coverage, a modified segment of a<br />
spare seal-retaining ring should be used<br />
as a <strong>fitting</strong> tool. The modification required<br />
is basically a large lead-in chamfer. Apply<br />
grease/lubricant to assist as necessary.<br />
GB<br />
D<br />
F<br />
FIN<br />
I<br />
Use <strong>fitting</strong> tool if required<br />
Ggf. Einsetzwerkzeug verwenden<br />
Utiliser un outil si nécessaire<br />
Käytä tarvittaessa asennus<br />
työkalua<br />
Se necessario utilizzare lo<br />
strumento di fissaggio<br />
F<br />
G<br />
Repeat previous steps for second<br />
seal (if applicable) ensuring the seals<br />
fit back-to-back and the joins are<br />
positioned one third of the<br />
circumference apart.<br />
Continue to complete assembly<br />
Material Safety Data Sheets are available on request<br />
Fit filling up rings if required (see diagram<br />
in section C.).<br />
After ensuring the seals are correctly<br />
seated (the seal arrangement should be<br />
shallower than the housing axial length) fit<br />
all segments of the seal-retaining plate.<br />
GB<br />
D<br />
F<br />
FIN<br />
I<br />
Repeat process for second seal<br />
Vorgang für zweite Dichtung<br />
wiederholen<br />
Faire de même avec le deuxième<br />
joint<br />
Toista työvaiheet seuraavalle<br />
tiivisteelle<br />
Ripetere la procedura per la<br />
seconda tenuta<br />
<strong>James</strong> <strong>Walker</strong> & Co Ltd Customer Support Centre, 1 Millennium Gate, Westmere Drive, Crewe, Cheshire, CW1 6AY, UK<br />
Tel: +44 (0)1270 536000 Fax: +44 (0)1270 536100 Email: csc@jameswalker.biz<br />
Health Warning: If PTFE products are heated to elevated temperatures, fumes will be produced which may give unpleasant effects, if inhaled. Whilst some fumes are emitted below 300° the affect at<br />
these temperatures is negligible. Care should be taken to avoid contaminating tobacco with PTFE particles or dispersion which may remain on hands or clothing. Materia Safety Data Sheets (MSDS) are<br />
available on request.<br />
Information in this publication and otherwise applied to users is based on our general experience and is given in good faith, but because of the particular factors which are outside our knowledge and<br />
control and affect the use of these products, no warranty is given or is to be implied with respect to such information. Specifications are subject to change without notice.<br />
Version 1