2.5HP AIR COMPRESSOR - ALDI UK: Warranty Search
2.5HP AIR COMPRESSOR - ALDI UK: Warranty Search
2.5HP AIR COMPRESSOR - ALDI UK: Warranty Search

Create successful ePaper yourself
Turn your PDF publications into a flip-book with our unique Google optimized e-Paper software.
Ver. 061110<br />
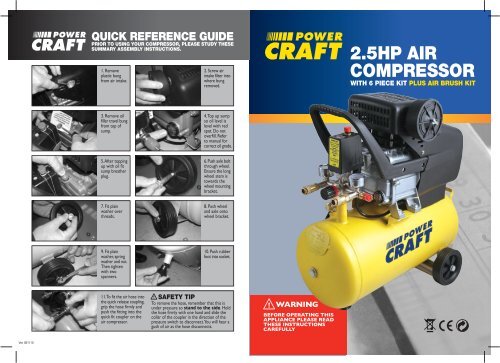
QUICK REFERENCE GUIDE<br />
PRIOR TO USING YOUR <strong>COMPRESSOR</strong>, PLEASE STUDY THESE<br />
SUMMARY ASSEMBLY INSTRUCTIONS.<br />
1. Remove<br />
plastic bung<br />
from air intake.<br />
3. Remove oil<br />
filler travel bung<br />
from top of<br />
sump.<br />
5. After topping<br />
up with oil fit<br />
sump breather<br />
plug.<br />
7. Fit plain<br />
washer over<br />
threads.<br />
9. Fit plain<br />
washer, spring<br />
washer and nut.<br />
Then tighten<br />
with two<br />
spanners.<br />
11. To fit the air hose into<br />
the quick release coupling,<br />
grip the hose firmly and<br />
push the fitting into the<br />
quick fit coupler on the<br />
air compressor.<br />
2. Screw air<br />
intake filter into<br />
where bung<br />
removed.<br />
4. Top up sump<br />
so oil level is<br />
level with red<br />
spot. Do not<br />
overfill. Refer<br />
to manual for<br />
correct oil grade.<br />
6. Push axle bolt<br />
through wheel.<br />
Ensure the long<br />
wheel stem is<br />
towards the<br />
wheel mounting<br />
bracket.<br />
8. Push wheel<br />
and axle onto<br />
wheel bracket.<br />
10. Push rubber<br />
foot into socket.<br />
SAFETY TIP<br />
To remove the hose, remember that this is<br />
under pressure so stand to the side. Hold<br />
the hose firmly with one hand and slide the<br />
collar of the coupler in the direction of the<br />
pressure switch to disconnect. You will hear a<br />
gush of air as the hose disconnects.<br />
WARNING<br />
BEFORE OPERATING THIS<br />
APPLIANCE PLEASE READ<br />
THESE INSTRUCTIONS<br />
CAREFULLY<br />
<strong>2.5HP</strong> <strong>AIR</strong><br />
<strong>COMPRESSOR</strong><br />
WITH 6 PIECE KIT PLUS <strong>AIR</strong> BRUSH KIT
<strong>2.5HP</strong> <strong>AIR</strong><br />
<strong>COMPRESSOR</strong><br />
WITH 6 PIECE KIT<br />
PLUS <strong>AIR</strong> BRUSH KIT<br />
MODEL PC270/24<br />
Power Craft products are manufactured to high<br />
quality standards and they are safe and fit for<br />
purpose at time of sale, but all tools can be<br />
dangerous if the correct precautions are not<br />
taken.<br />
Compressors are quick and efficient and provide a<br />
pressurised air source, which is useful for driving<br />
air tools and spraying applications. They are safe<br />
if used with care, always follow these instructions,<br />
do not carry out the operation until you are sure you<br />
can do so in safety. Ensure that you adhere to the<br />
instructions for your air tools.<br />
Remember to consider the work environment for<br />
safe operation of the compressor and any attached<br />
tools.<br />
WARNING<br />
When using compressors, basic safety<br />
precautions should always be followed to<br />
reduce the risk of fire, electric shock and<br />
personal injury.<br />
Read all these instructions before attempting<br />
to operate this product.<br />
Keep these instructions with the<br />
compressor.<br />
Save these instructions for future reference.<br />
NOTE: THIS IS AN OIL-LUBRICATED<br />
<strong>COMPRESSOR</strong>. BEFORE RUNNING, PLEASE FILL<br />
SUMP TO THE CORRECT LEVEL WITH SAE 30 OIL.<br />
Helpline: <strong>UK</strong> 08707 323023<br />
ROI 1800 481 005<br />
PRODUCT SPECIFICATION:<br />
Item PC270/24<br />
Maximum working pressure 8 bar / 115psi<br />
Pump air displacement 9.5CFM<br />
Air receiver (tank) capacity 24 Litres<br />
Motor capacity 1.87KW<br />
Motor rotation speed 2850rpm<br />
Power supply voltage 230V/50Hz<br />
Motor HP <strong>2.5HP</strong><br />
LWA Max 97dBA<br />
Dimensions 585 X 285 x 630mm<br />
Weight 34kg<br />
1 PERSONAL SAFETY<br />
Symbols used on the air compressor<br />
Read the operator instructions<br />
Warning shock hazard<br />
Warning high temperature parts<br />
Warning the compressor is automatic<br />
and can start unexpectedly<br />
Read This Manual<br />
In order to ensure working safety, read this<br />
manual and thoroughly understand how to<br />
turn the compressor on and off and to<br />
control the airflow.<br />
Use Personal Protection Safety<br />
Equipment<br />
The compressor ejects high-pressure air.<br />
Always wear protective eye goggles and<br />
avoid contact with air outlets. Protect eyes<br />
with safety glasses or goggles – use safety<br />
glasses or goggles which conform to<br />
BSEN136 or CE equivalent that provide<br />
protection from the front and side. Approved<br />
safety footwear and headgear should worn<br />
as appropriate, for example on building<br />
works, when heavy weights or overhead<br />
working are involved.<br />
Do not operate this machine or its<br />
accessories near other people unless<br />
they are wearing appropriate safety<br />
equipment also.<br />
WARRANTY TERMS AND CONDITIONS<br />
• Power Craft products are covered by a 36 month warranty from the date of purchase. This warranty<br />
applies to all material defects, which may arise.<br />
• In the event of a problem or defect, you should in the first instance contact the help line. In most cases<br />
solutions will be provided, which will solve the problem or correct the defect.<br />
• This warranty excludes components, which are subject to normal wear and tear.<br />
• Repairs or replacement parts will not extend the original warranty period.<br />
• Defects, which have arisen as a result of improper use or wear, are not covered by the warranty.<br />
Damage caused by a blocked air filter is not covered by this warranty.<br />
• The warranty stipulations apply in conjunction with our terms of sale and delivery.<br />
• The warranty does not cover any collection or redelivery costs to and from the service centre.<br />
Contact must be made with the help line before a claim can be processed.<br />
• Products, which are poorly packaged, will not be accepted.<br />
• <strong>Warranty</strong> claims can only be processed if the following conditions are met:<br />
1. Proof of the purchase date can be provided in the form of a sales receipt.<br />
2. No repairs or replacements have been carried out by third parties.<br />
3. The tool has not been subject to improper use.<br />
4. A description of the complaint is enclosed and any payment relating to the carriage costs, of which details<br />
can be obtained from the help line.<br />
This does not affect your statutory rights.<br />
Helpline: <strong>UK</strong> 08707 323023<br />
2 ROI 1800 481 005<br />
11
8 PARTS LIST<br />
No Designation Qty No Designation Qty<br />
1 Bolt M8x110 4 29 Washer foot 1<br />
2 Cylinder head 1 30 Bolt M8x25 1<br />
3 Cylinder head gasket 1 31 Washer 8 1<br />
4 Valve plate 1 32 Drain cock 1<br />
5 Valve gasket 1 33 Wheel 2<br />
6 Cylinder 1 34 Air tank 1<br />
7 Cylinder gasket 1 35 Discharge pipe 1<br />
8 Piston ring 3 36 Motor 1<br />
9 Piston 1 37 Bearing 6202 RS 1<br />
10 Cilrclip 2 38 Motor bracket 1<br />
11 Connecting rod 1 39 Bolt M5x105 4<br />
12 Crankcase 1 40 Fan 1<br />
13 Crank 1 41 Circlip 1<br />
14 Bolt M8x22-right 1 42 Bearing 6204 RS 1<br />
15 Rubber gasket 1 43 Sealing ring 1<br />
16 Breath pipe 1 44 Capacitance 1<br />
17 Crank case cover 1 45 Nut M8 1<br />
18 Screw M5x14 6 46 Gudgeon pin 1<br />
19 Oil leveller washer 1 47 Fan filter 1<br />
20 Oil leveller 1 48 Handle 1<br />
21 Unilateralist valve 1<br />
22 Pressure switch 1<br />
23 Pressure gauge 2<br />
24 Outlet valve 2<br />
25 Switch bracket 1<br />
26 Release pipe 1<br />
27 Safety valve 1<br />
28 Nut 8 1<br />
DECLARATION OF CONFORMITY (GB)<br />
M.D Irwin<br />
We declare under our sole responsibility that the air compressor as stated on the rating plate<br />
is in conformity with the following safety requirement of directives:<br />
98/37/EC<br />
73/23/EEC (As amended and supplemented by: 93/68/EEC)<br />
89/336/EEC (As amended and supplemented by: 92/31/EEC - 93/68/EEC -93/97/EEC)<br />
87/404/EEC (As amended and supplemented by: 90/488/EEC - 93/68/EEC)<br />
It complies with the European standards: EN1012-1/96, EN60204-1/97,<br />
EN50081-1/92, EN60335-1/94<br />
Omega Wolf Ltd<br />
Kirkby In Ashfield<br />
NG17 7LF<br />
03/07 36 Product Code 5259<br />
Helpline: <strong>UK</strong> 08707 323023<br />
ROI 1800 481 005<br />
Dress Properly<br />
Do not wear loose clothing or jewellery; it<br />
can get caught in moving parts.<br />
Non-skid safety footwear is recommended<br />
when working outdoors.<br />
Stay Alert<br />
Watch what you are doing. Use common<br />
sense. Do not operate the compressor or<br />
any air tool when tired or after taking alcohol<br />
or prescription/ non-prescription drugs.<br />
WARNING<br />
As with all tools keep away from children<br />
and pets.<br />
2 OPERATIONAL SAFETY<br />
What You Must Not Do<br />
Do not allow routine to lead to mistakes<br />
Do not allow routine, which occurs when using the<br />
machine frequently, to lead to mistakes. Remember<br />
that a slight lack of concentration can result in<br />
serious injuries in a split second.<br />
Do not use air tools on ladders<br />
Do not use air tools, whilst on ladders. Ensure<br />
correct platforms are used.<br />
Do not eat, drink or smoke in the work area<br />
Do not eat, drink or smoke while using this machine<br />
or in the work area.<br />
Do not touch the compressor cylinder head<br />
During operation the cooling fins of the cylinder<br />
head and the delivery pipe will become very hot.<br />
Even after use these will remain hot for some time.<br />
Avoid coming into contact with these. Do not leave<br />
inflammable objects near the compressor.<br />
Do not let children or pets in the work area<br />
Do not let children or pets come into contact with<br />
the compressor, high-pressure hose, air tools, mains<br />
cable or work area.<br />
Do not use the product for excessive time periods<br />
It will work better and safer at the rate for which it<br />
was intended. See section 5 Maintenance, Care<br />
and Repair. Please note that these compressors<br />
are designed for the DIY, hobbyist and enthusiast<br />
for applications where a convenient portable source<br />
of air is required.<br />
Do not abuse the hose/cable<br />
Never pull the compressor by the air hose or electrical<br />
cable.<br />
Keep hose/cable away from heat and sharp edges.<br />
Do not touch the metal plug pins when connecting<br />
or removing the electrical plug.<br />
Helpline: <strong>UK</strong> 08707 323023<br />
10 ROI 1800 481 005<br />
3<br />
Do not run the compressor in damp conditions<br />
The compressor should never be used in an area<br />
where it could be exposed to water or excessively<br />
damp conditions.<br />
Do not direct any air jet towards people or animals<br />
High-pressure air jets can be dangerous and air jets<br />
must not be directed towards people or animals.<br />
Do not make any alterations to the air receiver<br />
(tank) The air receiver (tank) is made to conform to<br />
the relevant European safety standards and the air<br />
receiver must never be altered by welding or any<br />
other means.<br />
What You Must Do<br />
Disconnect the compressor from power<br />
supply when maintaining<br />
Before carrying out any maintenance on the<br />
compressor. Always switch off and unplug the<br />
compressor from the power supply. Ensure that all<br />
the compressed air has been released from the air<br />
receiver.<br />
Maintenance of electrical components<br />
You must ensure that a suitably qualified person<br />
carries out repairs and maintenance of electrical<br />
components.<br />
Avoid unintentional starting of the compressor<br />
When the machine is not in use please depress the<br />
pressure switch, to ensure that it doesn't start up<br />
unexpectedly.<br />
Using extension cables<br />
See Section 3 Setting up the Compressor.<br />
WARNING! Use recommended highpressure<br />
hoses and couplings<br />
High-pressure hoses, fittings and couplings<br />
are important for the safety of the appliance.<br />
Use only hoses, fittings and couplings<br />
designed for usage with air compressors.<br />
Before disconnecting the air hose<br />
from the compressor.<br />
For safety close the tap and discharge residual<br />
pressure in the air hose before disconnecting.<br />
Using the compressor with your air tools<br />
Before using the compressor and your air tools,<br />
CHECK every time that the connections are fully<br />
tightened and that there are no broken or worn parts.<br />
Always adhere to the processes and safety warnings,<br />
which are stated in the instructions of your air tools.<br />
Guard against electric shock<br />
Use an RCD (residual current device) to provide<br />
protection against electrical shock.
Consider the work environment<br />
Make sure the area is clear of obstacles, which could<br />
cause you to trip and fall.<br />
Before moving the compressor<br />
The compressor air receiver must be discharged<br />
before the machine is transported.<br />
Keep work area clean<br />
Cluttered areas invite injuries.<br />
3 SETTING UP THE <strong>COMPRESSOR</strong><br />
Important: Only use the compressor for the purpose<br />
for which it was designed. The compressor is<br />
designed for use as stated only; do not attempt to<br />
adapt it for other purposes. The manufacturer<br />
assumes no responsibility for any damages resulting<br />
from improper use for non-compliance with the<br />
instructions described in this manual. The<br />
compressor is for use by competent persons only.<br />
Before Operation<br />
Check package contents<br />
Check for damage<br />
Before using this item check each part is undamaged.<br />
Check all pipes are firmly connected. Check plastic<br />
covers for damage. Inspect the air receiver (tank)<br />
to ensure that it has not been damaged.<br />
Save Packaging<br />
Save major packaging for return of product in the<br />
event of service or repair.<br />
Electrical Supply<br />
Before using the air compressor please check that<br />
you have a suitable electrical supply to support the<br />
requirements of the motor unit. Please ensure your<br />
mains power supply corresponds to the power rating<br />
on the data label on the machine.<br />
Electrical Cables<br />
Ensure that all cables are damage free before<br />
connecting to the power supply.<br />
Using extension cables<br />
Use an extension cable, which is no more than<br />
10metres long and has a conductor cross-section<br />
of at least 2.5mm2 i.e. a heavy-duty cable. Using<br />
an excessively long or thin-wired extension cable<br />
will cause severe damage to the motor. Always fully<br />
unwind extension cables. If using extension cables<br />
outdoors always use a cable, which is marked for<br />
outdoor use.<br />
Always maintain a clear area around the<br />
compressor<br />
It is very important that the compressor is positioned<br />
so that there is an adequate airflow around the<br />
machine. The compressor should be situated so<br />
that it has 50cm of obstacle free space around its<br />
air receiver (tank) and pump/motor unit.<br />
Helpline: <strong>UK</strong> 08707 323023<br />
ROI 1800 481 005<br />
Ensure that the compressor draws clean air<br />
For the correct function and longevity of your air<br />
compressor it is important that the air, which is<br />
drawn into the compressor is clean. The compressor<br />
should not be used in an area, where the air is<br />
contaminated with dust or over-spray from spraying<br />
applications.<br />
Component parts (Refer to Fig 1)<br />
1. Motor and Pump Unit<br />
2. Air Filter Cover<br />
3. Fan (inside cover)<br />
4. Air Receiver (tank)<br />
5. Drain Valve<br />
6. Air Receiver (tank) Pressure Gauge<br />
7. Air Outlet Pressure Gauge<br />
8. Air Outlets<br />
9. Air Outlet Pressure Regulator<br />
10. Pressure Switch (on/off)<br />
1<br />
Fig 1 The Compressor.<br />
7<br />
2<br />
6<br />
9<br />
8<br />
7 PARTS DIAGRAM<br />
Securing the wheels to the frame<br />
The wheels are secured to the lower frame on the<br />
underside of the air receiver. To fix the wheels to<br />
the frame, put the fixing bolt through each wheel<br />
and then through the hole in the frame. Secure by<br />
means of the washer and nut. The positioning of<br />
the wheel can be seen in Fig 1.<br />
Helpline: <strong>UK</strong> 08707 323023<br />
4 ROI 1800 481 005<br />
9
6 TROUBLE SHOOTING (CONT)<br />
FAULT PROBABLE CAUSE REMEDY<br />
The compressor doesn't seem The tank is full of water due Open the air tap and release the pressure.<br />
to provide as much air as it did to condensation Open the drain valve underneath the<br />
when new and the compressor compressor and release the water<br />
cuts off within a much shorter within the tank.<br />
time period.<br />
The motor pump unit does not Pressure switch defective Stop the compressor immediately<br />
stop when the tank pressure or needs adjusting and contact the help-line<br />
reaches its maximum working<br />
pressure (115PSI) and the safety<br />
valve vents air<br />
Excessive oil consumption Oil level too high Keep the level within set range<br />
Excessive oil consumption Breath pipe choked up Check and clean<br />
Excessive oil consumption Piston ring and cylinder Repair or replace<br />
worn or damaged<br />
RECYCLE<br />
Never place any electric tools in your household refuse.<br />
To comply with European Directive 2002/96/EC concerning<br />
old electric and electronic equipment and its implementation<br />
in national laws, old electric tools have to be separated from<br />
other waste and disposed of in an environmentally-friendly<br />
fashion, e.g. by taking to a recycling depot.<br />
ELECTRICAL INFORMATION<br />
It is supplied with a pre-wired mains plug, if the plug needs replacing follow these instructions.<br />
Wire correctly The wires in the mains lead are coloured in the following way:<br />
BLUE Neutral (N)<br />
BROWN Live (L)<br />
GREEN/ YELLOW Earth (E)<br />
Secure wires carefully and firmly to<br />
the correct terminals. Secure the mains<br />
cable in the plug cord grip firmly.<br />
Fit a 13amp fuse. If a 13amp (BS1363)<br />
plug is used a (BS 1362) ASTA<br />
approved 13-amp fuse must be fitted.<br />
If in doubt always consult a qualified<br />
electrician.<br />
Recycle/dispose of old plug and cable<br />
Prevent inadvertent connection to<br />
socket and risk of electric shock.<br />
Helpline: <strong>UK</strong> 08707 323023<br />
ROI 1800 481 005<br />
The safety blow off valve<br />
The compressor is equipped with a safety valve (see<br />
fig 2). If the pump were to continue operating passed<br />
the maximum pressure, due to a defective pressure<br />
switch, the safety valve would open and eject air<br />
from the air receiver. If the safety valve discharges<br />
air, please turn off the compressor and contact the<br />
help-line. The safety valve is either located to the<br />
side of the pressure switch as in Fig 2 or directly<br />
screwed into the air receiver.<br />
Fig 2. Pressure Switch with Safety Valve<br />
4 USING THE <strong>COMPRESSOR</strong><br />
Starting the Air Compressor<br />
Important: Before plugging into the mains, ensure<br />
that the button on the top of the pressure switch<br />
is in the off position. Once the air compressor is<br />
connected to the mains supply it is now ready for<br />
use as follows:<br />
a) Pull up the button on the pressure switch (10)<br />
(fig 1). This will 'click' up into position. See<br />
figures 3 and 4 below for more detail. The<br />
motor/ pump unit will now start to run.<br />
Fig 3 Pressure switch On / Off<br />
Helpline: <strong>UK</strong> 08707 323023<br />
8 ROI 1800 481 005<br />
5<br />
Fig 4 Pressure switch on/off positioning<br />
b) Check that the motor/pump unit automatically<br />
stops when the pressure inside the air receiver<br />
reaches approximately (115PSI / 8bar) (read<br />
gauge part No. 6). Rotate the air regulator to<br />
the desired outlet pressure and plug in hose<br />
with chosen air tool connected to the other end.<br />
The air is now ready for use.<br />
c) Check that the motor/ pump unit automatically<br />
starts, when the pressure falls by approximately<br />
2bar.<br />
Under normal use when the compressor is<br />
running correctly you would hear the<br />
following:<br />
a) When the air compressor starts from no<br />
pressure within the tank there is a whistle<br />
of 'leaking' air from the pressure switch<br />
for about 20-50 seconds.<br />
b) Whenever the motor stops there would<br />
be a quick sudden discharge of air. (This<br />
is the motor start and stop air unloading<br />
system being activated).<br />
Shutting down the Air Compressor<br />
Never stop the compressor by unplugging it. The<br />
pressure switch must always be used as this ensures<br />
that air is discharged from the head. This makes<br />
the starting easier for the motor and prevents motor<br />
damage.<br />
5 MAINTENANCE, CARE AND REP<strong>AIR</strong><br />
Ensure the items are disconnected from the<br />
electrical supply and cannot operate accidentally<br />
when, servicing or cleaning.<br />
Oil-lubricated pump unit and expected usage<br />
This air compressor has been specially designed<br />
and manufactured to meet the demands of the DIY<br />
hobbyist or enthusiast, who require a portable supply<br />
of air. It is recommended that the compressor duty<br />
cycle never exceeds 50% and its continuous running<br />
operation does not exceed 15minutes.
Drain the air receiver (tank) weekly<br />
Compressing air causes moisture, which is present<br />
in the air to condensate on the inside of the air<br />
receiver. This water can damage your air tools and<br />
produce a poor finish when spraying paint. It also<br />
damages the inside of your compressor and reduces<br />
its performance. It is important that the air receiver<br />
is drained weekly. This is done by first opening the<br />
air tap to discharge the pressure and then unscrewing<br />
the brass thumbscrew (fig 1 part 5) anticlockwise<br />
on the underside of the air receiver. Any water<br />
present in the air receiver should now flow out.<br />
Check the oil level regularly<br />
The level of the oil has to be visible in the sight glass<br />
between the red check-point mark and the upper<br />
edge of the sight glass. The first oil change should<br />
be carried out after 100 operating hours. Thereafter,<br />
drain the oil and replace it with new oil at intervals<br />
of 500 operating hours.<br />
Changing the oil<br />
Switch off the motor and remove the power plug<br />
from the socket outlet. Release any remaining air<br />
pressure and then unscrew the oil drain plug from<br />
the compressor pump and remove. To prevent the<br />
oil from escaping out of control, hold a small piece<br />
of metal guttering underneath the drain plug and<br />
direct the oil into an appropriate container. If any oil<br />
still remains, tilt the compressor slightly.<br />
IMPORTANT – take the old oil to an official old<br />
oil disposal station.<br />
When all the old oil has been removed, screw the<br />
oil drain plug/sight glass into place. Use a screwdriver<br />
to remove the cap of the oil filter plug and pour oil<br />
in until the level of oil in the sight glass reaches the<br />
red mark. Replace the cap back on the oil filler plug.<br />
Cleaning<br />
Clean the items with a soft brush or a wipe moistened<br />
with a suitable biodegradable solvent. Do not use<br />
inflammable liquids like petrol or alcohol, they are<br />
a fire risk and will damage the finish and plastic<br />
parts.<br />
Faults<br />
Have the air compressor repaired by a competent<br />
person.<br />
Use only genuine replacement parts, which are<br />
available from the Helpline.<br />
Do not use modified or non-genuine parts.<br />
Helpline: <strong>UK</strong> 08707 323023<br />
ROI 1800 481 005<br />
Maintain tools with care<br />
Keep the air compressor clean for better and safer<br />
performance.<br />
Follow instructions for changing accessories.<br />
Inspect the air compressor and extension<br />
cables/hoses occasionally; have them repaired by<br />
a qualified person or authorised service body.<br />
Check for damaged parts<br />
Do not use the air compressor with damaged parts.<br />
Before further use a damaged air compressor must<br />
be carefully checked by a qualified person to<br />
determine that it will operate properly. Check for<br />
breakage of parts, mountings and other conditions<br />
that may affect its operation. An authorised service<br />
centre should properly repair a damaged part, unless<br />
indicated otherwise in the instruction manual.<br />
Have your tool repaired by an expert<br />
This appliance is manufactured in accordance with<br />
relevant safety standards. Only experts must carry<br />
out repairing of electrical appliances, otherwise<br />
considerable danger for the user may result.<br />
Storing the air compressor<br />
When not in use the air compressor should be stored<br />
in the dry, out of reach of children and in a frost-free<br />
environment.<br />
Cleaning/ changing the air filter (Monthly)<br />
Please note: This compressor should not be used<br />
in a heavily dusty atmosphere. The warranty does<br />
not cover damage caused by a blocked air filter.<br />
The air filter must be cleaned or replaced monthly,<br />
or more frequently if the compressor is in regular<br />
use. The air filter can be accessed easily by<br />
unscrewing the air filter cover (Phillips screw) on top<br />
of the pump/motor cowling.<br />
To clean a lightly soiled air filter, use soapy water<br />
and leave to dry thoroughly.<br />
If in doubt please consult the help line for details on<br />
the servicing of this air compressor.<br />
Do not operate the compressor without<br />
the air filter installed.<br />
Operating the compressor without the air<br />
filter will cause severe damage to the<br />
pump unit.<br />
6 TROUBLE SHOOTING<br />
FAULT PROBABLE CAUSE REMEDY<br />
Pressure drop in the tank Air leaks at connections Let the compressor build pressure in the<br />
tank; to the maximum pressure if possible.<br />
Brush soapy water on air connections and<br />
look carefully for air bubbles. Tighten<br />
leaking connections. If the problem<br />
persists contact the help-line for further<br />
advice.<br />
The pressure switch valve leaks Non-return valve Let the air in the tank flow out until all the<br />
when the compressor is idle seal defective pressure is released. Then remove the<br />
non return-valve plug and clean the valve<br />
seat. If necessary replace the seal and<br />
then re-mount all the components.<br />
The compressor stopped Overload cut-out operated Check that the mains voltage corresponds<br />
and does not start because of motor overheating to specifications. An extension cable,<br />
which is too thin, and too long can cause<br />
a voltage drop and cause the motor to<br />
overheat. Leave to cool down. Use heavy<br />
duty extension cables Ensure that the<br />
compressor is plugged into a socket as<br />
near to the consumer unit/ fuse box as<br />
possible<br />
The compressor stopped Motor windings burnt out Contact the help line<br />
and does not start and makes<br />
a humming noise<br />
The motor does not start Capacitor burnt out Replacement starter capacitor needed,<br />
contact the help line.<br />
The motor does not start Low voltage supply Check that the mains voltage corresponds<br />
or starts slowly to the motor to specifications. An extension cable,<br />
which is too thin, and tool long can cause<br />
a voltage drop and cause the motor to<br />
overheat. Leave to cool down. Use heavy<br />
duty extension cables Ensure that the<br />
compressor is plugged into a socket as<br />
near to the consumer unit/ fuse box as<br />
possible.<br />
The compressor is noisy Compressor head gasket Stop the compressor and<br />
with metallic clangs broken or valve faulty contact the help line.<br />
The compressor does not Compressor head gasket Stop the compressor and<br />
reach the maximum pressure broken or valve faulty contact the help line<br />
The compressor doesn't seem The pressure switch Stop the compressor and<br />
to provide as much air as it did needs adjusting contact the help line<br />
when new and the compressor<br />
cuts off within a much shorter<br />
time period<br />
Helpline: <strong>UK</strong> 08707 323023<br />
6 ROI 1800 481 005<br />
7