Ketron SD1: a new wonderful musical adventure is about to begin ...
Ketron SD1: a new wonderful musical adventure is about to begin ...
Ketron SD1: a new wonderful musical adventure is about to begin ...

You also want an ePaper? Increase the reach of your titles
YUMPU automatically turns print PDFs into web optimized ePapers that Google loves.
INDEX<br />
PAGE<br />
<strong>Ketron</strong> <strong>SD1</strong>: a <strong>new</strong> <strong>wonderful</strong> <strong>musical</strong> <strong>adventure</strong> <strong>is</strong> <strong>about</strong> <strong>to</strong> <strong>begin</strong>!<br />
Connections<br />
Control panel and push but<strong>to</strong>n functions<br />
Parameter management<br />
Having fun with the <strong>SD1</strong>! A guide on how <strong>to</strong> start playing and having fun right away<br />
Voice and User Voice<br />
Programs and One Touch<br />
Sound Load<br />
The Sampler<br />
Drawbars<br />
Drum Set<br />
Arranger<br />
Style & Sound<br />
RAM Styles and Flash RAM<br />
Pattern Edit<br />
Power On Set Up<br />
Song Play, Midifiles and Karaoke<br />
Video Out and Karaoke<br />
Recording a Midi file<br />
.KAR Midi files and .TXT files<br />
Using the microphone<br />
Vocalizer<br />
Effects<br />
On Line Effects and Ro<strong>to</strong>r effect menus<br />
Reg<strong>is</strong>tration<br />
Utility<br />
MIDI Accordions<br />
Midi<br />
Using a MIDI pedal<br />
Demo & Hit<br />
D<strong>is</strong>k<br />
Up-dating and Resetting the <strong>SD1</strong><br />
Sequencer<br />
Tu<strong>to</strong>rial<br />
3<br />
5<br />
7<br />
13<br />
15<br />
23<br />
28<br />
33<br />
35<br />
40<br />
41<br />
45<br />
55<br />
56<br />
60<br />
68<br />
69<br />
77<br />
79<br />
80<br />
82<br />
84<br />
90<br />
93<br />
94<br />
97<br />
103<br />
105<br />
110<br />
111<br />
113<br />
121<br />
122<br />
137<br />
Owner’s Manual <strong>SD1</strong> 1
<strong>Ketron</strong> <strong>SD1</strong>: a <strong>new</strong> <strong>wonderful</strong> <strong>musical</strong> <strong>adventure</strong><br />
<strong>is</strong> <strong>about</strong> <strong>to</strong> <strong>begin</strong>!<br />
Congratulations for having purchased the <strong>new</strong> <strong>Ketron</strong> <strong>SD1</strong> electronic keyboard. It has taken us two years of painstaking research and programming<br />
<strong>to</strong> offer you improved and more natural timbres, modern and <strong>musical</strong> arrangements and <strong>new</strong> reproduction functions for MIDI files, samples,<br />
text files and General MIDI files.<br />
If you are already familiar with <strong>Ketron</strong> X1 then you will have no problem in using the <strong>SD1</strong>. If you are <strong>new</strong> <strong>to</strong> the world of <strong>Ketron</strong> and electronic<br />
keyboards then we adv<strong>is</strong>e you <strong>to</strong> read the “Having fun with the <strong>SD1</strong>!” section.<br />
Then again if you are experienced musicians and programmers and you’re interested in the real nitty-gritty then the specific sections for each<br />
operational environment <strong>is</strong> what you’re looking for!<br />
Finally whatever category of skill you belong <strong>to</strong> we recommend that you read the first few pages of th<strong>is</strong> manual. They provide a description of<br />
the operational control panel, the connections and the navigation principles among the parameters that are valid for all parts of th<strong>is</strong> manual.<br />
We hope you have lots of fun with <strong>Ketron</strong> <strong>SD1</strong>!<br />
THE NEW FEATURES OF THE <strong>SD1</strong><br />
Whereas many electronic keyboards are becoming real workstations, with ever-complicated functions and often not within everyone’s reach,<br />
our <strong>SD1</strong> keyboard has been thought up as an instrument capable of enhancing the musician’s skill in the centre of the show. Our desire <strong>is</strong> that<br />
of offering the <strong>SD1</strong> as a simple yet potential instrument that hides endless possibilities for the musician who loves playing, entertaining and<br />
interacting with the <strong>musical</strong> instrument. You can of course use the <strong>SD1</strong> just <strong>to</strong> reproduce files but you would be m<strong>is</strong>sing out on much of our<br />
research carried out worldwide!<br />
Some aspects of the <strong>SD1</strong> are similar <strong>to</strong> many other professional electronic keyboards:<br />
●<br />
●<br />
●<br />
●<br />
●<br />
●<br />
●<br />
●<br />
●<br />
●<br />
Polyphony with 64 notes.<br />
Hundreds of styles.<br />
Hundreds of timbres.<br />
A soph<strong>is</strong>ticated arranger.<br />
Reproduction of Midi files.<br />
D<strong>is</strong>play of the words of a Midi file also on the moni<strong>to</strong>r.<br />
A timbre edi<strong>to</strong>r.<br />
General MIDI and Standard MIDI File compatibility.<br />
A sequencer with sixteen tracks.<br />
A style edi<strong>to</strong>r.<br />
Other aspects on the other hand are more unique, often offered as optionals, but in the <strong>SD1</strong> they are given standard:<br />
●<br />
●<br />
●<br />
●<br />
●<br />
●<br />
●<br />
●<br />
●<br />
●<br />
A Vocalizer for harmonizing the voice.<br />
A hard d<strong>is</strong>k of six Gigabytes.<br />
A double MIDI input.<br />
Two audio inputs for microphones.<br />
A sampler of sixteen MB’s with wave graph editing.<br />
A half-weighted keyboard with 76 keys.<br />
Four audio outputs.<br />
Compatibility with audio .WAV files.<br />
A Flash RAM for loading <strong>new</strong> samples.<br />
The use of Styles directly from the d<strong>is</strong>k.<br />
Last but not least the <strong>SD1</strong> has some potentials that you have never seen or heard of in other electronic keyboards as they are an exclusive of<br />
<strong>Ketron</strong> <strong>SD1</strong>:<br />
●<br />
●<br />
●<br />
●<br />
●<br />
●<br />
●<br />
The use of audio .WAV files in real time with a Midi file linked with the transposition and change of the tempo thanks <strong>to</strong> a proprietary algorithm<br />
that does not alter the timbre for compatible intervals.<br />
The sampled grooves, processed and entered in the Styles <strong>to</strong> provide that certain <strong>musical</strong> real<strong>is</strong>m that <strong>is</strong> impossible <strong>to</strong> achieve with a simple<br />
drum kit.<br />
The Mutes of the individual instruments of a sampled groove.<br />
Two drum tracks for each style.<br />
The possibility <strong>to</strong> d<strong>is</strong>play a text file (.TXT) while using the Arranger <strong>to</strong> do away with awkward packs of song sheets and booklets.<br />
The complete au<strong>to</strong>mation of all loading procedures via the Reg<strong>is</strong>trations that can load for example the words, the audio files and the Midi<br />
file of a song all in one go.<br />
Management of the hard d<strong>is</strong>k via a serial port on a separate PC <strong>to</strong> organ<strong>is</strong>e your own back-up copies and <strong>to</strong> view all the files on a larger<br />
d<strong>is</strong>play.<br />
Owner’s Manual <strong>SD1</strong> 3
● The possibility <strong>to</strong> immediately call up any Midi file s<strong>to</strong>red in a dedicated folder.<br />
● The simplified management of the hard d<strong>is</strong>k thanks <strong>to</strong> the <strong>new</strong> Master Folder concept.<br />
● A menu especially studied for MIDI accordions.<br />
● A <strong>new</strong> professional look (but th<strong>is</strong> has already been invented!).<br />
Not bad eh? If you are impressed with these features then you could have probably purchased the <strong>SD1</strong> just looking at a catalogue. What we and<br />
all of our cus<strong>to</strong>mers <strong>to</strong>o are really proud of are not just the specifications and the <strong>new</strong> functions, which are certainly one step ahead of the current<br />
standard, but of how the <strong>SD1</strong> sounds! We are proud of the <strong>new</strong> acoustic piano sample, the acoustic timbres that have never been so warm<br />
and real<strong>is</strong>tic, the 48 MB’s of Wave tables of which many are rather envious as they are so natural, the grooves from which so much rhythm <strong>is</strong><br />
felt that it’s impossible <strong>to</strong> keep your feet still while l<strong>is</strong>tening <strong>to</strong> them.<br />
Before we even started <strong>to</strong> design the <strong>SD1</strong> we thought of the sounds and the styles, which had <strong>to</strong> be the best ever. We are convinced that we<br />
have managed perfection!<br />
Lots of fun from <strong>Ketron</strong>!<br />
4<br />
<strong>SD1</strong> Owner’s Manual
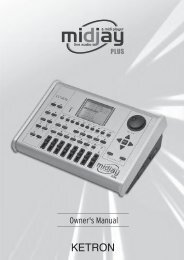
Connections<br />
1 3 6<br />
8 10 12<br />
2 4 5 7 9 11 13<br />
The <strong>SD1</strong> <strong>is</strong> supplied standard with all the audio and MIDI connections required and also for the pedals needed for its optimum use. The only<br />
options are the video interface and the two pedals. Below are the connections, from the left <strong>to</strong> the right of the panel:<br />
1 MICRO 1: Audio input for microphones on balanced XLR connection. It <strong>is</strong> preferable <strong>to</strong> use th<strong>is</strong> input for the main microphone for two major<br />
reasons: the balanced connection <strong>is</strong> more silent and less subject <strong>to</strong> environmental interference. The signal made available by th<strong>is</strong> input can be<br />
processed by the Vocalizer built in the <strong>SD1</strong>.<br />
2 MICRO 2: Audio mono Jack input 1/4’ unbalanced for auxiliary microphones. The Micro 2 signal cannot be processed by the Vocalizer built<br />
in the <strong>SD1</strong>, but only by the overall effects.<br />
3<br />
MICRO GAIN: Th<strong>is</strong> controls the gain of the Audio microphone inputs.<br />
4 PHONES: Th<strong>is</strong> <strong>is</strong> used <strong>to</strong> connect a stereo headphone. Micro 2 Output Monophonic audio output 1/4’ of the input signal of Micro 2, that<br />
<strong>is</strong> not processed by the built-in effects as Reverb and chorus..<br />
5<br />
MICRO 2 OUTPUT: Monophonic audio output 1/4’ of the input signal of Micro 1 no processed by the Vocalizer internal effects as Reverb and chorus.<br />
6 MICRO 1 OUTPUT: Monophonic audio output 1/4’ of the input signal of Micro 1 processed by the Vocalizer but not by the internal effects<br />
as Reverb and chorus.<br />
7 OUTPUT LEFT/MONO 1, RIGHT 2, 3, 4: Monophonic audio outputs 1/4’ of which Left can work as overall monophonic output for the<br />
whole instrument. When the Left and Right outputs are used the <strong>SD1</strong> works in stereo. Outputs 3 and 4, again monophonic, can be used for particular<br />
instrumental sections of the keyboard so that they can be controlled by a separate mixer or processor with separate effects.<br />
8 PEDAL FOOTSWITCH: Th<strong>is</strong> <strong>is</strong> a multipolar socket used <strong>to</strong> connect optional pedals with six or thirteen switches,<br />
<strong>to</strong> control many functions including au<strong>to</strong>matic accompaniment functions.<br />
9<br />
SUSTAIN PEDAL: Th<strong>is</strong> <strong>is</strong> the socket for the Sustain On/Off type pedal.<br />
10 VOLUME PEDAL: Th<strong>is</strong> <strong>is</strong> the socket for the continuous Volume control pedal. It <strong>is</strong> adv<strong>is</strong>able <strong>to</strong> use pedals produced by <strong>Ketron</strong> <strong>to</strong> avoid<br />
dangerous short circuits or abnormal conditions in general.<br />
11<br />
MIDI In (GM): Midi Input Port used just <strong>to</strong> control the General MIDI timbre genera<strong>to</strong>r of the <strong>SD1</strong> with sixteen MIDI parts.<br />
MIDI In 2 (Keyboard): MIDI port with which each <strong>SD1</strong> section <strong>is</strong> controlled from a separate keyboard or from an accordion with MIDI interface.<br />
MIDI Out: MIDI port used <strong>to</strong> send the data generated by the <strong>SD1</strong>, both for au<strong>to</strong>matic accompaniment and lead part.<br />
MIDI Thru: MIDI port that sends the replication of all received data only from the MIDI IN 1 input.<br />
12<br />
COMPUTER INTERFACE: The <strong>SD1</strong> can be directly connected <strong>to</strong> a PC or <strong>to</strong> a Mac via th<strong>is</strong> port, thus acting as MIDI interface <strong>to</strong> all effects.<br />
13 VIDEO INTERFACE: Th<strong>is</strong> optional device <strong>is</strong> used <strong>to</strong> d<strong>is</strong>play the words of a Midi file and other information given by the musician on a<br />
moni<strong>to</strong>r for the audience.<br />
MAIN SWITCH: Th<strong>is</strong> push but<strong>to</strong>n turns the <strong>SD1</strong> on.<br />
AC: Pit for the power supply cable.<br />
Owner’s Manual <strong>SD1</strong> 5
FURTHER ELEMENTS OF THE <strong>SD1</strong><br />
HARD DISK<br />
The 6 GB hard d<strong>is</strong>k supplied standard in each <strong>SD1</strong> has been chosen <strong>to</strong> ensure rapidity and long life.<br />
DISK DRIVE<br />
Supplied standard, it <strong>is</strong> used <strong>to</strong> read and write 720 KB and 1.4 MB floppy d<strong>is</strong>ks in DOS format. Floppy d<strong>is</strong>ks formatted on any PC can also be used.<br />
MODULATION WHEEL<br />
Th<strong>is</strong> wheel <strong>is</strong> used <strong>to</strong> control the timbre modulation (generally created with the use of an LFO on the pitch or on the amplitude) but, with the<br />
Ro<strong>to</strong>r effect enabled, it can also control the Ro<strong>to</strong>r speed variation from low <strong>to</strong> high.<br />
PITCH BEND WHEEL<br />
Th<strong>is</strong> <strong>is</strong> used <strong>to</strong> change the pitch <strong>to</strong> higher or lower on the timbre of the Right section.<br />
AFTERTOUCH<br />
Once a key has been pressed normally right down, a short section of the stroke of the key can be used, which can be felt by pressing further,<br />
<strong>to</strong> control the addition of some effects such as Vibra<strong>to</strong> or Pitch bend. Thus it <strong>is</strong> simple <strong>to</strong> control the different timbre <strong>to</strong>nes. The After<strong>to</strong>uch<br />
version installed in the <strong>SD1</strong> <strong>is</strong> the monphonic one, namely the effect produced <strong>is</strong> valid for all the keys pressed at that time.<br />
VELOCITY<br />
The key dynamics <strong>is</strong> used <strong>to</strong> control some timbre parameters such as the volume of the note or the filter.<br />
GENERAL VOLUME<br />
The volume cursor seen on the front panel controls the general volume of the audio outputs Left & Right of the whole keyboard, including the<br />
microphone signals. The cursor does not send a Volume signal <strong>to</strong> the MIDI Out port.<br />
6<br />
<strong>SD1</strong> Owner’s Manual
Control panel and push but<strong>to</strong>n functions<br />
Volume but<strong>to</strong>ns<br />
Selection but<strong>to</strong>ns<br />
Function but<strong>to</strong>ns: the functions vary according<br />
<strong>to</strong> the d<strong>is</strong>played window<br />
Style but<strong>to</strong>ns <strong>to</strong> select the different styles<br />
Voice but<strong>to</strong>ns <strong>to</strong> select the sounds<br />
The control panel <strong>is</strong> divided in<strong>to</strong> sections according <strong>to</strong> the group of functions related <strong>to</strong> the push but<strong>to</strong>ns. From left <strong>to</strong> right you will see the following:<br />
VOLUME Two rows of six push but<strong>to</strong>ns that are used <strong>to</strong> control the general volume for the Drums, Bass, Chords, Orchestral, Lower and Right sections.<br />
The volume can be immediately muted by pressing the right-hand and left-hand VOLUME push but<strong>to</strong>ns of one section <strong>to</strong>gether<br />
at the same time. To res<strong>to</strong>re the volume set prior <strong>to</strong> muting simply press one of the two VOLUME push but<strong>to</strong>ns of the section once.<br />
HOW TO MODIFY THE VOLUME OF THE RIGHT LEAD<br />
But<strong>to</strong>ns for style variation<br />
To ra<strong>is</strong>e the volume, hold the right-hand RIGHT VOLUME push but<strong>to</strong>n down. To lower the volume, use the left-hand push but<strong>to</strong>n.<br />
To Mute the volume press the two RIGHT VOLUME push but<strong>to</strong>ns <strong>to</strong>gether at the same time.<br />
To res<strong>to</strong>re the previous volume set press a RIGHT VOLUME push but<strong>to</strong>n.<br />
PUSH BUTTONS ON THE LEFT-HAND SIDE OF THE CONTROL PANEL<br />
There are eight push but<strong>to</strong>ns on the left-hand side of the control panel. All of these are provided with a LED which, when lit, points out that the<br />
push but<strong>to</strong>n <strong>is</strong> enabled. They are used <strong>to</strong> gain access <strong>to</strong> menus controlling crucial functions.<br />
SONG RECORD<br />
SONG PLAY<br />
PATTERN EDIT<br />
SEQUENCER<br />
Th<strong>is</strong> enables the sequencer in reg<strong>is</strong>tration mode and makes it possible <strong>to</strong> record everything played on the <strong>SD1</strong>, from the styles<br />
<strong>to</strong> calling up the Voices.<br />
Th<strong>is</strong> enables the sequencer in reproduction mode. It <strong>is</strong> also used <strong>to</strong> call up Midi file chains, <strong>to</strong> d<strong>is</strong>play the words and <strong>to</strong> transpose<br />
the whole Midi file.<br />
Th<strong>is</strong> <strong>is</strong> used <strong>to</strong> call up the menus for programming and modifying the style.<br />
Th<strong>is</strong> <strong>is</strong> used <strong>to</strong> gain access <strong>to</strong> a complete sequencer with various editing functions.<br />
MASTER FOLDER When the LED <strong>is</strong> lit the hard d<strong>is</strong>k util<strong>is</strong>es the Master Folder function <strong>to</strong> simplify and au<strong>to</strong>mate the reading and writing of any type of file.<br />
SINGLE REGISTR. When the LED <strong>is</strong> lit the single Reg<strong>is</strong>trations s<strong>to</strong>red on hard or floppy d<strong>is</strong>k are called up.<br />
SAMPLER MPS<br />
DISK<br />
SPLIT<br />
ROTOR<br />
Th<strong>is</strong> <strong>is</strong> used <strong>to</strong> call up the menus and the functions of the built-in sampler with relative editing functions.<br />
Th<strong>is</strong> <strong>is</strong> used <strong>to</strong> gain access <strong>to</strong> the management functions both on floppy d<strong>is</strong>k and built-in hard d<strong>is</strong>k. When the DISK LED <strong>is</strong> lit<br />
the PAGE + and PAGE – push but<strong>to</strong>ns can be used <strong>to</strong> select the hard d<strong>is</strong>k or the floppy d<strong>is</strong>k.<br />
Th<strong>is</strong> enables the choice of the split point of the keyboard that splits the lead section (Right) on the right from that dedicated<br />
<strong>to</strong> the Arranger and <strong>to</strong> the manual accompaniment parts (Lower and Manual Bass) <strong>to</strong> its left. To establ<strong>is</strong>h the split point, hold<br />
the SPLIT push but<strong>to</strong>n down and play the note on the keyboard that represents the split point. The default split point <strong>is</strong> set<br />
as note C3. To play the timbre of the lead over the whole keyboard press the SPLIT push but<strong>to</strong>n and the last key of the keyboard<br />
at the left end (E0)<br />
When the LED <strong>is</strong> lit it enables the Leslie “ effect dedicated <strong>to</strong> the electro-magnetic organs for the typical Hammond sounds!<br />
BLOCK/LIST RAM STYLE Th<strong>is</strong> <strong>is</strong> used <strong>to</strong> instantaneously d<strong>is</strong>play the l<strong>is</strong>t of styles s<strong>to</strong>red on hard d<strong>is</strong>k from which one or a number of styles can<br />
be loaded in RAM. The push but<strong>to</strong>n can be enabled only if the MASTER FOLDER push but<strong>to</strong>n LED <strong>is</strong> already lit.<br />
Owner’s Manual <strong>SD1</strong> 7
SINGLE RAM STYLE<br />
When the LED <strong>is</strong> lit it <strong>is</strong> used <strong>to</strong> directly enter the number of the style s<strong>to</strong>red on d<strong>is</strong>k and <strong>to</strong> be immediately loaded in RAM.<br />
CUSTOM STYLE<br />
Th<strong>is</strong> <strong>is</strong> used <strong>to</strong> select a style from the internal memory. CUSTOM STYLE <strong>is</strong> d<strong>is</strong>abled as soon as SINGLE <strong>is</strong> pressed <strong>to</strong><br />
load styles in volatile RAM from d<strong>is</strong>k, in all the other cases the LED <strong>is</strong> always lit as default setting.<br />
SELECTION, DATA ENTRY AND CONFIRMATION PUSH BUTTONS<br />
These are used <strong>to</strong> explore the d<strong>is</strong>play, <strong>to</strong>gether with the function push but<strong>to</strong>ns, <strong>to</strong> enter parameters and <strong>to</strong> confirm a procedure or otherw<strong>is</strong>e.<br />
PAGE + PAGE -<br />
When the d<strong>is</strong>play shows that there are more pages following the first one (as for Voice and Style), the PAGE + push but<strong>to</strong>n<br />
<strong>is</strong> used <strong>to</strong> move one page forwards and PAGE – <strong>to</strong> go back a page. The PAGE + and PAGE – push but<strong>to</strong>ns, with the<br />
LED of the DISK push but<strong>to</strong>n lit, are used <strong>to</strong> select the hard d<strong>is</strong>k rather than the d<strong>is</strong>k drive. In these cases, <strong>to</strong> move on<strong>to</strong><br />
the following pages of a direc<strong>to</strong>ry, the musician must use the CURSOR +/- push but<strong>to</strong>ns. In the main page the PAGE +<br />
and PAGE – push but<strong>to</strong>ns directly control the Tempo value of the Arranger.<br />
CURSOR +, CURSOR - When there are a number of parameters <strong>to</strong> be modified within a menu or the function push but<strong>to</strong>ns do not directly relate<br />
<strong>to</strong> a parameter (as in the case of the parameters situated in the middle of the d<strong>is</strong>play), these push but<strong>to</strong>ns are used<br />
<strong>to</strong> move between the parameters <strong>to</strong> select that <strong>to</strong> be modified. In the D<strong>is</strong>k environment the CURSOR +/- push but<strong>to</strong>ns<br />
are used <strong>to</strong> select following groups of files that are not shown on the d<strong>is</strong>play. The presence of following or previous<br />
pages <strong>to</strong> that in use <strong>is</strong> pointed out by symbols or seen under or above the group of files d<strong>is</strong>played. In the main<br />
page the CURSOR + and CURSOR – push but<strong>to</strong>ns are used <strong>to</strong> Transpose all the <strong>SD1</strong> <strong>musical</strong> sections in steps of one<br />
semi<strong>to</strong>ne. To reset the transposition, simply press the two push but<strong>to</strong>ns <strong>to</strong>gether at the same time.<br />
VALUE +, VALUE -<br />
SAVE/ENTER<br />
EXIT<br />
These are used <strong>to</strong> change the value of a parameter selected. The initial value of the parameter <strong>is</strong> reset by pressing the<br />
VALUE + and VALUE – push but<strong>to</strong>ns <strong>to</strong>gether at the same time, even after the parameter has been modified. On the<br />
main page the VALUE but<strong>to</strong>ns allow you <strong>to</strong> balance the Arranger and Lead volumes.<br />
Th<strong>is</strong> <strong>is</strong> used <strong>to</strong> s<strong>to</strong>re and save on d<strong>is</strong>k at the end of some modification procedures.<br />
Th<strong>is</strong> push but<strong>to</strong>n <strong>is</strong> pressed once <strong>to</strong> return <strong>to</strong> the main page of the d<strong>is</strong>play. EXIT <strong>is</strong> d<strong>is</strong>abled in the menus dedicated <strong>to</strong><br />
the Sequencer and Song Play where the SEQUENCER or SONG PLAY push but<strong>to</strong>ns are <strong>to</strong> be pressed again <strong>to</strong> return <strong>to</strong><br />
the main page of the d<strong>is</strong>play.<br />
The twelve STYLE push but<strong>to</strong>ns are used <strong>to</strong> enter the number of a folder or file while managing the hard d<strong>is</strong>k or modifying parameters, where<br />
they take over the function of a numeric keypad.<br />
THE DISPLAY, THE MAIN PAGE AND THE FUNCTION PUSH BUTTONS<br />
Fig. 1 illustrates the main page of the d<strong>is</strong>play from which access <strong>is</strong> gained <strong>to</strong> the programming functions using the function keys at the side of<br />
the d<strong>is</strong>play <strong>to</strong>gether with the dedicated push but<strong>to</strong>ns. Based on the functions called up the d<strong>is</strong>play changes the parameters and enables their<br />
selection thanks <strong>to</strong> the push but<strong>to</strong>ns at the side of the d<strong>is</strong>play (or function keys from F1 <strong>to</strong> F10, called so as they have a different function<br />
depending on the page d<strong>is</strong>played). Therefore simply press the function push but<strong>to</strong>n that indicates the parameter <strong>to</strong> enable or select the same<br />
parameter. When the parameters are situated in the middle of the d<strong>is</strong>play then they are selected using the CURSOR + and CURSOR – push but<strong>to</strong>ns.<br />
While you will find detailed descriptions of the modification pages further on, below <strong>is</strong> a description of the single parameters that are<br />
d<strong>is</strong>played.<br />
Style number and name<br />
Style volume<br />
Selected timbre<br />
Timbre volume<br />
Split note<br />
Second Voice<br />
Transposi<strong>to</strong>n<br />
Played chord<br />
Style tempo<br />
Right hand volume<br />
Accompaniment sections volumes<br />
Left hand volume<br />
Number, name and volume of the style: Th<strong>is</strong> indicates the name and number of the style currently in use. Use the STYLE push but<strong>to</strong>ns <strong>to</strong> call<br />
up another one. To modify the volume press the VALUE + and VALUE – push but<strong>to</strong>ns, which in th<strong>is</strong> page are used as Balance.<br />
8<br />
<strong>SD1</strong> Owner’s Manual
Timbre selected and volume: To change the timbre in use on the Right lead section use the VOICES push but<strong>to</strong>ns relative <strong>to</strong> the single group<br />
or the USER VOICES push but<strong>to</strong>n. The pair of RIGHT VOLUME push but<strong>to</strong>ns are used <strong>to</strong> modify the volume of the timbre.<br />
Second Voices: Th<strong>is</strong> indicates a second timbre <strong>to</strong> be overlapped on the Right lead section. It <strong>is</strong> entered using the 2ND VOICE push but<strong>to</strong>n.<br />
Split point and transpose: Th<strong>is</strong> indicates the note <strong>to</strong> the right of which the lead or Right section dedicated <strong>to</strong> the right hand plays. To the left<br />
on the other hand the part of keyboard used <strong>to</strong> acknowledge the chords for the arranger and for the notes <strong>to</strong> be played in the Lower section<br />
with the left hand are situated. The modification <strong>is</strong> achieved using the SPLIT push but<strong>to</strong>n as already described previously. Transp. Th<strong>is</strong> indicates<br />
the transpose semi<strong>to</strong>nes that can be modified using the CURSOR + and CURSOR - push but<strong>to</strong>ns. When a double dash <strong>is</strong> d<strong>is</strong>played transposition<br />
<strong>is</strong> not present.<br />
Tempo and beat of the style: Th<strong>is</strong> indicates the current Tempo of the Arranger. Use the PAGE + and PAGE – push but<strong>to</strong>ns <strong>to</strong> modify it. The beat<br />
indica<strong>to</strong>r <strong>is</strong> used <strong>to</strong> avoid v<strong>is</strong>ually loosing the rhythm of the style being played.<br />
Chord: Th<strong>is</strong> indicates the chord currently being played. To change it play another chord on the part of keyboard <strong>to</strong> the left of the Split point.<br />
Volume cursors of the main sections of the keyboard These graphically d<strong>is</strong>play, with absolute value, the state of the volume of the Drums, Bass,<br />
Chord, Orchestral, Lower and Right sections, the value of which can be directly modified using the pair of VOLUME push but<strong>to</strong>ns.<br />
To modify the d<strong>is</strong>play contrast turn the CONTRAST wheel on the control panel.<br />
A set of functions corresponds <strong>to</strong> each function push but<strong>to</strong>n F1/F10, in the main page of the d<strong>is</strong>play, which can be directly accessed by pressing<br />
the relative push but<strong>to</strong>n.<br />
F1 GM: Th<strong>is</strong> selects the menu with the parameters relative <strong>to</strong> the single MIDI parts of the sixteen offered by the standard General MIDI.<br />
F2 EFFECT: Th<strong>is</strong> <strong>is</strong> used <strong>to</strong> rapidly modify the Reverbs and <strong>to</strong> enable the modulation effects and also <strong>to</strong> access the single parameters of the<br />
single effects.<br />
F3 UTILITY: Th<strong>is</strong> controls the overall parameters of the keyboard and the physical controllers.<br />
F4 ARRANGE MODE: Th<strong>is</strong> <strong>is</strong> used <strong>to</strong> gain access <strong>to</strong> the parameters dedicated <strong>to</strong> the Arranger when playing live.<br />
F5 ARRANGE VIEW: Four menu pages offer the possibility <strong>to</strong> re-program the timbres, volumes and effects of each single section of the Arranger.<br />
F6 MIDI: Via the sub-menus access <strong>is</strong> gained <strong>to</strong> the programming of MIDI events even in transm<strong>is</strong>sion and reception mode and <strong>to</strong> the assignment<br />
function of the MIDI channels <strong>to</strong> each single section of the keyboard.<br />
F7 EDIT VOICE/DRAWBARS: Th<strong>is</strong> <strong>is</strong> used <strong>to</strong> modify the main parameters relating <strong>to</strong> the timbre such as the envelope, the filter and the modulations.<br />
When the LED of the DRAWBAR push but<strong>to</strong>n <strong>is</strong> lit, access can be gained <strong>to</strong> the programming function and d<strong>is</strong>play of the single Draw<br />
bars <strong>to</strong> create <strong>new</strong> organ sounds by pressing the EDIT VOICE/DRAWBARS push but<strong>to</strong>n from the main page of the d<strong>is</strong>play.<br />
F8 EDIT PROGRAM: Th<strong>is</strong> <strong>is</strong> used <strong>to</strong> program or modify the parameters relative <strong>to</strong> the four timbres that can be used at the same time for the<br />
lead section.<br />
F9 EDIT DRUM: For the drum tracks and not only. Th<strong>is</strong> group of functions <strong>is</strong> dedicated <strong>to</strong> the programming of a complete drum kit, of which<br />
up <strong>to</strong> two samples can be indicated for each key of the keyboard.<br />
F10 MICRO EDIT: Th<strong>is</strong> <strong>is</strong> related <strong>to</strong> the use of microphones and <strong>to</strong> the two relative inputs with the possibility <strong>to</strong> modify the volume and the entity<br />
of the various effects (Send).<br />
THE PUSH BUTTONS AND THE CHOICE OF THE STYLES<br />
Twelve push but<strong>to</strong>ns are used <strong>to</strong> call up just as many groups of styles directly from the control panel. When a group <strong>is</strong> selected the d<strong>is</strong>play shows<br />
five styles <strong>to</strong> the left and another five <strong>to</strong> the right. To enable a style simply press the relative function push but<strong>to</strong>n at the side of the d<strong>is</strong>play.<br />
Considering that the <strong>SD1</strong> offers more than ten styles per group, the user can move on<strong>to</strong> the next pages either using the PAGE + and PAGE –<br />
push but<strong>to</strong>ns or by pressing the push but<strong>to</strong>n relative <strong>to</strong> the group of styles in use again. When the <strong>SD1</strong> reaches the last page of styles available,<br />
the user can return <strong>to</strong> the first page by pressing the push but<strong>to</strong>n relative <strong>to</strong> the group of styles again and not the PAGE + and PAGE – push<br />
but<strong>to</strong>ns. In some editing situations the twelve STYLES push but<strong>to</strong>ns become numeric keys that are used <strong>to</strong> enter the value directly.<br />
THE PUSH BUTTONS AND THE CHOICE OF THE VOICES<br />
The two rows of eight push but<strong>to</strong>ns called VOICES are used <strong>to</strong> call up timbres or Preset Voices (that cannot be modified by the musician) according<br />
<strong>to</strong> the family <strong>to</strong> which they belong. When a family <strong>is</strong> selected with one push but<strong>to</strong>n the d<strong>is</strong>play shows five Voices <strong>to</strong> the left and five Voices<br />
<strong>to</strong> the right, which can be enabled by pressing the function push but<strong>to</strong>n relative <strong>to</strong> that timbre. Considering that the <strong>SD1</strong> offers more than ten<br />
Voices per family, the user can move on<strong>to</strong> the next pages either using the PAGE + and PAGE – push but<strong>to</strong>ns or by pressing the push but<strong>to</strong>n relative<br />
<strong>to</strong> the family of Voices in use again. When the <strong>SD1</strong> reaches the last page of Voices available, the user can return <strong>to</strong> the first page of Voices<br />
by pressing the push but<strong>to</strong>n relative <strong>to</strong> the family of Voices again and not the PAGE + and PAGE - push but<strong>to</strong>ns.<br />
The VOICES push but<strong>to</strong>ns are not only used <strong>to</strong> call up the pre-set voices alone.<br />
●<br />
●<br />
If the LED of the USER VOICE push but<strong>to</strong>n, i.e. of the bank of timbres that can be programmed by the user <strong>is</strong> activated, then the VOICES<br />
push but<strong>to</strong>ns call up the 128 User Voice timbres in groups of ten at a time.<br />
If the LED of the DRAWBAR push but<strong>to</strong>n <strong>is</strong> lit, an organ timbre corresponds <strong>to</strong> each single VOICES push but<strong>to</strong>n.<br />
Owner’s Manual <strong>SD1</strong> 9
●<br />
●<br />
●<br />
If the LED of the PROGRAM push but<strong>to</strong>n <strong>is</strong> lit, the VOICE push but<strong>to</strong>ns call up the Program memories.<br />
If the LED of the ONE TOUCH push but<strong>to</strong>n <strong>is</strong> lit, the first row of STYLE push but<strong>to</strong>ns calls up one of the eight pages of which the One Touch<br />
memories are made up.<br />
If the LEDs of the SET DRUM and MANUAL DRUM push but<strong>to</strong>ns are lit, the first six VOICES push but<strong>to</strong>ns are used <strong>to</strong> select the banks including<br />
ten Drum Kits each.<br />
PUSH BUTTONS ON THE RIGHT-HAND SIDE OF THE CONTROL PANEL<br />
1 TOUCH When the LED <strong>is</strong> lit, ten timbres of the first of the eight groups available are d<strong>is</strong>played. The One TouchSolo function <strong>is</strong> used<br />
<strong>to</strong> save the most frequently used Voices so that they can be called up easier rather than having <strong>to</strong> first select the group and<br />
then a timbre from within it.<br />
VOCALIZER EDIT Th<strong>is</strong> <strong>is</strong> used <strong>to</strong> gain access <strong>to</strong> the programming parameters of the Vocalizer from the main page.<br />
VOCALIZER ON/OFF When the LED <strong>is</strong> lit, the Vocalizer <strong>is</strong> enabled on the Voice or the audio signal sent from input 1 for the microphone<br />
PROGRAM<br />
2ND VOICE<br />
2ND VOICE EDIT<br />
When the LED <strong>is</strong> lit, eight Program memories are d<strong>is</strong>played, <strong>to</strong> be selected using the function push but<strong>to</strong>ns. A program combines<br />
up <strong>to</strong> four timbres dedicated <strong>to</strong> the lead section with the relative parameters.<br />
When the LED <strong>is</strong> lit, the second Voice <strong>is</strong> enabled on the lead, the timbre of which <strong>is</strong> d<strong>is</strong>played under the main one.<br />
When the LED <strong>is</strong> lit it <strong>is</strong> used <strong>to</strong> call up a <strong>new</strong> timbre <strong>to</strong> replace that set by <strong>Ketron</strong> for the second voice using the VOICES<br />
push but<strong>to</strong>ns and also from the User Voice group. By pressing 2ND VOICE and 2ND VOICE EDIT at the same time the block<br />
of the timbre assigned at the time <strong>to</strong> the Second Voice <strong>is</strong> obtained, which will appear with an aster<strong>is</strong>k in front of the name.<br />
BLOCK REGISTR. The Reg<strong>is</strong>trations control all the <strong>SD1</strong> settings, including the au<strong>to</strong>matic call up of audio and TXT files. When the LED <strong>is</strong> lit the<br />
user can call up one of the 198 Reg<strong>is</strong>trations using the numeric keypad, namely the STYLE push but<strong>to</strong>ns. The single<br />
Reg<strong>is</strong>tration can be loaded directly from hard d<strong>is</strong>k or floppy d<strong>is</strong>k using the SINGLE REGISTR. push but<strong>to</strong>n in use.<br />
PIANIST<br />
STYLE SETTING<br />
DEMO & HIT<br />
When the LED <strong>is</strong> lit the chords are acknowledged right along the whole keyboard, including the Right section. Th<strong>is</strong> function<br />
has been dev<strong>is</strong>ed <strong>to</strong> be able <strong>to</strong> play freely with two hands and <strong>to</strong> fully exploit the Arranger potentials. If the same timbre <strong>is</strong><br />
required right along the whole keyboard, for example the piano, the Split point <strong>is</strong> <strong>to</strong> be moved over <strong>to</strong> the first note of the<br />
keyboard (E0) using the dedicated push but<strong>to</strong>n. There are two different chord acknowledgement methods that can be chosen<br />
in the Utility menu. The default setting <strong>is</strong> Standard.<br />
For each style <strong>Ketron</strong> has foreseen ten settings, enabling just as many timbres <strong>to</strong> be called up for the Style lead part. When the<br />
LED <strong>is</strong> lit the ten timbres pre-set for that style are d<strong>is</strong>played. The attribution between styles and timbres can be modified.<br />
By pressing the PIANIST and STYLE SETTING push but<strong>to</strong>ns <strong>to</strong>gether at the same time access <strong>is</strong> gained <strong>to</strong> the folder of the<br />
hard d<strong>is</strong>k called Demo & Hit, which can s<strong>to</strong>re both demo files and any other Midi file for a <strong>to</strong>tal of 999 files. On the contrary<br />
<strong>to</strong> SONG PLAY, Demo & Hit <strong>is</strong> used <strong>to</strong> immediately play a Midi file by simply selecting it using the F1-F10 function push but<strong>to</strong>ns<br />
and it allows a large number of Midi files <strong>to</strong> be ready <strong>to</strong> be played. Press EXIT <strong>to</strong> exit from Demo & Hit. Considering<br />
that Demo & Hit refers <strong>to</strong> a specific folder of the hard d<strong>is</strong>k, the Midi files within Demo & Hit can be copied and erased with<br />
the normal procedures dedicated <strong>to</strong> the management of the hard d<strong>is</strong>k. The Right and Lower part can be played while a Midi<br />
file <strong>is</strong> being reproduced plus the SPLIT push but<strong>to</strong>n <strong>is</strong> also enabled.<br />
# In th<strong>is</strong> version of the operating system th<strong>is</strong> special push but<strong>to</strong>n <strong>is</strong> used <strong>to</strong>gether with * <strong>to</strong> d<strong>is</strong>able the Sustain in the Pian<strong>is</strong>t mode.<br />
* Th<strong>is</strong> <strong>is</strong> situated on the FOLK push but<strong>to</strong>n of the STYLES push but<strong>to</strong>ns. It works when the Demo & Hit function <strong>is</strong> in use<br />
where, when the Midi file selected <strong>is</strong> S<strong>to</strong>pped, it <strong>is</strong> used <strong>to</strong> put the Midi files within the folder in the desired order with the<br />
possibility of replacing them or cancelling their position. It <strong>is</strong> also used in SONG PLAY when in the Juke-Box function where,<br />
if it <strong>is</strong> pressed, the Chain Select command appears <strong>to</strong> create temporary chains of Midi files <strong>to</strong> be reproduced one after the<br />
other. Furthermore, in the Pian<strong>is</strong>t enabled mode, when pressed <strong>to</strong>gether with the # push but<strong>to</strong>n it d<strong>is</strong>ables the Sustain.<br />
LEAD<br />
DRUM & BASS<br />
DRUM SET<br />
The FILL 1 push but<strong>to</strong>n has another function when the Demo & Hit function <strong>is</strong> in use. It <strong>is</strong> used <strong>to</strong> cut-out the Lead track,<br />
usually set on the MIDI 4 channel, from the reproduction of the Midi file.<br />
The FILL 2 push but<strong>to</strong>n has another function when the Demo & Hit function <strong>is</strong> in use. It mutes the volume of all the tracks<br />
with the exception of the drum and bass ones.<br />
The drum set assigned <strong>to</strong> the Drum tracks of the style can be changed when the LED <strong>is</strong> lit. The drum set pages following the<br />
first page can be called up using PAGE +/- or directly using the first six VOICES push but<strong>to</strong>ns. Drum Kit written in capital<br />
letters refers <strong>to</strong> those made up of ROM samples, those on the other hand with a dot at the side are the sampled grooves,<br />
assigned <strong>to</strong> the Drum 2 tracks of the style.<br />
10<br />
<strong>SD1</strong> Owner’s Manual
DRUM MIXER For each drum set <strong>Ketron</strong> has grouped the percussion sounds <strong>to</strong>gether in ten categories that can be selected using the F1-<br />
F10 function push but<strong>to</strong>ns. When a category <strong>is</strong> ticked (✓), the percussion instruments related <strong>to</strong> it will play and vice versa<br />
their volume will be muted (Mute function). The purpose of the Drum Mixer <strong>is</strong> that of being able <strong>to</strong> create <strong>new</strong> rhythm combinations<br />
by simply Muting some percussion instruments. It proves especially useful in Southern-American rhythms and in<br />
dance. Drum Mixer also works for the sampled grooves, enabling an exceptionally unique real<strong>is</strong>tic and handy rhythm.<br />
MANUAL DRUM<br />
AFTERTOUCH<br />
OCTAVE<br />
PORTAMENTO<br />
HARMONY<br />
When the LED <strong>is</strong> lit the single instruments that make up a drum set can be played right along the whole keyboard, with the<br />
au<strong>to</strong>matic d<strong>is</strong>abling of the Right and Lower sections. The volume <strong>is</strong> controlled by the DRUM VOLUME push but<strong>to</strong>ns. If<br />
MANUAL DRUM <strong>is</strong> enabled while playing a style, with acknowledged chord, the arrangement and bass tracks will continue<br />
<strong>to</strong> play according <strong>to</strong> the chord acknowledged. MANUAL DRUM does not d<strong>is</strong>able the Drum tracks of the style.<br />
When the LED <strong>is</strong> lit the modulation of a timbre parameter <strong>is</strong> enabled, which can be programmed by pressing the key played again.<br />
When the LED <strong>is</strong> lit, the Right section <strong>is</strong> transposed by one Octave lower, or rather the lead of the right hand. The transposition<br />
direction can be changed by pressing the push but<strong>to</strong>n twice consecutively with the LED flashing.<br />
When the LED <strong>is</strong> lit, the Portamen<strong>to</strong> <strong>is</strong> enabled, namely the sliding from one <strong>to</strong> another note, the time of which can be programmed.<br />
When the LED <strong>is</strong> lit it enables and allows the selection of one of the 10 different harmonies <strong>to</strong> be assigned <strong>to</strong> the lead according<br />
<strong>to</strong> the chord played on the left part of the split point. Each of these au<strong>to</strong>matically cuts out the others. The Speed parameter<br />
<strong>is</strong> related <strong>to</strong> the Repeat mode, namely the repetition of the lead notes.<br />
ON LINE EFFECT A number of modulation effects can be attributed <strong>to</strong> the Right section, <strong>to</strong>gether with the Reverb and standard chorus. The<br />
On Line Effect page <strong>is</strong> used <strong>to</strong> enable up <strong>to</strong> four modulation effects simultaneously and also <strong>to</strong> control the effects that will<br />
process the microphone input, the parameters of which can be called up using the F10 MICRO EDIT push but<strong>to</strong>n. The LED<br />
of the ON LINE EFFECT push but<strong>to</strong>n will light up when the microphone input signal <strong>is</strong> <strong>to</strong>o high and could therefore be d<strong>is</strong><strong>to</strong>rted<br />
in the pre-amplification stage.<br />
SOUND LOAD<br />
Th<strong>is</strong> <strong>is</strong> used <strong>to</strong> enable a short-cut for loading <strong>new</strong> sampled sounds from hard d<strong>is</strong>k, for a maximum of sixteen MB’s, directly<br />
from the Master Folder, the LED of which will light up au<strong>to</strong>matically when the SOUND LOAD push but<strong>to</strong>n <strong>is</strong> pressed. To load<br />
.WAV or .MSP samples, select F8 Dir WAV which gives access <strong>to</strong> the dedicated folder. To return <strong>to</strong> .INS samples, select F9 Dir<br />
INSTRUM <strong>to</strong> load single files, or using F9 again, select Dir Block <strong>to</strong> load groups of single .INS files in one go.<br />
THE PUSH BUTTONS REQUIRED TO CONTROL THE ARRANGER<br />
The bot<strong>to</strong>m row of the control panel <strong>is</strong> almost entirely dedicated <strong>to</strong> controlling the Arranger in real time. From left <strong>to</strong> right you will see:<br />
JUMP<br />
MANUAL BASS<br />
When the LED <strong>is</strong> lit it <strong>is</strong> used <strong>to</strong> move on<strong>to</strong> other variations of the style using the Fill In’s and <strong>is</strong> used <strong>to</strong> exploit the Intro’s in<br />
a song that has already been started.<br />
When the LED <strong>is</strong> lit the bass track of the style can be played manually.<br />
BASS TO LOWEST When the LED <strong>is</strong> lit the bass note relative <strong>to</strong> the style <strong>is</strong> always the first of the chord played. Th<strong>is</strong> means that some songs<br />
can be played without altering the bass lead structure.<br />
BASS TO ROOT<br />
INTRO 1, 2, 3<br />
FILL 1, 2, 3<br />
BREAK<br />
TO END<br />
When the LED <strong>is</strong> lit the notes of the bass track of the style maintain all the crucial notes of the chord <strong>to</strong>nality. It can be used<br />
in association with Manual Bass.<br />
If one of these three push but<strong>to</strong>ns <strong>is</strong> pressed while the Arranger <strong>is</strong> s<strong>to</strong>pped an Intro <strong>is</strong> enabled, of which there are three levels<br />
of complexity. If one of these three push but<strong>to</strong>ns <strong>is</strong> pressed while the Arranger <strong>is</strong> playing, an Ending <strong>is</strong> enabled with three levels<br />
of complexity. If the LED of the JUMP push but<strong>to</strong>n <strong>is</strong> lit and an Intro push but<strong>to</strong>n <strong>is</strong> pressed, the Intro selected will be played.<br />
If one of these three push but<strong>to</strong>ns are pressed while the Arranger <strong>is</strong> in use, one or a number of Fill-In beats will be enabled.<br />
If the LED of the JUMP push but<strong>to</strong>n <strong>is</strong> lit and the FILL 1 and 2 push but<strong>to</strong>ns are pressed, the next variation of the style will<br />
be enabled. The FILL 3 push but<strong>to</strong>n will move the style being played back <strong>to</strong> the previous variation. If one of the three FILL<br />
push but<strong>to</strong>ns are held down for a while, the Arranger will cyclically play Fill In 1, 2 and 3 one after the other until the push<br />
but<strong>to</strong>n <strong>is</strong> released (Multi Fill).<br />
Th<strong>is</strong> <strong>is</strong> used <strong>to</strong> add a Break beat at the end of which the Arranger will start <strong>to</strong> play again. The Multi Fill function <strong>is</strong> enabled<br />
by holding it down.<br />
In the case of “emergency” th<strong>is</strong> push but<strong>to</strong>n ends whatever the Arranger <strong>is</strong> playing within one beat. It <strong>is</strong> a third very short<br />
Ending.<br />
Owner’s Manual <strong>SD1</strong> 11
A, B, C, D Each of these push but<strong>to</strong>ns corresponds <strong>to</strong> a variation of the style, from the most simple <strong>to</strong> the most complex. Further <strong>to</strong><br />
these push but<strong>to</strong>ns, also FILL IN and JUMP can be used <strong>to</strong> move forward or back among the variations.<br />
HOLD<br />
START<br />
SLOW<br />
FAST<br />
When the LED <strong>is</strong> lit it <strong>is</strong> used <strong>to</strong> hold the last chord played <strong>to</strong> the left of the Split point of the keyboard. In other words, while<br />
the Arranger <strong>is</strong> playing, it <strong>is</strong> used <strong>to</strong> hold the activation of all the accompaniment and bass tracks in use. If the LED <strong>is</strong><br />
switched off, the accompaniment will only work as long as the chord <strong>is</strong> held down on the keyboard, whereas the drum tracks<br />
will continue <strong>to</strong> play whatever the case.<br />
When pressed it starts <strong>to</strong> play the au<strong>to</strong>matic accompaniment. If START <strong>is</strong> pressed while the Arranger <strong>is</strong> already playing then<br />
everything <strong>is</strong> s<strong>to</strong>pped, in other words it acts as a S<strong>to</strong>p push but<strong>to</strong>n.<br />
Th<strong>is</strong> decreases the Tempo value of the Arranger or of the Sequencer.<br />
Th<strong>is</strong> increases the Tempo value of the Arranger or of the Sequencer. By pressing SLOW and FAST <strong>to</strong>gether at the same time,<br />
the Tempo value <strong>is</strong> blocked (marked by an aster<strong>is</strong>k) so that it cannot be modified by calling up another Style with a different<br />
Tempo. To d<strong>is</strong>able the blocking, press SLOW and FAST <strong>to</strong>gether at the same time . To res<strong>to</strong>re the default Tempo of the<br />
style press PAGE + and PAGE – <strong>to</strong>gether at the same time.<br />
COUNT/PAUSE RESTART<br />
With the Arranger s<strong>to</strong>pped, COUNT adds a Count In beat where a stick beats the quarters. If an INTRO has also been pressed<br />
before COUNT with the JUMP push but<strong>to</strong>n enabled, the Intro chosen will be enabled at the end of the count. With the<br />
Arranger running, pressing th<strong>is</strong> push but<strong>to</strong>n returns immediately <strong>to</strong> the first quarter of the beat, whatever the time position<br />
in which it <strong>is</strong> pressed. It may prove useful for a singer who <strong>is</strong> not quite singing in time! When working with the Sequencer<br />
(SEQUENCER LED lit), th<strong>is</strong> push but<strong>to</strong>n sets the reproduction in stand-by until the COUNT/PAUSE RESTART push but<strong>to</strong>n <strong>is</strong><br />
pressed again.<br />
LOCK<br />
KEY START<br />
KEY STOP<br />
TAP<br />
FADE IN/OUT<br />
Th<strong>is</strong> calls up the Lock and Interactive Arranger page. It <strong>is</strong> possible <strong>to</strong> select which accompaniment tracks among Drums, Bass<br />
and Orchestra, situated <strong>to</strong> the left of the d<strong>is</strong>play, will not change timbre and rhythm, so that the tracks of one style can be<br />
combined at pleasure with those of another. It <strong>is</strong> also a quick way of playing back a style with timbres of another style and<br />
<strong>to</strong> thus create endless variations on the subject. When the Interactive Arrange (F10) function <strong>is</strong> enabled the player can<br />
choose which of the au<strong>to</strong>matic accompaniment tracks set in On among 2, 3, 4 and 5 will not be played when at least one key<br />
of the Right section of the keyboard <strong>is</strong> pressed. The tracks will start playing again at the following beat, if no note of the<br />
Right section <strong>is</strong> played. Thus it <strong>is</strong> possible <strong>to</strong> directly control the state of the tracks from the lead.<br />
When the LED <strong>is</strong> lit and the Arranger <strong>is</strong> s<strong>to</strong>pped, th<strong>is</strong> push but<strong>to</strong>n <strong>is</strong> used <strong>to</strong> start the accompaniment when a note <strong>to</strong> the left<br />
of the split point of the keyboard <strong>is</strong> played. If an INTRO or a FILL <strong>is</strong> selected, as soon as a chord <strong>is</strong> played the Intro or Fill-<br />
In of the style will start. To control the performance of the Lower section, namely the background section for the left hand,<br />
the player must access the ARRANGE MODE menu where the Lower timbre can be d<strong>is</strong>abled if the Arranger <strong>is</strong> not running.<br />
Th<strong>is</strong> has been foreseen <strong>to</strong> avoid the Lower notes from being reproduced <strong>to</strong>gether with the chord played before the Arranger<br />
<strong>is</strong> started.<br />
When the LED <strong>is</strong> lit it s<strong>to</strong>ps the Arranger performance if a very short note or chord <strong>is</strong> played. It <strong>is</strong> restarted if another one or<br />
even the same one <strong>is</strong> played. If the note or the chord <strong>is</strong> held down for more than 1/4, the Arranger continues <strong>to</strong> play. With the<br />
Arranger s<strong>to</strong>pped, KEY STOP <strong>is</strong> used <strong>to</strong> restart it by playing a chord that <strong>is</strong> longer than the time set in Sync Time in the<br />
Arrange Mode menu. If a FILL or an INTRO has been selected, with the Arranger s<strong>to</strong>pped and playing a chord that <strong>is</strong> longer<br />
than the above mentioned value, the whole FILL or the INTRO will be played, whereas if the chord <strong>is</strong> very short, the Arranger<br />
will s<strong>to</strong>p immediately. If the KEY START LED <strong>is</strong> lit, as soon as the player takes h<strong>is</strong> hand off the left part of the split point, the<br />
Arranger s<strong>to</strong>ps and starts again as soon as a note or a chord <strong>is</strong> played on the part of the keyboard <strong>to</strong> the left of the split point.<br />
By playing the quarters on th<strong>is</strong> push but<strong>to</strong>n, the Tempo value <strong>to</strong> be assigned <strong>to</strong> the Arranger and <strong>to</strong> the Sequencer will be<br />
identified, provided that they are not playing or reproducing, then once the Tempo has been identified the reproduction will<br />
start. When the Arranger and Sequencer are reproducing, the push but<strong>to</strong>n <strong>is</strong> used <strong>to</strong> increase the Tempo in steps of five<br />
points each time it <strong>is</strong> pressed (Accelerando). By holding the TAP push but<strong>to</strong>n down, the Accelerando direction <strong>is</strong> changed<br />
(th<strong>is</strong> can be seen by the direction of the arrow) thus decreasing the Tempo in steps of five each time it <strong>is</strong> pressed<br />
(Ritardando).<br />
With the Arranger running, it generates a fade out, in other words taking the volume of all the sections, including the Right<br />
section, from the current value <strong>to</strong> zero. With the Arranger s<strong>to</strong>pped it generates a fade in, in other words taking the volume<br />
of all the sections from zero <strong>to</strong> the set volume. When pressed repeatedly it will not generate abrupt volume variations.<br />
12<br />
<strong>SD1</strong> Manuale di Istruzioni
Parameter management<br />
Before going in<strong>to</strong> the actual programming subject the musician must first be aware of how the menus and parameters of the <strong>SD1</strong> work. The<br />
rules that are l<strong>is</strong>ted in th<strong>is</strong> chapter are valid for all the following sections and are crucial <strong>to</strong> control the keyboard in the best way possible.<br />
CONVENTIONS<br />
The following conventions are used within th<strong>is</strong> manual, which refer <strong>to</strong>:<br />
Push but<strong>to</strong>ns on the control panel: all in capital letters or bold print (for example START, STOP, SPLIT push but<strong>to</strong>ns)<br />
Functions, parameters, items, commands d<strong>is</strong>played and that can be selected using the F1-F10 function keys at the side of the same: in bold print<br />
(for example F5 Escape, F10 Save)<br />
The functions and the parameters d<strong>is</strong>played are written in full and the indication expressed on the d<strong>is</strong>play <strong>is</strong> written between brackets, in different<br />
letters.<br />
CALLING UP THE MENUS<br />
The parameters of the <strong>SD1</strong> are grouped in menus that are always called up from the main page of the d<strong>is</strong>play and that can be accessed using<br />
the EXIT push but<strong>to</strong>n (apart from some exceptions which we will see later).<br />
The first group of parameter menus <strong>is</strong> associated with the F1-F10 function push but<strong>to</strong>ns at the side of the d<strong>is</strong>play and include the following<br />
menus:<br />
F1 GM<br />
F2 EFFECT<br />
F3 UTILITY<br />
F4 ARRANGE MODE<br />
F5 ARRANGE VIEW<br />
F6 MIDI<br />
F7 EDIT VOICE/DRAWBARS<br />
F8 EDIT PROGRAM<br />
F9 EDIT DRUM<br />
F10 MICRO EDIT<br />
The EXIT push but<strong>to</strong>n must always be pressed <strong>to</strong> exit one of these pages.<br />
A second group of menus <strong>is</strong> associated directly with some push but<strong>to</strong>ns on the control panel. They are called up from the main page and are<br />
exited using the EXIT push but<strong>to</strong>n and also using the push but<strong>to</strong>n again that was used <strong>to</strong> call up these pages. The menus relative <strong>to</strong> the single<br />
push but<strong>to</strong>ns are the following:<br />
SONG RECORD<br />
PATTERN EDIT<br />
SAMPLER MPS<br />
DISK<br />
SAVE/ENTER<br />
BLOCK/LIST RAM STYLE<br />
VOCALIZER EDIT<br />
ON LINE EFFECT<br />
HARMONY<br />
The following menus are an exception <strong>to</strong> th<strong>is</strong> rule:<br />
SEQUENCER<br />
SONG PLAY<br />
The relative push but<strong>to</strong>ns of these menus <strong>is</strong> <strong>to</strong> be pressed again <strong>to</strong> return <strong>to</strong> the main page of the d<strong>is</strong>play. Th<strong>is</strong> solution has been dev<strong>is</strong>ed <strong>to</strong><br />
prevent the reproduction of a Midi file from being accidentally s<strong>to</strong>pped by pressing the EXIT push but<strong>to</strong>n by m<strong>is</strong>take.<br />
EXCEPTIONS TO THE EXIT COMMAND<br />
In some menus in addition <strong>to</strong> the EXIT push but<strong>to</strong>n the Escape command may appear, which <strong>is</strong> attributed <strong>to</strong> a function push but<strong>to</strong>n at the side<br />
of the d<strong>is</strong>play. Therefore if the EXIT push but<strong>to</strong>n should fail <strong>to</strong> work, look carefully at the d<strong>is</strong>play <strong>to</strong> find the Escape function amongst the commands,<br />
or try pressing the key used <strong>to</strong> access the specific menu again.<br />
There are another few exceptions that aid programming: for example the editing of the Vocalizer can be accessed from any menu.<br />
Owner’s Manual <strong>SD1</strong> 13
THE F1-F10 FUNCTION PUSH BUTTONS<br />
There are five push but<strong>to</strong>ns <strong>to</strong> the left and five <strong>to</strong> the right of the d<strong>is</strong>play. They are called such as they have no specific function (apart from<br />
calling up the menus as already explained), but they take on the function of the command d<strong>is</strong>played next <strong>to</strong> them. If you take a close look you<br />
will see that a blue line has been traced for each function push but<strong>to</strong>n that relates <strong>to</strong> a specific area on the d<strong>is</strong>play. Th<strong>is</strong> area, when there are<br />
choices or commands available, <strong>is</strong> taken up by a rectangle that bears the name of the function, of the Voice or of the style <strong>to</strong> be called up.<br />
DATA ENTRY<br />
There are various possibilities based on the parameter <strong>to</strong> be modified within a menu.<br />
Direct call up: for the Voices and the styles, the choice of one of these using a function push but<strong>to</strong>n immediately calls them up.<br />
Enabling and d<strong>is</strong>abling: Some parameters may have an ON status and Off status, Active or Inactive and the function push but<strong>to</strong>n relative <strong>to</strong> that<br />
parameter has the task of changing its status.<br />
Selection of a line of parameters: Likew<strong>is</strong>e for Program editing, the function push but<strong>to</strong>n <strong>is</strong> used <strong>to</strong> select a group of parameters, the value of<br />
which <strong>is</strong> entered using the VALUE +/- push but<strong>to</strong>ns.<br />
Parameters in the middle of the d<strong>is</strong>play: Likew<strong>is</strong>e for Voice editing, some parameters may be found in the middle of the d<strong>is</strong>play and are accessed<br />
using the CURSOR +/- push but<strong>to</strong>ns.<br />
Calling up a Midi file: Together with the manual selection of a Midi file from a direc<strong>to</strong>ry, it <strong>is</strong> also possible <strong>to</strong> directly indicate the Midi file <strong>to</strong> be<br />
loaded, with the MASTER FOLDER enabled, by entering the number of the Midi file using the numeric keypad (STYLES push but<strong>to</strong>ns).<br />
Calling up a Single RAM Style: Using the enabled SINGLE RAM STYLE push but<strong>to</strong>n, a style can be called up from hard d<strong>is</strong>k by directly entering<br />
the number associated with it.<br />
Entering words or letters: When saving some files the <strong>SD1</strong> requests the entry of words, which can be done using the notes of the keyboard <strong>to</strong><br />
which letters and numbers are related. The CURSOR +/- push but<strong>to</strong>ns are used <strong>to</strong> move within the letters of the name and the VALUE +/- push<br />
but<strong>to</strong>ns are used <strong>to</strong> enter the alphabetic letter.<br />
14<br />
<strong>SD1</strong> Owner’s Manual
Having fun with the <strong>SD1</strong>!<br />
A guide on how <strong>to</strong> start playing and having fun right away<br />
You will certainly want <strong>to</strong> know how <strong>to</strong> use some functions of the <strong>SD1</strong> such as how <strong>to</strong> reproduce Midi files, how <strong>to</strong> use the Arranger, how <strong>to</strong> call<br />
up Styles and Voices, how <strong>to</strong> use a MIDI accordion and the Vocalizer with a microphone. If th<strong>is</strong> <strong>is</strong> the case then th<strong>is</strong> section <strong>is</strong> just down your<br />
street. If you’re not programmers and you’re not interested in the nitty-gritty of the menus then you can just end here.<br />
HOW TO USE A MIDI FILE<br />
The <strong>SD1</strong> <strong>is</strong> capable of reading Midi files with .MID and .KAR extension. Both types of files can bear words for karaoke (in particular .KAR files),<br />
which will be d<strong>is</strong>played.<br />
To gain access <strong>to</strong> the reproduction menu of Midi files press SONG PLAY (the LED will light up) and choose whether <strong>to</strong> load the Midi file from<br />
hard d<strong>is</strong>k (press the PAGE – push but<strong>to</strong>n) or from floppy d<strong>is</strong>k (press the PAGE + push but<strong>to</strong>n).<br />
REPRODUCING FROM FLOPPY DISK<br />
●<br />
●<br />
●<br />
●<br />
●<br />
●<br />
To gain access <strong>to</strong> the reproduction menu of Midi files press: SONG PLAY<br />
Choose whether <strong>to</strong> load the Midi file from floppy d<strong>is</strong>k by pressing the FLOPPY (PAGE +) push but<strong>to</strong>n<br />
D<strong>is</strong>play, if desired, the l<strong>is</strong>t of Midi files s<strong>to</strong>red using the F5 Dir function<br />
As you will see, the <strong>SD1</strong> au<strong>to</strong>matically numbers the Midi files s<strong>to</strong>red. To load a Midi file type-in the number using the numeric keypad (STY-<br />
LES push but<strong>to</strong>ns)<br />
A Midi file can also be selected by entering one or a number of letters of the title of the Midi file using the notes of the KEYBOARD, thanks<br />
<strong>to</strong> the search function that <strong>is</strong> always enabled (F5 - DIR)<br />
To return <strong>to</strong> the main page of the d<strong>is</strong>play press the SONG PLAY push but<strong>to</strong>n: (the LED will switch off)<br />
If a single number without zeros before it <strong>is</strong> entered the <strong>SD1</strong> waits a few seconds and loads the song with that number. Once loaded the d<strong>is</strong>play<br />
shows the title of the Midi file loaded.<br />
REPRODUCING A MIDI FILE FROM THE HARD DISK<br />
●<br />
●<br />
●<br />
●<br />
●<br />
●<br />
●<br />
●<br />
Press the SONG PLAY push but<strong>to</strong>n<br />
Select the hard d<strong>is</strong>k using the HARD (PAGE -) push but<strong>to</strong>n<br />
Check if the LED of the MASTER FOLDER push but<strong>to</strong>n <strong>is</strong> lit otherw<strong>is</strong>e press the MASTER FOLDER push but<strong>to</strong>n<br />
To d<strong>is</strong>play the l<strong>is</strong>t of Midi files s<strong>to</strong>red in the dedicated direc<strong>to</strong>ry of the Master Folder, press F5 DIR<br />
The <strong>SD1</strong> associates a number <strong>to</strong> each Midi file. To load a Midi file type-in th<strong>is</strong> number using the numeric keypad with the STYLES push but<strong>to</strong>ns.<br />
The d<strong>is</strong>play will show the title of the Midi file loaded.<br />
A Midi file can also be selected by entering one or a number of letters of the title of the Midi file using the notes of the KEYBOARD, thanks<br />
<strong>to</strong> the search function that <strong>is</strong> always enabled.<br />
To return <strong>to</strong> the main page of the d<strong>is</strong>play press the SONG PLAY push but<strong>to</strong>n: (the LED switches off)<br />
The number can be entered without zeros before it and the <strong>SD1</strong> will load the relative file after a few seconds.<br />
HOW TO REPRODUCE A .KAR MIDI FILE<br />
The Midi files with .KAR extension are normally Midi files with the Karaoke words already s<strong>to</strong>red. The .KAR files are however almost always<br />
Standard Midi files in format 1 and therefore need <strong>to</strong> be converted <strong>to</strong> format 0 so that they can be reproduced instantly from the hard d<strong>is</strong>k. The<br />
same procedure <strong>is</strong> required for the Midi files in format 1. The <strong>SD1</strong> converts au<strong>to</strong>matically without needing <strong>to</strong> know in advance if the Midi file <strong>is</strong><br />
in format 1 or format 0. When attempting <strong>to</strong> load a Midi file or a .KAR file in format 1, using the procedures explained previously, the <strong>SD1</strong> offers<br />
two options:<br />
● conversion of the Midi file for immediate use<br />
● save the Midi file converted.<br />
Manuale di Istruzioni <strong>SD1</strong> 15
Generally speaking there <strong>is</strong> no need <strong>to</strong> s<strong>to</strong>re Midi files in format 1 or .KAR files on hard d<strong>is</strong>k. It <strong>is</strong> always better <strong>to</strong> save them after they have<br />
been converted so that they are loaded rapidly.<br />
CONTROLLING REPRODUCTION<br />
Sia che abbiate carica<strong>to</strong> una base da floppy che da hard d<strong>is</strong>k, sono d<strong>is</strong>ponibili alcuni comandi da pannello per intervenire in tempo reale su alcuni<br />
parametri di riproduzione<br />
● To reproduce the song press the START push but<strong>to</strong>n<br />
● To s<strong>to</strong>p the procedure press the START push but<strong>to</strong>n<br />
● To set the reproduction procedure in stand-by press the CONT/PAUSE push but<strong>to</strong>n<br />
● To start reproducing from stand-by press the CONT/PAUSE push but<strong>to</strong>n<br />
● To transpose the entire song press the TRANSPOSER (CURSOR +/-) push but<strong>to</strong>ns<br />
● To cut-out the lead of the song (OFF) press: F8 Lead (Off)<br />
● To reproduce just the Drum and Bass tracks alone press: F9 Drum + Bas (On)<br />
● To d<strong>is</strong>play the words when available on the d<strong>is</strong>play (Karaoke), press: F10 Lyric (On)<br />
● To increase the song volume compared <strong>to</strong> the timbre assigned <strong>to</strong> the keyboard press: BALANCE (VALUE +/-)<br />
● To select another Midi file <strong>to</strong> be reproduced, enter its number using the numeric keypad relative <strong>to</strong> the STYLES push but<strong>to</strong>ns<br />
TRANSPOSITION<br />
As you will have noticed, when you transpose the song, the timbre assigned <strong>to</strong> the keyboard <strong>is</strong> not also transposed. To change the transposition<br />
of a song and of the timbre assigned <strong>to</strong> the keyboard simultaneously you must access the menu dedicated <strong>to</strong> the transposition parameters<br />
and enable the transposition of the keyboard <strong>to</strong>o. The procedure <strong>is</strong> the following:<br />
From the SONG PLAY page press F3 Transp and set the F1 Global parameter in ON. In th<strong>is</strong> way, using the TRANSPOSE (CURSOR +/-) push but<strong>to</strong>ns,<br />
you can transpose both the keyboard and the Midi file in semi<strong>to</strong>nes. Another extremely useful function <strong>is</strong> available in the same menu,<br />
which relates <strong>to</strong> the <strong>musical</strong> transposition of the bass line. By enabling parameter F6 Intellig. (default setting in On), the bass line will always<br />
play within its natural range whatever the transposition level.<br />
HOW TO CREATE A CHAIN OF MIDI FILES<br />
When playing live it may prove rather handy <strong>to</strong> be able <strong>to</strong> create a chain of Midi files that play one after the other <strong>to</strong> do away with dead times<br />
between one song and another. Th<strong>is</strong> chain can be created at any time or even chains of 32 Midi files can be created in advance and saved on<br />
hard d<strong>is</strong>k <strong>to</strong> be called up at a later date. For the time being we will just describe the temporary chain.<br />
●<br />
●<br />
●<br />
●<br />
From the main page of the d<strong>is</strong>play, enable the SONG PLAY push but<strong>to</strong>n<br />
Select the Midi file source, either hard or floppy d<strong>is</strong>k using the PAGE +/- push but<strong>to</strong>ns<br />
Select the F6 Juke-Box function<br />
To d<strong>is</strong>play the F9 Chain Select function press the * push but<strong>to</strong>n<br />
16<br />
<strong>SD1</strong> Owner’s Manual
●<br />
●<br />
●<br />
●<br />
●<br />
●<br />
Find the first Midi file of the chain using the VALUE +/- push but<strong>to</strong>ns<br />
Confirm the first Midi file of the chain using the function at the side of the Midi file and symbol ♦ will appear: F9 Chain Select<br />
Choose the next Midi file using the VALUE +/- push but<strong>to</strong>ns<br />
Confirm the choice using the F9 Chain Select function. Then repeat the last procedures until the Midi file chain has been completed.<br />
Start reproducing the first Midi file using the F7 Go Next function<br />
To move on<strong>to</strong> the next Midi file use the F7 Go Next function or s<strong>to</strong>p reproducing using START and press the START push but<strong>to</strong>n again <strong>to</strong><br />
start reproducing the next Midi file. To modify any reproduction parameters from the SONG PLAY page without loosing the chain, press the<br />
EXIT push but<strong>to</strong>n<br />
The only restriction in creating chains of Midi files lies in the fact that the <strong>SD1</strong> cannot use Midi files on hard d<strong>is</strong>k and floppy d<strong>is</strong>k at the same<br />
time. You must always work with the files s<strong>to</strong>red on one of the two d<strong>is</strong>ks.<br />
HOW TO RECORD A MIDI FILE WITH THE <strong>SD1</strong><br />
There are two ways of recording a song: the built-in sequencer works over sixteen independent tracks and has been dev<strong>is</strong>ed <strong>to</strong> record the songs<br />
meticulously. The Song Record function on the other hand <strong>is</strong> used <strong>to</strong> create a Midi file by recording everything played on the keyboard and<br />
various tracks of the Arranger. Th<strong>is</strong> last method <strong>is</strong> used <strong>to</strong> exploit the powerful au<strong>to</strong>matic arrangement functions <strong>to</strong> obtain a complete song.<br />
A separate section has been dedicated <strong>to</strong> the Sequencer and below <strong>is</strong> the information on how <strong>to</strong> record a song using Song Record:<br />
●<br />
●<br />
●<br />
●<br />
●<br />
●<br />
From the main page of the d<strong>is</strong>play press the SONG RECORD push but<strong>to</strong>n<br />
Enter the name <strong>to</strong> be given <strong>to</strong> the Midi file using the KEYBOARD keys<br />
Save the title using the F10 SAVE function<br />
Start SONG RECORD using the F10 START function<br />
From here you can start playing, start the Arranger, call up timbres and Styles and the <strong>SD1</strong> will record everything. Upon completion press<br />
the SONG RECORD push but<strong>to</strong>n<br />
The Midi file just recorded <strong>is</strong> now ready <strong>to</strong> be reproduced using the START push but<strong>to</strong>n<br />
Considering that it <strong>is</strong> in actual fact a true Midi file it can be later modified using the Sequencer editing functions or it can be put on sequencer<br />
software <strong>to</strong> add the fin<strong>is</strong>hing <strong>to</strong>uches.<br />
Further details on how <strong>to</strong> use Midi files are found in the following sections:<br />
- Song Play<br />
- Song Record<br />
- D<strong>is</strong>k<br />
- MIDI<br />
- Sequencer<br />
HOW TO USE THE ARRANGER<br />
The Arranger <strong>is</strong> the engine of the <strong>SD1</strong>’S au<strong>to</strong>matic accompaniment function. It produces an accompaniment according <strong>to</strong> <strong>musical</strong> styles, the<br />
chord and the controls of the panel. The heart of the Arranger <strong>is</strong> the Style, namely a combination of bass, drum and harmony tracks that have<br />
been designed for that kind of music. Without going in<strong>to</strong> <strong>to</strong>o much detail (for th<strong>is</strong> you can refer <strong>to</strong> the Arranger section), these tracks can have<br />
four variations called A, B, C and D, three Intro’s and three End’s that have different levels of complexity. Then there are also the Fill-In’s with<br />
which you can move on from one variation <strong>to</strong> the other or even remain on the same variation, depending on what you prefer. Generally speaking<br />
the Arranger of the <strong>SD1</strong> <strong>is</strong> very powerful and allows you <strong>to</strong> build up your accompaniment very carefully. Start from an Intro, then remain on<br />
a first variation and, with a Fill-In, move on<strong>to</strong> the refrain with a second variation <strong>to</strong> terminate with an End. Th<strong>is</strong> <strong>is</strong> just a simple example of what<br />
you can do. Whatever the case <strong>Ketron</strong> has developed some Styles that will never cover the lead but will enhance it.<br />
When the <strong>SD1</strong> <strong>is</strong> turned on it <strong>is</strong> always pre-arranged <strong>to</strong> use the Arranger with a piano timbre for the lead (Right section) <strong>to</strong> be played with the<br />
right hand, a background of strings and electric piano for the left hand (Lower section), a keyboard split point <strong>to</strong> keep the right hand separate<br />
from the left, set on note C3 and Style 001 Pub Song ready <strong>to</strong> be used.<br />
The part <strong>to</strong> the left of the split point of the keyboard <strong>is</strong> used not only <strong>to</strong> control the two Lower timbres but also <strong>to</strong> acknowledge the chord played<br />
by the user, which will be shown next <strong>to</strong> the four sections indicating the current measure.<br />
Owner’s Manual <strong>SD1</strong> 17
HOW TO SELECT A STYLE<br />
There are twelve STYLES push but<strong>to</strong>ns <strong>to</strong> the right of the d<strong>is</strong>play, each of which indicates a <strong>musical</strong> genre. For each of these <strong>Ketron</strong> has foreseen<br />
up <strong>to</strong> a maximum of 42 Styles. When, from the main page of the d<strong>is</strong>play and with the CUSTOM STYLE push but<strong>to</strong>n enabled (LED lit), you<br />
press one of these STYLES push but<strong>to</strong>ns the d<strong>is</strong>play shows five Styles on the right and another five on the left. The individual Style <strong>is</strong> called<br />
up using the relative function key (F1-F10), situated at the side of the d<strong>is</strong>play that, when pressed, immediately enables the Style for the<br />
Arranger. To check if the Style has been enabled simply look at the name that appears at the <strong>to</strong>p of the central window of the d<strong>is</strong>play.<br />
The <strong>SD1</strong> s<strong>to</strong>res the Styles of each kind of music in groups of ten and the number of the next groups <strong>is</strong> indicated as Pages. To call up the other<br />
groups of Styles that are not currently d<strong>is</strong>played, simply press the STYLES push but<strong>to</strong>n again <strong>to</strong> which the groups belong or use the PAGE +/-<br />
push but<strong>to</strong>ns. The d<strong>is</strong>play will show the Styles that follow, which can be selected again using the relative push but<strong>to</strong>ns at the side of the d<strong>is</strong>play<br />
(F1-F10).<br />
HOW TO CONTROL THE ARRANGER<br />
The Arranger controls are also described in the Arranger section.<br />
Below are simply the main concepts.<br />
● To move the split point hold the SPLIT push but<strong>to</strong>n down.Then simultaneously press the key on the keyboard that will be the <strong>new</strong> split point.<br />
● To start the Arranger press the START push but<strong>to</strong>n.<br />
● To s<strong>to</strong>p the Arranger press the START push but<strong>to</strong>n.<br />
● To add an Intro with the Arranger s<strong>to</strong>pped, set the chord and press one of the three INTRO 1, 2, 3 push but<strong>to</strong>ns.<br />
● To add a Fill-in with the Arranger running press one of the three FILL 1, 2, 3 push but<strong>to</strong>ns.<br />
● To start the Arranger with the first chord played enable it using the dedicated push but<strong>to</strong>n (the LED lights up) KEY START<br />
● To start the Intro with the first chord enabled, select an Intro using one of the INTRO 1,2,3 push but<strong>to</strong>ns and then play the chord (KEY START<br />
INTRO ENDING 1, 2, 3)<br />
● To conclude an au<strong>to</strong>matic accompaniment with an End, ensure that the JUMP push but<strong>to</strong>n LED <strong>is</strong> switched off (therefore d<strong>is</strong>abled) and press<br />
one of the followin push but<strong>to</strong>ns with the Arranger running: INTRO ENDING 1, 2, 3<br />
● To call up one of the four variations, with the Arranger running, press one of the A,B,C,D push but<strong>to</strong>ns.<br />
● To move on by one variation with the Fill In 1 and 2, enable it using the dedicated push but<strong>to</strong>n (the LED lights up) JUMP + FILL 1, 2<br />
● To go back by one variation with the fill In 3, enable it using the dedicated push but<strong>to</strong>n (the LED lights up) JUMP + FILL 3<br />
● To play over the whole keyboard and <strong>to</strong> acknowledge the chords, enable the function using the dedicated push but<strong>to</strong>n: PIANIST<br />
● To modify the tempo set on the Arranger, use the SLOW FAST push but<strong>to</strong>ns<br />
● To create an Accelerando press the TAP push but<strong>to</strong>n repeatedly and briefly: RIT ACC (TAP)<br />
● To create a Ritardando, change the direction of the arrow by holding the TAP push but<strong>to</strong>n down for a few seconds and then press it repeatedly<br />
and briefly: RIT ACC (TAP)<br />
● To enter a break, press the BREAK push but<strong>to</strong>n.<br />
● To immediately end an arrangement with a short end, press the END push but<strong>to</strong>n: TO END<br />
● To s<strong>to</strong>p an accompaniment when the next chord <strong>is</strong> released, enable the KEY STOP push but<strong>to</strong>n (the LED of the push but<strong>to</strong>n lights up) and<br />
then play a chord very briefly.<br />
● To hold the arrangement only while the chord <strong>is</strong> played, enable these functions using the dedicated push but<strong>to</strong>ns: KEY START+KEY STOP<br />
● To play the accompaniment again from the first beat, in whatever measure it currently <strong>is</strong>, press the RESTART push but<strong>to</strong>n.<br />
● To cut-out the accompaniment tracks, execept for the drum tracks, when no chord <strong>is</strong> played, d<strong>is</strong>able the HOLD function using the dedicated<br />
push but<strong>to</strong>n (the LED switches off): HOLD<br />
● To cyclically repeat all the Fill In’s, press a FILL 1, 2, 3 push but<strong>to</strong>n and hold it down.<br />
● To balance the volume of the Arranger with the lead played on the part of keyboard <strong>to</strong> the right of the split point, press these push but<strong>to</strong>ns:<br />
BALANCE +/- (VALUE +/-)<br />
● To res<strong>to</strong>re the original tempo of the Style, press the PAGE +/- push but<strong>to</strong>ns simultaneously<br />
● To repeat the Intro while a Style <strong>is</strong> playing, enable the function and then press one of the three Intro push but<strong>to</strong>ns: JUMP + INTRO<br />
● To reproduce only the Ending while the Arranger <strong>is</strong> s<strong>to</strong>pped, enable the function and press one of the following push but<strong>to</strong>ns: JUMP + INTRO<br />
● To cut-out the timbres assigned <strong>to</strong> the part of keyboard <strong>to</strong> the left of the split point, press these push but<strong>to</strong>ns simultaneously <strong>to</strong> mute the<br />
volume: LOWER VOLUME<br />
18<br />
<strong>SD1</strong> Owner’s Manual
HOW TO LOAD A STYLE FROM DISK<br />
Thanks <strong>to</strong> the built-in hard d<strong>is</strong>k the <strong>SD1</strong> facilitates the use of any Styles that are not saved in the memory but are s<strong>to</strong>red as files on the hard<br />
d<strong>is</strong>k, either by loading them from folders created by the user or by using a preferential folder with the Master Folder enabled. As default setting<br />
the <strong>SD1</strong> util<strong>is</strong>es the Styles s<strong>to</strong>red in the memory and called up by enabling the CUSTOM STYLE push but<strong>to</strong>n. The Styles on hard d<strong>is</strong>k can be<br />
called up in two different ways: Single Style <strong>is</strong> used <strong>to</strong> load a Style simply by entering the number without therefore changing the page of the<br />
d<strong>is</strong>play in use and Block Style on the other hand sends <strong>to</strong> the D<strong>is</strong>k menu and <strong>is</strong> used <strong>to</strong> select a desired number of Styles (compatibly with the<br />
RAM free) <strong>to</strong> be loaded all <strong>to</strong>gether so that they are immediately called up with Single Style. Another advantage of the Block Styles, which will<br />
be explained in the D<strong>is</strong>k section, lies in the possibility <strong>to</strong> load the preferred styles from the hard d<strong>is</strong>k when turning on.<br />
To load a Style with SINGLE STYLE<br />
●<br />
●<br />
Activate the push but<strong>to</strong>n SINGLE RAM STYLE (you will notice that the CUSTOM STYLE push but<strong>to</strong>n will be au<strong>to</strong>matically d<strong>is</strong>abled).<br />
Enter the number of the Style <strong>to</strong> be loaded using the numeric keypad: STYLES push but<strong>to</strong>ns<br />
The advantage of using Single Style, without going through the various menus, lies in the possibility <strong>to</strong> book a Style after that currently used<br />
by the Arranger without having <strong>to</strong> s<strong>to</strong>p the au<strong>to</strong>matic accompaniment.<br />
To load a Style with BLOCK/LIST RAM STYLE<br />
●<br />
●<br />
●<br />
●<br />
●<br />
●<br />
●<br />
Activate th<strong>is</strong> push but<strong>to</strong>n: BLOCK/LIST RAM STYLE<br />
Any pages that follow can be d<strong>is</strong>played using the CURSOR +/- push but<strong>to</strong>ns<br />
Find the Style desired using the VALUE +/- push but<strong>to</strong>ns<br />
Select the Style <strong>to</strong> be loaded using the F10 Select function<br />
Select the next Styles <strong>to</strong> be loaded using the F10 Select function<br />
Confirm loading in memory using the F1 Load function<br />
To exit from th<strong>is</strong> page press th<strong>is</strong> push but<strong>to</strong>n again: BLOCK/LIST RAM STYLE or press the EXIT push but<strong>to</strong>n.<br />
A third alternative <strong>is</strong> offered again in the BLOCK/LIST RAM STYLE page and <strong>is</strong> used <strong>to</strong> d<strong>is</strong>play the l<strong>is</strong>t of 33 patterns all <strong>to</strong>gether <strong>to</strong> find that<br />
desired.<br />
●<br />
●<br />
●<br />
●<br />
●<br />
●<br />
●<br />
●<br />
Enable th<strong>is</strong> push but<strong>to</strong>n: BLOCK/LIST RAM STYLE<br />
Select the F7 Pattern L<strong>is</strong>t function<br />
Scroll the pages that follow using the PAGE +/- push but<strong>to</strong>ns<br />
Select the Style in the page using the CURSOR +/- push but<strong>to</strong>ns<br />
Confirm loading using the F10 Load function<br />
To load the Style desired, without selecting it you can also directly enter the number using the numeric keypad: STYLES push but<strong>to</strong>ns<br />
To exit th<strong>is</strong> page press th<strong>is</strong> push but<strong>to</strong>n again: BLOCK/LIST RAM STYLE<br />
In alternative, <strong>to</strong> exit press the EXIT push but<strong>to</strong>n<br />
It <strong>is</strong> obviously possible <strong>to</strong> control many other aspects of the Arranger, amongst which the timbres <strong>to</strong> be assigned <strong>to</strong> the right hand or the settings<br />
for the single accompaniment tracks. For the time being however you can already have fun and meet your basic requirements. You will<br />
find detailed information in the sections dedicated <strong>to</strong> the following:<br />
- Arranger<br />
- Style<br />
- Reg<strong>is</strong>tration<br />
- Timbres<br />
- MIDI<br />
- D<strong>is</strong>k<br />
Owner’s Manual <strong>SD1</strong> 19
HOW TO USE THE VOICES<br />
To the right of the keyboard split point, when the Split function <strong>is</strong> enabled (LED of the SPLIT push but<strong>to</strong>n lit), a lead can be played with the right<br />
hand independently from the Arranger. The default timbre assigned <strong>is</strong> that of the acoustic piano, but one of the sixteen timbre groups can be<br />
called up at any time using the same number of VOICES push but<strong>to</strong>ns. Likew<strong>is</strong>e for the Styles, the timbres <strong>to</strong>o are d<strong>is</strong>played in groups of ten and<br />
the presence of any groups following the first <strong>is</strong> pointed out by “Page” with the number on the right indicating the number of groups available.<br />
Once a family has been selected from the main page of the d<strong>is</strong>play using the dedicated VOICES push but<strong>to</strong>ns <strong>to</strong> the right of the control panel,<br />
5 timbres appear on the right and five on the left. To call one up simply press the function push but<strong>to</strong>n at the sides of the d<strong>is</strong>play (F1-F10) relative<br />
<strong>to</strong> that timbre. The timbre selected will be d<strong>is</strong>played under the four measure bar segments. To select the groups of timbres that follow<br />
the first, use either the PAGE +/- push but<strong>to</strong>ns or press the VOICES push but<strong>to</strong>n again relative <strong>to</strong> the same family of timbres. In th<strong>is</strong> case the<br />
groups will be selected cyclically.<br />
The Modulation Wheel and the Pitch Bend are immediately available likew<strong>is</strong>e for the key dynamics <strong>to</strong> control the different timbre <strong>to</strong>nes.<br />
Without going in<strong>to</strong> <strong>to</strong>o much detail it <strong>is</strong> worth while remembering that up <strong>to</strong> four overlapped timbres can be used for the lead section, which <strong>is</strong><br />
programmed using the Programs.<br />
Further parameters on the timbres are explained in the following sections:<br />
- Timbres<br />
- Drawbars<br />
- Sound Load<br />
- Reg<strong>is</strong>tration<br />
HOW TO USE THE MICROPHONE AND THE VOCALIZER<br />
The <strong>SD1</strong> can work with up <strong>to</strong> two microphones connected <strong>to</strong> the dedicated rear inputs. The Micro 1 input, on the contrary <strong>to</strong> Micro 2, <strong>is</strong> processed<br />
by the Vocalizer, namely the effect with which the voice can be naturally harmonized according <strong>to</strong> the chords played, <strong>to</strong> a track of a Midi file or<br />
according <strong>to</strong> the notes played on the keyboard. What you need <strong>is</strong> a good microphone, a cable and the <strong>SD1</strong>. When you connect the microphone<br />
<strong>to</strong> one of the two inputs, adjust its gain, or rather move the Gain cursor until the LED of the ON LINE EFFECT (Overload) push but<strong>to</strong>n starts <strong>to</strong><br />
light up. The purpose of the Gain control <strong>is</strong> that of increasing the amplitude of the microphone signal <strong>to</strong> an ideal level. Th<strong>is</strong> ideal level <strong>is</strong> reached<br />
when the overload limit of the pre-amplifier <strong>is</strong> nearly reached, which <strong>is</strong> pointed out by the Overload LED that switches on.<br />
As default setting the <strong>SD1</strong> keeps the microphone inputs turned off <strong>to</strong> prevent any interference from d<strong>is</strong>turbing the audio output.<br />
Once the microphone has been connected the inputs are <strong>to</strong> be enabled. Proceed as follows <strong>to</strong> do so:<br />
●<br />
●<br />
●<br />
●<br />
●<br />
●<br />
Go <strong>to</strong> the main page of the d<strong>is</strong>play using the EXIT push but<strong>to</strong>n<br />
Gain access <strong>to</strong> the editing menu of the microphone inputs using the F10 MICRO EDIT function<br />
The d<strong>is</strong>play shows various options, amongst which <strong>is</strong> the operational status of the inputs, which can be enabled using the F10 (ACTIVE)<br />
function that switches them from Inactive <strong>to</strong> Active.<br />
Adjust the gain of the microphone input using the cursor on the rear panel until the Overload LED of the push but<strong>to</strong>n lights up: GAIN<br />
Overload (ON LINE EFFECT)<br />
To modify the volume of the microphone compared <strong>to</strong> that of the keyboard in general, select the parameter and adjust its value using the<br />
VALUE +/- push but<strong>to</strong>ns: F1 LEVEL 1 VALUE +/-<br />
To return <strong>to</strong> the main page of the d<strong>is</strong>play press the EXIT push but<strong>to</strong>n<br />
20<br />
<strong>SD1</strong> Owner’s Manual
Up <strong>to</strong> th<strong>is</strong> stage you can use the microphone with Reverb voice, the effects of which can be modified as desired. The character<strong>is</strong>tics of the<br />
Vocalizer of the <strong>SD1</strong> are such <strong>to</strong> enable its use in various contexts. First and foremost the <strong>SD1</strong> <strong>is</strong> capable of acknowledging the pitch of the note<br />
that you are singing so that it can be harmonized naturally. Th<strong>is</strong> function however depends on the operating mode chosen for the Vocalizer.<br />
●<br />
●<br />
●<br />
●<br />
●<br />
●<br />
●<br />
●<br />
●<br />
●<br />
You can harmonize the voice according <strong>to</strong> the chords played on the left part of the keyboard or, in Pian<strong>is</strong>t mode, along the whole keyboard.<br />
Th<strong>is</strong> method of acknowledging the notes by the Vocalizer <strong>is</strong> called Au<strong>to</strong>matic Chord and includes the identification of the note sung in the<br />
microphone.<br />
You can harmonize the voice according <strong>to</strong> the notes that you will play directly on the right part of the keyboard, with the Keyboard Harmony<br />
method where the note sung has no effect. The notes added do indeed depend only on the notes played on the keyboard.<br />
You can use a dedicated track of a Midi file, compatible with the Vocalizer in MIDI mode, <strong>to</strong> control the harmonization.<br />
You can use the Vocalizer as a normal PitchShifter, where the interval of the note generated <strong>is</strong> always fixed and depending on the note<br />
sung in Fixed Interval mode.<br />
You can use the Vocalizer as an effects processor <strong>to</strong> create special effects with the voice, in Vocal Effect mode.<br />
With the microphone in use on Micro 1, press th<strong>is</strong> push but<strong>to</strong>n: VOCALIZER ON/OFF<br />
To enable a different mode <strong>to</strong> that set as default, select it using the function F3 MODES push but<strong>to</strong>n<br />
A l<strong>is</strong>t with the settings programmed will appear in the centre of the d<strong>is</strong>play. To select one use the CURSOR +/- push but<strong>to</strong>ns<br />
To d<strong>is</strong>able the Vocalizer, press th<strong>is</strong> push but<strong>to</strong>n: VOCALIZER ON/OFF<br />
To return <strong>to</strong> the main page press the EXIT push but<strong>to</strong>n<br />
To simplify the choice of the operational mode when playing live, when the Vocalizer <strong>is</strong> in use you can immediately call up the Harmony Right<br />
settings, which belong <strong>to</strong> the Keyboard Harmony mode using the A and C push but<strong>to</strong>ns and Un<strong>is</strong>on, relative <strong>to</strong> the Fixed Interval mode using<br />
the B and D push but<strong>to</strong>ns.<br />
The <strong>SD1</strong> also au<strong>to</strong>matically acknowledges the track of the Midi file dedicated <strong>to</strong> the Vocalizer and enables it as soon as you start reproducing.<br />
When reproducing however it <strong>is</strong> important not <strong>to</strong> <strong>to</strong>uch the A, B, C and D push but<strong>to</strong>ns otherw<strong>is</strong>e the Vocalizer will d<strong>is</strong>able the MIDI mode relative<br />
<strong>to</strong> the Midi file and will enable that associated <strong>to</strong> one of the push but<strong>to</strong>ns.<br />
As you will see, there are obviously many other parameters, but <strong>to</strong> start working well these few notions are sufficient.<br />
Further information <strong>is</strong> provided in the following sections:<br />
- Vocalizer<br />
- Power On Setup<br />
- Reg<strong>is</strong>tration<br />
- Microphone<br />
HOW TO USE A MIDI ACCORDION<br />
<strong>Ketron</strong> has reserved a dedicated menu for the connection of accordions equipped with MIDI interface, which must exploit the MIDI In 2 input. To<br />
reach the parameters required, from the main page shown on the d<strong>is</strong>play, access F3 UTILITY and from th<strong>is</strong> page select F6 ACCORDION. Various<br />
parameters <strong>to</strong> be modified are offered here. The most important however <strong>is</strong> the enabling of the MIDI accordion that <strong>is</strong> achieved by pressing F10<br />
that switches from Inactive <strong>to</strong> Active. If you already own a MIDI accordion you most probably already know most of the parameters provided.<br />
In any event the default settings should work efficiently with almost all types of MIDI accordions. It <strong>is</strong> important <strong>to</strong> remember that if your MIDI<br />
accordion seems not <strong>to</strong> work you most probably have <strong>to</strong> work on the coincidence of the MIDI channels, which are accessed using the F6 MIDI<br />
Owner’s Manual <strong>SD1</strong> 21
menu and by selecting F2 ACCORD. When the Accordion mode <strong>is</strong> enabled, the <strong>SD1</strong> does indeed au<strong>to</strong>matically modify the MIDI settings that can<br />
be re-programmed at any time. Further details are provided in the following sections:<br />
- MIDI<br />
- MIDI accordion<br />
THE REGISTRATIONS<br />
All the parameters dealt with up <strong>to</strong> here, and many more again, can be saved and called up instantly thanks <strong>to</strong> the 198 Reg<strong>is</strong>trations. The handiness<br />
of the Reg<strong>is</strong>tration function <strong>is</strong> d<strong>is</strong>covered as you go along and are crucial when playing live as they are used <strong>to</strong> call up all the components<br />
of an au<strong>to</strong>matic accompaniment or a Midi file with words and audio files. There are two types of Reg<strong>is</strong>trations: those in the memory (Block<br />
Reg<strong>is</strong>tration) and those s<strong>to</strong>red on d<strong>is</strong>k (Single Reg<strong>is</strong>tration). The first are always 198 and are called up by enabling the Block Reg<strong>is</strong>tration push<br />
but<strong>to</strong>n and then entering the number of the Reg<strong>is</strong>tration using the numeric keypad (STYLES push but<strong>to</strong>ns). The <strong>SD1</strong> comes with 198 pre-set<br />
default Reg<strong>is</strong>trations, ready <strong>to</strong> use. The Single Reg<strong>is</strong>trations on the other hand are loaded time after time from hard d<strong>is</strong>k or floppy d<strong>is</strong>k. There<br />
may be up <strong>to</strong> 999 Single Reg<strong>is</strong>trations for each folder of the d<strong>is</strong>k and are called up using the SINGLE REGISTRATION push but<strong>to</strong>n enabled and<br />
then by entering the 3-digits number using the numeric keypad (STYLES push but<strong>to</strong>ns).<br />
The real secret of the Reg<strong>is</strong>tration however <strong>is</strong> another. On any electronic keyboard, <strong>to</strong> load a Midi file, a pattern and a sample, you have <strong>to</strong> go<br />
through at least three procedures <strong>to</strong> access the d<strong>is</strong>k, which <strong>is</strong> maybe not appreciated by the public who have <strong>to</strong> sit waiting. The <strong>SD1</strong> does all<br />
th<strong>is</strong> just by simply calling up the Reg<strong>is</strong>tration. If indeed the name of the Reg<strong>is</strong>tration <strong>is</strong> the same as that of the Midi file, of the text file, of the<br />
pattern and of the audio file, when it <strong>is</strong> called up the <strong>SD1</strong> will au<strong>to</strong>matically load all these files, without having <strong>to</strong> access the DISK functions.<br />
Then add the fact that you can build up the Reg<strong>is</strong>tration at home in comfort and you will real<strong>is</strong>e that the <strong>SD1</strong> <strong>is</strong> really fast and handy when playing<br />
live!<br />
For the time being we will end on how <strong>to</strong> simply save a Reg<strong>is</strong>tration. Once you have set the timbres, the Style, the Arranger options and any<br />
other parameter as desired, <strong>to</strong> save the current state of the <strong>SD1</strong> once and for all, press the SINGLE REGISTRATION push but<strong>to</strong>n if you w<strong>is</strong>h <strong>to</strong><br />
create a Reg<strong>is</strong>tration on d<strong>is</strong>k, or the BLOCK REGISTRATION push but<strong>to</strong>n if you w<strong>is</strong>h <strong>to</strong> leave the Reg<strong>is</strong>tration in the memory even after the keyboard<br />
has been turned off. At th<strong>is</strong> stage press the SAVE/ENTER push but<strong>to</strong>n, select F1 Reg<strong>is</strong>tration and enter the name <strong>to</strong> be assigned using<br />
the notes of the keyboard.<br />
The position in Block Reg<strong>is</strong>tration that will be taken over in the l<strong>is</strong>t can be modified using the F2 and F3 push but<strong>to</strong>ns that will move one position<br />
back or forward. Once the name has been entered and the position in the l<strong>is</strong>t chosen, all you have <strong>to</strong> do <strong>is</strong> confirm everything using F10<br />
Save, or exit without saving anything using F5 Escape or EXIT.<br />
The call up of a Reg<strong>is</strong>tration overrides all the other functions in use at the time: for example if Single RAM Style <strong>is</strong> in use <strong>to</strong> load a Style, the<br />
next entry of a number with BLOCK REGISTRATION or SINGLE REGISTRATION enabled will relate <strong>to</strong> the Reg<strong>is</strong>tration and not the Style.<br />
Further details are provided in the following sections:<br />
Reg<strong>is</strong>tration<br />
D<strong>is</strong>k<br />
Text Files<br />
Sound Load<br />
Style & Sound<br />
22<br />
<strong>SD1</strong> Owner’s Manual
Voice and User Voice<br />
One of the fundamental features of the <strong>SD1</strong> <strong>is</strong> its timbre quality and consequently the synthes<strong>is</strong> technology exploited that <strong>is</strong> based on mult<strong>is</strong>amples<br />
processed in subtractive synthes<strong>is</strong>, frequency modulation and additive synthes<strong>is</strong>. The samples have been developed over the last few<br />
years by a team of international programmers and, likew<strong>is</strong>e for the acoustic piano, exploit up <strong>to</strong> 64 samples arranged along the keyboard on<br />
two different levels of dynamics. For each timbre the musician can use up <strong>to</strong> a maximum of two oscilla<strong>to</strong>rs at the most, but the quality of the<br />
single samples <strong>is</strong> such that most of the timbres exploit only one oscilla<strong>to</strong>r. Th<strong>is</strong> item directly affects the polyphony, which <strong>is</strong> not halved: the 64<br />
Polyphony notes are not so far from reality! The synthesizer of the <strong>SD1</strong> exploits an LPF filter with 24 dB/Octave, three envelopes, two LFO’s and<br />
a complete modulation section. The part in frequency modulation <strong>is</strong> based on an algorithm with four opera<strong>to</strong>rs of which two are bearing and<br />
two modulating, the additive one <strong>is</strong> used for the timbres of a Hammond organ in the Drawbars mode. We have intentionally restricted access<br />
<strong>to</strong> the parameters that are fundamental for the timbre.<br />
The <strong>SD1</strong> <strong>is</strong> capable of loading <strong>new</strong> samples, files in .WAV format and the Multi-samples that will be produced by <strong>Ketron</strong>, plus it can produce its<br />
own samples thanks <strong>to</strong> the sampler supplied standard.<br />
The organ<strong>is</strong>ation of the timbres uses a bank of Preset Voices that cannot be accessed in any way by the musician, on which the more natural<br />
timbres are based, a General MIDI bank (used again for the Styles) and a bank of 128 User Voices. The latter <strong>is</strong> used <strong>to</strong> program your own timbres<br />
starting also from those in General MIDI.<br />
Amongst the d<strong>is</strong>tinctions of the <strong>SD1</strong> you must also remember that the Preset Voices, namely the more natural timbres, can be used only by the<br />
Lower and Right section, whereas the accompaniment tracks will use only the Voices in General MIDI <strong>to</strong> maintain the compatibility.<br />
For the Right part the Programs enable the use of up <strong>to</strong> four Voices at the same time, arranged along the keyboard and with parameters that<br />
are separate from one another. It <strong>is</strong> also possible <strong>to</strong> set a second timbre <strong>to</strong> be played over the main timbre (Second Voice).<br />
To call up the Voices you can use the control panel push but<strong>to</strong>ns VOICES and USER VOICE, or you can create a l<strong>is</strong>t of cus<strong>to</strong>m<strong>is</strong>ed Voices with<br />
the most frequently used timbres (1 Touch).<br />
A particular section <strong>is</strong> that of the Drum. It <strong>is</strong> specific for playing the drum sets right over the whole keyboard. The <strong>SD1</strong> uses both drum sets<br />
derived from samples and grooves achieved by recording famous drummers or percussion<strong>is</strong>ts live, then processed via a proprietary procedure<br />
<strong>to</strong> obtain a drum set but with “real” percussion instruments (Live Drum). Both types of drum sets can be used by the musician, even right over<br />
the entire keyboard.<br />
CALLING UP THE TIMBRES<br />
The two rows of eight push but<strong>to</strong>ns called VOICES are used <strong>to</strong> call up the timbres according <strong>to</strong> the family <strong>to</strong> which they belong. When a family<br />
<strong>is</strong> selected using the push but<strong>to</strong>n, the d<strong>is</strong>play shows five Voices <strong>to</strong> the left and five Voices <strong>to</strong> the right, which can be enabled by pressing the<br />
function but<strong>to</strong>n relative <strong>to</strong> that timbre. Considering that the <strong>SD1</strong> bears more than ten Voices per group, the following pages can be seen either<br />
by using the PAGE + and PAGE – push but<strong>to</strong>ns or by pressing the push but<strong>to</strong>n relative <strong>to</strong> the Family of Voices in use again.<br />
When the <strong>SD1</strong> reaches the last page of Voices available, if you press the push but<strong>to</strong>n relative <strong>to</strong> the family of voices again you will return <strong>to</strong> the<br />
group of voices of the first page. Th<strong>is</strong> <strong>is</strong> not achieved using the PAGE + and PAGE – push but<strong>to</strong>ns.<br />
The VOICES push but<strong>to</strong>ns do not call up the preset voices alone.<br />
If the LED of the USER VOICE push but<strong>to</strong>n <strong>is</strong> lit, in other words the bank of timbres that can be programmed by the user, 8 the VOICES push<br />
but<strong>to</strong>ns call up the 128 User Voice timbres in groups of ten at a time.<br />
If the LED of the DRAWBAR push but<strong>to</strong>n <strong>is</strong> lit, then an organ timbre corresponds <strong>to</strong> the single VOICES push but<strong>to</strong>n.<br />
If the LED of the PROGRAM push but<strong>to</strong>n <strong>is</strong> lit, then the VOICE push but<strong>to</strong>ns call up the Program memories.<br />
If the LED of the ONE TOUCH push but<strong>to</strong>n it lit, then the first row of VOICE push but<strong>to</strong>ns calls up one of the eight pages that make up the One<br />
Touch memories.<br />
If the LEDs of the DRUM SET and MANUAL DRUM push but<strong>to</strong>ns are lit, then the first six VOICES push but<strong>to</strong>ns are used <strong>to</strong> select the banks of<br />
ten Drum sets each.<br />
SECOND VOICE<br />
The <strong>SD1</strong> offers the possibility <strong>to</strong> create a layer of two overlapped timbres for the section <strong>to</strong> the right of the keyboard split point. The d<strong>is</strong>play<br />
shows the name in small letters of another Voice that <strong>is</strong> indeed called Second Voice under the name of the Voice selected. To avail of the Second<br />
Owner’s Manual <strong>SD1</strong> 23
Voice press the 2ND VOICE push but<strong>to</strong>n (the LED lights up).<br />
As default setting the <strong>SD1</strong> already bears a Second Voice for each timbre, even if th<strong>is</strong> combination can be modified at any time, with further<br />
adjustments.<br />
Once the Second Voice has been enabled for the timbre in use in the Right section the timbre <strong>to</strong> be associated <strong>to</strong> it can be changed.<br />
Press the EDIT push but<strong>to</strong>n positioned near the 2ND VOICE push but<strong>to</strong>n (for sake of simplicity it will be called EDIT 2ND)<br />
Select the group <strong>to</strong> which the <strong>new</strong> timbre for the Second Voice belongs using the VOICES push but<strong>to</strong>ns. Only the name of the first Voice of that<br />
group will appear.<br />
Use the VALUE+/- push but<strong>to</strong>ns <strong>to</strong> select the Voices that follow the first of the group selected.<br />
To modify the octave of the Second Voice timbre, with the EDIT 2ND push but<strong>to</strong>n enabled, use the CURSOR +/- push but<strong>to</strong>ns that will act as<br />
TRANSPOSER push but<strong>to</strong>ns.<br />
To modify the volume of the Second Voice timbre, with the EDIT 2ND push but<strong>to</strong>n enabled, use the RIGHT push but<strong>to</strong>ns for the volume.<br />
All these procedures can be done for each timbre assigned <strong>to</strong> the Second Voice remembering <strong>to</strong> save the modifications made, which would otherw<strong>is</strong>e<br />
be lost when the <strong>SD1</strong> <strong>is</strong> turned off, by proceeding as follows:<br />
Press SAVE/ENTER<br />
Select F6 2nd Voice<br />
Confirm the procedure using F10 Save, thus the modifications are saved permanently in Flash RAM.<br />
To res<strong>to</strong>re the original settings of the Second Voice preset by <strong>Ketron</strong>, use function push but<strong>to</strong>n F9 Default instead of confirming the procedure.<br />
USER VOICE<br />
s we have already explained the <strong>SD1</strong> <strong>is</strong> also a powerful synthesizer based on samples. We have chosen <strong>to</strong> limit the parameters <strong>to</strong> just those<br />
essential for most common use. Any modification made <strong>to</strong> a timbre can be saved in one of the 128 memory locations of the User Voice bank,<br />
split-up in<strong>to</strong> sixteen groups of eight User Voices each. To call up a User Voice follow the normal procedures for the Voice. The only difference<br />
<strong>is</strong> that the USER VOICE push but<strong>to</strong>n must be enabled (LED lit). As for programming, there are two solutions:<br />
Press the USER VOICE push but<strong>to</strong>n <strong>to</strong> enable the User Voice bank.<br />
Select one of the eight User Voices using the function push but<strong>to</strong>ns from the sixteen banks that can be called up using the VOICES push but<strong>to</strong>ns.<br />
Press the function push but<strong>to</strong>n relative <strong>to</strong> the User Voice selected once again.<br />
In alternative<br />
● Press the USER VOICE push but<strong>to</strong>n <strong>to</strong> enable the User Voice bank.<br />
● Select one of the eight User Voices using the function push but<strong>to</strong>ns from the sixteen banks that can be called up using the VOICES push<br />
but<strong>to</strong>ns.<br />
● Press EXIT <strong>to</strong> return <strong>to</strong> the main page of the d<strong>is</strong>play that will keep the User Voice timbre selected in use.<br />
● Access the programming menu using F7 Edit Voice.<br />
Together with the User Voices the <strong>SD1</strong> enables the musician <strong>to</strong> also modify the bank of timbres in General MIDI. To call up a timbre <strong>to</strong> be modified<br />
in GM proceed as follows:<br />
● Enable the User Voice bank (LED lit).<br />
● Access Edit Voice using the procedures just described (the page will show the timbre parameters).<br />
● Select a GM timbre within the sixteen families, again with USER VOICE enabled, using the VOICES push but<strong>to</strong>ns. Use the PAGE +/- push but<strong>to</strong>ns<br />
<strong>to</strong> call up the ten timbres that follow when available and the function push but<strong>to</strong>ns <strong>to</strong> select the timbre <strong>to</strong> be modified.<br />
Once the edit page of the User Voice selected <strong>is</strong> reached, whatever procedure used <strong>to</strong> do so, the d<strong>is</strong>play will be configured as follows:<br />
TIMBRE PROGRAMMING ELEMENTS<br />
A timbre of the <strong>SD1</strong> exploits a sampled wave form s<strong>to</strong>red in a Wavetable as sound source. The wave form can also be created from a number of<br />
different samples, arranged on the keyboard or according <strong>to</strong> the key dynamics, but in any event these samples cannot be modified by the musi-<br />
24<br />
<strong>SD1</strong> Owner’s Manual
cian with the <strong>SD1</strong>. The coarse sound of the wave form <strong>is</strong> processed with an envelope on the amplitude, namely a function that <strong>is</strong> used <strong>to</strong> “draw”<br />
the trend of the sound volume while a note <strong>is</strong> played. There are different types of envelope: that used by the <strong>SD1</strong> <strong>is</strong> made up of four segments<br />
split up in<strong>to</strong> Attack (the time the sound takes <strong>to</strong> reach the maximum level), Decay (the time that the sound takes <strong>to</strong> drop from maximum level<br />
<strong>to</strong> that establ<strong>is</strong>hed by the Sustain), Sustain (the level at which the sound remains until the note played <strong>is</strong> released), and Release (the time the<br />
sound takes <strong>to</strong> drop from the Sustain level <strong>to</strong> Zero level). Th<strong>is</strong> type of envelope <strong>is</strong> also called ADSR. Together with the control of the amplitude<br />
the <strong>SD1</strong> enables the musician <strong>to</strong> modify the harmonies of the sound with a filter that literally cuts-off the frequencies above a point, the socalled<br />
cut-off. The frequencies near the cut-off point can be enhanced with the Resonance, <strong>to</strong> create those classic sweeps that are typical of<br />
analogue synthesizers and thus often heard in dance. Again from the programming page the user can establ<strong>is</strong>h the effect and Reverb entity<br />
that will be used by that timbre and can modify the control exerted by the after <strong>to</strong>uch and the modulation wheel on some timbre parameters.<br />
Amongst these <strong>is</strong> also the LFO (Low Frequency Oscilla<strong>to</strong>r) that <strong>is</strong> required <strong>to</strong> create tremolo effects when it <strong>is</strong> applied on the amplitude (DCA),<br />
and vibra<strong>to</strong> effects when it <strong>is</strong> applied on the pitch (DCO) and finally modulation effects on the filter when applied on DCF.<br />
AMPLITUDE AND FILTER PARAMETERS<br />
The programming parameters can all be accessed from the Edit Voice menu using function push but<strong>to</strong>ns F8, F9 and F10 and using the CURSOR<br />
+/- and VALUE +/- push but<strong>to</strong>ns <strong>to</strong> move around and enter the values of the parameters. Below <strong>is</strong> a detailed description of the parameters.<br />
F1 Attack<br />
F2 Decay:<br />
F3 Sustain:<br />
F4 Release:<br />
F5 Level:<br />
Th<strong>is</strong> establ<strong>is</strong>hes the value of the Attack segment that can be modified using the VALUE +/- push but<strong>to</strong>ns.<br />
Th<strong>is</strong> establ<strong>is</strong>hes the value of the Decay segment that can be modified using the VALUE +/- push but<strong>to</strong>ns.<br />
Th<strong>is</strong> establ<strong>is</strong>hes the value of the Sustain segment that can be modified using the VALUE +/- push but<strong>to</strong>ns.<br />
Th<strong>is</strong> establ<strong>is</strong>hes the value of the Release segment that can be modified using the VALUE +/- push but<strong>to</strong>ns.<br />
Th<strong>is</strong> establ<strong>is</strong>hes the value of the <strong>to</strong>tal volume of the timbre that can be modified using the VALUE +/- push but<strong>to</strong>ns.<br />
To simplify programming of the envelope, the d<strong>is</strong>play also shows a graph, the segments of which change proportionally with the values set for<br />
the ADSR.<br />
F6 Resonance: Th<strong>is</strong> establ<strong>is</strong>hes the Resonance value that can be modified using the VALUE +/- push but<strong>to</strong>ns.<br />
F6 Cut Off: Th<strong>is</strong> establ<strong>is</strong>hes the cut-off point value of the low pass filter that can be modified using the VALUE +/- push but<strong>to</strong>ns.<br />
THE EFFECTS<br />
Using F8 Effect the musician can access the Sends for the Reverb and Chorus effects. Press F7 Effect <strong>to</strong> d<strong>is</strong>play the level of the Reverb, an<br />
always present effect (unless it <strong>is</strong> set at zero) and the multi-effect that can be d<strong>is</strong>abled (Off). To access these parameters use the CURSOR +/-<br />
and VALUE +/- push but<strong>to</strong>ns.<br />
As for the multi-effects, once the algorithm has been enabled and selected, one or a number of parameters appear right under the Reverb, which<br />
are used <strong>to</strong> establ<strong>is</strong>h the entity of the single effects of the multi-effects exploited by the timbre. For further information see the Effects section.<br />
CONTROL WITH AFTER TOUCH AND MODULATION WHEEL<br />
Press F9 After <strong>to</strong>uch Wheel and the d<strong>is</strong>play will show a 3-column table in which the first indicates the parameter, the second the enabling status<br />
of the After <strong>to</strong>uch and the third the enabling status for the Modulation Wheel. As you will notice not all parameters can be controlled at the<br />
Owner’s Manual <strong>SD1</strong> 25
same time with After <strong>to</strong>uch and Modulation Wheel. Choose whether <strong>to</strong> modulate (control) a parameter with After <strong>to</strong>uch or Modulation Wheel.<br />
Th<strong>is</strong> aspect <strong>is</strong> a matter of preference and skill in controlling the keyboard and wheel. For example it may be more handy <strong>to</strong> modulate the cu<strong>to</strong>ff<br />
point of the filter with after <strong>to</strong>uch rather than with modulation wheel. Some simple experimenting will allow you <strong>to</strong> make your timbres much<br />
more lively and dynamic. To select any one of the parameters and the column use the CURSOR +/- push but<strong>to</strong>ns and enter the modifications<br />
using the VALUE +/- push but<strong>to</strong>ns. Below <strong>is</strong> the explanation of the individual parameters:<br />
CUT OFF:<br />
LFO Pitch:<br />
Th<strong>is</strong> enables the control of the opening and closing of the filter, altering the cut-off point of the filter. It <strong>is</strong> used for example<br />
<strong>to</strong> create the analogue type sweeps or <strong>to</strong> confer additional harmony <strong>to</strong> a sound.<br />
Th<strong>is</strong> enables the modulation on the pitch (Vibra<strong>to</strong>), controlling the modulation intensity of the LFO.<br />
LFO Amplitude: Th<strong>is</strong> enables the modulation on the Amplitude (Tremolo), controlling the modulation intensity of the LFO.<br />
LFO Filter:<br />
Volume:<br />
Wha Wha:<br />
Slide (Vel):<br />
Th<strong>is</strong> enables the modulation on the Filter, controlling the modulation intensity of the LFO.<br />
Th<strong>is</strong> controls the Volume via the After <strong>to</strong>uch.<br />
Th<strong>is</strong> controls the Wha Wha effect via the use of the Modulation Wheel.<br />
Th<strong>is</strong> affects the tuning of the sound, creating a sort of slight pitch bend each time a key <strong>is</strong> pressed strongly. It may prove<br />
quite useful when playing <strong>to</strong> real<strong>is</strong>tically simulate the sound attack typical of wind instruments, such as the Sax and Trumpets.<br />
Attack:<br />
Th<strong>is</strong> makes all the parameters controlled with After <strong>to</strong>uch start working with a slight and gradual delay. If used skilfully it confers<br />
amazing expressiveness <strong>to</strong> the leads. To hear its affect, at least one of the parameters amongst those l<strong>is</strong>ted must be controlled<br />
by After <strong>to</strong>uch and obviously the After <strong>to</strong>uch must be used. It <strong>is</strong> quite handy, for example, when assigning a pitch bend<br />
<strong>to</strong> the After <strong>to</strong>uch and playing with high velocities that could trigger the After <strong>to</strong>uch. Th<strong>is</strong> system safeguards the use of the<br />
After <strong>to</strong>uch with additional control.<br />
LFO AND VELOCITY<br />
Press F10 LFO Velocity <strong>to</strong> access the parameters dedicated <strong>to</strong> the use of the LFO and the velocity <strong>to</strong> control some crucial timbre parameters.<br />
To select a parameter use the CURSOR +/- push but<strong>to</strong>ns and the VALUE +/- push but<strong>to</strong>ns <strong>to</strong> modify the value. Below <strong>is</strong> the description of the<br />
individual parameters:<br />
LFO 1 (DCO) Rate:<br />
LFO 1 (DCO) Depth:<br />
LFO 1 (DCO) Delay:<br />
LFO 2 Rate:<br />
LFO 2 (DCF) Depth:<br />
Th<strong>is</strong> establ<strong>is</strong>hes the velocity of the LFO dedicated <strong>to</strong> the pitch. Higher the value, faster will be the vibra<strong>to</strong>.<br />
Th<strong>is</strong> specifies the operating intensity of the LFO on DCO, therefore generating a Vibra<strong>to</strong> effect.<br />
Th<strong>is</strong> specifies the delay with which the LFO will affect the DCO for the vibra<strong>to</strong> effect.<br />
Th<strong>is</strong> establ<strong>is</strong>hes the velocity of the LFO dedicated <strong>to</strong> the control of the filter and the amplitude.<br />
Th<strong>is</strong> specifies the operating intensity of LFO on the cut-off point of the filter, therefore generating a closing and opening<br />
effect of the filter that, if the Resonance <strong>is</strong> set at high levels, can produce a primitive wha wha effect.<br />
LFO 2 (DCA) Depth: th<strong>is</strong> specifies the operating intensity of the LFO on the amplitude, with the result of obtaining a tremolo effect.<br />
Velocity Slope:<br />
Velocity Filter:<br />
Octave Shift:<br />
Th<strong>is</strong> <strong>is</strong> used <strong>to</strong> modify the response curve <strong>to</strong> the Velocity for the User Voice being modified that, at zero, mutes the timbre.<br />
Th<strong>is</strong> controls the opening of the filter according <strong>to</strong> the key dynamics. Value 64 <strong>is</strong> the standard condition. Lower values<br />
obtain a less brilliant sound, even when playing at high velocity.<br />
Th<strong>is</strong> shifts the octave of the User Voice by a range within - 2 octaves and +2 octaves.<br />
26<br />
<strong>SD1</strong> Owner’s Manual
SAVING A USER VOICE<br />
A modified User Voice must be saved permanently in the memory otherw<strong>is</strong>e the modification will be lost when the <strong>SD1</strong> <strong>is</strong> turned off. The saving<br />
procedure appears au<strong>to</strong>matically after even only one parameter has been modified and the user attempts <strong>to</strong> exit the programming menu<br />
using EXIT, or by pressing the SAVE/ENTER push but<strong>to</strong>n <strong>to</strong> enable the saving procedure. In both cases the page that appears shows the destination<br />
memory location with the name of the User Voice taken at the time. To change the destination memory use function push but<strong>to</strong>ns F2<br />
>> and F3
Programs and One Touch<br />
PROGRAMS<br />
A number of timbres are often used simultaneously <strong>to</strong> enhance the timbre of the lead part, namely the right section <strong>to</strong> the right of the keyboard<br />
split point. The simplest method <strong>is</strong> that of using the Second Voice but for more demanding musicians up <strong>to</strong> four Voices combined <strong>to</strong>gether<br />
differently can be exploited thanks <strong>to</strong> the 76-key keyboard. Using the Programs the musician can obtain a remarkably versatile timbre for<br />
the right hand and also right along the keyboard. The player could, for example, use two further timbres for the Lower section and leave another<br />
two for the Right section or use different timbres according <strong>to</strong> the key dynamics and again could transform the part of the keyboard <strong>to</strong> the<br />
left of the split point in<strong>to</strong> a real lower organ keyboard <strong>to</strong> be controlled with a MIDI pedal. Using the Programs the player can create Harmony<br />
effects such as Duet, Trio and Steel. The <strong>SD1</strong> provides the musician with 128 Programs that are d<strong>is</strong>tributed over sixteen pages of eight Programs<br />
each. To call up a Program simply enable the PROGRAM push but<strong>to</strong>n and select one of the Programs d<strong>is</strong>played using the function push but<strong>to</strong>ns.<br />
Use the sixteen VOICES push but<strong>to</strong>ns <strong>to</strong> call up the groups of Programs.<br />
MODIFYING A PROGRAM<br />
Select a Program and then press the function push but<strong>to</strong>n relative <strong>to</strong> the Program selected again or from the main d<strong>is</strong>play, after having selected<br />
the Program <strong>to</strong> be modified, access menu F8 Edit Program. In any event the d<strong>is</strong>play shows four columns, each of which corresponds <strong>to</strong> a<br />
Voice used in the Program, whereas the horizontal lines refer <strong>to</strong> the parameters, grouped <strong>to</strong>gether in three pages that are accessed using the<br />
PAGE +/- push but<strong>to</strong>ns. To move around within the parameters of the horizontal lines use the corresponding function push but<strong>to</strong>ns that select<br />
the parameter at the side of that in use each time the push but<strong>to</strong>n <strong>is</strong> pressed again.<br />
A GUIDE TO THE PARAMETERS<br />
PAGE 1<br />
From th<strong>is</strong> page access <strong>is</strong> gained <strong>to</strong> some overall parameters that directly affect the Voice performance.<br />
F1/F6 Voice:<br />
th<strong>is</strong> indicates the timbre used for the Voice selected. To change it follow the exact same procedures used <strong>to</strong> call up a Voice<br />
from the main page. The Preset voices, the User Voice and also the sounds of the RAM/Flash bank loaded in RAM can be used.<br />
Once a Voice has been selected, wait a few seconds <strong>to</strong> return <strong>to</strong> the Edit Program page or press the EXIT push but<strong>to</strong>n. To<br />
d<strong>is</strong>able a Voice selected press the VALUE +/- push but<strong>to</strong>ns <strong>to</strong>gether at the same time.<br />
When a Voice <strong>is</strong> selected the F10 Harmony function appears immediately at the bot<strong>to</strong>m right part of the d<strong>is</strong>play, which <strong>is</strong><br />
used <strong>to</strong> enable the harmonization function for that Voice. Only one Voice within the Program can use the harmonization<br />
28<br />
<strong>SD1</strong> Owner’s Manual
function and <strong>is</strong> d<strong>is</strong>tingu<strong>is</strong>hed from the others by the letter “H” written under the name. If the Harmony function has already<br />
been applied <strong>to</strong> a Voice, it will be au<strong>to</strong>matically d<strong>is</strong>abled when the same function <strong>is</strong> set on another Voice.<br />
A completely different matter <strong>is</strong> the fourth Voice of a Program: <strong>to</strong>gether with harmonization, with the same rules as those<br />
for the other Voices, it can become a Second Voice and therefore enabled or d<strong>is</strong>abled using the 2ND VOICE push but<strong>to</strong>n.<br />
To avail of th<strong>is</strong> option, once you have moved on<strong>to</strong> the fourth Voice, press F10 Harmony twice. The first time it <strong>is</strong> pressed<br />
the letter “H” will appear under the name of the timbre, the second time it <strong>is</strong> pressed the Harmony setting <strong>is</strong> res<strong>to</strong>red and<br />
the fourth Voice <strong>is</strong> transformed in<strong>to</strong> Second Voice, which will be pointed out by “2nd” under the name.<br />
F2/F7 Volume:<br />
F3/F8 Shift:<br />
F4/F9 Tune:<br />
F5/F10 Pan:<br />
Th<strong>is</strong> indicates the value of the volume for each single Voice that can be varied using the VALUE +/- push but<strong>to</strong>ns which, if<br />
pressed <strong>to</strong>gether at the same time, will set the value <strong>to</strong> zero.<br />
Th<strong>is</strong> <strong>is</strong> the transposition value in semi<strong>to</strong>nes (+/- 63) that can be modified using the VALUE +/- push but<strong>to</strong>ns which, if pressed<br />
<strong>to</strong>gether at the same time, will set the value <strong>to</strong> zero.<br />
Th<strong>is</strong> <strong>is</strong> the fine tuning value (+/- 63 steps corresponding <strong>to</strong> one semi<strong>to</strong>ne), that can be modified using the VALUE +/- push<br />
but<strong>to</strong>ns which, if pressed <strong>to</strong>gether at the same time, will set the value <strong>to</strong> zero.<br />
Th<strong>is</strong> <strong>is</strong> the Pan pot value on the stereo front (+/- 64) that can be modified using the VALUE +/- push but<strong>to</strong>ns which, if pressed<br />
<strong>to</strong>gether at the same time, will set the value <strong>to</strong> zero. Zero corresponds <strong>to</strong> the middle position.<br />
PAGE 2<br />
The second page <strong>is</strong> used <strong>to</strong> set the entity of the effects for the single Voices. For all four Voices the Send for the Reverb <strong>is</strong> always available<br />
whereas the other parameters available depend on the type of algorithm selected for the Effect which, in th<strong>is</strong> case, can work as a multi-effect<br />
unit with d<strong>is</strong><strong>to</strong>rtion, chorus and delay algorithms combined in five different ways. When the Effect <strong>is</strong> enabled on a Voice, the musician must also<br />
establ<strong>is</strong>h which algorithm of the multi-effect must that Voice use. The choice of the type of multi-effect <strong>is</strong> made using the CURSOR +/- push<br />
but<strong>to</strong>ns and the combination of algorithms <strong>is</strong> shown directly on the d<strong>is</strong>play via which the musician can find out which algorithms are set in<br />
series (the output of the first enters in the second effect) or in parallel (the output of the effect goes directly <strong>to</strong> the audio output). Let’s take<br />
th<strong>is</strong> combination as an example:<br />
Delay > Chorus ⏐Chorus<br />
In th<strong>is</strong> case there are two effects set in parallel with each other, namely:<br />
1- Delay > Chorus<br />
2- Chorus<br />
with two effects in series with each other where a Delay enters in a Chorus.<br />
If th<strong>is</strong> multi-effect should be selected, there would be two selection possibilities in the Effect parameter: Delay > Chorus and Chorus.<br />
The five multi-effects available, of which however only one can be used for a Program, are:<br />
Chorus / D<strong>is</strong><strong>to</strong>rsor / Delay<br />
D<strong>is</strong><strong>to</strong>rsor > Chorus / Chorus<br />
Delay > Chorus / Chorus<br />
D<strong>is</strong><strong>to</strong>rsor > Delay / Chorus / Delay<br />
D<strong>is</strong><strong>to</strong>rsor > Delay > Chorus / Delay > Chorus / Chorus<br />
F1/F6 Voice: Th<strong>is</strong> indicates the timbre used for the Voice selected. To change it refer <strong>to</strong> all explained for page 1.<br />
F2/F7 Reverb:<br />
F3/F8 Effect:<br />
Th<strong>is</strong> controls the Reverb entity for each Voice, that can be modified using the VALUE +/- but<strong>to</strong>ns which, if pressed<br />
<strong>to</strong>gether at the same time, will set the value <strong>to</strong> zero.<br />
Th<strong>is</strong> enables the multi-effect and <strong>is</strong> used <strong>to</strong> choose which algorithm of the multi-effect will be used for the Voice,<br />
using the VALUE +/- push but<strong>to</strong>ns.<br />
Owner’s Manual <strong>SD1</strong> 29
F4/F9 Amount: Th<strong>is</strong> controls the signal entity <strong>to</strong> be sent <strong>to</strong> the multi-effect and, in particular, <strong>to</strong> the pre-selected algorithm, that can<br />
be modified using the VALUE +/- but<strong>to</strong>ns which, if pressed <strong>to</strong>gether at the same time, will set the value <strong>to</strong> zero.<br />
F5/F10 Delay and Chorus: These control the signal entity <strong>to</strong> be sent <strong>to</strong> the delay or the chorus, when an appropriate algorithm has been selected.<br />
Compared <strong>to</strong> all seen up <strong>to</strong> here, the parameters within the horizontal lines are only called up using the function<br />
push but<strong>to</strong>n F5/F10, as there <strong>is</strong> no function push but<strong>to</strong>n available for the last line.<br />
PAGE 3<br />
From th<strong>is</strong> page the musician can make some adjustments that are required <strong>to</strong> limit the keyboard range and the velocity for a Voice. It <strong>is</strong> thus<br />
possible <strong>to</strong> avail of a number of timbres in different parts of the Right section (split) and <strong>to</strong> call up the timbre based on the key dynamics (velocity<br />
switch).<br />
F1/F6 Voice: Th<strong>is</strong> indicates the timbre used for the Voice selected. To change it refer <strong>to</strong> all explained for page 1.<br />
F2/F7 Range:<br />
For each Voice it <strong>is</strong> possible <strong>to</strong> indicate the lower and higher limit of the keyboard within which the timbre will be<br />
played, simply by playing the relative note on the keyboard when selecting the value or by using the VALUE +/- push<br />
but<strong>to</strong>ns which, if pressed <strong>to</strong>gether at the same time, will reset the value, setting it in Off. When th<strong>is</strong> parameter <strong>is</strong> in<br />
Off the Voice will play on the whole part of keyboard <strong>to</strong> the right of the split point. To be able <strong>to</strong> play the Voice also<br />
on the part of keyboard <strong>to</strong> the left of the split point, the adequate keyboard range <strong>is</strong> <strong>to</strong> be set.<br />
F3/F8 Velocity Switch: Th<strong>is</strong> <strong>is</strong> used <strong>to</strong> enable the velocity switch mode, namely the use of the timbre according <strong>to</strong> the key dynamics, that can<br />
be modified using the VALUE +/- push but<strong>to</strong>ns. The operating modes may be:<br />
Normal: The timbre <strong>is</strong> always enabled whatever the velocity value set.<br />
Low: The Voice <strong>is</strong> enabled only for velocity values ranging from 0 <strong>to</strong> the velocity value specified in F10<br />
Threshold with the VALUE +/- push but<strong>to</strong>ns.<br />
High: The Voice will only play for velocity values that range from the velocity value specified in F10 Threshold<br />
<strong>to</strong> value 127 (maximum dynamics).<br />
Cross: Th<strong>is</strong> can be enabled only for the first two Voices and it enables a gradual switching from one Voice <strong>to</strong><br />
the other according <strong>to</strong> the dynamics, where the central point of th<strong>is</strong> switching <strong>is</strong> set by the F10 Threshold value.<br />
F4/F9 Sustain - Portamen<strong>to</strong> -Expression: th<strong>is</strong> <strong>is</strong> used <strong>to</strong> enable, or otherw<strong>is</strong>e, the use of the Sustain, the Portamen<strong>to</strong> and the Expression.<br />
The three lines of parameters can only be accessed using the function push but<strong>to</strong>ns F4/F9.<br />
F5 Modes:<br />
Off:<br />
Duet:<br />
Trio:<br />
Steel:<br />
Morph:<br />
Th<strong>is</strong> <strong>is</strong> used <strong>to</strong> choose the polyphony response <strong>to</strong> the keyboard mode, <strong>to</strong> create interesting combinations between the<br />
timbres.<br />
Th<strong>is</strong> means that no alternative polyphony response <strong>is</strong> enabled.<br />
The first Voice Program will have priority as the highest note, the second Voice will have priority as the lowest note.<br />
For example, if the first Voice <strong>is</strong> a clarinet and the second Voice a trumpet, when the two notes are played the clarinet<br />
will always play the highest note whereas the trumpet will always play the lowest note.<br />
As for Duet but with the third Voice that will always play the lowest note.<br />
Th<strong>is</strong> <strong>is</strong> used <strong>to</strong> assign the pitch bend only <strong>to</strong> the lowest note between two notes played at the same time, real<strong>is</strong>tically<br />
simulating the typical Hawaiian guitar or pedal steel guitar effect.<br />
Using the Modulation Wheel it <strong>is</strong> possible <strong>to</strong> control the mix between the two timbres assigned <strong>to</strong> Voice 1 and 2. When<br />
the Modulation Wheel <strong>is</strong> set at minimum only the first Voice will be heard; when it <strong>is</strong> at maximum only the second Voice<br />
will be heard. In th<strong>is</strong> way it <strong>is</strong> possible <strong>to</strong> obtain a morphing between the two Voices in real time and controlled by the<br />
musician.<br />
30<br />
<strong>SD1</strong> Owner’s Manual
SAVING AND LOADING A PROGRAM<br />
Once a Program has been modified or programmed, it must be saved in the memory or on d<strong>is</strong>k.<br />
PROCEED AS FOLLOWS TO SAVE A SINGLE PROGRAM IN THE RAM<br />
●<br />
●<br />
●<br />
●<br />
Select the program <strong>to</strong> be saved.<br />
Access the Edit Program environment by pressing the function push but<strong>to</strong>n relative <strong>to</strong> the Program selected once again or from the main<br />
page of the d<strong>is</strong>play by pressing F8 Edit Program.<br />
Press SAVE/ENTER. The page that appears will show the destination memory location with the name of the Program saved that can be<br />
modified using the function push but<strong>to</strong>ns F2 >> and F3
PROCEED AS FOLLOWS TO LOAD A SINGLE PROGRAM FROM DISK, WITH MASTER FOLDER ENABLED<br />
●<br />
●<br />
●<br />
●<br />
●<br />
●<br />
Press the DISK push but<strong>to</strong>n.<br />
Select the hard d<strong>is</strong>k using the PAGE +/- push but<strong>to</strong>ns.<br />
Select the type of file <strong>to</strong> be loaded using F5 Folder Choice.<br />
Select F2 Program.<br />
Select the Program using the VALUE +/- push but<strong>to</strong>ns.<br />
Press F2 Load.<br />
ONE TOUCH<br />
As default setting the <strong>SD1</strong> already contains a l<strong>is</strong>t of Voices put in order used <strong>to</strong> call up the timbres using the One Touch function. It <strong>is</strong> used <strong>to</strong><br />
create groups of ten Voices at a time with the preferred timbres <strong>to</strong> therefore speed up their access. To call up one of these timbres simply press<br />
the 1 TOUCH push but<strong>to</strong>ns (LED lit). On the main page the first ten Voices of the l<strong>is</strong>t are d<strong>is</strong>dplayed. To d<strong>is</strong>play the other seven pages of ten<br />
Voices each, use the first eight VOICES push but<strong>to</strong>ns or scroll the pages using the PAGE +/- push but<strong>to</strong>ns. To select the Voice desired press the<br />
relative function push but<strong>to</strong>n. To modify the l<strong>is</strong>t proceed as follows:<br />
Press the SAVE/ENTER push but<strong>to</strong>n:<br />
● Select F4 One Touch Edit which will d<strong>is</strong>play the first page of the l<strong>is</strong>t. To access the other pages use just the PAGE +/- push but<strong>to</strong>ns.<br />
● Find the location <strong>to</strong> be replaced with a <strong>new</strong> Voice, selecting it using the function push but<strong>to</strong>ns.<br />
● Select the Voice that will replace that in the l<strong>is</strong>t by following the procedures already described for calling up timbres. The audio files could<br />
also be used but these will not be loaded au<strong>to</strong>matically when turning on again. Furthermore, the <strong>SD1</strong> does not acknowledge original audio<br />
files within the l<strong>is</strong>t, which d<strong>is</strong>tributes the audio files in their loading order. If the audio files are <strong>to</strong> be used in One Touch it <strong>is</strong> adv<strong>is</strong>able <strong>to</strong><br />
create a group of files <strong>to</strong> be loaded when starting up in the same order in which they appear in the l<strong>is</strong>t (Sound Block).<br />
● Press EXIT or wait a few seconds <strong>to</strong> return <strong>to</strong> the One Touch Edit page.<br />
● Once the l<strong>is</strong>t has been completed press SAVE/ENTER again.<br />
● Confirm the procedure using F10 Save or<br />
● Reset the original conditions of the l<strong>is</strong>t using F4 Undo or<br />
● Cancel the procedure using F5 Escape or<br />
● Reset the default l<strong>is</strong>t using F9 Default.<br />
32<br />
<strong>SD1</strong> Owner’s Manual
Sound Load<br />
Notwithstanding the possibility <strong>to</strong> load a sample or an audio file from the d<strong>is</strong>k using the usual procedures, the <strong>SD1</strong> offers a short-cut called<br />
SOUND LOAD. Pressing the SOUND LOAD but<strong>to</strong>n on the <strong>SD1</strong> activates the Master Folder function and d<strong>is</strong>plays the contents of folder 94 Sound.<br />
The <strong>SD1</strong> divides the audio files in<strong>to</strong> two different categories:<br />
- Wave: audio file in .WAV format, easy <strong>to</strong> recogn<strong>is</strong>e because all starting with letter “w”<br />
- MSP: mult<strong>is</strong>ample files, easy <strong>to</strong> recogn<strong>is</strong>e because all starting with letter “m”<br />
A group of audio files <strong>to</strong> be loaded with one single operation <strong>is</strong> called Sound Block, whereas samples processed by <strong>Ketron</strong> are called Instrument<br />
and contain all the information required for their optimal use with the <strong>SD1</strong>.<br />
The <strong>SD1</strong> <strong>is</strong> able <strong>to</strong> load up <strong>to</strong> a maximum of eight Wave or MSP files and up <strong>to</strong> 128 Instruments in<strong>to</strong> the RAM memory.<br />
LOADING AN AUDIO FILE<br />
Press the SOUND LOAD but<strong>to</strong>n <strong>to</strong> open the Sound Load page. Here you may chose the type of audio file <strong>to</strong> be loaded pressing the function keys<br />
F8 Dir Wave/MSP or F9 Dir Block/Instruments d<strong>is</strong>playing all the files of the relevant type s<strong>to</strong>red in the folder. If you w<strong>is</strong>h <strong>to</strong> d<strong>is</strong>play the complete<br />
contents of the folder, use the F1 Dir function.<br />
The files <strong>to</strong> be loaded are selected as follows:<br />
● Use the VALUE +/- but<strong>to</strong>ns <strong>to</strong> select the file.<br />
● Go <strong>to</strong> the next pages, if possible, pressing the CURSOR +/- but<strong>to</strong>ns.<br />
● Confirm the selection of the file pressing F10 Select. The file will be highlighted with the symbol ><br />
● Repeat the previous operations if you w<strong>is</strong>h <strong>to</strong> select a number of files <strong>to</strong> load<br />
● Press F2 Load <strong>to</strong> confirm that you actually w<strong>is</strong>h <strong>to</strong> load in<strong>to</strong> the memory all the selected files.<br />
● The audio files that have been loaded in<strong>to</strong> the RAM are highlighted with the ♦ symbol so you can d<strong>is</strong>tingu<strong>is</strong>h them in the Folder from those<br />
not yet loaded.<br />
The sounds loaded according <strong>to</strong> the above procedure will be available in the RAM/Flash bank. They can be reached pressing the RAM/FLASH<br />
but<strong>to</strong>n and selected pressing the relevant function but<strong>to</strong>ns. When a number of Instrument files are loaded, use the VOICES but<strong>to</strong>ns <strong>to</strong> d<strong>is</strong>play<br />
the subsequent pages.<br />
The F2 Load but<strong>to</strong>n loads the audio files in<strong>to</strong> the free memory locations of the RAM/Flash bank without deleting those loaded previously. If you<br />
w<strong>is</strong>h <strong>to</strong> load audio files removing those already ex<strong>is</strong>ting from the RAM/Flash bank, after having selected the files <strong>to</strong> load, press the F4<br />
Clear&Load but<strong>to</strong>n.<br />
DELETING THE SOUNDS FROM THE RAM<br />
If you w<strong>is</strong>h <strong>to</strong> delete from the RAM one or a number of sounds previously loaded, go back <strong>to</strong> the Sound Load page and select the sound you<br />
Owner’s Manual <strong>SD1</strong> 33
w<strong>is</strong>h <strong>to</strong> delete from the RAM. To make th<strong>is</strong> procedure easier, the sounds that have been loaded are marked with the ♦ symbol.<br />
●<br />
●<br />
●<br />
●<br />
●<br />
●<br />
●<br />
Press SOUND LOAD.<br />
If you prefer, select the file type pressing either F8 Dir Wave or F9 Dir Block/Instrument, or d<strong>is</strong>play the complete contents of the Folder<br />
pressing F1 Dir.<br />
Use the VALUE +/- but<strong>to</strong>ns <strong>to</strong> select the files.<br />
Use the CURSOR +/- but<strong>to</strong>ns <strong>to</strong> go <strong>to</strong> the next pages, if possible.<br />
Confirm the selection of the files pressing F10 Select. The selected file will be marked with the > symbol.<br />
Repeat the previous operations if you w<strong>is</strong>h <strong>to</strong> select a number of files <strong>to</strong> delete.<br />
Confirm that you actually w<strong>is</strong>h <strong>to</strong> delete by pressing F3 Clear.<br />
The sounds that are left in the memory take over the first free locations on the first page, maintaining however the Program Change of the first<br />
time they were loaded in<strong>to</strong> the memory.<br />
AUTOMATED LOADING<br />
It may become very useful <strong>to</strong> group a number of different audio files in<strong>to</strong> one single file (Sound Block) <strong>to</strong> be loaded with one single operation.<br />
If th<strong>is</strong> file <strong>is</strong> given the same name as one of the Reg<strong>is</strong>trations, a number of sounds will be au<strong>to</strong>matically loaded each time the Reg<strong>is</strong>tration <strong>is</strong><br />
called up. If the file name <strong>is</strong> the same as the name of a Style Block or of a Song Block, the sounds are au<strong>to</strong>matically loaded by simply loading<br />
a Style or a Song Block. Th<strong>is</strong> device proves <strong>to</strong> be most useful if a style or a Midi file also contains a groove or an audio file.<br />
Proceed as follows <strong>to</strong> create a Sound Block:<br />
●<br />
●<br />
●<br />
●<br />
●<br />
●<br />
Press the SOUND LOAD but<strong>to</strong>n.<br />
Use the F8 function but<strong>to</strong>n <strong>to</strong> select the type of audio file <strong>to</strong> be included in the Sound Block (chose between MSP and Wave).<br />
Use the VALUE +/-, CURSOR +/- and F10 Select but<strong>to</strong>ns <strong>to</strong> select a number of audio files.<br />
Press F6 Create Block <strong>to</strong> actually create the file block.<br />
Use the keys of the keyboard <strong>to</strong> enter the name, use the CURSOR +/- but<strong>to</strong>ns <strong>to</strong> move.<br />
Press F10 Save <strong>to</strong> confirm. The file block will be saved in the Sound Folder on the hard d<strong>is</strong>k, or press F5 Escape <strong>to</strong> delete the operation.<br />
In order <strong>to</strong> use sounds of the floppy d<strong>is</strong>k <strong>to</strong> create a file Block it <strong>is</strong> ind<strong>is</strong>pensable <strong>to</strong> first copy them on the hard d<strong>is</strong>k, in<strong>to</strong> folder 94 Sound, which<br />
<strong>is</strong> au<strong>to</strong>matically set if Master Folder <strong>is</strong> active.<br />
A file Block can contain files in the .WAV, .MSP, and .INS format.<br />
LOAD A SOUND BLOCK ON SWITCHING THE <strong>SD1</strong> ON<br />
It may be useful <strong>to</strong> au<strong>to</strong>matically load a Sound Block on switching the <strong>SD1</strong> on, so you have it immediately available. For th<strong>is</strong> purpose, create or<br />
select a Sound Block as described above. Then press the F9 function but<strong>to</strong>n <strong>to</strong> d<strong>is</strong>play only the files of the Sound Block (F9 Dir Block). Use the<br />
VALUE +/- and F10 Select but<strong>to</strong>ns <strong>to</strong> select the Sound Block you w<strong>is</strong>h <strong>to</strong> load on switching the instrument on and press the SAVE/ENTER but<strong>to</strong>n<br />
<strong>to</strong> create the <strong>new</strong> file called!! INIT 00.PWR, allocated in the inside of the source Folder of the Sound Block. If you w<strong>is</strong>h <strong>to</strong> deactivate the au<strong>to</strong>matic<br />
loading of a Sound Block you need <strong>to</strong> delete the !! INIT00.PWR file proceeding as follows:<br />
●<br />
●<br />
●<br />
●<br />
●<br />
Press the EXIT but<strong>to</strong>n <strong>to</strong> go back <strong>to</strong> the main d<strong>is</strong>play page.<br />
Activate the MASTER FOLDER but<strong>to</strong>n if deactivated.<br />
Press DISK and enter value 94 on the numeric keypad (STYLES but<strong>to</strong>ns) <strong>to</strong> select Folder 94 Sound.<br />
Press F10 Select <strong>to</strong> select file !! INIT00.PWR.<br />
Press F6 Delete <strong>to</strong> delete it and press F10 Exec <strong>to</strong> confirm after the <strong>SD1</strong> warning appears. Press F5 Escape <strong>to</strong> cancel the delete operation.<br />
Deleting the !! INIT00.PWR file will not delete neither the original Sound Block nor the single audio files it contains.<br />
DIFFERENCE BETWEEN RAM AND FLASH RAM<br />
The procedures described above refer <strong>to</strong> the loading of samples in<strong>to</strong> the RAM memory, which will be lost on switching the <strong>SD1</strong> off. There <strong>is</strong> a<br />
possibility <strong>to</strong> load samples in<strong>to</strong> a buffer memory, called Flash RAM, that makes it possible <strong>to</strong> keep the samples in memory even while the keyboard<br />
<strong>is</strong> switched off and which <strong>is</strong> used <strong>to</strong> up-date or locate the timbres. The use of the Flash RAM <strong>is</strong> reserved <strong>to</strong> <strong>Ketron</strong> special<strong>is</strong>ts, due <strong>to</strong> the<br />
fact that replacing one of the samples present on the purchase may jeopard<strong>is</strong>e the correct management of the Style and Voices timbres.<br />
Function F5 Flash Load makes it possible <strong>to</strong> load samples in<strong>to</strong> the Flash RAM, but th<strong>is</strong> procedure <strong>is</strong> not described in th<strong>is</strong> manual on purpose.<br />
34<br />
<strong>SD1</strong> Owner’s Manual
The sampler<br />
The <strong>SD1</strong> sampler <strong>is</strong> used <strong>to</strong> record <strong>new</strong> sounds using the Micro 1 audio input and can also handle Wave files created on PC using the floppy d<strong>is</strong>k.<br />
The character<strong>is</strong>tics of the <strong>SD1</strong> include the processing of the 16-bit signal with sampling frequency of 44,1 kHz in monphony. One of the special<br />
features <strong>is</strong> the possibility <strong>to</strong> create a Multi-sample file exploiting up <strong>to</strong> a maximum of 64 samples arranged over the keyboard and therefore<br />
achieving an amazing timbre over the octaves of the keyboard. The sampler can also record and handle audio files <strong>to</strong> be combined with both<br />
Styles and Midi files, as already explained in the relative sections. The au<strong>to</strong>matic function loads an audio file or a Sound Block (a number of<br />
audio files grouped in one single file) when a Style or Midi file <strong>is</strong> called up having the same name as the audio file. There <strong>is</strong> no need <strong>to</strong> use an<br />
external edi<strong>to</strong>r as the <strong>SD1</strong> <strong>is</strong> provided with some of the most important editing functions on the waveform, d<strong>is</strong>played in graph form.<br />
Considering that the sampler shares the standard RAM with the RAM/Flash bank, before starting you must cancel all the contents of th<strong>is</strong> bank,<br />
which <strong>is</strong> done au<strong>to</strong>matically. A warning message will appear requesting you <strong>to</strong> confirm using F10 Exec or <strong>to</strong> cancel using F5 Escape.<br />
To access the sampler menu simply press the SAMPLER MPS push but<strong>to</strong>n situated <strong>to</strong> the left of the control panel. Bear the following in mind:<br />
Only one sampling can be performed at a time. When a <strong>new</strong> sampling <strong>is</strong> started the whole RAM of the Sampler section <strong>is</strong> cancelled. Therefore<br />
when the sampling <strong>is</strong> completed record the result <strong>to</strong> avoid loosing it.<br />
A lot of memory space can be saved by attempting <strong>to</strong> exploit short samples and samples with loops in the best way possible.<br />
Up <strong>to</strong> eight Multi-sample files can be achieved with 32 samples each at the most.<br />
All samples are saved in Wave format with .WAV extension.<br />
The initial page of the menu shows the time value in seconds in the middle (th<strong>is</strong> can be modified) that corresponds <strong>to</strong> the length of the sample<br />
being recorded.<br />
RECORDING AND SAVING IN BRIEF<br />
Below <strong>is</strong> an example of a typical sampling session:<br />
●<br />
●<br />
●<br />
●<br />
●<br />
●<br />
●<br />
●<br />
Connect the audio signal source <strong>to</strong> Micro 1 input, such as a microphone or the output of an electronic instrument (not the output of the<br />
amplifier!)<br />
Adjust the Gain cursor next <strong>to</strong> the audio inputs <strong>to</strong> obtain the maximum signal level without d<strong>is</strong><strong>to</strong>rtion, in which case the Micro Input Overload<br />
LED will light up.<br />
Enable the sampler by pressing the SAMPLER push but<strong>to</strong>n. If the RAM/Flash bank has some sounds, the <strong>SD1</strong> will warn the user that the whole<br />
contents will be cancelled with th<strong>is</strong> procedure. When the message appears press F10 Exec <strong>to</strong> continue or F5 Escape <strong>to</strong> cancel.<br />
Set the duration of the reg<strong>is</strong>tration by pressing F2 Time and enter the value using the VALUE +/- push but<strong>to</strong>ns.<br />
Start recording by pressing F10 Start and the <strong>SD1</strong> enters the stand-by status until it receives the audio signal on the input. The reg<strong>is</strong>tration<br />
s<strong>to</strong>ps at the end of the time available.<br />
Play the sample using key C3 of the keyboard.<br />
To save the sample press SAVE/ENTER and enter the name using the keys of the keyboard and the CURSOR +/- push but<strong>to</strong>ns.<br />
If Master Folder <strong>is</strong> enabled (push but<strong>to</strong>n with LED lit) the file will be created in Folder 94 Sound. With Master Folder d<strong>is</strong>abled the destination<br />
Folder can be selected by entering the number using the numeric keypad (STYLES push but<strong>to</strong>ns).<br />
Owner’s Manual <strong>SD1</strong> 35
●<br />
●<br />
Confirm that the sample <strong>is</strong> <strong>to</strong> be saved using F10 Exec or cancel the procedure using F5 Escape.<br />
Upon completion the <strong>SD1</strong> returns <strong>to</strong> the initial page of the sampler <strong>to</strong> record <strong>new</strong> sounds or <strong>to</strong> modify those that already ex<strong>is</strong>t.<br />
THE SAMPLER FUNCTIONS<br />
The initial page of the Sampler MPS menu shows the sampling time in seconds that <strong>is</strong> selected using F2 Time (Sec). The functions available<br />
are called up using the function push but<strong>to</strong>ns.<br />
F1 Load:<br />
F2 Time (Sec):<br />
F3 Trigger:<br />
F4 MSP Edit:<br />
F5 MSP New:<br />
F6 View:<br />
F7 Pitch:<br />
Th<strong>is</strong> calls up a page that shows the l<strong>is</strong>t of audio files that can be loaded in the sampler for further modifications. If Master<br />
Folder <strong>is</strong> enabled the reference Folder <strong>is</strong> 94 and only th<strong>is</strong> folder can be used <strong>to</strong> manage the files. With Master Folder d<strong>is</strong>abled<br />
the Folders that are not correlated <strong>to</strong> Master Folder can be selecting by entering the number using the numeric keypad (STYLES<br />
push but<strong>to</strong>ns). The l<strong>is</strong>t of files <strong>is</strong> shown in the middle of the d<strong>is</strong>play with the number assigned au<strong>to</strong>matically by the <strong>SD1</strong>. To<br />
select the file <strong>to</strong> be loaded use the VALUE +/- and CURSOR +/- push but<strong>to</strong>ns (when more than one page of files <strong>is</strong> available).<br />
You can switch from hard d<strong>is</strong>k <strong>to</strong> floppy d<strong>is</strong>k using the PAGE +/- push but<strong>to</strong>ns. The functions available are the following:<br />
F1 Dir: Th<strong>is</strong> shows the l<strong>is</strong>t of all the audio files s<strong>to</strong>red in the Folder currently in use.<br />
F2 Load: Th<strong>is</strong> loads the file selected in RAM.<br />
F5 Escape: Th<strong>is</strong> returns <strong>to</strong> the initial page of the Sampler MSP.<br />
To play the sample loaded simply use the keyboard. Be careful not <strong>to</strong> press F10 Start as th<strong>is</strong> starts the reg<strong>is</strong>tration and <strong>is</strong><br />
not used <strong>to</strong> play the sample back.<br />
Th<strong>is</strong> <strong>is</strong> used <strong>to</strong> set the length in seconds of the sample <strong>to</strong> be recorded using the VALUE +/- push but<strong>to</strong>ns.<br />
Using the VALUE +/- push but<strong>to</strong>ns you can indicate an audio signal threshold beyond which the sampler, after having pressed<br />
F10 START, au<strong>to</strong>matically enables the reg<strong>is</strong>tration. Lower the value, more sensitive the sampler <strong>is</strong> <strong>to</strong> the amplitude of the<br />
audio signal. It <strong>is</strong> not always convenient <strong>to</strong> keep high trigger values as you could loose the reg<strong>is</strong>tration of the attack phase<br />
of the sound. It <strong>is</strong> therefore adv<strong>is</strong>able <strong>to</strong> leave th<strong>is</strong> value low and then cut the initial sample portion without a useful signal.<br />
Th<strong>is</strong> calls up the page used <strong>to</strong> modify the Multi-sample, which will be dealt with further on.<br />
Th<strong>is</strong> calls up the page used <strong>to</strong> create a Multi-sample, which will be dealt with further on.<br />
Th<strong>is</strong> calls up the page used <strong>to</strong> edit the loop and the d<strong>is</strong>play of the sampled wave shape.<br />
By pressing function but<strong>to</strong>n F7 repeatedly you can choose the in<strong>to</strong>nation mode of the sample. Standard assigns a normal<br />
chord <strong>to</strong> the sample right along the whole keyboard, by setting the original note using F8 Key, Fixed keeps the in<strong>to</strong>nation of<br />
the sample constant, the same as it <strong>is</strong> recorded or it <strong>is</strong> transposed by a value that <strong>is</strong> establ<strong>is</strong>hed using F8 Tune. Sync <strong>is</strong> used<br />
<strong>to</strong> enable the sample <strong>to</strong> be used with the Styles or the Midi files. The beat number of the sample <strong>to</strong> be used in Sync must<br />
always be defined using F8 Bar, as the <strong>SD1</strong> deduces the original Tempo value of the loop from th<strong>is</strong> value.<br />
F8: Th<strong>is</strong> has different functions depending on the F7 Pitch condition.<br />
F7 Pitch Standard: F8 Key <strong>is</strong> used <strong>to</strong> establ<strong>is</strong>h the note <strong>to</strong> which the transposition of the sample right along the keyboard<br />
will refer. Th<strong>is</strong> note <strong>is</strong> entered using the VALUE +/- push but<strong>to</strong>ns or by playing it on the keyboard.<br />
F7 Pitch Fixed: F8 Tune establ<strong>is</strong>hes the transposition <strong>to</strong> be applied <strong>to</strong> the sample according <strong>to</strong> the value entered<br />
using the VALUE +/- push but<strong>to</strong>ns.<br />
F7 Pitch Sync: F8 Bar th<strong>is</strong> <strong>is</strong> used <strong>to</strong> establ<strong>is</strong>h the number of beats that make up the loop. The tempo thus calculated<br />
<strong>is</strong> shown on the d<strong>is</strong>play. The values are selected by repeatedly pressing the function push but<strong>to</strong>n F8.<br />
F9 Fine: If F7 Pitch <strong>is</strong> set on Standard, th<strong>is</strong> parameter <strong>is</strong> used <strong>to</strong> modify the fine tuning in steps of one single cent for a <strong>to</strong>tal of 99<br />
(one semi<strong>to</strong>ne) using the VALUE +/- push but<strong>to</strong>ns.<br />
F10 Start:<br />
Th<strong>is</strong> enables the reg<strong>is</strong>tration of the sample that ends at the end of the time set using F2 Time. By pressing F10 Start the<br />
sample possibly loaded <strong>is</strong> cancelled, without warning, and <strong>is</strong> replaced by the <strong>new</strong> reg<strong>is</strong>tration.<br />
EDITING THE LOOP<br />
The loop <strong>is</strong> a portion of sample defined by a starting point and an ending point that <strong>is</strong> repeated au<strong>to</strong>matically until you s<strong>to</strong>p playing the note.<br />
36<br />
<strong>SD1</strong> Owner’s Manual
The advantage of using the loop lies in the possibility <strong>to</strong> save a lot of RAM space. In fact all electronic keyboards have been exploiting samples<br />
with loops for years. It <strong>is</strong> not easy <strong>to</strong> find the loop and it takes a few attempts <strong>to</strong> create an audio repetition without hearing digital no<strong>is</strong>es or<br />
oscillations of the pitch and the amplitude. Another use of the loop relates <strong>to</strong> drum grooves. Once you have sampled just a few beats you can<br />
repeat the two beats endlessly. In th<strong>is</strong> case it <strong>is</strong> easier <strong>to</strong> find the loop as each groove has a starting point and a prec<strong>is</strong>e ending point.<br />
Once a sound has been loaded or sampled, <strong>to</strong> access the loop editing function, from the initial page of the Sampler MSP menu, press F6 View.<br />
The window that appears after a few seconds of processing shows a graph of the wave shape and a number of parameters <strong>to</strong> the left. Use the<br />
zoom function of the wave shape <strong>to</strong> make it easier <strong>to</strong> find the loop points.<br />
F1 Start:<br />
F2 Loop:<br />
F3 End:<br />
The value that can be modified using the VALUE +/- push but<strong>to</strong>ns <strong>is</strong> used <strong>to</strong> accurately establ<strong>is</strong>h the starting point of the sample<br />
indicated with the S line on the graph. If it <strong>is</strong> impossible <strong>to</strong> enter a value above zero ensure that the starting point of the<br />
loop, establ<strong>is</strong>hed by F2 Loop, <strong>is</strong> greater than the value of F1 Start.<br />
The value that can be modified using the VALUE +/- push but<strong>to</strong>ns indicates the starting point of the loop and refers <strong>to</strong> line L on<br />
the wave shape.<br />
The value that can be modified using the VALUE +/- push but<strong>to</strong>ns indicates the ending point of the loop and always coincides<br />
with the end point of the sample, referred <strong>to</strong> line E on the wave shape.<br />
F4 Zoom:<br />
F5 Escape:<br />
Th<strong>is</strong> <strong>is</strong> used <strong>to</strong> enlarge the wave shape picture by up <strong>to</strong> 1600 times <strong>to</strong> make it easier <strong>to</strong> find the starting point of the loop. To<br />
modify the zoom value, proportional <strong>to</strong> the last point modified, press F4 Zoom and use the VALUE +/- push but<strong>to</strong>n. When F4<br />
Zoom <strong>is</strong> set on Envelope, the wave shape <strong>is</strong> d<strong>is</strong>played right across the d<strong>is</strong>play.<br />
Th<strong>is</strong> returns <strong>to</strong> the initial page of the Sampler MSP menu.<br />
THE MULTI-SAMPLES<br />
MSP stands for Multi-sample, namely the assignment of a number of samples across the keyboard, with their own pitch and volume parameters,<br />
in order <strong>to</strong> create one single audio file that <strong>is</strong> much more complex compared <strong>to</strong> a single Wave file. When a Multi-sample <strong>is</strong> created or modified<br />
the whole RAM contents are cancelled. The F4 MSP Edit function <strong>is</strong> used <strong>to</strong> modify a Multi-sample that already ex<strong>is</strong>ts, cancelling the RAM contents<br />
in use at the time, whereas the F5 MSP New function creates a Multi-sample from zero.<br />
LOADING A MULTI-SAMPLE THAT IS TO BE MODIFIED<br />
From the initial page of the Sampler MSP menu access the editing function of the Multi-sample by pressing F4 MSP Edit, which <strong>is</strong> used <strong>to</strong> load<br />
a Multi-sample that already ex<strong>is</strong>ts in Hard D<strong>is</strong>k or Floppy D<strong>is</strong>k, with the usual d<strong>is</strong>k selection procedures using the PAGE +/- push but<strong>to</strong>ns. Select<br />
the files using the VALUE +/- push but<strong>to</strong>ns and confirm the choice using F10 Select. The functions available are the following:<br />
F1 Dir: Th<strong>is</strong> shows the l<strong>is</strong>t of MSP files s<strong>to</strong>red in the Folder in use at the time.<br />
F2 Load: Th<strong>is</strong> <strong>is</strong> used <strong>to</strong> load one or a number of MSP files selected in RAM.<br />
F5 Escape: Th<strong>is</strong> shows the initial page of the Sampler MSP menu.<br />
F10: Together with the VALUE +/- push but<strong>to</strong>ns it <strong>is</strong> used <strong>to</strong> select one or a number of files <strong>to</strong> be loaded.<br />
Once the Multi-sample has been loaded, the <strong>SD1</strong> au<strong>to</strong>matically opens the MSP Edit page that <strong>is</strong> identical <strong>to</strong> the F5 MSP New function.<br />
Owner’s Manual <strong>SD1</strong> 37
CREATING AND EDITING A MULTI-SAMPLE<br />
From the initial page of the Sampler MSP menu you can access the creation function of a Multi-sample. The parameters available are the same<br />
as those for F4 MSP Edit, which calls up the same parameters but with a Multi-sample already loaded in RAM. The purpose in both cases <strong>is</strong><br />
that of arranging a sample in a portion of keyboard identified by the starting and range ending note, even overlapped, of defining the relative<br />
volume and the tuning compared <strong>to</strong> a reference note and of cancelling a sample.<br />
When the F5 MSP New function <strong>is</strong> used, <strong>to</strong> be able <strong>to</strong> create a completely <strong>new</strong> Multi-sample, you must first establ<strong>is</strong>h the keyboard split number<br />
using F9 Max Wave. Then load the samples using F10 Load, which opens the page with the following functions:<br />
F1 Dir:<br />
F2 Load:<br />
F5 Escape:<br />
F10 Select:<br />
Th<strong>is</strong> shows the l<strong>is</strong>t of .WAV files s<strong>to</strong>red in the Folder in use at the time.<br />
Th<strong>is</strong> <strong>is</strong> used <strong>to</strong> load one or a number of. WAV files selected in RAM.<br />
Th<strong>is</strong> shows the initial page of the Sampler MSP menu.<br />
Together with the VALUE +/- push but<strong>to</strong>ns it <strong>is</strong> used <strong>to</strong> select one or a number of files <strong>to</strong> be loaded.<br />
Once the single .WAV files have been loaded the <strong>SD1</strong> enters the editing function. From here onwards there are no differences between the editing<br />
function of a Multi-sample that already ex<strong>is</strong>ts and that <strong>to</strong> be created. The single samples of a Multi-sample are shown in the middle of the<br />
d<strong>is</strong>play and are selected using the CURSOR +/- push but<strong>to</strong>ns. By pressing the CURSOR + and CURSOR – push but<strong>to</strong>ns <strong>to</strong>gether at the same time<br />
only the sample selected at the time <strong>is</strong> played back ( “Solo” appears). By pressing the push but<strong>to</strong>ns <strong>to</strong>gether at the same time again all the<br />
samples will be played back. The editing function involves two pages that are called up using the PAGE +/- and push but<strong>to</strong>ns. The following<br />
parameters are available:<br />
PAGE 1<br />
F1 Start:<br />
F2 End:<br />
F3 Volume:<br />
F4 Remove:<br />
F5 Escape:<br />
F6 Pitch:<br />
F7 Key:<br />
F8 Fine:<br />
F9 Max Wave:<br />
F10 Load:<br />
Th<strong>is</strong> indicates the lower note of the keyboard range for the sample currently selected. The parameter <strong>is</strong> modified using the<br />
VALUE +/- push but<strong>to</strong>ns or by playing the note on the keyboard.<br />
Th<strong>is</strong> indicates the higher note of the keyboard range for the sample currently selected. The parameter <strong>is</strong> modified using the<br />
VALUE +/- push but<strong>to</strong>ns or by playing the note on the keyboard.<br />
Once modified using the VALUE +/- push but<strong>to</strong>ns, it indicates the Volume value for the sample currently selected.<br />
Th<strong>is</strong> erases the sample current selected from the RAM.<br />
The <strong>SD1</strong> requests you <strong>to</strong> save the Multi-sample by entering the name using the keyboard keys and the CURSOR +/- push but<strong>to</strong>ns.<br />
Use F10 Exec <strong>to</strong> save it on d<strong>is</strong>k or F5 Escape <strong>to</strong> cancel the saving procedure and <strong>to</strong> return <strong>to</strong> the editing page.<br />
Th<strong>is</strong> selects the type of tuning between Normal and Fixed, the latter does not alter the tuning along the keyboard and <strong>is</strong><br />
required <strong>to</strong> use loops. The choice <strong>is</strong> made by pressing push but<strong>to</strong>n F6.<br />
Using the VALUE +/- push but<strong>to</strong>ns or the key on the keyboard, th<strong>is</strong> defines which <strong>is</strong> the original note of the sample <strong>to</strong> be kept<br />
as reference for the transposition of the sample along the keyboard. It <strong>is</strong> enabled only if F6 Pitch <strong>is</strong> set on Normal.<br />
Using the VALUE +/- push but<strong>to</strong>n th<strong>is</strong> <strong>is</strong> used <strong>to</strong> tune, <strong>to</strong> a cent, a sample with F6 Pitch set on Normal.<br />
Th<strong>is</strong> defines the keyboard split number foreseen for a Multi-sample. The parameter can be modified only if no samples have<br />
been loaded yet. The values are selected by pressing the F9 repeatedly.<br />
Th<strong>is</strong> <strong>is</strong> used <strong>to</strong> load <strong>new</strong> samples <strong>to</strong> use in the Multi-sample. The page that opens has already been explained at the <strong>begin</strong>ning<br />
of the section.<br />
38<br />
<strong>SD1</strong> Owner’s Manual
PAGE 2<br />
Th<strong>is</strong> creates the d<strong>is</strong>tribution of the sample along the keyboard. Some synthetic parameters for the single sample can be modified. The parameters<br />
relative <strong>to</strong> the assignment of the effects appear in the middle of the d<strong>is</strong>play. To move around among these parameters use the CURSOR<br />
+/- push but<strong>to</strong>ns <strong>to</strong> select them and use the VALUE +/- push but<strong>to</strong>ns <strong>to</strong> enter the value. The effects section foresees the choice of a modulation<br />
effect between nine Overdrive, D<strong>is</strong><strong>to</strong>rsor, Chorus and Delay combinations. Based on the effect chosen, the single amounts (sending) of the<br />
Overdrive, D<strong>is</strong><strong>to</strong>rsor, Chorus and Delay effects will appear, the value of which <strong>is</strong> modified using the VALUE +/- push but<strong>to</strong>ns. The amount (sending)<br />
for the Reverb <strong>is</strong> always available. Three other parameters are also available:<br />
Octave Right:<br />
Global Level:<br />
Ro<strong>to</strong>r:<br />
Th<strong>is</strong> <strong>is</strong> used <strong>to</strong> establ<strong>is</strong>h the transposition in octaves when the Multi-sample <strong>is</strong> used by the Right part. The value <strong>is</strong> modified<br />
using the VALUE +/- push but<strong>to</strong>ns.<br />
Th<strong>is</strong> modifies the global volume of the Multi-sample using the VALUE +/- push but<strong>to</strong>ns.<br />
Th<strong>is</strong> <strong>is</strong> used <strong>to</strong> enable (VALUE +/- push but<strong>to</strong>ns) the Ro<strong>to</strong>r effect if the ROTOR push but<strong>to</strong>ns <strong>is</strong> pressed.<br />
Together with these parameters page 2 also offers a set of synthetic parameters for the single sample selected in page 1, associated with the<br />
function push but<strong>to</strong>ns, the values of which are modified using the VALUE +/- push but<strong>to</strong>ns To simplify the editing procedures you can select<br />
the sample of which the parameters are <strong>to</strong> be changed by playing it directly in the establ<strong>is</strong>hed keyboard range .<br />
F1 Attack:<br />
F2 Decay:<br />
F3 Sustain:<br />
F4 Release:<br />
F5 Fine Tune:<br />
F6 Cu<strong>to</strong>ff:<br />
F7 DCA Offs:<br />
F8 DCA Slop:<br />
F9 DCF Offs:<br />
F10 DCF Slop:<br />
Th<strong>is</strong> modifies the attack time of the amplitude envelope.<br />
Th<strong>is</strong> modifies the decay time of the amplitude envelope.<br />
Th<strong>is</strong> modifies the sustain time of the amplitude envelope.<br />
Th<strong>is</strong> modifies the release time of the amplitude envelope.<br />
Th<strong>is</strong> modifies the fine tuning of the sample.<br />
Th<strong>is</strong> modifies the low pass filter cut-off.<br />
Th<strong>is</strong> modifies the sample level at minimum velocity.<br />
Th<strong>is</strong> modifies the sample level at maximum velocity<br />
Th<strong>is</strong> modifies the low pass filter cut-off of the sample at minimum velocity<br />
Th<strong>is</strong> modifies the low pass filter cut-off of the sample at maximum velocity.<br />
SAVING THE MULTI-SAMPLE<br />
When the Multi-sample has been created or modified you can enable the saving function of the file by pressing F5 Escape from the first page<br />
of MSP Edit, or you can press SAVE/ENTER. The page called up <strong>is</strong> used <strong>to</strong> enter the name of the Multi-sample using the keyboard keys and the<br />
CURSOR +/- push but<strong>to</strong>ns. Confirm the procedure using F10 Exec, cancel it using F5 Escape, which will take you <strong>to</strong> the MSP Edit page.<br />
Owner’s Manual <strong>SD1</strong> 39
Drawbars<br />
Thanks <strong>to</strong> the very powerful timbre mo<strong>to</strong>r of the <strong>SD1</strong>, it <strong>is</strong> possible <strong>to</strong> reproduce very accurately also the sounds of classic electromagnetic<br />
organs, among which the Hammond‚ certainly <strong>is</strong> the most famous one with the most important timbre. If you do not know what an electromagnetic<br />
organ <strong>is</strong>, keep in mind that their timbres used <strong>to</strong> be mixed using so-called drawbars, with a specific harmonic corresponding <strong>to</strong> each<br />
of them. In order <strong>to</strong> compose the timbre, the required harmonics used <strong>to</strong> be added on different levels. The <strong>SD1</strong> reproduces these timbres d<strong>is</strong>playing<br />
the drawbars that can be controlled in real time by a number of but<strong>to</strong>ns on the panel.<br />
Simply press the DRAWBARS but<strong>to</strong>n <strong>to</strong> activate the Drawbars mode. For a simpler use, the <strong>SD1</strong> has been equipped with sixteen organ timbre<br />
presets, each of which <strong>is</strong> associated <strong>to</strong> one of the VOICES but<strong>to</strong>ns which can be called up at any time.<br />
PROGRAMMING THE ORGAN TIMBRE<br />
If you w<strong>is</strong>h <strong>to</strong> modify a preset and program your own settings, press F7 Edit Voice Drawbars on the main d<strong>is</strong>play page, while the DRAWBARS<br />
but<strong>to</strong>n <strong>is</strong> activated. The <strong>SD1</strong> d<strong>is</strong>plays a page with the single settings of the Drawbars and the other parameters that can be programmed.<br />
The single harmonics and the but<strong>to</strong>ns on the panel have been associated among each other as follows:<br />
16’ VOLUME DRUMS +/- 2’ VOLUME RIGHT<br />
5 1/3’ VOLUME BASS +/- 1 3/5’ PAGE +/-<br />
8’ VOLUME CHORDS +/- 1 1/3’ CURSOR +/-<br />
4’ VOLUME ORCHESTRAL 1’ VALUE +/-<br />
2 2/3’ VOLUME LOWER<br />
Due <strong>to</strong> the fact that the Drawbars page also contains parameters that can be called up using the funci<strong>to</strong>n but<strong>to</strong>ns, the VALUE +/- but<strong>to</strong>ns are<br />
enabled <strong>to</strong> control harmonic 1’ only if these parameters are not selected.<br />
As usual, pressing both but<strong>to</strong>ns relevant <strong>to</strong> a Drawbar at the same time put the harmonic <strong>to</strong> zero.<br />
The <strong>SD1</strong> also allows you <strong>to</strong> control a number of particular features relevant <strong>to</strong> the original organ timbre, <strong>to</strong> be called up with the function but<strong>to</strong>ns<br />
and the CURSOR +/- but<strong>to</strong>ns and modified with the VALUE +/- but<strong>to</strong>ns. These parameters are described in detail in the following:<br />
F1 Click:<br />
F2 Sustain:<br />
F6 Percussion:<br />
F7 Effects:<br />
activates the typical no<strong>is</strong>e when the sound of the electromagnetic organ starts.<br />
an effect used on the electronic organs of the sixties and seventies, extending the decline time of the timbre; the relevant<br />
value <strong>is</strong> programmed using the VALUE +/- but<strong>to</strong>ns.<br />
th<strong>is</strong> <strong>is</strong> a basic feature of the Jazz and Rock organ sound. The percussion introduced <strong>is</strong> <strong>to</strong> be chosen among 4’ and 2 2/3’ by<br />
pressing the F6 function key. The percussion volume <strong>is</strong> modified using the VALUE +/- keys.<br />
th<strong>is</strong> allows you <strong>to</strong> access the typical effects associated <strong>to</strong> the electromagnetic organ, i.e. Chorus and Vibra<strong>to</strong>. The Vibra<strong>to</strong> can<br />
be applied <strong>to</strong> the oscilla<strong>to</strong>r (Dco), the amplitude (Dca) or the filter (Dcf) with a global speed control (Rate). Pressing CURSOR<br />
+/- you select the parameter and pressing VALUE +/- you modify the quantity. To go back <strong>to</strong> the Drawbars page press once<br />
more the F7 function but<strong>to</strong>n.<br />
Each configuration of the nine Drawbars can be saved in<strong>to</strong> a preset, that can be called up with the VOICES but<strong>to</strong>ns and whose name appears<br />
on the <strong>to</strong>p of the d<strong>is</strong>play. Proceed as follows <strong>to</strong> s<strong>to</strong>re a Drawbars combination:<br />
● Press SAVE/ENTER.<br />
● If you do not w<strong>is</strong>h <strong>to</strong> modify the name, press F10 Save <strong>to</strong> confirm.<br />
● If you w<strong>is</strong>h <strong>to</strong> modify the name, digit the letters using the keys of the keyboard and move with the CURSOR +/- but<strong>to</strong>ns. Then press F10 Save<br />
<strong>to</strong> confirm.<br />
● The F9 Default function res<strong>to</strong>res the original fac<strong>to</strong>ry set combinations.<br />
● The F4 Undo function res<strong>to</strong>res the last combination.<br />
● The F5 Escape function deletes the s<strong>to</strong>rage operation.<br />
40<br />
<strong>SD1</strong> Owner’s Manual
Drum Set<br />
The rhythm section of the <strong>SD1</strong> uses both the Drum Sets and the Live Drums. The Drum Sets are assigned <strong>to</strong> the Drum 1 track (channel MIDI 10),<br />
whereas the Live Drums are assigned <strong>to</strong> the Drum 2 track (channel MIDI 9) within a style.<br />
The <strong>SD1</strong> <strong>is</strong> equipped with 24 preset Drum Sets and 24 additional User Drum Sets that can be freely programmed by the user.<br />
PLAYING A DRUM SET<br />
Simply press the MANUAL DRUM but<strong>to</strong>n if you w<strong>is</strong>h <strong>to</strong> play a Drum Set on your keyboard. If a style <strong>is</strong> being played, also the Drum track will<br />
remain active, but you will not be able <strong>to</strong> change the chord until you deactivate the MANUAL DRUM but<strong>to</strong>n.<br />
If you w<strong>is</strong>h <strong>to</strong> change the Drum Set assigned <strong>to</strong> the Drum 1 track, and as a consequence also the Drum Set <strong>to</strong> be played on the keyboard, press<br />
the DRUM SET but<strong>to</strong>n <strong>to</strong> d<strong>is</strong>play all the available Drum Sets, including the Live Drum Sets. If you w<strong>is</strong>h <strong>to</strong> select one of them, simply press the<br />
function but<strong>to</strong>n relevant <strong>to</strong> the Drum Set and use the PAGE +/- but<strong>to</strong>ns or the first six VOICE but<strong>to</strong>ns <strong>to</strong> go <strong>to</strong> the next pages.<br />
It may be useful <strong>to</strong> transpose the instruments by one octave. For doing so, press the OCTAVE but<strong>to</strong>n.<br />
The Drum Sets marked with a small circle are User Drum Sets s<strong>to</strong>red in the internal memory and can be modified by the user.<br />
LIVE DRUM SETS<br />
The <strong>SD1</strong> features an innovation of the electronic keyboard technology, allowing you <strong>to</strong> achieve a fluidity and <strong>musical</strong>ity of the rhythms that so<br />
far have been simply inconceivable. All th<strong>is</strong> <strong>is</strong> the result of extensive <strong>musical</strong> research and complex processing of sampled grooves. With the<br />
<strong>SD1</strong>, in fact, the groove <strong>is</strong> not a simple file audio combined with the rhythm, but an actual Live Drum Set where the single instruments are separated<br />
for each single key of the keyboard. Th<strong>is</strong> particular feature on the one hand allows you <strong>to</strong> use the grooves at different speeds without<br />
important changes on the in<strong>to</strong>nation, and on the other hand it enables you <strong>to</strong> arrange the rhythm according <strong>to</strong> your own taste. Using the Live<br />
Drum Sets on a separate track makes it possible <strong>to</strong> complete the rhythm section with the usual Drum Sets and <strong>to</strong> combine groups of similar<br />
instruments in Arrange Wiev. It <strong>is</strong> not possible <strong>to</strong> play Live Drum Set directly on the keyboard. The only moment in which you can l<strong>is</strong>ten <strong>to</strong> it and<br />
especially play it <strong>is</strong> while editing the Style. The instruments’ d<strong>is</strong>position in a Live Drum Set <strong>is</strong> substantially different from the one in a usual<br />
Drum Set, so before you will be in a position <strong>to</strong> use it properly you need some time <strong>to</strong> get used <strong>to</strong> it.<br />
Live Drums (DRUM 2)<br />
BANK<br />
(C.C.=0)<br />
PROGRAM<br />
CHANGE<br />
NAME<br />
4 1 Bachata<br />
4 2 Bolero<br />
4 3 Chacha<br />
4 4 Cumbia<br />
4 5 Guajra<br />
4 6 Mambo<br />
4 7 Salsa 1<br />
4 8 Rhumba<br />
4 9 Merengue 1<br />
4 10 Merengue 2<br />
4 11 Congas 1<br />
4 12 Congas 2<br />
4 13 Gipsy<br />
4 14 Maracas<br />
4 15 Tamburine<br />
4 16 Brush<br />
4 17 House<br />
4 18 Rap 1<br />
4 19 Rap 2<br />
4 20 Jakson<br />
4 21 Dance<br />
4 22 Under<br />
4 23 Ethnic 1<br />
4 24 Ethnic 2<br />
Drum Sets<br />
PROGRAM<br />
CHANGE<br />
NAME<br />
1 Standard<br />
9 Folk<br />
10 Acoustic<br />
11 Pop<br />
12 Jazz Dry<br />
17 Hard Rock<br />
25 Power<br />
26 Techno<br />
28 Progressive<br />
29 Rave<br />
30 Hip-Hop<br />
33 Fusion<br />
41 Brush<br />
49 Orchestra<br />
57 Contemporary<br />
58 Vocal 1<br />
59 Vocal 2<br />
65 Latin 1<br />
66 Latin 2<br />
73 Rock&Roll<br />
121 Beat<br />
122 Electro<br />
123 Country<br />
124 R&B<br />
Owner’s Manual <strong>SD1</strong> 41
BANK<br />
(C.C.=0)<br />
PROGRAM<br />
CHANGE<br />
4 25 Latingr 1<br />
4 26 Latingr 2<br />
4 27 Latingr 3<br />
4 28 Latingr 4<br />
4 29 Latingr 5<br />
4 30 Latingr 6<br />
4 31 Latingr 7<br />
4 32 Latingr 8<br />
4 33 Tekno 1<br />
4 34 Tekno 2<br />
4 35 Newage<br />
4 36 Latinhou<br />
4 37 Slowbeat<br />
4 38 Hiphop<br />
4 39 Pop<br />
4 40 Vocals<br />
4 41 Rock<br />
4 42 Jazz 1<br />
4 43 Shuffle<br />
4 44 Jazz 2<br />
4 45 Bossanova<br />
4 46 Samba 1<br />
4 47 Samba 2<br />
4 48 Pandero<br />
4 49 Salsa 2<br />
4 50 Eurolatin<br />
NAME<br />
DRUM MIXER<br />
Press the DRUM MIXER but<strong>to</strong>n and scroll the next pages with the PAGE +/- but<strong>to</strong>ns <strong>to</strong> open the Drum Mixer pages.<br />
The four Drum Mixer pages allow you <strong>to</strong> control the Volume, Reverb, Pan and activation status parameters for ten categories of percussion<br />
instruments. Th<strong>is</strong> makes it possible <strong>to</strong> personal<strong>is</strong>e the Drum Sets and the Live Drum Sets in a few instants, simply activating or deactivating a<br />
group of instruments. With regard <strong>to</strong> the Live Drum Sets you may perceive a number of instruments at a very low volume, although you have<br />
deactivated them: th<strong>is</strong> behaviour <strong>is</strong> a result of the groove processing and <strong>is</strong> not a defect of the <strong>SD1</strong>.<br />
The percussion sounds are grouped as follows:<br />
Kick<br />
Snare ( Snare, Rim Shot )<br />
Hi Hat<br />
Cymbals ( Crash, Ride, Cup )<br />
Toms<br />
Tambourine<br />
Latin 1 ( Congas , Bongos, Tambora )<br />
Latin 2 ( Cowbell, Guiro, Claves, )<br />
Latin3 ( Maracas, Cabaza, Shaker, Guira, Wh<strong>is</strong>tle )<br />
Clap / FX ( Clap, Special Effects )<br />
The first page allows you <strong>to</strong> activate or deactivate the instruments of a percussion group, by pressing the function but<strong>to</strong>ns corresponding <strong>to</strong><br />
the specific group. If you w<strong>is</strong>h <strong>to</strong> deactivate all percussion groups <strong>to</strong>gether (except for the Kick), simply press both VALUE +/- but<strong>to</strong>ns at the<br />
same time. If you then press one of the two VALUE but<strong>to</strong>ns, all groups will be activated again. The Kick group has been excluded from the global<br />
deactivation process especially in order <strong>to</strong> grant an optimum reproduction of techno and dance Styles, where during the first beats only the<br />
bass drum <strong>is</strong> used, with the other instruments being added later on.<br />
42<br />
<strong>SD1</strong> Owner’s Manual
The second page <strong>is</strong> used <strong>to</strong> control the volume of the single groups <strong>to</strong> be selected with the relevant function keys. The volume of the selected<br />
group can be modified from value 1 <strong>to</strong> 15 using the VALUE +/- but<strong>to</strong>ns.<br />
The third page <strong>is</strong> used <strong>to</strong> control the reverb quantity of the single groups <strong>to</strong> be selected with the relevant function keys. The reverb quantity of<br />
the selected group can be modified from value 1 <strong>to</strong> 15 using the VALUE +/- but<strong>to</strong>ns.<br />
The fourth page <strong>is</strong> used <strong>to</strong> control the pan value (stereo position) for the single groups <strong>to</strong> be selected with the relevant function keys. The pan<br />
value of the selected group can be modified in steps of 64 <strong>to</strong> the right (R) or <strong>to</strong> the left (L) using the VALUE +/- but<strong>to</strong>ns. Pressing both VALUE<br />
+/- but<strong>to</strong>ns at the same time brings the pan back <strong>to</strong> the neutral value, i.e. in the centre (—).<br />
HOW TO CREATE OR MODIFY A DRUM SET<br />
he <strong>SD1</strong> makes it possible <strong>to</strong> create and program a Drum Set <strong>to</strong> be s<strong>to</strong>red among the User Drum Sets and <strong>to</strong> be used in the styles. If you w<strong>is</strong>h <strong>to</strong><br />
access the editing pages, press the EXIT but<strong>to</strong>n <strong>to</strong> go <strong>to</strong> the main page and then press F9 Edit Drum.<br />
You are now able <strong>to</strong> edit the Drum Set presently selected and shown in the centre of the d<strong>is</strong>play, under which the destination User Drum Set for<br />
s<strong>to</strong>rage <strong>is</strong> shown, which cannot be modified if you do not select a different source Drum Set for the editing procedure. In fact the association<br />
between the preset Drum Sets and the User Drum Sets <strong>is</strong> prearranged.<br />
Owner’s Manual <strong>SD1</strong> 43
If you w<strong>is</strong>h <strong>to</strong> select a different Drum Set <strong>to</strong> modify, press the DRUM SET but<strong>to</strong>n and select another Drum Set in the usual way.<br />
Pressing EXIT once or pressing DRUM SET again, you go back <strong>to</strong> the Drum Edit page.<br />
If you w<strong>is</strong>h <strong>to</strong> modify the settings of the single key, first of all play the note, which will be shown in F2 Key, and then modify the following parameters<br />
<strong>to</strong> be selected with the function but<strong>to</strong>ns. The values are input using the VALUE +/- but<strong>to</strong>ns.<br />
F1 Wave Rev:<br />
F3 Group:<br />
F4 Instrument:<br />
F5 Wave:<br />
F6 Key Shift:<br />
F7 Pitch:<br />
F8 Tune:<br />
F9 Live Snare:<br />
Reverb quantity <strong>to</strong> be assigned <strong>to</strong> the presently selected note.<br />
Percussion group from which the sound <strong>to</strong> be assigned <strong>to</strong> the note <strong>is</strong> <strong>to</strong> be selected. Th<strong>is</strong> allows quicker sound assignment.<br />
Sound <strong>to</strong> be assigned <strong>to</strong> the note. Pressing the VALUE +/- but<strong>to</strong>ns, further <strong>to</strong> the sounds foreseen for the specific percussion<br />
group, you scroll the complete l<strong>is</strong>t of sounds without having <strong>to</strong> use F3 Group.<br />
Th<strong>is</strong> assigns one of the samples loaded within a mult<strong>is</strong>ample using the Sound Load function <strong>to</strong> a single note, with a maximum<br />
of 62 samples <strong>to</strong> be assigned <strong>to</strong> the same number of notes. Press F5 Wave <strong>to</strong> select the single samples <strong>to</strong> be assigned<br />
<strong>to</strong> the note. At the end of the modification procedure, press SAVE/ENTER and assign the Drum Set the same name as the<br />
one of the .MSP file so that on calling up the Drum Set also the MSP file <strong>is</strong> au<strong>to</strong>matically loaded. Th<strong>is</strong> function makes it possible<br />
<strong>to</strong> completely re<strong>new</strong> the rhythms section of your instrument.<br />
Repeatedly pressing th<strong>is</strong> but<strong>to</strong>n transposes the complete Drum Set by octaves.<br />
Transposes the sound assigned <strong>to</strong> the note by half<strong>to</strong>nes.<br />
Transposes the sound assigned <strong>to</strong> the note by hundredths.<br />
If th<strong>is</strong> parameter <strong>is</strong> set <strong>to</strong> On, the snare in<strong>to</strong>nation <strong>is</strong> slightly modified while playing, <strong>to</strong> simulate what occurs in reality. Th<strong>is</strong><br />
feature makes the Drum Set more expressive.<br />
F10 Save: Calls up the s<strong>to</strong>rage page, where <strong>to</strong> enter the name of the modified Drum Set using the keyboard keys and the CURSOR +/-<br />
but<strong>to</strong>ns. Pressing F10 Save once more you confirm the saving procedure, which will overwrite any already ex<strong>is</strong>ting User<br />
Drum Set. The F5 Escape but<strong>to</strong>n deletes s<strong>to</strong>rage and takes you back <strong>to</strong> the Edit Drum Set page.<br />
44<br />
<strong>SD1</strong> Owner’s Manual
Arranger<br />
The Arranger <strong>is</strong> the heart of the au<strong>to</strong>matic accompaniment of the <strong>SD1</strong>. It allows you <strong>to</strong> create a dynamic and versatile arrangement using the<br />
Styles and their controls.<br />
A Style <strong>is</strong> a group of short sequences relevant <strong>to</strong> major, minor and seventh <strong>to</strong>nalities or different <strong>to</strong>nalities combined with each other. The<br />
Arranger has the task <strong>to</strong> suitably modify those basic sequences, according <strong>to</strong> the chord played, <strong>to</strong> create continuous harmonies that may also<br />
be based on more complex chords like the thirteenths and the dimin<strong>is</strong>hed ones. The sequences a Style <strong>is</strong> made up of are called Sections and<br />
refer <strong>to</strong> single moments of the arrangement, like the introduction, the ending and the fill ins, i.e. the small detachments between the single<br />
parts of a piece of music.<br />
Each Section <strong>is</strong> made up of a number of tracks for the single instruments that make up a <strong>musical</strong> arrangement.<br />
The SD-1 makes available the following sections for each Style:<br />
Intro 1: one or more introduction bars<br />
Intro 2: one or more introduction bars that are more complex than those of Intro 1<br />
Intro 3: one or more introduction bars that are more complex than those of Intro 2<br />
Fill 1: one detachment bar<br />
Fill 2: one detachment bar that <strong>is</strong> more complex than the one of Fill In 1<br />
Fill 3: one detachment bar that <strong>is</strong> more complex than the one of Fill In 2<br />
Break (Fill 4): one percussion detachment bar<br />
To End: a very simple ending bar<br />
Ending 1: one or more ending bars<br />
Ending 2: one or more ending bars that are more complex than those of Ending 1<br />
Ending 3: one or more ending bars that are more complex than those of Ending 2<br />
Arrange A: a simple accompaniment variation<br />
Arrange B: an accompaniment variation that <strong>is</strong> more complex than the one of Arrange A<br />
Arrange C: an accompaniment variation that <strong>is</strong> more complex than the one of Arrange B<br />
Arrange D: an accompaniment variation that <strong>is</strong> more complex than the one of Arrange C<br />
Each section of the Arranger <strong>is</strong> made up of a maximum of eight tracks divided in<br />
Drum 1:<br />
track for the drums and percussion instruments of the Drum Set<br />
Bass:<br />
bass line<br />
Chord 1, 2, 3, 4, 5: melodic accompaniment tracks<br />
Drum 2:<br />
track where <strong>to</strong> use the Live Drums and audio samples<br />
Editing, modifying and copying accompaniment tracks and sections <strong>is</strong> achieved with Edit Pattern.<br />
For each Style, the <strong>SD1</strong> allows you <strong>to</strong> modify the timbres that are assigned <strong>to</strong> the tracks, as well as the volumes, the pan value and the amount<br />
of the effects sent. To simplify the association between the best timbres and the Right part, each Style makes it possible <strong>to</strong> s<strong>to</strong>re (Style<br />
Setting) the most frequently used timbres. The Arranger <strong>is</strong> controlled through the <strong>SD1</strong> keyboard, pedals and but<strong>to</strong>ns, or via MIDI. Th<strong>is</strong> last feature<br />
<strong>is</strong> particularly useful for those who use a MIDI accordion.<br />
PANEL COMMANDS<br />
JUMP :<br />
When the LED <strong>is</strong> on, th<strong>is</strong> enables you <strong>to</strong> pass <strong>to</strong> other Style variations using the Fill Ins and <strong>to</strong> use the Intros in an already<br />
started execution.<br />
Conditions of use:<br />
Jump Arranger But<strong>to</strong>ns<br />
activation status status pressed Result<br />
Activated Start FILL 1 and 2 After the Fill In bar, the <strong>SD1</strong> selects the Arrange section above the one<br />
in use in the order A>B>C>D<br />
Activated Start FILL 3 After the Fill In bar, the <strong>SD1</strong> selects the Arrange section below the one<br />
in use in the order D>C>B>A<br />
Activated S<strong>to</strong>p INTRO 1, 2, 3 The Arranger <strong>is</strong> started <strong>to</strong> play only the bars of the corresponding<br />
Ending<br />
Activated S<strong>to</strong>p FILL 1, 2, 3 The Arranger <strong>is</strong> started, the selected Fill <strong>is</strong> played without subsequent<br />
interruption of the Arranger<br />
Owner’s Manual <strong>SD1</strong> 45
Jump Arranger But<strong>to</strong>ns<br />
activation status status pressed Result<br />
Activated S<strong>to</strong>p TO END Only the To End bar <strong>is</strong> played<br />
Activated Start INTRO 1, 2, 3 The Arranger <strong>is</strong> not interrupted, plays the bars of the selected Intro and<br />
continues playing.<br />
Activated S<strong>to</strong>p COUNT IN The Arranger <strong>is</strong> started with a Count In bar.<br />
Activated S<strong>to</strong>p COUNT IN The Arranger <strong>is</strong> started, after one Count In bar the selected Intro <strong>is</strong><br />
INTRO 1, 2, 3 played without subsequent interruption of the Arranger<br />
If you play a chord in the following conditions: JUMP activated, HOLD activated and Arranger in S<strong>to</strong>p, before pressing a FILL, TO END, BREAK<br />
or COUNT IN but<strong>to</strong>n, the <strong>SD1</strong> remembers the chord played. In th<strong>is</strong> way you may create short <strong>musical</strong> detachments complete with Endings, that<br />
are most useful <strong>to</strong> manage unforeseen situations of interaction with the public during performance.<br />
MANUAL BASS:<br />
BASS TO LOWEST:<br />
BASS TO ROOT:<br />
INTRO/ENDING 1, 2, 3:<br />
FILL IN 1, 2, 3:<br />
BREAK:<br />
TO END:<br />
ARRANGE A, B, C, D:<br />
HOLD:<br />
START:<br />
SLOW:<br />
Th<strong>is</strong> excludes all sections of the Arranger and leaves the Drum tracks and the bass timbre activated. The bass can<br />
then be manually played on the keyboard portion <strong>to</strong> the left of the split point.<br />
If th<strong>is</strong> LED <strong>is</strong> on, the harmonic bass evolution has its lowest note always referred <strong>to</strong> the lowest one of the chord played.<br />
Th<strong>is</strong> makes it possible <strong>to</strong> perform a number of pieces of music keeping unaltered the melodic structure of the bass.<br />
If th<strong>is</strong> LED <strong>is</strong> on, the notes of the bass track are all referred <strong>to</strong> the fundamental note of the chord <strong>to</strong>nality, excluding<br />
the harmonic evolution. Th<strong>is</strong> can be used <strong>to</strong>gether with BASS TO LOWEST.<br />
The Arranger foresees three Intros and three Endings. Intro1 and Ending 1 are programmed without chord changes, so<br />
you may develop the harmony as you prefer. Intro 2 and 3, as well as Ending 2 and 3, instead, are programmed with<br />
harmony variations in their inside, so it <strong>is</strong> not recommendable <strong>to</strong> change the chord while they are being played.<br />
Pressing one of these but<strong>to</strong>ns while the Arranger <strong>is</strong> in S<strong>to</strong>p causes the instrument <strong>to</strong> activate the selected Intro and<br />
<strong>to</strong> go on <strong>to</strong> the Arrange A variation, unless you have previously selected a different type of Arrange. If the Arranger<br />
<strong>is</strong> in Start condition, pressing one of these but<strong>to</strong>ns activates the relevant Ending. If the JUMP but<strong>to</strong>n LED <strong>is</strong> on and<br />
the Arranger <strong>is</strong> being executed, pressing any Intro but<strong>to</strong>n starts the execution of the selected Intro.<br />
These are Style variations with the duration of one bar, used as short harmonic intervals <strong>to</strong> enhance the rhythm. When<br />
the Arranger <strong>is</strong> activated and one of these three pushbut<strong>to</strong>ns <strong>is</strong> pressed, a Fill-In bar <strong>is</strong> entered, and at its end the<br />
Arranger goes back <strong>to</strong> the conditions previous <strong>to</strong> the Fill In.<br />
If the LED of the JUMP push but<strong>to</strong>n <strong>is</strong> lit, the FILL 1 and 2 push but<strong>to</strong>ns allow you <strong>to</strong> go <strong>to</strong> the next Style variation,<br />
whereas pressing FILL 3 takes you back <strong>to</strong> the previous variation of the Style in use.<br />
Keeping any of the three FILL but<strong>to</strong>ns continuously pressed down causes the Arranger <strong>to</strong> cyclically perform the Fill<br />
Ins 1, 2, 3 one after the other, starting from the selected Fill In, until you release the push but<strong>to</strong>n (Multi Fill).<br />
While the Arranger <strong>is</strong> in S<strong>to</strong>p condition, the Fill Ins can be used as short Intros and they start the execution directly,<br />
without the need <strong>to</strong> switch over <strong>to</strong> the Start condition. If you w<strong>is</strong>h <strong>to</strong> use all the tracks of the au<strong>to</strong>matic accompaniment,<br />
before pressing the FILL push but<strong>to</strong>n while the Arranger <strong>is</strong> in S<strong>to</strong>p condition, play the chord on the keyboard<br />
section on the left from the split point.<br />
Th<strong>is</strong> enters one partial or complete s<strong>to</strong>ppage bar of the complete Arranger. At its end the Arranger continuous playing<br />
as before.<br />
In “emergency” cases th<strong>is</strong> push but<strong>to</strong>n concludes the Arranger performance within one measure. It <strong>is</strong> a very short<br />
third Ending.<br />
each one of these push but<strong>to</strong>ns corresponds <strong>to</strong> one Style variation, ranging from the simplest <strong>to</strong> the most complex<br />
one with <strong>musical</strong> ornaments. The most complete one <strong>is</strong> Arrange D. Apart from these push but<strong>to</strong>ns, you may scroll<br />
through the different variations using the FILL and JUMP but<strong>to</strong>ns.<br />
When the relevant LED <strong>is</strong> on, the last chord played <strong>to</strong> the left of the split point of the keyboard will remain s<strong>to</strong>red. In<br />
other words, while the Arranger <strong>is</strong> playing, th<strong>is</strong> but<strong>to</strong>n allows you <strong>to</strong> maintain active all the accompaniment and bass<br />
tracks without the need <strong>to</strong> keep the chord pressed on the keyboard. In fact if the LED <strong>is</strong> off, the accompaniment plays<br />
only as long as the chord <strong>is</strong> pressed on the keyboard, whereas the drums tracks continue playing anyway.<br />
A press on th<strong>is</strong> push but<strong>to</strong>n starts the au<strong>to</strong>matic accompaniment. If the Arranger <strong>is</strong> already playing, a press on START<br />
s<strong>to</strong>ps everything, i.e. it takes over the function of a S<strong>to</strong>p but<strong>to</strong>n.<br />
Decreases the Tempo value of the Arranger or the Sequencer.<br />
46<br />
<strong>SD1</strong> Owner’s Manual
FAST:<br />
CONT/PAUSE/RESTART:<br />
Increases the Tempo value of the Arranger or the Sequencer. Pressing both SLOW and FAST push but<strong>to</strong>ns at the same<br />
time blocks the Tempo value (which will then be marked with an *) so that th<strong>is</strong> will not be modified when calling up<br />
another Style having a different Tempo. If you w<strong>is</strong>h <strong>to</strong> d<strong>is</strong>able the blocking, press SLOW and FAST at the same time.<br />
If you w<strong>is</strong>h <strong>to</strong> res<strong>to</strong>re the Style default Tempo, press PAGE + and PAGE - at the same time.<br />
Controls three different functions.<br />
With the Arranger Off, COUNT enters a Count Down bar where a stick beats the fourths.<br />
If before the COUNT also an INTRO was pressed, with the LED of the JUMP but<strong>to</strong>n lighting, at the end of the counting<br />
the selected introduction will be activated.<br />
With the Arranger On, pressing th<strong>is</strong> but<strong>to</strong>n causes the immediate return <strong>to</strong> the first fourth of the bar, no matter in<br />
what moment it <strong>is</strong> pressed. Th<strong>is</strong> may be useful in case of a singer a bit out of tempo!<br />
If you are working with the Midifiles (the LED SONG/OLAY <strong>is</strong> lit), th<strong>is</strong> but<strong>to</strong>n s<strong>to</strong>ps reproduction (pause) and restarts<br />
it on the next press of COUNT/PAUSE/ RESTART.<br />
LOCK:<br />
Calls up the Lock and Interactive Arranger page from where two different functions are controlled.<br />
Lock <strong>is</strong> used <strong>to</strong> select the tracks of the accompaniment out of Drums, Bass and Orchestra that will not change their<br />
timbre and rhythm, independently from which Arrange will be chosen, within the same Style. Th<strong>is</strong> means that when<br />
you change from one Arrange <strong>to</strong> another, th<strong>is</strong> section will remain unaltered.<br />
If th<strong>is</strong> function <strong>is</strong> activated while switching over <strong>to</strong> another Style, the previous settings will be maintained with the<br />
timbres of the Style selected, i.e. also the Style selected last will have one or more accompaniment tracks identical<br />
for all Arranges. The LED of the LOCK but<strong>to</strong>n lights up if at least one of the tracks <strong>is</strong> locked.<br />
The Lock parameters are as follows:<br />
F3 Drums: pressing repeatedly the function key F3 changes the activation status of the Drums and Drums 2<br />
tracks lock..<br />
F4 Bass: the same as F3 Drums, but used <strong>to</strong> lock the bass track.<br />
F5 Orchestra: The tracks Chord 1, 2, 3, 4 and 5 are locked all <strong>to</strong>gether.<br />
Interactive Arrange<br />
KEY START:<br />
KEY STOP:<br />
<strong>is</strong> used <strong>to</strong> mute the Chord accompaniment while playing the lead on the Right section, on the right from the split<br />
point of the keyboards. In th<strong>is</strong> way, when the musician plays a solo, some sections of the accompaniment chosen by<br />
him will be muted, enhancing the solo. At the end of the solo, the muted sections will be au<strong>to</strong>matically re-activated.<br />
The Interactive Arrange parameters are:<br />
F6 Chord 2: Pressing function but<strong>to</strong>n F6 activates the Interactive Arrange function for the Chord 2 track.<br />
Pressing the same but<strong>to</strong>n once more d<strong>is</strong>ables the function.<br />
F7 Chord 3: the same as F6 Chord 2 but for the Chord 3 track.<br />
F8 Chord 4: the same as F6 Chord 2 but for the Chord 4 track.<br />
F9 Chord 5: the same as F6 Chord 2 but for the Chord 5 track.<br />
F10 Active/Inactive: pressing the function but<strong>to</strong>n F10 activates or deactivates the Interactive Arrange<br />
function.<br />
When the relative LED <strong>is</strong> lit and the Arranger <strong>is</strong> in S<strong>to</strong>p condition, the au<strong>to</strong>matic accompaniment <strong>is</strong> started as soon as<br />
you play a chord on the left <strong>to</strong> the split point of the keyboard. If an INTRO <strong>is</strong> selected, as soon as you play a chord<br />
the introduction will be started. If you w<strong>is</strong>h <strong>to</strong> control the behaviour of the Lower section, i.e. the one providing the<br />
background for the left hand, go <strong>to</strong> the ARRANGE MODE menu from the main d<strong>is</strong>play page, where you can d<strong>is</strong>able<br />
the Lower timbre if the Arranger <strong>is</strong> not On. In th<strong>is</strong> way you avoid that <strong>to</strong>gether with the chord played, before the<br />
Arranger <strong>is</strong> started, also the Lower notes are played. If the HOLD LED <strong>is</strong> lit, the Arranger remembers the chord played<br />
even after you s<strong>to</strong>pped playing the chord.<br />
If th<strong>is</strong> LED <strong>is</strong> on, playing a chord or a note of short duration interrupts the Arranger performance. It <strong>is</strong> restarted as<br />
soon as you play another one, even if identical. If the note or the chord <strong>is</strong> pressed for a longer duration, the Arranger<br />
continues playing. If the Arranger <strong>is</strong> Off, KEY STOP restarts it if you play a chord over a longer time than the one foreseen.<br />
If you have selected a FILL or an INTRO, the Arranger <strong>is</strong> Off and you play a chord over a longer time than the<br />
Owner’s Manual <strong>SD1</strong> 47
one foreseen, the complete FILL or INTRO will be performed. If instead you play a very short chord, the Arranger <strong>is</strong><br />
immediately s<strong>to</strong>pped. If also the KEY START LED <strong>is</strong> lit, as soon as you remove your hand from the section on the left<br />
from the split point, the Arranger <strong>is</strong> s<strong>to</strong>pped and will be restarted as soon as you play a note or a chord <strong>to</strong> the left<br />
of the splint point. The time elapsing before the Key S<strong>to</strong>p becomes active can by programmed in Sync Time in the<br />
Arrange Mode menu. Please refer <strong>to</strong> the relative section.<br />
TAP/RIT/ACC:<br />
FADE IN/OUT:<br />
PIANIST:<br />
Au<strong>to</strong>:<br />
Standard:<br />
Tapping four fourths on th<strong>is</strong> but<strong>to</strong>n identifies the Tempo value <strong>to</strong> be assigned <strong>to</strong> the Arranger and <strong>to</strong> the Sequencer,<br />
while they are in S<strong>to</strong>p condition. As soon as the Tempo value <strong>is</strong> identified, the performance <strong>is</strong> started. The minimum<br />
number of bars depends on the time signature, i.e. a 3/4 Style requires three bars, a 4/4 Style needs four bars. Some<br />
Styles will not accept the coplete range of Tempo values due <strong>to</strong> the fact that they contain Live Drums. If two high values<br />
are used, they will be rounded down <strong>to</strong> the permitted limit. If the Arranger and the Sequencer are playing, th<strong>is</strong><br />
but<strong>to</strong>n allows you <strong>to</strong> increase the Tempo by steps of five points on each press (Accelerando). Keeping TAP pressed<br />
down, the increase direction <strong>is</strong> changed (you can see th<strong>is</strong> from the arrow near <strong>to</strong> the Tempo value), i.e. the Tempo <strong>is</strong><br />
decreased by steps of five points on each press (Ritardando).<br />
AIf the Arranger <strong>is</strong> activated, th<strong>is</strong> generates the fading out effect, i.e. th<strong>is</strong> function brings the volume of all sections,<br />
including the Right section, from the present volume down <strong>to</strong> zero. If the Arranger <strong>is</strong> off, th<strong>is</strong> function produces the<br />
fading in effect, i.e. it brings all the sections from volume zero <strong>to</strong> their programmed volume level. Pressing th<strong>is</strong> but<strong>to</strong>n<br />
repeatedly will not cause any abrupt volume changes.<br />
Generally speaking it <strong>is</strong> preferable <strong>to</strong> have one keyboard portion dedicated <strong>to</strong> chords acknowledgement and the other<br />
one <strong>to</strong> the solos and the lead. For the true pian<strong>is</strong>t player, however, it may not be sufficient <strong>to</strong> have a length of nearly<br />
four octaves available. The Pian<strong>is</strong>t function deletes th<strong>is</strong> div<strong>is</strong>ion and dedicates the complete keyboard <strong>to</strong> the timbre<br />
assigned <strong>to</strong> the Right section and <strong>to</strong> the chords acknowledgement. Obviously the best results are obtained with<br />
pian<strong>is</strong>t timbres such as the Grand Piano or the Vintage electric piano. Pian<strong>is</strong>t allows you <strong>to</strong> use the complete extension<br />
of the keyboard for just one timbre, and at the same time it also allows you <strong>to</strong> control the Arranger. There are<br />
two different operating modes for Pian<strong>is</strong>t: Au<strong>to</strong> and Standard. These modes can be set in the F3 Utility menu, Page<br />
2/3, F5 Pian<strong>is</strong>t..<br />
The mode requires at least a chord of three notes, played no matter where, <strong>to</strong> acknowledge a chord. Once the chord<br />
has been acknowledged, th<strong>is</strong> can be maintained playing a melody with not more than two notes played at the same<br />
time.<br />
The Standard mode, set by default, <strong>is</strong> obtained using the Sustain pedal. If the Sustain pedal <strong>is</strong> pressed right after<br />
having set the chord on the keyboard, the Arranger uses only the chord that was acknowledged before the Sustain<br />
was activated. You may even keep the chord s<strong>to</strong>red without activating Sustain: simply press both the * and # push<br />
but<strong>to</strong>ns down at the same time.<br />
It <strong>is</strong> possible <strong>to</strong> d<strong>is</strong>able the Sustain on the timbre in use <strong>to</strong> util<strong>is</strong>e the Sustain pedal exclusively for the Pian<strong>is</strong>t function.<br />
Th<strong>is</strong> parameter <strong>is</strong> set in the F4 Arrange Mode menu, Page 2/3, F7 Pian<strong>is</strong>t Sustain and <strong>is</strong> described in the following:<br />
STYLE SETTING.<br />
Th<strong>is</strong> function can be very handy during live performance, <strong>to</strong> call up those timbres of the Right section that are used<br />
more frequently for a Style. The Style Setting function allows you <strong>to</strong> associate <strong>to</strong> each Style up <strong>to</strong> ten timbres that<br />
can be directly called up with the relevant function but<strong>to</strong>ns. The <strong>SD1</strong> has 48 Style Setting memories. Each of them<br />
can be associated with any Style. On changing the Style, even while the Arranger <strong>is</strong> playing, the timbres will be updated.<br />
The settings of all Style Settings can be freely programmed in the F4 Arrange Mode menu. To use the Style<br />
Settings, first of all select the Style with the STYLES push but<strong>to</strong>ns and the function push but<strong>to</strong>ns, then activate<br />
STYLE SETTING (the LED lights up). The d<strong>is</strong>play shows ten timbres you can choose from using the relevant function<br />
but<strong>to</strong>ns. Press EXIT <strong>to</strong> return <strong>to</strong> the main page. As long as STYLE SETTING <strong>is</strong> activated, it will be impossible <strong>to</strong> call<br />
up any timbres from the VOICES banks, and indeed the d<strong>is</strong>play shows the Style Setting timbres. In order <strong>to</strong> d<strong>is</strong>able<br />
Style Setting, press the relevant push but<strong>to</strong>n again (the LED goes off).<br />
It <strong>is</strong> possible <strong>to</strong> assign each Style one of the 48 Style Settings on the second page of F4 Arrange Mode.<br />
48<br />
<strong>SD1</strong> Owner’s Manual
HARMONY :<br />
ARRANGE MODE MENU<br />
Allows you <strong>to</strong> harmon<strong>is</strong>e the lead played on the Right section according <strong>to</strong> the chord played. Activating Harmony<br />
with the relative push but<strong>to</strong>n (the LED lights up) d<strong>is</strong>plays a page from where you can select the type of harmon<strong>is</strong>ation<br />
using the function but<strong>to</strong>ns. It <strong>is</strong> not possible <strong>to</strong> activate more than one type of harmon<strong>is</strong>ation and each selection<br />
deletes the previous one. The following parameters are available:<br />
F1 Full: The notes of the chord played on the portion left <strong>to</strong> the split point are repeated on the right part and<br />
added <strong>to</strong> the lead played.<br />
F2 Jazz: Similar <strong>to</strong> Full, but with a more complex harmon<strong>is</strong>ation, differentiated according <strong>to</strong> the sound played<br />
on the Right part.<br />
F3 Double Up: Doubles the notes of the lead with those of the superior octave.<br />
F4 Double Down: Doubles the notes of the lead with those of the lower octave.<br />
F5 5TH: Adds the fifth superior <strong>to</strong> the lead.<br />
F6 Blue Gras: Typical country harmon<strong>is</strong>ation.<br />
F7 Trill: To obtain th<strong>is</strong> effect, you need <strong>to</strong> play at least two notes on the Right section. The two notes are<br />
au<strong>to</strong>matically and alternatively repeated according <strong>to</strong> the speed set with F9 Speed.<br />
F8 Repeat: Repeats the single note played with the speed set with F9 Speed and synchron<strong>is</strong>ed with the<br />
Tempo value in use.<br />
F9 Speed: Pressing the relevant function but<strong>to</strong>n repeatedly sets different speeds for F7 Trill and F8 Repea<br />
F10: FOLK1 - FOLK 2<br />
From the main d<strong>is</strong>play page you gain access <strong>to</strong> the control of the different Arranger functions by pressing F4 Arrange Mode. The functions are<br />
l<strong>is</strong>ted on two pages that can be accessed using the PAGE +/- but<strong>to</strong>ns. The parameters are assigned <strong>to</strong> the relevant function but<strong>to</strong>ns. The modifications<br />
carried out on the different parameters are valid for all the Styles but are not permanently s<strong>to</strong>red. If you w<strong>is</strong>h <strong>to</strong> call up these modifications<br />
also later on, you need <strong>to</strong> save them within a Reg<strong>is</strong>tration. The parameters Lower Octave, Lower Mode, Reverb Lock, Step Tempo<br />
are excluded from s<strong>to</strong>rage. The parameters set in Arrange Mode are valid for all Styles until a <strong>new</strong> Reg<strong>is</strong>tration <strong>is</strong> called up.<br />
ARRANGE MODE: FIRST PAGE<br />
F1 Low 1 Hold:<br />
F2 Low 2 Hold:<br />
F3 Low 1 Octave:<br />
pressing repeatedly the function push but<strong>to</strong>n F1 activates (÷) or otherw<strong>is</strong>e the s<strong>to</strong>rage of the notes played with<br />
Lower 1 while the Arranger <strong>is</strong> executing. In th<strong>is</strong> way you will still hear the notes played with Lower 1 on the left <strong>to</strong><br />
the split point of the keyboard, even after you have s<strong>to</strong>pped playing them. Hold on Lower 1 <strong>is</strong> activated by default,<br />
since usually a strings or pad timbre <strong>is</strong> used.<br />
the same as F1 Low 1 Hold, but dedicated <strong>to</strong> the second timbre assigned <strong>to</strong> Lower 2. Hold on Lower 2 <strong>is</strong> d<strong>is</strong>abled by<br />
default, since usually a piano type timbre <strong>is</strong> used..<br />
once selected with the function but<strong>to</strong>n, th<strong>is</strong> transposes the timbre of Lower 1 by +/- three octaves, using the VALUE<br />
+/- push but<strong>to</strong>ns.<br />
F4 Low 2 Octave: the same as F3 Low 1 Octave but dedicated <strong>to</strong> the timbre of Lower 2.<br />
Owner’s Manual <strong>SD1</strong> 49
F5 Lower Mode:<br />
F6 Bass Sust:<br />
allows you <strong>to</strong> establ<strong>is</strong>h how the timbres assigned <strong>to</strong> Lower 1 and 2 will sound if the F1 and F2 Low Hold are activated<br />
and the LED of the HOLD but<strong>to</strong>n <strong>is</strong> on, while the Arranger <strong>is</strong> in S<strong>to</strong>p condition. The following conditions can be<br />
selected pressing repeatedly the F5 function but<strong>to</strong>n:<br />
Normal: the Lower timbres s<strong>to</strong>p playing as soon as you release the notes on the keyboard part <strong>to</strong> the left of<br />
the split point;<br />
Bass + Lower: <strong>to</strong> the timbres of Lower also those of the bass of the Style are added, <strong>to</strong> underline the keynote<br />
of the chord even while the Arranger <strong>is</strong> s<strong>to</strong>pped. The timbres s<strong>to</strong>p playing as soon as you release the notes<br />
on the left <strong>to</strong> the splint point.<br />
Off On S<strong>to</strong>p: The Lower timbres are muted and re-appear when the Arranger starts playing. Th<strong>is</strong> <strong>is</strong> a useful<br />
function <strong>to</strong> set a chord for the Intro without hearing the notes played by the Lower parts. Activate th<strong>is</strong> mode<br />
if you frequently use the Intro <strong>to</strong>gether with Sync Start: you thus avoid <strong>to</strong> hear for a short instant the notes<br />
of the chord played by Lower.<br />
Hold S<strong>to</strong>p: the notes of the Lower part remain in Hold even after they are released on the keyboard.<br />
the first of the two values possible, selected by pressing repeatedly the function push but<strong>to</strong>n F6, indicates the sustain<br />
time of the bass timbre in the Bass + Lower mode which can be set using the VALUE +/- push but<strong>to</strong>ns. The second<br />
parameter establ<strong>is</strong>hes if the Manual Bass <strong>is</strong> <strong>to</strong> be polyphonic, maintaining the decay of the single chords, or<br />
monophonic. The parameter <strong>is</strong> modified with the VALUE +/- but<strong>to</strong>ns.<br />
F7 Bas Octav: The parameter indicates the +/- transposition by two octaves of the bass timbre and <strong>is</strong> modified using the VALUE +/-<br />
push but<strong>to</strong>ns.<br />
F8 Swell:<br />
F9 Ped. Board:<br />
F10 Bass To Pb:<br />
If activated (√), the volume pedal controls only the timbres assigned <strong>to</strong> the Right section, whereas the volume of the<br />
complete Arranger remains unvaried. Th<strong>is</strong> value <strong>is</strong> modified pressing repeatedly the F8 function but<strong>to</strong>n.<br />
Th<strong>is</strong> function must be enabled by pressing the relevant function but<strong>to</strong>n in order <strong>to</strong> use the optional pedal board controlling<br />
the arranger performance. For further information please see the section dedicated <strong>to</strong> the pedal-board.<br />
If a pedal-board <strong>is</strong> connected, activating th<strong>is</strong> function with the relevant function but<strong>to</strong>n and with MANUAL BASS<br />
enabled, the pedal-board allows you <strong>to</strong> play the bass timbre of the Style, independently from the Arranger, while on<br />
the keyboard part <strong>to</strong> the left of the split point you may still play the Arranger chord.<br />
ARRANGE MODE: SECOND PAGE<br />
F1 Step Tempo:<br />
F2 Au<strong>to</strong>Crash:<br />
F3 Sync Time:<br />
F4 Lower Lock:<br />
F5 Bass Lock:<br />
F6 Chord Mode:<br />
If selected with the relevant function but<strong>to</strong>n and modified with the VALUE +/- but<strong>to</strong>n, th<strong>is</strong> allows you <strong>to</strong> establ<strong>is</strong>h the<br />
value by which the Tempo <strong>is</strong> increased or decreased by each single press on the RIT ACC (TAP) but<strong>to</strong>n.<br />
Th<strong>is</strong> function <strong>is</strong> enabled by default and generates a Crash sound at the end of each single Intro and Fill. Press the relevant<br />
push but<strong>to</strong>n <strong>to</strong> d<strong>is</strong>able it.<br />
Th<strong>is</strong> can be modified using the VALUE +/- but<strong>to</strong>ns and allows you <strong>to</strong> define after how many mill<strong>is</strong>econds exactly the<br />
Arranger continues playing with the SYNC STOP but<strong>to</strong>n activated and the chord played. If a chord <strong>is</strong> played for a period<br />
of time that <strong>is</strong> shorter than the value set, KEY STOP terminates the execution of the Style. In those <strong>musical</strong> styles<br />
requiring quick intervals (like for the Tango) values around 150 mill<strong>is</strong>econds are recommended, in the slower ones like<br />
the 16 Beats a value of <strong>about</strong> 500 or 600 mill<strong>is</strong>econds are recommended. Pressing the push but<strong>to</strong>ns VALUE +/- <strong>to</strong>gether,<br />
you res<strong>to</strong>re the standard value of 250 mill<strong>is</strong>econds.<br />
Activating th<strong>is</strong>, the Lower timbres remain those in use, even if you pass on <strong>to</strong> different Styles.<br />
Activating th<strong>is</strong>, the Bass timbre remains the one in use, even if you pass on <strong>to</strong> different Styles.<br />
Pressing repeatedly the F6 function but<strong>to</strong>n modifies the chord acknowledgement mode, choosing among the following<br />
four possibilities:<br />
50<br />
<strong>SD1</strong> Owner’s Manual
Fingered 1 acknowledges the chord only according <strong>to</strong> the notes actually played in the very moment, so that<br />
even chords made up of two notes are acknowledged if one single note <strong>is</strong> released after playing a three notes<br />
chord, with the other two notes still pressed down, even with HOLD activated.<br />
Fingered 2 <strong>is</strong> similar <strong>to</strong> Fingered 1, but keeps all the notes of the chord played in memory. If in a chord of<br />
three notes only one <strong>is</strong> released, the chord will remain still the original one.<br />
Easy 1 performs a chord with a minimum of notes. If for example you play only the keynote, you obtain a<br />
major chord; adding the third minor you create a minor chord, playing the seventh with the keynote you<br />
obtain a seventh chord.<br />
Easy 2 <strong>is</strong> similar <strong>to</strong> Easy 1 but acknowledges also chords <strong>to</strong> which further notes are added in addition <strong>to</strong> the<br />
original ones, avoiding that you need <strong>to</strong> replay the hole chord again.<br />
F7 Pian. Sustain:<br />
activates or otherw<strong>is</strong>e the Sustain function in the Pian<strong>is</strong>t mode, so you can use the Sustain pedal <strong>to</strong> deactivate the<br />
chord acknowledgement and <strong>to</strong> freely play, right after having set the chord, along the complete keyboard..<br />
F8 Retrigg. & Mode:<br />
Th<strong>is</strong> associates parameters <strong>to</strong> the function but<strong>to</strong>ns for the Retrigger part of the function and calls up a number of<br />
parameters in the centre of the page for the Mode part. It also allows you <strong>to</strong> assign a different Style Setting <strong>to</strong> the<br />
Style in use.<br />
F1 Style Setting:<br />
Retrigger:<br />
Mode:<br />
d<strong>is</strong>plays the Style Setting assigned <strong>to</strong> the Style in use. To modify the assigned Style Setting, use the VALUE +/- push<br />
but<strong>to</strong>ns. Confirm the operation using the SAVE/ENTER but<strong>to</strong>n. From the SAVE/ENTER page confirm the Style and the<br />
Style Setting modification pressing F2 Styles. Enter the Style name <strong>to</strong> which the <strong>new</strong> Style Setting has been<br />
assigned and press F10 Exec <strong>to</strong> confirm. If you w<strong>is</strong>h <strong>to</strong> call up a different Style <strong>to</strong> which a <strong>new</strong> Style Setting <strong>is</strong> <strong>to</strong> be<br />
associated, go back <strong>to</strong> the main page of the d<strong>is</strong>play, select the Style pressing the STYLES but<strong>to</strong>ns and the function<br />
but<strong>to</strong>ns, return <strong>to</strong> the main page and go <strong>to</strong> the F4 Arrange Mode menu using the above procedure.<br />
The Retrigger function <strong>is</strong> activated by default on the bass track of the Style, thus allowing you <strong>to</strong> repeat the fundamental<br />
note every time a chord <strong>is</strong> changed. If the retrigger <strong>is</strong> activated also for the accompaniment tracks, these<br />
repeat the chord programmed on the first step of the first Style measure. The following parameters are available:<br />
F1 Style Set: indicates the Style Set currently in use.<br />
F2 Bass: th<strong>is</strong> <strong>is</strong> activated by default and <strong>is</strong> d<strong>is</strong>abled by pressing the F2 push but<strong>to</strong>n again;<br />
F3 Chord 1: pressing the relevant push but<strong>to</strong>n activates the Retrigger function for the Chord 1 track;<br />
F4 Chord 2: pressing the relevant push but<strong>to</strong>n activates the Retrigger function for the Chord 2 track;<br />
F6 Chord 3: pressing the relevant push but<strong>to</strong>n activates the Retrigger function for the Chord 3 track;<br />
F7 Chord 4: pressing the relevant push but<strong>to</strong>n activates the Retrigger function for the Chord 4 track;<br />
F8 Chord 5: pressing the relevant push but<strong>to</strong>n activates the Retrigger function for the Chord 5 track.<br />
The Mode function defines the harmonic behaviour of the accompaniment tracks (Chord 1, 2, 3, 4, 5) <strong>to</strong> be chosen<br />
between Close, the mode using chords with close inversions, and Parallel, the mode moving the chords without altering<br />
the intervals it <strong>is</strong> made up of. Generally speaking the Close option <strong>is</strong> the most <strong>musical</strong> and natural one. If you w<strong>is</strong>h<br />
<strong>to</strong> modify the Mode parameter, select the Style track pressing the CURSOR +/- but<strong>to</strong>ns and modify the parameter<br />
pressing F10 Select. To go back <strong>to</strong> the second page of the Arrange Mode, press F5 Escape.<br />
F9 Dyn. Arranger:<br />
Owner’s Manual <strong>SD1</strong> 51
Using the keyboard velocity, you may control the volume of the single tracks of a Style. The page called up by<br />
Dynamic Arranger allows you <strong>to</strong> set for each track the keyboard dynamics sensibility, thus modifying the volume of<br />
the track. The higher the value, the more the track volume depends on velocity. The following parameters are available:<br />
F1 Drum: velocity sensibility for the Drum tracks<br />
F2 Bass: velocity sensibility for the Bass track<br />
F3 Chord 1: velocity sensibility for the Chord 1 track<br />
F4 Chord 2: velocity sensibility for the Chord 2 track<br />
F6 Chord 3: velocity sensibility for the Chord 3 track<br />
F7 Chord 4: velocity sensibility for the Chord 4 track<br />
F8 Chord 5: velocity sensibility for the Chord 5 track<br />
F5 Escape: returns <strong>to</strong> the Arrange Mode page.<br />
F10 Active/Inactive: pressing repeatedly the relevant push but<strong>to</strong>n activates and deactivates the Dynamic Arranger function.<br />
If you w<strong>is</strong>h <strong>to</strong> modify the sensibility value for the single tracks after having selected them with the relevant function<br />
push but<strong>to</strong>n, use the VALUE +/- but<strong>to</strong>ns.<br />
F10 Rev. Lock:<br />
When th<strong>is</strong> <strong>is</strong> activated, pressing the relevant function push but<strong>to</strong>n blocks the reverb in use for the Styles called up in<br />
future, and also for any Midi files.<br />
ARRANGE VIEW MENU<br />
From the main page of the d<strong>is</strong>play press F5 Arrange View <strong>to</strong> gain access <strong>to</strong> the four pages that allow you <strong>to</strong> modify timbres, volumes, reverb,<br />
effects and pan of each single track making up the Style. When the modification procedure has been terminated, the Style must be saved in a<br />
Cus<strong>to</strong>m Style. For easier programming, you may set the Arrange View pages while the Style <strong>is</strong> playing. The tracks playing are highlighted by<br />
a small blinking point. The single tracks of the au<strong>to</strong>matic accompaniment, as well as Lower 1 and Lower 2, are assigned <strong>to</strong> the relevant function<br />
push but<strong>to</strong>ns. Use the PAGE +/- but<strong>to</strong>ns <strong>to</strong> call up the next pages.<br />
MODIFYING THE TIMBRES<br />
From any of the four pages you may modify also the timbre assigned <strong>to</strong> a track for the Arrange A, B, C, D, Intro 1, 2, 3, Ending 1, 2, 3 sections.<br />
Modification can affect both the currently selected Arranger section (Single mode) or all sections (Global mode).<br />
The timbre can be selected while the Arranger <strong>is</strong> in S<strong>to</strong>p for the Arrange A, B, C and D sections, whereas for the Intros and Endings you need<br />
<strong>to</strong> start the Arranger, call up the Intro or the Ending and then, once you have started the section, select the timbre you w<strong>is</strong>h <strong>to</strong> modify.<br />
Use the following procedure <strong>to</strong> change a timbre:<br />
● Select the Style you w<strong>is</strong>h <strong>to</strong> modify and then press EXIT <strong>to</strong> go back <strong>to</strong> the main page of the d<strong>is</strong>play.<br />
● Gain access <strong>to</strong> Arrange View pressing the F5 ARRANGE VIEW but<strong>to</strong>n.<br />
● To modify an Arrange section, select it using the dedicated function push but<strong>to</strong>ns. The Arranger can be either playing or in s<strong>to</strong>p statues.<br />
For the Intros and the Endings, selection can be carried out only with the Arranger playing.<br />
● To see which one of the melodic accompaniment tracks are <strong>to</strong> be modified, you may start the Arranger and observe with tracks have a small<br />
blinking point.<br />
● To select the track whose timbre <strong>is</strong> <strong>to</strong> be modified, use the relevant function push but<strong>to</strong>ns <strong>to</strong> the side of the d<strong>is</strong>play, the selected track becomes<br />
black for <strong>about</strong> two seconds.<br />
● Within two seconds, you need <strong>to</strong> press one of the VOICES push but<strong>to</strong>ns <strong>to</strong> call up the timbre families. From that moment on there will be no<br />
time limits <strong>to</strong> find the timbre.<br />
● Select the timbre using the VOICES push but<strong>to</strong>ns and, if required, the PAGE +/- but<strong>to</strong>ns, further <strong>to</strong> the function push but<strong>to</strong>ns.<br />
● Once the timbre has been selected, use the CURSOR +/- but<strong>to</strong>ns <strong>to</strong> define if the modification has <strong>to</strong> refer <strong>to</strong> all the Arranger sections (Global<br />
mode) or only <strong>to</strong> the one currently in use (Single mode). The Global/Single parameter can be shown on the bot<strong>to</strong>m of the d<strong>is</strong>play or above<br />
the box where the title of the Style in use <strong>is</strong> shown..<br />
The timbre choice made in Global or in Single mode applies also <strong>to</strong> the two Lower parts and the Drum 1 track. In the latter case, after having<br />
selected the Drum 1 track, the VOICES push but<strong>to</strong>ns call up groups of preset Drum Sets, User Drum Sets and RAM Drum Sets. It <strong>is</strong> not possible<br />
<strong>to</strong> modify the Drum Set of Drum 2 because th<strong>is</strong> exploits a Live Drum and particular settings which would thwart the modification.<br />
The Style modified as described above must be saved in a Cus<strong>to</strong>m Style if you do not want <strong>to</strong> lose the settings. Further details will be given later<br />
on in th<strong>is</strong> section.<br />
LOWER 1/2<br />
Select the part pressing F4 Lower 1 or F5 Lower 2. On the d<strong>is</strong>play the present Arranger section and the transposition of the selected part <strong>is</strong><br />
d<strong>is</strong>played. Set the transposition with the CURSOR +/- push but<strong>to</strong>ns within a few seconds; otherw<strong>is</strong>e the Lower transposition parameter d<strong>is</strong>appears<br />
and the CURSOR +/- push but<strong>to</strong>ns take over the function <strong>to</strong> transpose the complete Style.<br />
Repeat the operation for the other Style sections.<br />
52<br />
<strong>SD1</strong> Owner’s Manual
ARRANGE VIEW: FIRST PAGE<br />
Further <strong>to</strong> modifying the volume for the single tracks and the Lower parts, the <strong>SD1</strong> allows you <strong>to</strong> activate the Mute function on a single trace.<br />
Th<strong>is</strong> setting will remain s<strong>to</strong>red also for the next Styles.<br />
In order <strong>to</strong> activate the Mute function on a track, select the track pressing the relevant function but<strong>to</strong>n and then press both VALUE +/- but<strong>to</strong>ns<br />
at the same time.<br />
If you w<strong>is</strong>h <strong>to</strong> res<strong>to</strong>re the initial volume value, press one of the two VALUE +/- push but<strong>to</strong>ns.<br />
In order <strong>to</strong> modify the volume of a track or of a part, select it with the relevant function push but<strong>to</strong>n.<br />
Modify the volume value using the VALUE +/- push but<strong>to</strong>ns.<br />
The Mute function <strong>is</strong> activated only by pressing both VALUE +/- push but<strong>to</strong>ns at the same time, and not by setting the value <strong>to</strong> zero.<br />
Only for the Lower parts you may establ<strong>is</strong>h a different volume value for the single Arranger sections.<br />
ARRANGE VIEW: SECOND PAGE<br />
The reverb quantity of each track and for the Lower parts remains unvaried for all Style sections. To carry out any modification, select the track<br />
or the part pressing the relevant function but<strong>to</strong>n. Modify the value pressing the VALUE +/- but<strong>to</strong>ns.<br />
ARRANGE VIEW: THIRD PAGE<br />
For each Lower part or track it <strong>is</strong> possible <strong>to</strong> establ<strong>is</strong>h which effect (Chorus, Delay or D<strong>is</strong><strong>to</strong>rtion) <strong>is</strong> <strong>to</strong> process the timbre, further <strong>to</strong> the quantity<br />
of the effect applied.<br />
To modify th<strong>is</strong> setting, select the track or the part using the relevant function but<strong>to</strong>n, then press the same function but<strong>to</strong>n repeatedly until the<br />
effect <strong>to</strong> be assigned <strong>is</strong> d<strong>is</strong>played. On the selected track or part, use the VALUE +/- push but<strong>to</strong>ns <strong>to</strong> enter the quantity of effect <strong>to</strong> be applied<br />
<strong>to</strong> the timbre.<br />
Owner’s Manual <strong>SD1</strong> 53
ARRANGE VIEW: FOURTH PART<br />
The pan function, with different values for Right and Left, allows you <strong>to</strong> position the timbre on the stereo panorama. To modify the setting, select<br />
the track or the part using the relevant function but<strong>to</strong>n and change the value pressing the VALUE +/- push but<strong>to</strong>ns. Two dashes indicate that<br />
the timbre <strong>is</strong> placed <strong>to</strong> the centre of the stereo panorama.<br />
STORING AND SAVING THE CUSTOM STYLES<br />
All Arrange View parameters described and RETRIGG MODE of ARRANGE MODE so far must be saved in a Cus<strong>to</strong>m Style so you can call them<br />
up later on. Use the normal procedure foreseen for the Save/Enter command.<br />
STORING A CUSTOM STYLE<br />
●<br />
●<br />
●<br />
●<br />
After having modified the parameters, press the SAVE/ENTER but<strong>to</strong>n <strong>to</strong> activate the s<strong>to</strong>rage operation.<br />
Select F2 Styles from the page d<strong>is</strong>played.<br />
Enter the Style name using the keys of the keyboard and the CURSOR +/- push but<strong>to</strong>ns.<br />
Confirm the operation pressing F10 Save or exit the page pressing F5 Escape. The modified parameters are saved <strong>to</strong>gether with the Style<br />
in the Flash RAM memory.<br />
SAVING ALL CUSTOM STYLES ON A DISK<br />
You may save all Cus<strong>to</strong>m Styles in one single block on the d<strong>is</strong>k. Th<strong>is</strong> operation will be easier <strong>to</strong> carry out if MASTER FOLDER <strong>is</strong> activated.<br />
● Open the DISK menu pressing the relevant push but<strong>to</strong>n.<br />
● Activate the Master Folder function, if not yet selecting, pressing the relevant push but<strong>to</strong>n (the LED lights up).<br />
● Select F5 Folder Choice.<br />
● From the page d<strong>is</strong>played select F5 Styles. The d<strong>is</strong>play shows the contents of the folder dedicated <strong>to</strong> the Styles.<br />
● Press F3 Save <strong>to</strong> activate the saving procedure.<br />
● Select F6 Cus<strong>to</strong>m Styles.<br />
● Enter the file name using the keyboard keys and the CURSOR +/- push but<strong>to</strong>ns.<br />
● Confirm the operation pressing F10 Exec or quit the procedure pressing F5 Escape.<br />
● The file thus created contains all the Cus<strong>to</strong>m Styles and has the extension .STY.<br />
54<br />
<strong>SD1</strong> Owner’s Manual
Style & Sound<br />
Personal<strong>is</strong>ing the Styles with <strong>new</strong> samples <strong>is</strong> one of the innovative features of the <strong>SD1</strong>. You may use up <strong>to</strong> four audio samples (in .WAV, .INS and<br />
.MSP format) for as many accompaniment tracks. Furthermore, for track Drum 2, you may use an audio loop processed by the internal <strong>SD1</strong> sampler,<br />
<strong>to</strong> be synchron<strong>is</strong>ed with the rhythm and the tempo, without important changes <strong>to</strong> the in<strong>to</strong>nation and the length of the loop.<br />
While audio samples are assigned in the Arrange View menu, the use of a loop for the Drum 2 track <strong>is</strong> handled in Pattern editing. Please refer<br />
<strong>to</strong> the relevant chapter.<br />
Audio samples and Style tracks can be associated <strong>to</strong> each other on the condition that the relevant audio files are s<strong>to</strong>red in Folder 94 Sound<br />
belonging <strong>to</strong> Master Folder.<br />
If you use the Sampler <strong>to</strong> create <strong>new</strong> samples, during the saving procedure <strong>to</strong> d<strong>is</strong>k while the Master Folder <strong>is</strong> activated, the files will be au<strong>to</strong>matically<br />
s<strong>to</strong>red in Folder 94 Sound.<br />
If you w<strong>is</strong>h <strong>to</strong> directly copy samples from the floppy d<strong>is</strong>k <strong>to</strong> Folder 94 Sound on the hard d<strong>is</strong>k, activate the MASTER FOLDER but<strong>to</strong>n.<br />
Before assigning a sample <strong>to</strong> a track, you need <strong>to</strong> load it in<strong>to</strong> RAM. For further details please refer <strong>to</strong> the Sound Load section.<br />
The procedure used <strong>to</strong> assign a sample <strong>to</strong> a track <strong>is</strong> exactly the same as the one described in the Arranger section for modifying the timbre of<br />
a track. Please refer <strong>to</strong> the relevant section. In the following please find the most important details:<br />
●<br />
●<br />
Select the Style <strong>to</strong> modify and press EXIT <strong>to</strong> go <strong>to</strong> the main page of the d<strong>is</strong>play.<br />
Open Arrange View by pressing the F5 ARRANGE VIEW push but<strong>to</strong>n.<br />
●<br />
●<br />
●<br />
●<br />
●<br />
●<br />
●<br />
●<br />
Select the Arranger section containing the track <strong>to</strong> modify.<br />
To select the track whose timbre <strong>is</strong> <strong>to</strong> be modified, use the relevant function push but<strong>to</strong>ns next <strong>to</strong> the d<strong>is</strong>play: the selected track will be<br />
d<strong>is</strong>played black for <strong>about</strong> two seconds.<br />
Within these two seconds, press the RAM/FLASH but<strong>to</strong>n <strong>to</strong> call up the samples loaded in the RAM.<br />
From that moment on there will be no time limits <strong>to</strong> find the sample.<br />
Select the sample using the VOICES push but<strong>to</strong>ns or the PAGE +/- but<strong>to</strong>ns <strong>to</strong> select the next samples pages, further <strong>to</strong> the function push<br />
but<strong>to</strong>ns relevant <strong>to</strong> the sample <strong>to</strong> be assigned.<br />
Once the timbre has been selected, use the CURSOR +/- but<strong>to</strong>ns <strong>to</strong> define if the modification has <strong>to</strong> refer <strong>to</strong> all the Arranger sections (Global<br />
mode) or only <strong>to</strong> those currently in use (Single mode).<br />
Proceed in the same way, if desired, also for the other three tracks <strong>to</strong> which you w<strong>is</strong>h <strong>to</strong> assign a sample.<br />
Save the Cus<strong>to</strong>m Style using the SAVE/ENTER but<strong>to</strong>n.<br />
Cus<strong>to</strong>m Style always uses the audio sample on the condition that th<strong>is</strong> <strong>is</strong> in the RAM, so for th<strong>is</strong> reason it <strong>is</strong> recommendable <strong>to</strong> create both a<br />
Sound Block and a Style Block of Cus<strong>to</strong>m Styles, <strong>to</strong> make sure that everything <strong>is</strong> correctly loaded. A RAM Style, instead, always au<strong>to</strong>matically<br />
calls up the associated audio sample.<br />
Owner’s Manual <strong>SD1</strong> 55
RAM Styles and Flash RAM<br />
Thanks <strong>to</strong> the velocity of the internal hard d<strong>is</strong>k, a Style s<strong>to</strong>red in any Folder of the hard d<strong>is</strong>k can be loaded in RAM. The Style can be loaded<br />
while the Arranger <strong>is</strong> running or when it <strong>is</strong> s<strong>to</strong>pped and it only takes a matter of seconds. On the contrary <strong>to</strong> the Cus<strong>to</strong>m Styles s<strong>to</strong>red in Flash<br />
RAM, a RAM Style <strong>is</strong> lost when the instrument <strong>is</strong> turned off. Deciding whether a Style <strong>is</strong> <strong>to</strong> be loaded in RAM or in Flash RAM <strong>is</strong> an organ<strong>is</strong>ational<br />
choice but from a practical point of view the only difference <strong>is</strong> the loading time and the possibility, using the Cus<strong>to</strong>m Styles, <strong>to</strong> have your preferred<br />
Styles as soon as you turn the <strong>SD1</strong> on. However, for the RAM Styles <strong>to</strong>o it <strong>is</strong> possible <strong>to</strong> create a l<strong>is</strong>t of Styles <strong>to</strong> be loaded when turning<br />
the instrument on.<br />
It <strong>is</strong> no longer possible, as was the case for <strong>Ketron</strong> X1, <strong>to</strong> copy and load one or a number of Styles in floppy d<strong>is</strong>k <strong>to</strong> Flash RAM but they must first<br />
be copied on hard d<strong>is</strong>k then must be loaded from there. The Ram Styles constitute the transition from hard d<strong>is</strong>k <strong>to</strong> RAM. To d<strong>is</strong>tingu<strong>is</strong>h a RAM<br />
Style in RAM from a Style in Flash RAM, the d<strong>is</strong>play shows “DISK” under the name and the number of the Style loaded.<br />
The RAM Styles can be loaded one at a time (Single RAM Style) or in block (Block RAM Style). The more complete options are provided with<br />
Master Folder enabled, but the single Styles can also be loaded from a Folder that <strong>is</strong> not correlated <strong>to</strong> Master Folder. The table below illustrates<br />
the differences:<br />
Function Master Folder enabled Master Folder d<strong>is</strong>abled<br />
Single RAM Style – Loading from main page of d<strong>is</strong>play Yes Yes<br />
Single Ram Style – Loading with Arranger running Yes Yes<br />
D<strong>is</strong>play of the l<strong>is</strong>t of Styles s<strong>to</strong>red in the Folder (Pattern L<strong>is</strong>t) Yes Yes<br />
D<strong>is</strong>play of the Folder contents Yes No<br />
Reference Folder 95 Style Folder selected previously<br />
but not correlated with those<br />
of Master Folder<br />
Cancel a Style in RAM Yes No<br />
D<strong>is</strong>play of the memory available and of the memory required by the Style Yes No<br />
Creation of a Block RAM Style Yes No<br />
Loading directly in Flash RAM No Yes<br />
LOADING RAM STYLES WITH MASTER FOLDER ENABLED.<br />
There are two ways of loading a single Style: The first <strong>is</strong> used <strong>to</strong> directly call up the Style by entering the number assigned within Folder 95<br />
Styles. The second <strong>is</strong> used <strong>to</strong> d<strong>is</strong>play a l<strong>is</strong>t of all the Styles in Folder 95 Styles from which that desired <strong>is</strong> selected, or <strong>to</strong> d<strong>is</strong>play the whole contents<br />
of Folder 95 Styles.<br />
DIRECTLY LOADING A SINGLE RAM STYLE<br />
●<br />
●<br />
●<br />
●<br />
●<br />
●<br />
From the main page of the d<strong>is</strong>play, enable the MASTER FOLDER push but<strong>to</strong>n and the SINGLE RAM STYLE.<br />
Ensure that the BLOCK/LIST push but<strong>to</strong>n <strong>is</strong> not lit.<br />
Enter the 3-figure number of the Style <strong>to</strong> be loaded using the numeric keypad (STYLES push but<strong>to</strong>ns). The status of the Arranger <strong>is</strong> not<br />
important.<br />
The symbol “#” will appear next <strong>to</strong> the name of the Style <strong>to</strong> point out that the <strong>SD1</strong> <strong>is</strong> loading it in RAM.<br />
Upon completion, the name of the Style loaded appears without any symbol.<br />
To call up the Cus<strong>to</strong>m Styles press the CUSTOM STYLE push but<strong>to</strong>n.<br />
LOADING ONE OR A NUMBER OF SINGLE RAM STYLES WITH PATTERN LIST<br />
●<br />
●<br />
From the main page of the d<strong>is</strong>play, enable the MASTER FOLDER push but<strong>to</strong>n.<br />
Press the BLOCK/LIST push but<strong>to</strong>n. The page that <strong>is</strong> called up shows all the Styles (in Pattern format) s<strong>to</strong>red in Folder 95 Styles. See the<br />
next section for the functions available in th<strong>is</strong> page.<br />
56<br />
<strong>SD1</strong> Owner’s Manual
The contents of the Folder can be d<strong>is</strong>played right across the full screen using function F7 Pattern L<strong>is</strong>t. It calls up a page where the names of<br />
the Styles are shown in 3 columns, at the bot<strong>to</strong>m the Tempo in use and the name of the Style loaded.<br />
Select the Style <strong>to</strong> be loaded from th<strong>is</strong> l<strong>is</strong>t using the CURSOR +/- push but<strong>to</strong>ns and confirm the loading in RAM using F10 Load. If F10 Play<br />
appears then the Style has already been loaded in RAM.<br />
In alternative you can enter the number of the Style <strong>to</strong> be loaded using the numeric keypad (STYLES push but<strong>to</strong>ns).<br />
The Tempo value can be blocked from th<strong>is</strong> page by pressing SLOW and FAST <strong>to</strong>gether. When the blocking function <strong>is</strong> active, the symbol “*”<br />
appears next <strong>to</strong> the Tempo value.<br />
The Arranger controls are available <strong>to</strong> immediately play the Style.<br />
There <strong>is</strong> no need <strong>to</strong> go back <strong>to</strong> the main page <strong>to</strong> use the Arranger. If you remain in the Pattern L<strong>is</strong>t page you can select other Styles <strong>to</strong> be loaded<br />
even when the Arranger <strong>is</strong> running.<br />
The Styles loaded in RAM are marked with the symbol “♦”.<br />
The advantage of loading a number of Styles in RAM lies in the fact that they are immediately available from the main page of the d<strong>is</strong>play using<br />
the Single RAM Style function already described.<br />
LOADING AND MANAGING A NUMBER OF RAM STYLES FROM HARD DISK<br />
Th<strong>is</strong> procedure <strong>is</strong> used <strong>to</strong> select a number of RAM Styles <strong>to</strong> be loaded directly in the memory, plus it <strong>is</strong> possible <strong>to</strong> see how much RAM space <strong>is</strong><br />
still available and how much space <strong>is</strong> taken up by the single Style and also <strong>to</strong> cancel the whole contents of the RAM while loading the Styles<br />
selected.<br />
●<br />
●<br />
●<br />
●<br />
From the main page of the d<strong>is</strong>play, enable the MASTER FOLDER push but<strong>to</strong>n.<br />
Press the BLOCK/LIST push but<strong>to</strong>n. The page that <strong>is</strong> called up shows all the Styles (in Pattern format) s<strong>to</strong>red in Folder 95 Styles. The status<br />
of the SINGLE RAM STYLE push but<strong>to</strong>n does not affect the procedures.<br />
The page that appears shows all the Styles in the middle of the d<strong>is</strong>play (in .PAT format) and offers various options. To select the Styles <strong>to</strong><br />
be loaded use the VALUE +/- push but<strong>to</strong>ns <strong>to</strong> scroll one file at a time, CURSOR +/- <strong>to</strong> call up groups of Styles if s<strong>to</strong>red in the Folder and F10<br />
Select <strong>to</strong> confirm the choice. The symbol “>” <strong>is</strong> set next <strong>to</strong> each Style selected.<br />
Press the VALUE +/- push but<strong>to</strong>ns <strong>to</strong>gether at the same time <strong>to</strong> select all the Styles in Folder 95 Styles.<br />
Owner’s Manual <strong>SD1</strong> 57
The parameters available are the following:<br />
F1 Load: To load the Styles selected in RAM.<br />
F2 Clear: To cancel the contents of the RAM dedicated <strong>to</strong> the Styles.<br />
F3 Clear & Load: To load the Styles selected and <strong>to</strong> cancel those in RAM at the same time.<br />
F4 Memory Selection: Th<strong>is</strong> indicates the RAM space that the Styles selected will take up.<br />
F5 Memory Free: Th<strong>is</strong> indicates the RAM space still free for the RAM Styles.<br />
F6 Create Block: To create a single file of all the Styles selected. The function will be described later in th<strong>is</strong> section.<br />
F7 Pattern L<strong>is</strong>t: Th<strong>is</strong> d<strong>is</strong>plays the l<strong>is</strong>t of the Styles in Folder 95 Styles right across the full screen.<br />
F9 Dir Block: Th<strong>is</strong> d<strong>is</strong>plays only the Block Styles s<strong>to</strong>red in the Folder.<br />
F10 Select: Th<strong>is</strong> confirms the choice.<br />
The Styles loaded in RAM are marked with the symbol “♦”.<br />
You can go from th<strong>is</strong> page <strong>to</strong> the D<strong>is</strong>k menu <strong>to</strong> manage the files by pressing and d<strong>is</strong>abling the BLOCK/LIST push but<strong>to</strong>n. The functions called<br />
up from th<strong>is</strong> page are described in detail in the D<strong>is</strong>k section.<br />
CREATING A BLOCK STYLE<br />
Up <strong>to</strong> 32 Styles can be grouped in one single file <strong>to</strong> be loaded in one go, called Block Style and with .STY extension.<br />
To create a Block Style select the Styles from the page called up by enabling the BLOCK/LIST, the same page as that just described.<br />
To select the Styles <strong>to</strong> be loaded use the VALUE +/- push but<strong>to</strong>ns <strong>to</strong> scroll one file at a time, CURSOR +/- <strong>to</strong> call up groups of Styles if s<strong>to</strong>red in<br />
the Folder and F10 Select <strong>to</strong> confirm the choice. The symbol “>” <strong>is</strong> set next <strong>to</strong> each Style selected.<br />
Press the VALUE +/- push but<strong>to</strong>ns <strong>to</strong>gether at the same time <strong>to</strong> select all the Styles in Folder 95 Styles.<br />
Enable the procedure using F6 Create Block.<br />
The page called up <strong>is</strong> used <strong>to</strong> enter the name <strong>to</strong> be assigned <strong>to</strong> the file using the keyboard and the CURSOR+/- push but<strong>to</strong>ns.<br />
Parameter F4 Mem. Sel. indicates the size of the Block Style file.<br />
To exit th<strong>is</strong> page or <strong>to</strong> skip the saving procedure press F5 Escape.<br />
Once the file name has been assigned, confirm the creation of the Block Style using F10 Save.<br />
The Block L<strong>is</strong>t files are always s<strong>to</strong>red in Folder 95 Styles.<br />
Just these files can be d<strong>is</strong>played using F9 Dir Block.<br />
Once a Block Style file has been selected using the VALUE +/- and CURSOR +/- and F10 Select push but<strong>to</strong>ns, the name of the Styles included<br />
can be d<strong>is</strong>played using F8 View Block.<br />
To return <strong>to</strong> the direc<strong>to</strong>ry of the Block Style files press F10 Escape.<br />
To return <strong>to</strong> the d<strong>is</strong>play of just the Styles s<strong>to</strong>red in the Folder press F9 Dir Pattern.<br />
LOADING A BLOCK STYLE AND CALLING UP THE RAM STYLES<br />
●<br />
●<br />
●<br />
From the main page of the d<strong>is</strong>play enable the MASTER FOLDER push but<strong>to</strong>n.<br />
Press the BLOCK/LIST push but<strong>to</strong>n.<br />
Press F9 Dir Block <strong>to</strong> d<strong>is</strong>play the Block L<strong>is</strong>t files s<strong>to</strong>red in Folder 95 Styles.<br />
58<br />
<strong>SD1</strong> Owner’s Manual
●<br />
●<br />
●<br />
●<br />
Select the Block Style <strong>to</strong> be loaded in RAM using the VALUE +/- push but<strong>to</strong>ns <strong>to</strong> scroll one file at a time, CURSOR +/- <strong>to</strong> call up groups of<br />
Block Styles if s<strong>to</strong>red in the Folder and F10 Select <strong>to</strong> confirm the choice. The symbol “>” appears next <strong>to</strong> the Block Styles selected.<br />
To load the Block Style press F1 Load.<br />
To cancel the contents of the RAM press F2 Clear.<br />
To load the Block Style and cancel the contents of the current memory press F3 Clear & Load.<br />
The Styles are now loaded in the memory.<br />
● Go back <strong>to</strong> the main page of the d<strong>is</strong>play by pressing EXIT.<br />
● Enable the call up function of the Style in RAM using the SINGLE RAM STYLE push but<strong>to</strong>n that <strong>is</strong> already enabled if no other procedure <strong>is</strong><br />
accompl<strong>is</strong>hed.<br />
● Enter the number of the RAM Style using the numeric keypad (STYLES push but<strong>to</strong>ns). For further details consult the “Directly loading a<br />
Single RAM Style” section.<br />
AUTOMATICALLY LOADING A BLOCK STYLE WHEN TURNING ON<br />
A Block Style <strong>to</strong> be au<strong>to</strong>matically loaded when turning the <strong>SD1</strong> on can be selected or created <strong>to</strong> save time. D<strong>is</strong>play the l<strong>is</strong>t of Block Styles available<br />
using F9 Dir Block and then select that desired using the VALUE +/- and F10 Select push but<strong>to</strong>ns. Once selected, press the SAVE/ENTER<br />
push but<strong>to</strong>n and the <strong>SD1</strong> will create a file called !! INIT 01.PWR placed in the same Folder as the original Block Style. The next time the <strong>SD1</strong> <strong>is</strong><br />
turned on it will au<strong>to</strong>matically load the Block Style desired. To d<strong>is</strong>able the au<strong>to</strong>matic loading function cancel the file called !! INIT 01.PWR using<br />
F6 Delete, which will not cancel the original Block Style. When the <strong>SD1</strong> turns on Block Au<strong>to</strong>loading will appear in the middle of the d<strong>is</strong>play with<br />
the options: F5 Escape <strong>to</strong> cancel loading and F10 Exec <strong>to</strong> confirm loading. However, if no function <strong>is</strong> selected the file will be loaded after a<br />
few seconds.<br />
LOADING RAM STYLES FROM A FOLDER THAT IS NOT CORRELATED TO MASTER FOLDER<br />
Styles can also be loaded from Folders created by the musician and different <strong>to</strong> those related <strong>to</strong> the Master Folder, but some functions are<br />
lost. Consult the table at the <strong>begin</strong>ning of the section for more details. The Styles copied in a Folder with Master Folder d<strong>is</strong>abled can be loaded<br />
directly using SINGLE RAM STYLE and entering the relative number using the numeric keypad (STYLES push but<strong>to</strong>ns), or they can be d<strong>is</strong>played<br />
right across the full screen using the BLOCK/LIST and then from here they are selected in the same manner mentioned above.<br />
When the Master Folder <strong>is</strong> d<strong>is</strong>abled the Single RAM Style and Block/L<strong>is</strong>t functions refer <strong>to</strong> the last Folder selected, except for those strictly<br />
related <strong>to</strong> Master Folder. Therefore before starting <strong>to</strong> load a Ram Style select the Folder in which they are s<strong>to</strong>red. See the D<strong>is</strong>k section for further<br />
details.<br />
Bear in mind that the Styles loaded in RAM will not be marked in any way. Furthermore, the F2 Load function will not load the Styles in RAM<br />
but it enables the replacement of these Styles with the Cus<strong>to</strong>m Styles in Flash RAM.<br />
REPLACING THE CUSTOM STYLES<br />
The 107 Cus<strong>to</strong>m Styles s<strong>to</strong>red in Flash RAM can be replaced with any other Style s<strong>to</strong>red in the hard d<strong>is</strong>k. The Flash RAM has the advantage that<br />
it s<strong>to</strong>res the parameters even after the machine has been turned off. The Cus<strong>to</strong>m Style replaced however <strong>is</strong> not copied in hard d<strong>is</strong>k and <strong>is</strong> therefore<br />
lost. For th<strong>is</strong> reason, before replacing the file, a password must first be entered. The procedure <strong>is</strong> described in detail in the Utility section<br />
indicated briefly below:<br />
● From the main page of the d<strong>is</strong>play press F3 Utility.<br />
● Go <strong>to</strong> page 3 using the PAGE +/- push but<strong>to</strong>ns.<br />
● Press F6 Password.<br />
There <strong>is</strong> no password when you purchase the <strong>SD1</strong>, therefore all the related functions can be ignored.<br />
● D<strong>is</strong>able the blocking function of the Flash RAM saving procedure (Unlocked) using F6 Flash.<br />
● Exit from the page using EXIT.<br />
To replace a Style in Flash RAM access the DISK menu.<br />
● Selected Folder 95 Styles using the numeric keypad (STYLE push but<strong>to</strong>ns) if the Master Folder <strong>is</strong> enabled.<br />
● Select the Folder in which the source Styles are s<strong>to</strong>red using the numeric keypad if the Master Folder <strong>is</strong> d<strong>is</strong>abled.<br />
● Select the original Style using the VALUE +/-, CURSOR +/- and F10 Select push but<strong>to</strong>ns.<br />
● Press F2 Load <strong>to</strong> start the replacement procedure.<br />
● The d<strong>is</strong>play calls up the Style Replace page where the location of the destination Cus<strong>to</strong>m Styles <strong>is</strong> pointed out and also the source Style.<br />
The destination Flash RAM location can be modified using the VALUE +/- push but<strong>to</strong>ns.<br />
● Once the destination memory has been selected, confirm the replacing procedure using F10 Execute or go back <strong>to</strong> the previous page using<br />
F5 Escape.<br />
● A message will warn the user <strong>about</strong> the procedure being accompl<strong>is</strong>hed. Press F10 Continue <strong>to</strong> confirm; <strong>to</strong> cancel and return <strong>to</strong> the Folder<br />
page press F5 Exit.<br />
The original Cus<strong>to</strong>m Styles (1-107) can be re-loaded from Folder 90 Reload, with Master Folder enabled, which s<strong>to</strong>res a copy of the single Styles<br />
and the <strong>SD1</strong>STY0.RLD, which by pressing F2 Load, au<strong>to</strong>matically starts <strong>to</strong> load the original Styles in Flash RAM.<br />
A single Cus<strong>to</strong>m Style cannot be loaded from RAM <strong>to</strong> hard d<strong>is</strong>k as the <strong>SD1</strong> saves all the timbre parameters of the Cus<strong>to</strong>m Styles in one single file<br />
with .STY extension. The saving procedure has already been described in the Arranger section.<br />
Owner’s Manual <strong>SD1</strong> 59
Pattern Edit<br />
The <strong>SD1</strong> can record <strong>new</strong> Styles both in real time and also exploiting a MIDI connection <strong>to</strong> au<strong>to</strong>mate and speed-up the process. It <strong>is</strong> also possible<br />
<strong>to</strong> copy Sections of different Styles and <strong>to</strong> modify the timbres used in the tracks.<br />
The most important innovations of the <strong>SD1</strong> relate <strong>to</strong> the synchronization of an audio file with the Pattern, the use of a Live Drum derived from<br />
the sampled grooves plus an easy function for MIDI reg<strong>is</strong>trations.<br />
The Styles created or modified using Patter Edit are always saved in the dedicated Styles Folder no. 95 (with Master Folder enabled) and from<br />
here they are called up directly by enabling Single RAM Style. In th<strong>is</strong> way the Styles that already ex<strong>is</strong>t are not erased from the Flash RAM. Th<strong>is</strong><br />
procedure <strong>is</strong> performed using the Load function where however, the overwrite protection of the Flash RAM <strong>is</strong> <strong>to</strong> be d<strong>is</strong>abled by entering a password<br />
that can be cus<strong>to</strong>m<strong>is</strong>ed. From a practical point of view the only difference between loading a Style in Flash RAM and loading it directly in<br />
RAM from d<strong>is</strong>k lies in the possibility <strong>to</strong> keep the Styles loaded in the memory even after the instrument has been turned off. For more skilled<br />
musicians th<strong>is</strong> also means that the table of the Styles in the permanent Flash memory can be completely modified. When playing live the loading<br />
speed of a Style from d<strong>is</strong>k <strong>is</strong> in any event so fast that the musician <strong>is</strong> not troubled with long dead times.<br />
The default setting of the Styles in Flash RAM can in any event be reset at any time by resetting the parameters. Th<strong>is</strong> procedure <strong>is</strong> described<br />
in the “Resetting and up-dating the <strong>SD1</strong>” section.<br />
The structure of a Style of the <strong>SD1</strong> (also called Pattern) entails eight separate tracks with independent parameters, namely:<br />
- Drum: associated with a Drum Set for the rhythm section.<br />
- Bass: associated with a GM timbre for the bass track.<br />
- Chord 1: associated with a GM timbre for the first lead accompaniment track.<br />
- Chord 2: associated with a GM timbre for the second lead accompaniment track<br />
- Chord 3: associated with a GM timbre for the third lead accompaniment track<br />
- Chord 4: associated with a GM timbre for the fourth lead accompaniment track<br />
- Chord 5: associated with a GM timbre for the fifth lead accompaniment track<br />
- Drum 2: associated with the use of a Live Drum derived from a groove<br />
Each of these tracks <strong>is</strong> found within a Section, or rather a specifically defined section of the au<strong>to</strong>matic accompaniment.<br />
The <strong>SD1</strong> can program the following Sections:<br />
- To End - Arrange A<br />
- Intro 1, 2, 3 - Arrange B<br />
- Fill In 1, 2, 3, 4 (Break) - Arrange C<br />
- Ending 1, 2, 3 - Arrange D<br />
Pattern editing <strong>is</strong> possible both on Styles s<strong>to</strong>red in hard d<strong>is</strong>k and for the Cus<strong>to</strong>m Styles in Flash RAM.<br />
To modify a Style s<strong>to</strong>red in hard d<strong>is</strong>k simply select the F5 L<strong>is</strong>t function from the initial page of Pattern Edit, or from the l<strong>is</strong>t that will be shown<br />
the first time Pattern Edit <strong>is</strong> accessed.<br />
To modify a Cus<strong>to</strong>m Style create a <strong>new</strong> Pattern using Pattern Edit and copy the parameters of the Cus<strong>to</strong>m Style using the F4 Copy function.<br />
IIn th<strong>is</strong> last case the creation of a Pattern also corresponds <strong>to</strong> the creation of a .PAT file for which you may decide its name, with relative identification<br />
number that <strong>is</strong> required <strong>to</strong> call it up using the Single RAM Style function.<br />
Pattern Edit does not work on Styles s<strong>to</strong>red in Floppy D<strong>is</strong>k. They must therefore necessarily be copied in the hard d<strong>is</strong>k <strong>to</strong> be able <strong>to</strong> use them.<br />
From a purely technical point of view, Pattern Edit exploits only one RAM location <strong>to</strong> modify the Style. Th<strong>is</strong> means that a number of Styles<br />
cannot be loaded <strong>to</strong> be modified at a later date and above all, all the modifications made must be saved each time they are made otherw<strong>is</strong>e<br />
the Style will be lost when the <strong>SD1</strong> <strong>is</strong> turned off. Th<strong>is</strong> RAM location <strong>is</strong> managed completely au<strong>to</strong>matically and <strong>is</strong> not seen by the musician, who<br />
needs not worry <strong>about</strong> it.<br />
THE FIRST PAGE OF THE EDIT PATTERN MENU<br />
To access the editing function of a Style you must be in the main page of the d<strong>is</strong>play, then press PATTERN EDIT and the LED lights up.<br />
To return <strong>to</strong> the main page press the EXIT push but<strong>to</strong>n. In some cases the SONG PLAY push but<strong>to</strong>n or the SEQUENCER <strong>is</strong> <strong>to</strong> be d<strong>is</strong>abled before<br />
accessing Pattern Edit.<br />
60<br />
<strong>SD1</strong> Owner’s Manual
Another requirement <strong>is</strong> that the hard d<strong>is</strong>k must be selected from the D<strong>is</strong>k page as the edi<strong>to</strong>r only works on files in the hard d<strong>is</strong>k. To access the<br />
hard d<strong>is</strong>k:<br />
- press DISK<br />
- press one of the PAGE +/- push but<strong>to</strong>ns <strong>to</strong> d<strong>is</strong>play “Hard” next <strong>to</strong> the Folder currently selected.<br />
The first time that you access Pattern Edit, with Master Folder enabled, a l<strong>is</strong>t of Styles <strong>is</strong> d<strong>is</strong>played, s<strong>to</strong>red in the hard d<strong>is</strong>k from which that<br />
<strong>to</strong> be modified <strong>is</strong> <strong>to</strong> be selected using F10 Select and the CURSOR +/- push but<strong>to</strong>ns <strong>to</strong> move around within the l<strong>is</strong>t or again from the same page<br />
the musician can create a <strong>new</strong> Style using F5 New, that sends <strong>to</strong> the page in which the name <strong>is</strong> entered, then confirm using F10 Create. The<br />
same Pattern creation function <strong>is</strong> found in the first page of Pattern Edit and corresponds <strong>to</strong> the F10 New function.<br />
In both cases you will access the main menu of Pattern Edit.<br />
The first page of Pattern Edit <strong>is</strong> used <strong>to</strong> call up a set of functions, with relative parameters, using the function push but<strong>to</strong>ns. The name of the<br />
Style selected or created will be seen in the middle of the d<strong>is</strong>play of the first page and the SINGLE RAM STYLE push but<strong>to</strong>n will be enabled at<br />
the same time <strong>to</strong> point out that you are working on a Style s<strong>to</strong>red in RAM.<br />
Below <strong>is</strong> the explanation of the parameters of the various menus that can be called up from the first page.<br />
F1 RECORD<br />
From th<strong>is</strong> page you can record and reproduce the single tracks of a Section. The default setting <strong>is</strong> Arrange A as the Section <strong>to</strong> be modified<br />
and the reproduction function (F8 Play) enabled.<br />
To be able <strong>to</strong> playback the Section selected you must set a chord on the keyboard in the part <strong>to</strong> the left of the split point. If, before accessing<br />
Pattern Edit, the split point was set at the bot<strong>to</strong>m end of the keyboard, it will be impossible <strong>to</strong> set the chord. If th<strong>is</strong> <strong>is</strong> the case, exit Pattern<br />
Edit, set a <strong>new</strong> split point and, while doing so, reset the volume of the Lower section by pressing the LOWER VOLUME +/- push but<strong>to</strong>ns <strong>to</strong>gether<br />
at the same time. Return <strong>to</strong> Pattern Edit and F1 Record <strong>to</strong> playback all the tracks of the Section according <strong>to</strong> the chord set.<br />
As for the recording principles, for each Section you must establ<strong>is</strong>h which <strong>to</strong>nality <strong>is</strong> <strong>to</strong> be recorded amongst Major, Minor, Seventh, Seventh<br />
Major, Seventh Minor and two combinations that are required <strong>to</strong> keep the rhythm and lead structure unaltered and modifying only the <strong>to</strong>nality.<br />
Once the <strong>to</strong>nality has been selected, establ<strong>is</strong>h which Section <strong>is</strong> <strong>to</strong> be recorded using F1 and the relative track, by selecting it with push but<strong>to</strong>ns<br />
CURSOR +/-. Once the track has been identified its octave can be modified using the VALUE +/- push but<strong>to</strong>ns (including that for the Drum track<br />
so that the sounds beyond the range can also be used) and change the timbre assigned.<br />
If the Pattern has been created <strong>new</strong>, before you record any Section you can modify the measure number that makes it up, moving around using<br />
the CURSOR +/- push but<strong>to</strong>n on Bar and then select the measure number using VALUE +/-. If vice versa you are modifying a Pattern or a<br />
Section that already ex<strong>is</strong>ts, it will be impossible <strong>to</strong> change the measure value. The Fill In’s always have a fixed duration of one beat.<br />
To change the reproduction and reg<strong>is</strong>tration Tempo simply use the FAST and SLOW push but<strong>to</strong>ns.<br />
Below <strong>is</strong> the explanation of the single parameters that can be called up using the function push but<strong>to</strong>ns.<br />
Owner’s Manual <strong>SD1</strong> 61
ASSIGNING TIMBRES TO THE TRACKS<br />
For the lead tracks (Bass, Chord 1, 2, 3, 4 and 5) the timbres of the GM bank can be used and of the USER VOICE bank for those you have created<br />
yourself and of the RAM/FLASH bank for any samples loaded in RAM for the lead tracks. Timbres achieved using Drawbars cannot be used.<br />
Select a lead track using the CURSOR +/- push but<strong>to</strong>ns.<br />
For the timbres in GM, select the timbre <strong>to</strong> be assigned using the VOICES push but<strong>to</strong>ns. Use the PAGE +/- push but<strong>to</strong>ns <strong>to</strong> call up the groups<br />
of timbres and the function push but<strong>to</strong>ns <strong>to</strong> select the sound.<br />
For the User Voices, enable the USER VOICE, use the PAGE +/- push but<strong>to</strong>ns and select the timbre using the relative function push but<strong>to</strong>n.<br />
For the audio files loaded in RAM, enable the RAM/FLASH push but<strong>to</strong>n and use the function push but<strong>to</strong>ns <strong>to</strong> select the relative sound.<br />
The Drum 1 and 2 tracks are dedicated <strong>to</strong> the exclusive use of the Drum Sets and, only for Drum 2, also for the Live Drums derived from grooves<br />
and for the sampled or imported loops (file .WAV).<br />
For the Drum 1 track you can only select the pre-set Drum Sets and the User Drum Sets.<br />
Select the Drum 1 track using the CURSOR +/- push but<strong>to</strong>ns.<br />
Enable the DRUM SET push but<strong>to</strong>n and, using the VOICES, PAGE +/-push but<strong>to</strong>ns and function push but<strong>to</strong>ns, assign the <strong>new</strong> Drum Set <strong>to</strong> the<br />
track.<br />
Select the Drum 2 track using the CURSOR +/- push but<strong>to</strong>ns.<br />
To use a Drum Set enable DRUM SET. The pages from which the selection <strong>is</strong> made are no longer six but eleven. Once you exceed the sixth<br />
group of Drum Sets, the Live Drums appear that are derived from the grooves from which that preferred <strong>is</strong> <strong>to</strong> be selected.<br />
To assign a sampled loop <strong>to</strong> Drum 2, enable RAM/FLASH and then select a loop with the suitable character<strong>is</strong>tics that has been previously loaded<br />
in the memory (see the appendix of the Manual).<br />
DESCRIPTION OF THE PARAMETERS<br />
F1 Section:<br />
F2 Solo:<br />
F3 Tonality:<br />
F4 Metronome:<br />
F5 Save:<br />
F6 Value Quantize:<br />
F7 Quantize:<br />
Once F1 has been pressed using the VALUE +/- push but<strong>to</strong>ns call up the Section <strong>to</strong> be recorded or reproduced. The order<br />
order of appearance <strong>is</strong>: Arrange A, B, C, D, Fill In 1, 2, 3, 4, Intro 1, 2, 3, Ending 1, 2, 3, To End. Before starting the reg<strong>is</strong>tration<br />
it <strong>is</strong> a good rule <strong>to</strong> always make sure that the Section on which you are working <strong>is</strong> really that desired <strong>to</strong> avoid<br />
confusion.<br />
When th<strong>is</strong> function <strong>is</strong> enabled (√), only the track selected at the time will be reproduced in Play mode.<br />
Th<strong>is</strong> <strong>is</strong> used <strong>to</strong> establ<strong>is</strong>h which <strong>to</strong>nality the Section being recorded refers <strong>to</strong>, between Major, Minor, Seventh and combinations<br />
of the three. In th<strong>is</strong> way you can create completely different arrangements because of the various combinations<br />
of <strong>to</strong>nality. To simplify the recording phase it <strong>is</strong> also possible <strong>to</strong> record a section only in Major leaving it up <strong>to</strong> the<br />
<strong>SD1</strong> <strong>to</strong> extract the various versions of minor and seventh. To do th<strong>is</strong> select “M.m.7th” for Tonality and record the section<br />
with an arrangement in Do major.<br />
When enabled (√), the <strong>SD1</strong> will use a Stick sound <strong>to</strong> beat the tempo.<br />
Th<strong>is</strong> <strong>is</strong> used <strong>to</strong> save the modifications permanently in hard d<strong>is</strong>k.<br />
In reg<strong>is</strong>tration mode it may be handy <strong>to</strong> take the notes <strong>to</strong> a temporal grid, the value of which can be modified using the<br />
VALUE +/-push but<strong>to</strong>ns. The lack of Quantize <strong>is</strong> pointed out by “Real”, whereas maximum Quantize has a value of 2.<br />
The letter “T” indicates values arranged in triples.<br />
While F6 Value Quantize works during reg<strong>is</strong>tration, th<strong>is</strong> function can be used <strong>to</strong> quantize the notes even after the reg<strong>is</strong>tration.<br />
Having chosen the track, establ<strong>is</strong>h the Quantize value using F6 Value Quantize and then press F7 Quantize<br />
<strong>to</strong> quantize the notes recorded.<br />
62<br />
<strong>SD1</strong> Owner’s Manual
F8 Rec/Play:<br />
F9 Velocity:<br />
F10 Clear:<br />
Th<strong>is</strong> <strong>is</strong> used <strong>to</strong> switch between recording (Rec) of the Section and reproduction (Play). To play back any Section, even<br />
without modifying it, it <strong>is</strong> <strong>to</strong> be selected using F1 Section and then <strong>to</strong> be played back using F7 Play. By enabling the<br />
Arranger using START and by playing a chord, split point permitting, you can playback the Section involved as many<br />
times desired.<br />
Th<strong>is</strong> <strong>is</strong> used <strong>to</strong> modify the velocity values of one or all the notes of the track when selected. By enabling the function<br />
a <strong>new</strong> page with the following parameters <strong>is</strong> accessed:<br />
F1 Global: Select th<strong>is</strong> <strong>to</strong> modify all the notes within the track.<br />
F2 Note: Th<strong>is</strong> <strong>is</strong> used <strong>to</strong> select the note of which the velocity <strong>is</strong> <strong>to</strong> be modified by simply playing it on the keyboard.<br />
F3 Value: Th<strong>is</strong> establ<strong>is</strong>hes the increase or decrease value <strong>to</strong> be given <strong>to</strong> the velocity of the note selected using<br />
F2 Note, or of all the notes using F1 Global. The value <strong>is</strong> entered using push but<strong>to</strong>ns VALUE +/-.<br />
F10 Execute: Th<strong>is</strong> executes the modification.<br />
F5 Escape: Th<strong>is</strong> <strong>is</strong> used <strong>to</strong> cancel the whole procedure unless it has been previously confirmed using F10<br />
Execute, and sends <strong>to</strong> the previous page F1 Record.<br />
Th<strong>is</strong> <strong>is</strong> used <strong>to</strong> cancel the contents of a track in a different manner for the Drum tracks and the lead tracks (including<br />
Bass). It <strong>is</strong> indeed possible for the Drum tracks <strong>to</strong> also select the note <strong>to</strong> be cancelled. Once the Drum track <strong>to</strong> be modified<br />
has been selected, press and hold down the F10 Clear push but<strong>to</strong>n. A <strong>new</strong> window will appear with the following<br />
parameters:<br />
F2 Tempo: Th<strong>is</strong> <strong>is</strong> present only for Drum 1 track. If you select th<strong>is</strong> function any Tempo data recorded will be<br />
cancelled.<br />
F3 Note: Th<strong>is</strong> <strong>is</strong> used <strong>to</strong> cancel a single note. By holding down F10 Clear of the previous page, play the note <strong>to</strong><br />
be cancelled on the keyboard. It will be cancelled immediately without having <strong>to</strong> confirm.<br />
F5 Global: Press th<strong>is</strong> push but<strong>to</strong>n <strong>to</strong> cancel the whole Drum track.<br />
With regard <strong>to</strong> the lead track it <strong>is</strong> possible only <strong>to</strong> cancel the whole track. Select the track <strong>to</strong> be cancelled and<br />
hold down F10 Clear and a <strong>new</strong> page will appear with:<br />
F5 Global: By selecting th<strong>is</strong> function the whole contents of the track are cancelled immediately, without having<br />
<strong>to</strong> confirm.<br />
Finally there are two aspects <strong>to</strong> bear in mind when recording:<br />
● The changes of tempo using SLOW and FAST are recorded on Drum 1 track.<br />
● When recording on a track that already bears some <strong>musical</strong> data, these will not be cancelled. In other words the next reg<strong>is</strong>tration adds the<br />
notes played by means of an over-dubbing process.<br />
Press the EXIT key <strong>to</strong> return <strong>to</strong> the initial page of Pattern Edit.<br />
F2 PARAMETER<br />
From the Edit Pattern menu you can select th<strong>is</strong> page where some overall parameters for the whole Pattern can be modified. It <strong>is</strong> preferable<br />
<strong>to</strong> set these parameters before starting <strong>to</strong> record a track or a Section. Some of these parameters can only be modified with a Pattern just created<br />
where nothing has already been recorded.<br />
F1 Tempo: Its default setting <strong>is</strong> 120 bpm. Th<strong>is</strong> value can be modified using the SLOW and FAST push but<strong>to</strong>ns or VALUE +/-.<br />
F2 Time Signature:<br />
F3 Au<strong>to</strong>crash:<br />
F4 Crash Level:<br />
F5 Escape:<br />
Th<strong>is</strong> establ<strong>is</strong>hes the <strong>musical</strong> div<strong>is</strong>ion. The values can be modified using the VALUE +/- push but<strong>to</strong>ns and by pressing F2<br />
Time Signature again <strong>to</strong> switch the position in the div<strong>is</strong>ion.<br />
If enabled (√), a Crash will be played at the end of every Fill In, Break and Intro.<br />
Th<strong>is</strong> establ<strong>is</strong>hes the Crash volume related <strong>to</strong> the Au<strong>to</strong>crash. It <strong>is</strong> modified using the VALUE +/- push but<strong>to</strong>ns.<br />
Th<strong>is</strong> <strong>is</strong> used <strong>to</strong> return <strong>to</strong> the main Edit Pattern menu<br />
Owner’s Manual <strong>SD1</strong> 63
F8 Bas Octav:<br />
F9 Bass Type:<br />
F10 Save:<br />
Th<strong>is</strong> <strong>is</strong> used <strong>to</strong> define the octave in which the fundamental note of the bass <strong>is</strong> found. The value <strong>is</strong> modified by repeatedly<br />
pressing the F8 Bass Octave function push but<strong>to</strong>n.<br />
While a bass with four strings cannot go below note E0, a bass with five strings can go down <strong>to</strong> note C0. In other words<br />
by choosing a 4-string bass the bass note will not go below E0 and if you change <strong>to</strong> a 5-string bass the lowest note will<br />
be C0. Pay attention also <strong>to</strong> the F8 Bass Octave value, which could invalidate the choice of the Bass Type. To select<br />
a Bass Type press the F9 Bass Type function push but<strong>to</strong>n repeatedly.<br />
Th<strong>is</strong> <strong>is</strong> used <strong>to</strong> save all the parameters modified.<br />
All the lead tracks and respective harmonization and Retrigger modes are shown in the middle of the d<strong>is</strong>play. To move around within these<br />
parameters use the CURSOR +/- push but<strong>to</strong>ns and use the VALUE +/- push but<strong>to</strong>ns <strong>to</strong> modify their status.<br />
The harmonization mode that will also be seen in the Arrange Mode menu <strong>is</strong> used <strong>to</strong> choose between two types of harmonization of the notes:<br />
Close <strong>is</strong> used <strong>to</strong> stay as near as possible <strong>to</strong> the notes even when the chord <strong>is</strong> further away. Parallel on the other hand <strong>is</strong> used <strong>to</strong> shift the notes<br />
without altering their intervals. Generally the more <strong>musical</strong> results are obtained with Close.<br />
While the Retrigger mode <strong>is</strong> set on On, when the chord <strong>is</strong> changed the fundamental note for the bass track <strong>is</strong> always played and the notes programmed<br />
on the Chord track found in the first measure are repeated.<br />
HOW TO RECORD A SECTION<br />
Right from here you are already capable of recording your Pattern in real time. To explain further we are providing a practical example..<br />
From the main page of the d<strong>is</strong>play, after having checked if the D<strong>is</strong>k <strong>is</strong> working with Hard D<strong>is</strong>k, press the PATTERN EDIT push but<strong>to</strong>n.<br />
To create a completely <strong>new</strong> Style, press F5 Escape <strong>to</strong> exit the l<strong>is</strong>t which may be d<strong>is</strong>played when accessing Pattern Edit or press F10 Select.<br />
Create a <strong>new</strong> Style using the F10 Create function from the main menu of Pattern Edit. The <strong>SD1</strong> will switch <strong>to</strong> the page dedicated <strong>to</strong> entering the<br />
name, using the keyboard keys and the CURSOR +/- push but<strong>to</strong>ns. Once the name has been entered (th<strong>is</strong> operation <strong>is</strong> required <strong>to</strong> continue) you<br />
must confirm using press F10 Create.<br />
To record a Section press F1 Record.<br />
Select which section <strong>is</strong> <strong>to</strong> be recorded using F1 and the VALUE +/- push but<strong>to</strong>ns.<br />
If you w<strong>is</strong>h, modify the Tempo value using the SLOW and FAST push but<strong>to</strong>ns.<br />
Modify the beat number, moving over using the CURSOR +/- push but<strong>to</strong>ns next <strong>to</strong> Bar and then enter the value using the VALUE +/- push but<strong>to</strong>ns.<br />
To modify the time signature <strong>to</strong>o, return <strong>to</strong> the initial page using EXIT and switch <strong>to</strong> the F2 Parameter menu then <strong>to</strong> F2 Time Signature.<br />
Select the <strong>to</strong>nality of the chord for the track <strong>to</strong> be recorded using F3 Tonality (Major, Minor or Seventh). In normal conditions with “M.m.7th”<br />
the Pattern will record a single chord valid for all the <strong>to</strong>nalities. In th<strong>is</strong> case the chord programmed must strictly be DO major if the Pattern <strong>is</strong><br />
then <strong>to</strong> execute all the other chords correctly.<br />
From the F1 Record menu, select the track <strong>to</strong> be recorded using the CURSOR +/- push but<strong>to</strong>ns.<br />
The timbre of the track selected can be changed simply by calling it up using the VOICE, USER VOICES, FLASH/RAM push but<strong>to</strong>ns and relative<br />
function push but<strong>to</strong>ns. Once you have made your choice, press EXIT <strong>to</strong> return <strong>to</strong> the previous menu.<br />
Enable, or otherw<strong>is</strong>e, the metronome using F4 Metronome.<br />
Switch F8 Rec/Play <strong>to</strong> Rec.<br />
Press the START push but<strong>to</strong>n <strong>to</strong> start recording. After one pre-count you can start recording.<br />
Upon completion of the number of beats available the reg<strong>is</strong>tration will s<strong>to</strong>p au<strong>to</strong>matically and will switch <strong>to</strong> Play.<br />
Press START <strong>to</strong> play back all recorded and play a chord on the left part of the keyboard. The track reproduction will enter the loop status until<br />
START <strong>is</strong> pressed again.<br />
Save the whole reg<strong>is</strong>tration using F5 Save.<br />
F3 SECTION CLEAR<br />
From the initial page of Edit Pattern you can access th<strong>is</strong> page <strong>to</strong> cancel the whole contents of a single Section. Simply press the function push<br />
but<strong>to</strong>n relative <strong>to</strong> the Section, after having selected any variations and press F10 Execute <strong>to</strong> cancel.<br />
64<br />
<strong>SD1</strong> Owner’s Manual
F1 To End: Th<strong>is</strong> <strong>is</strong> used <strong>to</strong> select To End<br />
F2 Intro: Th<strong>is</strong> <strong>is</strong> used <strong>to</strong> select Intro 1, 2, 3, by pressing F2 Intro repeatedly.<br />
F3 Fill In: Th<strong>is</strong> <strong>is</strong> used <strong>to</strong> select Fill In 1, 2, 3, 4, by pressing F3 Fill In repeatedly.<br />
F4 Ending: Th<strong>is</strong> <strong>is</strong> used <strong>to</strong> select Ending 1, 2, 3, by pressing F4 Ending repeatedly.<br />
F5 Escape: Th<strong>is</strong> <strong>is</strong> used <strong>to</strong> return <strong>to</strong> the Edit Pattern page.<br />
F6 Arrange A: Th<strong>is</strong> <strong>is</strong> used <strong>to</strong> select Arrange A.<br />
F7 Arrange B: Th<strong>is</strong> <strong>is</strong> used <strong>to</strong> select Arrange B<br />
F8 Arrange C: Th<strong>is</strong> <strong>is</strong> used <strong>to</strong> select Arrange C<br />
F9 Arrange D: Th<strong>is</strong> <strong>is</strong> used <strong>to</strong> select Arrange D<br />
F10 Execute: Th<strong>is</strong> <strong>is</strong> used <strong>to</strong> cancel the Section selected at the time.<br />
F4 COPY<br />
Th<strong>is</strong> <strong>is</strong> accessed from the initial Pattern Edit page, <strong>to</strong> copy a whole Pattern or Section of it on the Pattern being edited. If the Pattern being<br />
modified already has some tracks recorded, then the source tracks or Sections must have the same time signature and the same length in<br />
beats. The copy function <strong>is</strong> used <strong>to</strong> define not only the original Section but also the track within the Section <strong>to</strong> be copied.<br />
Page F4 Copy appears as follows:<br />
F1 Source:<br />
F3 Section:<br />
Th<strong>is</strong> <strong>is</strong> used <strong>to</strong> specify the memory location from which the file <strong>to</strong> be copied <strong>is</strong> selected, amongst Cus<strong>to</strong>m (in Flash<br />
RAM) and D<strong>is</strong>k Style (in Hard D<strong>is</strong>k) by pressing F1 Source again. Immediately underneath <strong>is</strong> the number of the source<br />
Style. To change the Style <strong>to</strong> be copied simply enter the number of the Style using the numeric keypad (STYLES<br />
push but<strong>to</strong>ns).<br />
sTh<strong>is</strong> <strong>is</strong> used <strong>to</strong> specify the Section <strong>to</strong> be copied by pressing F3 Section repeatedly. Included are Intro 1, 2, 3, Ending<br />
1, 2, 3, Fill In 1, 2, 3, 4 (Break), To End. Arrange A, B, C, D. If “Global” <strong>is</strong> selected all the Sections of one Style will be<br />
copied.<br />
F4 Tracks: When F3 Section <strong>is</strong> different <strong>to</strong> “Global”, the track <strong>to</strong> be copied can also be specified, amongst Drums, Chord 1, 2, 3,<br />
4, 5 and Drums 2.<br />
F5 Escape:<br />
F6 Destination:<br />
F8 Destination Section:<br />
F9 Destination Track:<br />
F10 Save:<br />
F5 LIST<br />
Th<strong>is</strong> <strong>is</strong> used <strong>to</strong> return <strong>to</strong> the Pattern Edit page.<br />
Th<strong>is</strong> provides information on the destination Pattern, which cannot be modified unless you exit F4 Copy and load a<br />
<strong>new</strong> Pattern for editing<br />
When selecting a Section of which a number of variations are available, you can modify the destination Section provided<br />
that it matches the original one. Thus, for example, if the source Section <strong>is</strong> Arrange A, you could choose not<br />
only Arrange A as destination but also B, C and D. The same applies <strong>to</strong> Intro, Ending and Fill In. To select a different<br />
Section press the function push but<strong>to</strong>n F6 Destination Section repeatedly.<br />
If a Chord track has been selected in F4 Tracks, you can copy it in a different Chord track <strong>to</strong> the original one, as<br />
explained for F6 Destination Section. To select a different Chord track, press function push but<strong>to</strong>n F7 Destination<br />
Track repeatedly.<br />
Th<strong>is</strong> <strong>is</strong> used <strong>to</strong> confirm and <strong>to</strong> save the copy procedure set with the parameters as indicated above.<br />
From the initial page of Pattern Edit you can select a Style in Hard D<strong>is</strong>k <strong>to</strong> be modified. The Patterns are indeed created and modified by working<br />
on the files of the hard d<strong>is</strong>k, <strong>to</strong> avoid accidentally damaging the contents of the Flash RAM. To select a Style <strong>to</strong> be loaded in Pattern Edit,<br />
scroll the l<strong>is</strong>t using the VALUE +/- push but<strong>to</strong>ns and, having found the Style, press F10 Select. You will au<strong>to</strong>matically return <strong>to</strong> the main page<br />
of Pattern Edit. To return <strong>to</strong> the initial page without choosing a Style press F5 Escape.<br />
Owner’s Manual <strong>SD1</strong> 65
F6 MIDI RECORD<br />
From the main Edit Pattern d<strong>is</strong>play screen, you can have access <strong>to</strong> Midi Record F6.<br />
Thanks <strong>to</strong> th<strong>is</strong> function, you can record the Pattern directly from a complete sequence transmitted by Computer or Sequencer .<br />
To record a Pattern from Computer :<br />
● Connect the Midi In 2 of the instrument <strong>to</strong> the Midi Out of the Computer and the Midi Out of the instrument <strong>to</strong> the Midi In of the computer.<br />
● Activate the Midi Clock In of the Computer (deactivate the Thru if inserted)<br />
● Activate Midi Clock Out on the instrument<br />
● Prepare the sequence <strong>to</strong> transmit on the Computer<br />
● The channel of each track of the sequence must correspond <strong>to</strong> that of the various sections of the style as they have already been selected<br />
in the Midi RX of the instrument<br />
● Press the Edit Pattern but<strong>to</strong>n<br />
● Select the MIDI RECORD function using F6<br />
● Make sure that the Time Signature of the Pattern on the PARAMETER section corresponds <strong>to</strong> that of the sequence <strong>to</strong> be transmitted.<br />
● Choose the part <strong>to</strong> record (Arrange A, B,C,D, Intro, Fill etc.)<br />
● Set the Value Quantize function <strong>to</strong> the desired value. (In the event of very complex sequences, we recommend you set the REAL value).<br />
● Choose the number of Beats <strong>to</strong> record using the BAR function<br />
● Press F8 <strong>to</strong> select REC .<br />
● Press the Start but<strong>to</strong>n. The recording will au<strong>to</strong>matically s<strong>to</strong>p at the end of the set beats. All the tracks will be recorder in one go.<br />
● To l<strong>is</strong>ten <strong>to</strong> it again, press Start and play the Pattern normally. In th<strong>is</strong> phase, you can give different Quantizations for the acquired sequence<br />
before saving it.<br />
● To save the Pattern, press F5 Save.<br />
The biggest difference compared <strong>to</strong> the traditional recording method lies in the possibility <strong>to</strong> record all the tracks via MIDI in one go. In fact,<br />
each track corresponds <strong>to</strong> a specific MIDI channel and by creating, for example, four beats of Arrange A on the external sequencer using all the<br />
tracks containing the Parts, the whole contents of the Section can be sent from the sequencer <strong>to</strong> be reproduced. In any event it <strong>is</strong> always possible<br />
<strong>to</strong> send a single track from the external sequencer using the internal functions of the sequencer such as Mute and Solo.<br />
It <strong>is</strong> adv<strong>is</strong>able not <strong>to</strong> use Program Changes in the sequence that will be controlled by the external sequencer. They can be modified at a later<br />
date by selecting the most appropriate timbres for each track, from the F1 Record or F8 MIDI Record page as already explained above. Th<strong>is</strong><br />
method of working avoids confusion.<br />
F9 WAVE SYNC<br />
The possibility of synchron<strong>is</strong>ing a loop with a Style <strong>is</strong> an absolutely <strong>new</strong> aspect in the field of electronic keyboards and means that the whole<br />
Style can be turned around according <strong>to</strong> the musician’s desires. The <strong>SD1</strong> implements a Pitch Shift algorithm that works on the loop linked with<br />
the tempo value. In other words modifying the tempo of the Style, by adjacent values, the length of the sampled loop, which remains synchronized<br />
with the rhythm, <strong>is</strong> also modified, but not the timbre. The applications of th<strong>is</strong> <strong>new</strong> mixed Style are the most <strong>musical</strong> that there could possibly<br />
be: on one hand the fidelity of the timbres of the <strong>SD1</strong>, on the other the groove of a sampled drummer. The appendix provides some practical<br />
examples of th<strong>is</strong> innovation. As for Pattern editing, the Wave Sync page <strong>is</strong> used <strong>to</strong> establ<strong>is</strong>h which Section <strong>is</strong> <strong>to</strong> be synchronized with the<br />
sampled loop, by enabling Wave Sync for the single Sections using the relative function push but<strong>to</strong>ns.<br />
The obliga<strong>to</strong>ry requirements necessary <strong>to</strong> exploit a sampled loop are not many, but each <strong>is</strong> required <strong>to</strong> complete the connection.<br />
66<br />
<strong>SD1</strong> Owner’s Manual
The loop must be a monophonic .WAV file.<br />
The .WAV file must have a Start and End point for the loop that must be in use. If the audio file <strong>is</strong> not provided with a loop, import it in Sampler<br />
MSP, set the loop and save in hard d<strong>is</strong>k.<br />
The audio file must be loaded in the FLASH/RAM bank before it can be used in Pattern Edit.<br />
The audio .WAV file can be assigned as timbre <strong>to</strong> Drum 2. Select Drum 2, enable FLASH/RAM and from the l<strong>is</strong>t of audio files in Flash/RAM select<br />
the loop <strong>to</strong> be assigned <strong>to</strong> the track using the relative function push but<strong>to</strong>ns.<br />
The loop <strong>is</strong> valid only for the Section indicated at the time (F1). To use it on others Sections repeat the loop selection procedure for the Drum<br />
2 track also for the other Sections that will exploit that loop.<br />
Only one loop can be used for each Pattern, despite the assignment <strong>to</strong> the Section.<br />
To minim<strong>is</strong>e loading times, especially for the loop, it <strong>is</strong> adv<strong>is</strong>able <strong>to</strong> create a RAM Style Block <strong>to</strong> be loaded when turning the instrument on. In<br />
th<strong>is</strong> way all the loops required for the Styles will also be loaded in one go and will be immediately ready for use in Single RAM Style without<br />
having <strong>to</strong> re-assign the loop <strong>to</strong> the Sections.<br />
F10 NEW<br />
From the Pattern Edit page, even if you are working on a Style, a <strong>new</strong> Style <strong>to</strong> be recorded can be created at any time using F10 New. You will<br />
be requested <strong>to</strong> enter the name of the Style using the keyboard and the CURSOR +/- push but<strong>to</strong>ns and then <strong>to</strong> confirm creation using F10 Save.<br />
To cancel the procedure and <strong>to</strong> return <strong>to</strong> the Edit Pattern page press the F5 Escape function push but<strong>to</strong>n. Remember, if you were modifying a<br />
Style before you started <strong>to</strong> create a <strong>new</strong> one, save the Style otherw<strong>is</strong>e all the modifications added will be lost.<br />
Owner’s Manual <strong>SD1</strong> 67
Power On Set Up<br />
Some of the most important settings programmed for the use of your <strong>SD1</strong> can be s<strong>to</strong>red in such a way that they are au<strong>to</strong>matically called up<br />
when turning the instrument on, thus avoiding loss of time <strong>to</strong> re-program them. The parameters are not grouped on the same page, but d<strong>is</strong>tributed<br />
in a number of menus such as Arrange Mode, Arrange View, MIDI as well as the push but<strong>to</strong>ns on the control panel. The following table<br />
reports all the parameters that can be s<strong>to</strong>red and au<strong>to</strong>matically set on turning the instrument on.<br />
Style Cus<strong>to</strong>m/Fac<strong>to</strong>ry (led)<br />
1 Touch (led)<br />
4 switch mode<br />
Accordion Mode<br />
Arabic mode<br />
Au<strong>to</strong>crash<br />
Bass Lock<br />
Bass <strong>to</strong> Lower<br />
Bass Octave<br />
Bass Mono / Poly<br />
Fingered<br />
Finger 2<br />
Easy 1<br />
Easy 2<br />
Song Balance<br />
Reg<strong>is</strong>tration<br />
Switch On / Off<br />
Modulation Amount / Rate<br />
Vocal<strong>is</strong>t Active-Inactive-Internal - None<br />
Bass <strong>to</strong> Pedal<br />
Bass hold<br />
Bass Retrigg. Accordion<br />
Fixed Dynamic Value<br />
Song Expression<br />
Midi Menu<br />
Microphone Active / Inactive<br />
Lower off on s<strong>to</strong>p<br />
Music Volume<br />
Initial User Folder<br />
Delay Lock<br />
Micro Dry On S<strong>to</strong>p<br />
Setup Video mode, color zoom<br />
Pian<strong>is</strong>t Mode (standard, au<strong>to</strong>)<br />
Tempo Step<br />
Arranger lock<br />
Au<strong>to</strong>matic switch off reg<strong>is</strong>tr.<br />
Global Bass retrigger<br />
Hold on s<strong>to</strong>p<br />
Live Drum<br />
Interactive Arrange<br />
Bass Boost<br />
Out Levels ( Menu Effects)<br />
Timbres selection mode<br />
Styles selection mode by numbers or by pages<br />
Gm Tx-Rx channels<br />
Dynamic Arranger<br />
Dynamic Curve<br />
Equalizer<br />
Font 1-2 text lyric<br />
Global transposer<br />
Global Tune<br />
Harmony type<br />
Lower 1 Hold<br />
Lower 2 Hold<br />
Lower Lock<br />
Pattern (led)<br />
Pedalboard<br />
Pian<strong>is</strong>t Sustain<br />
Portamen<strong>to</strong> time<br />
Reverb Level<br />
Reverb Lock<br />
Separate Out Assignment<br />
Split point<br />
Sustain 2nd voice<br />
Swell <strong>to</strong> right<br />
Sync time<br />
Enhancer<br />
Master Volumes<br />
For th<strong>is</strong> function just one inv<strong>is</strong>ible memory location ex<strong>is</strong>ts, that <strong>is</strong> maintained even when the keyboard <strong>is</strong> Off. There <strong>is</strong>, however, the possibility<br />
<strong>to</strong> s<strong>to</strong>re a number of Power On Set Up settings on the d<strong>is</strong>k.<br />
If you feel that your present setting <strong>is</strong> the optimal one for the parameters l<strong>is</strong>ted in the above table, you may s<strong>to</strong>re or save them on the d<strong>is</strong>k<br />
using the following procedure:<br />
●<br />
●<br />
Press the SAVE/ENTER but<strong>to</strong>n <strong>to</strong> activate the procedure.<br />
Select F3 Power On Setup.<br />
The following four functions are d<strong>is</strong>played:<br />
F5 Escape:<br />
F8 D<strong>is</strong>k Save:<br />
deletes the operation and returns <strong>to</strong> the main page of the d<strong>is</strong>play.<br />
Saves the Power On Set Up <strong>to</strong> the d<strong>is</strong>k you selected before confirming the saving in Flash RAM. If Master Folder <strong>is</strong> activated,<br />
a file with the name Setup.PON <strong>is</strong> created and saved in Folder 98 Userfiles. To save another Power On Set Up file it <strong>is</strong> necessary<br />
that the previous one <strong>is</strong> renamed using the Rename function in the D<strong>is</strong>k menu (please refer <strong>to</strong> the D<strong>is</strong>k section). If<br />
Master Folder <strong>is</strong> not active, the file will be saved in the folder selected last. In th<strong>is</strong> case, <strong>to</strong>o, you will need <strong>to</strong> rename the<br />
saved file before you can save a <strong>new</strong> setting in the same folder.<br />
F9 Default: Th<strong>is</strong> res<strong>to</strong>res the initial conditions of all parameters included in the above table. F10 Save: Th<strong>is</strong> saves the settings in the<br />
Flash RAM memory of the <strong>SD1</strong>.<br />
68<br />
<strong>SD1</strong> Owner’s Manual
Song Play, Midi files and Karaoke<br />
Accessed using the dedicated push but<strong>to</strong>n on the control panel, Song Play <strong>is</strong> used <strong>to</strong> reproduce and organize Midi files, whether they are on<br />
hard d<strong>is</strong>k or floppy d<strong>is</strong>k.<br />
The <strong>SD1</strong> <strong>is</strong> compatible with the following formats:<br />
● Standard MIDI Files in format 0 and 1<br />
● Midi files with .MID extension<br />
● Midi files with .KAR extension<br />
● Midi files with Lyrics events and .KAR or .MID extension<br />
● General MIDI Level 1<br />
Note that the words set in syllables can only be d<strong>is</strong>played if the Midi file has Lyric events. The <strong>SD1</strong> can however import a text file (.TXT), <strong>to</strong> be<br />
linked <strong>to</strong> a Midi file, without having <strong>to</strong> use software <strong>to</strong> add the words. Th<strong>is</strong> possibility <strong>is</strong> described in the “Text files” section.<br />
To make it easier <strong>to</strong> find a Midi file, the <strong>SD1</strong> au<strong>to</strong>matically numbers the Midi files both in hard d<strong>is</strong>k and floppy, as the Midi files are not called up<br />
by their name or by selecting them but by entering the number assigned. The numbering cannot be changed and <strong>is</strong> assigned following the temporal<br />
order in which the Midi files are added <strong>to</strong> those previously s<strong>to</strong>red in a Folder.<br />
The numbering does not alter the name or the contents of the Midi files.<br />
The <strong>SD1</strong> <strong>is</strong> the first electronic keyboard <strong>to</strong> be capable of synchronizing an audio loop, often a groove, with a Midi file. The loop can be imported<br />
or generated directly by the built-in sampler and once prepared for the Midi file the Tempo can be altered or the transposition without drastic<br />
changes in the loop imported. Th<strong>is</strong> means that samples of perfectly synchronized rhythmic loops can be used or instrumental or vocal samples<br />
without undesired effects on the timbre. A separate section <strong>is</strong> dedicated <strong>to</strong> the use of audio files with Midi files.<br />
LOADING A MIDI FILE FROM FLOPPY DISK<br />
●<br />
●<br />
●<br />
●<br />
●<br />
●<br />
●<br />
●<br />
●<br />
●<br />
Insert the floppy d<strong>is</strong>k with Midi files with .MID or .KAR. extension.<br />
Enable SONG PLAY using the dedicated push but<strong>to</strong>n on the control panel and the LED will light up.<br />
Select Floppy D<strong>is</strong>k using the PAGE +/- push but<strong>to</strong>ns.<br />
D<strong>is</strong>play the l<strong>is</strong>t of files using the F5 Dir function push but<strong>to</strong>n.<br />
The d<strong>is</strong>play shows the first 20 Midi files s<strong>to</strong>red. To d<strong>is</strong>play those that follow use the VALUE +/- push but<strong>to</strong>ns.<br />
Enter the number of the Midi file <strong>to</strong> be loaded using the numeric keypad (STYLES push but<strong>to</strong>ns) and the d<strong>is</strong>play will return <strong>to</strong> the initial page<br />
of Song Play.<br />
Once loaded, the name and the number of the Midi file will be d<strong>is</strong>played.<br />
Start reproducing using the START push but<strong>to</strong>n.<br />
The default setting also means that the words are d<strong>is</strong>played <strong>to</strong>o, which can be d<strong>is</strong>abled by pressing the F10 Lyrics function push but<strong>to</strong>n.<br />
There <strong>is</strong> no need <strong>to</strong> exit from the text d<strong>is</strong>play <strong>to</strong> load another Midi file, simply enter the number directly using the numeric keypad. If the<br />
previous Midi file <strong>is</strong> being executed, as soon as loading <strong>is</strong> complete (roughly five seconds) the <strong>new</strong> Midi file will be reproduced. The l<strong>is</strong>t can<br />
also be d<strong>is</strong>played by pressing F5 Dir.<br />
Owner’s Manual <strong>SD1</strong> 69
●<br />
Press START <strong>to</strong> s<strong>to</strong>p reproduction.<br />
LOADING A MIDI FILE FROM HARD DISK<br />
On the contrary <strong>to</strong> the Floppy D<strong>is</strong>k, loading from Hard D<strong>is</strong>k <strong>is</strong> extremely rapid. If the Midi file <strong>is</strong> reproducing and originates from the Floppy D<strong>is</strong>k,<br />
the reproduction procedure <strong>is</strong> <strong>to</strong> be s<strong>to</strong>pped using START before switching over <strong>to</strong> the Hard D<strong>is</strong>k, then using the PAGE +/- push but<strong>to</strong>ns go <strong>to</strong><br />
Hard D<strong>is</strong>k without exiting from Song Play.<br />
If the Hard D<strong>is</strong>k had been previously selected, the enabling of Song Play will refer <strong>to</strong> a Folder of the Hard D<strong>is</strong>k.<br />
If Master Folder <strong>is</strong> enabled, the reference Folder <strong>is</strong> the 91 Midi-file Folder.<br />
If Master Folder <strong>is</strong> d<strong>is</strong>abled, the reference Folder <strong>is</strong> the last selected in order of time. Th<strong>is</strong> performance can be exploited when playing live <strong>to</strong><br />
switch from folder 91 Midi file <strong>to</strong> that chosen by the musician by simply enabling or otherw<strong>is</strong>e MASTER FOLDER, so that two Folders are immediately<br />
ready and available.<br />
The loading procedures of a Midi file are the same as those for the Floppy D<strong>is</strong>k (refer <strong>to</strong> the specific section). The loading times are obviously<br />
much shorter.<br />
CREATING A TEMPORARY CHAIN OF MIDI FILES TO BE REPRODUCED<br />
The F6 Juke-box function available in the Song Play page <strong>is</strong> used <strong>to</strong> create chains of Midi files taken from the Folder in use. Once the relative<br />
function push but<strong>to</strong>n has been pressed a page opens where the Midi files within the Folder are indicated.<br />
The Midi files <strong>to</strong> be booked are selected using the VALUE +/- push but<strong>to</strong>ns. The Midi file selected <strong>is</strong> shown near <strong>to</strong> the box relative <strong>to</strong> F7 Go<br />
Next.<br />
If the number of the Midi file <strong>is</strong> entered it <strong>is</strong> immediately loaded in the memory and does not become a booked Midi file.<br />
If you then press F7 Go Next, with the Midi file previously being reproduced, it will be s<strong>to</strong>pped immediately <strong>to</strong> start again with the Midi file<br />
selected.<br />
At the end of the Midi file being reproduced, the Midi file selected in F7 Go Next will be au<strong>to</strong>matically reproduced.<br />
While in Song Play, by pressing F7 Go Next, the Midi file selected will be immediately reproduced.<br />
If you s<strong>to</strong>p the reproduction of the Midi file the <strong>SD1</strong> loads the Midi file selected in F7 Go Next in the memory.<br />
Temporary chains of Midi files can be created, starting from the Midi files in the Folder, for a maximum of 64 Midi files. It <strong>is</strong> however necessary<br />
<strong>to</strong> enable the function by pressing the * push but<strong>to</strong>n <strong>to</strong> d<strong>is</strong>play the F9 Chain function in the Jukebox page. By pressing the * push but<strong>to</strong>n again,<br />
the function d<strong>is</strong>appears from the d<strong>is</strong>play.<br />
To create a temporary chain, the following steps are required for each Midi file that makes it up:<br />
Select the Midi file <strong>to</strong> be linked using the VALUE +/- push but<strong>to</strong>ns.<br />
Enable the chain function using F9 Chain. The symbol “♦” will appear next <strong>to</strong> the name of the Midi file and a number appears next <strong>to</strong> “Chain”<br />
that indicates the position of the Midi file within the chain.<br />
To cut-out a Midi file that <strong>is</strong> part of the chain, select it again and press F9 Chain. The symbol “♦” d<strong>is</strong>appears from next <strong>to</strong> the name and the<br />
<strong>SD1</strong> up-dates the position of the other Midi files.<br />
To cancel the whole chain press the VALUE +/- push but<strong>to</strong>ns <strong>to</strong>gether at the same time.<br />
Once the chain has been created, press F7 Go Next <strong>to</strong> load the first Midi file of the chain. Start its reproduction by pressing START. Upon<br />
completion the <strong>SD1</strong> will move on<strong>to</strong> the next Midi file.<br />
By s<strong>to</strong>pping the reproduction procedure using START the <strong>SD1</strong> au<strong>to</strong>matically loads the next Midi file of the chain and remains ready <strong>to</strong> start as<br />
soon as START <strong>is</strong> pressed.<br />
With a Midi file being reproduced, press F7 Go Next <strong>to</strong> call up the next Midi file of the chain that <strong>is</strong> immediately reproduced.<br />
Return <strong>to</strong> the Song Play page using EXIT and call up the next Midi files of the chain using START.<br />
Chains thus created cannot be saved and are lost if you change Folder or d<strong>is</strong>k as the <strong>SD1</strong> <strong>is</strong> no longer capable of finding the references.<br />
Direc<strong>to</strong>ries and words can be d<strong>is</strong>played at the same time if the “Screen” mode has been set in the Video function.<br />
To be able <strong>to</strong> create Midi files chains and save them on d<strong>is</strong>k the Chain Edit function of the D<strong>is</strong>k Utility menu <strong>is</strong> <strong>to</strong> be used. Refer <strong>to</strong> the specific<br />
section. Th<strong>is</strong> function <strong>is</strong> used <strong>to</strong> create a chain with a maximum of 32 Midi files, saved as .CHN files and d<strong>is</strong>played in F5 Dir of Song Play<br />
with the letter “c” in front of the name.<br />
70<br />
<strong>SD1</strong> Owner’s Manual
BALANCING AND PLAYING THE TIMBRES ASSIGNED TO THE KEYBOARD<br />
One of the prerogatives of the <strong>SD1</strong> <strong>is</strong> the availability of timbres <strong>to</strong> be played on the keyboard while the Midi file <strong>is</strong> being reproduced. In fact the<br />
two parts Lower and Bass as well as Right and Manual Drum remain in use, separated by the split point that can be programmed even while the<br />
Midi file <strong>is</strong> being reproduced.<br />
The timbres of the Lower parts can be modified, before enabling Song Play, in Arrange View whereas the Manual Bass <strong>is</strong> controlled directly by<br />
the track of the Midi file <strong>to</strong> which the bass <strong>is</strong> assigned.<br />
The Right section can use the following timbres:<br />
● Voices<br />
● User Voices<br />
● RAM Sound<br />
● Drawbar<br />
They can be selected in the usual manner.<br />
Furthermore, the Programs are also enabled, therefore the musician can avail of a potential of four timbres arranged over the whole keyboard.<br />
To play the bass timbre manually, d<strong>is</strong>abling that of the Midi file track, enable the MANUAL BASS push but<strong>to</strong>n.<br />
To play the Drum Set on the keyboard, enable the MANUAL DRUM push but<strong>to</strong>n. In th<strong>is</strong> case the drum track will not be muted as it can overlap<br />
that programmed.<br />
The Volume of the Lower, Right, Manual Bass and Manual Drum parts <strong>is</strong> controlled using the relative VOLUME push but<strong>to</strong>ns.<br />
The global volume of the Midi file and that of all the timbres associated with the keyboard <strong>is</strong> on the other hand controlled by the VALUE +/-<br />
push but<strong>to</strong>ns (Balance). By pressing them <strong>to</strong>gether at the same time the whole Midi file <strong>is</strong> muted compared <strong>to</strong> the keyboard. The muting of<br />
the volume using th<strong>is</strong> procedure however only relates <strong>to</strong> the built-in genera<strong>to</strong>r of the <strong>SD1</strong>, therefore there will be no changes if the Midi file <strong>is</strong><br />
reproduced by an external module controlled via MIDI by the <strong>SD1</strong>. For the latter the general volume can be controlled using PAGE +/- (GM<br />
Remote Level) only when the Midi file <strong>is</strong> being reproduced. Otherw<strong>is</strong>e PAGE +/- push but<strong>to</strong>ns select the d<strong>is</strong>k.<br />
If the Midi file <strong>is</strong> reproduced by an external module via MIDI and <strong>is</strong> reproducing, the PAGE +/- push but<strong>to</strong>ns pressed <strong>to</strong>gether at the same time<br />
mute the volume of the external module and not that of the built-in genera<strong>to</strong>r of the <strong>SD1</strong>.<br />
MIDI FILES AND RAM SOUNDS<br />
With the <strong>SD1</strong> you are now capable of fully exploiting the audio samples <strong>to</strong> be assigned and reproduced with a Midi file. In th<strong>is</strong> way drum loops,<br />
special effects, chorus or even only one timbre perfected for that specific Midi file can be used. The use of a sample in RAM <strong>is</strong> explained in the<br />
appendix. What we’re interested in for the time being <strong>is</strong> <strong>to</strong> know how <strong>to</strong> control Midi files and audio files on d<strong>is</strong>k so that when a Midi file <strong>is</strong> loaded<br />
the correlated audio files are also loaded. There are different situations, namely:<br />
MIDI FILES WITH SINGLE AUDIO FILE<br />
If the Midi file should use only one audio file with the Master Folder d<strong>is</strong>abled, simply put the Midi file and its audio file in the same folder, giving<br />
both the same name, with the original extension.<br />
With Master Folder enabled, the audio file with the same name as the Midi file will be put in Folder 94 “Sounds”.<br />
MIDI FILES WITH A NUMBER OF AUDIO FILES<br />
When a Midi file uses more than one audio files, all the audio files relating <strong>to</strong> the Midi file must be saved in one block, namely a Sound Block<br />
with .BLK extension, with the same name as the Midi file. A Sound Block can bear audio files in .WAV, .MSP and .INS format or a loop <strong>to</strong> be synchronized<br />
with the rhythm.<br />
With Master Folder d<strong>is</strong>abled, simply put the Sound Block in the same folder.<br />
With Master Folder enabled, the Sound Block will be s<strong>to</strong>red in Folder 94 “Sounds”.<br />
SEARCHING A MIDI FILE<br />
If hundreds of Midi files are grouped in a Folder they will be d<strong>is</strong>played in alphabetical order and with their own number assigned according <strong>to</strong><br />
the time order in which they were copied or created in the Folder. One of these Midi files can be called up at any time from Song Play by entering<br />
the number using the numeric keypad, but it may prove more handy <strong>to</strong> search a Midi file according <strong>to</strong> its title.<br />
Proceed as follows:<br />
● D<strong>is</strong>play the l<strong>is</strong>t of Midi files using F5 Dir.<br />
● Enter the first letters of the title using the keyboard keys, which will be shown in the dedicated box under the d<strong>is</strong>k in use.<br />
● The d<strong>is</strong>play will show the first 20 Midi files found with these letters. To see the next use the VALUE +/- push but<strong>to</strong>ns.<br />
● The search function becomes more accurate by adding more letters.<br />
● If a title <strong>is</strong> entered incorrectly, press F5 again <strong>to</strong> start the procedure again.<br />
● If there <strong>is</strong> only one Midi file with that title, be it partial or complete, press SAVE/ENTER <strong>to</strong> immediately load the Midi file.<br />
● If you have found the Midi file within the l<strong>is</strong>t given, load it by entering its number using the numeric keypad.<br />
● Once the Midi file has been loaded, press START <strong>to</strong> reproduce it.<br />
Owner’s Manual <strong>SD1</strong> 71
THE SONG PLAY FUNCTIONS<br />
The page called up by enabling Song Play bears various functions for controlling the Midi files. Below are the details:<br />
F1 GM Part:<br />
F2 Count:<br />
F3 Transpose:<br />
Th<strong>is</strong> calls up a set of pages for modifying the parameters of the single tracks. Later on you will find a specific section with<br />
all the explanations.<br />
Th<strong>is</strong> has a double function. It d<strong>is</strong>plays the number of the beat as the Midi file reproduction continues. By pressing the relative<br />
function push but<strong>to</strong>n on the other hand it leads directly <strong>to</strong> the Effects page where the effects for the Midi file can be<br />
set. Th<strong>is</strong> page <strong>is</strong> described in the Effects section. To return from Effect page <strong>to</strong> the Song Play page, press EXIT.<br />
Th<strong>is</strong> leads <strong>to</strong> a page dedicated <strong>to</strong> the transposition options, exited using EXIT, with the following parameters:<br />
Transposer: Th<strong>is</strong> <strong>is</strong> set in the middle of the d<strong>is</strong>play and points out the transposition value in semi<strong>to</strong>nes entered<br />
using the CURSOR +/- push but<strong>to</strong>ns (Transposer). Th<strong>is</strong> value can be applied <strong>to</strong> the Midi file, <strong>to</strong> just the keyboard, or<br />
<strong>to</strong> both.<br />
F1 Global: When set as On, the transposition value <strong>is</strong> applied <strong>to</strong> Midi files and keyboard.<br />
F2 Keyboard: When set as On, the transposition value <strong>is</strong> applied only <strong>to</strong> the keyboard, without altering the Midi file.<br />
F3 Song: When set as On, the transposition value <strong>is</strong> applied only <strong>to</strong> the Midi file, without altering the timbres<br />
assigned <strong>to</strong> the keyboard.<br />
F6 Intelligent Transposer: Th<strong>is</strong> applies a special transposition <strong>to</strong> the tracks of the Midi file so that the single timbres<br />
are always played in their natural range and are re-lead within the original octave. The results are much more<br />
<strong>musical</strong> than with the simple application of the transposition. It <strong>is</strong> enabled as default setting.<br />
F7 Lead Channel: By selecting a parameter and using the VALUE +/- push but<strong>to</strong>ns you can modify the MIDI channel<br />
of the Midi file that bears the main lead, which can be muted using the Lead Off function. The lead <strong>is</strong> usually<br />
set on channel 4.<br />
F10 Save To D<strong>is</strong>k: Th<strong>is</strong> <strong>is</strong> used <strong>to</strong> save the settings of the transposition for the tracks of the Midi file once and for<br />
all by recording a <strong>new</strong> Midi file on d<strong>is</strong>k that replaces the previous one. The procedure <strong>is</strong> done using Song Play in<br />
s<strong>to</strong>pped status. If the Midi file has an audio loop, the Save To D<strong>is</strong>k command modifies the in<strong>to</strong>nation of the loop<br />
without altering the velocity and the synchronization with the Tempo.<br />
F4 Transposition Info:<br />
Th<strong>is</strong> <strong>is</strong> used <strong>to</strong> d<strong>is</strong>play the type of transposition applied between Global, Keyboard and Song. Its only function <strong>is</strong> that<br />
of informing the user.<br />
F5 Dir:<br />
F6 Jukebox:<br />
F7 Video:<br />
F8 Lead:<br />
F9 Drum + Bass:<br />
F10 Lyric:<br />
Th<strong>is</strong> <strong>is</strong> used <strong>to</strong> d<strong>is</strong>play the l<strong>is</strong>t of Midi files s<strong>to</strong>red in the Folder or in the d<strong>is</strong>k in use and its function has already been<br />
described in the sections on how <strong>to</strong> load a Midi file.<br />
The creation of chains of Midi files has already been illustrated in the dedicated section, <strong>to</strong> which you may refer. You will<br />
find the explanations of the single parameters.<br />
F7 Go Next: Th<strong>is</strong> indicates the next Midi file <strong>to</strong> be reproduced or loaded.<br />
F8 Lead: If set as On the lead track will be reproduced. If pressed again the track of the Midi file indicated as Lead<br />
Channel will be d<strong>is</strong>abled.<br />
F9 Chain: Th<strong>is</strong> appears after the * push but<strong>to</strong>n <strong>is</strong> pressed and <strong>is</strong> used <strong>to</strong> create chains.<br />
F10 Lyric: If there are Lyrics events in the Midi file and if the function <strong>is</strong> set as On, the d<strong>is</strong>play shows the words set<br />
in syllables. In th<strong>is</strong> status, if F10 <strong>is</strong> pressed again, the function will be d<strong>is</strong>abled.<br />
Th<strong>is</strong> <strong>is</strong> used <strong>to</strong> control the optional video interface. Further details are provided in the Video Out and Karaoke section.<br />
Th<strong>is</strong> <strong>is</strong> used <strong>to</strong> quickly enable or d<strong>is</strong>able the track of the lead establ<strong>is</strong>hed with Lead Channel in page F3 Transposer. Press<br />
the function push but<strong>to</strong>n <strong>to</strong> switch On and Off. If the MIDI channel does not correspond <strong>to</strong> that of the lead, there <strong>is</strong> the r<strong>is</strong>k<br />
of d<strong>is</strong>abling a different track such as that of the bass or of another instrument. The F8 Lead status <strong>is</strong> valid for all Midi files.<br />
When set as On, it d<strong>is</strong>ables all the tracks of the Midi file with the exception of those for the Drums and Bass.<br />
The d<strong>is</strong>play choice applies <strong>to</strong> all Midi files. Its default setting <strong>is</strong> Off. Press the function push but<strong>to</strong>n F10 again if the Midi<br />
72<br />
<strong>SD1</strong> Owner’s Manual
file has Lyrics events and they will be set in syllables on the d<strong>is</strong>play. From the words d<strong>is</strong>play page exit using the F10 function<br />
push but<strong>to</strong>n.<br />
MODIFYING AND SAVING THE PARAMETERS OF THE TRACKS OF A MIDI FILE<br />
The <strong>SD1</strong> can modify the Volume, Reverb, Chorus and Pan parameters for each single track (Part) of a Midi file. It can also always filter undesired<br />
MIDI events, transpose the track, enable the Mute and define the MIDI channel receiving and transmitting for each track. To go beyond the<br />
General MIDI standard Level 1, it <strong>is</strong> also possible <strong>to</strong> convert the track in<strong>to</strong> one dedicated <strong>to</strong> the use of a Drum Set or the Vocalizer. These parameters<br />
can be edited only after having started the Midi file for some beats, just enough <strong>to</strong> load the single track parameters that are always at<br />
the <strong>begin</strong>ning of each Midi file.<br />
The <strong>SD1</strong> <strong>is</strong> provided with two different editing methods: the first <strong>is</strong> based on d<strong>is</strong>playing one track or Part at a time, the second shows the setting<br />
of the single parameter for all sixteen parts.<br />
Once the Midi file has been started for a few beats, press F1 GM Part <strong>to</strong> access the editing pages.<br />
It <strong>is</strong> not necessary <strong>to</strong> continue reproducing the Midi file once the parameters have been loaded in the memory, however by modifying the parameters<br />
while the Midi file <strong>is</strong> reproducing it will be much easier <strong>to</strong> play back the result.<br />
MODIFYING A SINGLE PART<br />
Once a Midi file has been loaded, enable SONG PLAY and from the main page press F1 GM Part <strong>to</strong> call up the page dedicated <strong>to</strong> the parameters<br />
of a single track of the Midi file. The Part <strong>is</strong> shown in the middle of the d<strong>is</strong>play, the parameters of which (that can be modified) are assigned<br />
<strong>to</strong> the function push but<strong>to</strong>ns. Right underneath <strong>is</strong> the timbre assigned <strong>to</strong> the Part and the effect used. The bot<strong>to</strong>m part of the d<strong>is</strong>play <strong>is</strong> dedicated<br />
<strong>to</strong> moni<strong>to</strong>ring the activities of the sixteen Parts, while playing the Midi file and can be useful <strong>to</strong> find the Part <strong>to</strong> be modified.<br />
To move around between the single Parts use the PAGE +/- push but<strong>to</strong>ns.<br />
The parameters that can be modified must be selected using the dedicated function push but<strong>to</strong>n before the value can be modified.<br />
Timbre: Each track can use a timbre taken from the Voice, User Voice and RAM/Flash bank. To modify the timbre assigned follow the normal<br />
procedure using the VOICES, RAM/FLASH, USER VOICE, PAGE +/- push but<strong>to</strong>ns and the function push but<strong>to</strong>ns.<br />
Modulation effect: For each single track you can choose the modulation effect <strong>to</strong> be applied <strong>to</strong> the timbre between Chorus, D<strong>is</strong><strong>to</strong>rsor and Delay,<br />
using the CURSOR +/- push but<strong>to</strong>ns. The effect entity can be programmed using F3 Chorus/D<strong>is</strong><strong>to</strong>rsor/Delay.<br />
F1 Volume:<br />
F2 Reverb:<br />
F3 Chorus/D<strong>is</strong><strong>to</strong>rsor/Delay:<br />
F4 Panpot:<br />
F5 Filter<br />
Th<strong>is</strong> modifies the volume of the whole track. The value can be changed using the VALUE +/- push but<strong>to</strong>ns which,<br />
if pressed <strong>to</strong>gether at the same time, reset the value.<br />
Th<strong>is</strong> modifies the Reverb entity applied <strong>to</strong> the track. The value can be changed using the VALUE +/- push but<strong>to</strong>ns<br />
which, if pressed <strong>to</strong>gether at the same time, reset the value.<br />
Th<strong>is</strong> modifies the entity of the modulation effect chosen between Chorus, D<strong>is</strong><strong>to</strong>rsor and Delay assigned <strong>to</strong> the<br />
track using the CURSOR +/- push but<strong>to</strong>ns. The value can be changed using the VALUE +/- push but<strong>to</strong>ns which,<br />
if pressed <strong>to</strong>gether at the same time, reset the value. The d<strong>is</strong>play shows the type of effect chosen next <strong>to</strong> F3<br />
and also below the timbre.<br />
Th<strong>is</strong> modifies the arrangement of the timbre on the stereo panorama. The value can be changed using the<br />
VALUE +/- push but<strong>to</strong>ns which, if pressed <strong>to</strong>gether at the same time, take the timbre back <strong>to</strong> the middle of the<br />
stereo panorama.<br />
Owner’s Manual <strong>SD1</strong> 73
Th<strong>is</strong> calls up the page where some MIDI events can be cut-out from the reproduction of the track. It may occur<br />
for example, that the musician w<strong>is</strong>hes <strong>to</strong> avoid using the Modulation or some other MIDI parameter that directly<br />
affects the timbre. The MIDI filters can also be used <strong>to</strong> control an external MIDI module better. The page<br />
called up from F5 Filter shows a table of four lines and four columns relative <strong>to</strong> the sixteen Parts. To be able<br />
<strong>to</strong> access the MIDI filter of a single Part use the F1 and F6 push but<strong>to</strong>ns for Parts 1, 2, 3 and 4 that are <strong>to</strong> be<br />
selected by pressing the same push but<strong>to</strong>ns repeatedly. Use push but<strong>to</strong>ns F2 and F7 for Parts 5, 6, 7, and 8.<br />
Use push but<strong>to</strong>ns F3 and F8 for Parts 9, 10, 11 and 12 and push but<strong>to</strong>ns F4 and F9 for Parts 13, 14, 15 and 16. Once<br />
the Part <strong>to</strong> which the MIDI filter <strong>is</strong> <strong>to</strong> be applied has been found, select which MIDI message <strong>is</strong> <strong>to</strong> be cut-out from<br />
the reproduction using the VALUE +/- push but<strong>to</strong>ns and enable the filter using the F10 On/Off push but<strong>to</strong>n. The<br />
filter <strong>is</strong> enabled when “ON” appears next the MIDI message <strong>to</strong> be filtered. The MIDI messages that can be filtered<br />
are the following:<br />
Notes: all notes within the track<br />
Control Change: all Control Changes within the track<br />
Program Change: all Program Changes<br />
After Touch: all After <strong>to</strong>uch events<br />
Pitch Bend: all Pitch Bend events<br />
Volume: only Control Change 07 Volume<br />
Pan: only Control Change 10 Pan<br />
Reverb: only Control Change XX Reverb Send<br />
Chorus: only Control Change XX Effect Send<br />
Modulation Wheel: only Control Change 01 Modulation<br />
Expression: only Control Change 11 Expression<br />
RPN: only Control Change XX RPN<br />
NRPN: only Control Change XX NRPN<br />
To exit from F5 Filter press EXIT that sends <strong>to</strong> the main page of Song Play.<br />
F6 Key Shift:<br />
F7 Channel Tx Rx:<br />
F8 Part Mode:<br />
F9 Mute:<br />
F10 16 Parts:<br />
Th<strong>is</strong> changes the transposition of the track selected by up <strong>to</strong> +/- 24 semi<strong>to</strong>nes. The value can be changed using<br />
the VALUE +/- push but<strong>to</strong>ns which, if pressed <strong>to</strong>gether at the same time, reset the value.<br />
When push but<strong>to</strong>n F7 <strong>is</strong> pressed repeatedly it switches from TX, that indicates the transm<strong>is</strong>sion MIDI channel, <strong>to</strong><br />
RX, that establ<strong>is</strong>hes the MIDI receiving channel. The value can be changed using the VALUE +/- push but<strong>to</strong>ns. If<br />
no value <strong>is</strong> specified the track receives and transmits on the MIDI channel having the same number as the Part.<br />
Th<strong>is</strong> modifies the operational mode of the track, using the VALUE +/- push but<strong>to</strong>ns. The possible choices are:<br />
Voice: track dedicated <strong>to</strong> the use of a timbre<br />
Drumset: track dedicated <strong>to</strong> the use of a Drum Set<br />
Drum2: track dedicated <strong>to</strong> the use of Live Drums<br />
Vocalize: track dedicated <strong>to</strong> the control of the Vocalizer<br />
Based on the choice made Drum Set, Live Drum, Voice and Vocal Set can be called up or otherw<strong>is</strong>e. Whereas in<br />
the case of Voice and Drum Set mode the Voice and Drum Set are called up normally. For Drum 2 and Vocal Set<br />
the Live Drums and Vocal Sets must be selected using the VALUE +/- push but<strong>to</strong>ns. The modification of operational<br />
mode of a track can make the song incompatible with modules in General MIDI, but it offers the best possible<br />
for creating Midi files on <strong>SD1</strong>.<br />
If the function <strong>is</strong> enabled (symbol √), the track <strong>is</strong> cut-out from the reproduction.<br />
Th<strong>is</strong> enables the d<strong>is</strong>play of each single parameter, showing its value for all sixteen Parts.<br />
MODIFYING A PARAMETER FOR THE SIXTEEN PARTS<br />
As already mentioned the status of a single parameter for all sixteen tracks can be d<strong>is</strong>played using the F10 16 Parts function just described.<br />
To rapidly access a parameter, select it from the GM Part page and then press F10 16 Parts <strong>to</strong> d<strong>is</strong>play the status of that parameter for the sixteen<br />
tracks. The page F10 16 Parts structure shows a table with four lines and four columns relative <strong>to</strong> the sixteen Parts. To access the single<br />
Part use push but<strong>to</strong>ns F1 and F6 for Parts 1, 2, 3 and 4 that are selected by pressing the same push but<strong>to</strong>ns repeatedly. Use push but<strong>to</strong>ns<br />
F2 and F7 for Parts 5, 6, 7, and 8. Use push but<strong>to</strong>ns F3 and F8 for Parts 9, 10, 11 and 12 and push but<strong>to</strong>ns F4 and F9 for Parts 13, 14, 15 and 16.<br />
Once the Part has been found its value can be modified using the VALUE+/- push but<strong>to</strong>ns which, if pressed <strong>to</strong>gether at the same time, will reset<br />
the value.<br />
The parameters that can be modified in th<strong>is</strong> way are d<strong>is</strong>tributed over seven pages that are called up using push but<strong>to</strong>ns PAGE +/-, and include<br />
Volume, Reverb, Effects, Pan, Shift, Channel Rx, Channel Tx, already explained in the previous section.<br />
The F5 Mute (Solo) function <strong>is</strong> used <strong>to</strong> establ<strong>is</strong>h which <strong>is</strong> the F10 Mute action. When F5 <strong>is</strong> set on Mute (Solo), F10 <strong>is</strong> used <strong>to</strong> cut-out only the<br />
track selected at the time from the reproduction. Press F5 again and the relative function <strong>is</strong> changed in<strong>to</strong> Solo (Mute) and F10 Mute cutsout<br />
all the tracks with the exception of that selected.<br />
Press EXIT <strong>to</strong> return <strong>to</strong> the main page of Song Play but it will not be possible <strong>to</strong> save the modifications made. Therefore SAVE/ENTER <strong>is</strong> <strong>to</strong> be<br />
enabled if the modifications are <strong>to</strong> be saved.<br />
74<br />
<strong>SD1</strong> Owner’s Manual
SAVING THE PARAMETERS MODIFIED<br />
The parameters that can be saved within a Midi file are indicated in the XXX table and also include the volume balance between Midi file and<br />
keyboard, the Tempo value, the settings of the Drum Mixer, the timbre for the Right section and the settings for the Vocal<strong>is</strong>t track. The saving<br />
function <strong>is</strong> called up only when the Midi file <strong>is</strong> s<strong>to</strong>pped and must be used only within the F1 GM Part menus. It <strong>is</strong> therefore important <strong>to</strong> save<br />
each modification within F1 GM Part before returning <strong>to</strong> the main page of Song Play, using the SAVE/ENTER function that enables the relative<br />
page. It <strong>is</strong> used <strong>to</strong> enter a <strong>new</strong> name for the Midi file, which otherw<strong>is</strong>e will be overwritten, using the keyboard keys and the CURSOR +/-<br />
push but<strong>to</strong>ns. To cancel the procedure press F5 Escape, <strong>to</strong> save and cancel the previous settings press F9 Remove or <strong>to</strong> confirm saving press<br />
F10 Execute. The Midi file thus modified <strong>is</strong> saved in the same folder from which it was loaded.<br />
SAVE SONG SETUP PARAMETERS<br />
- Program Change - Transposer ( Global/Song )<br />
- Effects - Pan<br />
- Volume - Note Shift<br />
- Tempo - Song Balance<br />
- Drum Mixer - Right Hand Voice<br />
Owner’s Manual <strong>SD1</strong> 75
CREATING A PERMANENT CHAIN OF MIDI FILES ON DISK<br />
A chain created with the Juke-Box function cannot be saved on d<strong>is</strong>k, however the D<strong>is</strong>k menu offers a function that <strong>is</strong> indeed used <strong>to</strong> create and<br />
save chains of a maximum of 32 Midi files. From the main page of the d<strong>is</strong>play press the DISK push but<strong>to</strong>ns and then F9 Utility. The controls<br />
required <strong>to</strong> create a chain are the following:<br />
F7 Chain Edit:<br />
Th<strong>is</strong> creates chains of Midi files of no more than 32 Midi files, <strong>to</strong> be reproduced in sequence without therefore having <strong>to</strong> callup<br />
each file individually. It only works for the Midi files s<strong>to</strong>red in the same Folder, which <strong>is</strong> called up as already explained<br />
for F3 Transposer. Once F7 Chain Edit <strong>is</strong> pressed the <strong>SD1</strong> d<strong>is</strong>plays the Midi files s<strong>to</strong>red in the Folder that can be selected<br />
using the VALUE +/- and CURSOR +/- push but<strong>to</strong>ns. The options available are:<br />
F5 Escape: th<strong>is</strong> cancels the procedure<br />
F7 Save Chain:<br />
F8 Chain L<strong>is</strong>t:<br />
F10 Select:<br />
th<strong>is</strong> creates a file with .CHN extension within the same Folder that bears the Midi files relative <strong>to</strong> the chain programmed.<br />
Th<strong>is</strong> d<strong>is</strong>plays all the chains of Midi files already s<strong>to</strong>red within the Folder in use.<br />
Th<strong>is</strong> selects the Midi file <strong>to</strong> be added <strong>to</strong> the chain.<br />
The procedures required <strong>to</strong> create a chain of Midi files are the following:<br />
●<br />
●<br />
●<br />
●<br />
●<br />
●<br />
●<br />
Select the Folder where the Midi files are s<strong>to</strong>red using the numeric keypad (STYLES push but<strong>to</strong>ns).<br />
Press F7 Chain Edit.<br />
Find the first Midi file of the chain using the VALUE +/- and CURSOR +/- push but<strong>to</strong>ns.<br />
Select the Midi file using F10 Select. A number will appear at the side of the name that indicates the position within the chain.<br />
Find and select the next Midi files.<br />
If you make a m<strong>is</strong>take, find the Midi file and press F10 Select again. The Midi file will be removed from the chain and the Midi files will move<br />
back one position.<br />
Save the chain using F7 Save Chain, from the page called up the name can be entered using the keyboard and the CURSOR push but<strong>to</strong>ns.<br />
Confirm using F10 Exec or cancel using F5 Escape.<br />
USING THE CHAIN OF MIDI FILES<br />
The chain thus created <strong>is</strong> loaded in Song Play using the Load function from the D<strong>is</strong>k menu or <strong>is</strong> called up directly from the first page of Song<br />
Play, by entering the number associated with the Chain file using the numeric keypad (STYLES push but<strong>to</strong>ns). When switching <strong>to</strong> Song Play<br />
the title of the first Midi file will appear. There are three ways of moving along the chain:<br />
Leave the Midi files <strong>to</strong> end normally, the <strong>SD1</strong> will load the next one and will reproduce it without having <strong>to</strong> <strong>to</strong>uch a key.<br />
Without starting Song Play with the START push but<strong>to</strong>n, use the VALUE +/- push but<strong>to</strong>ns <strong>to</strong> select the Midi files of the chain.<br />
While Song Play <strong>is</strong> playing, press the COUNT/PAUSE/RESTART push but<strong>to</strong>n <strong>to</strong> call up another Midi file and then use the VALUE +/- push but<strong>to</strong>ns.<br />
Once the Midi files has been found, press the COUNT/PAUSE/RESTART push but<strong>to</strong>n again <strong>to</strong> start Song Play again with the <strong>new</strong> Midi file.<br />
Whatever the method used, if the execution of a Midi file <strong>is</strong> s<strong>to</strong>pped using the START push but<strong>to</strong>n, Song Play will loose the data of the chains<br />
for good and it will have <strong>to</strong> be loaded again. The same applies <strong>to</strong> all controls of the Juke-Box function d<strong>is</strong>abled when using a chain. The words<br />
d<strong>is</strong>play remains enabled.<br />
76<br />
<strong>SD1</strong> Owner’s Manual
Video Out and Karaoke<br />
The optional video card allows you <strong>to</strong> use a TV or a moni<strong>to</strong>r <strong>to</strong> d<strong>is</strong>play messages, words set in syllables of a Midi file or <strong>to</strong> duplicate the d<strong>is</strong>play<br />
of the <strong>SD1</strong>.<br />
The options for the video output are grouped in the Song Play menu that <strong>is</strong> enabled using the dedicated push but<strong>to</strong>n.<br />
When working in Song Play access the Video page by pressing the F7 Video function push but<strong>to</strong>n from the initial page of the Song Play menu<br />
<strong>to</strong> set all the parameters that are described below.<br />
Press F5 Escape <strong>to</strong> return <strong>to</strong> the Song Play page.<br />
WRITING A MESSAGE TO BE SENT TO THE AUDIO OUTPUT<br />
A box (Video Message) appears in the middle of the d<strong>is</strong>play where a message <strong>to</strong> be d<strong>is</strong>played on the video output can be entered, which will<br />
appear in the lowest line of the TV screen or the moni<strong>to</strong>r. Th<strong>is</strong> possibility <strong>is</strong> rather handy when playing live <strong>to</strong> communicate with the audience<br />
or <strong>to</strong> introduce yourself or <strong>to</strong> write dedications.<br />
To write the words of the message, no longer than 32 characters, use the keyboard keys and the CURSOR +/- push but<strong>to</strong>ns.<br />
Once the message has been entered, confirm using F10 Execute <strong>to</strong> transfer it <strong>to</strong> the video output.<br />
Press F9 Clear <strong>to</strong> cancel the whole message.<br />
The message will remain on the video whatever the operational status.<br />
CHANGING THE BACKGROUND AND TEXT COLOUR<br />
The <strong>SD1</strong> can select two different colours for the background and for the words: The combinations are Blue/White or White/Black.<br />
To change the colour of the background use F1 Background, by pressing the function push but<strong>to</strong>n repeatedly.<br />
To change the colour of the words use F2 Foreground, by pressing the function push but<strong>to</strong>n repeatedly.<br />
The two settings are mutually interchangeable.<br />
The settings of these parameters depend also on the F6 Mirror function.<br />
MODIFYING THE WORD CHARACTERS<br />
All the characters can be changed from capital letters <strong>to</strong> small letters (on d<strong>is</strong>play only) by pressing the F3 Upper Chase function push but<strong>to</strong>n<br />
with Song Play s<strong>to</strong>pped.<br />
MODIFYING THE SCREEN LAY-OUT<br />
The F4 Lyric Mode function <strong>is</strong> used <strong>to</strong> establ<strong>is</strong>h how the space on the video screen will be used. The settings are called up by pressing the relative<br />
function push but<strong>to</strong>n repeatedly with Song Play s<strong>to</strong>pped, namely:<br />
Full Screen: th<strong>is</strong> uses the full screen <strong>to</strong> d<strong>is</strong>play the words of the Midi file.<br />
1/2 Screen: the direc<strong>to</strong>ry of the Midi files <strong>is</strong> d<strong>is</strong>played in the bot<strong>to</strong>m half of the screen and the words of the Midi file in the <strong>to</strong>p half.<br />
If you choose the Full Screen mode, again using F4 Lyric Mode, the d<strong>is</strong>play mode of the text syllables can be defined for which there are two<br />
options:<br />
Underline: th<strong>is</strong> underlines the syllables in time with the lead<br />
Mark: an indica<strong>to</strong>r appears <strong>to</strong> the left of the line <strong>to</strong> be sung<br />
Another function used <strong>to</strong> control the screen performance <strong>is</strong> F6 Mirror that <strong>is</strong> used <strong>to</strong> reproduce, or otherw<strong>is</strong>e, the conditions of the d<strong>is</strong>play of<br />
Owner’s Manual <strong>SD1</strong> 77
the <strong>SD1</strong> based on its status:<br />
On: means that everything that appears on the <strong>SD1</strong> d<strong>is</strong>play can be d<strong>is</strong>played on the screen.<br />
Off: means that only the Midi file words appear on the screen despite the <strong>SD1</strong> d<strong>is</strong>play.<br />
The Mirror Off status may prove useful <strong>to</strong> read the words on the screen when the words d<strong>is</strong>played on the <strong>SD1</strong> <strong>is</strong> set on off via Lyric Off, and<br />
can only be set with Song Play s<strong>to</strong>pped.<br />
F7 Zoom th<strong>is</strong> <strong>is</strong> used <strong>to</strong> enable, or otherw<strong>is</strong>e, the enlargement of the words shown on the screen. The Zoom function <strong>is</strong> not effective if F6<br />
Mirror <strong>is</strong> set as On.<br />
SELECTING THE VIDEO OUTPUT<br />
The optional video interface <strong>is</strong> used <strong>to</strong> choose amongst the following formats, using the F8 Video function:<br />
PAL: European telev<strong>is</strong>ion system<br />
NTSC: American telev<strong>is</strong>ion system<br />
SVHS Pal: super VHS European<br />
SVHS NTSVC: super VHS American<br />
Moni<strong>to</strong>r: VGA moni<strong>to</strong>r for computers<br />
Off: Video card d<strong>is</strong>abled<br />
To select one of these formats press the function push but<strong>to</strong>n F8 Video repeatedly.<br />
78<br />
<strong>SD1</strong> Owner’s Manual
Recording a Midi file<br />
Everything that <strong>is</strong> played on the <strong>SD1</strong>, including the au<strong>to</strong>matic accompaniment and the variations made on the control panel, can be recorded as<br />
a Midi file directly on Floppy D<strong>is</strong>k or Hard D<strong>is</strong>k. Everything recorded can be later modified using the built-in sequencer of the <strong>SD1</strong> or on software<br />
sequencers for PC/Mac. Considering that the accompaniment tracks use timbres in standard General MIDI, it <strong>is</strong> also possible <strong>to</strong> create<br />
some arrangements very quickly and sufficiently compatible also with other GM modules. Some of the properties of the <strong>SD1</strong> may however be<br />
lost if reproduced on GM modules, in particular the use of Live Drum, the response <strong>to</strong> the modulation of the timbres for the Right section of the<br />
keyboard that are not compatible with the General MIDI Standard, the use of the audio samples and the Drawbars. While recording you can also<br />
use RAM Styles provided that they are previously loaded in RAM and not called up directly from d<strong>is</strong>k. The latter <strong>is</strong> already busy recording the<br />
Midi file.<br />
To start recording the Midi file press the SONG RECORD push but<strong>to</strong>n (the LED lights up). The page called up <strong>is</strong> used <strong>to</strong> enter the name of the<br />
Midi file using the keyboard keys and the CURSOR +/- push but<strong>to</strong>ns, <strong>to</strong> cancel the procedure using F5 Escape and <strong>to</strong> confirm the creation of<br />
the Midi file using F10 Save.<br />
Once creation has been confirmed, the d<strong>is</strong>play will show the F10 Start function. By pressing the relative function push but<strong>to</strong>n “Recording”<br />
appears under the Tempo bar and the Midi <strong>is</strong> already recording, even with the Arranger d<strong>is</strong>abled, thus enabling all the basic settings <strong>to</strong> be<br />
recorded that will then go <strong>to</strong> the f<strong>is</strong>t measure of the Midi file. The Tempo starts only if the Arranger <strong>is</strong> enabled.<br />
Recording <strong>is</strong> not s<strong>to</strong>pped by pressing the START push but<strong>to</strong>n once again but only by d<strong>is</strong>abling SONG RECORD by pressing the relative push but<strong>to</strong>n<br />
again. Once Song Record <strong>is</strong> d<strong>is</strong>abled, the <strong>SD1</strong> sets itself ready <strong>to</strong> reproduce everything recorded in Song Play.<br />
Owner’s Manual <strong>SD1</strong> 79
.KAR Midi files and .TXT files<br />
The karaoke function <strong>is</strong> used <strong>to</strong> show the words (Lyrics) of a Midi file being reproduced on the d<strong>is</strong>play, setting it in syllables via some graphic<br />
solutions. The words of a Midi file are handled as meta event and therefore there are Midi files + Lyrics with .MID and .KAR. extension. Generally<br />
all there <strong>is</strong> in a .KAR file <strong>is</strong> a normal Midi file in format 1 and therefore it <strong>is</strong> <strong>to</strong> be converted in<strong>to</strong> format 0 for it <strong>to</strong> be reproduced directly by the<br />
sequencer.<br />
The <strong>SD1</strong> not only reads Midi files with Lyrics in format 0 and 1 can also au<strong>to</strong>matically convert a .KAR Midi file in<strong>to</strong> a <strong>new</strong> .MID Midi file in format<br />
0 with text meta events.<br />
The solution of the Midi file with words has been designed <strong>to</strong> read the words of the song, often set in syllables and synchronized with the tempo<br />
directly on the d<strong>is</strong>play. Thus you can do away with music stands, booklets and piles of sheets, which <strong>is</strong> handier for the musician and also looks<br />
more professional. It <strong>is</strong> also possible <strong>to</strong> d<strong>is</strong>play the words of a song on an external moni<strong>to</strong>r using an optional video card thus additionally involving<br />
the audience when needed.<br />
The <strong>SD1</strong> does not just d<strong>is</strong>play the words of a Midi file. The text files generated on any word processor, both for PC and for MAC, with .TXT extension<br />
can be d<strong>is</strong>played even when the Arranger <strong>is</strong> being used or for Midi files that do not already have Lyrics originally. For the latter the <strong>SD1</strong><br />
offers a tempo synchronization function.<br />
The .TXT files do not depend on a Midi file whereas the Lyrics events are entered in the MIDI Standard. Both may have the same function but<br />
they are handled differently.<br />
The best results for the Midi files with Lyrics are obtained exploiting the Midi files of the Sol<strong>to</strong>n Song Word & Music library, where the words of<br />
the song are handled so that the colour of the words syllables changes in time with the lead.<br />
USING .KAR MIDI FILES<br />
There are many ways of converting a .KAR Midi file in<strong>to</strong> a .MID Midi file. The first entails the copying of the .KAR Midi file in Hard D<strong>is</strong>k and then<br />
converting it.<br />
● Insert the Floppy D<strong>is</strong>k with the .KAR file in the d<strong>is</strong>k drive.<br />
● Enable the DISK menu using the dedicated push but<strong>to</strong>n.<br />
● Go <strong>to</strong> floppy using the PAGE +/- push but<strong>to</strong>ns. The d<strong>is</strong>play will show confirmation that the d<strong>is</strong>k <strong>is</strong> selected.<br />
● Select the .KAR file <strong>to</strong> be copied using the CURSOR +/- and VALUE +/- push but<strong>to</strong>ns.<br />
● Enable the MASTER FOLDER using the dedicated push but<strong>to</strong>n, thus the <strong>SD1</strong> will copy the file in the Midi file Folder.<br />
● Confirm that the file <strong>is</strong> <strong>to</strong> be copied using F4 Copy.<br />
● Once the file has been copied exit from the D<strong>is</strong>k menu using the EXIT push but<strong>to</strong>n or go straight <strong>to</strong> the Hard D<strong>is</strong>k by pressing PAGE - once.<br />
The <strong>SD1</strong> will show the contents of the Folder 91 Midi file with Master Folder enabled.<br />
● Select the .KAR Midi file <strong>to</strong> be converted from the Folder.<br />
● Press F2 Load or F3 Convert and the <strong>SD1</strong> converts the Midi file and upon completion opens a window where the name of the Midi file can<br />
be modified, saved or overwritten using the usual procedures.<br />
Once the Midi file with Lyrics events has been loaded it can be reproduced using Song Play. From the Song Play menu the d<strong>is</strong>play of the words<br />
of the song loaded can be d<strong>is</strong>abled using F10 Lyric Off. See the D<strong>is</strong>k section for information on how <strong>to</strong> copy a Midi file from Floppy D<strong>is</strong>k <strong>to</strong> Hard<br />
D<strong>is</strong>k with Master Folder d<strong>is</strong>abled.<br />
.TXT FILES<br />
The text files in .TXT format are used <strong>to</strong> d<strong>is</strong>play the words of a song on the <strong>SD1</strong> d<strong>is</strong>play, both in Song Play mode and when the Arranger <strong>is</strong> being<br />
used. The advantage of using .TXT files lies in the simplicity of creating them on PC/Mac and then saving them in Hard D<strong>is</strong>k or loading them<br />
from Floppy D<strong>is</strong>k. Using the .TXT files you can create your own library of song words <strong>to</strong> be called up instantly from hard d<strong>is</strong>k, leaving whole<br />
<strong>musical</strong> compilations at home. The .TXT files can be loaded and d<strong>is</strong>played both with the Arranger and in Song Play mode. In both cases the<br />
words can be made <strong>to</strong> temporarily d<strong>is</strong>appear by pressing EXIT, and pressing it again <strong>to</strong> d<strong>is</strong>play the words again.<br />
It <strong>is</strong> crucial <strong>to</strong> remember that for those using a Mac, it <strong>is</strong> preferable <strong>to</strong> write the accents without using letters already having accents, <strong>to</strong> save<br />
the file in text format with line interruption and <strong>to</strong> add the.TXT extension <strong>to</strong> the name of the file that cannot be longer than 8 characters.<br />
USING .TXT FILES WITH THE ARRANGER<br />
80<br />
<strong>SD1</strong> Owner’s Manual
Whatever the status of the Arranger (started or s<strong>to</strong>pped), access can be gained <strong>to</strong> the RAM of TXT files at any time:<br />
● Press the DISK push but<strong>to</strong>n.<br />
● Choose between Floppy D<strong>is</strong>k or Hard D<strong>is</strong>k using the PAGE +/- push but<strong>to</strong>ns.<br />
● If you choose Hard D<strong>is</strong>k you must find the Folder bearing the TXT files. With Master Folder enabled, the Folder corresponds <strong>to</strong> 97 Text files.<br />
You can also create <strong>new</strong> Folders with Master Folder d<strong>is</strong>abled, <strong>to</strong> organ<strong>is</strong>e your own .TXT, files, the procedure of which <strong>is</strong> described in the<br />
D<strong>is</strong>k section.<br />
● Once you have found the .TXT file <strong>to</strong> be loaded using the VALUE +/- push but<strong>to</strong>ns, enable RAM loading using F2 Load.<br />
● The words are d<strong>is</strong>played in the bot<strong>to</strong>m of the d<strong>is</strong>play. When a number of pages are present, the next pages are scrolled using the PAGE +/-<br />
push but<strong>to</strong>ns or the optional pedals FS13 or FS6.<br />
● Press the PAGE +/- push but<strong>to</strong>ns <strong>to</strong>gether <strong>to</strong> d<strong>is</strong>play the first page of the words and press them again <strong>to</strong> go <strong>to</strong> the last page of the words.<br />
Press them a third time <strong>to</strong> return <strong>to</strong> the words page d<strong>is</strong>played initially.<br />
● To d<strong>is</strong>able the d<strong>is</strong>play press the EXIT push but<strong>to</strong>n which, if pressed again, d<strong>is</strong>plays the words again.<br />
The d<strong>is</strong>play of the words in the Arranger mode can be d<strong>is</strong>abled using function push but<strong>to</strong>n F7 Text, set in Off, in the F3 Utility menu that <strong>is</strong><br />
accessed from the main page of the d<strong>is</strong>play.<br />
To au<strong>to</strong>mate the loading procedure of a .TXT file you can use a Single Reg<strong>is</strong>tration observing three conditions:<br />
The Single Reg<strong>is</strong>tration must have the same name as the .TXT file <strong>to</strong> be loaded.<br />
With Master Folder d<strong>is</strong>abled, the .TXT file and that of the Single Reg<strong>is</strong>tration must be s<strong>to</strong>red within the same Folder.<br />
With Master Folder enabled, the .TXT file must be s<strong>to</strong>red in the Folder 97 Text file and Single Reg<strong>is</strong>tration in the Folder 93 Reg<strong>is</strong>tration.<br />
If you record the settings of the Arranger, including the Style, in a Single Reg<strong>is</strong>tration with the same name as the .TXT file <strong>to</strong> be loaded, when<br />
you call up the Single Reg<strong>is</strong>tration the .TXT file will also be loaded. The loading speed <strong>is</strong> obviously longer when the .TXT file <strong>is</strong> read from the<br />
Hard D<strong>is</strong>k.<br />
USING .TXT FILES WITH SONG PLAY<br />
Compared <strong>to</strong> the Arranger it <strong>is</strong> not possible <strong>to</strong> first load a Midi file and then the .TXT file <strong>to</strong> be d<strong>is</strong>played. The only possibility <strong>to</strong> au<strong>to</strong>mate the<br />
whole process <strong>is</strong> that of giving the Midi file and the .TXT file the same name so that, when loading the Midi file, the .TXT file <strong>is</strong> au<strong>to</strong>matically<br />
found and loaded in RAM. In Song Play <strong>to</strong>o the d<strong>is</strong>play of the .TXT file <strong>is</strong> controlled by the EXIT push but<strong>to</strong>n. The same conditions seen above<br />
apply here <strong>to</strong>o:<br />
The Midi file must have the same name as the .TXT <strong>to</strong> be loaded.<br />
With Master Folder d<strong>is</strong>abled the .TXT file and the Midi file must be s<strong>to</strong>red in the same Folder.<br />
With Master Folder enabled the .TXT file must be s<strong>to</strong>red in the Folder 97 Text file and the Midi file in the Folder 91 Midi file.<br />
To au<strong>to</strong>matically call up the Midi file and the .TXT file set with the above mentioned conditions use the controls already described in Song Play<br />
(see specific section). To scroll any pages that follow, the words must be d<strong>is</strong>played and then use the PAGE +/- push but<strong>to</strong>ns. Press the PAGE<br />
+/- push but<strong>to</strong>ns <strong>to</strong>gether <strong>to</strong> d<strong>is</strong>play the first page of the words, press again <strong>to</strong> go <strong>to</strong> the last page of words and press a third time <strong>to</strong> return <strong>to</strong><br />
the page d<strong>is</strong>played initially.<br />
If the words d<strong>is</strong>play <strong>is</strong> d<strong>is</strong>abled using the EXIT push but<strong>to</strong>n the PAGE +/- push but<strong>to</strong>ns are used <strong>to</strong> switch from Hard D<strong>is</strong>k <strong>to</strong> Floppy D<strong>is</strong>k.<br />
It <strong>is</strong> <strong>to</strong> be pointed out again that a .TXT file <strong>is</strong> not at all a Karaoke file, in other words a file with Lyrics events and therefore the functions related<br />
<strong>to</strong> the Karaoke will not work using a .TXT file.<br />
SYNCHRONIZING THE PAGE CHANGE USING A MIDI FILE<br />
The <strong>SD1</strong> can record the page change of the .TXT file d<strong>is</strong>played at any stage of a Midi file. By writing a text with empty lines you can reach results<br />
very near <strong>to</strong> Karaoke, obviously with some graphic restrictions. The synchronization procedure <strong>is</strong> always enabled when reproducing the Midi<br />
file and there are no functions or controls <strong>to</strong> call it up.<br />
●<br />
●<br />
●<br />
●<br />
●<br />
●<br />
●<br />
Load the Midi file and the .TXT file in Song Play.<br />
Enable the Midi file reproduction mode using START.<br />
When you w<strong>is</strong>h <strong>to</strong> call up the next page press the PAGE + push but<strong>to</strong>n.<br />
Repeat the procedure for the following pages.<br />
When the reproduction of the Midi file has ended press SAVE/ENTER <strong>to</strong> record the synchronized page change.<br />
Confirm the reg<strong>is</strong>tration using F10 Save, or cancel the procedure using F5 Escape.<br />
The <strong>SD1</strong> saves the beats and the measures in which the page change occurs with some special codes within the .TXT file, whereas the Midi<br />
file <strong>is</strong> not modified in any way whatsoever. Therefore <strong>to</strong> return <strong>to</strong> the original .TXT file use the F4 Clear function that cancels these codes<br />
from the .TXT file.<br />
Owner’s Manual <strong>SD1</strong> 81
Using the microphone<br />
The <strong>SD1</strong> can use two separate microphones, thanks <strong>to</strong> its separate inputs, of which one (input Mic 1) with professional pre-amplifier and balanced<br />
XLR connection <strong>to</strong> minim<strong>is</strong>e interference. Input Mic 1 <strong>is</strong> the only one that can exploit the built-in Vocalizer plus it <strong>is</strong> provided with a separate<br />
audio output <strong>to</strong> be able <strong>to</strong> lead the voice and the signal processed <strong>to</strong> an external mixer. To use both microphones correctly you have <strong>to</strong> adjust<br />
the input gain using the dedicated cursor on the rear panel <strong>to</strong> reach an ideal no<strong>is</strong>e signal level. To check if th<strong>is</strong> level <strong>is</strong> correct, simply sing or<br />
speak in<strong>to</strong> the microphone while adjusting the rear cursor and check the Overload LED on the ON LINE EFFECT push but<strong>to</strong>n. The ideal setting<br />
<strong>is</strong> obtained when the LED lights up very rarely. Generally <strong>to</strong> reach th<strong>is</strong> level easily, it <strong>is</strong> adv<strong>is</strong>able <strong>to</strong> increase the input gain with the rear cursor<br />
but with the volume of the keyboard set at zero (otherw<strong>is</strong>e you could damage your hearing or the speakers and the amplifier!) until the LED<br />
<strong>is</strong> lit steady, then reduce the gain until the LED lights up rarely and only for excessive no<strong>is</strong>e levels. If the gain <strong>is</strong> <strong>to</strong>o high, with the LED lit steady<br />
the audio signal of the microphone would be unpleasantly d<strong>is</strong><strong>to</strong>rted and vice versa if the gain <strong>is</strong> <strong>to</strong>o low the signal will be d<strong>is</strong>turbed in proportion<br />
with the quality of the cable and the microphone. For th<strong>is</strong> reason it <strong>is</strong> better <strong>to</strong> spend a little bit more for a good quality dynamic and sturdy<br />
microphone and strong connection cable.<br />
Some other aspects must be remembered when using a microphone:<br />
●<br />
●<br />
●<br />
●<br />
●<br />
●<br />
Always connect the microphone with the volume of the <strong>SD1</strong> at zero, with the gain at zero and the amplifier turned off.<br />
Keep the microphone away from the speakers as there could be Larsen effects, which could seriously damage your PA.<br />
In small rooms it <strong>is</strong> preferable <strong>to</strong> use a microphone with hypercardoid diagram <strong>to</strong> avoid Larsen effects.<br />
Keep the microphone on a very solid rod <strong>to</strong> avoid mechanical no<strong>is</strong>es interfering with your voice.<br />
Keep the microphone cable away from power supply cables and lines.<br />
When you connect all your equipment remember that the speakers and the amplifier are always the last <strong>to</strong> be turned on and the first <strong>to</strong> be<br />
turned off.<br />
MICRO EDIT<br />
The microphone parameters are s<strong>to</strong>red in the F10 Micro Edit menu that <strong>is</strong> called up from the main page of the d<strong>is</strong>play using the dedicated function<br />
push but<strong>to</strong>n. The parameters relative <strong>to</strong> the microphone are correlated <strong>to</strong> the relative function push but<strong>to</strong>ns.<br />
F1 Level 1:<br />
F2 Level 2:<br />
F3 Pan 1:<br />
Th<strong>is</strong> specifies the volume of the microphone on input Mic 1. Once the parameter has been selected using the function push<br />
but<strong>to</strong>n the value <strong>is</strong> then varied using the VALUE +/- push but<strong>to</strong>ns, which if pressed <strong>to</strong>gether at the same time reset the value.<br />
Th<strong>is</strong> specifies the volume of the microphone on input Mic 2. Once the parameter has been selected using the function push<br />
but<strong>to</strong>n the value <strong>is</strong> then varied using the VALUE +/- push but<strong>to</strong>ns, which if pressed <strong>to</strong>gether at the same time reset the value.<br />
Th<strong>is</strong> selects the position on the stereo front of the microphone on input Mic 1. The signal of the microphone <strong>is</strong> set in the<br />
middle when the parameter shows two dashes (—). The value <strong>is</strong> modified using the VALUE +/- push but<strong>to</strong>ns which if pressed<br />
<strong>to</strong>gether at the same time set the signal back in the middle.<br />
F4 Pan 2: The same as F3 Pan 1 but for the microphone signal on input Mic 2.<br />
F5 Music Vol: Th<strong>is</strong> balances the microphone signals with the timbre genera<strong>to</strong>r of the <strong>SD1</strong>. The value <strong>is</strong> modified using the VALUE +/-<br />
push but<strong>to</strong>ns which, if pressed <strong>to</strong>gether at the same time, set the value back at maximum. If the level of the two<br />
microphones <strong>is</strong> not sufficient <strong>to</strong> stand out compared <strong>to</strong> the <strong>SD1</strong>, it <strong>is</strong> useful <strong>to</strong> remember <strong>to</strong> reduce th<strong>is</strong> value.<br />
F6 Echo 1-2:<br />
F7 Reverb 1-2:<br />
F8 Pitch Shift:<br />
A delay can be set on the two microphone signals, the intensity of which <strong>is</strong> controlled by th<strong>is</strong> value. To switch between<br />
input Mic 1 and Mic 2 press the function push but<strong>to</strong>n F6 cyclically. The value <strong>is</strong> entered using the VALUE +/- push but<strong>to</strong>ns<br />
which, if pressed <strong>to</strong>gether at the same time, reset the value.<br />
The same as F6 Echo 1-2, but for the reverb for each input.<br />
Th<strong>is</strong> only affects the signal of the microphone on input Mic 1 and <strong>is</strong> used <strong>to</strong> transpose the notes sung in the microphone<br />
82<br />
<strong>SD1</strong> Owner’s Manual
in steps of semi<strong>to</strong>nes. When the values are excessive the timbre of the voice <strong>is</strong> d<strong>is</strong><strong>to</strong>rted. Th<strong>is</strong> effect <strong>is</strong> one of the<br />
Vocalizer features. The value <strong>is</strong> increased or decreased using the VALUE +/- push but<strong>to</strong>ns which, if pressed <strong>to</strong>gether at<br />
the same time, reset the value.<br />
F9 Dry:<br />
When enabled (√), no Reverb effect <strong>is</strong> set on the microphone inputs. Press the function push but<strong>to</strong>n F9 again and Dry<br />
<strong>is</strong> d<strong>is</strong>abled.<br />
F10 Active/Inactive: Th<strong>is</strong> enables or d<strong>is</strong>ables the microphone inputs. If they are connected but they are not <strong>to</strong> be used it <strong>is</strong> a good rule <strong>to</strong><br />
d<strong>is</strong>able the inputs <strong>to</strong> avoid d<strong>is</strong>turbing no<strong>is</strong>es.<br />
REMOVING THE EFFECTS WHILE SPEAKING<br />
One of the problems that are most frequently encountered by the musician <strong>is</strong> the need <strong>to</strong> remove the effects from the microphone signal when<br />
speaking <strong>to</strong> the audience. The <strong>SD1</strong> resolves th<strong>is</strong> problem with the Dry On S<strong>to</strong>p function which, in other words enables the effects on the microphone<br />
signals only when the Arranger or a Midi file are playing. When the Arranger and the Midi file s<strong>to</strong>p, the <strong>SD1</strong> d<strong>is</strong>ables the effects on the<br />
microphones <strong>to</strong> res<strong>to</strong>re them again as soon as the Arranger or the Midi file start playing again.<br />
Proceed as follows <strong>to</strong> enable th<strong>is</strong> function:<br />
●<br />
●<br />
●<br />
From the main page of the d<strong>is</strong>play press F3 Utility.<br />
Move <strong>to</strong> the third page using the PAGE + push but<strong>to</strong>n.<br />
Press F4 Micro repeatedly <strong>to</strong> switch from Normal (effects always enabled) <strong>to</strong> Dry On S<strong>to</strong>p (effects d<strong>is</strong>abled when Song or Style s<strong>to</strong>pped).<br />
All the parameters described in th<strong>is</strong> section can be saved in a Reg<strong>is</strong>tration.<br />
Owner’s Manual <strong>SD1</strong> 83
Vocalizer<br />
The Vocalizer produces a particular type of effects that harmon<strong>is</strong>e the audio signal on the microphone input according <strong>to</strong> some specific rules.<br />
It <strong>is</strong> dedicated <strong>to</strong> the human voice, and adds two or three notes <strong>to</strong> the single note sung in<strong>to</strong> the microphone, thus creating a vocal duo or trio<br />
util<strong>is</strong>ing the timbre of the voice on the microphone input. The <strong>SD1</strong> applies the Vocalizer only <strong>to</strong> the signal coming from the balanced Micro 1<br />
input with XLR connection, and uses, as harmon<strong>is</strong>ation information, the chords played on the keyboard or those on the MIDI In 2 input. The<br />
Vocalizer control can also be carried out by a MIDI track of a Midifile played by the <strong>SD1</strong> sequencer or by information collected on MIDI In 1. Due<br />
<strong>to</strong> the fact that the Vocalizer includes the control of the elements forming the timbre, further <strong>to</strong> harmon<strong>is</strong>ation it also consents <strong>to</strong> significantly<br />
alter the timbre itself, for example <strong>to</strong> transform a male timbre in<strong>to</strong> a female one.<br />
The <strong>SD1</strong> Vocalizer <strong>is</strong> freely programmable and consents s<strong>to</strong>rage of all parameters in one of the twelve RAM Vocal Sets, in addition of the four<br />
Vocal Sets in ROM. It also features the opportunity of assigning some Arranger control but<strong>to</strong>ns, like Fill or Arrange, a different algorithm, such<br />
as <strong>to</strong> au<strong>to</strong>mate voice harmon<strong>is</strong>ation, <strong>to</strong>o. The assignments made <strong>to</strong> the Arrange A, B, C and D but<strong>to</strong>ns are valid even while reproducing a song,<br />
so it will be possible <strong>to</strong> call up a different algorithm pressing one of these but<strong>to</strong>ns.<br />
HOW TO ACTIVATE THE VOCALIZER<br />
Before using the Vocalizer, you need <strong>to</strong> connect a microphone of good quality <strong>to</strong> the audio input Micro 1 and regulate the amplification acting<br />
on the Gain cursor. The <strong>SD1</strong> provides special parameters for gain management, but you may v<strong>is</strong>ually control the microphone volume by observing<br />
the Overload LED on the ON LINE EFFECT but<strong>to</strong>n. A good regulation <strong>is</strong> achieved if the LED lights up only very rarely. If the LED <strong>is</strong> continuously<br />
lighting, th<strong>is</strong> means that the audio input <strong>is</strong> saturated and, as a consequence, unpleasant d<strong>is</strong><strong>to</strong>rtions will be produced on the audio signal.<br />
For further information on how <strong>to</strong> manage the audio inputs please refer <strong>to</strong> the Effects and Microphone sections.<br />
Activating the Vocalizer <strong>is</strong> extremely easy:<br />
Press the VOCALIZER ON/OFF but<strong>to</strong>n, the LED will light up.<br />
The <strong>SD1</strong> d<strong>is</strong>plays a first page with ten Vocal Sets assigned <strong>to</strong> the function but<strong>to</strong>ns, which can be instantly called up. Pressing PAGE +/- opens<br />
the second Vocal Set page including also the Vocal Sets preset by <strong>Ketron</strong>.<br />
The Vocal Set can also be called up from the On Line Effect menu, where the Vocal Set selected on the Vocalizer On/Off page <strong>is</strong> indicated.<br />
There <strong>is</strong> no difference between selecting a Vocal Set from the Vocalizer menus or from the On Line Effect menus.<br />
Pressing the VOCALIZER ON/OFF but<strong>to</strong>n immediately activates the Vocalizer, which can be deactivated by re-pressing the same but<strong>to</strong>n on the<br />
Vocalizer page. If you are on the main page of the d<strong>is</strong>play, in order <strong>to</strong> deactivate th<strong>is</strong> function you will need <strong>to</strong> go <strong>to</strong> the Vocalizer page with a<br />
first press on the VOCALIZER ON/OFF but<strong>to</strong>n and then press again the same but<strong>to</strong>n.<br />
THE VOCALIZER MODES<br />
The Vocalizer performs differently according <strong>to</strong> which of the five different harmon<strong>is</strong>ation modes Au<strong>to</strong>matic Chord 1, Au<strong>to</strong>matic Chord 2,<br />
Keyboard Harmony, Fixed Interval and Vocal Effects has been selected. Each one of these modes includes different algorithms that will be d<strong>is</strong>played<br />
in the centre of the d<strong>is</strong>play.<br />
Au<strong>to</strong>matic Chord 1 and Au<strong>to</strong>matic Chord 2 produce the additional notes according <strong>to</strong> the chord played and <strong>to</strong> the recognition of the note that<br />
was sung in<strong>to</strong> the microphone input.<br />
Keyboard Harmony adds the notes according <strong>to</strong> the chord played but independently from the recognition of the note sung. A particular aspect<br />
of Keyboard Harmony <strong>is</strong> the MIDI algorithm drawing the notes <strong>to</strong> be added <strong>to</strong> the human voice from a MIDI track of a Midifile. Th<strong>is</strong> opportunity<br />
<strong>is</strong> included by a number of commercial Midifiles and the <strong>SD1</strong> <strong>is</strong> compatible with most of these files.<br />
Fixed Interval transforms the Vocalizer in<strong>to</strong> a common Pitch Shifter, i.e. it adds the voices according <strong>to</strong> fixed intervals and not based on the<br />
chord recognition. Vocal Effects offers special effects algorithms that <strong>to</strong>tally transform the character of the original voice.<br />
THE VOCALIZER PARAMETERS<br />
Pressing the VOCALIZER EDIT but<strong>to</strong>n accesses the page dedicated <strong>to</strong> programming a Vocal Set, with all the relevant parameters. Th<strong>is</strong> page indicates<br />
the presently selected Vocal Set <strong>to</strong> be edited and, in the centre, the l<strong>is</strong>t of algorithms available according <strong>to</strong> the selected harmon<strong>is</strong>ation<br />
mode. To its side, associated <strong>to</strong> the function but<strong>to</strong>ns, you will find a number of directly accessible parameters, or parameters over which you<br />
may access other parameters that will be shown at the centre of the d<strong>is</strong>play.<br />
84<br />
<strong>SD1</strong> Owner’s Manual
F1 Direct:<br />
F2 Vocalize:<br />
F3 Modes:<br />
F4 Octave:<br />
F5 Hold:<br />
allows you <strong>to</strong> define the quantity of audio signal <strong>to</strong> be drawn from the Micro 1 input and <strong>to</strong> be used <strong>to</strong>gether with<br />
the Vocalizer effect. Th<strong>is</strong> can be modified with the VALUE +/- but<strong>to</strong>ns.<br />
controls the quantity of Vocalizer processed signal present on the audio output. To be modified by acting on the<br />
VALUE +/- but<strong>to</strong>ns.<br />
pressing repeatedly the F3 function but<strong>to</strong>n modifies the harmon<strong>is</strong>ation mode and, as a consequence, the available<br />
algorithms d<strong>is</strong>played at the centre of the d<strong>is</strong>play that can be selected with the CURSOR +/- but<strong>to</strong>ns.<br />
transposes the voices that have been added <strong>to</strong> the lead by +/- two octaves. When set on Au<strong>to</strong>matic, the voices will<br />
remain within the octave of the note that has been sung. Can be modified with the VALUE +/- but<strong>to</strong>ns.<br />
th<strong>is</strong> will be present only if the harmon<strong>is</strong>ation mode <strong>is</strong> set on Keyboard Harmony; if activated, th<strong>is</strong> function allows<br />
you <strong>to</strong> s<strong>to</strong>re the notes recogn<strong>is</strong>ed by the Vocalizer.<br />
F6 Effects:<br />
th<strong>is</strong> allows you <strong>to</strong> modify the effects settings, <strong>to</strong> apply the Vibra<strong>to</strong> and the Limiter, <strong>to</strong> modify the vocal timbre and<br />
<strong>to</strong> activate a number of modulations. The Reverb and the Delay are the general ones and are programmable. The<br />
parameters are selected with the CURSOR +/- but<strong>to</strong>ns and the value <strong>is</strong> entered with the VALUE +/- but<strong>to</strong>ns. To go<br />
back <strong>to</strong> the main page of Vocalizer Edit, press once more the F6 Effects function but<strong>to</strong>n.<br />
In the following the parameters are described in detail:<br />
Reverb Level: Reverb quantity <strong>to</strong> be assigned <strong>to</strong> the voices generated by the Vocalizer<br />
Delay Level: Delay quantity <strong>to</strong> be assigned <strong>to</strong> the voices generated by the Vocalizer<br />
Vibra<strong>to</strong> Depth: Intensity of the Vibra<strong>to</strong> effect on the voices generated by the Vocalizer<br />
Vibra<strong>to</strong> Rate: Vibra<strong>to</strong> effect speed<br />
Vibra<strong>to</strong> Delay: Delay value of the starting of the Vibra<strong>to</strong> effect<br />
Modulation: If activated (On), the Vibra<strong>to</strong> <strong>is</strong> controlled by the Modulation wheel<br />
Pitch Bend: If activated (On), Pitch Bend effects can be achieved on the voices generated, acting on the relevant<br />
wheel<br />
Limiter: A particular effect allowing you <strong>to</strong> control the level of the input signal in order not <strong>to</strong> saturate the<br />
DSP. Th<strong>is</strong> should always be left On, especially if the singer has a powerful and dynamic voice.<br />
Singer: Defines the timbre of the voices generated by the Vocalizer, with male and female option.<br />
F7 Filter:<br />
Pressing th<strong>is</strong> function push but<strong>to</strong>n d<strong>is</strong>plays a number of parameters <strong>to</strong> control the three vocal formants for the<br />
same number of voices generated, as well as the equalizer with three bands for the direct voice and for the generated<br />
voices. The Vocalizer indeed works on three bands of formants, in order not <strong>to</strong> completely change the timbre<br />
when changing its in<strong>to</strong>nation. The formants theory <strong>is</strong> a very complex one, and substantially based on the idea<br />
that the human voice <strong>is</strong> character<strong>is</strong>ed by fixed frequencies for certain in<strong>to</strong>nations, so modifying these you obtain<br />
different timbres. The parameters are selected with the CURSOR +/- but<strong>to</strong>ns and the value <strong>is</strong> entered with the<br />
VALUE +/- but<strong>to</strong>ns. To go back <strong>to</strong> the main page of Vocalizer Edit, press once more the F7 Filter function but<strong>to</strong>n.<br />
In the following the parameters are described in detail:<br />
Owner’s Manual <strong>SD1</strong> 85
Formant 1, 2, 3: formant level for voices 1, 2, 3<br />
Frequency 1, 2, 3: formant frequency for voices 1, 2, 3<br />
Resonance 1, 2, 3: resonance of the single formant for voices 1, 2, 3<br />
Low Band Direct, Vocalizer: Low band level of the equalizer for the direct voice and for those generated<br />
by the Vocalizer<br />
Mid Band Direct, Vocalizer: Mid band level of the equalizer for the direct voice and for those generated by<br />
the Vocalizer<br />
High Band Direct, Vocalizer: High band level of the equalizer for the direct voice and for those generated<br />
by the Vocalizer.<br />
Volume 1, 2, 3: Volume of the single voices added by the Vocalizer.<br />
F8 Vocalize To Arranger: the but<strong>to</strong>ns controlling the Arranger may be assigned a different algorithm <strong>to</strong> be chosen among those available for<br />
the harmon<strong>is</strong>ation mode selected in F3 Modes. In the centre of the d<strong>is</strong>play the Start, S<strong>to</strong>p, Arrange A, B, C, D, Fill 1,<br />
2, 3 and Break sections can be selected with the CURSOR +/- but<strong>to</strong>ns, and one of the available algorithms can be<br />
assigned <strong>to</strong> them acting on the VALUE +/- but<strong>to</strong>ns. Pressing again the F8 Vocalize To Arranger but<strong>to</strong>n takes you<br />
back <strong>to</strong> the Vocalizer Edit menu. The algorithms assigned <strong>to</strong> the Arrange A, B, C, D but<strong>to</strong>ns are still valid while<br />
replaying a Midifile or a Song. Th<strong>is</strong> allows you <strong>to</strong> instantly call up a different voice algorithm. The F10 Status parameter<br />
must be set on Internal Active <strong>to</strong> avoid confusion or errors, i.e. <strong>to</strong> avoid that the Vocalizer <strong>is</strong> controlled by a<br />
MIDI track. Further <strong>to</strong> assigning an algorithm, you may also select the Off condition which will d<strong>is</strong>able the Vocalizer<br />
for th<strong>is</strong> specific but<strong>to</strong>n only. If neither an algorithm nor the Off condition <strong>is</strong> selected, two dashes will indicate that<br />
for th<strong>is</strong> specific but<strong>to</strong>n the general Vocalizer conditions apply. Vocal Set 1, called up when the Vocalizer <strong>is</strong> activated,<br />
assigns Arrange A and C the Harmony Right mode, and Arrange B and D the Un<strong>is</strong>on mode by default.<br />
F9 Vocalize Lead On:<br />
Th<strong>is</strong> <strong>is</strong> present only on the first ten algorithms of the Au<strong>to</strong>matic Chord 1 and Fixed Interval mode. It tunes the third<br />
voice generated by the Vocalizer in un<strong>is</strong>on with the singer voice. It <strong>is</strong> deactivated by pressing the F9 Vocalize Lead<br />
On function key again.<br />
F10 Status:<br />
pressing repeatedly the F10 but<strong>to</strong>n modifies the Vocalizer status switching from Active <strong>to</strong> Internal Active, None or<br />
Inactive. “Active” indicates that the Vocalizer <strong>is</strong> active and able <strong>to</strong> receive data from the keyboard, via MIDI and from<br />
the sequencer. “Internal Active” assures that the Vocalizer <strong>is</strong> controlled only by the keyboard and by the algorithms<br />
assigned <strong>to</strong> the control but<strong>to</strong>ns of the Arranger, and not via MIDI and not via the sequencer. “None” completely deactivates<br />
the <strong>SD1</strong> Vocalizer but still transmits the information for the Vocalizer control <strong>to</strong> the MIDI Out, <strong>to</strong> be able <strong>to</strong><br />
control a similar external unit. “Inactive” deactivates the Vocalizer control via the keyboard, but not via MIDI.<br />
HARMONISATION MODES AND DESCRIPTION OF THE ALGORITHMS<br />
After you have selected a harmon<strong>is</strong>ation mode using F3 Modes, at the centre of the screen the relevant algorithms you can select using the<br />
CURSOR +/- push but<strong>to</strong>ns are d<strong>is</strong>played. In the following we have a short description of the single algorithms for each mode.<br />
AUTOMATIC CHORD 1<br />
The voices added by the Vocalizer depend on the chord recogn<strong>is</strong>ed on the keyboard area <strong>to</strong> the left of the splint point, independently from its<br />
inversion, and on the note sung, of which the in<strong>to</strong>nation and the inversion, if any, will be determined according <strong>to</strong> the recogn<strong>is</strong>ed chord. If the<br />
note sung <strong>is</strong> extraneous <strong>to</strong> the chord, th<strong>is</strong> note will not be reproduced by the Vocalizer but will be present as a direct audio signal. In th<strong>is</strong> case<br />
the Vocalizer reproduces a voice with a note that <strong>is</strong> as near as possible <strong>to</strong> the note sung, but compatible with the chord. If the note sung belongs<br />
<strong>to</strong> the chord, the Vocalizer creates the harmon<strong>is</strong>ation as a function of th<strong>is</strong> note, producing the single inversions. The single algorithms can vary<br />
the position of the note sung within the chord and can place it <strong>to</strong> the centre, on the third or on the fifth. Modifying the note sung can, as a consequence,<br />
cause also the inversions <strong>to</strong> change. The following algorithms are available for Au<strong>to</strong>matic Chord 1:<br />
Trio Standard: Th<strong>is</strong> maintains the note sung in the centre of the chord. If the Vocalize Lead <strong>is</strong> active (On), the note sung <strong>is</strong> doubled.<br />
Trio Up: Th<strong>is</strong> maintains the note sung in the bass of the chord. If the Vocalize Lead <strong>is</strong> active (On), the note sung <strong>is</strong> doubled.<br />
Trio Down: Th<strong>is</strong> maintains the note sung in the treble, generating the two voices under it. If the Vocalize Lead <strong>is</strong> active (On), the note sung<br />
<strong>is</strong> doubled<br />
86<br />
<strong>SD1</strong> Owner’s Manual
Trio Octa 1: Th<strong>is</strong> maintains the note sung in the centre, with the keynote of the chord always in the bass. If the Vocalize Lead <strong>is</strong> active (On),<br />
the note sung <strong>is</strong> doubled.<br />
Trio Octa 2: Th<strong>is</strong> performs a third above the note sung and doubles the note sung in the higher octave. If the Vocalize Lead <strong>is</strong> active (On),<br />
the note sung <strong>is</strong> doubled.<br />
Trio Octa 3: Th<strong>is</strong> performs a third above and the un<strong>is</strong>on with the note sung and doubles the note sung in the lower octave. If the Vocalize<br />
Lead <strong>is</strong> active (On), the note sung <strong>is</strong> doubled<br />
Trio Octa 4: Th<strong>is</strong> performs a fifth below the note sung and maintains the fundamental note of the chord in the bass. If the Vocalize Lead <strong>is</strong><br />
active (On), the note sung <strong>is</strong> doubled<br />
Duet Open: Th<strong>is</strong> performs only the fifth above the note sung. If the Vocalize Lead <strong>is</strong> active (On), the note sung <strong>is</strong> doubled.<br />
Duet Down: Th<strong>is</strong> performs the third below the note sung, transposed by one octave downward (lower tenth). If the note sung <strong>is</strong> the keynote<br />
of the chord, the Vocalizer creates the third in the bass, belonging <strong>to</strong> the lower octave with regard <strong>to</strong> the note sung. If the note<br />
sung <strong>is</strong> the third of the cord, the Vocalizer creates the keynote in the bass, belonging <strong>to</strong> the lower octave. If the note sung <strong>is</strong><br />
the fifth of the chord, the Vocalizer creates the third in the bass, but still belonging <strong>to</strong> the same octave as the note sung. If the<br />
Vocalize Lead <strong>is</strong> active (On), the note sung <strong>is</strong> doubled.<br />
Duet Up: Performs the third above the note sung. If the Vocalize Lead <strong>is</strong> active (On), the note sung <strong>is</strong> doubled.<br />
3 Open 1: Performs the higher third as well as the lower fifth and octave, compared <strong>to</strong> the note sung.<br />
3 Open 2: Performs the higher third, as well as the lower third and fifth compared <strong>to</strong> the note sung.<br />
AUTOMATIC CHORD2<br />
In th<strong>is</strong> mode the Vocalizer always uses all three voices available, so the Vocalize Lead function cannot be activated. The voices generated by<br />
the Vocalizer depend on the chord recogn<strong>is</strong>ed on the keyboard area <strong>to</strong> the left of the split point, independently from the position of its inversion,<br />
and on the note sung. If the note sung <strong>is</strong> extraneous <strong>to</strong> the chord, th<strong>is</strong> note will not be reproduced by the Vocalizer but will be present as<br />
a direct audio signal. The Full algorithms are a reproduction of the recogn<strong>is</strong>ed chord. The Jazz algorithms are more soph<strong>is</strong>ticated harmon<strong>is</strong>ations<br />
<strong>to</strong> model the chords with sixths and sevenths.<br />
The following algorithms are available for Au<strong>to</strong>matic Chord 2:<br />
Full Trio 1:<br />
Full Trio 2:<br />
Full Trio 3:<br />
Jazz Trio 1:<br />
Jazz Trio 2:<br />
Jazz Trio 3:<br />
Th<strong>is</strong> performs the un<strong>is</strong>on and two notes of the chord below the note sung.<br />
The harmony presents an interval above the note sung.<br />
All the voices are generated above the note sung.<br />
The harmon<strong>is</strong>ation follows a complex table, according <strong>to</strong> which a major chord <strong>is</strong> interpreted like a sixth chord. Similar <strong>to</strong> Full<br />
Trio 1, the generated notes remain below the note sung.<br />
Uses the same harmon<strong>is</strong>ation table as the previous one, but similar <strong>to</strong> Full Trio 2 the harmony presents an interval above the<br />
note sung.<br />
Uses the same harmon<strong>is</strong>ation table as the previous Jazz algorithms, but similar <strong>to</strong> Full Trio 3 all the voices are generated above<br />
the note sung.<br />
KEYBOARD HARMONY<br />
In th<strong>is</strong> operating mode the note sung does not influence the harmon<strong>is</strong>ation, which depends only on the chord played. The complete keyboard<br />
of the <strong>SD1</strong> <strong>is</strong> enabled <strong>to</strong> recogn<strong>is</strong>e the chord and the single inversions, producing different harmon<strong>is</strong>ation.<br />
The algorithms available for Keyboard Harmony are:<br />
Harmony Right:The chord <strong>is</strong> recogn<strong>is</strong>ed on the keyboard area <strong>to</strong> the right of the split point, with all its inversions, regardless of the note sung.<br />
Harmony Left: The chord <strong>is</strong> recogn<strong>is</strong>ed on the keyboard area <strong>to</strong> the left of the split point, with all its inversions, regardless of the note sung.<br />
Full 1: Similar <strong>to</strong> Full Trio 1 in Au<strong>to</strong>matic Chord 2 mode, with the difference that instead of the note sung a single note on the keyboard<br />
area <strong>to</strong> the right of the split point <strong>is</strong> taken as reference. The chord, instead, <strong>is</strong> recogn<strong>is</strong>ed on the keyboard area <strong>to</strong> the left of<br />
the split point, regardless of the inversion of the note played <strong>to</strong> the right of the split point.<br />
Full 2: Similar <strong>to</strong> Full 1, but with the voices generated above the note played <strong>to</strong> the right of the keyboard split point.<br />
Full 3: Similar <strong>to</strong> Full 2, but with all the voices generated above the note played <strong>to</strong> the right of the keyboard split point.<br />
Jazz 1: Applies the harmon<strong>is</strong>ation table used for Jazz Trio 1 of Au<strong>to</strong>matic Chord 2, with the difference that the inversions of the chord<br />
played on the keyboard area <strong>to</strong> the left of the split point are determined by the note played <strong>to</strong> the right of the split point. The<br />
voices generated remain below the note played <strong>to</strong> which the un<strong>is</strong>on note <strong>is</strong> added.<br />
Jazz 2: Similar <strong>to</strong> Jazz 1 with just one voice generated above the note played on the keyboard area <strong>to</strong> the right of the split point.<br />
Jazz 3: Similar <strong>to</strong> Jazz 2 with all voices generated above the note played on the keyboard area <strong>to</strong> the right of the split point.<br />
MIDI Mode: Th<strong>is</strong> <strong>is</strong> a special mode allowing the musician <strong>to</strong> control the voices generated by the Vocalizer via the MIDI data, no matter if<br />
these come from a track of a Midifile being reproduced or from a MIDI In 2 input.<br />
When using a Midifile, if the track dedicated <strong>to</strong> the Vocalizer has been correctly programmed, it <strong>is</strong> recommended <strong>to</strong> d<strong>is</strong>able the F4 Octave function,<br />
in particular <strong>to</strong> avoid setting it on Au<strong>to</strong>matic. In a Midifile it <strong>is</strong> sufficient <strong>to</strong> enter Control Change 16 with value 0 in the desired track <strong>to</strong> destine<br />
it <strong>to</strong> the Vocalizer control. If the Midifile <strong>is</strong> reproduced by an external sequencer, it <strong>is</strong> recommended <strong>to</strong> use the MIDI In 1 input. Vice-versa,<br />
in case of control by a MIDI accordion or by another keyboard, you need <strong>to</strong> select MIDI In 2. If the Vocalizer track <strong>is</strong> <strong>to</strong> work with the internal<br />
sequencer, access the GM menu, select the destination track and reproduce a couple of initial beats. With Part Mode you enable the chosen part<br />
selecting Vocalize and confirming the operation pressing the ENTER key.<br />
Owner’s Manual <strong>SD1</strong> 87
FIXED INTERVAL<br />
One or a number of voices are added <strong>to</strong> the note sung at fixed intervals, regardless of the recogn<strong>is</strong>ed chord. If set in th<strong>is</strong> mode, the Vocalizer<br />
works as a common Pitch Shifter. The F9 Vocalize Lead function can always be activated and allows you <strong>to</strong> double the note sung with a voice<br />
generated in un<strong>is</strong>on.<br />
The following algorithms are available for Fixed Interval:<br />
Un<strong>is</strong>on: Th<strong>is</strong> generates a voice in un<strong>is</strong>on with the note sung. If F9 Vocalize <strong>is</strong> On, the note sung <strong>is</strong> doubled in un<strong>is</strong>on.<br />
Octave Up: Th<strong>is</strong> generates a voice in the octave above the note sung. If F9 Vocalize <strong>is</strong> On, the note sung <strong>is</strong> doubled in un<strong>is</strong>on.<br />
Octave Down: Th<strong>is</strong> generates a voice in the octave below the note sung. If F9 Vocalize <strong>is</strong> On, the note sung <strong>is</strong> doubled in un<strong>is</strong>on.<br />
Octave Up/Down: Th<strong>is</strong> generates one voice in the octave above and one voice in the octave below the note sung. If F9 Vocalize <strong>is</strong> On, the note<br />
sung <strong>is</strong> doubled in un<strong>is</strong>on.<br />
Lead+Octa. Down: Th<strong>is</strong> generates one voice in the octave below and one voice in un<strong>is</strong>on with the note sung. If F9 Vocalize <strong>is</strong> On, the note sung<br />
<strong>is</strong> doubled in un<strong>is</strong>on.<br />
Lead+Octa. Up: Th<strong>is</strong> generates one voice in the octave above and one voice in un<strong>is</strong>on with the note sung. If F9 Vocalize <strong>is</strong> On, the note sung <strong>is</strong><br />
doubled in un<strong>is</strong>on.<br />
5Th Down: Th<strong>is</strong> generates one voice in the fifth below the note sung. If F9 Vocalize <strong>is</strong> On, the note sung <strong>is</strong> doubled in un<strong>is</strong>on.<br />
5th Up: Th<strong>is</strong> generates one voice in the fifth above the note sung. If F9 Vocalize <strong>is</strong> On, the note sung <strong>is</strong> doubled in un<strong>is</strong>on.<br />
Lead+5Th Down:Th<strong>is</strong> generates one voice in the fifth below and one in un<strong>is</strong>on with the note sung. If F9 Vocalize <strong>is</strong> On, the note sung <strong>is</strong> doubled<br />
in un<strong>is</strong>on..<br />
Lead+5Th Up: Th<strong>is</strong> generates one voice in the fifth above and one in un<strong>is</strong>on with the note sung. If F9 Vocalize <strong>is</strong> On, the note sung <strong>is</strong> doubled<br />
in un<strong>is</strong>on..<br />
3Th Up: Th<strong>is</strong> generates one voice in the third major above the note sung. If F9 Vocalize <strong>is</strong> On, the note sung <strong>is</strong> doubled in un<strong>is</strong>on.<br />
VOCAL EFFECTS<br />
The twelve algorithms of th<strong>is</strong> mode are designed <strong>to</strong> modify the voice in an amusing and unexpected way. As soon as you select one of these<br />
algorithms, the direct microphone signal <strong>is</strong> muted <strong>to</strong> better hear the effect. You may res<strong>to</strong>re it pressing F1 Direct and the VALUE +/- push but<strong>to</strong>ns.<br />
Just try and l<strong>is</strong>ten <strong>to</strong> these algorithms: th<strong>is</strong> will be better than any description. The algorithm parameters can be modified using F7 Filter<br />
and can be saved in a Vocal Set.<br />
SAVING A VOCAL SET IN RAM<br />
Once you have modified any of the Vocal Set parameters, you need <strong>to</strong> s<strong>to</strong>re it in one of the twelve memories available <strong>to</strong> avoid losing them when<br />
you exit Vocalizer Edit or switch the <strong>SD1</strong> off. To activate the saving operation, press the SAVE/ENTER push but<strong>to</strong>n before exiting Vocalizer Edit.<br />
The page d<strong>is</strong>played allows you <strong>to</strong> enter the name of the Vocal Set using the keys of the keyboard and the CURSOR +/- push but<strong>to</strong>ns, as well as<br />
<strong>to</strong> define the destination memory entering directly the relevant number on the numeric keypad (STYLES push but<strong>to</strong>ns). Then press F10 Exec<br />
<strong>to</strong> confirm. If you w<strong>is</strong>h <strong>to</strong> cancel the operation, press F5 Escape which takes you back <strong>to</strong> the Vocalizer Edit page without s<strong>to</strong>ring the modifications,<br />
that are still active, however. Another option available on the Save page <strong>is</strong> F9 Default: Pressing th<strong>is</strong> but<strong>to</strong>n takes the Vocal set back <strong>to</strong><br />
its original settings.<br />
SAVING A VOCAL SET ON DISK<br />
The whole group of twelve Vocal Set memories can be saved either on a floppy d<strong>is</strong>k or on a hard d<strong>is</strong>k. Only the complete group of Vocal sets<br />
can be saved, but not the single ones. Proceed as follows:<br />
●<br />
●<br />
●<br />
●<br />
●<br />
●<br />
●<br />
●<br />
●<br />
Activate the DISK menu by pressing the special but<strong>to</strong>n, the LED lights up<br />
Use PAGE +/- <strong>to</strong> select the target d<strong>is</strong>k among Hard and Floppy<br />
If the Hard D<strong>is</strong>k d<strong>is</strong>plays the l<strong>is</strong>t of Midifile s<strong>to</strong>red, press F5 Folder Choice and any of the function but<strong>to</strong>ns except for F1 Midifile, and the<br />
d<strong>is</strong>play shows the contents of the selected folder.<br />
Press F3 Save <strong>to</strong> activate the saving function.<br />
Select the type of file <strong>to</strong> be saved, in th<strong>is</strong> case F7 Sound & Vocal.<br />
Select F5 Voc from the page appearing next.<br />
Th<strong>is</strong> d<strong>is</strong>plays a <strong>new</strong> page where you have <strong>to</strong> enter the name of the file <strong>to</strong> be saved, using the keyboard keys and the CURSOR +/- but<strong>to</strong>ns,<br />
and confirm the operation pressing F10 Exec. Press F5 Escape <strong>to</strong> exit.<br />
After having terminated the operation, the d<strong>is</strong>play shows the contents of the target folder which will be au<strong>to</strong>matically chosen if the MASTER<br />
FOLDER has been activated.<br />
Press EXIT twice <strong>to</strong> go back <strong>to</strong> the main page.<br />
LOADING A VOCAL SET FROM THE DISK<br />
You may load the complete group of twelve Vocal Sets back from the d<strong>is</strong>k using the following procedure:<br />
●<br />
Activate the DISK menu by pressing the special but<strong>to</strong>n, the LED lights up.<br />
88<br />
<strong>SD1</strong> Owner’s Manual
● Use PAGE +/- <strong>to</strong> select the d<strong>is</strong>k containing the file <strong>to</strong> be loaded .<br />
● Deactivate the MASTER FOLDER but<strong>to</strong>n, if th<strong>is</strong> <strong>is</strong> active.<br />
● Select the type of files <strong>to</strong> be loaded pressing F5 File Choice; a number of different options appear next <strong>to</strong> the function but<strong>to</strong>ns.<br />
● Select F7 Sound & Vocal as a file <strong>to</strong> be loaded.<br />
● If a number of files <strong>is</strong> d<strong>is</strong>played, select the desired one pressing the CURSOR +/- but<strong>to</strong>ns.<br />
● Confirm the loading procedure pressing F2 Load.<br />
● Press EXIT twice <strong>to</strong> go back <strong>to</strong> the main page.<br />
AUTOMATIC VOCAL SET LOADING ON <strong>SD1</strong> POWER ON<br />
Thanks <strong>to</strong> the Power On Setup function described in the special section, you may load the desired Vocal set on turning the <strong>SD1</strong> on.<br />
For th<strong>is</strong> purpose, proceed as follows:<br />
●<br />
●<br />
●<br />
●<br />
●<br />
●<br />
Access the On Line Effect menu pressing the relevant push but<strong>to</strong>n.<br />
Use the F9 function key and the VALUE +/- push but<strong>to</strong>ns <strong>to</strong> select the Vocal Set <strong>to</strong> be loaded on power up.<br />
Exit the On Line Effect menu pressing the EXIT push but<strong>to</strong>n <strong>to</strong> return <strong>to</strong> the main page of the d<strong>is</strong>play.<br />
Start the saving procedure pressing the SAVE/ENTER push but<strong>to</strong>n.<br />
Confirm that you w<strong>is</strong>h <strong>to</strong> save the current Vocal Set setting in the Power On Setup memory pressing the F3 function key.<br />
On the d<strong>is</strong>play the following four options appear:<br />
F5 Escape cancels the operation.<br />
F8 D<strong>is</strong>k Save carries out the saving operation of the Power On Setup file with .PON extension either on the floppy d<strong>is</strong>k or on the<br />
hard d<strong>is</strong>k, <strong>to</strong> be selected with the PAGE +/- but<strong>to</strong>ns. If Master Folder <strong>is</strong> active, th<strong>is</strong> file will be saved in the Userfile folder. If Master<br />
Folder <strong>is</strong> d<strong>is</strong>abled, the .PON file will be saved in the folder selected last.<br />
F9 Default s<strong>to</strong>res the Vocal Set as the one that will be called up on turning the <strong>SD1</strong> on.<br />
F10 Save writes in the Power On Setup memory in the Flash RAM.<br />
VOCAL SET AND REGISTRATION<br />
Each reg<strong>is</strong>tration can s<strong>to</strong>re the Vocal Set <strong>to</strong> use, such as <strong>to</strong> drastically reduce the time required <strong>to</strong> select the parameters. On the other hand, it<br />
might be useful not <strong>to</strong> load the Vocal Set assigned <strong>to</strong> the reg<strong>is</strong>trations if you w<strong>is</strong>h <strong>to</strong> use a personal<strong>is</strong>ed setting without needing <strong>to</strong> modify all<br />
the reg<strong>is</strong>trations. If you w<strong>is</strong>h <strong>to</strong> avoid that a Vocal Set s<strong>to</strong>red in the reg<strong>is</strong>trations <strong>is</strong> called up, proceed as follows:<br />
●<br />
●<br />
●<br />
●<br />
●<br />
●<br />
On the first page of the d<strong>is</strong>play press F3 Utility.<br />
Use the PAGE + but<strong>to</strong>n <strong>to</strong> go <strong>to</strong> the second page in the Utility menu.<br />
Press F3 Reg<strong>is</strong>tration Mode <strong>to</strong> d<strong>is</strong>play the single parameters.<br />
From th<strong>is</strong> page press F4 Effects <strong>to</strong> d<strong>is</strong>play how the single parameters will be managed.<br />
Using the CURSOR +/- but<strong>to</strong>ns select Vocalize and press F10 Select <strong>to</strong> d<strong>is</strong>able the loading of the Vocal Set s<strong>to</strong>red in a Reg<strong>is</strong>tration. Set the<br />
value <strong>to</strong> Off.<br />
Press F7 Save <strong>to</strong> s<strong>to</strong>re the settings.<br />
From th<strong>is</strong> moment on when calling up a reg<strong>is</strong>tration, the relevant Vocal Set will not be au<strong>to</strong>matically loaded. To res<strong>to</strong>re the selection of the Vocal<br />
Set, repeat the procedure just described setting the value <strong>to</strong> On and then pressing F7 Save.<br />
Owner’s Manual <strong>SD1</strong> 89
Effects<br />
The DSP’s of the <strong>SD1</strong> are capable of producing Reverb, Chorus, Delay and Modulation effects <strong>to</strong> be applied <strong>to</strong> the Upper and Lower parts, <strong>to</strong> the<br />
accompaniment tracks and <strong>to</strong> the external audio signals. The <strong>SD1</strong> <strong>is</strong> also equipped with an equalizer <strong>to</strong> model the final sound. From th<strong>is</strong> menu<br />
again the level of the individual audio outputs can be modified.<br />
The <strong>SD1</strong> employs up <strong>to</strong> three DSP’s <strong>to</strong> generate the global Reverb and for the Upper parts, the Reverb <strong>to</strong> assign <strong>to</strong> the Drum 1 track and the three<br />
groups of Chorus, Delay and D<strong>is</strong><strong>to</strong>rsor effects that can work both in parallel and in series in Programs and in parallel for the au<strong>to</strong>matic accompaniment<br />
tracks and the Lower parts.<br />
The assignment of the Delay, Chorus and D<strong>is</strong><strong>to</strong>rsion effects <strong>is</strong> done in the Arrange View menu for the au<strong>to</strong>matic accompaniment tracks and the<br />
Lower parts (with the exception of the Drum 1 and Drum 2 tracks). For the Right section the assignment of the effects <strong>is</strong> done using the On Line<br />
Effect menu or using the Programs.<br />
To access the effects menu from the main page press F3 Effect.<br />
The Effects menu <strong>is</strong> made up as follows:<br />
F1 Reverb 1:<br />
F2 Right:<br />
F3 Reverb Type:<br />
F4 Reverb 2:<br />
F5 Reverb Type:<br />
Th<strong>is</strong> <strong>is</strong> the Reverb assigned <strong>to</strong> the whole keyboard and <strong>to</strong> the whole timbre genera<strong>to</strong>r, despite the single parts. The value,<br />
that can be modified using the VALUE +/- push but<strong>to</strong>ns, establ<strong>is</strong>hes the entity of the Reverb applied.<br />
Th<strong>is</strong> always uses the Reverb 1 type of Reverb, but it <strong>is</strong> used <strong>to</strong> specify the quantity of Reverb <strong>to</strong> be applied separately <strong>to</strong> the<br />
Right part of the keyboard, that dedicated <strong>to</strong> the lead. The value <strong>is</strong> modified using the VALUE +/- push but<strong>to</strong>ns.<br />
Th<strong>is</strong> <strong>is</strong> used <strong>to</strong> establ<strong>is</strong>h which Reverb algorithm <strong>is</strong> <strong>to</strong> be used for Reverb 1 and Right <strong>to</strong> be chosen between Box 1, Box 2, Room<br />
1, Room 2, Studio 1, Studio 2, Hall 1, Hall 2, Stage 1, Stage 2, Theatre, Cathedral, Arena, Valley, Planet and Galaxy. Furthermore,<br />
you can also select four User Reverbs derived from the modification of the algorithms in ROM. Th<strong>is</strong> modification <strong>is</strong> enabled<br />
using the F10 Edit push but<strong>to</strong>n, again from the Effects menu, that we will d<strong>is</strong>cuss later. To choose the type of algorithm use<br />
the VALUE +/- push but<strong>to</strong>ns.<br />
Th<strong>is</strong> <strong>is</strong> the Reverb assigned <strong>to</strong> just the Drum 1 track of the Styles and not <strong>to</strong> the Drum 2 track that controls the Live Drums.<br />
The quantity of Reverb applied <strong>is</strong> modified using the VALUE +/- push but<strong>to</strong>ns.<br />
Th<strong>is</strong> specifies the algorithm assigned <strong>to</strong> the Drum 1 track between Room, Studio, Club, Hall, Theatre, Stage and Arena. By<br />
selecting Rev1 Type the Drum 1 track will use the same algorithm used for Reverb 1. To select the type of algorithm use the<br />
VALUE +/- push but<strong>to</strong>ns.<br />
F6 Equalize:<br />
Th<strong>is</strong> sends the user <strong>to</strong> the page dedicated <strong>to</strong> the graphic equalizer with three bands and <strong>to</strong> the level of the audio outputs.<br />
The parameters, that can be modified using the VALUE +/- push but<strong>to</strong>ns, are the following:<br />
90<br />
<strong>SD1</strong> Owner’s Manual
F1 Low: Th<strong>is</strong> establ<strong>is</strong>hes the gain in decibels of the lower frequencies of the audio range<br />
F2 Mid: Th<strong>is</strong> establ<strong>is</strong>hes the gain in decibels of the middle frequencies of the audio range<br />
F3 High: Th<strong>is</strong> establ<strong>is</strong>hes the gain in decibels of the higher frequencies of the audio range<br />
F4 Bass Boost: Th<strong>is</strong> <strong>is</strong> used <strong>to</strong> increase or decrease the gain on the bass, in order <strong>to</strong> send <strong>to</strong> the amplification more<br />
or less enhanced bass lines. The parameter <strong>is</strong> modified by pressing the relative function push but<strong>to</strong>n F4 repeatedly.<br />
F5: Escape: Th<strong>is</strong> <strong>is</strong> used <strong>to</strong> return <strong>to</strong> the Effects menu.<br />
F6 Out 1 Level: Th<strong>is</strong> establ<strong>is</strong>hes the level of the audio 1 output or Left/Mono.<br />
F7 Out 2 Level: Th<strong>is</strong> establ<strong>is</strong>hes the level of the audio 2 output or Right.<br />
F8 Out 3 Level: Th<strong>is</strong> establ<strong>is</strong>hes the level of the audio 3 output.<br />
F9 Out 4 Level: Th<strong>is</strong> establ<strong>is</strong>hes the level of the audio 4 output .<br />
F7 Chorus:<br />
F8 Delay:<br />
F9 D<strong>is</strong><strong>to</strong>rsion:<br />
F10 Edit:<br />
Th<strong>is</strong> <strong>is</strong> used <strong>to</strong> select the type of algorithm between Chorus 1, Chorus 2, Chorus 3, Chorus 4, Chorus 5, Flanger, Short Delay,<br />
Feedback and four User Chorus using push but<strong>to</strong>ns VALUE +/-. Once the algorithm has been selected, it <strong>is</strong> edited using F10 Edit.<br />
Th<strong>is</strong> <strong>is</strong> used <strong>to</strong> select between eight types of pre-set Delays and four User Delays using the VALUE +/- push but<strong>to</strong>ns. Once<br />
the algorithm has been selected, it <strong>is</strong> edited using F10 Edit.<br />
Th<strong>is</strong> <strong>is</strong> used <strong>to</strong> select between eight types of d<strong>is</strong><strong>to</strong>rsion and four User D<strong>is</strong><strong>to</strong>rsion using the VALUE +/- push but<strong>to</strong>ns . Once<br />
the algorithm has been selected, it <strong>is</strong> edited using F10 Edit.<br />
Th<strong>is</strong> <strong>is</strong> used <strong>to</strong> access the menu dedicated <strong>to</strong> programming the most important parameters of an algorithm.<br />
EDITING AN EFFECT<br />
The <strong>SD1</strong> does not only choose the algorithm <strong>to</strong> be assigned <strong>to</strong> the DSPs but it also allows its substantial modification and saving in dedicated<br />
memories. To modify an algorithm first it must be selected between Reverb 1, Chorus, Delay and D<strong>is</strong><strong>to</strong>rsion, simply by pressing the function<br />
push but<strong>to</strong>n and choosing the algorithm. Without doing anything else at th<strong>is</strong> stage press F10 Edit <strong>to</strong> access the menu.<br />
Whatever the algorithm <strong>to</strong> be modified the Edit page shows some fixed parameters:<br />
F4 Default:<br />
F5 Escape:<br />
F8 Source:<br />
F9 Destination:<br />
F10 Save:<br />
Th<strong>is</strong> resets the parameters of the algorithm at their original values.<br />
Th<strong>is</strong> returns <strong>to</strong> the Effects menu.<br />
Th<strong>is</strong> indicates the current algorithm selected <strong>to</strong> be modified, however by pressing function push but<strong>to</strong>n F8 several times, a<br />
different algorithm can be selected.<br />
Th<strong>is</strong> specifies the destination memory for the algorithm modified. It <strong>is</strong> selected by pressing the function push but<strong>to</strong>n F9<br />
repeatedly.<br />
Th<strong>is</strong> confirms and saves the parameters modified in the memory selected using F9 Destination.<br />
The single parameters <strong>to</strong> be modified are shown in the middle of the d<strong>is</strong>play that are selected using the CURSOR +/- push but<strong>to</strong>ns and are modified<br />
using the VALUE +/- push but<strong>to</strong>ns.<br />
PARAMETERS FOR REVERB ALGORITHMS<br />
Level:<br />
Filter:<br />
Pre Delay:<br />
Decay:<br />
Delay:<br />
Th<strong>is</strong> <strong>is</strong> the level of the signal.<br />
Th<strong>is</strong> applies an LPF filter that cuts out the higher frequencies.<br />
Th<strong>is</strong> <strong>is</strong> the length of the first delay.<br />
Th<strong>is</strong> <strong>is</strong> the decay tempo of the reverb.<br />
Th<strong>is</strong> <strong>is</strong> the length of the delay of the signal.<br />
Owner’s Manual <strong>SD1</strong> 91
PARAMETERS FOR CHORUS ALGORITHMS<br />
Level:<br />
Delay:<br />
Feedback:<br />
Rate:<br />
Depth:<br />
Th<strong>is</strong> <strong>is</strong> the level of the signal.<br />
Th<strong>is</strong> <strong>is</strong> the length of the delay.<br />
Th<strong>is</strong> <strong>is</strong> the repetition degree of the Delay.<br />
Th<strong>is</strong> <strong>is</strong> the modulation speed.<br />
Th<strong>is</strong> <strong>is</strong> the modulation intensity.<br />
PARAMETERS FOR DELAY ALGORITHMS<br />
Volume Centre: Th<strong>is</strong> <strong>is</strong> the level of the signal repeated in the centre.<br />
Volume Left: Th<strong>is</strong> <strong>is</strong> the level of the signal repeated <strong>to</strong> the left.<br />
Volume Right: Th<strong>is</strong> <strong>is</strong> the level of the signal repeated <strong>to</strong> the right.<br />
Delay Centre: Th<strong>is</strong> <strong>is</strong> the delay tempo for repeating the signal in the centre.<br />
Delay Left: As above but for the signal <strong>to</strong> the left.<br />
Delay Right: As above but for the signal <strong>to</strong> the right.<br />
Feedback: Th<strong>is</strong> <strong>is</strong> the signal regeneration degree.<br />
Filter: Th<strong>is</strong> <strong>is</strong> the LPF filter <strong>to</strong> cut out the higher frequencies.<br />
PARAMETERS FOR DISTORSOR ALGORITHMS<br />
Level:<br />
Tone:<br />
Resonance:<br />
Th<strong>is</strong> <strong>is</strong> the level of the signal.<br />
Th<strong>is</strong> <strong>is</strong> the timbre variation degree.<br />
Th<strong>is</strong> <strong>is</strong> the accentuation of the frequencies of the d<strong>is</strong><strong>to</strong>rted timbre.<br />
92<br />
<strong>SD1</strong> Owner’s Manual
On Line Effects and Ro<strong>to</strong>r effect menus<br />
The ON LINE EFFECT push but<strong>to</strong>n calls up a menu dedicated <strong>to</strong> managing the effects for the Voices used in the Right section, namely the lead.<br />
These parameters have been intentionally kept separate so that the addition of the effects can be controlled very rapidly. The greater definition<br />
however <strong>is</strong> obtained by programming the Programs (consult the dedicated section).<br />
The On Line Effect menu that <strong>is</strong> called up by pressing the relative push but<strong>to</strong>n on the control panel from the main page of the d<strong>is</strong>play also<br />
includes parameters required <strong>to</strong> control the microphone input.<br />
The parameters available for the Right section are the following:<br />
F1 Chorus:<br />
F2 Wha-Wha:<br />
F3 Delay:<br />
F4 Overdrive:<br />
F5 D<strong>is</strong><strong>to</strong>rsor:<br />
By pressing the function push but<strong>to</strong>n repeatedly the Chorus effect <strong>is</strong> enabled or otherw<strong>is</strong>e on the Right section.<br />
Th<strong>is</strong> <strong>is</strong> an amazing effect for guitar riffs but it can be used in many other situations. The optional Volume pedal <strong>is</strong> <strong>to</strong> be connected<br />
<strong>to</strong> control it better. When the Wha-Wha <strong>is</strong> enabled, by pressing the relative function push but<strong>to</strong>n, the pedal controls<br />
the closing of the filter and not the general volume. The Wha-Wha effect can also be controlled by the Modulation Wheel<br />
using the Utility menu and the F3 Modulation function where the F7 Wha-Wha function <strong>is</strong> <strong>to</strong> be set as On.<br />
Th<strong>is</strong> <strong>is</strong> used <strong>to</strong> enable the Delay effect on the Right section by pressing the relative function push but<strong>to</strong>n repeatedly.<br />
Th<strong>is</strong> <strong>is</strong> not available amongst the algorithms described in Effects. It gradually saturates the sound controlled by the optional<br />
Volume Pedal. It <strong>is</strong> one of the effects required <strong>to</strong> simulate jazz and rock organs in the best way possible. The Overdrive<br />
cuts out the use of the D<strong>is</strong><strong>to</strong>rsor effect.<br />
Th<strong>is</strong> enables the D<strong>is</strong><strong>to</strong>rsor effect on the Right section, cutting out the use of the Overdrive.<br />
The parameters available <strong>to</strong> control the microphone input are the following:<br />
F6 Micro:<br />
F7 Direct:<br />
F8 Reverb:<br />
F9 Vocal Set:<br />
F10 Enhancer:<br />
Th<strong>is</strong> enables, or otherw<strong>is</strong>e, the use of the effects for the Right section on the microphone input.<br />
Th<strong>is</strong> <strong>is</strong> used <strong>to</strong> modify the quantity of direct signal that goes <strong>to</strong> the audio output. It <strong>is</strong> modified using the VALUE +/- push<br />
but<strong>to</strong>ns.<br />
Th<strong>is</strong> indicates the quantity of Reverb assigned <strong>to</strong> the microphone input. The value <strong>is</strong> modified using the VALUE +/- push<br />
but<strong>to</strong>ns.<br />
Th<strong>is</strong> <strong>is</strong> used <strong>to</strong> select a Vocal Set of the Vocalizer without going through the Vocalizer menu directly.<br />
Th<strong>is</strong> <strong>is</strong> used <strong>to</strong> enable the enhancement of the high frequencies on the microphone signal and on the audio output <strong>to</strong><br />
increase the intelligibility.<br />
ROTOR<br />
The relative push but<strong>to</strong>n on the control panel <strong>is</strong> used <strong>to</strong> enable the Ro<strong>to</strong>r effect that simulates the classic cabinet Leslie ® used of old with the<br />
Hammond ® electro-magnetic organs. The rotation velocity of the speakers, when the ROTOR LED <strong>is</strong> lit, <strong>is</strong> controlled by the Modulation Wheel.<br />
Owner’s Manual <strong>SD1</strong> 93
Reg<strong>is</strong>tration<br />
Thanks <strong>to</strong> these special memories all the control panel settings and the main parameters that control the <strong>SD1</strong> can be called up instantly. Once<br />
the Reg<strong>is</strong>trations have been programmed they make it very quick <strong>to</strong> change the Style, the Voice variations, the settings of the effects and above<br />
all the au<strong>to</strong>matic call-up of the audio samples associated with a Style and the possible TXT file. The programming of a Reg<strong>is</strong>tration does not<br />
entail any special menu with all the parameters and values available and therefore they are <strong>to</strong> be modified from the single menus <strong>to</strong> which they<br />
belong. It <strong>is</strong> usually better <strong>to</strong> start-off from a default setting and then set just the Style, the Voices and the other parameters without having <strong>to</strong><br />
go through all the menus.<br />
The Reg<strong>is</strong>trations, once programmed, are extremely useful when playing live but it takes some time <strong>to</strong> program them however, which requires<br />
some work at home.<br />
When programming, but also when playing live, it could be necessary <strong>to</strong> establ<strong>is</strong>h which parameter will be recorded or otherw<strong>is</strong>e in the<br />
Reg<strong>is</strong>trations. It could indeed be useful <strong>to</strong> leave one or a number of parameters free or <strong>to</strong> d<strong>is</strong>able the call-up function of the parameter status<br />
with the following Reg<strong>is</strong>trations.<br />
Each single function saved in the Reg<strong>is</strong>tration can be enabled or d<strong>is</strong>abled via the dedicated Reg<strong>is</strong>tration Mode menu found in Utility.<br />
A Reg<strong>is</strong>tration can be called up from the group 198 memories saved in Flash RAM (Block Reg<strong>is</strong>tration), or from Floppy or Hard D<strong>is</strong>k, in which case<br />
it will be called Single Reg<strong>is</strong>tration. The Block Reg<strong>is</strong>tration and Single Reg<strong>is</strong>tration parameters are absolutely identical, but their management<br />
<strong>is</strong> quite different:<br />
For a single Reg<strong>is</strong>tration in Block Reg<strong>is</strong>tration all the 198 Reg<strong>is</strong>trations have <strong>to</strong> be saved in one single file. The Single Reg<strong>is</strong>tration on the other<br />
hand <strong>is</strong> always saved as a single file.<br />
While it <strong>is</strong> possible <strong>to</strong> d<strong>is</strong>play the Single reg<strong>is</strong>tration’s s<strong>to</strong>red in Hard D<strong>is</strong>k or in Floppy D<strong>is</strong>k in a l<strong>is</strong>t, th<strong>is</strong> <strong>is</strong> not possible with Block Reg<strong>is</strong>tration,<br />
which can only be called up by entering the number using the numeric keypad.<br />
It takes less time <strong>to</strong> load the Block Reg<strong>is</strong>tration than the Single Reg<strong>is</strong>tration.<br />
The Block Reg<strong>is</strong>trations are s<strong>to</strong>red in the memory even when the instrument <strong>is</strong> turned off, as they are saved in Flash RAM.<br />
CALLING UP AND SAVING A REGISTRATION OF THE BLOCK REGISTRATION GROUP<br />
As mentioned the Block Reg<strong>is</strong>tration group s<strong>to</strong>res 198 Reg<strong>is</strong>trations in Flash RAM. Each Reg<strong>is</strong>tration can be selected by enabling the BLOCK<br />
REGISTR push but<strong>to</strong>n (the LED lights up) and then by entering the corresponding 3-figure number using the numeric keypad (STYLES push but<strong>to</strong>ns).<br />
The name of the Reg<strong>is</strong>tration called up will be d<strong>is</strong>played in bold print next <strong>to</strong> the number in the <strong>to</strong>p left corner of the d<strong>is</strong>play.<br />
Proceed as follows <strong>to</strong> save a <strong>new</strong> Reg<strong>is</strong>tration in Block Reg<strong>is</strong>tration, once the desired Style, Tempo, Volumes and Parameters have been set using<br />
the BLOCK REGISTR push but<strong>to</strong>n:<br />
●<br />
●<br />
●<br />
●<br />
●<br />
●<br />
Return <strong>to</strong> the main page of the d<strong>is</strong>play using the EXIT push but<strong>to</strong>n.<br />
Press SAVE/ENTER.<br />
Select F1 Reg<strong>is</strong>tration.<br />
Enter the name of the Reg<strong>is</strong>tration using the keyboard and the CURSOR push but<strong>to</strong>ns.<br />
Select the number of the destination memory using the F2 and F3 function but<strong>to</strong>ns.<br />
Confirm that the Reg<strong>is</strong>tration <strong>is</strong> <strong>to</strong> be saved using F10 Save or cancel it using F5 Escape.<br />
Proceed as follows <strong>to</strong> save the whole group of Block Reg<strong>is</strong>tration on d<strong>is</strong>k in one single file with the .REG extension:<br />
●<br />
●<br />
●<br />
●<br />
●<br />
●<br />
Enable MASTER FOLDER if the file <strong>is</strong> <strong>to</strong> be created in the dedicated Folder 98 User files, or with MASTER FOLDER d<strong>is</strong>abled select the destination<br />
Folder (see D<strong>is</strong>k section).<br />
Press DISK <strong>to</strong> access the D<strong>is</strong>k menu.<br />
Press F3 Save <strong>to</strong> enable the procedure.<br />
Select F3 Block Reg<strong>is</strong>tration.<br />
In the page that appears you can enter the name of the file using the keyboard keys and the CURSOR +/- push but<strong>to</strong>ns.<br />
Confirm the procedure using F10 Exec. or cancel it using F5 Escape.<br />
To load a .REG Block Reg<strong>is</strong>tration file in the Flash RAM of the <strong>SD1</strong> proceed as follows:<br />
If the .REG file has been created with Master Folder enabled, ensure that the relative push but<strong>to</strong>n <strong>is</strong> enabled.<br />
If the .REG file <strong>is</strong> in a Folder created by the user, d<strong>is</strong>able Master Folder and find the Folder.<br />
Press DISK <strong>to</strong> access the menu.<br />
With Master Folder enabled press F5 Folder Choice and then F8 Userfile. Select the file <strong>to</strong> be loaded using VALUE +/- and then confirm the<br />
procedure using F2 Load.<br />
With Master Folder d<strong>is</strong>abled select the original Folder using the numeric keypad (STYLES push but<strong>to</strong>ns) then press F5 File Choice <strong>to</strong> then<br />
select F3 Block Reg<strong>is</strong>tration. Find the file using the VALUE +/- push but<strong>to</strong>ns and then confirm using F2 Load.<br />
94<br />
<strong>SD1</strong> Owner’s Manual
CALLING UP AND SAVING A SINGLE REGISTRATION<br />
The call-up function of a Single Reg<strong>is</strong>tration <strong>is</strong> enabled by pressing the SINGLE REGISTR push but<strong>to</strong>n (the LED lights up). The original Folder of<br />
the Single Reg<strong>is</strong>tration will be Folder 93 when Master Folder <strong>is</strong> enabled or any other Folder created by the user with Master Folder d<strong>is</strong>abled.<br />
At the <strong>begin</strong>ning it <strong>is</strong> adv<strong>is</strong>able and easier <strong>to</strong> manage the Single Reg<strong>is</strong>trations with Master Folder enabled as there <strong>is</strong> no need <strong>to</strong> select the<br />
source Folder before.<br />
The Single Reg<strong>is</strong>trations can also be managed on Floppy D<strong>is</strong>k with Master Folder d<strong>is</strong>abled, by selecting the source and/or destination d<strong>is</strong>k using<br />
PAGE +/-.<br />
A Folder or a Floppy D<strong>is</strong>k may s<strong>to</strong>re up <strong>to</strong> a maximum of 999 Single Reg<strong>is</strong>trations, the numbering of which <strong>is</strong> au<strong>to</strong>matically attributed according<br />
<strong>to</strong> the time order in which the file <strong>is</strong> created, whereas the file will always be d<strong>is</strong>played in alphabetical order.<br />
In both cases it <strong>is</strong> always possible <strong>to</strong> d<strong>is</strong>play the l<strong>is</strong>t of Single Reg<strong>is</strong>trations s<strong>to</strong>red in the Folder simply by pressing DISK. From th<strong>is</strong> page you<br />
can find the progressive number attributed <strong>to</strong> the Single Reg<strong>is</strong>trations when the file <strong>is</strong> created or you can select the Single Reg<strong>is</strong>tration <strong>to</strong> be<br />
loaded directly using the VALUE +/-, F10 Select and F2 Load push but<strong>to</strong>ns. The Single Reg<strong>is</strong>tration cannot be called up using the numeric keypad<br />
in the D<strong>is</strong>k environment; therefore the Single Reg<strong>is</strong>tration <strong>is</strong> either selected using the normal procedures required in the D<strong>is</strong>k environment<br />
or you return <strong>to</strong> the main page of the d<strong>is</strong>play using the EXIT push but<strong>to</strong>n and enter the number of the desired Reg<strong>is</strong>tration with SINGLE REG-<br />
ISTR enabled.<br />
To save a Single Reg<strong>is</strong>tration on d<strong>is</strong>k ( .SRG extension) you must first decide whether <strong>to</strong> use the Master Folder function and enable it using the<br />
dedicated push but<strong>to</strong>n or find the destination Folder with Master Folder d<strong>is</strong>abled. In the last case you can also select the Floppy D<strong>is</strong>k as the<br />
destination d<strong>is</strong>k (see D<strong>is</strong>k section).<br />
●<br />
●<br />
●<br />
●<br />
●<br />
Once the desired parameters have been set enable SINGLE REGISTR.<br />
Press SAVE/ENTER.<br />
Select F1 Reg<strong>is</strong>tr.<br />
From the page that follows enter the name of the Single Reg<strong>is</strong>tration using the keyboard keys and the CURSOR +/- push but<strong>to</strong>ns.<br />
Confirm using F10 Save or cancel using F5 Escape.<br />
AUTOMATICALLY LOADING THE TEXT FILE AND MIDI FILE WITH THE REGISTRATIONS<br />
Th<strong>is</strong> function <strong>is</strong> one of the most powerful and useful functions of the <strong>SD1</strong>. It <strong>is</strong> used <strong>to</strong> avoid lots of procedures <strong>to</strong> load the file required when<br />
playing live. There <strong>is</strong> no operational difference between a Reg<strong>is</strong>tration of the Block Reg<strong>is</strong>trations and a Single Reg<strong>is</strong>tration.<br />
To au<strong>to</strong>matically load a text file with .TXT extension or a Midi file with .MID extension all that <strong>is</strong> needed <strong>is</strong> for the name of the Reg<strong>is</strong>tration <strong>to</strong><br />
match that of the .TXT or .MID file. The Midi file will be available by enabling SONG PLAY and then by pressing START. Remember that by calling<br />
up a Style which exploits a synchronized audio sample, the audio sample will also be au<strong>to</strong>matically loaded. The same applies when au<strong>to</strong>matically<br />
loading a Midi file with audio samples, the audio sample will also be au<strong>to</strong>matically loaded. The most critical phases are indeed the<br />
loading times of the audio sample which could be <strong>to</strong>o long when playing live. Th<strong>is</strong> <strong>is</strong> why it <strong>is</strong> adv<strong>is</strong>able <strong>to</strong> always check the actual loading times<br />
in RAM. The Reg<strong>is</strong>trations do not allow for the au<strong>to</strong>matic loading of audio samples <strong>to</strong> be attributed <strong>to</strong> Lower or Upper part.<br />
DEFINING WHICH PARAMETERS WILL BE CONTROLLED BY THE REGISTRATION<br />
It could prove useful <strong>to</strong> prevent the Reg<strong>is</strong>trations from saving or calling up one or a number of parameters they can control. For example, you<br />
can prevent just the Vocal Sets or the assignment of the effects from being called up. Each single parameter can be detached from the<br />
Reg<strong>is</strong>tration. These settings are achieved in the following manner:<br />
●<br />
●<br />
●<br />
From the main page of the d<strong>is</strong>play press F3 Utility.<br />
Using the PAGE +/- push but<strong>to</strong>ns go <strong>to</strong> the second page of the Utility menu, pointed out by “2/3” on the d<strong>is</strong>play.<br />
Select F3 Reg<strong>is</strong>tr. Mode <strong>to</strong> access the single parameters.<br />
The page d<strong>is</strong>played shows the parameters in the middle, grouped per areas <strong>to</strong> which they belong, called up using the function push but<strong>to</strong>ns. For<br />
F1 Arrange, F3 Utility and F6 Tabs a number of parameter pages are foreseen that are called up by pressing the same function push but<strong>to</strong>n<br />
again. The parameters in the middle of the d<strong>is</strong>play are accessed using the CURSOR +/- push but<strong>to</strong>ns whereas their enabling status <strong>is</strong> modified<br />
from F10 Select. The first time you access the F3 Reg<strong>is</strong>tr. Mode menu the Global parameters are shown, which can be modified only at th<strong>is</strong><br />
time and <strong>to</strong> call up the pages that follow you must press the F1 push but<strong>to</strong>n. Below <strong>is</strong> the description.<br />
Owner’s Manual <strong>SD1</strong> 95
Global:<br />
F1 Arrange 1/3:<br />
Th<strong>is</strong> <strong>is</strong> used <strong>to</strong> d<strong>is</strong>able the control of all the parameters related <strong>to</strong> MIDI, Arrange Mode, Drum Mixer, Utility, Effect, 2nd Voice,<br />
Global Transpose, Split Point, Left Level and Tempo.<br />
Th<strong>is</strong> <strong>is</strong> used <strong>to</strong> d<strong>is</strong>able the control of the parameters programmed in the Arrange View menu.<br />
F1 Arrange 2/3: Th<strong>is</strong> <strong>is</strong> used <strong>to</strong> d<strong>is</strong>able the control of the parameters programmed in the Arrange Mode menu in page 1/2.<br />
F1 Arrange 3/3: Th<strong>is</strong> <strong>is</strong> used <strong>to</strong> d<strong>is</strong>able the control of the parameters programmed in the Arrange Mode menu in page 2/2.<br />
F2 Drum Mixer:<br />
Th<strong>is</strong> <strong>is</strong> used <strong>to</strong> d<strong>is</strong>able the control of the parameters programmed in the Drum Mixer menu.<br />
F3 Utility 1/2: Th<strong>is</strong> <strong>is</strong> used <strong>to</strong> d<strong>is</strong>able the control of the parameters programmed in the Utility menu in page 1/3<br />
F3 Utility 2/2: Th<strong>is</strong> <strong>is</strong> used <strong>to</strong> d<strong>is</strong>able the control of the parameters programmed in the Utility menu in pages 2/3 and 3/3<br />
F4 Effects:<br />
F5 Escape:<br />
F6 Tabs 1/2:<br />
F6 Tabs 2/2:<br />
F7 Save:<br />
F8 Default:<br />
F9 Switch Off:<br />
F10 Select:<br />
Th<strong>is</strong> <strong>is</strong> used <strong>to</strong> d<strong>is</strong>able the control of the parameters Effect menu.<br />
Th<strong>is</strong> returns <strong>to</strong> the previous page of the Utility menu.<br />
Th<strong>is</strong> <strong>is</strong> used <strong>to</strong> inhibit the control of the enabling status of the relative push but<strong>to</strong>ns on the control panel.<br />
The same as above.<br />
Th<strong>is</strong> <strong>is</strong> used <strong>to</strong> save the settings made in Reg<strong>is</strong>tr. Mode in the Flash RAM. These settings are s<strong>to</strong>red even after the instrument<br />
has been turned off and are called up when it <strong>is</strong> turned on again.<br />
Th<strong>is</strong> resets the original control status of all the parameters.<br />
When it <strong>is</strong> enabled (On) it d<strong>is</strong>ables the BLOCK REGISTRAT push but<strong>to</strong>n, after a few seconds <strong>to</strong> allow the user <strong>to</strong> select a<br />
Style rather than a Reg<strong>is</strong>tration using the numeric keypad.<br />
Once the parameter has been selected F10 Select <strong>is</strong> used <strong>to</strong> modify its enabling status.<br />
96<br />
<strong>SD1</strong> Owner’s Manual
Utility<br />
The Utility menus are used <strong>to</strong> control the physical controllers, the MIDI accordions, the pedal, the dynamics response curve, the audio outputs<br />
and a group of parameters that modify the general performance of the <strong>SD1</strong>.<br />
From the main page of the d<strong>is</strong>play, press F3 Utility <strong>to</strong> access the first page indicated as 1/3 at the <strong>to</strong>p right part of the d<strong>is</strong>play. To select the<br />
other two menu pages use the PAGE +/- push but<strong>to</strong>ns. The single groups of parameters, <strong>to</strong> which other menus correspond, are enabled using<br />
the relative function push but<strong>to</strong>ns.<br />
UTILITY, PAGE 1/3<br />
F1 Transpos:<br />
By pressing the function push but<strong>to</strong>n F1 repeatedly the transposition mode <strong>is</strong> modified between Normal and Delayed. With<br />
Normal the transposition <strong>is</strong> applied immediately as soon at it <strong>is</strong> varied. With Delayed the transposition <strong>is</strong> applied when the<br />
next chord change <strong>is</strong> played in the part of keyboard <strong>to</strong> the left of the split point.<br />
F2 After<strong>to</strong>uch:<br />
Th<strong>is</strong> calls up a <strong>new</strong> menu dedicated <strong>to</strong> controlling the after <strong>to</strong>uch. The parameters available are the following:<br />
F1 Cu<strong>to</strong>ff: When On, by pressing the function push but<strong>to</strong>n F1 again, the after <strong>to</strong>uch controls the opening of the filter<br />
that can make the timbre more brilliant.<br />
F2 LFO DCO: When On, the after <strong>to</strong>uch controls the vibra<strong>to</strong>.<br />
F3 Bend: The value entered using the VALUE +/- push but<strong>to</strong>ns indicates the deviation semi<strong>to</strong>nes of the in<strong>to</strong>nation.<br />
By entering a value of –1, additional expressiveness <strong>is</strong> given <strong>to</strong> the timbres such as the sax.<br />
F4 Slide: Th<strong>is</strong> <strong>is</strong> an effect associated with the keyboard velocity and cons<strong>is</strong>ts in a very quick tuning adjustment of<br />
the chord during the sound attack, very similar <strong>to</strong> that encountered normally in the attack of almost all wind instruments.<br />
The Slide can be used successfully <strong>to</strong> make the sax, trumpet, clarinet and guitar phrasing more real<strong>is</strong>tic and<br />
expressive.<br />
F5 Attack: When On, it enables the modulations controlled by the after <strong>to</strong>uch with a slight delay. If for example the<br />
after <strong>to</strong>uch <strong>is</strong> used <strong>to</strong> create a vibra<strong>to</strong>, with Attack set On the vibra<strong>to</strong> works only after a few seconds, creating a more<br />
natural sensation.<br />
F6 LFO DCA: When On, the after <strong>to</strong>uch controls the tremolo effect.<br />
F7 LFO DCF: When On, the after <strong>to</strong>uch controls the modulation of the LFO on the filter cut-off.<br />
F8 Volume: When On, the after <strong>to</strong>uch controls the volume of the timbres of the Right section.<br />
F9 Slide Thr: The value entered using the VALUE +/- push but<strong>to</strong>ns establ<strong>is</strong>hes the velocity beyond which the Slide<br />
affect <strong>is</strong> triggered. Lower the value less key dynamics <strong>is</strong> required <strong>to</strong> activate the Slide.<br />
F10 Sensitiv.: The value entered using the VALUE +/- push but<strong>to</strong>ns establ<strong>is</strong>hes the response sensitivity <strong>to</strong> the after<br />
<strong>to</strong>uch. If modified the control of all the parameters controlled by after <strong>to</strong>uch are also changed.<br />
Owner’s Manual <strong>SD1</strong> 97
F3 Modulation:<br />
Th<strong>is</strong> calls up a <strong>new</strong> menu dedicated <strong>to</strong> the management of the Modulation Wheel. The parameters available are the following:<br />
F1 LFO Pitch: When On, the Modulation Wheel controls the entry of the modulation of the LFO on the pitch <strong>to</strong> create<br />
a cyclic vibra<strong>to</strong>r. It can be set Off only if at least one modulation between DCF, DCA, Cu<strong>to</strong>ff and WhaWha <strong>is</strong> enabled<br />
so that the Modulation Wheel always controls a parameter.<br />
F2 LFO DCF: When On, the Modulation Wheel controls the entry of the modulation on the LFO on the filter cut-off.<br />
F3 LFO DCA: When On, the Modulation Wheel controls the entry of the modulation on the LFO on the amplitude <strong>to</strong><br />
create a cyclic tremolo.<br />
F4 Cu<strong>to</strong>ff: When On, the Modulation Wheel directly controls the filter cut-off. Th<strong>is</strong> proves useful <strong>to</strong> control the harmonic<br />
richness of a timbre. It cannot be used if F6 Wha-Wha <strong>is</strong> already enabled.<br />
F5 Escape: Th<strong>is</strong> returns <strong>to</strong> the initial page of the Utility menu.<br />
F6 Wha-Wha: When On, the Modulation Wheel controls the Wha-Wha effect, typical of electric guitars. It cannot be<br />
used if F4 Cu<strong>to</strong>ff <strong>is</strong> already enabled.<br />
F7 To Swell: When On, it transfers all the parameters controlled by the Modulation Wheel <strong>to</strong> the optional Volume<br />
pedal.<br />
F8 Mod. Rate: The value entered using the VALUE +/- push but<strong>to</strong>ns defines the velocity of the LFO’s used with the<br />
Modulation Wheel<br />
F9 Mod. Amou: The value entered using the VALUE +/- push but<strong>to</strong>ns establ<strong>is</strong>hes the modulation depth that can be<br />
obtained using the Modulation Wheel for the LFO’s.<br />
F4 Pitch:<br />
Th<strong>is</strong> calls up a <strong>new</strong> menu dedicated <strong>to</strong> controlling the tuning. The parameters available are the following:<br />
F1 Tune: The value indicated in Hertz, that can be modified +/- 100 Cents using the VALUE +/- push but<strong>to</strong>ns, establ<strong>is</strong>hes<br />
the fine tuning of the whole sound genera<strong>to</strong>r of the <strong>SD1</strong>. By pressing the two VALUE +/- push but<strong>to</strong>ns <strong>to</strong>gether<br />
at the same time the standard tuning of 440 Hz <strong>is</strong> reset.<br />
F2 Vibra<strong>to</strong>: When Off, it d<strong>is</strong>ables the vibra<strong>to</strong> on the timbres that use it. The sampled vibra<strong>to</strong> of some timbres <strong>is</strong> not<br />
affected by the setting of th<strong>is</strong> parameter.<br />
F3 Portament: The value set using the VALUE +/- push but<strong>to</strong>ns controls the Portamen<strong>to</strong> velocity.<br />
F4 Lega<strong>to</strong>: When On, the Portamen<strong>to</strong> between two notes <strong>is</strong> monophonic and <strong>is</strong> achieved only when the two notes<br />
are played with note ligature. When Off, the Portamen<strong>to</strong> <strong>is</strong> polyphonic and <strong>is</strong> produced even when the two notes are<br />
played separately. The tied notes function <strong>is</strong> extremely interesting <strong>to</strong> simulate the phrasing of some traditional<br />
solo<strong>is</strong>t instruments, such as violins, trumpet, horn and trombone.<br />
F5 Escape: Th<strong>is</strong> returns <strong>to</strong> the initial page of the Utility menu.<br />
F6 Bend Valu: The value entered using the VALUE +/- push but<strong>to</strong>ns establ<strong>is</strong>hes the excursion semi<strong>to</strong>nes of the Pitch<br />
Bend Wheel.<br />
F7 Bend LFO: Th<strong>is</strong> assigns the vibra<strong>to</strong> control created with the LFO <strong>to</strong> the Pitch Bend Wheel, the intensity of which<br />
<strong>is</strong> establ<strong>is</strong>hed by the value that can be modified using the VALUE +/-push but<strong>to</strong>ns.<br />
F8 Bend DCF: Th<strong>is</strong> assigns the filter cut-off control <strong>to</strong> the Pitch Bend Wheel, the intensity of which <strong>is</strong> establ<strong>is</strong>hed by<br />
the value that can be modified using the VALUE +/-push but<strong>to</strong>ns.<br />
F9 Bend DCA: Th<strong>is</strong> assigns the timbre amplitude control <strong>to</strong> the Pitch Bend Wheel, the intensity of which <strong>is</strong> establ<strong>is</strong>hed<br />
by the value that can be modified using the VALUE +/-push but<strong>to</strong>ns.<br />
98<br />
<strong>SD1</strong> Owner’s Manual
F5 Footswitch:<br />
The <strong>SD1</strong> can exploit two types of optional pedals (FS13 with thirteen switches and FS6 with six switches) <strong>to</strong> control many functions,<br />
including those already available in the X series.<br />
F5 Footswitch: Th<strong>is</strong> calls up a page that shows the function assigned <strong>to</strong> each of the switches. To modify it, use the CUR-<br />
SOR +/- push but<strong>to</strong>ns <strong>to</strong> select the pedal switch and the VALUE +/- push but<strong>to</strong>ns <strong>to</strong> modify the function assigned as desired,<br />
amongst the following:<br />
Sustain<br />
Soft<br />
Sostenu<strong>to</strong><br />
Arranger A<br />
Arranger B<br />
Arranger C<br />
Arranger D<br />
In./End. 1<br />
In./End. 2<br />
In./End. 3<br />
Fill 1<br />
Fill 2<br />
Fill 3<br />
Break<br />
Start/S<strong>to</strong>p<br />
Count In<br />
Key Start<br />
Key S<strong>to</strong>p<br />
Tap Tempo<br />
To End<br />
Reg<strong>is</strong>tr. Up<br />
Reg<strong>is</strong>tr. Down<br />
Tempo +<br />
Tempo -<br />
minor<br />
7th<br />
m7th<br />
5+<br />
dim<br />
Glide<br />
Kick Off<br />
Snare Off<br />
Hi-Hat Off<br />
Cymbal Off<br />
Tom/Fx Off<br />
Tamb. Off<br />
Latin1 Off<br />
Latin2 Off<br />
Latin3 Off<br />
Clap/Fx Off<br />
Drum Lock<br />
Bass Lock<br />
Chords Lock<br />
Fall Off<br />
Shake<br />
Overdrive<br />
Delay<br />
Wha-Wha<br />
Chorus<br />
Reverb<br />
D<strong>is</strong><strong>to</strong>rsor<br />
Text Page-<br />
Text Page+<br />
Vocalizer<br />
Jump<br />
Arabic_1<br />
Arabic_2<br />
Arabic_3<br />
Arabic_4<br />
Arabic_5<br />
Arabic_6<br />
Micro Dry<br />
Fade Out<br />
Crash<br />
Voice Down<br />
Voice Up<br />
Harmony<br />
Program<br />
Swell<br />
Transposer -<br />
Transposer +<br />
2nd Voice<br />
Hold<br />
Arabic_7<br />
Arabic_8<br />
Arabic_9<br />
Arabic_10<br />
Arabic_11<br />
Arabic_12<br />
Arabic_13<br />
Left Drum<br />
Interact.Arr<br />
6th<br />
7th+<br />
The Footswitch menu also takes the F5 Escape functions in<strong>to</strong> account, <strong>to</strong> return <strong>to</strong> the initial page of Utility and F10 Default <strong>to</strong> reset the original<br />
settings.<br />
Once the modification has been completed, save the settings by pressing SAVE/ENTER <strong>to</strong> make it possible <strong>to</strong> save in Flash RAM using F10 Save,<br />
<strong>to</strong> cancel the procedure using F5 Escape and <strong>to</strong> return <strong>to</strong> the Footswitch menu using F4 Undo.<br />
F6 Accord.:<br />
F7 Text:<br />
F8 Au<strong>to</strong>close:<br />
F9 Styles:<br />
F10 Vel. Curve:<br />
Th<strong>is</strong> calls up a <strong>new</strong> page with the parameters dedicated <strong>to</strong> the use of a MIDI accordion. See the MIDI Accordion section for<br />
more details.<br />
Th<strong>is</strong> <strong>is</strong> used <strong>to</strong> d<strong>is</strong>able, or otherw<strong>is</strong>e, the d<strong>is</strong>play of .TXT files.<br />
When set on Yes, the page in which the Voices and Styles are selected closes after a short time <strong>to</strong> return <strong>to</strong> the page previously<br />
d<strong>is</strong>played.<br />
Th<strong>is</strong> establ<strong>is</strong>hes the Style selection mode. When it <strong>is</strong> set on Group, the selection <strong>is</strong> made by families of Styles corresponding<br />
<strong>to</strong> the relative parameters. When set on Numeric, the Style <strong>is</strong> called up by entering the 3-figure number using the<br />
numeric keypad (STYLES push but<strong>to</strong>ns), as for the X series. The first of the 3-figures can be saved (that in hundreds) by<br />
pressing the * push but<strong>to</strong>n at the same time as the number. Thus the number blocked <strong>is</strong> d<strong>is</strong>played in small print and the<br />
selection continues with two-digits within the hundreds fixed. To release the hundreds number simply press the same but<strong>to</strong>n<br />
again <strong>to</strong>gether with the * push but<strong>to</strong>n. For example, if you w<strong>is</strong>h <strong>to</strong> select style 215 and then 279 press number 2 and the<br />
push but<strong>to</strong>n * at the same time. The d<strong>is</strong>play will keep number 2 in small print, then if you select the two remaining digits<br />
making up the complete number using the numeric keypad, namely 15, the d<strong>is</strong>play will show 215. Then by entering number<br />
79 the d<strong>is</strong>play will show 279. Press 2 and * <strong>to</strong>gether again at the same time <strong>to</strong> release number 2 and then proceed in the<br />
same manner <strong>to</strong> select numbers belonging <strong>to</strong> other hundreds.<br />
By pressing the function push but<strong>to</strong>n F10 repeatedly one of the six different response curves <strong>to</strong> the keyboard velocity can<br />
be selected or one of the five User curves that can be programmed. The Fixed curve produces an identical velocity value<br />
whatever the keyboard dynamics applied, the value of which <strong>is</strong> set using the VALUE +/- push but<strong>to</strong>ns. To access the programming<br />
function of the User curves, select one using F10 and then press the VALUE + and VALUE – push but<strong>to</strong>ns <strong>to</strong>gether<br />
at the same time. The page thus called up shows the response curve in the middle of the d<strong>is</strong>play, indicated in a Cartesian<br />
system that indicates the velocity value acknowledged by the keyboard on the ax<strong>is</strong> of the absc<strong>is</strong>sas (Key In) and the output<br />
value on that of the ordinate (Key Out) according <strong>to</strong> the curve processed. All modifications made <strong>to</strong> the curve are d<strong>is</strong>played<br />
Owner’s Manual <strong>SD1</strong> 99
in real time. The parameters available are the following:<br />
F1 Key In: Th<strong>is</strong> indicates the velocity value acknowledged by the keys of the keyboard or entered using the VALUE<br />
+/- push but<strong>to</strong>ns.<br />
F2 Key Out: Th<strong>is</strong> indicates the output value of the velocity according <strong>to</strong> the response curve. It <strong>is</strong> a purely informative<br />
parameter.<br />
F3 Edit In: The dynamics curve <strong>is</strong> split up in<strong>to</strong> twelve sections, each of which bears ten velocity values. By selecting<br />
a section using the VALUE +/- push but<strong>to</strong>ns you can modify its response using Edit Out.<br />
F4 Edit Out: The value that can be changed using the VALUE +/- push but<strong>to</strong>ns defines the increase or decrease that<br />
will be applied proportionally <strong>to</strong> the ten velocity values within a section.<br />
F5 Default: Th<strong>is</strong> resets the initial curve.<br />
F6 Curve: Th<strong>is</strong> calls up one of the five User curves.<br />
F10 Mem. Save: Th<strong>is</strong> saves the User curve modified in Flash RAM.<br />
UTILITY, PAGE 2/3<br />
From the initial page of the Utility menu access <strong>is</strong> gained <strong>to</strong> the second page by pressing PAGE +. The parameters available are the following:<br />
F1 Arabic:<br />
Th<strong>is</strong> calls up a <strong>new</strong> page <strong>to</strong> create tunings suitable for the countries using the Arabic scale, which <strong>is</strong> kept even in the<br />
case of transposition. A scale <strong>is</strong> shown in the middle of the d<strong>is</strong>play, the notes of which are selected using the octave<br />
keys from C5 <strong>to</strong> B5. Once the note <strong>is</strong> selected a box appears indicating a value of –50 Cent (a fourth of a <strong>to</strong>ne) that can<br />
be modified prec<strong>is</strong>ely using the VALUE +/- push but<strong>to</strong>ns. By pressing the same key again the modification <strong>is</strong> cancelled<br />
and the tuning returns <strong>to</strong> the original one. The parameters available are the following:<br />
F1 Left: Th<strong>is</strong> establ<strong>is</strong>hes whether the intervals of the Arabic scale are operational also on the Arranger and<br />
Lower parts or otherw<strong>is</strong>e. If set as No the Arabic scale <strong>is</strong> not cut-out from the whole Left part.<br />
F5 Escape: Th<strong>is</strong> returns <strong>to</strong> the initial page of the Utility menu.<br />
100<br />
<strong>SD1</strong> Owner’s Manual
F6 Footswitch: If set as Note Mapping, the Arabic scale <strong>is</strong> also applied <strong>to</strong> the notes played using the pedal. If<br />
set as Arabic Set, the thirteen Arabic scales <strong>to</strong> be called up instantly are assigned <strong>to</strong> the pedal switches.<br />
F10 Normal: Th<strong>is</strong> resets the standard tuning.<br />
When the modifications have been completed, save the scale in one of the thirteen available memory locations. Press<br />
SAVE/ENTER <strong>to</strong> access the l<strong>is</strong>t of memory locations that can be selected using the CURSOR +/- push but<strong>to</strong>ns. F10 Save<br />
saves the scale in the location selected at the time and F5 Escape returns <strong>to</strong> the previous page. The thirteen Arabic<br />
scales saved can be easily called up while playing live using the pedal switches FS 6 and FS 13 (optional).<br />
F2 Video:<br />
F3 Reg<strong>is</strong>tr. Mode:<br />
F4 D<strong>is</strong>p. Time:<br />
F5 Pian<strong>is</strong>t:<br />
Th<strong>is</strong> <strong>is</strong> used <strong>to</strong> select the type of video output signal using the VALUE +/- push but<strong>to</strong>ns, between PAL (European telev<strong>is</strong>ion<br />
system), NTSC (American telev<strong>is</strong>ion system), SVHS Pal (super VHS European), SVHS NTSC (super VHS American),<br />
Moni<strong>to</strong>r (VGA moni<strong>to</strong>r for computers), OFF (video card d<strong>is</strong>abled).<br />
Th<strong>is</strong> <strong>is</strong> used <strong>to</strong> access a number of parameters dedicated <strong>to</strong> the Reg<strong>is</strong>trations. Further details are given in the<br />
Reg<strong>is</strong>tration section.<br />
The value entered using the VALUE +/- push but<strong>to</strong>ns establ<strong>is</strong>hes the time that the page in use remains d<strong>is</strong>played, at the<br />
end of which the <strong>SD1</strong> returns <strong>to</strong> the main page of the d<strong>is</strong>play. Set as Off, the page in use remains d<strong>is</strong>played.<br />
Th<strong>is</strong> <strong>is</strong> used <strong>to</strong> select the Pian<strong>is</strong>t mode between Au<strong>to</strong>matic, where the chord <strong>is</strong> acknowledged if at least two keys are<br />
pressed and Normal where the chord <strong>is</strong> blocked by the enabling of the Sustain pedal. Further details are given in the<br />
Arranger section.<br />
F6 Keyboard Out Ass:<br />
Th<strong>is</strong> calls up the page used <strong>to</strong> manage the four audio outputs. The rhythm sections and the lead parts are d<strong>is</strong>played in<br />
the middle of the d<strong>is</strong>play, which can be conveyed <strong>to</strong> the audio outputs. The use of an additional output d<strong>is</strong>ables the<br />
built-in DSP dedicated <strong>to</strong> the effects, but not the Reverb. Therefore if D<strong>is</strong><strong>to</strong>rsor effect <strong>is</strong> <strong>to</strong> be used on a timbre, the auxiliary<br />
output cannot be used at the same time. If four audio outputs are used <strong>to</strong>gether at the same time, the <strong>SD1</strong> d<strong>is</strong>ables<br />
all the DSP’s, therefore the timbres are not processed by Reverb or Effects.<br />
To select one of these sections or parts use the CURSOR +/- push but<strong>to</strong>ns and then the VALUE +/- push but<strong>to</strong>ns <strong>to</strong> modify<br />
the audio output according <strong>to</strong> the management mode of the outputs referred <strong>to</strong> the F1/5 function push but<strong>to</strong>ns.<br />
F1 L&R Standard: All the sections and the parts are lead <strong>to</strong> the main audio outputs L and R.<br />
F2 L&R Out 3: Together with the main audio outputs there <strong>is</strong> also the audio output 3 available, which <strong>is</strong> not<br />
processed by the internal effects. The Reverb remains enabled for the L&R outputs.<br />
F3 L&R Out 4: As for the previous output but using audio output 4.<br />
F4 L&R Out 3 & 4: The pair of main stereo audio outputs and the two audio outputs independent from one<br />
another are available.<br />
F5 Separate 1, 2, 3, 4: Four monophonic audio outputs that can be assigned freely.<br />
F6 Default: Th<strong>is</strong> resets the initial conditions on each of the Out Assign combinations.<br />
F7 GM Out Ass.:<br />
Th<strong>is</strong> calls up the page <strong>to</strong> assign the outputs separate from the sixteen MIDI parts in General MIDI and the drum sections.<br />
The management of the parameters and the limits are identical <strong>to</strong> F6 Keyboard Out Assign (see relative section).<br />
Owner’s Manual <strong>SD1</strong> 101
F8 Vol. Select:<br />
F9 4 Sw Mode:<br />
F10 Song Expr:<br />
Th<strong>is</strong> <strong>is</strong> used <strong>to</strong> select the call-up mode of the Voices. In Mode 1 the last Voice selected within a single family <strong>is</strong> always<br />
au<strong>to</strong>matically called up. To change it simply select another Voice within the same family. In Mode 2 the Voice <strong>is</strong> enabled<br />
only after it has been selected using the function push but<strong>to</strong>ns within a family, so that the Voice in use <strong>is</strong> not replaced<br />
just by calling up a family.<br />
Th<strong>is</strong> function <strong>is</strong> used if connected <strong>to</strong> a Sol<strong>to</strong>n MIDI pedal and <strong>to</strong> the special pedal for guitar<strong>is</strong>ts with four switches for<br />
changing the <strong>to</strong>nality. When the parameter <strong>is</strong> set as On, each <strong>new</strong> change of <strong>to</strong>nality <strong>is</strong> held even if the relative switch<br />
<strong>is</strong> not held down. In Off the <strong>to</strong>nality variation remains in use only for the time during which the switch <strong>is</strong> pressed and<br />
then it returns <strong>to</strong> a major <strong>to</strong>nality.<br />
When set on Yes, the volume pedal controls the global level of the Song.<br />
UTILITY, PAGE 3/3<br />
Using the PAGE + push but<strong>to</strong>n access <strong>is</strong> gained <strong>to</strong> the following parameters:<br />
F1 2ND Sust.:<br />
F2 2ND Split:<br />
F3 Arab. Mode:<br />
F4 Micro:<br />
F5 Low. Hold:<br />
F6 Password:<br />
F7 Chorus Lck:<br />
F8 Vocal Ch:<br />
F9 Song Play:<br />
F10 Delay Lck:<br />
Th<strong>is</strong> enables or d<strong>is</strong>ables the Sustain on the Second Voicee<br />
Th<strong>is</strong> enables a second split point dedicated only <strong>to</strong> the use of the Second Voice. The value <strong>is</strong> entered directly from the keyboard<br />
or using the VALUE +/- push but<strong>to</strong>ns.<br />
Th<strong>is</strong> enables the use of the Arabic scale.<br />
By selecting Dry On S<strong>to</strong>p, each time the Arranger <strong>is</strong> s<strong>to</strong>pped using the START push but<strong>to</strong>n (S<strong>to</strong>p) the effects on the microphone<br />
signal are d<strong>is</strong>abled.<br />
Th<strong>is</strong> enables or d<strong>is</strong>ables the chord holding on the two Voices assigned <strong>to</strong> Lower with the Arranger not running.<br />
Th<strong>is</strong> <strong>is</strong> used <strong>to</strong> set the password for the hard d<strong>is</strong>k folders in use that require such procedure (see D<strong>is</strong>k section) <strong>to</strong> protect the<br />
writing and reading of data. The password <strong>is</strong> assigned <strong>to</strong> the hard d<strong>is</strong>k folder currently in use, namely the last folder that<br />
was used in order of time, using F1 Modify. If no password <strong>is</strong> assigned <strong>to</strong> the Folder, type in the <strong>new</strong> name in the line called<br />
New using the keyboard keys. The name must be made up of no more than six letters. Confirm using F10 Confirm. If there<br />
<strong>is</strong> an old password and th<strong>is</strong> <strong>is</strong> <strong>to</strong> be changed, first type in the old name in the line called Old and then the <strong>new</strong> one in line<br />
called New and then confirm using F10 Confirm. F5 Escape returns <strong>to</strong> the main page of the d<strong>is</strong>play, F6 FlashIns <strong>is</strong> used<br />
for any Styles up-dates produced by <strong>Ketron</strong>.<br />
When set as On, it keeps the chorus of the Voice selected locked even if the Voice <strong>is</strong> changed and Midi files are played.<br />
Th<strong>is</strong> <strong>is</strong> used <strong>to</strong> lock (Locked) the MIDI channel selected <strong>to</strong> control the Vocalizer whatever the source Midi file. In th<strong>is</strong> way<br />
you avoid having <strong>to</strong> set the same MIDI channel for different Midi files each time.<br />
Th<strong>is</strong> selects the access time <strong>to</strong> a Midi file in Hard D<strong>is</strong>k between Normal, in other words starting from the first beat of the<br />
first measure, and Fast that skips the reproduction directly at the <strong>begin</strong>ning of the Midi file, ignoring its measures having<br />
no notes. In th<strong>is</strong> way you can reproduce a number of Midi files without s<strong>to</strong>pping.<br />
Th<strong>is</strong> <strong>is</strong> used <strong>to</strong> lock the type of delay currently in use in the same way as F7 Chorus Lck.<br />
102<br />
<strong>SD1</strong> Owner’s Manual
MIDI Accordions<br />
The <strong>SD1</strong> can be managed by an Accordion connected via MIDI, thanks <strong>to</strong> the fact that the attribution of the MIDI channels <strong>to</strong> the single parts of<br />
the keyboard, the bass transposition, the velocity and also the use of the bass timbres can be controlled. The controls directly depend on the<br />
MIDI implementation of the Accordion therefore, for very simple MIDI accordions some of the functions described hereafter will not be available.<br />
CONNECTING A MIDI ACCORDION<br />
The MIDI Out Output of the MIDI Accordion <strong>is</strong> <strong>to</strong> be connected using a MIDI cable <strong>to</strong> the MIDI 2 In input (Keyboard) of the <strong>SD1</strong> and then enable<br />
the Accordion mode on the <strong>SD1</strong>.<br />
ENABLING THE ACCORDION AND ITS PARAMETERS<br />
The parameters for the MIDI Accordion are accessed, from the main page of the d<strong>is</strong>play, by pressing F3 Utility and, from the first page of the<br />
Utility menu, by pressing F6 Accord. A <strong>new</strong> page of dedicated parameters opens. When the Accordion <strong>is</strong> connected, the Accordion mode <strong>is</strong><br />
enabled by pressing F10, which from d<strong>is</strong>abled (Inactive) becomes enabled (Active). To d<strong>is</strong>able the Accordion mode press the F10 push but<strong>to</strong>n<br />
again. The Accordion mode calls up a number of MIDI settings that can however be modified as desired.<br />
The parameters available in the Utility Accordion menu are the following:<br />
F1 Chord Mode:<br />
F2 Left Velo:<br />
F3 Right Vel:<br />
F4 Left Drum:<br />
F5 Au<strong>to</strong>chord:<br />
F6 Bas Sust:<br />
F7 Bas To Ch:<br />
F8 Bas Octav:<br />
F9 Lower Oct:<br />
Th<strong>is</strong> <strong>is</strong> used <strong>to</strong> select two different methods for acknowledging the chords. International <strong>is</strong> the most widely used system,<br />
Belgique <strong>is</strong> <strong>to</strong> be used only <strong>to</strong> acknowledge Belgian chords. Press function push but<strong>to</strong>n F1 <strong>to</strong> switch from one system<br />
<strong>to</strong> the other.<br />
Th<strong>is</strong> selects the velocity curve for the notes played manually using the chords of the Accordion. By pressing the F2<br />
function push but<strong>to</strong>n repeatedly you can select the response curve. In the case of Fixed curve you can enter the fixed<br />
velocity value applied <strong>to</strong> the notes played using the VALUE +/- push but<strong>to</strong>n.<br />
The same as for F2 Left Velo but dedicated <strong>to</strong> the notes played with the right hand, namely the lead.<br />
When set as On, it <strong>is</strong> used <strong>to</strong> play two percussion timbres of the Drum section of the <strong>SD1</strong> with the bass timbres of the<br />
Accordion and another two timbres with the Accordion chords. The two timbres with relative velocity values can be<br />
selected for chords and bass. Using the CURSOR +/- push but<strong>to</strong>ns, go <strong>to</strong> the timbre and then select it using the VALUE<br />
+/- push but<strong>to</strong>ns. Moving around again using the CURSOR +/- push but<strong>to</strong>ns you can modify the velocity value using the<br />
VALUE +/- push but<strong>to</strong>ns. When a timbre <strong>is</strong> <strong>to</strong> be completely excluded, set the velocity at 0. It <strong>is</strong> adv<strong>is</strong>able <strong>to</strong> use the<br />
Left Drum function when the Arranger <strong>is</strong> not in use.<br />
Th<strong>is</strong> excludes the acknowledgement of the chords leaving the Accordion player free <strong>to</strong> play the bass and the chords<br />
manually, without any au<strong>to</strong>mat<strong>is</strong>m.<br />
The value that can be modified using the VALUE +/- push but<strong>to</strong>ns indicates the length of the Sustain on the manual<br />
bass, when the MANUAL BASS push but<strong>to</strong>n <strong>is</strong> in use (LED lit).<br />
Set as On, it also includes the bass note in the acknowledgement of the chords, <strong>to</strong> create chords with varied bass using<br />
the BASS TO LOWEST push but<strong>to</strong>n.<br />
The value that can be modified using the VALUE +/- push but<strong>to</strong>ns indicates the octave of the manual bass timbre, with<br />
the MANUAL BASS push but<strong>to</strong>n enabled.<br />
For each timbre assigned <strong>to</strong> Lower 1 and Lower 2, its octave can be modified using the VALUE +/- push but<strong>to</strong>ns and<br />
push but<strong>to</strong>n F9 <strong>to</strong> switch between the two parameters.<br />
Owner’s Manual <strong>SD1</strong> 103
F10 Accordion Mode:<br />
Th<strong>is</strong> enables or d<strong>is</strong>ables the use of the parameters for the MIDI Accordion.<br />
SAVING THE PARAMETERS FOR THE MIDI ACCORDION<br />
Thanks <strong>to</strong> the Power On Set-up function all the settings of the parameters described can be saved, which will be called up au<strong>to</strong>matically when<br />
the <strong>SD1</strong> <strong>is</strong> turned on. To enable th<strong>is</strong> procedure, press the SAVE/ENTER push but<strong>to</strong>n and then select F3PowerOnSet-up. Press F10 Save <strong>to</strong><br />
save the settings in Flash RAM. Further details on Power On Set-up are given in the dedicated section.<br />
THE MIDI PARAMETERS FOR THE ACCORDION<br />
When the Accordion <strong>is</strong> enabled using F10 Active, the <strong>SD1</strong> calls up the MIDI Accordion 1 set-up <strong>to</strong> attribute the MIDI channels <strong>to</strong> the keyboad sections<br />
in MIDI reception. The MIDI Accordion 1 set-up <strong>is</strong> that most frequently used with most MIDI accordions. The attribution of the MIDI reception<br />
channels can be modified in menu F6 MIDI that <strong>is</strong> accessed from the main page of the d<strong>is</strong>play and then using F2 Channel Receive.<br />
You will see that, when the Accordion mode <strong>is</strong> enabled, the MIDI Set-up in F10 <strong>is</strong> Accordion 1. To modify the settings of the single sections,<br />
move on<strong>to</strong> one of them using the CURSOR +/- push but<strong>to</strong>ns and then enter the MIDI channel using the VALUE +/- push but<strong>to</strong>ns. The main sections<br />
involved with the MIDI Accordion are:<br />
Right Channel:<br />
Left Channel:<br />
Bass Channel:<br />
Drum Channel:<br />
Th<strong>is</strong> <strong>is</strong> the setting of the MIDI receiving channel for the part played with the right hand, namely the lead.<br />
Th<strong>is</strong> <strong>is</strong> the setting of the MIDI receiving channel for the part played with the left hand, namely the left section of the <strong>SD1</strong><br />
dedicated <strong>to</strong> the acknowledgement of the chords for the Arranger.<br />
Th<strong>is</strong> <strong>is</strong> the setting of the MIDI receiving channel for the manual bass section.<br />
Th<strong>is</strong> <strong>is</strong> the setting of the MIDI receiving channel used <strong>to</strong> play the percussion timbres when the Left Drum mode <strong>is</strong> enabled.<br />
To save the settings, press the SAVE/ENTER push but<strong>to</strong>n and then F10 Save. Further details are given in the MIDI section.<br />
A GUIDE TO THE QUICK CONNECTION OF A MIDI ACCORDION<br />
Connect the MIDI cable <strong>to</strong> the MIDI Out of the Accordion and the MIDI In 2 of the <strong>SD1</strong>.<br />
Call up the F3 Utility menu from the main page of the d<strong>is</strong>play and then press F6 Accordion and then F10 <strong>to</strong> set the parameter on Active.<br />
If the sections of the Accordion (Right, Lower and Chords) do not play correctly, exit using the EXIT push but<strong>to</strong>n, press F6 MIDI and then F2<br />
Channel Receive <strong>to</strong> set the match between the MIDI channel of the Accordion sections with those of the <strong>SD1</strong> using the CURSOR +/- and VALUE<br />
+/- push but<strong>to</strong>ns. If the settings have been modified, save them using the SAVE/ENTER push but<strong>to</strong>n then F10 Save, in the Accordion 1 set-up,<br />
which <strong>is</strong> called up each time the Accordion mode <strong>is</strong> enabled.<br />
<strong>Ketron</strong> <strong>SD1</strong> <strong>is</strong> provided with two MIDI set-ups for Accordions. Accordion 1 <strong>is</strong> dedicated <strong>to</strong> the use of the Accordion with the <strong>SD1</strong> Arranger and<br />
Accordion 2 controls all sixteen MIDI parts of the <strong>SD1</strong>.<br />
The settings of the Accordion menu in the Utility menu can be saved in a Reg<strong>is</strong>tration.<br />
To enable the manual bass, press the MANUAL BASS push but<strong>to</strong>n (the LED lights up).<br />
Remember that most problems relating <strong>to</strong> a MIDI Accordion depend on the settings of the MIDI transmitting channels on the MIDI Accordion. If<br />
various MIDI instruments are used and connected <strong>to</strong> the Accordion, it <strong>is</strong> preferable <strong>to</strong> modify the MIDI set-up of the <strong>SD1</strong> rather than <strong>to</strong> re-program<br />
the Accordion <strong>to</strong> match the MIDI set-ups of the <strong>SD1</strong>.<br />
104<br />
<strong>SD1</strong> Owner’s Manual
MIDI<br />
MIDI <strong>is</strong> a communication pro<strong>to</strong>col used <strong>to</strong> transmit and receive commands, messages and events that are then translated by the compatible<br />
<strong>musical</strong> instrument in<strong>to</strong> notes, events and commands. Th<strong>is</strong> pro<strong>to</strong>col <strong>is</strong> therefore used <strong>to</strong> connect a computer with dedicated programs <strong>to</strong> the<br />
<strong>SD1</strong>, <strong>to</strong> control other timbre modules or keyboards directly from the <strong>SD1</strong> and <strong>to</strong> connect the <strong>SD1</strong> <strong>to</strong> an Accordion, a Sax or a MIDI guitar. Various<br />
books have been written on the MIDI standard and some simple research via Internet or in any special<strong>is</strong>ed library can help you <strong>to</strong> better understand<br />
how it works. Naturally, again on Internet, you can find sites that attempt <strong>to</strong> explain what MIDI <strong>is</strong>, free of charge. In any event a skilled<br />
musician will not mix up the MIDI pro<strong>to</strong>col with the Midi files (often called MIDI improperly): the first <strong>is</strong> indeed the starting point for the second.<br />
The <strong>SD1</strong>, thanks <strong>to</strong> the polyphony, offers 32 independent MIDI parts. Sixteen parts are dedicated <strong>to</strong> using the keyboard when playing live, with<br />
separate parts for the Arranger and the lead. The other sixteen are reached using the MIDI In 1 input that exploits the timbre genera<strong>to</strong>r of the<br />
<strong>SD1</strong> as a module in independent General MIDI standard. The same sixteen GM parts are used <strong>to</strong> reproduce the Midi files in Song Play and in the<br />
sequencer.<br />
The <strong>SD1</strong> parameters are used <strong>to</strong> control each MIDI part and channel of the 32 available. Remember not <strong>to</strong> use MIDI cables longer than 15 meters<br />
<strong>to</strong> avoid running in<strong>to</strong> transm<strong>is</strong>sion errors.<br />
The <strong>SD1</strong> d<strong>is</strong>tingu<strong>is</strong>hes the programming of the parts between those in General MIDI and those dedicated <strong>to</strong> the single sections of the <strong>SD1</strong>. The<br />
General MIDI settings are called up from the main page of the d<strong>is</strong>play using F1 GM and the MIDI settings of the keyboard are called up from the<br />
main page of the d<strong>is</strong>play using F6 MIDI.<br />
USING THE <strong>SD1</strong> AS A GENERAL MIDI MODULE<br />
To reach the sixteen independent MIDI channels from the keyboard you must use a Midi file loaded in Song Play or in the sequencer, or you can<br />
exploit the MIDI In 1 input (GM). With regard <strong>to</strong> Song Play there <strong>is</strong> a dedicated menu (F1 GM Part) that <strong>is</strong> used <strong>to</strong> modify the parameters of each<br />
single part, which has already been explained in the Song Play section (see relative section). With regard <strong>to</strong> the MIDI In 1 input (GM), the modification<br />
page of the parameters for each single MIDI part <strong>is</strong> enabled using F1 GM from the main page of the d<strong>is</strong>play. The parameters modified<br />
using F1 GM cannot be saved, on the contrary <strong>to</strong> what occurs with the same parameters in Song Play.<br />
MODIFYING A SINGLE GM PART<br />
From the main page press F1 GM Part <strong>to</strong> call up the page dedicated <strong>to</strong> the parameters of a single GM part. The Part <strong>is</strong> shown in the middle of<br />
the d<strong>is</strong>play, the parameters of which (that can be modified) are assigned <strong>to</strong> the function push but<strong>to</strong>ns. Right underneath <strong>is</strong> the timbre assigned<br />
<strong>to</strong> the Part and the effect used. The bot<strong>to</strong>m part of the d<strong>is</strong>play <strong>is</strong> dedicated <strong>to</strong> moni<strong>to</strong>ring the activities of the sixteen Parts on the MIDI In 1<br />
(GM) input, and can be useful <strong>to</strong> find the Part <strong>to</strong> be modified.<br />
To move around between the single Parts use the PAGE +/- push but<strong>to</strong>ns.<br />
The parameters that can be modified must be selected using the dedicated function push but<strong>to</strong>n before the value can be modified.<br />
TTimbre: Each track can use a timbre taken from the Voice, User Voice and RAM/Flash bank. To modify the timbre assigned follow the normal<br />
procedure using the VOICES, RAM/FLASH, USER VOICE, PAGE +/- push but<strong>to</strong>ns and the function push but<strong>to</strong>ns.<br />
Modulation effect: For each single track you can choose the modulation effect <strong>to</strong> be applied <strong>to</strong> the timbre between Chorus, D<strong>is</strong><strong>to</strong>rsor and Delay,<br />
using the CURSOR +/- push but<strong>to</strong>ns. The effect entity can be programmed using F3 Chorus/D<strong>is</strong><strong>to</strong>rsor/Delay.<br />
F1 Volume:<br />
F2 Reverb:<br />
F3 Chorus/D<strong>is</strong><strong>to</strong>rsor/Delay:<br />
Th<strong>is</strong> modifies the volume of the whole track. The value can be changed using the VALUE +/- push but<strong>to</strong>ns which,<br />
if pressed <strong>to</strong>gether at the same time, reset the value.<br />
h<strong>is</strong> modifies the Reverb entity applied <strong>to</strong> the track. The value can be changed using the VALUE +/- push but<strong>to</strong>ns<br />
which, if pressed <strong>to</strong>gether at the same time, reset the value.<br />
Th<strong>is</strong> modifies the entity of the modulation effect chosen between Chorus, D<strong>is</strong><strong>to</strong>rsor and Delay assigned <strong>to</strong> the<br />
track using the CURSOR +/- push but<strong>to</strong>ns. The value can be changed using the VALUE +/- push but<strong>to</strong>ns which,<br />
if pressed <strong>to</strong>gether at the same time, reset the value. The d<strong>is</strong>play shows the type of effect chosen next <strong>to</strong> F3<br />
and also below the timbre.<br />
Owner’s Manual <strong>SD1</strong> 105
F4 Panpot:<br />
Th<strong>is</strong> modifies the arrangement of the timbre on the stereo panorama. The value can be changed using the<br />
VALUE +/- push but<strong>to</strong>ns which, if pressed <strong>to</strong>gether at the same time, take the timbre back <strong>to</strong> the middle of the<br />
stereo panorama.<br />
F5 Filter:<br />
Th<strong>is</strong> calls up the page where some MIDI events can be cut-out from the reproduction of the track. It may occur<br />
for example, that the musician w<strong>is</strong>hes <strong>to</strong> avoid using the Modulation or some other MIDI parameter that directly<br />
affects the timbre. The MIDI filters can also be used <strong>to</strong> control an external MIDI module better. The page<br />
called up from F5 Filter shows a table of four lines and four columns relative <strong>to</strong> the sixteen Parts. To be able<br />
<strong>to</strong> access the MIDI filter of a single Part use the F1 and F6 push but<strong>to</strong>ns for Parts 1, 2, 3 and 4 that are <strong>to</strong> be<br />
selected by pressing the same push but<strong>to</strong>ns repeatedly. Use push but<strong>to</strong>ns F2 and F7 for Parts 5, 6, 7, and 8.<br />
Use push but<strong>to</strong>ns F3 and F8 for Parts 9, 10, 11 and 12 and push but<strong>to</strong>ns F4 and F9 for Parts 13, 14, 15 and 16. Once<br />
the Part <strong>to</strong> which the MIDI filter <strong>is</strong> <strong>to</strong> be applied has been found, select which MIDI message <strong>is</strong> <strong>to</strong> be cut-out from<br />
the reproduction using the VALUE +/- push but<strong>to</strong>ns and enable the filter using the F10 On/Off push but<strong>to</strong>n. The<br />
filter <strong>is</strong> enabled when “ON” appears next the MIDI message <strong>to</strong> be filtered. The MIDI messages that can be filtered<br />
are the following:<br />
Notes: all notes within the track<br />
Control Change: all Control Changes within the track<br />
Program Change: all Program Changes<br />
After Touch: all After <strong>to</strong>uch events<br />
Pitch Bend: all Pitch Bend events<br />
Volume: only Control Change 07 Volume<br />
Pan: only Control Change 10 Pan<br />
Reverb: only Control Change XX Reverb Send<br />
Chorus: only Control Change XX Effect Send<br />
Modulation Wheel: only Control Change 01 Modulation<br />
Expression: only Control Change 11 Expression<br />
RPN: only Control Change XX RPN<br />
NRPN: only Control Change XX NRPN<br />
To exit from F5 Filter press EXIT that sends <strong>to</strong> the main page of Song Play.<br />
F6 Key Shift:<br />
F7 Channel Tx Rx:<br />
F8 Part Mode:<br />
F9 Mute:<br />
F10 16 Parts:<br />
Th<strong>is</strong> changes the transposition of the track selected by up <strong>to</strong> +/- 24 semi<strong>to</strong>nes. The value can be changed using<br />
the VALUE +/- push but<strong>to</strong>ns which, if pressed <strong>to</strong>gether at the same time, reset the value.<br />
When push but<strong>to</strong>n F7 <strong>is</strong> pressed repeatedly it switches from TX, that indicates the transm<strong>is</strong>sion MIDI channel, <strong>to</strong><br />
RX, that establ<strong>is</strong>hes the MIDI receiving channel. The value can be changed using the VALUE +/- push but<strong>to</strong>ns.<br />
If no value <strong>is</strong> specified the track receives and transmits on the MIDI channel having the same number as the<br />
Part.<br />
Th<strong>is</strong> modifies the operational mode of the track, using the VALUE +/- push but<strong>to</strong>ns. The possible choices are:<br />
Voice: track dedicated <strong>to</strong> the use of a timbre<br />
Drumset: track dedicated <strong>to</strong> the use of a Drumset<br />
Drum2: track dedicated <strong>to</strong> the use of Live Drumsets<br />
Vocalize: track dedicated <strong>to</strong> the control of the Vocalizer<br />
Based on the choice made Drumset, Live Drum, Voice and Vocal Set can be called up or otherw<strong>is</strong>e. Whereas in<br />
the case of Voice and Drumset mode the Voice and Drumset are called up normally. For Drum 2 and Vocal Set<br />
the Live Drums and Vocal Sets must be selected using the VALUE +/- push but<strong>to</strong>ns. The modification of operational<br />
mode of a track can make the song incompatible with modules in General MIDI, but it offers the best possible<br />
for creating Midi files on <strong>SD1</strong>.<br />
If the function <strong>is</strong> enabled (symbol √), the track <strong>is</strong> cut-out from the reproduction.<br />
Th<strong>is</strong> enables the d<strong>is</strong>play of each single parameter, showing its value for all sixteen Parts.<br />
106<br />
<strong>SD1</strong> Owner’s Manual
MODIFYING A PARAMETER FOR THE SIXTEEN GM PARTS<br />
As already mentioned the status of a single parameter for all sixteen tracks can be d<strong>is</strong>played using the F10 16 Parts function. To rapidly access<br />
a parameter, select it from the GM Part page and then press F10 16 Parts <strong>to</strong> d<strong>is</strong>play the status of that parameter for the sixteen tracks. The<br />
page F10 16 Parts structure shows a table with four lines and four columns relative <strong>to</strong> the sixteen Parts. To access the single Part use push<br />
but<strong>to</strong>ns F1 and F6 for Parts 1, 2, 3 and 4 that are selected by pressing the same push but<strong>to</strong>ns repeatedly. Use push but<strong>to</strong>ns F2 and F7 for Parts<br />
5, 6, 7, and 8. Use push but<strong>to</strong>ns F3 and F8 for Parts 9, 10, 11 and 12 and push but<strong>to</strong>ns F4 and F9 for Parts 13, 14, 15 and 16. Once the Part has been<br />
found its value can be modified using the VALUE+/- push but<strong>to</strong>ns which, if pressed <strong>to</strong>gether at the same time, will reset the value.<br />
The parameters that can be modified in th<strong>is</strong> way are d<strong>is</strong>tributed over seven pages that are called up using push but<strong>to</strong>ns PAGE +/-, and include<br />
Volume, Reverb, Effects, Pan, Shift, Channel Rx, Channel Tx, already explained in the previous section.<br />
The F5 Mute (Solo) function <strong>is</strong> used <strong>to</strong> establ<strong>is</strong>h which <strong>is</strong> the F10 Mute action. When F5 <strong>is</strong> set on Mute (Solo), F10 <strong>is</strong> used <strong>to</strong> cut-out only the<br />
track selected at the time from the reproduction. Press F5 again and the relative function <strong>is</strong> changed in<strong>to</strong> Solo (Mute) and F10 Mute cutsout<br />
all the tracks with the exception of that selected.<br />
THE MIDI PARAMETERS OF THE <strong>SD1</strong> SECTIONS<br />
From the main page of the d<strong>is</strong>play press F6 MIDI <strong>to</strong> call up the menus dedicated <strong>to</strong> the <strong>SD1</strong> sections. For each single function the single sections<br />
involved are d<strong>is</strong>played <strong>to</strong>gether with relative value. To move around between the sections use the CURSOR +/- push but<strong>to</strong>ns and use the<br />
VALUE +/- push but<strong>to</strong>ns <strong>to</strong> modify the value.<br />
THE MIDI SET-UP’S<br />
To simplify programming the <strong>SD1</strong> uses some memories called MIDI Set-up’s that are used <strong>to</strong> save the settings of the MIDI receiving and transmitting<br />
channels associated with the single sections and programmed in the Channel Transmit and Channel Receive menus. When a modification<br />
has been completed in these menus, you can save it by pressing the SAVE/ENTER push but<strong>to</strong>n. The options available are the following:<br />
F4 Undo:<br />
F5 Escape:<br />
F9 Default:<br />
F10 Save:<br />
Th<strong>is</strong> returns <strong>to</strong> the page of MIDI channel settings, res<strong>to</strong>ring the initial situation.<br />
Th<strong>is</strong> returns <strong>to</strong> the MIDI channel settings page without saving.<br />
Th<strong>is</strong> res<strong>to</strong>res the default settings.<br />
Th<strong>is</strong> confirms that the settings in the current MIDI set-up are <strong>to</strong> be saved.<br />
The preferred MIDI set-up can be called up when turning the instrument on using the PowerOnSetupfunction. Once the MIDI set-up has been<br />
selected go back <strong>to</strong> the initial page of the MIDI menu using F5 Escape, press the SAVE/ENTER push but<strong>to</strong>n, select F3PowerOnSetupand then<br />
confirm using F10 Save. More details are given in the Power On Set-up section.<br />
THE PARAMETERS OF THE MIDI MENU<br />
Owner’s Manual <strong>SD1</strong> 107
F1 Channel Transmit:<br />
Th<strong>is</strong> <strong>is</strong> used <strong>to</strong> associate a MIDI transmitting channel on the MIDI OUT <strong>to</strong> each section. The following functions<br />
are also available:<br />
F4: th<strong>is</strong> switches between the Channel Transmit page and Channel Receive page.<br />
F5 Escape: Th<strong>is</strong> returns <strong>to</strong> the initial page of the MIDI menu.<br />
F10 MIDI Setup: Th<strong>is</strong> calls up the settings already put in order and saved <strong>to</strong> use the <strong>SD1</strong> via MIDI. The<br />
MIDI Set-up currently selected <strong>is</strong> also that where the settings will be saved using the SAVE/ENTER push<br />
but<strong>to</strong>n.<br />
F2 Channel Receive:<br />
F3 Transpose Transmit:<br />
F4 Transpose Receive:<br />
F5 Filter Tx:<br />
F6 Filter RX:<br />
F7 Program Change Tx:<br />
F8 Program Change Rx:<br />
F9 Clock SoftThru:<br />
Th<strong>is</strong> <strong>is</strong> used <strong>to</strong> associate a MIDI receiving channel on MIDI In 2 (Keyboard) <strong>to</strong> each section. The parameters are<br />
the same as F1 Channel Transmit.<br />
The value for each single section identifies the number of transposition octaves applied <strong>to</strong> the notes transmitted<br />
on the MIDI Out.<br />
The value of each section identifies the number of transposition octaves applied <strong>to</strong> the notes received on the<br />
MIDI In 2 (Keyboard).<br />
Valid for all the sections, the MIDI filters being transmitted are used <strong>to</strong> enable or d<strong>is</strong>able the transm<strong>is</strong>sion of<br />
some MIDI messages such as the Pitch Bend, some Control Changes and exclusive system messages. The type<br />
of message <strong>to</strong> be filtered <strong>is</strong> selected using the CURSOR +/- push but<strong>to</strong>ns and <strong>is</strong> enabled or d<strong>is</strong>abled using the<br />
F10 Select push but<strong>to</strong>n. The filter <strong>is</strong> enabled when the symbol “*” appears next <strong>to</strong> the MIDI message.<br />
The same as F5 Filter Tx, but dedicated <strong>to</strong> the MIDI messages received on MIDI In 2 (Keyboard).<br />
For each section you can establ<strong>is</strong>h whether the Program Change message associated with the Voice in use <strong>is</strong><br />
also <strong>to</strong> be transmitted <strong>to</strong> MIDI Out. The transm<strong>is</strong>sion function <strong>is</strong> enabled or d<strong>is</strong>abled using the F10 Select push<br />
but<strong>to</strong>n. The 2nd/Prog section refers <strong>to</strong> the Second Voice and <strong>to</strong> the Program memory, processed as a Single<br />
Voice. The Voice sections 1, 2, 3 and 4 refer <strong>to</strong> the single Voices of a Program.<br />
The same as F7 Program Change TX, but dedicated <strong>to</strong> the Program Changes received on MIDI In 2 (Keyboard).<br />
The <strong>SD1</strong> can receive and transmit the MIDI Clock that <strong>is</strong> used <strong>to</strong> synchron<strong>is</strong>e the Arranger, Song Play and the<br />
Sequencer. The function of the START push but<strong>to</strong>n depends on these settings. The parameters available are<br />
selected using the CURSOR +/- push but<strong>to</strong>ns and are enabled using F10 Select. They are:<br />
Clock Out: When th<strong>is</strong> function <strong>is</strong> enabled, the <strong>SD1</strong> sends the MIDI Clock <strong>to</strong> MIDI Out and therefore it can<br />
control the reproduction of external sequencers.<br />
Clock In: When enabled the reproduction controls of the <strong>SD1</strong> depend on MIDI Clock inputs received on<br />
MIDI In and not on the push but<strong>to</strong>ns on the control panel.<br />
Soft Thru 1: When enabled, the MIDI Clock received on MIDI In 1 GM <strong>is</strong> sent back <strong>to</strong> MIDI Out.<br />
Soft Thru 2: When enabled the MIDI Clock received on MIDI In 2 Keyboard <strong>is</strong> sent back <strong>to</strong> MIDI Out<br />
F10 Utility:<br />
108<br />
<strong>SD1</strong> Owner’s Manual
Th<strong>is</strong> <strong>is</strong> the only menu that <strong>is</strong> <strong>to</strong> be called up from the initial page of the MIDI menu and <strong>is</strong> used <strong>to</strong> access some<br />
settings dedicated <strong>to</strong> the MIDI ports. The parameters, the value of which <strong>is</strong> called up by pressing the relative<br />
function push but<strong>to</strong>n repeatedly, are:<br />
F1 MIDI In 1: Th<strong>is</strong> <strong>is</strong> used <strong>to</strong> modify the initial setting of the MIDI port from GM <strong>to</strong> Keyboard.<br />
F2 MIDI In2/Computer: The same as F1 MIDI In 1. The setting also establ<strong>is</strong>hes the type of MIDI input<br />
used by the Interface Computer.<br />
F3 MIDI Out: Th<strong>is</strong> establ<strong>is</strong>hes which group of MIDI channels will be sent <strong>to</strong> MIDI Out.<br />
F4 Computer Out: Th<strong>is</strong> establ<strong>is</strong>hes which group of MIDI channels will be sent <strong>to</strong> the Computer Interface.<br />
F5 Escape: Th<strong>is</strong> returns <strong>to</strong> the initial page of the MIDI menu.<br />
F6 Computer: Th<strong>is</strong> selects the type of computer <strong>to</strong> which the <strong>SD1</strong> <strong>is</strong> connected.<br />
F7 Local On/Off: Th<strong>is</strong> <strong>is</strong> a MIDI condition for which, when set as Off, all the <strong>SD1</strong> sections are no longer<br />
controlled by the keyboard but only by the MIDI In input.<br />
CALLING UP THE PROGRAMS, THE ONE TOUCH MEMORIES AND THE REGISTRATIONS VIA MIDI<br />
Program: Send the relative Program Change <strong>to</strong> the MIDI channel associated <strong>to</strong> the Right section.To assure a good reception, before you send the<br />
Program Change, ensure that the PROGRAM push but<strong>to</strong>n <strong>is</strong> enabled (LED lit).<br />
One Touch: send the relative Program Change on the MIDI channel associated <strong>to</strong> the Right section. To asure a good reception, before you send<br />
the Program Change, ensure that the 1 TOUCH push but<strong>to</strong>n <strong>is</strong> enabled (LED lit).<br />
Reg<strong>is</strong>tration: Send the relative Program Change on the MIDI channel associated <strong>to</strong> the Reg<strong>is</strong>trations. The status of the REGISTRATION push but<strong>to</strong>n<br />
<strong>is</strong> not important.<br />
BANK SELECT AND PROGRAM CHANGE<br />
We are providing a complete l<strong>is</strong>t of the Bank Select (CC 0) and Program Change values relative <strong>to</strong> the Pre-set Voices, User Voices, Drum Sets and<br />
Flash RAM. The <strong>SD1</strong> only uses the Control Change 00 as Bank Select.<br />
Owner’s Manual <strong>SD1</strong> 109
Using a MIDI pedal<br />
The <strong>SD1</strong> enables the connection of a MIDI pedal <strong>to</strong> control the manual bass line and <strong>to</strong> set the chords. The MIDI reception channel <strong>is</strong> <strong>to</strong> be set<br />
for the bass part on the same transm<strong>is</strong>sion channel as the pedal, by proceeding as follows:<br />
●<br />
●<br />
●<br />
●<br />
●<br />
Connect the MIDI pedal <strong>to</strong> MIDI In 2 (Keyboard).<br />
From the main page of the d<strong>is</strong>play press F6 MIDI.<br />
Select F2 Channel Receive.<br />
Find the Bass parameter using the CURSOR +/- push but<strong>to</strong>ns and modify the receiving MIDI channel using the VALUE +/- push but<strong>to</strong>ns based<br />
on that of the pedal.<br />
Enable the MANUAL BASS push but<strong>to</strong>n <strong>to</strong> use the pedal in organ player mode with the bass timbre associated <strong>to</strong> the Style in use.<br />
The pedal can also be used <strong>to</strong> add chords, however, when it <strong>is</strong> used alone it cannot play above the Major chords. To modify the <strong>to</strong>nality of the<br />
chords use the optional pedal switches FS13 and FS6 or use a pedal with four switches for guitar<strong>is</strong>ts (Mod. 9AC101) that has a special method of<br />
adding <strong>to</strong>nality variations. Proceed as follows <strong>to</strong> enable it:<br />
●<br />
●<br />
●<br />
From the main page of the d<strong>is</strong>play press F3 Utility.<br />
Move on<strong>to</strong> page 2/3 using the PAGE +/- push but<strong>to</strong>ns.<br />
Press F9 4Sw. Mode <strong>to</strong> set as On<br />
The MIDI parameters modified can be saved in a MIDI Set-up whereas the status of 4Sw. Mode can be saved in a Reg<strong>is</strong>tration.<br />
110<br />
<strong>SD1</strong> Owner’s Manual
Demo & Hit<br />
During live performance, it may be very useful <strong>to</strong> have a l<strong>is</strong>t of songs available <strong>to</strong> call up by a single press of a but<strong>to</strong>n. Demo & Hit <strong>is</strong> connected<br />
<strong>to</strong> the Master Folder function, that creates a special Folder within the Hard D<strong>is</strong>k where any Midi file loaded from the Floppy or the Hard D<strong>is</strong>k<br />
will be s<strong>to</strong>red, sorted in 99 pages containing ten Midi files each. The Demo & Hit function does not create any connection or any alias <strong>to</strong> the<br />
source file, but it actually copies it from the source d<strong>is</strong>k or Folder. The Midi files copied according <strong>to</strong> th<strong>is</strong> procedure will be called up by the relevant<br />
function but<strong>to</strong>ns on the d<strong>is</strong>play.<br />
COPYING MIDI FILES FROM THE FLOPPY DISK TO THE DEMO & HIT FOLDER<br />
●<br />
●<br />
●<br />
●<br />
●<br />
Press the MASTER FOLDER but<strong>to</strong>n.<br />
Introduce the floppy d<strong>is</strong>k, press DISK and then use the PAGE +/- but<strong>to</strong>ns <strong>to</strong> select Floppy.<br />
Use the VALUE +/- but<strong>to</strong>ns and, if there <strong>is</strong> a number of pages containing Midi files, the CURSOR +/- but<strong>to</strong>ns <strong>to</strong> select the files <strong>to</strong> copy.<br />
Press F10 Select <strong>to</strong> confirm. The symbol “” appears next <strong>to</strong> the names of the selected Midi files.<br />
Press F4 Copy.<br />
On the page that appears now, you may modify the name of the Midi file using the keys of the keyboard and pressing the CURSOR +/- but<strong>to</strong>ns.<br />
Before pressing the F10 Execute <strong>to</strong> confirm, change the target Folder in<strong>to</strong> “Songs To Demo & Hit” pressing the function key F3!<br />
COPYING MIDI FILES FROM A HARD DISK FOLDER INTO THE DEMO & HIT FOLDER<br />
●<br />
●<br />
●<br />
●<br />
●<br />
●<br />
●<br />
Enter the DISK menu by pressing the relevant but<strong>to</strong>n.<br />
Press F8 Folder <strong>to</strong> d<strong>is</strong>play the complete l<strong>is</strong>t of Folders on the Hard d<strong>is</strong>k.<br />
Select the Folder containing the Midi files <strong>to</strong> copy by entering its number on the numeric keypad (STYLES but<strong>to</strong>n), or by moving with the<br />
VALUE +/- but<strong>to</strong>ns. If Master Folder was activated while the file was copied from the floppy d<strong>is</strong>k <strong>to</strong> the hard d<strong>is</strong>k, the Midi files will be s<strong>to</strong>red<br />
in folder 91.<br />
Press F7 Copy after having selected the Folder.<br />
On the d<strong>is</strong>play the complete contents of the Folder appears. Use the VALUE +/-, CURSOR +/- and F10 Select but<strong>to</strong>ns <strong>to</strong> select the Midi file<br />
<strong>to</strong> copy.<br />
After having selected the Midi file, press F8 Target Folder <strong>to</strong> define the target folder. Use the VALUE +/- but<strong>to</strong>ns <strong>to</strong> select the Demo & Hit<br />
folder.<br />
Press F10 Exec. <strong>to</strong> start copying the Midi file. On the page that appears now you may modify the name of the Midi file using the keys of the<br />
keyboard and the CURSOR +/- but<strong>to</strong>ns. Press F10 Execute <strong>to</strong> confirm. Pressing F9 Copy All copies all Midi files without changing the name.<br />
USING DEMO & HIT<br />
After having copied all the required Midi files, pressing both the PIANIST and the STYLE SETTING but<strong>to</strong>ns at the same time activates the Demo<br />
& Hit function (the LEDs of the two but<strong>to</strong>ns stay OFF). On the d<strong>is</strong>play the names of the copied Midi files appear in chronological order, d<strong>is</strong>tributed<br />
on a number of pages you can call up pressing the PAGE +/- but<strong>to</strong>ns. The Midi files are associated with the relevant function but<strong>to</strong>ns.<br />
Pressing one of these, the relevant Midi file <strong>is</strong> immediately replayed without the need <strong>to</strong> press the START but<strong>to</strong>n. Pressing any other function<br />
but<strong>to</strong>n starts replaying the Midi file associated with th<strong>is</strong> but<strong>to</strong>n, and the previous one <strong>is</strong> interrupted.<br />
ORGANISING THE MIDI FILES IN DEMO & HIT<br />
You may delete Midi files or change their location on the Demo & Hit pages.<br />
Owner’s Manual <strong>SD1</strong> 111
Press START <strong>to</strong> s<strong>to</strong>p the Midi file that may be playing.<br />
Press the * (FOLK) but<strong>to</strong>n. The complete l<strong>is</strong>t of Midifile appears. Use the VALUE +/- and CURSOR +/- but<strong>to</strong>ns <strong>to</strong> scroll th<strong>is</strong> l<strong>is</strong>t.<br />
Select the Demo & Hit page <strong>to</strong> modify pressing the PAGE +/- but<strong>to</strong>ns or entering its number on the numeric keypad (STYLES but<strong>to</strong>ns). The number<br />
of the page <strong>is</strong> shown on the <strong>to</strong>p, <strong>to</strong> the right, on the d<strong>is</strong>play.<br />
Use the F1-F10 function but<strong>to</strong>ns <strong>to</strong> chose the location of the Midi file <strong>to</strong> modify. You may even select an empty location.<br />
Select the Midi file <strong>to</strong> replace from the l<strong>is</strong>t shown in the centre of the d<strong>is</strong>play.<br />
Press * (FOLK) <strong>to</strong> assign the selected Midi file <strong>to</strong> the location.<br />
If you w<strong>is</strong>h <strong>to</strong> delete a location, press both VALUE +/- but<strong>to</strong>ns at the same time.<br />
Press the SAVE/ENTER but<strong>to</strong>n <strong>to</strong> save the modifications. The page that appears now allows you <strong>to</strong> res<strong>to</strong>re the conditions previous <strong>to</strong> the modifications<br />
carried out by pressing F4 Undo, delete the s<strong>to</strong>rage operation without saving the modifications by pressing F5 Escape, save the settings<br />
on the hard d<strong>is</strong>k by pressing F8 D<strong>is</strong>k Save, res<strong>to</strong>re the Midi files sorting according <strong>to</strong> their numeric order pressing F9 Default, or save<br />
the modifications in the Flash memory by pressing F10 Save.<br />
112<br />
<strong>SD1</strong> Owner’s Manual
DISK<br />
The <strong>SD1</strong> <strong>is</strong> supplied standard with built-in 6 GB Hard D<strong>is</strong>k and a D<strong>is</strong>k drive for Floppy D<strong>is</strong>ks of 720 Kb (DD) or 1,4 MB (HD). The <strong>SD1</strong> uses the DOS<br />
format for the Floppy, therefore the same floppy d<strong>is</strong>k can be used <strong>to</strong> exchange files from PC or Mac. The direct connection <strong>to</strong> a PC on the back<br />
of the control panel <strong>is</strong> used <strong>to</strong> directly control the contents of the Hard D<strong>is</strong>k via PC, by means of an application developed by <strong>Ketron</strong>.<br />
HOW IT WORKS AND HOW THE FILES OF THE HARD DISK ARE MANAGED<br />
Likew<strong>is</strong>e for any computer Hard D<strong>is</strong>k, the <strong>SD1</strong> offers the possibility <strong>to</strong> create folders and <strong>to</strong> copy, rename and cancel compatible files. The <strong>SD1</strong><br />
works principally with direc<strong>to</strong>ries of files but can make the job easier thanks <strong>to</strong> the Master Folder concept.<br />
The Hard D<strong>is</strong>k can s<strong>to</strong>red up <strong>to</strong> a maximum of 99 Folder (or files) each of which may include any type of file for a maximum of 999 files. The<br />
files and the Folders are d<strong>is</strong>played in alphabetical order and they are attributed a progressive number according <strong>to</strong> the time order in which they<br />
are created, which will be required in some cases <strong>to</strong> load the file directly by entering the number using the numeric keypad (STYLES push but<strong>to</strong>ns)<br />
or <strong>to</strong> call-up a Folder.<br />
THE MASTER FOLDER CONCEPT<br />
The <strong>SD1</strong> makes it amazingly simple <strong>to</strong> find and save the files thanks <strong>to</strong> the Master Folder idea. It practically involves some Folders created by<br />
<strong>Ketron</strong> that are used as a reference when the MASTER FOLDER push but<strong>to</strong>n <strong>is</strong> enabled. In th<strong>is</strong> way you can save and load the files within the<br />
suitable folder au<strong>to</strong>matically without having <strong>to</strong> worry <strong>about</strong> choosing the right folder when saving and loading. For each operating environment<br />
the <strong>SD1</strong> will always know which <strong>is</strong> the right folder for that type of file being managed.<br />
The Folders created by <strong>Ketron</strong> for th<strong>is</strong> purpose are thus split-up and numbered:<br />
Name of the folder Type of file DOS Extension<br />
MIDIFILE (Folder 91) Standard Midi File .MID<br />
PROGRAM (Folder 92) Program .PRG<br />
Single Program<br />
.SPG<br />
REGISTRATION (Folder 93) Single Reg<strong>is</strong>tration .REG<br />
Block Reg<strong>is</strong>tration<br />
.SRG<br />
SOUND (Folder 94) Sound Bank .SND<br />
Single samples<br />
.WAV<br />
Multi-samples<br />
.MSP<br />
Instruments<br />
.INS<br />
STYLE (Folder 95) Pattern .PAT<br />
Cus<strong>to</strong>m Style<br />
.STY<br />
Block Style<br />
.BLK<br />
DEMO & HIT (Folder 96) Standard MIDI File .MID<br />
TEXTFILE (Folder 97) Text files .TXT<br />
Another Folder (USER Folder number 98) within Master Folder has been arranged for all files generated following the modification of the internal<br />
parameters of the <strong>SD1</strong>. The USER FILE Folder (Folder 98) gathers some files. Compared <strong>to</strong> what has been described so far, however, th<strong>is</strong><br />
d<strong>is</strong>tribution does not correspond <strong>to</strong> real Folders but it <strong>is</strong> supplied by the <strong>SD1</strong> just <strong>to</strong> make it easier <strong>to</strong> find the files.<br />
Category Type of file DOS Extension<br />
GLOBAL Global setting parameters of the Power Up Set-up menu .PON<br />
U. VOICE Banc of 128 User Voices created by the user .USV<br />
U. DRUMS Memory banc for the User Drum Kits .USD<br />
VOCAL SET Parameters for the Vocalizer .VOC<br />
REGISTRAT. Banc of 198 Reg<strong>is</strong>tration’s created by the user .REG<br />
or Single Reg<strong>is</strong>tration<br />
.SRG<br />
PROGRAM Banc of 128 Programs created by the user .PRG<br />
Owner’s Manual <strong>SD1</strong> 113
When you purchase the instrument the Hard D<strong>is</strong>k of the <strong>SD1</strong> bears some Folder which, in some cases, could be empty and are used as reference<br />
for the Master Folder: These folders are safeguarded and cannot be cancelled.<br />
HOW TO USE THE MASTER FOLDER<br />
You are maybe wondering whether it convenient <strong>to</strong> use the Master Folder or not. First and foremost, thanks <strong>to</strong> the reference folders, if you are<br />
not used <strong>to</strong> using and organizing a Hard D<strong>is</strong>k, if you exploit the Master Folder you will save a lot of time and it will be much easier then <strong>to</strong> find<br />
the files. Generally speaking there are three solutions used <strong>to</strong> put a number of files in a d<strong>is</strong>k, namely:<br />
- you can create some individual folders for each type of file (very similar <strong>to</strong> Master Folder)<br />
- you can create some folders relative <strong>to</strong> a project and add all the files, whatever the origin, that are useful for that job.<br />
- you can create groups of single folders that s<strong>to</strong>re just one type of tile but referred <strong>to</strong> a project.<br />
If on one hand these solutions are all just as valid, on the other some confusion could be created when looking for a specific file, especially with<br />
the last two work methods. Th<strong>is</strong> <strong>is</strong> why we believe that the Master Folder (a folder for each group of the same files) <strong>is</strong> the best for the musician<br />
who cannot waste time in saving and then looking for a file later. You can naturally proceed as you prefer, but remember with Master<br />
Folder you do not have <strong>to</strong> worry <strong>about</strong> having <strong>to</strong> select the destination folder for the file being saved, as th<strong>is</strong> <strong>is</strong> done by the <strong>SD1</strong>! Then consequently<br />
the DISK menu <strong>to</strong>o changes and <strong>is</strong> simplified when Master Folder <strong>is</strong> enabled.<br />
From an opposite view, namely that of loading a file, if you enable Master Folder you can quickly access the Folder required in a operating environment.<br />
If for example you are working in Song Play, when you access D<strong>is</strong>k you immediately call-up the Midi files folder.<br />
The <strong>SD1</strong> does not just not end here, as if you should load Midi file, a User Voice bank, an audio file, a TXT file and a Style for a song even with<br />
Master Folder enabled we would have <strong>to</strong> look for the single files and load them one at a time. <strong>SD1</strong> on the other hand has a special feature: the<br />
Reg<strong>is</strong>tration’s and the Midi files can call-up and load the files required <strong>to</strong> play au<strong>to</strong>matically, whether they be text or audio files. The procedure<br />
for these au<strong>to</strong>matic functions are described in the sections relative <strong>to</strong> Reg<strong>is</strong>tration, Song Play and Midi file, Text File, Audio File and RAM/FLASH<br />
GENERAL RULES<br />
● All the functions relative <strong>to</strong> the hard d<strong>is</strong>k and <strong>to</strong> the floppy d<strong>is</strong>k can be accessed by pressing the DISK push but<strong>to</strong>n.<br />
● To see if you are using the MASTER FOLDER function or otherw<strong>is</strong>e, look at the LED of the relative push but<strong>to</strong>n, which must be OFF<br />
● Press th<strong>is</strong> push but<strong>to</strong>n <strong>to</strong> use the Hard d<strong>is</strong>k: HARD (PAGE -)<br />
● Press th<strong>is</strong> push but<strong>to</strong>n <strong>to</strong> use the Floppy d<strong>is</strong>k: FLOPPY (PAGE +)<br />
● To exit from the D<strong>is</strong>k menus press the DISK or the EXIT push but<strong>to</strong>n.<br />
The D<strong>is</strong>k page shows the files or the folders according <strong>to</strong> the function selected in the middle of the d<strong>is</strong>play. Next <strong>to</strong> the type of d<strong>is</strong>k in use (Hard<br />
or Floppy) you will see the number and the name of the folder selected at the time between brackets. Underneath you will also see the number<br />
of elements whether they be files or folders. The d<strong>is</strong>play also shows the type of elements shown using the category div<strong>is</strong>ion given above.<br />
HOW TO MOVE AROUND BETWEEN THE FILES<br />
The files within a folder are <strong>to</strong> be managed as follows:<br />
●<br />
●<br />
●<br />
●<br />
●<br />
●<br />
●<br />
The files are put in alphabetical order in the middle of the d<strong>is</strong>play. To scroll the l<strong>is</strong>t of files use the VALUE +/- push but<strong>to</strong>ns.<br />
To select a file <strong>to</strong> load it in the memory, <strong>to</strong> copy it, cancel it or rename it pressing the F10 Select function push but<strong>to</strong>n.<br />
To select following pages of files, pointed out by arrows, press the CURSOR +/- push but<strong>to</strong>ns.<br />
To load a file after having selected it using F10 Select press the F2 Load function push but<strong>to</strong>n<br />
To copy a file selected from Hard D<strong>is</strong>k <strong>to</strong> Floppy and vice versa press the F4 Copy function push but<strong>to</strong>n.<br />
To cancel a file selected for good press the F6 Delete function push but<strong>to</strong>n.<br />
To rename a file selected press the F7 Rename function push but<strong>to</strong>n.<br />
HOW TO MOVE AROUND BETWEEN THE FOLDERS<br />
The <strong>SD1</strong> works in a different manner when Master Folder <strong>is</strong> enabled or d<strong>is</strong>abled. In the first case only the Folders connected <strong>to</strong> Master Folder<br />
can be selected by directly entering the number of the Folder, using the numeric keypad (STYLES push but<strong>to</strong>ns) or select the Folder using the<br />
F5 Folder Choice function. With Master Folder d<strong>is</strong>abled you cannot access the Folders used by Master Folder and the Folders are selected<br />
only by entering the relative number using the numeric keypad ( STYLES push but<strong>to</strong>ns).<br />
THE DISK FUNCTIONS FOR THE HARD DISK<br />
The <strong>SD1</strong> offers some functions used <strong>to</strong> simplify the loading procedure: It can show the whole contents of a single Folder, find just one type of<br />
file <strong>to</strong> be shown on the d<strong>is</strong>play when many different types of files are s<strong>to</strong>red, select one or a number of files <strong>to</strong> be loaded, <strong>to</strong>gether with the<br />
typical Load, Copy and Rename controls. The <strong>SD1</strong> cannot d<strong>is</strong>play the whole contents of the Hard D<strong>is</strong>k by grouping the files and Folders <strong>to</strong>gether<br />
but only the contents of one Folder at a time. Some functions vary depending on whether the Master Folder <strong>is</strong> enabled or otherw<strong>is</strong>e.<br />
Below are the functions available on the d<strong>is</strong>play:<br />
114<br />
<strong>SD1</strong> Owner’s Manual
F1 Dir (Master Folder enabled):<br />
Th<strong>is</strong> shows the possible div<strong>is</strong>ion of the Folder currently in use <strong>to</strong> make it easier <strong>to</strong> find the file, with the following order for single<br />
Folder:<br />
91 Midifile: F1 Global: Th<strong>is</strong> shows the whole contents of the Folder<br />
F2 Midifile: Th<strong>is</strong> shows just the Midi files with .MID extension.<br />
F3 Chain: Th<strong>is</strong> shows the Chain files for the chain linking of the Midi files.<br />
92 Program: F1 Global: Th<strong>is</strong> shows the whole contents of the Folder<br />
F2 Single Program: Th<strong>is</strong> shows just the Single Program files.<br />
93 Reg<strong>is</strong>tration: F1 Global: Th<strong>is</strong> shows the whole contents of the Folder.<br />
F2 Single Reg<strong>is</strong>tration: Th<strong>is</strong> shows just the files of Single Reg<strong>is</strong>tration.<br />
94 Sound: F1 Global: Th<strong>is</strong> shows the whole contents of the Folder.<br />
F2 Instrument: Th<strong>is</strong> shows just the Instrument files.<br />
F3 Wave: Th<strong>is</strong> shows just the .WAV files.<br />
F4 MSP: Th<strong>is</strong> shows just the multi-sample files.<br />
F5 Block: Th<strong>is</strong> shows just the Sound Block files.<br />
95 Style: F1 Global: Th<strong>is</strong> shows the whole contents of the Folder.<br />
F2 Pattern: Th<strong>is</strong> shows just the Pattern files.<br />
F3 Block: Th<strong>is</strong> d<strong>is</strong>plays just the files of the Block Styles groups.<br />
F4 Styles: Th<strong>is</strong> d<strong>is</strong>plays just the files of Cus<strong>to</strong>m Style parameters.<br />
96 Demo & Hit: F1 Global: Th<strong>is</strong> d<strong>is</strong>plays the whole contents of the Folder<br />
F2 Midifile: Th<strong>is</strong> d<strong>is</strong>plays just the Midi-files.<br />
97 Text: F1 Global: Th<strong>is</strong> d<strong>is</strong>plays the whole contents of the Folder<br />
F2 Text: Th<strong>is</strong> d<strong>is</strong>plays just the .TXT files.<br />
98 Userfile: F1 Global: Th<strong>is</strong> d<strong>is</strong>plays the whole contents of the Folder.<br />
F2 User Voice: Th<strong>is</strong> d<strong>is</strong>plays just the User Voice files.<br />
F3 User Drum: Th<strong>is</strong> d<strong>is</strong>plays just the User Drum set files.<br />
F4 Vocalset: Th<strong>is</strong> d<strong>is</strong>plays just the Vocal Set files.<br />
F5 Reg<strong>is</strong>tration: Th<strong>is</strong> d<strong>is</strong>plays just the Block Reg<strong>is</strong>tration files.<br />
F6 Program: Th<strong>is</strong> d<strong>is</strong>plays just the Block Program files.<br />
F1 Dir (Master Folder d<strong>is</strong>abled):<br />
Th<strong>is</strong> <strong>is</strong> used <strong>to</strong> show the whole contents of the Folder in use on the d<strong>is</strong>play, which ever type of file involved. When Global appears<br />
on the d<strong>is</strong>play it means that all the files are d<strong>is</strong>played.<br />
F2 Load:<br />
F3 Save:<br />
Th<strong>is</strong> <strong>is</strong> used <strong>to</strong> load the file found at the time in the appropriate memory if no file <strong>is</strong> selected using F10 Select. If on the other<br />
hand one or a number of files have already been selected using F10 Select, only those pointed out with the > symbol will be<br />
loaded. Another very handy possibility for the Folder with just a few files <strong>is</strong> that of selecting the whole contents by pressing<br />
the VALUE +/- push but<strong>to</strong>ns <strong>to</strong>gether at the same time.<br />
Th<strong>is</strong> calls up a page from which the type of file <strong>to</strong> be saved on the d<strong>is</strong>k selected can be chosen. Some of these options are not<br />
in use presently. It <strong>is</strong> also preferable <strong>to</strong> save the files when they are programmed via the Save options <strong>to</strong> avoid making m<strong>is</strong>takes<br />
in selecting them. All these files are saved always in the Folder currently selected. The options are the following:<br />
Owner’s Manual <strong>SD1</strong> 115
F1 Global: Th<strong>is</strong> returns <strong>to</strong> the previous page.<br />
F2 Program: Th<strong>is</strong> enables a page with the following options.<br />
F1 Program: Th<strong>is</strong> <strong>is</strong> used <strong>to</strong> select all the Programs in the memory. The files can then be re-named using the<br />
keyboard keys. The procedure <strong>is</strong> confirmed using F10 Exec or <strong>is</strong> cancelled using F5 Escape.<br />
F2 Single Program: Not in use.<br />
F3 Block Reg<strong>is</strong>tration: Th<strong>is</strong> enables the saving function in one file of all the Reg<strong>is</strong>tration’s in Flash RAM. The<br />
page called up <strong>is</strong> used <strong>to</strong> name the file using the keyboard keys. Confirm the procedure using F10 Exec or cancel<br />
it using F5 Escape.<br />
F4 Pattern: Not in use.<br />
F5 Midifile: Not in use.<br />
F6 Cus<strong>to</strong>m Styles: Th<strong>is</strong> saves just the settings of the Cus<strong>to</strong>m Style parameters in one file in Flash RAM and not<br />
the single tracks with the MIDI events. The page called up <strong>is</strong> used <strong>to</strong> name the file using the keyboard keys.<br />
Confirm the procedure using F10 Exec or cancel it using F5 Escape.<br />
F7 Sound Block: Th<strong>is</strong> <strong>is</strong> used <strong>to</strong> save audio files and the set-up’s of the Vocalizer loaded in RAM with the following<br />
options:<br />
F1 Sound: Not in use.<br />
F2 Wave: Th<strong>is</strong> saves the file in .WAV format, loaded in the RAM of the sampler and calls up a page that <strong>is</strong> used<br />
<strong>to</strong> re-name the audio file loaded using the keyboard keys. Confirm the procedure using F10 Exec or cancel it<br />
using F5 Escape.<br />
F3 MSP: Th<strong>is</strong> saves the multi-sample loaded in the RAM of the sampler and calls up a page that <strong>is</strong> used <strong>to</strong> rename<br />
the audio file loaded using the keyboard keys. Confirm the procedure using F10 Exec or cancel it using<br />
F5 Escape.<br />
F4 Intruments: Not in use.<br />
F5 Vocalize: Th<strong>is</strong> saves the Vocalizer set-up’s in one file and calls up a page that <strong>is</strong> used <strong>to</strong> re-name the audio<br />
file loaded using the keyboard keys. Confirm the procedure using F10 Exec or cancel it using F5 Escape.<br />
F8 Text: Not in use.<br />
F9 User Voice: Th<strong>is</strong> saves the whole User Voice bank in one file and calls up a page that <strong>is</strong> used <strong>to</strong> re-name<br />
the audio file loaded using the keyboard keys. Confirm the procedure using F10 Exec or cancel it using F5<br />
Escape.<br />
F10 User Drum: Th<strong>is</strong> saves the User Drum Sets and calls up a page that <strong>is</strong> used <strong>to</strong> re-name the audio file loaded<br />
using the keyboard keys. Confirm the procedure using F10 Exec or cancel it using F5 Escape.<br />
F3 Save, (Folder 91 Midifile, Master Folder enabled): if you are working in the Midi file Folder with Master Folder enabled, the F3 Save function<br />
becomes F3 Convert <strong>to</strong> au<strong>to</strong>matically convert a Midi file with . KAR extension in<strong>to</strong> another with .MID extension.<br />
F4 Copy:<br />
Th<strong>is</strong> <strong>is</strong> used <strong>to</strong> copy one or a number of files from Floppy D<strong>is</strong>k <strong>to</strong> Hard D<strong>is</strong>k and vice versa. The copy function works in a different<br />
manner based on whether Master Folder <strong>is</strong> enabled or otherw<strong>is</strong>e. When it <strong>is</strong> enabled the files are copied au<strong>to</strong>matically in<br />
the pre-establ<strong>is</strong>hed Folders and when Master Folder <strong>is</strong> d<strong>is</strong>abled you can define which <strong>is</strong> the destination folder amongst those<br />
that do not belong <strong>to</strong> Master Folder. Th<strong>is</strong> section describes the procedures used <strong>to</strong> copy from Floppy D<strong>is</strong>k <strong>to</strong> Hard D<strong>is</strong>k and vice<br />
versa. The copying procedure from one Folder <strong>to</strong> another <strong>is</strong> found in the F8 Folder section.<br />
COPYING FROM FLOPPY TO HARD DISK<br />
When copying from Floppy <strong>to</strong> Hard D<strong>is</strong>k you must first choose the destination Folder. If Master Folder <strong>is</strong> enabled, the files copied will be d<strong>is</strong>tributed<br />
in the appropriate Folders pre-arranged by <strong>Ketron</strong>. If Master Folder <strong>is</strong> d<strong>is</strong>abled before copying you must first establ<strong>is</strong>h which <strong>is</strong> the<br />
destination Folder using the following procedure:<br />
● Enable the DISK menu using the dedicated push but<strong>to</strong>n.<br />
● Choose the Hard D<strong>is</strong>k using the PAGE +/- push but<strong>to</strong>ns.<br />
● Using the numeric keypad (STYLES push but<strong>to</strong>ns) type-in the destination Folder. If you do not know the number associated with the Folder,<br />
press F8 Folder <strong>to</strong> d<strong>is</strong>play the l<strong>is</strong>t. From the page called up you can also create a <strong>new</strong> Folder using F1 New. The Folder selected <strong>is</strong> enhanced<br />
on the first line of the d<strong>is</strong>play.<br />
Once you have chosen the Folder, you can return <strong>to</strong> the Floppy D<strong>is</strong>k using the PAGE +/- push but<strong>to</strong>ns for the next steps.<br />
First of all, select the files <strong>to</strong> be copied using the following but<strong>to</strong>ns:<br />
●<br />
●<br />
●<br />
VALUE +/- <strong>to</strong> go from one file <strong>to</strong> the next within those d<strong>is</strong>played.<br />
CURSOR +/- <strong>to</strong> go <strong>to</strong> the next group of files, if ex<strong>is</strong>tent.<br />
F10 Select <strong>to</strong> confirm the files <strong>to</strong> be copied, next <strong>to</strong> which an arrow appears <strong>to</strong> confirm that the selection has taken place.<br />
Pressing both VALUE +/- but<strong>to</strong>ns at the same time selects all files present o the floppy d<strong>is</strong>k.<br />
If there are many files with different extensions on the floppy d<strong>is</strong>k, function F5 File Choice can become very useful: th<strong>is</strong> function opens a page<br />
where you may select, using the relevant function but<strong>to</strong>ns, the type of file <strong>to</strong> d<strong>is</strong>play among the different types present. Remember that you<br />
have <strong>to</strong> select Pattern and not Cus<strong>to</strong>m Styles <strong>to</strong> load a Style.<br />
Once you have selected the files <strong>to</strong> copy, press F3 Copy <strong>to</strong> start the operation. The page that appears now d<strong>is</strong>plays the original file (Copy…)<br />
and the final destination d<strong>is</strong>k (From… To…) and includes a number of options.<br />
116<br />
<strong>SD1</strong> Owner’s Manual
In the centre of the d<strong>is</strong>play the name of the first file selected appears. Th<strong>is</strong> can be modified using the keyboard keys and the CURSOR +/- but<strong>to</strong>ns.<br />
You may copy each single file confirming the copy operation each time by pressing F10 Execute. If you have not modified the name, the<br />
copied file will have the same name as the original one. At the end of the copy operation, the next file among those selected will appear.<br />
If a number of files has been selected, you may skip the current file and go <strong>to</strong> the next one pressing F8 Skip.<br />
Pressing F9 Copy All copies all the selected files which will maintain their original name.<br />
Pressing F9 Escape exits th<strong>is</strong> page at any time, even if just some of the selected files have been copied.<br />
While Midifiles are being copied and if Master Folder <strong>is</strong> enabled, pressing repeatedly the function key F3 switches the destination folder from<br />
the Midifile folder <strong>to</strong> the Demo & Hit folder.<br />
COPYING FROM HARD DISK TO FLOPPY<br />
Once you have inserted the Floppy D<strong>is</strong>k with sufficient free space in the D<strong>is</strong>k drive you must find the Folder from which the files are <strong>to</strong> be copied<br />
within the Hard D<strong>is</strong>k using the following procedure:<br />
Enable the D<strong>is</strong>k menu using the dedicated push but<strong>to</strong>n.<br />
If Master Folder <strong>is</strong> enabled you can select only the Folders relative <strong>to</strong> Master Folder, d<strong>is</strong>played using F5 Folder Choice<br />
If Master Folder <strong>is</strong> d<strong>is</strong>abled you can select any Folder, barring those relative <strong>to</strong> Master Folder.<br />
To select a Folder type-in its number using the numeric keypad (STYLES push but<strong>to</strong>ns).<br />
If you do not know the number associated with the Folder, press F8 Folder <strong>to</strong> d<strong>is</strong>play the l<strong>is</strong>t of all the Folders s<strong>to</strong>red in the Hard D<strong>is</strong>k, then choose that<br />
required using the numeric keypad and return <strong>to</strong> the previous page using F5 Escape.<br />
With Master Folder d<strong>is</strong>abled you can only select one type of file amongst those d<strong>is</strong>played using F5 File Choice and the relative function push but<strong>to</strong>ns.<br />
First of all, select the files <strong>to</strong> be copied using the following but<strong>to</strong>ns:<br />
●<br />
●<br />
●<br />
VALUE +/- <strong>to</strong> go from one file <strong>to</strong> the next within those d<strong>is</strong>played.<br />
CURSOR +/- <strong>to</strong> go <strong>to</strong> the next group of files, if ex<strong>is</strong>tent.<br />
F10 Select <strong>to</strong> confirm the files <strong>to</strong> be copied, next <strong>to</strong> which an arrow appears <strong>to</strong> confirm that the selection has taken place.<br />
Pressing both VALUE +/- but<strong>to</strong>ns at the same time selects all files contained in the folder.<br />
Once you have selected the files <strong>to</strong> copy, press F4 Copy <strong>to</strong> start the operation. The page that appears now d<strong>is</strong>plays the original file (Copy…)<br />
and the final destination d<strong>is</strong>k (From… To…) and includes a number of options.<br />
In the centre of the d<strong>is</strong>play the name of the first file selected appears. Th<strong>is</strong> can be modified using the keyboard keys and the CURSOR +/- but<strong>to</strong>ns.<br />
You may copy each single file confirming the copy operation each time by pressing F10 Execute. If you have not modified the name, the copied<br />
file will have the same name as the original one. At the end of the copy operation, the next file among those selected will appear.<br />
If a number of files has been selected, you may skip the current file and go <strong>to</strong> the next one pressing F8 Skip.<br />
Pressing F9 Copy All copies all the selected files which will maintain their original name.<br />
Pressing F9 Escape exits th<strong>is</strong> page at any time, even if just some of the selected files have been copied.<br />
F5 Folder Choice (Master Folder enabled): Th<strong>is</strong> <strong>is</strong> used <strong>to</strong> open one of the Folders correlated <strong>to</strong> Master Folder:<br />
F1 Midifile: Th<strong>is</strong> opens Folder 91 Midifile<br />
F2 Program: Th<strong>is</strong> opens Folder 92 Program<br />
F3 Reg<strong>is</strong>tration: Th<strong>is</strong> opens Folder 93 Reg<strong>is</strong>tration<br />
F4 Sound: Th<strong>is</strong> opens Folder 94 Sound<br />
F5 Style: Th<strong>is</strong> opens Folder 95 Style<br />
F6 Demo & Hit: Th<strong>is</strong> opens Folder 96 Demo & Hit<br />
F7 Textfile: Th<strong>is</strong> opens Folder 97 Textfile<br />
F8 Userfile: Th<strong>is</strong> opens Folder 98 Userfile<br />
F5 Files Choice (Master Folder d<strong>is</strong>abled): Th<strong>is</strong> <strong>is</strong> used <strong>to</strong> select the files according <strong>to</strong> the group <strong>to</strong> which they belong within the Folder currently<br />
in use. The options are the same as those indicated in F3 Save.<br />
F6 Delete:<br />
F7 Rename:<br />
F8 Folder:<br />
Th<strong>is</strong> cancels one or a number of files selected using F10 Select. Before completing the procedure the <strong>SD1</strong> d<strong>is</strong>plays a warning<br />
message with the following options:<br />
F5 Escape: Th<strong>is</strong> cancels the procedure.<br />
F10 Exec: Th<strong>is</strong> confirms the procedure.<br />
Th<strong>is</strong> <strong>is</strong> used <strong>to</strong> re-name the file selected or simply identified using the keyboard keys and the CURSOR +/- push but<strong>to</strong>ns. The<br />
following remain enabled:<br />
F5 Escape: Th<strong>is</strong> cancels the procedure.<br />
F10 Exec: Th<strong>is</strong> confirms the procedure.<br />
Th<strong>is</strong> <strong>is</strong> used <strong>to</strong> manage and organ<strong>is</strong>e the single Folders, selected by entering the relative number using the numeric keypad<br />
(STYLES push but<strong>to</strong>ns), calling up a page with the following options:<br />
F1 New: Th<strong>is</strong> <strong>is</strong> used <strong>to</strong> create a <strong>new</strong> Folder that will be identified with the number following the last Folder created and<br />
Owner’s Manual <strong>SD1</strong> 117
<strong>is</strong> used <strong>to</strong> enter the name using the keyboard keys and the CURSOR +/- push but<strong>to</strong>ns. Once the name has been entered,<br />
confirm the procedure using F10 Exec, or cancel it using F5 Escape.<br />
F2 Delete: Th<strong>is</strong> <strong>is</strong> used <strong>to</strong> cancel the Folder selected using the VALUE +/- push but<strong>to</strong>ns or by typing in the number and all<br />
the files within it. When you confirm the cancelling procedure a warning message will appear with the F5 Escape or F10<br />
Exec options. If you confirm using F10 Exec. A second message appears requesting further confirmation <strong>to</strong> cancel with<br />
F10 Exec, or <strong>to</strong> cancel the procedure using F5 Escape. The Folders relative <strong>to</strong> Master Folder cannot be cancelled.<br />
F3 Rename: Th<strong>is</strong> <strong>is</strong> used <strong>to</strong> re-name a Folder, selected using the VALUE +/- push but<strong>to</strong>ns or by typing in the number,<br />
writing the name using the keyboard keys and the CURSOR +/- push but<strong>to</strong>ns. Confirm the procedure using F10 Exec or<br />
cancel it using F5 Escape.<br />
F4 Lock: Th<strong>is</strong> protects the Folder from being Deleted or Re-named. To enable the lock function select the Folder using<br />
the VALUE +/- push but<strong>to</strong>ns or type in its number and then press F4 Lock. The symbol ® will appear next <strong>to</strong> the Folder.<br />
A number of Folders can be locked. To d<strong>is</strong>able the lock function, find the folder protected and then press F4 Lock again.<br />
SETTING THE PASSWORD FOR PROTECTED FOLDERS<br />
The Folder of the Hard D<strong>is</strong>k that have been protected with the F4 Lock function in the F8 Folder page of the D<strong>is</strong>k menu can be additionally<br />
protected by assigning a password that will be requested when d<strong>is</strong>abling the lock function. The password <strong>is</strong> modified in the following manner:<br />
● From the main page of the d<strong>is</strong>play press F3 Utility.<br />
● Press the PAGE +/- push but<strong>to</strong>ns <strong>to</strong> reach page 3/3.<br />
● Press F6 Password <strong>to</strong> access the dedicated menu.<br />
The options possible are the following:<br />
F1 Modify:<br />
F5 Escape:<br />
F6 Report:<br />
F7 Copy:<br />
F9 Utility:<br />
Th<strong>is</strong> <strong>is</strong> used <strong>to</strong> modify the password. When you purchase the instrument there <strong>is</strong> no password therefore its modification also<br />
corresponds with its creation. The modification command requests the entry of the old password, using the keyboard keys and<br />
the CURSOR +/- push but<strong>to</strong>ns and an initial confirmation command using F10 Confirm. The <strong>new</strong> name can then be entered and<br />
confirmed using F10 Confirm. F5 Escape <strong>is</strong> used <strong>to</strong> return <strong>to</strong> the main page of the menu. The F6 Flash function <strong>is</strong> reserved<br />
for future up-dates and must not be d<strong>is</strong>abled for any reason whatsoever unless under the strict superv<strong>is</strong>ion of experts.<br />
Th<strong>is</strong> <strong>is</strong> used <strong>to</strong> return <strong>to</strong> the previous page of the D<strong>is</strong>k menu.<br />
Th<strong>is</strong> creates a TXT file on Floppy D<strong>is</strong>k that shows the whole contents of the Folder currently selected, split-up per extension and<br />
in alphabetical order. The file can be read both from Mac and PC and can prove quite useful <strong>to</strong> have a l<strong>is</strong>t of files when there<br />
are many of files s<strong>to</strong>red.<br />
Th<strong>is</strong> <strong>is</strong> used <strong>to</strong> copy the file, selected using the VALUE +/-, CURSOR +/- and F10 Select push but<strong>to</strong>ns from the Folder currently<br />
selected and a Folder at choice within the Hard D<strong>is</strong>k. The options possible are the following:<br />
F5 Escape: Th<strong>is</strong> <strong>is</strong> used <strong>to</strong> return <strong>to</strong> the previous page of the D<strong>is</strong>k menu.<br />
F8 Target Folder: Th<strong>is</strong> d<strong>is</strong>plays the l<strong>is</strong>t of Folders in the middle of the d<strong>is</strong>play amongst which you can choose that<br />
desired using the VALUE +/- push but<strong>to</strong>ns.<br />
F10 Exec: Th<strong>is</strong> confirms that the file selected <strong>is</strong> <strong>to</strong> be copied in the chosen Folder using F8 Target Folder.<br />
The complete procedure entails the following steps:<br />
● Select the Folder in which the files <strong>to</strong> be copied are s<strong>to</strong>red.<br />
● Press F7 Copy.<br />
● Select one or a number of files <strong>to</strong> be copied using the VALUE +/-, CURSOR +/- and F10 Select push but<strong>to</strong>ns.<br />
● Press F8 Target Folder and find the destination Folder using the VALUE +/- push but<strong>to</strong>ns from the l<strong>is</strong>t that<br />
appears.<br />
● Confirm the procedure using F10 Exec, or cancel it using F5 Escape.<br />
● Press F10 Exec and a <strong>new</strong> page appears in which the file being copied can be re-named using the keyboard<br />
keys and the CURSOR +/- push but<strong>to</strong>ns. The options possible are the following:<br />
F5 Escape: Th<strong>is</strong> cancels the procedure and returns <strong>to</strong> the D<strong>is</strong>k menu.<br />
F8 Skip: Th<strong>is</strong> skips the copying procedure of the current file.<br />
F9 Copy All: Th<strong>is</strong> copies all the files without re-naming them.<br />
F10 Execute: Th<strong>is</strong> confirms that the single file <strong>is</strong> <strong>to</strong> be copied.<br />
118<br />
<strong>SD1</strong> Owner’s Manual
Th<strong>is</strong> <strong>is</strong> used <strong>to</strong> control some parameters such as the Tempo and the transposition of a Midi file, the formatting of the Hard D<strong>is</strong>k,<br />
the creation of chains of Midi files and the operational control of the Hard D<strong>is</strong>k. The options possible are the following:<br />
F1 Info: Th<strong>is</strong> d<strong>is</strong>plays the capacity of the Hard D<strong>is</strong>k, the space available, the number of the Folder and files s<strong>to</strong>red and<br />
the percentage of space available.<br />
F2 Tempo: Th<strong>is</strong> <strong>is</strong> used <strong>to</strong> modify the Tempo of a Midi file s<strong>to</strong>red in the Folder currently in use. With Master Folder d<strong>is</strong>abled,<br />
enter the number of the Folder in which the Midi files are s<strong>to</strong>red. With Master Folder enabled type-in 91 (Midi file<br />
Folder) using the numeric keypad (STYLES push but<strong>to</strong>ns). Once the Midi files are d<strong>is</strong>played, select that desired using<br />
the VALUE +/- and CURSOR +/- push but<strong>to</strong>ns, then press F10 Exec. A window appears where the difference in steps of<br />
1 can be entered compared <strong>to</strong> the original Tempo using the VALUE +/- push but<strong>to</strong>ns. Once the value has been entered,<br />
press F10 Exec that calls up a <strong>new</strong> window where the original name of the Midi file can be modified. When the modification<br />
has been completed, confirm the procedure using F10 Exec or press F5 Escape <strong>to</strong> skip saving it.<br />
F3 Transposer: Th<strong>is</strong> <strong>is</strong> used <strong>to</strong> define a negative or positive transposition value for the Midi file selected. With Master<br />
Folder d<strong>is</strong>abled, enter the number of the Folder in which the Midi files are s<strong>to</strong>red. With Master Folder enabled, typein<br />
91 (Midi file Folder) using the numeric keypad (STYLES push but<strong>to</strong>ns). Once the Midi files are d<strong>is</strong>played, select that<br />
desired using the VALUE +/- and CURSOR +/- push but<strong>to</strong>ns, then press F10 Exec. A window appears where you can<br />
define whether the transposition applied will be valid only for the Midi file (Song) or whether it will also apply <strong>to</strong> the<br />
keyboard transposition (Global). To select th<strong>is</strong> application mode, cyclically press the F9 function push but<strong>to</strong>n that<br />
shows the application mode and upon completion press F10 Exec <strong>to</strong> confirm or press F5 Escape <strong>to</strong> cancel the procedure.<br />
Once you have confirmed you can enter the transposition value <strong>to</strong> be applied <strong>to</strong> the Midi file, using the VALUE +/-<br />
push but<strong>to</strong>ns. Confirm again using F10 Exec that will call up the window in which the name can be modified. Confirm<br />
the transposition procedure using F10 Exec or abandon using F5 Escape.<br />
F4 Format: Th<strong>is</strong> <strong>is</strong> used <strong>to</strong> format the Hard D<strong>is</strong>k that can be done only by d<strong>is</strong>abling the default protection function using<br />
the F6 Lock Format push but<strong>to</strong>n. You will be requested <strong>to</strong> confirm using F10 Exec or <strong>to</strong> abandon using F5 Escape.<br />
Once the protection function has been d<strong>is</strong>abled you can format the Hard D<strong>is</strong>k by pressing F4 Format. You will be<br />
requested twice <strong>to</strong> confirm using F10 Exec. Press F5 Escape <strong>to</strong> cancel the procedure. The formatting lock function <strong>is</strong><br />
enabled each time the <strong>SD1</strong> <strong>is</strong> turned on <strong>to</strong> avoid irreversible m<strong>is</strong>takes. The formatting procedure cancels the whole contents<br />
of the Hard D<strong>is</strong>k.<br />
F5 Escape: Th<strong>is</strong> returns <strong>to</strong> the previous page of the D<strong>is</strong>k menu.<br />
F6 Lock Format: Th<strong>is</strong> locks the F4 Format function.<br />
F7 Chain Edit: Th<strong>is</strong> <strong>is</strong> used <strong>to</strong> create chains of Midi files, of no longer than 32 Midi files, <strong>to</strong> be reproduced one after the<br />
other without therefore having <strong>to</strong> call up each file individually. It only works for the Midi files s<strong>to</strong>red in the same Folder,<br />
which <strong>is</strong> called up as already explained for the F3 Transposer. Once F7 Chain Edit has been pressed the <strong>SD1</strong> d<strong>is</strong>plays<br />
the Midi files s<strong>to</strong>red in the Folder that can be selected using the VALUE +/- and CURSOR +/- push but<strong>to</strong>ns. The options<br />
available are the following:<br />
F5 Escape: Th<strong>is</strong> cancels the procedure<br />
F7 Save Chain: Th<strong>is</strong> creates a file with .CHN extension within the same Folder in which the Midi files relative <strong>to</strong><br />
the chain programmed are s<strong>to</strong>red.<br />
F8 Chain L<strong>is</strong>t: Th<strong>is</strong> d<strong>is</strong>play all the chains of Midi files already s<strong>to</strong>red within the Folder in use.<br />
F10 Select:<br />
Th<strong>is</strong> selects the Midi files <strong>to</strong> be added <strong>to</strong> the chain.<br />
The procedures required <strong>to</strong> create a chain of Midi files are the following:<br />
● Select the Folder in which the Midi files are s<strong>to</strong>red.<br />
● Press F7 Chain Edit.<br />
● Find the first Midi file of the chain using the VALUE +/- and CURSOR +/- push but<strong>to</strong>ns.<br />
● Select the Midi file using F10 Select, a number will appear next <strong>to</strong> the name that indicates the position within the chain.<br />
● Find and select the other Midi files that follow.<br />
● If you make a m<strong>is</strong>take, find the wrong Midi file and press F10 Select again. The Midi file will be removed from the chain<br />
and the following Midi files will move back by one place.<br />
● Save the chain using F7 Save Chain. From the page called up you can enter the name using the keyboard keys and the<br />
CURSOR push but<strong>to</strong>ns. Confirm using F10 Exec or cancel using F5 Escape<br />
USING A CHAIN OF MIDI FILES<br />
The chain thus created <strong>is</strong> loaded in Song Play using the Load function from the D<strong>is</strong>k menu or called up directly from the first page of Song<br />
Play, by entering the number associated with the file chain using the numeric keypad (STYLES push but<strong>to</strong>ns). Then if you go <strong>to</strong> Song Play, the<br />
title of the first Midi file will appear. There are three ways of moving along the chain, namely:<br />
● Let the Midi files come-in as they end normally and the <strong>SD1</strong> will load the next file and reproduce it without <strong>to</strong>uching a key.<br />
●<br />
●<br />
Without starting Song Play using the START push but<strong>to</strong>n, use the VALUE +/- push but<strong>to</strong>ns <strong>to</strong> select the Midi files of the chain.<br />
With Song Play running, <strong>to</strong> call up another Midi file, press the COUNT/PAUSE/RESTART push but<strong>to</strong>n and then use the VALUE +/- push but<strong>to</strong>ns.<br />
Once you have found the Midi file, press the COUNT/PAUSE/RESTART push but<strong>to</strong>n again <strong>to</strong> start Song Play again with the <strong>new</strong> Midi file.<br />
Whatever the case, if you s<strong>to</strong>p a Midi file using the START push but<strong>to</strong>n, Song Play will loose the data of the chain permanently and you will have<br />
<strong>to</strong> re-load them. The same applies <strong>to</strong> all Juke-Box controls, d<strong>is</strong>abled when a chain <strong>is</strong> in use. Just the words can be d<strong>is</strong>played.<br />
F9 D<strong>is</strong>k Control:<br />
Th<strong>is</strong> calls up a number of functions required <strong>to</strong> control the Hard D<strong>is</strong>k. The options available are the following:<br />
F1 Surface Control: Th<strong>is</strong> controls the Hard D<strong>is</strong>k surface and takes a few minutes <strong>to</strong> complete the procedure. If<br />
Owner’s Manual <strong>SD1</strong> 119
Fatal Error appears you must contact a <strong>Ketron</strong> service centre as the Hard D<strong>is</strong>k <strong>is</strong> seriously damaged. If the Hard D<strong>is</strong>k<br />
surface test detects no anomalies the d<strong>is</strong>play will return <strong>to</strong> the D<strong>is</strong>k Utility menu once the procedure has been completed.<br />
F2 ScanD<strong>is</strong>k: Th<strong>is</strong> controls the integrity of the Folders and the files. When the test ends press F10 Escape <strong>to</strong> return <strong>to</strong><br />
the previous page. If errors are found the <strong>SD1</strong> au<strong>to</strong>matically moves on<strong>to</strong> the Repair function.<br />
F3 Repair: Th<strong>is</strong> repairs errors found in damaged files. Press F10 Escape once th<strong>is</strong> procedure has been completed.<br />
F5 Escape: Th<strong>is</strong> returns <strong>to</strong> the previous page of the menu.<br />
F6 D<strong>is</strong>k Copy: Using a special cable you can connect a second Hard D<strong>is</strong>k <strong>to</strong> the standard one for back-up procedures.<br />
Contact <strong>Ketron</strong> for further information.<br />
F7 Standby: Th<strong>is</strong> <strong>is</strong> used <strong>to</strong> set the time in minutes, which can be selected by pressing function push but<strong>to</strong>n F7 repeatedly,<br />
after which the Hard D<strong>is</strong>k enters the stand-by status if it <strong>is</strong> not used. The Hard D<strong>is</strong>k <strong>is</strong> immediately available again<br />
as soon as some function that requires its use <strong>is</strong> accessed.<br />
THE DISK FUNCTIONS FOR THE FLOPPY DISK<br />
When using the Floppy D<strong>is</strong>k, the <strong>SD1</strong> offers the following functions:<br />
F1 Dir:<br />
F2 Load:<br />
F3 Save:<br />
F4 Copy:<br />
Th<strong>is</strong> d<strong>is</strong>plays all the files s<strong>to</strong>red in the Floppy D<strong>is</strong>k.<br />
Once a file has been selected using the VALUE +/- and F10 Select push but<strong>to</strong>ns you can load it in RAM. Files with .PAT extension<br />
are on the other hand copied within the Hard D<strong>is</strong>k in the Folder in use when Master Folder <strong>is</strong> d<strong>is</strong>abled or in the Midi file<br />
Folder Midifile if Master Folder <strong>is</strong> enabled.<br />
Th<strong>is</strong> calls up the page used <strong>to</strong> select the type of memory <strong>to</strong> be saved on Floppy. The options are the same as those described<br />
for F3 Save in the section called “The D<strong>is</strong>k functions for the Hard D<strong>is</strong>k”. Not all options are enabled.<br />
Th<strong>is</strong> <strong>is</strong> used <strong>to</strong> copy the file, selected using the VALUE +/- and F10 Select push but<strong>to</strong>ns, in the Folder in use or in the reference<br />
Folder with Master Folder enabled. In the case of Midi files, you can copy them in the Midi file Folder or in that of Demo & Hit,<br />
by using the F3 function push but<strong>to</strong>n. When copying you must also re-name the file and the Skip commando for single files<br />
and Copy All for all files. It works in the exact same manner as the F4 Copy function of the Hard D<strong>is</strong>k.<br />
F5 File Choice: When a number of files are s<strong>to</strong>red in Floppy d<strong>is</strong>k but with different extension, you can find only those desired by choosing the<br />
type of file <strong>to</strong> be d<strong>is</strong>played. The options are the exact same as those for the Hard D<strong>is</strong>k<br />
F6 Delete:<br />
F7 Rename:<br />
F9 Utility:<br />
F10 Select<br />
Th<strong>is</strong> cancels one or a number of files selected using the VALUE +/- and F10 Select push but<strong>to</strong>ns.<br />
Th<strong>is</strong> <strong>is</strong> used <strong>to</strong> re-name a file selected using the VALUE +/- push but<strong>to</strong>ns.<br />
Th<strong>is</strong> calls up a page with the following options:<br />
F1 Info: Th<strong>is</strong> d<strong>is</strong>plays the free space on Floppy and the number of files s<strong>to</strong>red.<br />
F4 Format: Th<strong>is</strong> formats the Floppy d<strong>is</strong>k inserted in MS DOS. To enable the procedure, d<strong>is</strong>able the lock function by<br />
pressing F6 Lock Format and confirm the warning message using F10 Exec. To cancel the procedure press F5 Escape.<br />
F5 Escape: Th<strong>is</strong> returns <strong>to</strong> the previous page of the menu.<br />
F6 Lock Format: When enabled it <strong>is</strong> impossible <strong>to</strong> format a Floppy from the <strong>SD1</strong><br />
F7 Chain Edit: Th<strong>is</strong> <strong>is</strong> used <strong>to</strong> create chains of Midi file, of no longer than 32 Midi files, <strong>to</strong> be reproduced one after the<br />
other. The procedures are the exact same as the F7 Chain Edit in the Utility page of the D<strong>is</strong>k menu for the Hard D<strong>is</strong>k<br />
(refer <strong>to</strong> the specific section)<br />
F8 Chain L<strong>is</strong>t: Th<strong>is</strong> d<strong>is</strong>plays only the chains of Midi files s<strong>to</strong>red in the Floppy D<strong>is</strong>k.<br />
F10 Exec. Th<strong>is</strong> <strong>is</strong> enabled only if the chains of Midi files are d<strong>is</strong>played and <strong>is</strong> used <strong>to</strong> create a l<strong>is</strong>t of the Midi files that<br />
make up the chain.<br />
Th<strong>is</strong> confirms the choice of a file, putting the symbol ♦ in front of the file.<br />
120<br />
<strong>SD1</strong> Owner’s Manual
Up-dating and Resetting the <strong>SD1</strong><br />
UP-DATING THE OPERATING SYSTEM<br />
Thanks <strong>to</strong> the use of a Flash RAM for the operating system the <strong>SD1</strong> can be constantly up-dated in time without having <strong>to</strong> contact service centres.<br />
Once the original files of the operating system have been obtained from <strong>Ketron</strong> (www.ketron.it), format a Floppy D<strong>is</strong>k of 1.4 MB’s, possibly<br />
on the <strong>SD1</strong> <strong>to</strong> ensure utmost compatibility and then copy the original files on Floppy D<strong>is</strong>k. For Mac users, the procedure <strong>is</strong> the same and no particular<br />
caution <strong>is</strong> required even in the case of Floppy D<strong>is</strong>k Drive USB.<br />
Once the operating system Floppy has thus been created, turn the <strong>SD1</strong> off and put it in the D<strong>is</strong>k Drive. Turn the <strong>SD1</strong> on and press the function<br />
push but<strong>to</strong>n F6 immediately. The <strong>SD1</strong> will acknowledge the operating system files and will consequently up-date the dedicated Flash ROM. When<br />
the procedure has been completed the <strong>SD1</strong> starts normally. When the <strong>SD1</strong> <strong>is</strong> turned on again there <strong>is</strong> no need <strong>to</strong> put the Floppy with the operating<br />
system in the d<strong>is</strong>k drive.<br />
RESETTING THE ORIGINAL CONDITIONS OF THE <strong>SD1</strong><br />
The Hard D<strong>is</strong>k <strong>is</strong> provided with all the files for resetting the original conditions of the <strong>SD1</strong>. When one of these files are loaded any modifications<br />
that have been made will au<strong>to</strong>matically be cancelled. To access the reset files, d<strong>is</strong>able MASTER FOLDER and type-in number 90 using the numeric<br />
keypad (STYLES push but<strong>to</strong>ns). Folder 90 Reload <strong>is</strong> not part of the Master Folder and <strong>is</strong> supplied by <strong>Ketron</strong> <strong>to</strong> reset the data and the files<br />
contained can be cancelled. To reset a certain group of memories, select the corresponding file using the VALUE +/- and F10 Select push but<strong>to</strong>ns<br />
and then press F2 Load. Below <strong>is</strong> the match between the singles files and the type of reset in Folder 90:<br />
<strong>SD1</strong>ALL00.RLD:<br />
<strong>SD1</strong>STY0.RLD:<br />
1TOUCH.TOU:<br />
FIRM0000.SND:<br />
<strong>SD1</strong>PRG00.PRG:<br />
<strong>SD1</strong>REG00.REG:<br />
<strong>SD1</strong>STYL.STY:<br />
<strong>SD1</strong>TAB00.RLD:<br />
<strong>SD1</strong>USD00.USD:<br />
<strong>SD1</strong>VOC00.VOC:<br />
<strong>SD1</strong>VOIOO.USV:<br />
Complete back-up of the instrument. It may be required <strong>to</strong> re-initialize the keyboard.<br />
All the original Flash Styles<br />
1 Touch memory<br />
The parameters of the internal Voices.<br />
Programs<br />
Reg<strong>is</strong>trations<br />
The parameters of all the Flash and Rom Styles.<br />
Overall reload for Programs, Reg<strong>is</strong>trations, User Voices, User Drums, 1Touch and Vocal Sets.<br />
User Drums<br />
Vocal Sets<br />
User Voices<br />
Folder 90 s<strong>to</strong>res some special files dedicated <strong>to</strong> resetting the Wave table which are of no interest <strong>to</strong> the final user therefore their use <strong>is</strong> not<br />
explained. Folder 98 s<strong>to</strong>res copies of the reset files for Programs, Reg<strong>is</strong>trations, User Voices, User Drum Sets and Vocal Sets.<br />
BONUS<br />
Folder 95 Styles, connected <strong>to</strong> Master Folder, <strong>is</strong> provided with some additional Styles that are not loaded in Flash RAM and can be loaded in RAM.<br />
These styles are the following:<br />
Dance1<br />
Dance2<br />
Dance3<br />
Dance4<br />
Dance5<br />
PopDown1<br />
PopDown2<br />
PopDown3<br />
PopDown4<br />
Beguine1Ms<br />
Beguine2Ms<br />
TangoMs<br />
PolkaMs<br />
WaltzMs<br />
MazurkaMs<br />
TarantellaMs<br />
PartyFox<br />
The Dance and PopDown Styles use <strong>new</strong> Loops s<strong>to</strong>red in HD in Folder 94 Sound, which are au<strong>to</strong>matically loaded in RAM as soon as the corresponding<br />
Styles are called up.<br />
Owner’s Manual <strong>SD1</strong> 121
Sequencer<br />
The internal sequencer of the instrument allows the user <strong>to</strong> create or modify midi sequences in a rapid and functional manner, being provided<br />
with advanced functions that are typical only <strong>to</strong> soph<strong>is</strong>ticated computer programs. Press the SEQUENCER but<strong>to</strong>n <strong>to</strong> access the main page. Note.<br />
All operations performed on the sequencer must always be saved on d<strong>is</strong>k (see LOAD/SAVE) before exiting the menu or turning the keyboard off.<br />
Otherw<strong>is</strong>e, the recorded data will be lost forever. When in the Sequencer mode, the first track out of the 16 available <strong>is</strong> selected. All the tracks<br />
are empty, including the MASTER TRACK. The various functions can be accessed from the main page.<br />
NAME:<br />
Use the Cursor but<strong>to</strong>ns <strong>to</strong> access th<strong>is</strong> box and give a <strong>new</strong> name <strong>to</strong> the sequence (“SEQUENCE” by default). Press the<br />
Save/Name but<strong>to</strong>n: an edit window will appear, bearing the current name of the sequence. Every letter that <strong>is</strong> highlighted<br />
by the blinking cursor can be changed by typing on the keyboard. Each key corresponds <strong>to</strong> a letter that <strong>is</strong> clearly<br />
marked in the serigraphy on the ketyboard. After each letter entry from the keyboard, the cursor au<strong>to</strong>matically moves<br />
forward by one letter (you may enter up <strong>to</strong> 8 letters). As an alternative <strong>to</strong> the keyboard, the Value-/+ but<strong>to</strong>ns may be<br />
used. In th<strong>is</strong> case the cursor will not move forward au<strong>to</strong>matically. If the Value-/+ but<strong>to</strong>ns are pressed <strong>to</strong>gether, all edited<br />
letters, starting from the current cursor position, will be cancelled. The Cursor but<strong>to</strong>ns can be used <strong>to</strong> move the<br />
cursor from one letter <strong>to</strong> another. Press F10 (Execute) <strong>to</strong> confirm the <strong>new</strong> name, press F5 (Escape) <strong>to</strong> cancel editing.<br />
TEMPO:<br />
TIME SIGNATURE:<br />
POSITION:<br />
TRACKS:<br />
CHAN:<br />
It <strong>is</strong> the speed, expressed in quarters per minute, with which the sequence will be played once it has been recorded. The<br />
tempo default value <strong>is</strong> the one of the last style selected. Use the Cursor but<strong>to</strong>ns <strong>to</strong> access the TEMPO box and change<br />
the tempo value by pressing the Value-/+ but<strong>to</strong>ns. When the recording starts, the tempo <strong>is</strong> memorized in the MASTER<br />
TRACK. During recording, use the Fast/Slow but<strong>to</strong>ns <strong>to</strong> reg<strong>is</strong>ter any tempo variations on the MASTER TRACK. Tempo<br />
events can be entered, modified and cancelled after recording, by using the MASTER TRACK menu functions as explained<br />
below.<br />
It <strong>is</strong> the bar <strong>musical</strong> div<strong>is</strong>ion. The default value <strong>is</strong> 4/4, i.e. each bar <strong>is</strong> divided in<strong>to</strong> four quarters. Use the Cursor but<strong>to</strong>ns<br />
<strong>to</strong> access the SIGN box and change the numera<strong>to</strong>r/denomina<strong>to</strong>r values by pressing the Value-/+ but<strong>to</strong>ns. When the<br />
recording starts, the SIGNATURE <strong>is</strong> memorized on the MASTER TRACK. As with tempo, the SIGNATURE can be entered,<br />
modified and cancelled by using the MASTER TRACK menu.<br />
It indicates the current position of the sequence. It <strong>is</strong> divided in<strong>to</strong> three areas that can be accessed by means of the<br />
Cursor but<strong>to</strong>ns or by pressing the F1 but<strong>to</strong>n in succession. The first value indicates the bars, the second value indicates<br />
the quarters, the third value indicates the steps making up one quarter. Each quarter <strong>is</strong> made up of 48 steps. Once<br />
the position has been selected, its default value [1 1 1] can be changed by pressing the Value -/+ but<strong>to</strong>ns. Pressing the<br />
Value -/+ but<strong>to</strong>ns <strong>to</strong>gether will reset the default value.<br />
The sequencer <strong>is</strong> divided in<strong>to</strong> sixteen tracks, plus one MASTER TRACK. Track names are given in the center of the page,<br />
preceded by a progressive number. Track default name <strong>is</strong> “TRACK_n”. Single track names can be changed by means of<br />
the OPTIONS menu described hereafter. Recording <strong>is</strong> performed on the highlighted track; therefore, the track on which<br />
one wants <strong>to</strong> record must be selected before recording <strong>begin</strong>s. Tracks are selected by pressing the Page but<strong>to</strong>ns. The<br />
d<strong>is</strong>play will show only the group of tracks from 01 <strong>to</strong> 08 or the group from 09 <strong>to</strong> 16. Therefore, every time you scroll the<br />
tracks, passing from track 08 <strong>to</strong> 09 by pressing Page> or from 09 <strong>to</strong> 08 by pressing Page
STAT:<br />
The [Stat] column shows the status for each track. Initially, the column <strong>is</strong> empty; th<strong>is</strong> means that nothing has been<br />
recorded. During recording, the d<strong>is</strong>play shows an arrow “>” indicating that each event will be recorded on the selected<br />
track. When the recording s<strong>to</strong>ps, if at least one event has been recorded, the d<strong>is</strong>play will show an “i” (initialized track).<br />
The initialization status <strong>is</strong> removed from the d<strong>is</strong>play only if the track <strong>is</strong> completely deleted. If a track <strong>is</strong> in the Mute<br />
mode, the Status <strong>is</strong> ‘*’ (although the track contains data, it <strong>is</strong> not played back). If a track <strong>is</strong> in the Solo mode, the Status<br />
<strong>is</strong> ‘s’ (during playback, only the Solo track plays).<br />
FREE:<br />
Th<strong>is</strong> indicates the percentage of memory available. (see DEFRAG function for memory optimization).<br />
SYNCSTART:<br />
It can be switched on/off by pressing the F6 function but<strong>to</strong>n. If SYNCSTART <strong>is</strong> [Off], the sequence (clock) starts moving<br />
forward as soon as the recording <strong>begin</strong>s, starting from the selected POSITION. If the first midi event falls in the PRE-<br />
COUNT phase (see OPTIONS function), th<strong>is</strong> will force the POSITION in<strong>to</strong> the selected value. Instead, if SYNCSTART <strong>is</strong> [On],<br />
the sequence starts moving forward only when the first event arrives. In th<strong>is</strong> case the PRECOUNT <strong>is</strong> switched off.<br />
Recording with the SYNCSTART switched on <strong>is</strong> very useful when you want <strong>to</strong> record an internal style on the sequencer.<br />
In th<strong>is</strong> case, recording <strong>begin</strong>s only after the style has been switched on (START but<strong>to</strong>ns, Fills but<strong>to</strong>ns, Key Start, etc.).<br />
RECORD:<br />
Recording <strong>is</strong> switched on/off by pressing the F2 but<strong>to</strong>n. There are two recording modes: Overdub and Replace, which<br />
can be selected from the OPTIONS menu.<br />
Overdub: At every recording (run), the recorded events are mixed temporally <strong>to</strong> the events recorded during the<br />
previous runs.<br />
Replace: The <strong>new</strong> recorded data replace the previous ones.<br />
HOW TO RECORD A SEQUENCE<br />
There are various ways of recording a sequence starting from an empty sequencer (no initialized track). How <strong>to</strong><br />
load sequences from d<strong>is</strong>ks (midi files) and how <strong>to</strong> use the editing functions for already-recorded sequences are<br />
<strong>to</strong>pics that will be d<strong>is</strong>cussed in specific paragraphs. Before describing the recording procedure, here <strong>is</strong> some<br />
general preliminary information <strong>about</strong> midi events and <strong>about</strong> how <strong>to</strong> deal with them (if you already have th<strong>is</strong><br />
information, you can skip th<strong>is</strong> sub-paragraph).<br />
Midi Events: The sequencer <strong>is</strong> capable of recording and playing back events in the midi format. Every midi event<br />
<strong>is</strong> represented by a small set of data. Each datum <strong>is</strong> normally called “byte” and contains coded “<strong>musical</strong>” information.<br />
For example, every note that <strong>is</strong> transmitted <strong>to</strong> the sequencer <strong>is</strong> coded in a set of three bytes, so that<br />
parameters such as timbre, volume, pan-pot, amount of reverb, expression, sustain, etc., are coded. In general,<br />
every midi event <strong>is</strong> made up of 2 or 3 bytes; the first one indicates the type of event and <strong>is</strong> called STATUS, while<br />
the other bytes are data and have different meanings depending on the STATUS.<br />
STATUS Dati 1st 2nd<br />
NOTE ON/OFF 2 bytes Note, Velocity<br />
CONTROL CHANGE 2 bytes Type, Value<br />
PROGRAM CHANGE 1 byte Program (timbre)<br />
PITCH BEND 2 bytes Pitch value<br />
AFTERTOUCH 1 byte Key pressure value<br />
SYSTEM MESSAGES or EXCLUSIVE MESSAGES are particularly important; they are made up of a greater and variable<br />
number of data. They contain information (type of effect, lyrics, sound parameters, etc.) in a format that <strong>is</strong><br />
typical <strong>to</strong> the instrument. System messages will be described in the MASTER TRACK paragraph.<br />
MIDI CHANNEL: Every Note, Control, Program, Pitch bend, After<strong>to</strong>uch event <strong>is</strong> associated with information <strong>about</strong><br />
the midi channel <strong>to</strong> which the event <strong>is</strong> directed. There are 16 midi channels and, thanks <strong>to</strong> channeling feature,<br />
16 different instruments can be made <strong>to</strong> play separately. Example. One normally says “The piano <strong>is</strong> playing on<br />
channel 1”. Th<strong>is</strong> means that the change program relating <strong>to</strong> a piano timbre has been sent on channel 1; therefore,<br />
all the notes sent on channel 1 will be played with the piano timbre and they will take up the controls (volume,<br />
reverb, etc.) that were previously set for that specific channel. System messages (for example, exclusive<br />
systems) are not associated with a midi channel; in the sequencer, they are memorized only on the MASTER<br />
TRACK. In the NOTE events, the first of the two data bytes contains the note that was played, while the second<br />
one contains information <strong>about</strong> the speed with which the key generating the note was pressed. The speed value<br />
will determine the <strong>musical</strong> timbral response of the instrument; for example, many timbres will play at a higher<br />
or lower volume depending on the speed of the note. In the CONTROL events, the first byte indicates the type<br />
of control, for example, 7 for Volume, 10 for pan-pot, while the second byte normally expresses the amount of<br />
control. A number of controls and related codes are given below (see midi implementation in the Instructions<br />
Handbook for a more detailed l<strong>is</strong>t).<br />
Owner’s Manual <strong>SD1</strong> 123
Sound Bank 0<br />
Sounds Desk 0<br />
Modulation Wheel 1<br />
Vocal Glide Tempo 5<br />
Volume 7<br />
Pan-pot 10<br />
Expression Pedal 11<br />
Sustain on/off Pedal 64<br />
Vocal Glide/off 65<br />
Reverb 91<br />
Amount of Effects 93<br />
NRPN LSB 98<br />
NRPN MSB 99<br />
RPN LSB 100<br />
RPN MSB 101<br />
DATA ENTRY RPN/NRPN 6<br />
RPN(Reg<strong>is</strong>tered Parameter Numbers), NRPN (Non-Reg<strong>is</strong>tered Parameter Numbers), are special controls that are<br />
used <strong>to</strong> change sound parameters such as, for example, <strong>musical</strong> entry, release, filter, timbral resonance. Some<br />
NRPN are used <strong>to</strong> change volume, pan, reverb, chorus, pitch of every single percussion instrument, e.g. drum,<br />
roll, etc. for drum sets. In general, th<strong>is</strong> type of control <strong>is</strong> divided in<strong>to</strong> three events.<br />
RPN/NRPN MSB (Most significant byte).<br />
RPN/NRPN LSB (Least significant byte).<br />
RPN/NRPN DATA ENTRY (data) (see midi implementation in the Instructions Handbook for more details).<br />
Every event that <strong>is</strong> recorded by the sequencer <strong>is</strong> associated with the temporal position in which the event was<br />
“seized” (see EDIT menu), represented in bars, bar quarters, steps per quarter. Notes are also associated with<br />
their duration, which <strong>is</strong> given by the difference in the amount of time elapsing between the On note (depressed<br />
key) and the Off note (released key).<br />
Recording: Once recording <strong>is</strong> switched on by pressing the F2 but<strong>to</strong>n, every midi event <strong>is</strong> recorded on the selected<br />
track, regardless of the event output channel. Thus, events coming from any channel can be recorded on<br />
one single track (therefore, do not confuse track with midi channel). For example, if a style <strong>is</strong> recorded on track<br />
01, when track 01 <strong>is</strong> played back, all the parts of the style will play because each one of them <strong>is</strong> associated with<br />
a midi channel (see MIDI FILTER function). To select only one or some parts of a style, the midi-in channel of<br />
those parts that are not <strong>to</strong> be recorded must be “shut” (see MIDI FILTER function). If a style <strong>is</strong> recorded internally<br />
or by using the midi plug In 2 (Keyb), the channels are the ones set in the MIDI Channel Tx menu (see<br />
Instructions Handbook). Instead, if recording <strong>is</strong> made from the midi 1 (GM), the channels are those set in the<br />
General Midi Chan Rx menu(see Instructions Handbook).<br />
Summarizing, in order <strong>to</strong> record a track:<br />
● From the MIDI FILTER menu, close the in-coming channels that you do not want <strong>to</strong> record.<br />
● Use Page or Cursor but<strong>to</strong>ns <strong>to</strong> select the track you want <strong>to</strong> record.<br />
● Set the channel of the track you want <strong>to</strong> record on All, so that you can playback what you recorded.<br />
● Select the recording mode Overdub/Replace as already described.<br />
● Set SYNCSTART on On or Off as already described.<br />
● Determine the initial recording position.<br />
● Press F2 <strong>to</strong> start recording.<br />
● At th<strong>is</strong> point, you may start playing: every midi event will be recorded.<br />
● Press F2 again <strong>to</strong> s<strong>to</strong>p recording.<br />
How <strong>to</strong> play back recorded tracks:<br />
It <strong>is</strong> possible <strong>to</strong> playback during recording whatever was previously recorded. If, instead you simply want <strong>to</strong> play<br />
back, you need <strong>to</strong> press the Seq. Play (Save/Enter) but<strong>to</strong>n. Playback will start from the set POSITION. Note. The<br />
POSITION can be brought back rapidly <strong>to</strong> [1 1 1] by pressing the Value -/+ but<strong>to</strong>ns <strong>to</strong>gether, even without selecting<br />
the box. In order <strong>to</strong> playback the track on a channel that <strong>is</strong> different from the recorded one, you will have<br />
<strong>to</strong> work on the column [Chan.] that <strong>is</strong> <strong>to</strong> the right of the recorded track. Be careful, though, because if several<br />
midi channels were recorded and you enter values that are different from All, all the events will play on the<br />
same playback channel, thus generating unwanted effects.<br />
MUTE:<br />
It switches off the selected track. After selecting a track, it <strong>is</strong> switched off (no event <strong>is</strong> reproduced) by pressing<br />
F9 (MUTE); pressing F9 once more will switch it on again.<br />
SOLO:<br />
Allows you <strong>to</strong> switch off all tracks except the one in Solo. After selecting a track, it <strong>is</strong> put in solo by pressing F10<br />
(SOLO); pressing F10 again will remove the solo.<br />
NOTE. Only one track at a time can be in solo.<br />
124<br />
<strong>SD1</strong> Owner’s Manual
SEQUENCE QUANTIZATION<br />
Quantization means changing the position of the recorded events so that the selected <strong>musical</strong> div<strong>is</strong>ion can be followed exactly, thus eliminating<br />
small performance imperfections.<br />
QUANTIZE:<br />
Enter the QUANTIZE menu by pressing the F3 but<strong>to</strong>n.<br />
The track that <strong>is</strong> selected in that prec<strong>is</strong>e moment or part of it can be quantized.<br />
The name of the track chosen for quantization and the loca<strong>to</strong>rs indicating the FROM: position (where quantization<br />
will start from) and TO: position (where quantization will end) will appear in the center of the page.<br />
Use the Cursor but<strong>to</strong>ns <strong>to</strong> select the loca<strong>to</strong>r and the Value -/+ but<strong>to</strong>ns <strong>to</strong> change its position.<br />
The loca<strong>to</strong>rs are represented by the usual three numbers indicating bar, bar quarter and step.<br />
In order <strong>to</strong> quantize a track, proceed as follows:<br />
●<br />
●<br />
Use F1(NOTE), F2(CONTROL), F3(PROGRAM CHANGE), F4(ALL) <strong>to</strong> select the type of event you want <strong>to</strong> quantize.<br />
If you press F4(ALL), all the events will be quantized and, therefore, the NOTE, CONTROL and PROGRAM CHAN-<br />
GE events will au<strong>to</strong>matically be deselected. Pressing F1 or F2 or F3 will au<strong>to</strong>matically deselect ALL if the latter<br />
had been previously selected. By default, quantization <strong>is</strong> performed only on notes (most commonly used<br />
condition).<br />
Pressing F6 repeatedly <strong>to</strong> select the desired quantization value. The following values are available:<br />
real no quantization<br />
64T 1/96 of a bar (triplet)<br />
64 1/64 of a bar<br />
32T 1/48 of a bar (triplet)<br />
32 1/32 of a bar<br />
16T 1/24 of a bar (triplet)<br />
16 1/16 of a bar<br />
8T 1/12 of a bar (triplet)<br />
8 1/8 of a bar<br />
4T 1/6 of a bar<br />
4 1/4 of a bar<br />
2 1/2 bar<br />
1 1 bar<br />
●<br />
●<br />
Use F7(LAST RECORD), F8(PART), F9(ALL TRACK) <strong>to</strong> select the part of the track that will be quantized.<br />
LAST RECORD: The last recording <strong>is</strong> quantized; the loca<strong>to</strong>rs are au<strong>to</strong>matically set on the positions of the<br />
last recording.<br />
PART:Any part of the track. Th<strong>is</strong> condition <strong>is</strong> au<strong>to</strong>matically highlighted when a loca<strong>to</strong>r <strong>is</strong> changed.<br />
ALL TRACK: The whole track. By pressing F9, the loca<strong>to</strong>rs are positioned at the <strong>begin</strong>ning and at the end of<br />
the track respectively. “Beginning” <strong>is</strong> the position of the first event, “end” <strong>is</strong> the position of the last event.<br />
Press F10(Execute) <strong>to</strong> perform the operation. If the result of th<strong>is</strong> operation <strong>is</strong> unsat<strong>is</strong>fac<strong>to</strong>ry, you can use a<br />
different quantization value and repeat the operation.<br />
EDITING SINGLE EVENTS (EDIT FUNCTION)<br />
EDIT:<br />
Th<strong>is</strong> function allows you <strong>to</strong> edit every event that has been recorded on the selected track. Access the first page<br />
of the EDIT menu by pressing the F5 but<strong>to</strong>n. The menu <strong>is</strong> divided in<strong>to</strong> two pages. For both pages, the midi events<br />
with their temporal position are centered on the d<strong>is</strong>play. Let us have a detailed look at the fields relating <strong>to</strong> the<br />
events that are centered on the d<strong>is</strong>play.<br />
Owner’s Manual <strong>SD1</strong> 125
Position: The Position column gives you the temporal position of the event in bars, quarters, steps. Every<br />
quarter <strong>is</strong> divided in<strong>to</strong> 48 steps.<br />
Length: It indicates the length of the note events alone; the field <strong>is</strong> blank for the other events. E.g. Length<br />
1 2 0 indicates a note lasting 1 bar + 2 quarters; Length 0 3 24 indicates a note lasting _ plus 24 steps.<br />
1st: The meaning of th<strong>is</strong> parameter changes according <strong>to</strong> the midi event that <strong>is</strong> represented. The range of<br />
values for th<strong>is</strong> field <strong>is</strong> 0-127. In the case of NOTES, it indicates the note that was played. E.g. C_4, G_3. In the<br />
case of control, it indicates the type of control – as shown in the table below, where the most commonly<br />
used controls are given (see midi implementation in the Instructions Handbook for a more detailed l<strong>is</strong>t).<br />
1st = 0 Bank (sound bank selection marked “Bank” on the d<strong>is</strong>play).<br />
1 Modulation (modulation wheel marked “Modul” on the d<strong>is</strong>play).<br />
5 Portamen<strong>to</strong> Time<br />
6 Data Entry (contains RPN and NRPN controls data and <strong>is</strong> marked “DtaEn” on the d<strong>is</strong>play).<br />
7 Volume (marked “Vol.” on the d<strong>is</strong>play).<br />
10 Pan-Pot (marked “Pan” on the d<strong>is</strong>play).<br />
11 Expression (expression pedal marked “Expr.” on the d<strong>is</strong>play).<br />
64 Sustain (marked “Sust.” on the d<strong>is</strong>play).<br />
65 Portamen<strong>to</strong> on/off (marked "Port." on the d<strong>is</strong>play).<br />
66 Sustain pedal on/off (marked "Sost." on the d<strong>is</strong>play).<br />
67 Soft pedal on/off (marked "Soft" on the d<strong>is</strong>play).<br />
84 Wha-wha on/off.<br />
85 Wha-wha amount.<br />
91 Reverb amount (marked “Rev.” on the d<strong>is</strong>play).<br />
93 Effects amount (marked “Cho.” on the d<strong>is</strong>play).<br />
98 Byte LSB (significant menu) NRPN (marked "NrpnL").<br />
99 Byte MSB (most significant) NRPN (marked "NrpnM").<br />
100 Byte LSB RPN (marked "RpnL").<br />
101 Byte MSB RPN (marked "RpnM").<br />
121 Reset all controllers (sets main controls at default value and <strong>is</strong> marked “RstCn” on the d<strong>is</strong>play).<br />
123 All notes Off (reset played notes marked “Allof” on the d<strong>is</strong>play).<br />
In the case of PROGRAM, it indicates the timbre (see l<strong>is</strong>t of voices in the Instructions Handbook).<br />
if Bank = 0 (first sound bank)<br />
Program = 0 Piano<br />
1 Rock Piano<br />
2 Upright<br />
3 Honky Tonk<br />
" "<br />
16 Leslies<br />
17 Jazz Organ<br />
" "<br />
Bank = 1 (second sound bank)<br />
Program = 0 Concert<br />
1 Digipiano<br />
2 House Piano<br />
3 Stage Piano<br />
" "<br />
16 Ro<strong>to</strong>r B3<br />
17 Pop Organ<br />
" "<br />
126<br />
<strong>SD1</strong> Owner’s Manual
Bank = 2 (user voices bank)<br />
Program = 0 timbre user 1 will play<br />
1 timbre user 2 will play<br />
" "<br />
Bank = 3 (card bank) the flash card timbres will play<br />
Bank = 4 (groove bank) the grooves will play<br />
Bank = 5 (drawbars bank) the drawbars will play<br />
Bank = 6 (ram bank) the ram timbres will play<br />
Bank = 7 (msp bank) the msp timbres will play (selected through sampling)<br />
In the case of PITCH BEND (or WHEEL) both 1st and 2nd indicate the pitch value of the bend wheel.<br />
2nd: The meaning of th<strong>is</strong> parameter, <strong>to</strong>o, <strong>is</strong> different according <strong>to</strong> the type of event that <strong>is</strong> represented. The<br />
range of values of th<strong>is</strong> field <strong>is</strong> 0-127. In the case of note events, the parameter indicates the speed at which the<br />
note was played. In the case of control events, it indicates the amount of such control; for example, the amount<br />
of volume (7), reverb (91), chorus (93), expression (11), etc. For the pan-pot (10), value 64 means that the pan <strong>is</strong><br />
centered, while for smaller values the pan <strong>is</strong> moved <strong>to</strong> the left and for greater values it <strong>is</strong> moved <strong>to</strong> the right.<br />
For the sustain (64), portamen<strong>to</strong> (65), wha-wha (84), soft (67), sustained (66), value 0 means that the effect <strong>is</strong><br />
Off while value 127 indicates that it <strong>is</strong> On.<br />
Event: It indicates the type of Note, Control, Program, Pitch Bend, After<strong>to</strong>uch event (there are no exclusive messages<br />
since they are recorded only on the MASTER TRACK).<br />
Channel: It <strong>is</strong> the midi channel where the event was recorded.<br />
FUNCTIONS AVAILABLE IN THE EDIT PAGES<br />
EDIT (PAGE ONE)<br />
EDIT Position: The F1 and Value -/+ but<strong>to</strong>ns can be used <strong>to</strong> change the position of the sequence and the d<strong>is</strong>play will be updated accordingly.<br />
Use the Cursor but<strong>to</strong>ns <strong>to</strong> scroll events. If OPTIONS <strong>is</strong> set on On STEP TRACE in the menu, use the Cursor but<strong>to</strong>ns <strong>to</strong> l<strong>is</strong>ten <strong>to</strong><br />
the notes played. Th<strong>is</strong> function <strong>is</strong> useful <strong>to</strong> trace parts of the sequence.<br />
EDIT View: It allows you <strong>to</strong> select only certain types of events. Pressing F2 repeatedly will allow you <strong>to</strong> select in succession: ALL -> NOTE -><br />
CONTROL -> PROGRAM CHANGE. The d<strong>is</strong>play will be updated accordingly.<br />
EDIT Modify:<br />
EDIT Insert:<br />
EDIT Delete:<br />
It allows you <strong>to</strong> change the selected sequence. Press the F6 but<strong>to</strong>n <strong>to</strong> access an edit window; use the Cursor but<strong>to</strong>ns <strong>to</strong> move<br />
around the various fields of the event that you want <strong>to</strong> change; use the Value -/+ but<strong>to</strong>ns <strong>to</strong> change the selected field. Press<br />
F10 (Execute) <strong>to</strong> confirm the operation or F5 (Escape) <strong>to</strong> cancel it. If, for example, you want <strong>to</strong> change the timbre, select the<br />
event marked Progr in the Event field; press F6 (MODIFY), use the Cursor but<strong>to</strong>ns <strong>to</strong> access the related box on field 1st; use<br />
the Value -/+ but<strong>to</strong>ns <strong>to</strong> select the <strong>new</strong> timbre, press F10 (Execute). For example, if you want <strong>to</strong> move a note, simply replace its<br />
Position field with the <strong>new</strong> position.<br />
Th<strong>is</strong> function allows you <strong>to</strong> insert a single event in any position. Press the F3 (INSERT) but<strong>to</strong>n <strong>to</strong> access an editing window. The<br />
Event field <strong>is</strong> selected by default. Use the Value but<strong>to</strong>ns <strong>to</strong> select the event type you want <strong>to</strong> insert. Use the Cursor but<strong>to</strong>ns<br />
<strong>to</strong> move around the various event fields <strong>to</strong> edit parameters. Press F10 <strong>to</strong> confirm the operation, or F5 <strong>to</strong> cancel it.<br />
Th<strong>is</strong> function deletes a single event; press F4 (DELETE) <strong>to</strong> open the window (non editable) containing the selected event. If you<br />
confirm by pressing F10, the event will be deleted. Press F5 <strong>to</strong> cancel the operation and the event will not be deleted.<br />
EDIT (SECONDA PAGINA):<br />
Press Page > <strong>to</strong> access the second edit page. Two important functions can be accessed from the second page; FADER and LOGICAL.<br />
EDIT FADER:<br />
Th<strong>is</strong> function allows you <strong>to</strong> insert controls continuously so that you can give expression <strong>to</strong> the sequence. Th<strong>is</strong> function <strong>is</strong> useful<br />
if, for example: You want <strong>to</strong> obtain a crescendo or fade an orchestra instrument. You want <strong>to</strong> move the Pan-pot continuously<br />
Left-center-Right <strong>to</strong> simulate movement. You want <strong>to</strong> change the filter of an instrument gradually (Cut-Off) in order <strong>to</strong> obtain,<br />
for e.g., effects such as Wha-Wha.<br />
Let us make an example so that the use of th<strong>is</strong> function becomes clearer: Say you want <strong>to</strong> obtain a volume crescendo from 1 <strong>to</strong><br />
96 and then a decrescendo from 96 <strong>to</strong> 20. Let us suppose that the crescendo should go from bar 31 <strong>to</strong> bar 33; the decrescendo<br />
from bar 33 <strong>to</strong> bar 36. Use the Cursor but<strong>to</strong>ns <strong>to</strong> access the various function fields.<br />
Owner’s Manual <strong>SD1</strong> 127
a) Use the Value -/+ but<strong>to</strong>ns <strong>to</strong> select “VOLUME” from the EVENT box.<br />
b) the three position boxes (1st POSIT, 2nd POSIT, 3rd POSIT) enter the following settings:<br />
1 st Position [31 1 1]. Crescendo start position<br />
2 nd Position [33 1 1]. Decrescendo start position (in th<strong>is</strong> position the volume reaches its maximum value)<br />
3 rd Position [36 1 1]. Fading end position.<br />
c) In the three Value boxes (1st VALUE, 2nd VALUE, 3rd VALUE) enter the following settings:<br />
1 st VALUE: 1. Crescendo start volume value.<br />
2 nd VALUE: 96. Crescendo end and decrescendo start volume value.<br />
3 rd VALUE: 20. Decrescendo end value.<br />
Note. If you want <strong>to</strong> perform only one crescendo or decrescendo, press the Value -/+ but<strong>to</strong>ns <strong>to</strong>gether and set the 3rd VALUE<br />
field on Off. Interposed arrows between the VALUE fields indicate whether you are performing a crescendo or a decrescendo.<br />
a) In the STEP box, select the number of steps for which each volume crescendo or decrescendo <strong>is</strong> <strong>to</strong> take place. Use the Value<br />
-/+ but<strong>to</strong>ns <strong>to</strong> change the value. In the REPEAT box, select the number of bars for which the entire FADER cycle <strong>is</strong> <strong>to</strong> be repeated.<br />
If, for example, you use the Value -/+ but<strong>to</strong>ns <strong>to</strong> enter value 2, the volume crescendo and decrescendo will take place for<br />
two consecutive bars.<br />
b) Press F10(Execute) <strong>to</strong> confirm the operation. Press F5(Escape) <strong>to</strong> return <strong>to</strong> the EDIT page EDIT.<br />
EDIT Logical:<br />
COND:<br />
STATUS:<br />
COND:<br />
press F4 <strong>to</strong> access the LOGICAL function. Th<strong>is</strong> <strong>is</strong> a quite complicated but powerful function. It allows you <strong>to</strong> edit in a complete<br />
manner groups of events of the running track. Let us start by describing the various fields making up the page (use the Cursor<br />
but<strong>to</strong>ns <strong>to</strong> access them).<br />
condition relating <strong>to</strong> the operational range (<strong>to</strong>p left-hand side of the d<strong>is</strong>play). It selects the temporal interval that will be affected<br />
by the edit function. If you select All with the Value -/+ but<strong>to</strong>ns, the changes will applied <strong>to</strong> the entire track. If you select<br />
Equal, only the events with position v<strong>is</strong>ualized in RANGE OP (operational interval) will be affected. The position can be changed<br />
by using the Cursor but<strong>to</strong>ns <strong>to</strong> select the desired box and then pressing the Value -/+ but<strong>to</strong>ns accordingly.<br />
If you select Internal, only the events with position falling inside the position values shown in RANGE OP will be affected. The<br />
events with position outside th<strong>is</strong> interval will not be changed. Therefore, the changes will affect all the events starting from the<br />
position shown at the <strong>to</strong>p of the RANGE OP box and down until the events in the position shown at the bot<strong>to</strong>m of the same box.<br />
If you select External, the changes will affect only the events in the position outside the operational interval, while the events<br />
falling inside the interval given in RANGE OP will not be changed.<br />
th<strong>is</strong> box allows you <strong>to</strong> select the event types that will be affected by the changes. They are ALL, NOTE, PROGRAM, CONTROL, PITCH<br />
WHEEL(BEND), AFTERTOUCH.<br />
condition relating <strong>to</strong> the event fields.<br />
1st<br />
All:<br />
Equal:<br />
Internal:<br />
External:<br />
the operation will affect the events, regardless of the value (see above). For example, in the case of STATUS NOTE, all the notes<br />
will be considered, in the case of STATUS PROGRAM, all the timbres will be considered.<br />
the operation will affect only one event type shown and editable in the FROM field. For example, in the case of NOTES, only the<br />
note shown in the FROM field will be changed, in the case of CONTROL, the operation will affect only the control with the number<br />
shown in the FROM field. If, for example, the number shown <strong>is</strong> 7, the operation will affect the volume; if, instead, the number<br />
shown <strong>is</strong> 1, the operation will affect modulation.<br />
the operation will affect only the events with values falling inside the editable interval given by FROM and TO. If the STATUS <strong>is</strong><br />
NOTES, only the notes inside the interval will be changed.<br />
the operation will affect only the events with values falling outside the editable interval given by FROM and TO. If the STATUS <strong>is</strong><br />
NOTES, all the notes falling inside the interval will be excluded.<br />
128<br />
<strong>SD1</strong> Owner’s Manual
2nd:<br />
Chann:<br />
Len:<br />
the same considerations made for field 1st hold true, except that the conditions All, Equal, Internal, External refer <strong>to</strong> the 2nd<br />
value of the event (second byte). For example, in the case of notes, 2nd <strong>is</strong> the velocity; in the case of control, 2nd normally indicates<br />
the amount of control, for example the amount of reverb if 1st = 91. For example, Internal can be used <strong>to</strong> select notes where<br />
the dynamics falls inside a given value (shown in the related FROM TO box).<br />
conditions relating <strong>to</strong> the midi channel field. The All, Equal, Internal, External conditions will affect events represented by 1st<br />
and 2nd which will also sat<strong>is</strong>fy the condition on the midi channel as set in the related box.<br />
condition relating <strong>to</strong> the duration of notes. Th<strong>is</strong> condition can be accessed and <strong>is</strong> valid only if NOTES <strong>is</strong> selected on the STATUS.<br />
If ALL <strong>is</strong> selected, th<strong>is</strong> condition will in any case affect only the notes.<br />
LOGICAL operations:<br />
once the conditions relating <strong>to</strong> intervals and events have been selected as described above, one can decide what operations<br />
<strong>to</strong> perform.<br />
OPERATIONS ON EVENTS (RESULT FIELDS):<br />
All events sat<strong>is</strong>fying the conditions relating <strong>to</strong> the operational interval and the conditions relating <strong>to</strong> their values can be transformed as follows:<br />
STAT:<br />
status transformation. The status will be transformed in<strong>to</strong> the one shown in the left-hand box; therefore, a note event can become,<br />
for example, a control event. If the status <strong>is</strong> not changed, there will be no transformation of events, i.e. notes will remain<br />
notes, etc. We suggest not <strong>to</strong> change the result status unless specific sound effects are desired.<br />
1 (1st): by selecting th<strong>is</strong> field you can perform operations such as addition subtraction equality. For example, in the case of STATUS<br />
NOTES, you can transpose the notes by one octave upwards by entering [+] (addition) and entering 12 (amount that will be added<br />
<strong>to</strong> the notes) in the value box. If None <strong>is</strong> selected, no operation will be performed on the first byte of the event.<br />
2 (2nd): by selecting th<strong>is</strong> field you can perform operations such as addition subtraction equality. For example, in the case of STATUS<br />
NOTES, you can change the velocity of the notes downwards by 10 points by entering [-] (subtraction) and value 10. If None <strong>is</strong><br />
selected, no operation will be performed on the second byte of the event.<br />
CH (Channel): you can change the midi channel of the events by entering for instance the value 16. All the events that sat<strong>is</strong>fy the set conditions<br />
will take up midi channel 16. If None <strong>is</strong> selected, no operation will be performed on the channel of the event. Contrarily <strong>to</strong><br />
the other functions, th<strong>is</strong> one does not allow you <strong>to</strong> choose any of the three operations -/+/=; in fact, the = sign <strong>is</strong> fixed. You can<br />
only choose the midi channel.<br />
LEN (lenght): th<strong>is</strong> <strong>is</strong> valid only for note events. For example, you can “stretch” the duration of a note by one quarter by entering [+] and [0 1<br />
0]. You can give the notes a fixed duration of 2 quarters with [=] and [0 2 0]. If None <strong>is</strong> selected, no operation will be performed<br />
on the duration of the note event.<br />
QUANTIZE:<br />
EXTRACT:<br />
COPY:<br />
use F6 <strong>to</strong> select the quantization value and press F10 (Execute): the events will be quantized.<br />
press F7 for selection and then F10 <strong>to</strong> execute: the events will be moved from the running track <strong>to</strong> the first available track.<br />
use F8 <strong>to</strong> select the function and then use F10 <strong>to</strong> enter the end position in the COPY POSITION box: starting from the position<br />
set in COPY POSITION, all the events will be copied.<br />
DELETE:<br />
use F9 <strong>to</strong> select the function and then press F10: all the events will be deleted. The Quantize, Extract, Copy, Delete operations<br />
take place according <strong>to</strong> the conditions set in the upper part of the d<strong>is</strong>play and they do not take in<strong>to</strong> account the Result part.<br />
The Copy function, as mentioned earlier, takes in<strong>to</strong> account also the parameter that <strong>is</strong> in the lower part of the “Copy Posit”<br />
d<strong>is</strong>play.<br />
Example. Let us suppose you are editing the notes of a track on the bas<strong>is</strong> of the following character<strong>is</strong>tics:<br />
- They are in the interval going from bar 32 <strong>to</strong> 64.<br />
- They are different from C_2.<br />
Owner’s Manual <strong>SD1</strong> 129
- Their velocity ranges from 32 <strong>to</strong> 48.<br />
- They are on midi channel 14.<br />
- Their duration <strong>is</strong> _.<br />
To select the notes with the above-mentioned character<strong>is</strong>tics:<br />
a) Go on COND (<strong>to</strong>p left) and select Internal:<br />
b) Go on RANGE OP and set [32 1 1] in the upper part of the box and [65 1 1] in the bot<strong>to</strong>m part of the box.<br />
c) Set NOTES in the STATUS box.<br />
d) In the COND 1st field select the External condition and set C_2 in the FROM section and again C_2 in the TO section.<br />
e) In the COND 2nd field select Internal and set 32 in the FROM field and 48 in the TO field.<br />
f) In the CHANN field select Equal and enter 14 in the FROM field.<br />
g) In the LEN field select Equal and enter [0 1 0] in the FROM field.<br />
At th<strong>is</strong> point you have set the desired conditions on the notes. You may now perform the various editing operations as described<br />
above.<br />
COPY/MOVE:<br />
the COPY/MOVE function allows you <strong>to</strong> copy or move parts of a track or an entire track <strong>to</strong> other positions on the same track or<br />
<strong>to</strong> a different track. Access the function by pressing the F8 but<strong>to</strong>n. Two windows will appear in the center of the COPY/MOVE<br />
page. The upper window refers <strong>to</strong> the source track, the lower one <strong>to</strong> the end track. You can access the various editing fields by<br />
pressing the Cursor but<strong>to</strong>ns and you can set values by using the Value -/+ but<strong>to</strong>ns. Set the source track on the source track<br />
window <strong>to</strong>gether with the track interval that will be copied/moved FROM -> TO. On the end track window, set the track and the<br />
starting point where the source track interval will be positioned after copying or moving. When you access the menu, the entire<br />
selected running track <strong>is</strong> selected by default as source track and the ALL box <strong>is</strong> highlighted. Th<strong>is</strong> implies that all midi typeevents<br />
will be copied or moved. You may select only certain events by pressing the but<strong>to</strong>ns F1 (NOTES), F2 (CONTROL), F3 (PRO-<br />
GRAM CHANGE), F4 (PITCH BEND). Press F9 <strong>to</strong> choose between copying or moving the events. Press F10 <strong>to</strong> execute or F5 <strong>to</strong> exit<br />
the operation.<br />
Esempi.<br />
Supponiamo di aver reg<strong>is</strong>tra<strong>to</strong> poche battute di batteria su di una traccia. Il nostro scopo é quello di ripetere la battuta in modo<br />
di avere una intera sequenza. Si puó utilizzare per ques<strong>to</strong> la funzione COPY piú volte. Supponiamo di aver reg<strong>is</strong>tra<strong>to</strong> una traccia<br />
spostata di una m<strong>is</strong>ura r<strong>is</strong>pet<strong>to</strong> alle altre tracce. Effettuando un move della traccia su se stessa sulla posizione anticipata di<br />
una m<strong>is</strong>ura, si puó rimettere in "fase" la traccia in questione. Si puó tramite copy delle sole note in posizione poco d<strong>is</strong>tanti creare<br />
un effet<strong>to</strong> di "eco".<br />
DELETE:<br />
it allows you <strong>to</strong> delete entirely or partially the events of the selected track. Press the F7 but<strong>to</strong>n <strong>to</strong> access th<strong>is</strong> function. A window<br />
will be highlighted in the middle of the d<strong>is</strong>play. In th<strong>is</strong> window you can enter the interval that will be deleted FROM -> TO.<br />
When you enter the menu, the entire track <strong>is</strong> selected by default and the ALL box <strong>is</strong> highlighted. Th<strong>is</strong> means that all midi typeevents<br />
will be deleted. You may select only certain events <strong>to</strong> be deleted by pressing F1 (NOTES), F2 (CONTROL), F3 (PROGRAM<br />
CHANGE), F4 (PITCH BEND). Press F7 LAST RECORD if you want <strong>to</strong> delete only the last recording.<br />
DELETE LINK: press F8 <strong>to</strong> select/deselect the DELETE LINK mode. Selecting th<strong>is</strong> function will allow you <strong>to</strong> link the events that are positioned at the<br />
two ends of the deleted interval, so that you will not have a “hole” in the deleted interval. Press F10 <strong>to</strong> execute the deletion but,<br />
before that, confirmation will be requested by means of the message “Are you sure?”. Press F5 <strong>to</strong> exit without deleting.<br />
DEFRAG:<br />
when you perform several deletions, the memory space <strong>is</strong> not freed completely. Therefore, you might be “short” of memory<br />
even if your sequence <strong>is</strong> a short one. Press F9 (DEFRAG) <strong>to</strong> “format” the memory and free the spaces lost through deletion.<br />
FUNCTION:<br />
when FUNCTION <strong>is</strong> selected by pressing the F4 but<strong>to</strong>n, <strong>new</strong> functions of the sequencer become operational such as OPTIONS,<br />
MIDI FILTER, MASTER TRACK LOAD/SAVE, DEMIX, MIXDOWN, VELOCITY, TRANSPOSER.<br />
130<br />
<strong>SD1</strong> Owner’s Manual
OPTIONS:<br />
Access th<strong>is</strong> menu by pressing the F2 but<strong>to</strong>n after you have entered the FUNCTION mode by pressing F2. Press the F5 but<strong>to</strong>n<br />
(Escape) <strong>to</strong> exit the menu.<br />
METRONOME: Press F1 <strong>to</strong> switch the metronome On/Off during recording.<br />
MODE RECORD: Press F1 <strong>to</strong> select the two recording modes Overdub and Replace (see RECORD).<br />
RECORD PRECOUNT: By repeatedly pressing F3 you may select the bars that will pass between the moment the recording<br />
<strong>is</strong> launched and the moment it actually starts. You can choose from 0 <strong>to</strong> 5 precount bars. The precount <strong>is</strong> shown<br />
on the POSITION box with a negative sign (-). The precount <strong>is</strong> interrupted when the first event arrives. When in the SYNC-<br />
START mode, it <strong>is</strong> au<strong>to</strong>matically switched off since it <strong>is</strong> not necessary.<br />
CHASE EVENTS: When th<strong>is</strong> function <strong>is</strong> On (F4 but<strong>to</strong>n), regardless of the position from which the sequence starts, the<br />
CONTROL CHANGE and the PROGRAM CHANGE of the sequence are transmitted in any case, even when recorded in previous<br />
positions. If, for example, the starting point of a sequence <strong>is</strong> set at number 20 and the controls are set at bar 1,<br />
the sequencer will immediately send all the controls that are present from the <strong>begin</strong>ning of the sequence up <strong>to</strong> bar 20.<br />
Th<strong>is</strong> functions allows the notes <strong>to</strong> play in the set manner, regardless of the starting point of the sequence.<br />
RESET STOP: If th<strong>is</strong> function <strong>is</strong> On (F6 but<strong>to</strong>n), at every s<strong>to</strong>p the suspended notes are deleted and the pitch bend <strong>is</strong><br />
reset.<br />
STEP TRACE: If th<strong>is</strong> function <strong>is</strong> On(F8 but<strong>to</strong>n), you can use the Cursor but<strong>to</strong>ns <strong>to</strong> move around the EDIT menu and play<br />
back the recorded notes while scrolling them. Th<strong>is</strong> function <strong>is</strong> useful <strong>to</strong> trace parts of the sequence.<br />
TRACK NAME: Use the Cursor but<strong>to</strong>ns <strong>to</strong> scroll through the names of the tracks shown in the middle of the d<strong>is</strong>play.<br />
Press the F7 but<strong>to</strong>n if you want <strong>to</strong> change the name of a track with a selected number. Th<strong>is</strong> way you will access the usual<br />
name editing window. The procedure <strong>to</strong> edit a <strong>new</strong> name <strong>is</strong> the same as the one already described in the NAME paragraph.<br />
Press F10 (Execute) <strong>to</strong> save, press F5 (Escape) <strong>to</strong> exit.<br />
MIDI FILTER:<br />
before describing in detail the various menu functions, here <strong>is</strong> some information <strong>about</strong> the <strong>musical</strong> parts and the channels on<br />
which such parts play. The sequencer <strong>is</strong> capable of managing up <strong>to</strong> 16 <strong>musical</strong> parts for each track. Every part <strong>is</strong> associated with<br />
a midi channel. If a sequence <strong>is</strong> recorded using the styles of the <strong>musical</strong> instrument, the instrument parts will be recorded on<br />
channels set in the MIDI channel Tx menu. With MIDI SETUP set on “General”, by default the part -> channel association <strong>is</strong> the<br />
following (recommended one):<br />
Part<br />
Channel<br />
Preset (right) 1<br />
2nd Voice (right) 2<br />
Lower1 (left) 3<br />
Lower2 (left) 4<br />
Bass (left) 5<br />
Chord1 (left) 6<br />
Chord2 (left) 7<br />
Chord3 (left) 8<br />
Groove (left) 9<br />
Drum (left) 10<br />
Chord4 (left) 11<br />
Chord5 (left) 12<br />
Program voice1 (right) 13<br />
Program voice2 (right) 14<br />
Program voice3 (right) 15<br />
Program voice4 (right) 16<br />
By playing the keyboard on the left hand side of the split, the left parts are switched on, while by playing on the right hand side<br />
the right parts are switched on. For example, on the left hand side in the s<strong>to</strong>p mode only the two lowers play whereas, if you<br />
keep start pressed and set a chord, the drums will play <strong>to</strong>gether with the other parts of the style. The preset plays on the right<br />
hand side but if you enter the program, the parts of the program or the 2nd voice will play if you access by pressing the related<br />
but<strong>to</strong>n. If a channel <strong>is</strong> switched off, it will not be recorded by the sequencer. The MIDI FILTER can be used <strong>to</strong> filter the events<br />
Owner’s Manual <strong>SD1</strong> 131
and the incoming and outgoing channels (by default no event or channel <strong>is</strong> filtered). In order <strong>to</strong> filter the events so that they<br />
are not recorded, you must first use the Cursor or Page but<strong>to</strong>ns <strong>to</strong> select the event box on the IN column (incoming). You<br />
can filter: Note, Control Change, Program change, Pitch Bend, After<strong>to</strong>uch, Exclusive Messages. In order <strong>to</strong> switch the filter on,<br />
press the F10 but<strong>to</strong>n <strong>to</strong> make the dot appear in the box.<br />
The procedure <strong>is</strong> the same also for the channels. If you want <strong>to</strong> record an event or a channel without playing it and exit at the<br />
midi out, the filter must be put in the OUT column.<br />
Special mention must be made for the clock IN OUT boxes.<br />
In th<strong>is</strong> case, an empty box means that the clock <strong>is</strong> switched off. When the clock <strong>is</strong> set on IN, the clock inside the sequencer <strong>is</strong><br />
switched off. It has <strong>to</strong> be powered from the outside by means of a midi or by switching on the internal mode (Start, Fills, etc.).<br />
If the clock <strong>is</strong> set on OUT, both midi events and the midi clock will pass through the midi out. If the sequencer IN clock <strong>is</strong> switched<br />
on and so <strong>is</strong> the MIDI out clock (see MIDI CLOCK SOFTTHRU Menu), when the style <strong>is</strong> switched on by pressing the Start but<strong>to</strong>n,<br />
the style clock out will also start the recording. On the contrary, if the MIDI FILTER clock out and the MENU MIDI CLOCK<br />
SOFTTHRU clock in are switched on, also the internal style will au<strong>to</strong>matically start when the recording.<br />
DEMIX:<br />
MIXDOWN:<br />
th<strong>is</strong> function allows you <strong>to</strong> pick out every single recorded channel from a track and <strong>to</strong> transfer it <strong>to</strong> other tracks so that, in the<br />
end, every track will have only one channel associated <strong>to</strong> it. To demix a track from the main menu, select the track by using the<br />
Cursor or Page but<strong>to</strong>ns and then press F4 (FUNCTION) followed by F7 (DEMIX). Example: Suppose you have recorded an internal<br />
style on track 01 and you want <strong>to</strong> change the bass round. By using the Demix function, the events on the bass channel will<br />
be transferred <strong>to</strong> a separate track (e.g. track number 5 since by default the bass plays on channel number 5). At th<strong>is</strong> point, select<br />
track 05 which contains the information <strong>about</strong> the bass alone. The Chan. column highlights the number of the demixed channel.<br />
The track can be deleted and recorded again, it can be edited, etc. and you can be sure that the operations will concern<br />
only the bass.<br />
Th<strong>is</strong> function allows you <strong>to</strong> mixdown the contents of one or more tracks un<strong>to</strong> a track. The original midi channels of the events<br />
will be maintained.<br />
To select the tracks that you want <strong>to</strong> mix, use the Cursor or Page but<strong>to</strong>ns, then press F8 (MIXDOWN) <strong>to</strong> show that the track<br />
will be mixed. Note. Only initialized tracks (status ‘i’) can be selected.<br />
When you press MIXDOWN, an ‘M’ will appear in the status column. Once all the tracks <strong>to</strong> be mixed have been selected, press F10<br />
(Execute). A window will appear in the middle of the d<strong>is</strong>play; us the Value -/+ but<strong>to</strong>ns <strong>to</strong> choose the end track. By pressing F10<br />
(Execute), all the tracks that have been selected for mixage will be mixed down un<strong>to</strong> the end track. The original tracks will be<br />
lost forever.<br />
VELOCITY/TRANSPOSER:<br />
Th<strong>is</strong> function affects only note events.<br />
It allows you <strong>to</strong>:<br />
a) Transpose notes (in semi<strong>to</strong>nes) so that you may for example change the <strong>to</strong>ne of a sequence or re-establ<strong>is</strong>h<br />
the natural interval of a <strong>musical</strong> instrument.<br />
b) Change the velocity, i.e. the volume in general of each note, <strong>to</strong> achieve improved performance.<br />
Access the menu by pressing F4 (FUNCTION) and then F9 (VELOCITY/TRANSP.). The d<strong>is</strong>play will show the selected<br />
running track on which changes will be made and the FROM -> TO position loca<strong>to</strong>rs outlining the temporal interval<br />
where the operation will be performed.<br />
The two fields VELOCITY, TRANSPOSER are in the lower part of the d<strong>is</strong>play. Use the Cursor but<strong>to</strong>ns <strong>to</strong> select<br />
the loca<strong>to</strong>rs and the VELOCITY or TRANSPOSER controls. Controls can be accessed directly also by pressing the<br />
F5 but<strong>to</strong>n. Use the Value -/+ but<strong>to</strong>ns <strong>to</strong> change the values.<br />
Example:<br />
If you set FROM: 1 1 1<br />
TO: 4 1 1<br />
VELOCITY: -23<br />
TRANSPOSER: +12<br />
The first 3 bars of the running track will be ra<strong>is</strong>ed by one octave, while the velocity will be lowered by 23 (less<br />
volume for every note).<br />
MASTER TRACK: The MASTER TRACK <strong>is</strong> the track on which all bar, signature and exclusive messages controlling parameters such as effects, lyrics,<br />
etc. are recorded. Press F4 (FUNCTION) and then F4 (MASTER TRACK) again <strong>to</strong> access the master track from the main menu. The<br />
recorded events are shown in the center of the d<strong>is</strong>play.<br />
Position indica la posizione degli eventi (m<strong>is</strong>ure, quarti, steps)<br />
Event<br />
Tempo:<br />
Signature:<br />
ExcMsg:<br />
Sol<strong>to</strong>n:<br />
Part:<br />
Lyrics:<br />
performance tempo<br />
<strong>musical</strong> div<strong>is</strong>ion<br />
exclusive messages of other producers<br />
Sol<strong>to</strong>n exclusive messages<br />
name of the <strong>musical</strong> part<br />
lyric events (rows of letters)<br />
132<br />
<strong>SD1</strong> Owner’s Manual
HOW TO EDIT EXCLUSIVE MESSAGES<br />
An exclusive message <strong>is</strong> made up of a set of bytes with values ranging between 0 and 127. Data in the sequencer are given in hexadecimal notation<br />
in the 00h-7fh range. For the l<strong>is</strong>t of Sol<strong>to</strong>n exclusive messages, please refer <strong>to</strong> the annex in the Instructions Handbook. Press F6 (EXCL.MSG.)<br />
<strong>to</strong> enter an exclusive message. At th<strong>is</strong> point you will access a window with 24 boxes which will allow you <strong>to</strong> enter up <strong>to</strong> 24 bytes (Sol<strong>to</strong>n messages<br />
have a smaller number of bytes). The position of the message <strong>is</strong> given on the <strong>to</strong>p left-hand corner; you may change th<strong>is</strong> position by pressing<br />
the Value -/+ but<strong>to</strong>ns. For every box you may enter or change a message byte, using the Cursor but<strong>to</strong>ns <strong>to</strong> select and the Value -/+ but<strong>to</strong>ns<br />
<strong>to</strong> make changes. By pressing both Value -/+ but<strong>to</strong>ns <strong>to</strong>gether you will cancel the content of the selected box.<br />
NOTE. The boxes must be filled one after the other, without leaving blank boxes.<br />
Sol<strong>to</strong>n exclusive messages are already part of the instrument and can be recognized by the fact that the first data byte (ID) <strong>is</strong> 26h(38).<br />
The general form of a Sol<strong>to</strong>n exclusive message that can change the instrument parameters <strong>is</strong>:<br />
F0h, 26h, 7Bh, parameter code value_1, value_2, .. ,value_n, F7<br />
Values F0h and F7h are entered au<strong>to</strong>matically by the sequencer.<br />
Let us see some examples:<br />
By entering 26h in the first box and 7bh in the second box, the third box gives you the message parameter code.<br />
Third box: 00h reverb type<br />
01h chorus type<br />
02h reverb level<br />
06h delay type<br />
11h d<strong>is</strong><strong>to</strong>rsor type<br />
" "<br />
For the complete l<strong>is</strong>t, please refer <strong>to</strong> the annexes in the Instructions Handbook.<br />
From the fourth box onwards, you must enter one or more values according <strong>to</strong> the parameter in the third box. For example, by entering 26H 7BH<br />
00H 00H, the instrument will set the reverb type 00h = box1.<br />
By entering 26H 7BH 00H 07H you will set reverb number 07h(Hall2).<br />
By entering 26H 7BH 06H 02H you will set delay number 02h(Delay3).<br />
By entering 26H,7Bh,0Bh,00h as first 4 bytes, the fifth byte will indicate the part and the sixth effect that the sound will take up on that part.<br />
Example (effect allocation).<br />
In general: F0H, 26H, 7BH, 0BH, 00H, Part, Effect, F7H<br />
By entering in the boxes 26H 7BH 0BH 00H 00H 02h, the d<strong>is</strong><strong>to</strong>rsor will go on part 0 (See table below).<br />
Part 0 Preset (right)<br />
1 2nd Voice (right)<br />
2 Lower1 (left)<br />
3 Lower2 (left)<br />
4 Bass (left)<br />
5 Chord1 (left)<br />
6 Chord2 (left)<br />
7 Chord3 (left)<br />
8 Groove (left)<br />
9 Drum (left)<br />
10 Chord5 (left)<br />
11 Program voice1 (right)<br />
12 Program voice2 (right)<br />
13 Program voice3 (right)<br />
14 Program voice4 (right)<br />
Effect 00h no effect<br />
01h Leslie<br />
02h D<strong>is</strong><strong>to</strong>rsor<br />
03h Chorus<br />
04h Delay<br />
Owner’s Manual <strong>SD1</strong> 133
05h<br />
06h<br />
07h<br />
08h<br />
Delay + Chorus<br />
D<strong>is</strong><strong>to</strong>rsor + Chorus<br />
D<strong>is</strong><strong>to</strong>rsor + Delay<br />
D<strong>is</strong><strong>to</strong>rsor + Delay + Chorus<br />
Press F10 <strong>to</strong> save the message, F5 <strong>to</strong> cancel the operation. NOTE. The message <strong>is</strong> always added <strong>to</strong> the master track; therefore, if you want it <strong>to</strong><br />
replace another message, you will first have <strong>to</strong> delete the old one.<br />
Master track DELETE EVENT:<br />
Master track INS/MOD TEMPO:<br />
Pressing F4 will immediately delete the selected event (without confirmation request) from the master<br />
track.<br />
It allows you <strong>to</strong> insert/modify tempo events.Press F2 <strong>to</strong> open the edit window. Use the Cursor but<strong>to</strong>ns <strong>to</strong><br />
access the Position and Value fields, and the Value -/+ but<strong>to</strong>ns <strong>to</strong> perform changes. Press F10 <strong>to</strong> execute, F5<br />
<strong>to</strong> cancel.<br />
Master track INS/MOD SIGNATURE: It allows you <strong>to</strong> insert/modify signature events. Press F3 <strong>to</strong> open the edit window. Use the Cursor but<strong>to</strong>ns<br />
<strong>to</strong> access the Position and Value fields, and the Value -/+ but<strong>to</strong>ns <strong>to</strong> perform changes. Press F10 <strong>to</strong> execute,<br />
F5 <strong>to</strong> cancel.<br />
Master track LYRIC:<br />
LYRIC INSERT/MODIFY:<br />
LYRIC AUTOMATIC:<br />
LYRIC DELETE EVENT:<br />
NAME PART:<br />
press F8 <strong>to</strong> access the LYRIC page where you can insert lyric events in the sequence. The lyric events available<br />
in many MIDIFILES contain the text of a song and if they are inserted in<strong>to</strong> the sequence on a syllabic bas<strong>is</strong>, you<br />
will have a KARAOKE-type effect when you play it back in the PLAY SONG mode.<br />
It allows you <strong>to</strong> insert/modify lyric events. Press F2 <strong>to</strong> open an edit window where you can select the position;<br />
place the cursor <strong>to</strong> the right of the position and open a <strong>new</strong> window where you can edit letters. The letter above<br />
the cursor can be inserted by using the keyboard or the Value -/+ but<strong>to</strong>ns. Some but<strong>to</strong>ns have special functions.<br />
The B_1 but<strong>to</strong>n allows you <strong>to</strong> change the letters associated with the keys from small letters <strong>to</strong> capital letters.<br />
The G_5 but<strong>to</strong>n <strong>is</strong> the Carriage Return but<strong>to</strong>n shown on the d<strong>is</strong>play by an arrow <strong>to</strong> the right. The F#-5 but<strong>to</strong>n<br />
selects a number of international signs. The F_5 but<strong>to</strong>n deletes the cursor position up <strong>to</strong> the end of the sentence<br />
(th<strong>is</strong> can be done also by pressing the Value -/+ but<strong>to</strong>ns <strong>to</strong>gether). Use the Cursor but<strong>to</strong>ns <strong>to</strong> move from<br />
one letter <strong>to</strong> the other. Once the sentence <strong>is</strong> edited, it can be memorized in the lyric event by pressing F10; press<br />
F5 <strong>to</strong> go back <strong>to</strong> the position field; pressing F5 again will cancel the operation.<br />
It allows you <strong>to</strong> insert lyric events au<strong>to</strong>matically, changing the notes of a selected channel of the running track<br />
in<strong>to</strong> lyric events. You can choose the channel where there <strong>is</strong> a melodic line that follows the singing. Every lyric<br />
event can later be edited <strong>to</strong> insert a <strong>new</strong> syllable.<br />
In other words:<br />
Once the track on which changes are <strong>to</strong> be made has been selected from the main menu, enter the MASTER<br />
TRACK.<br />
Press F8 (LYRIC).<br />
Press F6 <strong>to</strong> select (with Value -/+) the channel where the track melodic line <strong>is</strong>.<br />
Press F3 (AUTOMATIC).<br />
At th<strong>is</strong> point, position the loca<strong>to</strong>rs From and To in the set interval.<br />
Press F10 <strong>to</strong> confirm the operation. By doing so, the notes of the selected track interval will be copied on the<br />
MASTER TRACK as lyric events.<br />
At th<strong>is</strong> point, empty lyric events will be made available for editing with INSERT/MODIFY as previously described.<br />
Pressing F4 (DELETE EVENT) will delete the lyric event that was previously selected with the Cursor but<strong>to</strong>ns.<br />
It allows you name every part of the sequence. Once the sequence names have been entered, the name will<br />
appear in the POSITION box of the sequencer main page.<br />
Example: x.1.1 can be called “Strophe 1”, y.1.1 “Strophe 2”, and z.1.1 “Refrain” in order <strong>to</strong> have an au<strong>to</strong>matic reference<br />
point. Press F9 <strong>to</strong> name a part. A window <strong>is</strong> opened where you can set the initial position of the part and<br />
the name of the part itself. Use the Cursor but<strong>to</strong>ns <strong>to</strong> move from one Position value <strong>to</strong> the other and the Value<br />
-/+ but<strong>to</strong>ns <strong>to</strong> change the values. Once the position has been chosen, place the cursor on the default name<br />
“Part”. Another window will au<strong>to</strong>matically open so that you can give a <strong>new</strong> name <strong>to</strong> the part. Syllables are selected<br />
by using the Value -/+ but<strong>to</strong>ns o by using the keyboard. If the Value -/+ but<strong>to</strong>ns are used, use the Cursor <br />
but<strong>to</strong>ns <strong>to</strong> move along from one syllable <strong>to</strong> the next. Press F10 <strong>to</strong> confirm the operation, F5 <strong>to</strong> exit.<br />
VIEW:<br />
ALL:<br />
LYRIC:<br />
It allows you <strong>to</strong> choose the type of event <strong>to</strong> show in the MASTER TRACK menu. Press F6 (VIEW) repeatedly <strong>to</strong> select the events.<br />
all events are d<strong>is</strong>played.<br />
only lyric events are d<strong>is</strong>played.<br />
134<br />
<strong>SD1</strong> Owner’s Manual
PART :<br />
TEMPO:<br />
EXCL :<br />
OPTIONS:<br />
METRONOME:<br />
MODE RECORD:<br />
only part name events are d<strong>is</strong>played.<br />
tempo and signature are d<strong>is</strong>played.<br />
exclusive messages are d<strong>is</strong>played.<br />
Press F4 <strong>to</strong> enter the FUNCTION mode and then F2 <strong>to</strong> access th<strong>is</strong> menu. Press F5 (Escape) <strong>to</strong> exit the menu.<br />
By pressing F1, the metronome <strong>is</strong> switched on/off during the recording stage.<br />
By pressing F1, the two recording modes, Overdub and Replace, are selected (see RECORD).<br />
RECORD PRECOUNT: By repeatedly pressing F3 you select the bars that must elapse between the moment in which the recording command <strong>is</strong><br />
given and the moment in which the recording actually starts. You can have from 0 <strong>to</strong> 5 precount bars. The precount <strong>is</strong><br />
d<strong>is</strong>played in the POSITION box, marked with a negative sign (-). The precount <strong>is</strong> interrupted when the first event starts. In<br />
the SYNCSTART mode it <strong>is</strong> au<strong>to</strong>matically switched off since it <strong>is</strong> not required.<br />
CHASE EVENTS:<br />
RESET STOP:<br />
STEP TRACE:<br />
TRACK NAME:<br />
LOAD/SAVE:<br />
When th<strong>is</strong> function <strong>is</strong> On (F4 but<strong>to</strong>n), regardless of the position from which the sequence starts, the CONTROL CHANGE and<br />
the PROGRAM CHANGE of the sequence are transmitted in any case, even if they were recorded in previous positions. If,<br />
for example, the starting point of a sequence <strong>is</strong> set at number 20 and the controls are set at bar 1, the sequencer will immediately<br />
send all the controls that are present from the <strong>begin</strong>ning of the sequence up <strong>to</strong> bar 20. Th<strong>is</strong> functions allows the<br />
notes <strong>to</strong> play in the set manner, regardless of the starting point of the sequence.<br />
If th<strong>is</strong> function <strong>is</strong> On (F6 but<strong>to</strong>n), at every s<strong>to</strong>p the suspended notes are deleted and the pitch bend <strong>is</strong> reset.<br />
If th<strong>is</strong> function <strong>is</strong> On (F8 but<strong>to</strong>n), you can use the Cursor but<strong>to</strong>ns <strong>to</strong> move around the EDIT menu and play back the recorded<br />
notes while scrolling them. Th<strong>is</strong> function <strong>is</strong> useful <strong>to</strong> trace parts of the sequence.<br />
Use the Cursor but<strong>to</strong>ns <strong>to</strong> scroll through the names of the tracks shown in the middle of the d<strong>is</strong>play. Press the F7 but<strong>to</strong>n<br />
if you want <strong>to</strong> change the name of the track with a selected number. Th<strong>is</strong> way you will access the usual name editing<br />
window. The procedure <strong>to</strong> edit a <strong>new</strong> name <strong>is</strong> the same as the one already described in the NAME paragraph. Press F10<br />
(Execute) <strong>to</strong> save, F5 (Escape) <strong>to</strong> exit.<br />
A sequence can be imported from outside (d<strong>is</strong>k), provided it <strong>is</strong> in a midi file format. The instrument <strong>is</strong> capable of interpreting<br />
the midi file format (see SONG PLAY section of the Instructions Handbook). During the LOAD phase, the midi file<br />
(MID extension) <strong>is</strong> au<strong>to</strong>matically translated in<strong>to</strong> a format that the sequencer can read and it <strong>is</strong> loaded in the memory.<br />
Therefore, it can be edited for changes, additions, deletions by using the sequencer’s functions. Once the sequence imported<br />
through LOAD or recorded from zero has been edited, it can be saved in the midi file format. To th<strong>is</strong> end, the SAVE function<br />
<strong>is</strong> used. Once saved on d<strong>is</strong>k, the sequence can be reproduced (by accessing the SONG PLAY menu).<br />
In detail:<br />
LOAD: Access the function from the main menu by pressing F4 (FUNCTION) and then F6 (LOAD/SAVE). You will<br />
access a page on the d<strong>is</strong>play with the following arrangement: The midi files direc<strong>to</strong>ry <strong>is</strong> in the center of the d<strong>is</strong>play.<br />
If the HARD DISK <strong>is</strong> selected, the direc<strong>to</strong>ry refers <strong>to</strong> the midi files that are in the Folder that <strong>is</strong> selected and shown<br />
in the upper part of the d<strong>is</strong>play. For example, if HARD [03 Newfold] <strong>is</strong> shown, the files are those belonging <strong>to</strong> folder<br />
number 3 named Newfold. If Floppy D<strong>is</strong>k <strong>is</strong> shown, the filed are those belonging <strong>to</strong> the main direc<strong>to</strong>ry of the<br />
floppy. Use the numeric but<strong>to</strong>ns 0-9 <strong>to</strong> change Folders; use the Page but<strong>to</strong>ns <strong>to</strong> select the Floppy from the Hard<br />
D<strong>is</strong>k and vice versa. If you change a d<strong>is</strong>kette in the floppy and you want <strong>to</strong> update the d<strong>is</strong>play so that it shows also<br />
the contents of the <strong>new</strong> d<strong>is</strong>kette, press F4 (Dir) because updating in th<strong>is</strong> case <strong>is</strong> not au<strong>to</strong>matic. To select the midi<br />
file that has <strong>to</strong> be loaded, use the Cursor but<strong>to</strong>ns <strong>to</strong> change page; use the Value -/+ but<strong>to</strong>ns <strong>to</strong> move between<br />
files. Loading modes are highlighted in the MODE box which can be changed by pressing F3. They are:<br />
REPLACE: The midi file will replace any sequence that <strong>is</strong> in the memory (th<strong>is</strong> sequence will be deleted). In th<strong>is</strong><br />
case press F1 (Load) and the selected midi file will be loaded in the memory, deleting everything else that was<br />
already in the memory.<br />
MERGE: The midi file will merge with the sequence that <strong>is</strong> already in the memory. Once the MERGE mode <strong>is</strong> set, a<br />
window appears in the middle of the d<strong>is</strong>play. You can select the position (by using the Cursor and Value -/+ but<strong>to</strong>ns)<br />
where the midi file will be “hooked” un<strong>to</strong> the already-ex<strong>is</strong>ting sequence. Th<strong>is</strong> function can be used <strong>to</strong> merge<br />
several midi files by selecting their positions accordingly. If you want the midi files <strong>to</strong> play in the proper manner,<br />
we recommend that you use the Merge function for midi files saved in 0 format (i.e. made up of one single track).<br />
Once the midi files have been loaded in the memory, use the Demix function <strong>to</strong> assign one track <strong>to</strong> every channel.<br />
To load the selected midi file, set its position and then press F10. After the loading procedure, the sequencer will<br />
au<strong>to</strong>matically return <strong>to</strong> the main menu. The tracks containing midi files will take up the “i” status; if the midi file<br />
<strong>is</strong> in the multitrack format, a reproduction channel (Chan. column) will be au<strong>to</strong>matically set for every track.<br />
Instead, the tempo and signatures of the midi files, and any lyrics or exclusive messages, will be recorded on the<br />
MASTER TRACK.<br />
Owner’s Manual <strong>SD1</strong> 135
SAVE: A recorded or loaded sequence can be saved on d<strong>is</strong>k in the midi file format by using the SAVE function. The<br />
SAVE procedure <strong>is</strong> similar <strong>to</strong> the LOAD one, except that F6 (SAVE) must be pressed instead of F1. Once a name has<br />
been assigned <strong>to</strong> the sequence that will be saved, press F10 (Execute) <strong>to</strong> confirm the operation. Press F5 (Escape)<br />
<strong>to</strong> exit the menu without performing any operation. We recommend that you save the sequence not only at the<br />
end of your work session but also before performing r<strong>is</strong>ky operations such as Delete, Mixdown, Copy/Move. In th<strong>is</strong><br />
way, should any of these operations not give you the desired results, you can always use LOAD <strong>to</strong> reload your original<br />
sequence. After saving, press F5 <strong>to</strong> return <strong>to</strong> the main menu.<br />
136<br />
<strong>SD1</strong> Owner’s Manual
Tu<strong>to</strong>rial<br />
In the following a step by step guide <strong>is</strong> given on how <strong>to</strong> convert MS series styles, on how <strong>to</strong> use audio samples in the Midi files and on how <strong>to</strong><br />
synchron<strong>is</strong>e a loop with a style.<br />
CONVERTING STYLES OF THE MS AND X SERIES<br />
Before using a style of the MS series, you need <strong>to</strong> copy it from the floppy d<strong>is</strong>k <strong>to</strong> the hard d<strong>is</strong>k and then convert in using Edit Pattern.<br />
COPYING FROM THE FLOPPY TO THE HARD DISK<br />
●<br />
●<br />
●<br />
●<br />
●<br />
●<br />
After having introduced the floppy d<strong>is</strong>k in<strong>to</strong> the d<strong>is</strong>k drive, press DISK on the main d<strong>is</strong>play page.<br />
To make things easier, make sure that the MASTER FOLDER but<strong>to</strong>n (LED) <strong>is</strong> lighting. If not, press th<strong>is</strong> but<strong>to</strong>n once.<br />
Press the PAGE + but<strong>to</strong>n <strong>to</strong> go <strong>to</strong> floppy.<br />
Use the VALUE +/-, CURSOR +/- and F10 Select <strong>to</strong> select the style <strong>to</strong> copy.<br />
Pressing both VALUE +/- but<strong>to</strong>ns at the same time selects all the files s<strong>to</strong>red on the floppy d<strong>is</strong>k.<br />
Press F4 Copy <strong>to</strong> confirm. The selected styles are copied in<strong>to</strong> folder 95 Style<br />
CONVERTING STYLES OF THE MS SERIES<br />
●<br />
●<br />
●<br />
●<br />
●<br />
Exit the DISK menu pressing the EXIT but<strong>to</strong>n.<br />
Pressing PATTERN EDIT d<strong>is</strong>plays the l<strong>is</strong>t of styles contained in the folder 95 Style.<br />
Use CURSOR +/- <strong>to</strong> select the style <strong>to</strong> convert and press F10 Select. <strong>SD1</strong> goes back <strong>to</strong> the initial page of Pattern Edit.<br />
Press F7 MS Series Converter <strong>to</strong> au<strong>to</strong>matically convert the style.<br />
You may handle timbre modification using the F1 Record menu.<br />
CONVERTING STYLES OF THE X SERIES<br />
No particular attention <strong>is</strong> required while using styles of the X series: The <strong>SD1</strong> <strong>is</strong> able <strong>to</strong> read them without converting them. In some cases it may<br />
become necessary <strong>to</strong> adjust some volumes of single voices. You will find the necessary parameters in the Arrange View menu, which you can<br />
reach from the main d<strong>is</strong>play page by pressing F5 function key.<br />
USING AUDIO FILES IN A MIDI FILE<br />
You may assign up <strong>to</strong> eight .WAV files, with or without loop, <strong>to</strong> a Midi file. The <strong>SD1</strong> will apply a real time Pitch Shift algorithm <strong>to</strong> avoid excessive<br />
timbre modifications within a reasonable tempo and transposition range. The audio files loaded in<strong>to</strong> the RAM are managed as if they were<br />
Program Changes within the Midi file.<br />
The Midi file must contain in the target track of the audio sample the notes required as a reference point where <strong>to</strong> enter the audio file. In the<br />
case of an audio loop, the note <strong>is</strong> used as a trigger for the sample. For the audio files without loop (one shot), notes must be set both <strong>to</strong> activate<br />
the trigger and <strong>to</strong> define the pitch of the note the pitch shift algorithm <strong>is</strong> supposed <strong>to</strong> refer <strong>to</strong>. For easier composition work, you should work<br />
directly on a Mac or on a PC with an integrated sequencer software (audio + MIDI) using the same samples that will then be transferred on<strong>to</strong> the<br />
<strong>SD1</strong>. In th<strong>is</strong> way you may replay the Midi file with the samples even before transferring them on<strong>to</strong> the <strong>SD1</strong>. It <strong>is</strong> also possible <strong>to</strong> set the notes using<br />
the <strong>SD1</strong> sequencer and <strong>to</strong> select the audio samples <strong>to</strong> be assigned <strong>to</strong> the tracks once they have been loaded in<strong>to</strong> the RAM/FLASH bank.<br />
COPYING AN AUDIO FILE FROM THE FLOPPY DISK TO THE HARD DISK<br />
Format a 1,4 MB floppy d<strong>is</strong>k on the PC or on the Mac in 1, 4 MB MS-DOS format. For quicker reading from the floppy d<strong>is</strong>k, you should format the<br />
floppy d<strong>is</strong>k directly on the <strong>SD1</strong>, as described in the D<strong>is</strong>k chapter.<br />
Copy the audio .WAV file from the PC or the Mac on<strong>to</strong> the floppy d<strong>is</strong>k. Mac users must add the extension .WAV <strong>to</strong> the name. The <strong>SD1</strong> accepts names<br />
with up <strong>to</strong> eight characters, extension excluded.<br />
● The MASTER FOLDER function must be activated (with lighting but<strong>to</strong>n LED) if you w<strong>is</strong>h <strong>to</strong> copy the audio file on<strong>to</strong> the hard d<strong>is</strong>k.<br />
● Press the relevant but<strong>to</strong>n on the operating panel <strong>to</strong> enter the D<strong>is</strong>k menu.<br />
● Use the PAGE +/- but<strong>to</strong>ns <strong>to</strong> select Floppy as source d<strong>is</strong>k.<br />
● Highlight the file using the VALUE +/- and the CURSOR +/- but<strong>to</strong>ns (if the files are d<strong>is</strong>tributed on a number of pages) and use F10 Select<br />
<strong>to</strong> select it. Next <strong>to</strong> the file name the “” symbol appears.<br />
● Press F4 Copy <strong>to</strong> start copying the file on<strong>to</strong> the Hard D<strong>is</strong>k. The <strong>SD1</strong> copies the file directly in<strong>to</strong> folder 94 “Sound” if Master Folder has been<br />
activated. The page called up pressing F4 Copy allows you <strong>to</strong> change the file name using the keys of the keyboard and the CURSOR +/- but<strong>to</strong>ns.<br />
Press F10 Execute <strong>to</strong> confirm that you actually w<strong>is</strong>h <strong>to</strong> copy the selected file.<br />
PRELIMINARY PROCESSING OF THE AUDIO LOOP<br />
The audio loop requires preliminary processing with the internal <strong>SD1</strong> sampler before you may use it.<br />
Owner’s Manual <strong>SD1</strong> 137
● Activate the MSP SAMPLER (the but<strong>to</strong>n LED will light up) on the main d<strong>is</strong>play page <strong>to</strong> load the audio file in<strong>to</strong> the sampler.<br />
● Make sure that the MASTER FOLDER but<strong>to</strong>n <strong>is</strong> activated and press F1 Load <strong>to</strong> d<strong>is</strong>play the l<strong>is</strong>t of audio files s<strong>to</strong>red in the Sound folder (no. 94).<br />
● Use the VALUE +/- but<strong>to</strong>ns <strong>to</strong> select the audio file <strong>to</strong> be loaded and press the F2 Load but<strong>to</strong>n. When loading <strong>is</strong> completed, the <strong>SD1</strong> goes back<br />
<strong>to</strong> the initial Sampler page.<br />
● Activate the Sync mode by cyclically pressing the F7 Pitch but<strong>to</strong>n.<br />
● Use F8 Bar <strong>to</strong> enter the number of bars the audio loop cons<strong>is</strong>ts of: The <strong>SD1</strong> offers a number of options obtained from the analys<strong>is</strong> of the<br />
audio file by pressing several times F8 Bar. The tempo value will be modified according <strong>to</strong> your choice.<br />
● Press SAVE/ENTER <strong>to</strong> save your settings: Th<strong>is</strong> d<strong>is</strong>plays a page where you can rename the file using the keys of the keyboard and the CUR-<br />
SOR +/- but<strong>to</strong>ns. Press F10 Exec <strong>to</strong> confirm the execution. If you maintain the same name, the <strong>SD1</strong> asks you if you w<strong>is</strong>h <strong>to</strong> overwrite the ex<strong>is</strong>ting<br />
file pressing F10 Overw.<br />
LOADING THE AUDIO LOOP INTO THE RAM<br />
If you have processed the audio file with the sampler, th<strong>is</strong> file <strong>is</strong> already loaded in the RAM and, as a matter of fact, the lighting LED on the<br />
RAM/FLASH but<strong>to</strong>n informs that there are samples selected.<br />
Otherw<strong>is</strong>e, make sure that the MASTER FOLDER <strong>is</strong> activated, enter the DISK menu, press F5 Folder Choice and then select F4 Sound. From<br />
the l<strong>is</strong>t d<strong>is</strong>played choose the audio file <strong>to</strong> be loaded in<strong>to</strong> the RAM using the VALUE +/- and CURSOR +/- but<strong>to</strong>ns, then select it with F10 Select<br />
and execute the loading operation pressing F2 Load. Pressing the EXIT but<strong>to</strong>n you return <strong>to</strong> the main d<strong>is</strong>play page.<br />
LOADING A MIDI FILE FROM THE FLOPPY DISK WHILE YOU ARE IN SONG PLAY<br />
●<br />
●<br />
●<br />
●<br />
●<br />
●<br />
●<br />
Introduce the floppy d<strong>is</strong>k with the Midi file (.MID extension) previously processed with the notes <strong>to</strong> be assigned <strong>to</strong> the loop.<br />
Press the special but<strong>to</strong>n on the control panel <strong>to</strong> activate SONG PLAY. The relevant led lights up.<br />
Use the PAGE +/- but<strong>to</strong>ns <strong>to</strong> select Floppy D<strong>is</strong>k.<br />
Press function key F5 Dir <strong>to</strong> d<strong>is</strong>play the l<strong>is</strong>t of files.<br />
On the d<strong>is</strong>play the first 20 of the s<strong>to</strong>red Midi files <strong>is</strong> shown. Use the VALUE +/- but<strong>to</strong>ns <strong>to</strong> d<strong>is</strong>play the next ones.<br />
Enter the number of the Midi file <strong>to</strong> be loaded using the numeric keypad (STYLES but<strong>to</strong>ns). The D<strong>is</strong>play goes back <strong>to</strong> the initial page of the<br />
Song Play menu.<br />
As soon as the loading operation <strong>is</strong> completed, the name and the number of the Midi file appears on the d<strong>is</strong>play<br />
LOADING A MIDI FILE FROM THE HARD DISK WHILE YOU ARE IN SONG PLAY<br />
●<br />
●<br />
●<br />
●<br />
●<br />
●<br />
Use the PAGE +/- but<strong>to</strong>ns <strong>to</strong> go <strong>to</strong> the hard d<strong>is</strong>k without exiting from Song Play.<br />
If the Hard D<strong>is</strong>k was already previously selected, on activating Song Play reference <strong>is</strong> made <strong>to</strong> a folder of the hard d<strong>is</strong>k.<br />
If Master Folder <strong>is</strong> activated, the reference folder <strong>is</strong> no. 91 Midi file.<br />
Press function key F5 Dir <strong>to</strong> d<strong>is</strong>play the l<strong>is</strong>t of files.<br />
On the d<strong>is</strong>play the first 20 of the s<strong>to</strong>red Midi files <strong>is</strong> shown. Use the VALUE +/- but<strong>to</strong>ns <strong>to</strong> d<strong>is</strong>play the next ones.<br />
Enter the number of the Midi file <strong>to</strong> be loaded using the numeric keypad (STYLES but<strong>to</strong>ns). The D<strong>is</strong>play goes back <strong>to</strong> the initial page of the<br />
Song Play menu.<br />
ASSIGNING AN AUDIO LOOP TO A MIDI PART<br />
After having loaded the modified Midi file, press F1 GM Part on the main Song play page. Use the PAGE +/- but<strong>to</strong>ns <strong>to</strong> move among the single<br />
parts. Select the part corresponding <strong>to</strong> the track created <strong>to</strong> control the sample, and then change the timbre selecting the desired audio loop<br />
from the RAM/FLASH bank. On starting, synchron<strong>is</strong>ation <strong>is</strong> au<strong>to</strong>matically carried out.<br />
The modified Midi file can be saved pressing SAVE/ENTER, which allows you <strong>to</strong> rename the Midi file using the keys of the keyboard and the<br />
CURSOR +/- but<strong>to</strong>ns. Press F10 Execute <strong>to</strong> confirm.<br />
CALLING UP THE AUDIO FILE AND THE MIDI FILE<br />
Replaying the Midi file with the correct audio loops requires previous creation of a Sound Block containing all the audio loops with the same<br />
name as the Midi file. Th<strong>is</strong> means that on calling up the Midi file, also all the necessary audio loops are loaded. It <strong>is</strong> preferable <strong>to</strong> load the samples<br />
in a sound block on starting the <strong>SD1</strong>, keeping in mind that during the loading operation neither the keyboard nor the timbres of the <strong>SD1</strong> can<br />
be used.<br />
OTHER AUDIO LOOP CONTROLS<br />
Pressing the # but<strong>to</strong>n activates and deactivates the sample loop, also during the execution of the Midi file.<br />
If in the RAM/FLASH bank there are other audio samples loaded with loops that have already been processed by the sampler for synchron<strong>is</strong>ation,<br />
these can be called up in real time, one after the other, without the need <strong>to</strong> modify the timbre assignment <strong>to</strong> a part. For th<strong>is</strong> purpose, press<br />
the INTRO 1, INTRO 2, INTRO3, FILL 1, FILL 2, FILL 3, BREAK and TO END but<strong>to</strong>ns while the Midi file <strong>is</strong> being executed. A maximum of eight<br />
audio files can be performed in th<strong>is</strong> way, <strong>to</strong> create real time re-mixing, like in a Dance.<br />
Loop activation can be controlled by MIDI messages like Note On/Off on the same MIDI channel where the audio file <strong>is</strong> handled. The following<br />
Sys-Ex expressed in hexadecimal values must be entered in<strong>to</strong> the Midi file <strong>to</strong> obtain th<strong>is</strong> type of control: F0, 26, 7B, 7C, 00, F7. Th<strong>is</strong> function <strong>is</strong><br />
most important if you w<strong>is</strong>h <strong>to</strong> use One Shot type audio samples like choruses, guitar riffs or special effects. If you know the Program Change<br />
138<br />
<strong>SD1</strong> Owner’s Manual
value, you may use the <strong>SD1</strong> sequencer or any sequencer software, even if not of the professional type, <strong>to</strong> exactly enter these audio events in<strong>to</strong><br />
the Midi file with the considerable advantage that the reading speed remains unaltered even if tempo and transposition <strong>is</strong> changed.<br />
USING AUDIO SAMPLES WITHOUT LOOP<br />
In th<strong>is</strong> case the notes set on the track dedicated <strong>to</strong> the use of the sample define both the point where the sample <strong>is</strong> <strong>to</strong> be activated and its<br />
pitch. After the Midi file has been imported in<strong>to</strong> the <strong>SD1</strong>, assign the sample <strong>to</strong> the track proceeding in the same way as with the audio loop and<br />
then save the modified Midi file. The Midi file will recogn<strong>is</strong>e the sample only if it <strong>is</strong> saved in the same source RAM/FLASH. Th<strong>is</strong> means that the<br />
samples util<strong>is</strong>ed must be saved in a Sound Block with the same name as the Midifile, also in order <strong>to</strong> achieve au<strong>to</strong>matic loading.<br />
ADVANCED PROGRAMMING<br />
The Midi file calls up the audio samples using Program Change messages relating <strong>to</strong> the RAM/FLASH bank. If the samples are arranged differently<br />
than in their original condition, a wrong replay takes place. Further <strong>to</strong> using Sound Blocks, th<strong>is</strong> problem can be avoided entering the audio<br />
file name at the <strong>begin</strong>ning of the Midi file using a sys-ex message (see table). In th<strong>is</strong> way, <strong>SD1</strong> searches for the sample within the RAM/FLASH<br />
bank avoiding the use of Program Changes, independently from the location within the RAM.<br />
SAMPLED AUDIO LOOP SYNCHRONISATION WITH A STYLE<br />
The <strong>SD1</strong> processes only samples of the .WAV type for sync. The sampled loop derived from the audio file should be of good quality and should<br />
contain a well defined Start and End point, and possibly also with the loop points already entered. The loop can also be cut and set on the <strong>SD1</strong><br />
sampler.<br />
COPYING AN AUDIO FILE FROM THE FLOPPY DISK TO THE HARD DISK<br />
●<br />
●<br />
●<br />
●<br />
●<br />
●<br />
●<br />
Format a 1,4 MB floppy d<strong>is</strong>k on the PC or on the Mac in 1, 4 MB MS-DOS format. For quicker reading from the floppy d<strong>is</strong>k, you should format<br />
the floppy d<strong>is</strong>k directly on the <strong>SD1</strong>, as described in the D<strong>is</strong>k chapter.<br />
Copy the audio .WAV file from the PC or the Mac on<strong>to</strong> the floppy d<strong>is</strong>k. Mac users must add the extension .WAV <strong>to</strong> the name. The <strong>SD1</strong> accepts<br />
names with up <strong>to</strong> eight characters, extension excluded.<br />
The MASTER FOLDER function must be activated (with lighting but<strong>to</strong>n LED) if you w<strong>is</strong>h <strong>to</strong> copy the audio file on<strong>to</strong> the hard d<strong>is</strong>k.<br />
Press the relevant but<strong>to</strong>n on the operating panel <strong>to</strong> enter the D<strong>is</strong>k menu.<br />
Use the PAGE +/- but<strong>to</strong>ns <strong>to</strong> select Floppy as source d<strong>is</strong>k.<br />
Highlight the file using the VALUE +/- and the CURSOR +/- but<strong>to</strong>ns (if the files are d<strong>is</strong>tributed on a number of pages) and use F10 Select<br />
<strong>to</strong> select it. Next <strong>to</strong> the file name the “” symbol appears.<br />
Press F4 Copy <strong>to</strong> start copying the file on<strong>to</strong> the Hard D<strong>is</strong>k. The <strong>SD1</strong> copies the file directly in<strong>to</strong> folder 94 “Sound” if Master Folder has been<br />
activated. The page called up pressing F4 Copy allows you <strong>to</strong> change the file name using the keys of the keyboard and the CURSOR +/- but<strong>to</strong>ns.<br />
Press F10 Execute <strong>to</strong> confirm that you actually w<strong>is</strong>h <strong>to</strong> copy the selected file.<br />
PRELIMINARY PROCESSING OF THE AUDIO LOOP<br />
The audio loop requires preliminary processing with the internal <strong>SD1</strong> sampler before you may use it.<br />
● Activate the MSP SAMPLER (the but<strong>to</strong>n LED will light up) on the main d<strong>is</strong>play page <strong>to</strong> load the audio file in<strong>to</strong> the sampler.<br />
● Make sure that the MASTER FOLDER but<strong>to</strong>n <strong>is</strong> activated and press F1 Load <strong>to</strong> d<strong>is</strong>play the l<strong>is</strong>t of audio files s<strong>to</strong>red in the Sound folder (no. 94).<br />
● Use the VALUE +/- but<strong>to</strong>ns <strong>to</strong> select the audio file <strong>to</strong> be loaded and press the F2 Load but<strong>to</strong>n. When loading <strong>is</strong> completed, the <strong>SD1</strong> goes back<br />
<strong>to</strong> the initial Sampler page.<br />
● Activate the Sync mode by cyclically pressing the F7 Pitch but<strong>to</strong>n.<br />
● Use F8 Bar <strong>to</strong> enter the number of bars the audio loop cons<strong>is</strong>ts of: The <strong>SD1</strong> offers a number of options obtained from the analys<strong>is</strong> of the<br />
audio file by pressing several times F8 Bar. The tempo value will be modified according <strong>to</strong> your choice.<br />
● Press SAVE/ENTER <strong>to</strong> save your settings: Th<strong>is</strong> d<strong>is</strong>plays a page where you can rename the file using the keys of the keyboard and the CUR-<br />
SOR +/- but<strong>to</strong>ns. Press F10 Exec. <strong>to</strong> confirm the execution. If you maintain the same name, the <strong>SD1</strong> asks you if you w<strong>is</strong>h <strong>to</strong> overwrite the<br />
ex<strong>is</strong>ting file pressing F10 Overw.<br />
LOADING THE AUDIO LOOP INTO THE RAM<br />
If you have processed the audio file with the sampler, th<strong>is</strong> file <strong>is</strong> already loaded in the RAM and, as a matter of fact, the lighting LED on the<br />
RAM/FLASH but<strong>to</strong>n informs that there are samples selected.<br />
Otherw<strong>is</strong>e, make sure that the MASTER FOLDER <strong>is</strong> activated, enter the DISK menu, press F5 Folder Choice and then select F4 Sound. From<br />
the l<strong>is</strong>t d<strong>is</strong>played choose the audio file <strong>to</strong> be loaded in<strong>to</strong> the RAM using the VALUE +/- and CURSOR +/- but<strong>to</strong>ns, then select it with F10 Select<br />
and execute the loading operation pressing F2 Load. Pressing the EXIT but<strong>to</strong>n you return <strong>to</strong> the main d<strong>is</strong>play page.<br />
COPYING THE STYLE TO MODIFY<br />
●<br />
The Style <strong>to</strong> modify must be copied in<strong>to</strong> Pattern Edit. From the main page of the D<strong>is</strong>play press PATTERN EDIT (the LED lights up) and then<br />
create a <strong>new</strong> Style pressing F10 New, enter the Style name using the keys of the keyboard and the CURSOR +/- but<strong>to</strong>ns and press F10<br />
Owner’s Manual <strong>SD1</strong> 139
●<br />
●<br />
●<br />
Create <strong>to</strong> confirm.<br />
Press F4 Copy.<br />
On the page that appears now press F1 Source and enter the Style <strong>to</strong> be modified using the VALUE +/- but<strong>to</strong>ns or directly on the numeric<br />
keypad (STYLES but<strong>to</strong>ns).<br />
Maintain the option Global in F3, where the Style part <strong>to</strong> be copied <strong>is</strong> defined, and maintain the option All Parts in F4, where the traces <strong>to</strong><br />
be copied are defined. Global and All Parts must also be set in F8 and F9. Press F10 Execute <strong>to</strong> confirm. At the end, press F5 Escape <strong>to</strong><br />
return <strong>to</strong> the first page of Pattern Edit..<br />
ASSIGNING THE AUDIO LOOP TO THE DRUM 2 TRACK<br />
The Drum 2 track within the Style <strong>is</strong> the only one enabled <strong>to</strong> use sampled audio loops or Live Drums. You must therefore assign it the loop you<br />
are going <strong>to</strong> use.<br />
● Press F1 Record from the first page of Pattern Edit.<br />
● Use the CURSOR +/- but<strong>to</strong>ns <strong>to</strong> go <strong>to</strong> Drum 2.<br />
● Proceed as follows <strong>to</strong> assign the audio loop <strong>to</strong> the track: Use the special but<strong>to</strong>n (the LED lights up) <strong>to</strong> all up the RAM/FLASH bank and use<br />
the function but<strong>to</strong>ns <strong>to</strong> select the audio loop loaded in the RAM. Press EXIT <strong>to</strong> go back <strong>to</strong> the Record page.<br />
● Repeat the same operation for the other Style sections indicated in F1 and use the VALUE +/- but<strong>to</strong>ns <strong>to</strong> call them up. Th<strong>is</strong> allows you <strong>to</strong><br />
decide which Style sections are <strong>to</strong> use the audio loop. The <strong>SD1</strong> makes it possible <strong>to</strong> assign up <strong>to</strong> 8 audio loops, one for each Style section.<br />
● Once you have completed your settings, save them pressing F5 Save and then press the EXIT but<strong>to</strong>n <strong>to</strong> go back <strong>to</strong> the initial Pattern Edit<br />
page.<br />
● You also may modify the audio loop velocity, which au<strong>to</strong>matically modifies the Volume. For th<strong>is</strong> purpose, enter the F1 Record menu from the<br />
initial Pattern Edit page and select F9 Velocity. The F6 Wave Velocity parameter <strong>is</strong> modified pressing the VALUE +/- but<strong>to</strong>ns. Press F5<br />
Escape <strong>to</strong> go back <strong>to</strong> the initial page.<br />
ACTIVATING THE LOOP SYNC<br />
●<br />
●<br />
●<br />
On the initial Pattern Edit page, activate function F9 Wave Sync.<br />
The page d<strong>is</strong>played allows you <strong>to</strong> activate the Loop Sync for the single Style sections pressing the relevant function but<strong>to</strong>n and setting the<br />
parameter <strong>to</strong> On.<br />
Press F10 Save <strong>to</strong> save the settings and press EXIT <strong>to</strong> exit from Pattern Edit.<br />
USING THE STYLE WITH LOOP SYNC<br />
The Style modified according <strong>to</strong> the above procedure <strong>is</strong> saved on the hard d<strong>is</strong>k as a<br />
Single Style and can be called up at any time pressing the SINGLE RAM STYLE but<strong>to</strong>n and entering the number on the numeric keypad (STYLES<br />
but<strong>to</strong>ns), or selecting it from folder 95 “Styles” (if Master Folder <strong>is</strong> active) from the d<strong>is</strong>played l<strong>is</strong>t by pressing the BLOCK/LIST RAM STYLE<br />
but<strong>to</strong>n.<br />
The name and the number of the selected Style are indicated on the left <strong>to</strong>p of the d<strong>is</strong>play. To modify volume, reverb, effects and pan of the<br />
loop assigned <strong>to</strong> Drum 2, use the Arrange View parameters.<br />
Any time you use the Style with a loop that was sampled in Sync, <strong>SD1</strong> loads in<strong>to</strong> the RAM memory the relevant audio samples. To avoid <strong>to</strong>o long<br />
waiting times, it <strong>is</strong> recommended <strong>to</strong> create a Style Block <strong>to</strong> be loaded on switching on the instrument.<br />
140<br />
<strong>SD1</strong> Owner’s Manual