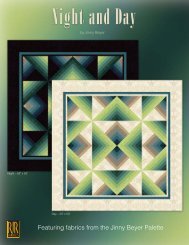
High Desert - Plum Creek Quilts
High Desert - Plum Creek Quilts
High Desert - Plum Creek Quilts

You also want an ePaper? Increase the reach of your titles
YUMPU automatically turns print PDFs into web optimized ePapers that Google loves.
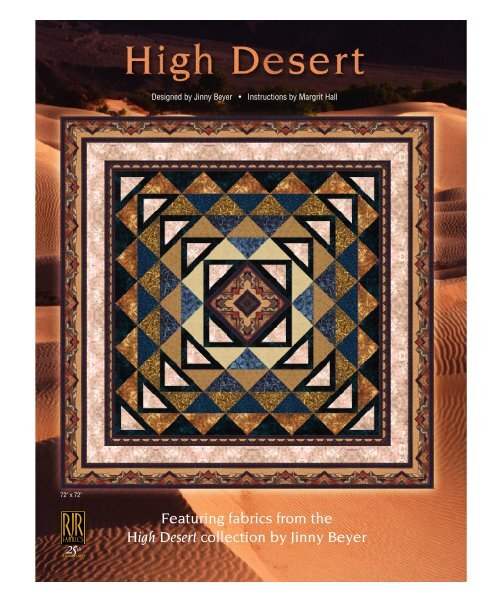
72" x 72"<br />
Designed by Jinny Beyer • Instructions by Margrit Hall
All strips are to be cut on crosswise grain of the fabric (width of the fabric)<br />
unless stated otherwise. All strips are based on 42" long strips. Press all<br />
seams toward arrows. Carefully trim off all selvages. Please Read the<br />
Pattern Carefully Before You Begin.<br />
For cutting the 1 9 /16" strips, use a ruler with 1 /16" gradients or use the<br />
enclosed cutting guide template.<br />
Fabric Cutting Directions<br />
1 4459-1 See directions in the pattern.<br />
2 4461-3 Cut (4) 3 1 /2" x 1 7 /8 yard strips for the 2nd border (length of<br />
fabric). From the remaining fabric, cut (10) 5 5 /8" squares.<br />
Cut each square once on the diagonal to make (20) triangles.<br />
3 4464-11 Cut (1) 6 7 /8" strip. Cut strip into (4) 6 7 /8" squares. Cut<br />
each square once on the diagonal to make (8) triangles.<br />
4 1535-10 Cut (1) 6 7 /8" strip. Cut strip into (6) 6 7 /8" squares. Cut<br />
each square once on the diagonal to make (12) triangles.<br />
5 4462-3 Cut (2) 6 7 /8" strips. Cut strips into (8) 6 7 /8" squares. Cut<br />
each square once on the diagonal to make (16) triangles.<br />
6 4461-11 Cut (2) 6 7 /8" strips. Cut strips into (10) 6 7 /8" squares. Cut<br />
each square once on the diagonal to make (20) triangles.<br />
7 4460-1 Cut (1) 6 7 /8" strip. Cut strip into (2) 6 7 /8" squares. Cut<br />
each square once on the diagonal to make (4) triangles.<br />
8 4462-1 Cut (1) 6 7 /8" strip. Cut strip into (4) 6 7 /8" squares. Cut<br />
each square once on the diagonal to make (8) triangles.<br />
9 4464-1 Cut (1) 6 7 /8" strip. Cut strip into (6) 6 7 /8" squares. Cut<br />
each square once on the diagonal to make (12) triangles.<br />
10 4461-21 Cut (1) 9 5 /8" strip. Cut strip into (4) 9 5 /8" squares. Cut<br />
each square twice on the diagonal to make (16) triangles.<br />
Cut (14) 1 9 /16" strips.<br />
Use (5) of the strips to cut (20) Template A<br />
(see illustration at right).<br />
Use (4) of the strips to cut (20) Template B. Cut right-side-up<br />
and do not fold fabric (see illustration at right).<br />
Use (5) of the strips to cut (20) Template C. Cut right-side-up<br />
and do not fold fabric (see illustration at right).<br />
Quilt Center Block<br />
Before beginning to piece the quilt, make the center block. Cut (4) 2 1 /8" x 60"<br />
(1 2 /3 yard) strips from the narrow stripe of the border print. Then cut (4)<br />
5" x 2 1 /2 yard strips from the wider stripe<br />
of the border print. The remaining portion<br />
of the border print will be used to<br />
construct the center block.<br />
Make a see-through template using template plastic for Template D. Center the<br />
template on the large motif in the remaining border print stripe as illustrated<br />
below. Cut three more identical triangles and sew together as illustrated.<br />
Cutting Guide for Rotary Cutting<br />
Make a paper template with the enclosed cutting guide template.<br />
Carefully place one edge of the template along the edge of the ruler and<br />
tape in place. Using the template as a guide, cut the strip the same width<br />
as the template.<br />
A A A<br />
B<br />
C<br />
Template A<br />
B<br />
Template B<br />
Template C<br />
Flying Geese Sections<br />
Sew a fabric 10 Template A to the bottom of a fabric 2 triangle. Sew a fabric 10<br />
Template B to the right side of the triangle, and a fabric 10 Template C to the<br />
left side of the triangle to make unit 1. Make (20). Sew a fabric 3 to each side<br />
of (4) unit 1s to make the flying geese unit. Repeat the process using fabrics<br />
4, 5, and 6. Use the following diagram to sew units together to make a flying<br />
geese section.<br />
10 10<br />
Fabric 2 Fabric 2<br />
10<br />
10<br />
C<br />
B<br />
10<br />
Press Seams Open<br />
10<br />
Fabric 2<br />
10<br />
10<br />
Fabric 2<br />
10<br />
10<br />
Unit 1 – Make (20)<br />
3<br />
10<br />
Flying Geese Unit – Make (4) each<br />
with fabrics 3, 4, 5 and 6<br />
3
Fabric 3<br />
Fabric 4<br />
Fabric 5<br />
Fabric 6<br />
Fabric 10<br />
Fabric 10<br />
Fabric 2<br />
Fabric 10<br />
Fabric 10<br />
Fabric 10<br />
Fabric 2<br />
Fabric 10<br />
Fabric 10<br />
Fabric 10<br />
Fabric 2<br />
Fabric 10<br />
Fabric 10<br />
Fabric 10<br />
Fabric 2<br />
Fabric 10<br />
Fabric 10<br />
Fabric 10<br />
Fabric 2<br />
Fabric 10<br />
Fabric 3<br />
Fabric 4<br />
Fabric 5<br />
Fabric 6<br />
Flying Geese Section – Make (4)<br />
Triangle Sections<br />
Sew a fabric 4 triangle to a fabric 7 triangle. Make (4). Repeat, sewing a fabric<br />
5 triangle to a fabric 8 triangle. Make (8). Sew a fabric 6 triangle to a fabric 9<br />
triangle. Make (12). Using the squares and fabric 10 triangles, sew together<br />
according to the following illustration.<br />
Fabric 4<br />
Fabric 7<br />
Fabric 10<br />
Fabric 6<br />
Fabric 9<br />
Fabric 10<br />
Fabric 5<br />
Fabric 8<br />
Fabric 6<br />
Fabric 9<br />
Fabric 4<br />
Fabric 7<br />
Fabric 10<br />
Fabric 5<br />
Fabric 8<br />
Fabric 6<br />
Fabric 9<br />
Fabric 10<br />
Fabric 10<br />
Fabric 6<br />
Fabric 9<br />
Fabric 10<br />
Fabric 5<br />
Fabric 8<br />
Fabric 6<br />
Fabric 9<br />
Fabric 4<br />
Fabric 7<br />
Fabric 10 Fabric 10<br />
Fabric 5<br />
Fabric 8<br />
Fabric 6<br />
Fabric 9<br />
Make (4)<br />
Sew the body of the quilt together.<br />
Triangle Sections<br />
Flying Geese<br />
Section<br />
Flying Geese<br />
Section<br />
Triangle Sections<br />
Border Print Square<br />
Triangle Sections<br />
Border Print Square<br />
Flying Geese<br />
Section<br />
Flying Geese<br />
Section<br />
Triangle Sections
Borders<br />
1. Fold each border print in half, dividing the mirrored-imaged sections into<br />
two equal halves. Press on fold.<br />
4. Fold the border unit as shown. The design motifs should be exactly the<br />
same on both and should be precisely matched. Measure 25 1 /2" from the<br />
center fold. Place a dot a 1 /4" up from the bottom edge of the border.<br />
Border 1<br />
Border 3<br />
2. Fold border 2 in half. Press on fold.<br />
Matching the folds, sew the three borders together as illustrated.<br />
25 1 /2"<br />
5. Lay a ruler with the 45˚ marking along the top of the border and the edge of<br />
the ruler through the dot. Cut.<br />
6. Match the center of the border to the center of your quilt. Sew the border to<br />
the center of the quilt. Sew the border to the quilt (do not sew through the<br />
seam allowances).<br />
Press<br />
3. Fold the quilt in half, and measure across the middle. It should measure<br />
25 1 /2". If your measurement is different, use your measurements for the<br />
following steps.<br />
7. Sew miters last, carefully matching the design motifs.<br />
Sew to the dots (do not sew through the seam<br />
allowances). See pattern cover for illustration of<br />
completed borders.<br />
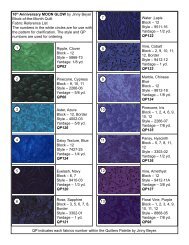
Fabric Requirement Chart<br />
Fabric Swatch Fabric # Style # Description Yardage<br />
1 4459-1 <strong>High</strong> <strong>Desert</strong> Border 21/2<br />
2 4461-3 beige Canvas 17/8<br />
3 4464-11 beige Palm 1/2<br />
4 1535-10 taupe Etch 1/2<br />
5 4462-3 gold Lichen 1/2<br />
6 4461-11 gold Canvas 1/2<br />
7 4460-1 blue <strong>High</strong> <strong>Desert</strong> Floral 1/2<br />
8 4462-1 teal Lichen 1/2<br />
9 4464-1 blue Palm 1/2<br />
10 4461-21 teal Canvas 13/8<br />
© 2003 RJR Fabrics
19/16" cutting guide<br />
Template B<br />
Top<br />
(cut with top side up)<br />
Template A<br />
Template C<br />
Top<br />
(cut with top side up)<br />
Center<br />
Template D<br />
Draw half of template on see-through template plastic.<br />
Flip and draw second half. Mark perpendicular<br />
line on center of triangle.<br />
base<br />
mark center<br />
Base