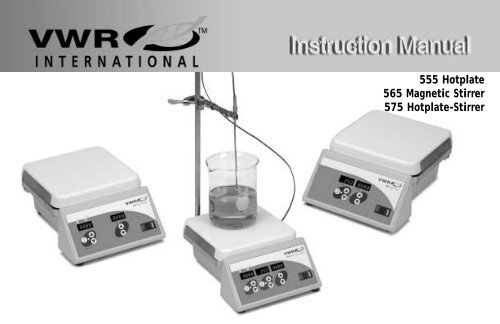
555 Hotplate 565 Magnetic Stirrer 575 Hotplate-Stirrer
555 Hotplate 565 Magnetic Stirrer 575 Hotplate-Stirrer
555 Hotplate 565 Magnetic Stirrer 575 Hotplate-Stirrer

You also want an ePaper? Increase the reach of your titles
YUMPU automatically turns print PDFs into web optimized ePapers that Google loves.
<strong>555</strong> <strong>Hotplate</strong><br />
<strong>565</strong> <strong>Magnetic</strong> <strong>Stirrer</strong><br />
<strong>575</strong> <strong>Hotplate</strong>-<strong>Stirrer</strong>
TABLE OF CONTENTS<br />
Package Contents . . . . . . . . . . . 1<br />
Controls . . . . . . . . . . . 2<br />
Installation . . . . . . . . . . . 3<br />
Maintenance & Servicing . . . . . . . . . . 3<br />
Temperature Probe . . . . . . . . . . . 3<br />
Safety Instructions . . . . . . . . . . . 3<br />
Safety Features . . . . . . . . . . . 4<br />
Environmental Conditions . . . . . . . . . . 4<br />
<strong>Hotplate</strong> Model <strong>555</strong> . . . . . . . . . . . 5,6<br />
<strong>Stirrer</strong> Model <strong>565</strong> . . . . . . . . . . . 7,8<br />
<strong>Hotplate</strong>-<strong>Stirrer</strong> Model <strong>575</strong> . . . . . . . . . 9,10<br />
PACKAGE CONTENTS<br />
<strong>Hotplate</strong>, <strong>Stirrer</strong>, or Hoplate-stirrer with mounting bracket<br />
Instruction manual<br />
Power Cord<br />
J-type thermocouple, (provided <strong>Hotplate</strong>-stirrer)<br />
Teflon stirbar (provided with <strong>Hotplate</strong>-stirrer and <strong>Stirrer</strong>)<br />
1
CONTROL PANEL<br />
The front panel of the Series 500 hotplate/stirrer/hotplate-stirrer contain all<br />
switches, controls and displays needed to operate the unit.<br />
Rocker switch: Press left side to turn power on, right side to shut off power.<br />
Time display: Shows how long the unit has been heating (continuous mode)<br />
or how much time is left to heat (timed mode). The display range is from 0<br />
to 9,999 minutes in one second increments.<br />
Speed display: Shows the speed of the stirrer. up/down arrows for setpoint<br />
control. On/Off button starts/stops stirring feature. Speed range is from 60<br />
to 2000rpm<br />
Temperature display: Shows the actual/setpoint temperatures, up/down<br />
arrows for setpoint control, On/Off button starts/stops the heating feature.<br />
Plate indicator light: Lights when the external temperature probe is not<br />
being used. The actual temperature displayed is the top-plate temperature.<br />
Probe indicator light: Lights when the external temperature probe is<br />
plugged in. The actual temperature displayed is the probe temperature, not<br />
the top-plate temperature.<br />
Actual indicator light: Lights when the temperature displayed is the actual<br />
temperature of the top-plate/temperature probe.<br />
Setpoint indicator light: Lights when the setpoint temperature is displayed.<br />
Plate hot indicator light: Lights when the top-plate temperature is above<br />
40 o C.<br />
2
INSTALLATION<br />
After unpacking, place your VWR Series 500 microprocessor-controlled hotplate/stirrer/hotplate-stirrer on a level bench or table, away from<br />
explosive vapors. Be sure the unit is well clear of papers, drapery and curtains, and other flammable materials.<br />
The 120v and 230v units are supplied with a 3-prong power cord that should be plugged into a standard 3-prong grounded outlet.<br />
PLEASE NOTE: If you observed any damage to the carton or now see any shipping damage to the unit, contact the carrier immediately to file a claim.<br />
MAINTENANCE & SERVICING<br />
Your VWR Series 500 Microprocessor-controlled hotplate/stirrer/hotplate-stirrers are built for long, trouble-free, dependable service. It needs no<br />
user maintenance beyond keeping the surface of the top plate and the control panel clean. Spills should be removed promptly after the unit has<br />
cooled down. Do not use any cleaning agent or solvent on the front panel which is abrasive or harmful to plastics, nor one which is flammable.<br />
If the unit ever requires service, contact your VWR International sales office for repairs at 1-800-932-5000.<br />
TEMPERATURE PROBE:<br />
Use J-type thermocouple VWR International Cat. No. 333918-341. The probe plugs into the back of the hotplate and hotplate-stirrer.<br />
SAFETY INSTRUCTIONS<br />
CAUTION! The top plate of the Series 500 hotplate/hotplate-stirrers can reach 450 o C. DO NOT TOUCH the heated surface. Use caution at<br />
<br />
all times. Keep the unit away from other objects. Place the unit a minimum of six (6) inches from vertical surfaces.<br />
Caution! Keep the unit away from explosive vapors, and clear of papers, drapery, curtains, and other flammable materials.<br />
<br />
<br />
<br />
<br />
<br />
3<br />
CAUTION! Do not operate the unit at high temperature without a vessel on the top plate.<br />
CAUTION! Always operate the unit on a level surface for best performance and maximum safety.<br />
CAUTION! Keep the electrical cord away from the heater plate<br />
WARNING! Do not use the Series 500 hotplate/stirrer/hotplate-stirrers in a hazardous atmosphere or with hazardous materials. Also, the user<br />
should be aware that the protection provided by the equipment might be impaired if used with accessories not provided or recommended by<br />
manufacturer, or used in a manner not specified by the manufacturer.
SAFETY FEATURES:<br />
When the external temperature probe is being used, the actual temperature shown on the display is the temperature of external temperature<br />
probe, NOT the plate temperature. The plate temperature can heat up to 450 o C while trying to heat the liquid in the container. If you are<br />
working with a flammable substance, set the plate over-temperature limit below the flash point of that substance as follows:<br />
Example: Change the plate over-temperature limit from the current 450 o C to 200 o C<br />
1. Start with the unit off.<br />
2. Press and hold the On/Off button below the temperature display while turning the unit on (press the left side of the rocker switch). The temperature<br />
displayed is the current plate over-temperature limit setting, 450 o C. Press the up/down arrows until the display reads 200 o C.<br />
3. After approximately 2 seconds, the display will blink off, then on again to store the new setting.<br />
4. The new over-temperature limit is now set for 200 o C. Turn the unit off before using.<br />
When you turn the unit on, the temperature setpoint can still show up to 400 o C, but the unit will not heat above the new over-temperature<br />
limit you have stored. This new setting will remain until you re-programmed it.<br />
If the unit heats above the plate over-temperature limit (factory programmed 450 o C or re-programmed limit) the heater will automatically<br />
shut off, the unit will still stir if that function has been programmed. The unit will automatically start to heat again when the top-plate has<br />
cooled to below the plate over-temperature limit.<br />
If the setpoint stirring speed cannot be reached in 2-1/2 minutes, the heater will be turned off. If the unit reaches the setpoint speed, but<br />
cannot maintain it, the heater will be turned off. The stirrer stays on and keeps trying to reach the setpoint speed. The display flashes to<br />
show the time of the failure. The stirring speed setpoint needs to be reduced if this occurs.<br />
ENVIRONMENTAL CONDITIONS<br />
Non-Operating Storage:<br />
Temperature: -20 to 65 o C (-4 to 149 o F)<br />
Humidity: 20% to 85% RH, non-condensing<br />
Operating Conditions: Indoor use only<br />
Temperature: 10 to 40 o C (50 to 104 o F)<br />
Humidity: 20% to 85% RH, non-condensing<br />
Altitude: 0 to 6,562 ft. (2000M) above sea level<br />
Installation Category II and pollution degree 2 in accordance with IEC 664 4
<strong>555</strong> <strong>Hotplate</strong><br />
Specifications:<br />
Catalog No:<br />
14217-600 - 120v<br />
14217-606 - 230v<br />
Dimensions:<br />
W x H x D<br />
8-1/4" x 5" x 12"<br />
(20.96cm x 12.7cm x 30.48cm)<br />
Weight Capacity: 25 lbs.<br />
Top plate: Ceramic 7 x 7<br />
Voltage:<br />
120V/230V<br />
Probe indicator<br />
light<br />
Current:<br />
Fuses:<br />
120v - 7 amps<br />
230v - 4 amps<br />
120v - 5mm x 20mm 10 amp quick acting<br />
230v - 5mm x 20mm, 5 amp quick acting<br />
Plate indicator<br />
light<br />
Actual indicator<br />
light<br />
Set point<br />
indicator light<br />
Temperature display<br />
On/Off button<br />
Plate hot<br />
indicator light<br />
Time display<br />
Power switch<br />
Power: 800 watts<br />
Temp. Accuracy: +/- 3% at 400 o C w/temperature probe<br />
+/- 1% below 100 o C w/temperature probe<br />
Controls: 2-way rocker switch<br />
Timer: Digital, LED, 1 second to 9999<br />
minutes (increased in 1 second increments)<br />
Up/Down Keypad for setpoint control<br />
Temperature: ambient to 400 o C<br />
Digital, LED,<br />
Up/Down Keypad for setpoint control<br />
On/Off keypad<br />
5<br />
Ship weight:<br />
10.5 lbs. (5kg)
OPERATION<br />
1. Get ready: Place a vessel with the solution and the appropriate accessories in the center of the top plate. It is important because the vessel<br />
should be over the hottest part of the top-plate.<br />
2. Power: Press the left side of the rocker switch to the "Run" position. The Time and Temperature displays will light. On power-up, allow the unit<br />
approximately 30 seconds to stabilize before accurate temperature readings are displayed.<br />
3. Set Timed: Press the up/down arrow below the time display until you reach the desired time. When the unit is started by pressing the<br />
"ON/OFF" button under the temperature display, the unit will run for the selected time and shut off automatically. To repeat for the same time,<br />
simply depress the "ON/OFF" button again. To interrupt an automatic timing cycle before it is complete, press the "ON/OFF" button below the<br />
temperature display.<br />
4. Set Continuous: To accumulate time on the display set timer to zero (0) using the up/down arrows below time display. When the unit is started<br />
by pressing the "ON/OFF" button under the temperature display, the unit time display will show actual running time. To stop, press the<br />
"ON/OFF" button under the temperature display.<br />
5. Set Temperature: Press the up/down arrows below the temperature display until you reach the desired temperature.<br />
6. Adjust Temperature: Temperature adjustments can be made to the temperature setpoint without interrupting heating using the up/down arrows<br />
below the temperature display<br />
7. Stop: To stop heating, press the "ON/OFF" button below the temperature display. To turn the unit off, press the power switch to the right.<br />
OPERATING TIPS:<br />
The heater is designed to climb at a steady rate until it reaches the setpoint. It may overshoot by up to 5 o C before finally stabilizing at the setpoint.<br />
Two methods are suggested to minimize overshoot.<br />
1. Metal containers minimize overshoot.<br />
2. If a glass vessel is used, anticipate overshoot. Start with a setting 5 - 10 o C below the desired temperature. When the temperature stabi<br />
lizes at this lower setting, program the unit to go to the final temperature, using the up arrow. Overshoot is then reduced to about 1 o C.<br />
The plate sensor shows the actual temperature of the plate, the vessel being heated may be at a lower temperature depending on the size and<br />
insulating qualities of the vessel. It may be beneficial to monitor the temperature of the vessel contents and adjust the setpoint temperature<br />
accordingly.<br />
6
<strong>565</strong> <strong>Magnetic</strong> <strong>Stirrer</strong><br />
Specifications:<br />
Catalog No:<br />
14217-602 - 120v<br />
14217-608 - 230v<br />
Dimensions:<br />
W x H x D<br />
8-1/4" x 5" x 12"<br />
(20.96cm x 12.7cm x 30.48)<br />
Weight Capacity: 25 lbs<br />
Top plate: Ceramic 7 x 7<br />
Voltage:<br />
120v/230v<br />
Current:<br />
1 amp<br />
Fuses:<br />
5mm x 20mm 5 amp quick actng<br />
Power:<br />
50 watts<br />
Speed:<br />
60 to 2000rpm<br />
Controls:<br />
2 way rocker switch<br />
Speed<br />
On/Off keypad<br />
Speed display<br />
Time display<br />
Power switch<br />
Ship weight:<br />
Timer: Digital, LED, 1 second to 9999<br />
minutes (increased in 1 second increments)<br />
Up/Down Keypad for setpoint control<br />
Speed: 60 to 2000rpm<br />
Digital, LED,<br />
Up/Down Keypad for setpoint control<br />
On/Off Keypad<br />
10.5 lb (5kg)<br />
7
OPERATION<br />
1. Get Ready: Place a vessel with the solution and the appropriate accessories in the center of the top plate. It is important for stirring,<br />
the stir-bar will be well within the magnetic field.<br />
2. Power: Press the left side of the rocker switch to the "Run" position. The Time and Speed displays will light.<br />
3. Set Timed: Press the up/down arrow below the time display until you reach the desired time. When the unit is started by pressing the "ON/OFF"<br />
button below the speed display, the unit will run for the selected time and shut off automatically. To repeat for the same time, simply depress<br />
the "ON/OFF" button again. To interrupt an automatic timing cycle before it is complete, press the "ON/OFF" button below the speed display.<br />
4. Set Continuous: To accumulate time in the display set timer to zero (0) using the up/down arrows below time display. When the unit is<br />
started by pressing the "ON/OFF" button under the speed display, the time display will show actual running time. To stop, press the<br />
"ON/OFF" button below the speed display.<br />
5. Set Speed: Press the up/down arrow below the speed display until you reach the desired speed.<br />
6. Adjust Speed: Speed adjustments can be made to the speed setpoint while in use, by pressing the up/down arrows below the speed display.<br />
7. Stop: To turn the unit off, press the power switch to the right.<br />
OPERATING TIPS:<br />
The model <strong>565</strong> stirrer increases speed at a steady rate until the setpoint is reached, if the stir-bar is larger than 1 inch long or the liquid is<br />
too viscous, the stirbar may not reach its setpoint. The setpoint speed needs to be reduced.<br />
8
<strong>575</strong> <strong>Hotplate</strong> <strong>Stirrer</strong><br />
9<br />
Plate indicator<br />
light<br />
Actual indicator<br />
light<br />
Set point<br />
indicator light<br />
Probe indicator<br />
light<br />
Temperature display<br />
Temperature<br />
On/Off button<br />
Plate hot<br />
indicator light<br />
Speed display<br />
Speed<br />
On/Off button<br />
Time display<br />
Power switch<br />
Specifications:<br />
Catalog No: 14217-604 - 120v<br />
14217-610 - 230v<br />
Dimensions: W x H x D<br />
8-1/4" x 5" x 12"<br />
(20.96cm x 12.7cm x 30.48)<br />
Weight Capacity: 25 lbs<br />
Top plate: Ceramic 7 x 7<br />
Voltage: 120v/230v<br />
Current: 120v - 7 amps<br />
230v - 4 amps<br />
Fuses: 120v - 5mm x 20mm, 10 amp quick acting<br />
230v - 5mm x 20mm, 5 amp quick acting<br />
Power: 800 watts<br />
Speed: 60 to 2000rpm<br />
Temp. Accuracy: +/- 3% at 400 o C w/temperature probe<br />
+/- 1% below 100 o C w/temperature probe<br />
Controls: 2 way rocker switch<br />
Timer: Digital, LED, 1 second to 9999<br />
minutes (increased in 1 second increments)<br />
Up/Down Keypad for setpoint control<br />
Speed: 60 to 2000rpm<br />
Digital, LED,<br />
Up/Down keypad for setpoint control<br />
On/Off button<br />
Temperature: ambient to 400 o C<br />
Digital, LED,<br />
Up/Down Keypad for setpoint control<br />
On/Off button<br />
Ship weight: 10.5 lbs. (5kg)
OPERATION<br />
1. Get Ready: Place a vessel with the solution and the appropriate accessories in the center of the top plate. It is important for two reasons: for<br />
heating, the vessel will be over the hottest part of the top-plate; for stirring, the stir-bar will be well within the magnetic field.<br />
2. Power: Press the left side of the rocker switch to the "Run" position. The Time, Speed and Temperature displays will light. On power-up, allow<br />
the unit approximately 30 seconds to stabilize before accurate temperature readings are displayed.<br />
3. Set Timed: Press the up/down arrow below the time display until you reach the desired time. When the unit is started by pressing the "ON/OFF"<br />
button below the temperature or speed display, the unit will run for the selected time and shut off automatically. To repeat for the same time,<br />
simply depress the "ON/OFF" button again. To interrupt an automatic timing cycle before it is complete, press the "ON/OFF" button below the<br />
temperature or speed display.<br />
4. Set Continuous: To accumulate time in the display set timer to zero (0) using the up/down arrows below time display. When the unit is started<br />
by pressing the "ON/OFF" button under the temperature or speed display, the time display will show actual running time. To stop, press the<br />
"ON/OFF" button below the temperature or speed display.<br />
5. Set Temperature: Press the up/down arrows below the temperature display until you reach the desired temperature.<br />
6. Adjust Temperature: Temperature adjustments can be made to the temperature setpoint without interrupting heating using the up/down arrows<br />
below the temperature display<br />
7. Set Speed: Press the up/down arrow below the speed display until you reach the desired speed.<br />
8. Adjust Speed: Speed adjustments can be made to the speed setpoint while in use, by pressing the up/down arrows below the speed display.<br />
9. Stop: To stop heating, press the "Off" button below the temperature display. To turn the unit off, press the power switch to the right.<br />
OPERATING TIPS:<br />
The heater is designed to climb at a steady rate until it reaches the setpoint. It may overshoot by up to 5 o C before finally stabilizing at the setpoint.<br />
Two methods are suggested to minimize overshoot.<br />
1. Metal containers minimize overshoot.<br />
2. If a glass vessel is used, anticipate overshoot. Start with a setting 5 - 10 o C below the desired temperature. When the temperature stabilizes<br />
at this lower setting, program the unit to go to the final temperature, using the "up" arrow. Overshoot is then reduced to about 1 o C.<br />
The plate sensor shows the actual temperature of the plate, the vessel being heated may be at a lower temperature depending on the size and<br />
insulating qualities of the vessel. It may be beneficial to monitor the temperature of the vessel contents and adjust the setpoint temperature<br />
accordingly if required.<br />
10
MANUFACTURED BY:<br />
HENRY TROEMNER LLC<br />
201 Wolf Drive ● PO Box 87 ● Thorofare, NJ 08086-0087<br />
Phone: 856-686-1600 ● Fax: 856-686-1601<br />
www.troemner.com ● email: troemner@troemner.com<br />
586050-00 4-047-INS Rev (1/03)