Parrot UNIKA for Mercedes cars
Parrot UNIKA for Mercedes cars
Parrot UNIKA for Mercedes cars

Create successful ePaper yourself
Turn your PDF publications into a flip-book with our unique Google optimized e-Paper software.
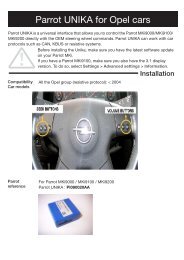
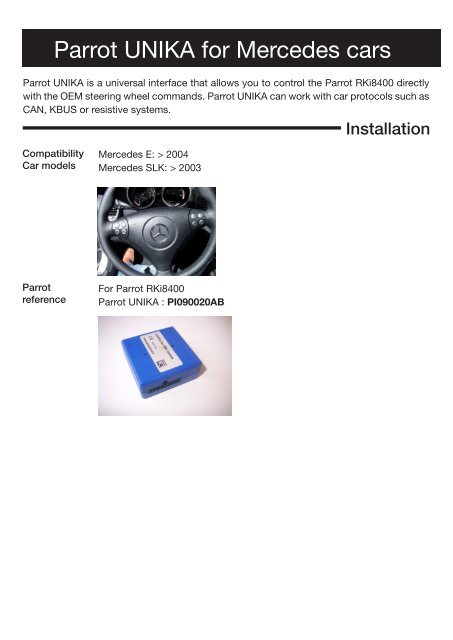
<strong>Parrot</strong> <strong>UNIKA</strong> <strong>for</strong> <strong>Mercedes</strong> <strong>cars</strong><br />
<strong>Parrot</strong> <strong>UNIKA</strong> is a universal interface that allows you to control the <strong>Parrot</strong> RKi8400 directly<br />
with the OEM steering wheel commands. <strong>Parrot</strong> <strong>UNIKA</strong> can work with car protocols such as<br />
CAN, KBUS or resistive systems.<br />
Installation<br />
Compatibility<br />
Car models<br />
<strong>Mercedes</strong> E: > 2004<br />
<strong>Mercedes</strong> SLK: > 2003<br />
<strong>Parrot</strong><br />
reference<br />
For <strong>Parrot</strong> RKi8400<br />
<strong>Parrot</strong> <strong>UNIKA</strong> : PI090020AB
Installation<br />
Installation of<br />
the <strong>Parrot</strong> RKi<br />
Selecting the<br />
protocol<br />
We recommend you to install the <strong>Parrot</strong> RKi be<strong>for</strong>e installing the<br />
<strong>UNIKA</strong>. Make sure the installation is correctly per<strong>for</strong>med by checking if the<br />
«Good bye» message is displayed when you turn off the ignition.<br />
► Refer to the documentation of your <strong>Parrot</strong> RKi <strong>for</strong> more in<strong>for</strong>mation.<br />
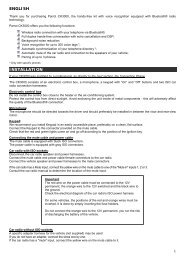
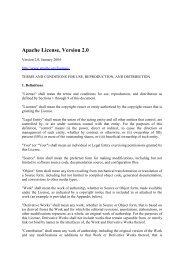
Use the DIP switches located on one side of the <strong>UNIKA</strong> to select the<br />
protocol (resistive or CAN Bus / KBus) on which the vehicle is based.<br />
Warning: Make sure the <strong>UNIKA</strong> is not powered be<strong>for</strong>e selecting the<br />
protocol.<br />
For your car set the DIP this way.<br />
Installing the<br />
<strong>UNIKA</strong> with<br />
the <strong>Parrot</strong><br />
RKi8400<br />
• Replace the MKi part on the <strong>UNIKA</strong> cable by the provided RKi part.<br />
• Connect the <strong>UNIKA</strong> between the <strong>Parrot</strong> RKi8400 and the vehicle wiring.<br />
Warning : Connect the ignition to the <strong>Parrot</strong> car kit if the vehicle is<br />
based on a resistive or a K-Bus protocol. Don’t connect the ignition<br />
if the vehicle is based on a CAN protocol as this signal is supplied by<br />
the <strong>Parrot</strong> <strong>UNIKA</strong>.<br />
12V ignition is provided by CAN protocol
CAN / KBus protocol<br />
The wires corresponding to the CAN / KBUS protocol must be connected correctly to your car<br />
stereo’s. It is important to follow the wiring diagram <strong>for</strong> your vehicle.<br />
Defining the<br />
mode<br />
If your vehicle is based on a CAN Bus or KBus protocol, the mode (A, B,<br />
C or D) is automatically defined. The LED blinks in red and turns green<br />
once the mode is defined.<br />
Checking the<br />
wiring<br />
Once your <strong>UNIKA</strong> interface has been fitted, the LED should light up green<br />
and should turn amber while pressing a button on your steering wheel.<br />
If the LED does not light up, check the power supply connections. If the<br />
LED is red or blinks red, check the CAN wire connections.<br />
Warning : Once the installation is complete, turn the ignition off until the <strong>UNIKA</strong> LED<br />
switches off.<br />
Reset<br />
procedure<br />
In case of problem or if you have installed the <strong>UNIKA</strong> interface in another<br />
car, reset the <strong>UNIKA</strong> by holding down the Reset button until the LED turns<br />
off (if the vehicle is based on a CAN Bus / KBus protocol) or blinks red (resistive<br />
protocol). You can then release the reset button.
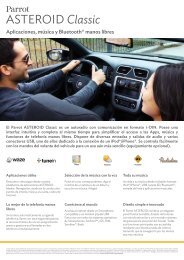
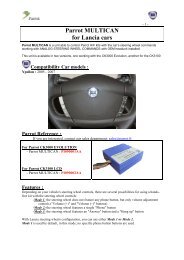
CAN Configuration <strong>Mercedes</strong><br />
The wires corresponding to the CAN protocol must be connected correctly to your car<br />
stereo’s CAN in<strong>for</strong>mation. It is important to follow the wiring diagram <strong>for</strong> your vehicle. We<br />
would advise our customers to have the interface fitted by a professional.<br />
N° Color Description<br />
1 Green CAN High<br />
2 White CAN Low<br />
Fakra male connexion<br />
Not used Violet K-BUS<br />
Fakra female connexion<br />
<strong>UNIKA</strong><br />
Connect the white wire corresponding to CAN High to pin 1.<br />
Connect the green wire corresponding to CAN Low to pin 2.
Programming <strong>Parrot</strong> <strong>UNIKA</strong> <strong>for</strong> your car<br />
The wires corresponding to the CAN / KBUS protocol must be connected correctly to your<br />
car stereo’s. It is important to follow the wiring diagram <strong>for</strong> your vehicle.<br />
Defining the<br />
mode<br />
If your vehicle is based on a CAN Bus or KBus protocol, the mode (A, B,<br />
C or D) is automatically defined. The LED blinks in red and turns green<br />
once the mode is defined.<br />
Your system runs on D mode.<br />
Checking the<br />
wiring<br />
Once your <strong>UNIKA</strong> interface has been fitted, the LED should light up green<br />
and should turn amber while pressing a button on your steering wheel.<br />
If the LED does not light up, check the power supply connections. If the<br />
LED is red or blinks red, check the CAN wire connections.
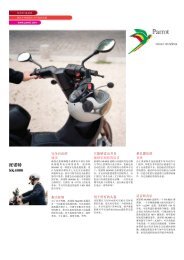
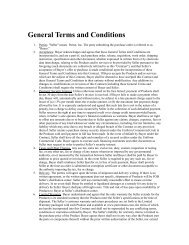
Depending on the steering wheel control in your vehicle, the <strong>UNIKA</strong><br />
interface will enable you to take full advantage of the telephone and music functions in 4<br />
different modes: Mode A (4 buttons), Mode B (5 buttons), Mode C (6 buttons) and Mode D<br />
(7 buttons).The selection of this mode depends on the protocol of the vehicle.<br />
Note : Pictograms on the buttons depend on the model of the vehicles.<br />
2 - Features<br />
Short press<br />
2 short presses<br />
Long press<br />
Volume<br />
Seek<br />
SRC<br />
Source<br />
Pick up - Hang up<br />
Warning : The mode you will use depends on the number of available buttons and not on<br />
the pictograms. For instance, if you have the<br />
buttons, you will use the<br />
<strong>UNIKA</strong> in mode B : consider the SRC buttons is replaced by the button.
Mode D<br />
s r c<br />
/<br />
s r c<br />
s r c<br />
/<br />
Enter the menu / Entrer dans le menu / Entrar en el menú / Öffnen<br />
eines Menüs / Accedere al menu / Het hoofdmenu openen<br />
Navigate through the menus / Naviguer dans le menu / Navegar por<br />
los menús / Navigation in den Menüs / Consente di utilizzare i menu /<br />
In de menu’s navigeren<br />
Confirm menu choice / Confirmer / Validar la selección / Bestätigung<br />
einer Auswahl / Confermare la selezione / De selectie valideren<br />
Back menu / Menu précédent / Menú anterior / Rückkehr zum vorhergehenden<br />
Menü / Consente di tornare al menu precedente / Vorige menu<br />
Adjust the volume / Modifier le volume / Ajustar el volumen / Einstellung<br />
der Lautstärke / Modificare il volume / De geluidssterkte regelen<br />
s r c<br />
s r c<br />
Answer an incoming call / Répondre à un appel / Descolgar una llamada /<br />
Entgegennehmen eines eingehenden Anrufs / Rispondere a una chiamata<br />
/ Een inkomend gesprek opnemen<br />
Refuse an incoming call / Refuser un appel / Colgar una llamada / Beenden<br />
eines eingehenden Anrufs / Rifiutare una chiamata / en inkomend<br />
gesprek weigeren<br />
Hang up / Raccrocher / Rechazar / Ablehnen / Riagganciare / Ophangen<br />
Discreet mode / Mode discret / Modo discreto / Diskreter Modus / Modalità<br />
privata / Privacy modus<br />
Exit discreet mode / Sortir du mode discret / Salir del modo discreto /<br />
Beenden des Diskreter Modus / Disattivare la modalità privata / De discrete<br />
modus opheffen<br />
Start the voice recognition feature / Lancer la reconnaissance vocale /<br />
Iniciar el modo de reconocimiento de voz / Aktivieren der Spracherkennung<br />
/ Attivare la funzione di ricon. vocale / De modus Spraakherkenning<br />
sluiten<br />
Redial function / Fonction Bis / Función de rellamada / Wiederholung des<br />
letzten Anrufs / Funzione Bis / Bis functie<br />
Mute Mic / Couper le microphone / Desactivar el micrófono / Das Mikrofon<br />
deaktivieren / Disattivare il microfono / De microfoon in- of uitschakelen<br />
/<br />
Next - previous / Suivant - précédent / Siguiente - precedente / Vorhergehende<br />
- nächsten / Precedente - successivo<br />
s r c<br />
s r c<br />
Play - Pause / Parar - reproducir música / Anhalten - Fortsetzen der Wiedergabe<br />
/ Interrompere - riprendere la lettura