INSTALLATION WIRING SYSTEMS ENCLOSURES - Pearson Schools
INSTALLATION WIRING SYSTEMS ENCLOSURES - Pearson Schools
INSTALLATION WIRING SYSTEMS ENCLOSURES - Pearson Schools

Create successful ePaper yourself
Turn your PDF publications into a flip-book with our unique Google optimized e-Paper software.
Chapter 4: Installation of wiring systems and enclosures<br />
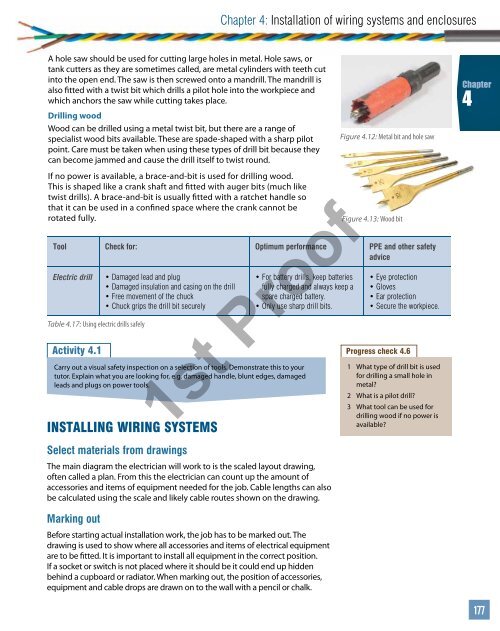
A hole saw should be used for cutting large holes in metal. Hole saws, or<br />
tank cutters as they are sometimes called, are metal cylinders with teeth cut<br />
into the open end. The saw is then screwed onto a mandrill. The mandrill is<br />
also fitted with a twist bit which drills a pilot hole into the workpiece and<br />
which anchors the saw while cutting takes place.<br />
Drilling wood<br />
Wood can be drilled using a metal twist bit, but there are a range of<br />
specialist wood bits available. These are spade-shaped with a sharp pilot<br />
point. Care must be taken when using these types of drill bit because they<br />
can become jammed and cause the drill itself to twist round.<br />
If no power is available, a brace-and-bit is used for drilling wood.<br />
This is shaped like a crank shaft and fitted with auger bits (much like<br />
twist drills). A brace-and-bit is usually fitted with a ratchet handle so<br />
that it can be used in a confined space where the crank cannot be<br />
rotated fully.<br />
Activity 4.1<br />
Carry out a visual safety inspection on a selection of tools. Demonstrate this to your<br />
tutor. Explain what you are looking for, e.g. damaged handle, blunt edges, damaged<br />
leads and plugs on power tools.<br />
Figure 4.13: Wood bit<br />
Tool Check for: Optimum performance PPE and other safety<br />
advice<br />
Electric drill<br />
Table 4.17: Using electric drills safely<br />
• Damaged lead and plug<br />
• Damaged insulation and casing on the drill<br />
• Free movement of the chuck<br />
• Chuck grips the drill bit securely<br />
INSTALLING <strong>WIRING</strong> <strong>SYSTEMS</strong><br />
Select materials from drawings<br />
• For battery drills, keep batteries<br />
fully charged a nd always keep a<br />
spare charged battery.<br />
• Only use sharp drill bits.<br />
1st Proof<br />
The main diagram the electrician will work to is the scaled layout drawing,<br />
often called a plan. From this the electrician can count up the amount of<br />
accessories and items of equipment needed for the job. Cable lengths can also<br />
be calculated using the scale and likely cable routes shown on the drawing.<br />
Figure 4.12: Metal bit and hole saw<br />
• Eye protection<br />
• Gloves<br />
• Ear protection<br />
• Secure the workpiece.<br />
Progress check 4.6<br />
1 What type of drill bit is used<br />
for drilling a small hole in<br />
metal?<br />
2 What is a pilot drill?<br />
3 What tool can be used for<br />
drilling wood if no power is<br />
available?<br />
Chapter<br />
4<br />
177<br />
Unit<br />
GH8<br />
Marking out<br />
Before starting actual installation work, the job has to be marked out. The<br />
drawing is used to show where all accessories and items of electrical equipment<br />
are to be fitted. It is important to install all equipment in the correct position.<br />
If a socket or switch is not placed where it should be it could end up hidden<br />
behind a cupboard or radiator. When marking out, the position of accessories,<br />
equipment and cable drops are drawn on to the wall with a pencil or chalk.<br />
177