

AQUATRAM LT POOL LIFT USER MANUAL WARNING - Pentair
AQUATRAM LT POOL LIFT USER MANUAL WARNING - Pentair
AQUATRAM LT POOL LIFT USER MANUAL WARNING - Pentair

Create successful ePaper yourself
Turn your PDF publications into a flip-book with our unique Google optimized e-Paper software.
CORE DRILLING RETRO-FIT INSTRUCTIONS<br />
Required Materials & Tools:<br />
• Core drill and 1 ¼” core drill bit<br />
• Tape Measure<br />
• Marking Pen suitable for writing on concrete<br />
• Hammer<br />
• Cold Chisel<br />
• Torpedo Level<br />
• High Strength 2 part construction epoxy*<br />
• Black electrical tape (Optional)<br />
• Masking tape<br />
*<strong>Pentair</strong> recommends either Hilti Brand HIT HY-150 or Simpson brand ET22 Strong Tie or<br />
equivalent<br />
1) Locate the anchor plate, four (4) anchor inserts with nuts and mounting hardware. (Sold<br />
separatelyP/N 11231 - See picture).<br />
2) Using the larger holes in the anchor plate as a template, mark the four hole locations<br />
with a marking pen on the pool deck. Verify that the CENTER LINE of the front anchors<br />
are no more than 14 inches from the pools edge. See FIGURE 1, page 6.<br />
3) Using the core drill and the 1 ¼” core drill bit, drill out the four hole locations marked on<br />
the pool deck to a depth of about 4 ½”.<br />
a. NOTE: You can use black electrical tape on the end of the drill bit as a visual<br />
marker to indicate the proper depth that you need to drill to.<br />
b. NOTE: Depending on your local grounding requirements,<br />
you may need to drill one hole larger than the others so that<br />
you can ground at least one of the anchor inserts. In some<br />
cases saw cutting a portion of the deck out completely<br />
might be required. In this case, follow the “Saw Cutting<br />
Retro-Fit Instructions”.<br />
4) Remove the core from the holes using a hammer and chisel.<br />
The holes should be completely dry and clear of any debris<br />
before installing the anchors into them.<br />
5) Remove the nuts from the threaded anchor inserts and the<br />
black protective cover from the end of the anchor insert<br />
exposing the internal threads that will accept the mounting<br />
hardware.<br />
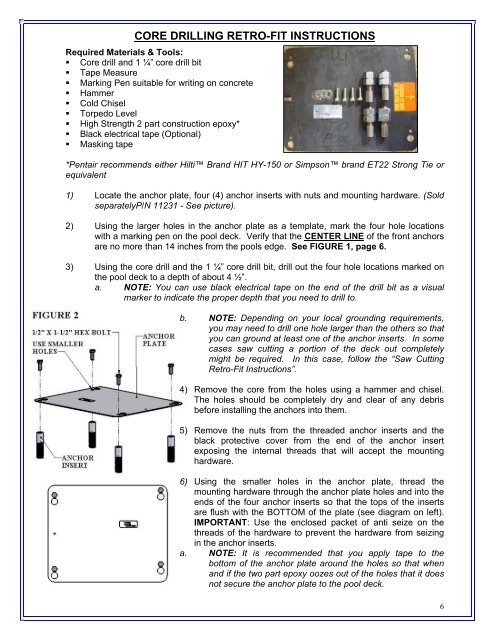
6) Using the smaller holes in the anchor plate, thread the<br />
mounting hardware through the anchor plate holes and into the<br />
ends of the four anchor inserts so that the tops of the inserts<br />
are flush with the BOTTOM of the plate (see diagram on left).<br />
IMPORTANT: Use the enclosed packet of anti seize on the<br />
threads of the hardware to prevent the hardware from seizing<br />
in the anchor inserts.<br />
a. NOTE: It is recommended that you apply tape to the<br />
bottom of the anchor plate around the holes so that when<br />
and if the two part epoxy oozes out of the holes that it does<br />
not secure the anchor plate to the pool deck.<br />
6


