Blu-ray Disc PLAYER - Pioneer
Blu-ray Disc PLAYER - Pioneer
Blu-ray Disc PLAYER - Pioneer

You also want an ePaper? Increase the reach of your titles
YUMPU automatically turns print PDFs into web optimized ePapers that Google loves.
Operating Instructions<br />
<strong>Blu</strong>-<strong>ray</strong> <strong>Disc</strong> <strong>PLAYER</strong>
Thank you for buying this <strong>Pioneer</strong> product.<br />
Please read through these operating instructions so you will know how to operate your model properly.<br />
After you have finished reading the instructions, put them away in a safe place for future reference.<br />
IMPORTANT<br />
CAUTION<br />
RISK OF ELECTRIC SHOCK<br />
DO NOT OPEN<br />
The lightning flash with arrowhead symbol,<br />
within an equilateral triangle, is intended to<br />
alert the user to the presence of uninsulated<br />
"dangerous voltage" within the product's<br />
enclosure that may be of sufficient<br />
magnitude to constitute a risk of electric<br />
shock to persons.<br />
CAUTION:<br />
TO PREVENT THE RISK OF ELECTRIC<br />
SHOCK, DO NOT REMOVE COVER (OR<br />
BACK). NO USER-SERVICEABLE PARTS<br />
INSIDE. REFER SERVICING TO QUALIFIED<br />
SERVICE PERSONNEL.<br />
The exclamation point within an equilateral<br />
triangle is intended to alert the user to the<br />
presence of important operating and<br />
maintenance (servicing) instructions in the<br />
literature accompanying the appliance.<br />
D3-4-2-1-1_En-A<br />
CAUTION<br />
This product is a class 1 laser product, but this<br />
product contains a laser diode higher than Class 1.<br />
To ensure continued safety, do not remove any covers<br />
or attempt to gain access to the inside of the product.<br />
Refer all servicing to qualified personnel.<br />
The following caution label appears on your unit.<br />
Location: inside of the unit<br />
VRW2262 - A<br />
2<br />
En<br />
<br />
<br />
<br />
<br />
<br />
<br />
<br />
<br />
<br />
<br />
<br />
<br />
<br />
<br />
<br />
<br />
<br />
<br />
<br />
Operating Environment<br />
<br />
<br />
<br />
<br />
<br />
<br />
D3-4-2-1-7c_A_En<br />
D3-4-2-1-8*_C_En<br />
WARNING<br />
This equipment is not waterproof. To prevent a fire<br />
or shock hazard, do not place any container filled<br />
with liquid near this equipment (such as a vase or<br />
flower pot) or expose it to dripping, splashing, rain<br />
or moisture.<br />
D3-4-2-1-3_B_En<br />
<br />
<br />
<br />
<br />
<br />
<br />
<br />
<br />
CAUTION<br />
The STANDBY/ON switch on this unit will not<br />
completely shut off all power from the AC outlet.<br />
Since the power cord serves as the main disconnect<br />
device for the unit, you will need to unplug it from<br />
the AC outlet to shut down all power. Therefore,<br />
make sure the unit has been installed so that the<br />
power cord can be easily unplugged from the AC<br />
outlet in case of an accident. To avoid fire hazard,<br />
the power cord should also be unplugged from the<br />
AC outlet when left unused for a long period of time<br />
(for example, when on vacation).<br />
D3-4-2-2-2a_A_En
This product incorporates copyright protection<br />
technology that is protected by method claims of certain<br />
U.S. patents and other intellectual property rights owned<br />
by Macrovision Corporation and other rights owners.<br />
Use of this copyright protection technology must be<br />
authorized by Macrovision Corporation, and is intended<br />
for home and other limited viewing uses only unless<br />
otherwise authorized by Macrovision Corporation.<br />
Reverse engineering or disassembly is prohibited.<br />
POWER-CORD CAUTION<br />
Handle the power cord by the plug. Do not pull out the<br />
plug by tugging the cord and never touch the power<br />
cord when your hands are wet as this could cause a<br />
short circuit or electric shock. Do not place the unit, a<br />
piece of furniture, etc., on the power cord, or pinch the<br />
cord. Never make a knot in the cord or tie it with other<br />
cords. The power cords should be routed such that they<br />
are not likely to be stepped on. A damaged power cord<br />
can cause a fire or give you an electrical shock. Check<br />
the power cord once in a while. When you find it<br />
damaged, ask your nearest PIONEER authorized<br />
service center or your dealer for a replacement. S002*_En<br />
<br />
<br />
<br />
<br />
<br />
<br />
<br />
For Singapore model:<br />
Replacement and mounting of an AC plug on the power supply cord of this unit should be performed only by qualified<br />
service personnel.<br />
IMPORTANT: THE MOULDED PLUG<br />
This appliance is supplied with a moulded three pin mains plug for your safety and convenience. A 10 amp fuse is fitted in this plug. Should the<br />
fuse need to be replaced, please ensure that the replacement fuse has a rating of 10 amps and that it is approved by ASTA or BSI to BS1362.<br />
Check for the ASTA mark or the BSI mark on the body of the fuse.<br />
If the plug contains a removable fuse cover, you must ensure that it is refitted when the fuse is replaced. If you lose the fuse cover the plug<br />
must not be used until a replacement cover is obtained. A replacement fuse cover can be obtained from your local dealer.<br />
If the fitted moulded plug is unsuitable for your socket outlet, then the fuse shall be removed and the plug cut off and disposed of<br />
safely. There is a danger of severe electrical shock if the cut off plug is inserted into any 13 amp socket.<br />
If a new plug is to be fitted, please observe the wiring code as shown below. If in any doubt, please consult a qualified electrician.<br />
IMPORTANT: The wires in this mains lead are coloured in accordance with the following code:<br />
<strong>Blu</strong>e : Neutral Brown : Live<br />
As the colours of the wires in the mains lead of this appliance may not correspond with the coloured markings identifying the terminals in<br />
your plug, proceed as follows ;<br />
The wire which is coloured BLUE must be connected to the terminal which is marked with the<br />
letter N or coloured BLACK.<br />
The wire which is coloured BROWN must be connected to the terminal which is marked with the<br />
letter L or coloured RED.<br />
How to replace the fuse: Open the fuse compartment with a screwdriver and replace the fuse.<br />
D3-4-2-1-2-2_B_En<br />
3<br />
En
Contents<br />
01 Before you start<br />
What’s in the box . . . . . . . . . . . . . . . . . . . . . . . . . . . . . . . . . . . . . . . . . 5<br />
Putting the batteries in the remote control. . . . . . . . . . . . . . . . . . . 5<br />
Types of discs/files that can be played. . . . . . . . . . . . . . . . . . . . . . . . 6<br />
Playable discs . . . . . . . . . . . . . . . . . . . . . . . . . . . . . . . . . . . . . . . . . . 6<br />
Playable files . . . . . . . . . . . . . . . . . . . . . . . . . . . . . . . . . . . . . . . . . . . 8<br />
Part Names and Functions . . . . . . . . . . . . . . . . . . . . . . . . . . . . . . . . . 9<br />
Remote Control . . . . . . . . . . . . . . . . . . . . . . . . . . . . . . . . . . . . . . . . . 9<br />
Front Panel. . . . . . . . . . . . . . . . . . . . . . . . . . . . . . . . . . . . . . . . . . . . 11<br />
Front Panel Display . . . . . . . . . . . . . . . . . . . . . . . . . . . . . . . . . . . . . 11<br />
Rear Panel . . . . . . . . . . . . . . . . . . . . . . . . . . . . . . . . . . . . . . . . . . . . 12<br />
02 Connecting up<br />
Connecting using an HDMI cable . . . . . . . . . . . . . . . . . . . . . . . . . . 13<br />
About HDMI. . . . . . . . . . . . . . . . . . . . . . . . . . . . . . . . . . . . . . . . . . . 13<br />
About KURO LINK function . . . . . . . . . . . . . . . . . . . . . . . . . . . . . . 14<br />
Connecting a TV . . . . . . . . . . . . . . . . . . . . . . . . . . . . . . . . . . . . . . . 14<br />
Connecting an AV receiver or amplifier . . . . . . . . . . . . . . . . . . . . 15<br />
Connecting video and audio cables. . . . . . . . . . . . . . . . . . . . . . . . . 16<br />
Connecting a TV using a component video cable and an audio<br />
cable . . . . . . . . . . . . . . . . . . . . . . . . . . . . . . . . . . . . . . . . . . . . . . . . . 16<br />
Connecting a TV using a video cable and an audio cable. . . . . . 16<br />
Connecting an AV receiver or amplifier using audio cables . . . . 17<br />
Connecting an AV receiver or amplifier using a digital audio<br />
cable . . . . . . . . . . . . . . . . . . . . . . . . . . . . . . . . . . . . . . . . . . . . . . . . . 17<br />
Network connection . . . . . . . . . . . . . . . . . . . . . . . . . . . . . . . . . . . . . 18<br />
Connecting via an Ethernet hub . . . . . . . . . . . . . . . . . . . . . . . . . . 18<br />
Connecting the power cord. . . . . . . . . . . . . . . . . . . . . . . . . . . . . . . . 18<br />
03 Getting Started<br />
Making settings using the Setup Navigator menu . . . . . . . . . . . . . 19<br />
Operating the TV with the player’s remote control . . . . . . . . . . . . . 21<br />
TV Preset code list. . . . . . . . . . . . . . . . . . . . . . . . . . . . . . . . . . . . . . 21<br />
Using the TOOLS menu. . . . . . . . . . . . . . . . . . . . . . . . . . . . . . . . . . . 22<br />
Switching the video output terminal to be viewed . . . . . . . . . . . . . 23<br />
Switching the output video resolution . . . . . . . . . . . . . . . . . . . . . . . 23<br />
04 Playback<br />
Playing discs or files . . . . . . . . . . . . . . . . . . . . . . . . . . . . . . . . . . . . . 25<br />
Forward and reverse scanning. . . . . . . . . . . . . . . . . . . . . . . . . . . . 25<br />
Playing specific titles, chapters or tracks . . . . . . . . . . . . . . . . . . . 26<br />
Skipping content . . . . . . . . . . . . . . . . . . . . . . . . . . . . . . . . . . . . . . . 26<br />
Playing in slow motion . . . . . . . . . . . . . . . . . . . . . . . . . . . . . . . . . . 26<br />
Step forward and step reverse . . . . . . . . . . . . . . . . . . . . . . . . . . . . 26<br />
Switching the camera angles . . . . . . . . . . . . . . . . . . . . . . . . . . . . 27<br />
Switching the subtitles . . . . . . . . . . . . . . . . . . . . . . . . . . . . . . . . . . 27<br />
Switching the audio streams/channels . . . . . . . . . . . . . . . . . . . . 28<br />
Switching the secondary video . . . . . . . . . . . . . . . . . . . . . . . . . . . 28<br />
Displaying the disc information. . . . . . . . . . . . . . . . . . . . . . . . . . . 28<br />
Using the Play Mode functions . . . . . . . . . . . . . . . . . . . . . . . . . . . . 29<br />
Playing from a specific time (Time Search) . . . . . . . . . . . . . . . . . 29<br />
Playing a specific title, chapter or track (Search) . . . . . . . . . . . . 29<br />
Playing a specific section within a title or track repeatedly<br />
(A-B Repeat). . . . . . . . . . . . . . . . . . . . . . . . . . . . . . . . . . . . . . . . . . . 30<br />
Playing repeatedly (Repeat Play) . . . . . . . . . . . . . . . . . . . . . . . . . . 30<br />
Playing in random order (Random Play). . . . . . . . . . . . . . . . . . . . 31<br />
About Play Mode types . . . . . . . . . . . . . . . . . . . . . . . . . . . . . . . . . . 32<br />
Playing from the Home Media Gallery . . . . . . . . . . . . . . . . . . . . . . .33<br />
Playing discs. . . . . . . . . . . . . . . . . . . . . . . . . . . . . . . . . . . . . . . . . . .33<br />
Playing video files. . . . . . . . . . . . . . . . . . . . . . . . . . . . . . . . . . . . . . .33<br />
Playing image files . . . . . . . . . . . . . . . . . . . . . . . . . . . . . . . . . . . . . .34<br />
Playing audio files . . . . . . . . . . . . . . . . . . . . . . . . . . . . . . . . . . . . . .35<br />
Playing in the desired order (HMG Playlist). . . . . . . . . . . . . . . . . .36<br />
05 Adjusting audio and video<br />
Adjusting the video . . . . . . . . . . . . . . . . . . . . . . . . . . . . . . . . . . . . . . .38<br />
Adjusting the audio . . . . . . . . . . . . . . . . . . . . . . . . . . . . . . . . . . . . . .39<br />
Adjusting the Audio DRC . . . . . . . . . . . . . . . . . . . . . . . . . . . . . . . .39<br />
Adjusting the output level of the different speakers during<br />
BD/DVD playback (Channel Level) . . . . . . . . . . . . . . . . . . . . . . . . .39<br />
Adjusting the audio delay (Lip Sync) . . . . . . . . . . . . . . . . . . . . . . .40<br />
06 Advanced settings<br />
Changing the settings . . . . . . . . . . . . . . . . . . . . . . . . . . . . . . . . . . . .41<br />
Operating the Initial Setup screen . . . . . . . . . . . . . . . . . . . . . . . . .41<br />
Stretching widescreen pictures vertically<br />
(Anamorphic Zoom). . . . . . . . . . . . . . . . . . . . . . . . . . . . . . . . . . . . .50<br />
Eliminating extraneous noise to play with high quality sound<br />
(Pure Audio) . . . . . . . . . . . . . . . . . . . . . . . . . . . . . . . . . . . . . . . . . . .51<br />
Restoring all the settings to the factory default settings . . . . . . .51<br />
About the audio output settings . . . . . . . . . . . . . . . . . . . . . . . . . . .52<br />
Language Code Table and Country/Area Code Table . . . . . . . . . .53<br />
07 Additional information<br />
Licenses. . . . . . . . . . . . . . . . . . . . . . . . . . . . . . . . . . . . . . . . . . . . . . . .54<br />
Cautions on use . . . . . . . . . . . . . . . . . . . . . . . . . . . . . . . . . . . . . . . . .62<br />
Moving the player. . . . . . . . . . . . . . . . . . . . . . . . . . . . . . . . . . . . . . .62<br />
Place of installation . . . . . . . . . . . . . . . . . . . . . . . . . . . . . . . . . . . . .62<br />
Turn the power off when not using the player . . . . . . . . . . . . . . . .62<br />
Condensation . . . . . . . . . . . . . . . . . . . . . . . . . . . . . . . . . . . . . . . . . .62<br />
Cleaning the player . . . . . . . . . . . . . . . . . . . . . . . . . . . . . . . . . . . . .62<br />
Caution for when the unit is installed in a rack with a glass<br />
door . . . . . . . . . . . . . . . . . . . . . . . . . . . . . . . . . . . . . . . . . . . . . . . . . .62<br />
Cleaning the pickup lens. . . . . . . . . . . . . . . . . . . . . . . . . . . . . . . . .63<br />
Handling discs . . . . . . . . . . . . . . . . . . . . . . . . . . . . . . . . . . . . . . . . .63<br />
Troubleshooting . . . . . . . . . . . . . . . . . . . . . . . . . . . . . . . . . . . . . . . . .63<br />
Playback . . . . . . . . . . . . . . . . . . . . . . . . . . . . . . . . . . . . . . . . . . . . . .63<br />
Software updating . . . . . . . . . . . . . . . . . . . . . . . . . . . . . . . . . . . . . .66<br />
KURO LINK . . . . . . . . . . . . . . . . . . . . . . . . . . . . . . . . . . . . . . . . . . . .67<br />
Others . . . . . . . . . . . . . . . . . . . . . . . . . . . . . . . . . . . . . . . . . . . . . . . .68<br />
Glossary . . . . . . . . . . . . . . . . . . . . . . . . . . . . . . . . . . . . . . . . . . . . . . . .68<br />
Specifications . . . . . . . . . . . . . . . . . . . . . . . . . . . . . . . . . . . . . . . . . . .71<br />
4<br />
En
MENU<br />
Chapter 1<br />
Before you start<br />
01<br />
What’s in the box<br />
Remote control x 1 BNC-RCA adapter x 3<br />
STANDBY/ON<br />
INPUT<br />
SELECT<br />
TV CONTROL<br />
CH<br />
VOL<br />
OPEN/CLOSE<br />
Use this to connect an RCA pin type<br />
cable to the COMPONENT VIDEO<br />
terminal.<br />
Putting the batteries in the<br />
remote control<br />
1 Open the rear cover.<br />
AUDIO SUBTITLE ANGLE FL DIMMER<br />
CLEAR<br />
SECONDARY<br />
AUDIO VIDEO<br />
VIDEO SELECT PLAY MODE<br />
ENTER<br />
OUTPUT<br />
RESOLUTION<br />
AA/R6 dry cell batteries x 2<br />
Press lightly on this<br />
part and slide into<br />
the direction of the<br />
arrow.<br />
HOME MEDIA<br />
GALLERY DISPLAY<br />
TOP MENU<br />
ENTER<br />
POPUP MENU<br />
TOOLS<br />
2 Insert the batteries (AA/R6 x 2).<br />
Insert as indicated by the / marks into the battery compartment.<br />
HOME<br />
MENU<br />
RETURN<br />
PLAY<br />
PREV PAUSE STOP NEXT<br />
RED GREEN YELLOW BLUE<br />
VIDEO ADJUST<br />
HDMI cable x 1<br />
LAN cable x 1<br />
Power cord x 1<br />
Insert the negative<br />
() side first.<br />
Operating instructions (this manual)<br />
BD <strong>PLAYER</strong><br />
3 Close the rear cover.<br />
Close securely (a click should be heard).<br />
Caution<br />
• Do not mix new and old batteries together.<br />
• Batteries may have different voltages, even if they look similar.<br />
Do not use different kinds of batteries together.<br />
• To prevent leakage of battery fluid, remove the batteries if you do<br />
not plan to use the remote control for a long period of time (1<br />
month or more). If the fluid should leak, wipe it carefully off the<br />
inside of the case, then insert new batteries.<br />
• When disposing of used batteries, please comply with<br />
governmental regulations or environmental public instruction’s<br />
rules that apply in your country/area.<br />
• WARNING<br />
Do not use or store batteries in direct sunlight or other<br />
excessively hot place, such as inside a car or near a heater. This<br />
can cause batteries to leak, overheat, explode or catch fire. It<br />
can also reduce the life or performance of batteries.<br />
D3-4-2-3-3_En<br />
5<br />
En
01<br />
Types of discs/files that can be played<br />
Playable discs<br />
<strong>Disc</strong>s with the logo marks below indicated on the disc label, package or jacket can be played.<br />
BD<br />
<strong>Disc</strong> type<br />
Logo<br />
BDMV 1<br />
Application format<br />
BDAV DVD-Video DVD VR<br />
CD-DA<br />
DTS-CD<br />
DATA-DISC 2<br />
BD-ROM <br />
BD-R <br />
BD-RE <br />
DVD-ROM <br />
DVD-R <br />
DVD<br />
DVD-R DL<br />
(Dual Layer)<br />
<br />
DVD-RW <br />
DVD+R <br />
DVD+RW <br />
CD-DA<br />
(Audio CD)<br />
<br />
CD<br />
CD-R <br />
CD-RW <br />
CD-ROM <br />
1. Including the AVCHD format.<br />
2. <strong>Disc</strong>s on which video, image or audio files are recorded<br />
“<strong>Blu</strong>-<strong>ray</strong> <strong>Disc</strong>” and<br />
are trademarks.<br />
is a trademark of DVD Format/Logo Licensing Corporation.<br />
6<br />
En
<strong>Disc</strong>s that cannot be played<br />
• Non-finalized (Non-closed) BD-R discs in the BDMV format<br />
• HD DVDs<br />
•DVD Audio discs<br />
•DVD-RAM discs<br />
• Non-finalized DVD-R/-RW/+R/+RW discs in the DVD-Video<br />
format and AVCHD format<br />
• Non-finalized Dual Layer DVD-R discs in the DVD VR format<br />
• Non-finalized CD-R/-RW discs<br />
•SACDs<br />
•Video CDs<br />
•SVCDs<br />
Note<br />
• Some discs cannot be played, even if one of the logo marks on<br />
the previous page is indicated.<br />
• To play 8 cm discs, set the disc in the 8 cm disc depression in<br />
the center of the disc t<strong>ray</strong>. No adapter is necessary. 8 cm BD-<br />
ROMs cannot be played.<br />
About audio formats<br />
The following audio formats are supported on this player:<br />
•Dolby TrueHD<br />
•Dolby Digital Plus<br />
•Dolby Digital<br />
• DTS-HD Master Audio<br />
•DTS-HD High Resolution Audio<br />
• DTS Digital Surround<br />
•MPEG<br />
• MPEG-2 AAC<br />
•Linear PCM<br />
To enjoy the surround sound of Dolby TrueHD, Dolby Digital Plus,<br />
DTS-HD Master Audio and DTS-HD High Resolution Audio, it is<br />
recommended to connect the player to an AV receiver or amplifier<br />
compatible with these audio formats using an HDMI cable. After<br />
loading a BD containing sound in one of these audio formats, select<br />
the audio format on the menu screen.<br />
See About the audio output settings on page 52 for the output<br />
conditions of the different formats.<br />
Manufactured under license under U.S. Patent #: 5,451,942;<br />
5,956,674; 5,974,380; 5,978,762; 6,487,535 & other U.S. and worldwide<br />
patents issued & pending. DTS is a registered trademark and the DTS<br />
logos, Symbol, DTS-HD and DTS-HD Advanced Digital Out are<br />
trademarks of DTS, Inc. © 1996-2007 DTS, Inc. All Rights Reserved.<br />
Playing BDs<br />
• BDs (BDMV) compatible with the formats below can be played.<br />
– <strong>Blu</strong>-<strong>ray</strong> <strong>Disc</strong> Read-Only (ROM) Format Version 2<br />
– <strong>Blu</strong>-<strong>ray</strong> <strong>Disc</strong> Recordable (R) Format Version 2 (finalize (close)<br />
them before playing them on this player)<br />
– <strong>Blu</strong>-<strong>ray</strong> <strong>Disc</strong> Rewritable (RE) Format Version 3<br />
This player supports BD-ROM Profile 1 Version 1.1.<br />
BONUSVIEW Functions such as playback of secondary video<br />
(Picture-in-Picture) and secondary audio can be used. For<br />
details on secondary video and secondary audio playback, refer<br />
to the disc’s instructions.<br />
“BONUSVIEW” is trademark of <strong>Blu</strong>-<strong>ray</strong> <strong>Disc</strong> Association.<br />
When a BD-ROM is played, additional data may be stored in the<br />
player’s memory area (local storage). If the message indicating<br />
low memory (local storage) appears, erase the BDMV data<br />
(page 49).<br />
• BDs (BDAV) compatible with the formats below can be played.<br />
– <strong>Blu</strong>-<strong>ray</strong> <strong>Disc</strong> Recordable (R) Format Version 1<br />
– <strong>Blu</strong>-<strong>ray</strong> <strong>Disc</strong> Rewritable (RE) Format Version 2<br />
• Dual Layer BDs can be played.<br />
• Video, image and audio files recorded on BDs cannot be played.<br />
• 8 cm BD-ROMs cannot be played.<br />
Playing DVDs<br />
• DVD-Video can be played.<br />
• DVD-R/-RW/+R/+RW discs recorded in the DVD-Video format<br />
can be played (finalize them before playing them on this player).<br />
• DVD-R/-RW discs recorded in the VR format (Video Recording<br />
format) can be played.<br />
01<br />
This label indicates playback compatibility with DVD-RW discs<br />
recorded in VR format (Video Recording format). However, for discs<br />
recorded with a record-only-once encrypted program, playback can<br />
only be achieved using a CPRM compatible device.<br />
Manufactured under license from Dolby Laboratories. Dolby and the<br />
double-D symbol are trademarks of Dolby Laboratories.<br />
7<br />
En
01<br />
• DVDs recorded in the AVCHD format can be played (finalize<br />
them before playing them on this player).<br />
“AVCHD” and the “AVCHD” logo are trademarks of Panasonic<br />
Corporation and Sony Corporation.<br />
• Video, image and audio files recorded on DVD-R/-RW/+R/+RW<br />
discs can be played. See Playable files below.<br />
• Dual Layer DVDs can be played. However, non-finalized Dual<br />
Layer DVD-R discs recorded in the VR format cannot be played<br />
(finalize them before playing them on this player).<br />
• HD DVD, DVD Audio and DVD-RAM discs cannot be played.<br />
About region numbers<br />
<strong>Blu</strong>-<strong>ray</strong> <strong>Disc</strong> Player and BD-ROM or DVD-Video discs are assigned<br />
region numbers according to the region in which they are sold.<br />
This player’s region numbers are:<br />
•BD-ROM: A<br />
•DVD-Video: 3<br />
<strong>Disc</strong>s not including these numbers cannot be played. <strong>Disc</strong>s<br />
playable on this player are as shown below.<br />
• BDs: A (including A) and ALL<br />
• DVDs: 3 (including 3) and ALL<br />
Playing CDs<br />
• Audio CDs (CD-DAs and DTS-CDs) can be played.<br />
• Video, image and audio files recorded on CDs can be played.<br />
See Playable files below.<br />
• CD-R/-RW discs that are not finalized cannot be played.<br />
• SACD, Video CD and Super VCD discs cannot be played.<br />
• Regarding copy protected CDs: This player is designed to<br />
conform to the specifications of the Audio CD format. This<br />
player does not support the playback or function of discs that do<br />
not conform to these specifications.<br />
Dual<strong>Disc</strong> playback<br />
A Dual<strong>Disc</strong> is a new two-sided disc, one side of which contains DVD<br />
content — video, audio, etc. — while the other side contains non-<br />
DVD content such as digital audio material.<br />
The DVD side of a Dual<strong>Disc</strong> can be played on this player (excluding<br />
any DVD-Audio content).<br />
The non-DVD, audio side of the disc is not compatible with this<br />
player.<br />
It is possible that when loading or ejecting a Dual<strong>Disc</strong>, the opposite<br />
side to that being played will be scratched. Scratched discs may not<br />
be playable.<br />
For more detailed information on the Dual<strong>Disc</strong> specification, please<br />
refer to the disc manufacturer or disc retailer.<br />
3<br />
Playing discs created on computers or BD/<br />
DVD recorders<br />
• It may not be possible to play discs recorded using a computer<br />
due to the application settings or computer’s environment<br />
settings. Record discs in a format playable on this player. For<br />
details, contact the dealer.<br />
• It may not be possible to play discs recorded using a computer<br />
or a BD/DVD recorder, if burn quality is not good due to<br />
characteristics of the disc, scratches, dirt on the disc, dirt on the<br />
recorder’s lens, etc.<br />
Playable files<br />
Video, image and audio files recorded on DVDs and CDs can be<br />
played.<br />
Caution<br />
• In DVD, only the one recorded by the ISO 9660 file system can be<br />
played.<br />
• Some files may not be playable.<br />
• For some files, it may not be possible to use certain functions<br />
during playback.<br />
• It may not be possible to play some files, even if they have the<br />
extension of a file playable on this player.<br />
• Files protected by DRM (Digital Rights Management) cannot be<br />
played (not including DivX VOD files).<br />
Supported video file formats<br />
•DivX<br />
DivX is a media technology created by DivX, Inc. DivX media files<br />
contain not only video but also advanced media features like<br />
subtitles and alternate audiotracks, etc.<br />
Conform to the size under 720 x 576 pixels/720 x 480 pixels.<br />
DivX files encoded with GMC/Qpel option cannot be played.<br />
Only audio signals with MP3 or Dolby Digital (AC3) format are<br />
output.<br />
Note that files other than the ones containing DivX video cannot<br />
be played, even if they have the extension “.avi”.<br />
Official DivX ® Certified product.<br />
Plays all versions of DivX ® video (including DivX ® 6) with standard<br />
playback of DivX ® media files.<br />
DivX, DivX Certified, and associated logos are trademarks of DivX,<br />
Inc. and are used under license.<br />
8<br />
En
Note<br />
• DivX VOD files are protected by DRM. They can only be played<br />
on registered devices.<br />
– You may be requested by the file distributor to input the DivX<br />
VOD registration code for authorization of the player in order<br />
to play DivX VOD files. This player’s DivX VOD registration<br />
code can be checked at Initial Setup Playback DivX<br />
VOD Registration Code (page 43).<br />
– DivX VOD files for which the player’s DivX VOD registration<br />
code is not authorized cannot be played (Authorization<br />
Error is displayed).<br />
– The number of views is restricted for some DivX VOD files.<br />
When such files are played on this player, the remaining<br />
number of views is displayed. Files for which the remaining<br />
number of views has reached 0 cannot be played (Rental<br />
Expired is displayed). Files for which the number of views is<br />
not restricted can be played as many times as you like (the<br />
remaining number of views is not displayed).<br />
Supported image file formats<br />
• JPEG<br />
File format: JFIF Ver.1.02/Exif Ver.2.2<br />
Resolution: Up to 4096 x 4096 pixels<br />
Only baseline JPEG files are supported.<br />
Supported audio file formats<br />
• Windows Media Audio 9 (WMA9)<br />
Bit rate: Up to 192 kbps<br />
Sampling frequencies: 22.05 kHz, 32 kHz, 44.1 kHz and 48 kHz<br />
Windows Media is either a registered trademark or trademark of<br />
Microsoft Corporation in the United States and/or other countries.<br />
This product includes technology owned by Microsoft Corporation<br />
and cannot be used or distributed without a license from<br />
Microsoft Licensing, Inc.<br />
• MPEG-1 Audio Layer 3 (MP3)<br />
Bit rate: Up to 320 kbps<br />
Sampling frequencies: 8 kHz, 11.025 kHz, 12 kHz, 16 kHz,<br />
22.05 kHz, 24 kHz, 32 kHz, 44.1 kHz and 48 kHz<br />
Playable file extensions<br />
• Video files<br />
.divx and .avi<br />
• Image files<br />
.jpg and .jpeg<br />
• Audio files<br />
.wma and .mp3<br />
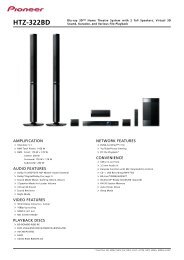
Part Names and Functions<br />
Remote Control<br />
4<br />
1<br />
2<br />
3<br />
5<br />
6<br />
7<br />
8<br />
9<br />
10<br />
11<br />
12<br />
13<br />
14<br />
STANDBY/ON<br />
INPUT<br />
SELECT<br />
1 STANDBY/ON<br />
Press to turn the power on and off.<br />
OPEN/CLOSE<br />
AUDIO SUBTITLE ANGLE FL DIMMER<br />
CLEAR<br />
VIDEO SELECT<br />
HOME MEDIA<br />
GALLERY<br />
TOP MENU<br />
HOME<br />
MENU<br />
PLAY MODE<br />
DISPLAY<br />
BD <strong>PLAYER</strong><br />
2 TV CONTROL<br />
Your TV can be controlled using the player’s remote control<br />
(page 21).<br />
– Press to turn the TV’s power on and off.<br />
INPUT SELECT – Press to switch the TV’s input.<br />
CH +/– – Press to select the TV channel.<br />
VOL +/– – Press to adjust the volume.<br />
3 AUDIO<br />
Press to switch the audio streams/channels (page 28).<br />
4 SUBTITLE<br />
Press to switch the subtitles (page 27).<br />
PLAY<br />
ENTER<br />
POPUP MENU<br />
MENU<br />
TOOLS<br />
RETURN<br />
PREV PAUSE STOP NEXT<br />
RED GREEN YELLOW BLUE<br />
VIDEO ADJUST<br />
TV CONTROL<br />
CH<br />
SECONDARY<br />
AUDIO VIDEO<br />
ENTER<br />
VOL<br />
OUTPUT<br />
RESOLUTION<br />
15<br />
16<br />
18<br />
20<br />
22<br />
23<br />
17<br />
19<br />
21<br />
01<br />
9<br />
En
01<br />
10<br />
En<br />
5 Number buttons – Use these to select and play the title/<br />
chapter/track you want to view or listen to and to select items<br />
from menus.<br />
CLEAR – Press to clear the numeric number, etc.<br />
ENTER – Press to execute the selected item or enter a setting<br />
that has been changed, etc.<br />
6 SECONDARY AUDIO – When playing a BD-ROM on which<br />
secondary audio is recorded, press to switch to the secondary<br />
audio (page 28).<br />
SECONDARY VIDEO – When playing a BD-ROM on which<br />
secondary video (Picture-in-Picture) is recorded, press to switch<br />
to the secondary video (page 28).<br />
7 VIDEO SELECT<br />
Press to switch the video output signal to be viewed between the one<br />
output from the HDMI OUT (MAIN) terminal, the HDMI OUT (SUB)<br />
terminal and an analog output terminal (COMPONENT VIDEO, S-<br />
VIDEO or VIDEO output terminals) (page 23).<br />
8 HOME MEDIA GALLERY<br />
Press to display/hide the Home Media Gallery screen (page 33).<br />
9 TOP MENU<br />
Press to display the top menu of the BD-ROM or DVD-Video.<br />
10 /// – Use to select items, change settings and move<br />
the cursor.<br />
ENTER – Press to execute the selected item or enter a setting<br />
that has been changed, etc.<br />
11 HOME MENU<br />
Press to display/hide the Home Menu.<br />
12 PLAY – Press to start playback.<br />
PAUSE – Press to pause playback. Press again to restart<br />
playback.<br />
STOP – Press to stop playback.<br />
PREV/ NEXT – Press to skip to the beginning of the<br />
previous/next title/chapter/track/file (page 26).<br />
// – Press during playback to start reverse scanning.<br />
While playback is paused, press for step reverse playback. Press<br />
and hold while playback is paused for reverse slow motion<br />
playback (pages 25 and 26).<br />
// – Press during playback to start forward scanning.<br />
While playback is paused, press for step forward playback.<br />
Press and hold while playback is paused for forward slow<br />
motion playback (pages 25 and 26).<br />
13 RED/GREEN/YELLOW/BLUE<br />
Use these to navigate BD-ROM menus.<br />
14 VIDEO ADJUST<br />
Press to display/hide the Video Adjust menu (page 38).<br />
15 OPEN/CLOSE<br />
Press to open and close the disc t<strong>ray</strong>.<br />
16 FL DIMMER<br />
Press to switch the brightness of the front panel display. The FL OFF<br />
indicator lights when Off is selected.<br />
17 ANGLE<br />
Press to switch the BD-ROM or DVD-Video camera angles<br />
(page 27).<br />
18 OUTPUT RESOLUTION<br />
Use these to switch the output video resolution from the HDMI OUT<br />
or COMPONENT VIDEO output terminals (page 23).<br />
19 PLAY MODE<br />
Press to display/hide the Play Mode screen (page 29).<br />
20 POP UP MENU/MENU<br />
Press to display the BD-ROM or DVD-Video menus.<br />
21 DISPLAY<br />
Press to display disc information (page 28).<br />
22 TOOLS<br />
Press to display/hide the TOOLS menu (page 22).<br />
23 RETURN<br />
Press to return to the previous screen.
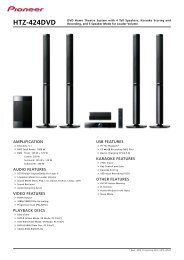
Front Panel<br />
01<br />
1 2 3<br />
4 5<br />
6<br />
11<br />
10<br />
9 8<br />
7<br />
1 STANDBY/ON<br />
Press to turn the power on and off.<br />
2 PURE AUDIO – High quality audio signals with any extraneous<br />
noise eliminated are output (page 51).<br />
RESOLUTION – Press to switch the output video resolution from<br />
HDMI OUT or COMPONENT VIDEO output terminals (page 23).<br />
3 Front panel display<br />
4 Remote control sensor<br />
Point the remote control to this, then operate it within approximately<br />
7 m.<br />
The player may have trouble capturing remote control signals if<br />
there is a fluorescent light nearby. If this happens, move the player<br />
away from the fluorescent light.<br />
5 OPEN/CLOSE – Press to open and close the disc t<strong>ray</strong>.<br />
/ – Press to skip to the beginning of the previous title/<br />
chapter/track/file. Press and hold to start reverse scanning<br />
(pages 25 and 26).<br />
/ – Press to skip to the beginning of the next title/<br />
chapter/track/file. Press and hold to start forward scanning<br />
(pages 25 and 26).<br />
– Press during playback to pause. Press again to restart<br />
playback.<br />
– Press to stop playback.<br />
6 <br />
Press to start playback.<br />
7 HDMI indicator<br />
This lights when an HDMI-compatible device is connected to an<br />
HDMI OUT (MAIN) or HDMI OUT (SUB) terminal (page 13).<br />
8 FL OFF indicator<br />
This lights when Off is selected with FL DIMMER.<br />
9 <strong>Disc</strong> t<strong>ray</strong><br />
10 HD indicator<br />
This lights when an HDMI cable is connected and video signals are<br />
being output with a resolution of 1080/50i, 1080/50p, 720/50p, 1080/<br />
24p, 1080/60i, 1080/60p or 720/60p. It also lights when a component<br />
video cable is connected and video signals are being output with a<br />
resolution of 1080/60i or 720/60p.<br />
11 PURE AUDIO indicator<br />
This lights when PURE AUDIO is set to Mode 1 or Mode 2<br />
(page 51).<br />
Front Panel Display<br />
1 2<br />
3 4<br />
LAN<br />
PQLS<br />
HDMI 1 2 24HZ<br />
CONTROL 50HZ<br />
60HZ<br />
8<br />
7<br />
6<br />
5<br />
1 <br />
Lights during playback.<br />
2 <br />
Lights when playback is paused.<br />
3 LAN<br />
Lights when there is an active local area network (LAN) connection<br />
(page 18).<br />
4 PQLS<br />
Lights when the PQLS function is activated (page 14).<br />
5 Character display<br />
Displays the title/chapter/track number, elapsed time, etc.<br />
6 24HZ/50HZ/60HZ<br />
The frequency of the video frame or field being output lights.<br />
7 CONTROL<br />
Lights when the KURO LINK function is activated (page 14).<br />
8 HDMI 1 2<br />
HDMI 1 lights when VIDEO SELECT is pressed and the HDMI OUT<br />
(MAIN) terminal is selected. HDMI 2 lights when the HDMI OUT<br />
(SUB) terminal is selected (page 23).<br />
11<br />
En
01<br />
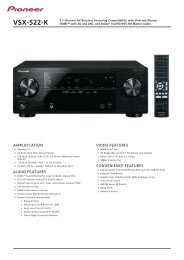
Rear Panel<br />
1 2<br />
R<br />
FRONT<br />
SUB WOOFER<br />
CENTER AUDIO OUT ( 7.1 ch ) SURROUND<br />
SURROUND<br />
L R L R BACK L<br />
<br />
RS-232 C<br />
S-VIDEO<br />
VIDEO OUT<br />
VIDEO<br />
CONTROL<br />
IN<br />
LAN(100)<br />
DIGITAL OUT<br />
HDMI OUT<br />
COMPONENT VIDEO<br />
OPTICAL<br />
COAXIAL<br />
MAIN(KURO LINK)<br />
SUB<br />
PR<br />
PB<br />
Y<br />
8 7 6<br />
5 4<br />
3<br />
1 AUDIO OUT (7.1 ch) terminals<br />
Connect with the multi-channel (7.1- or 5.1-channel) audio input<br />
terminals on an AV receiver or amplifier, etc. (page 17).<br />
To connect to the 2-channel audio input terminals on a TV, etc.,<br />
connect to FRONT (L/R).<br />
2 AC IN<br />
Connect the power cord here.<br />
3 VIDEO OUT terminals<br />
VIDEO – Connect with the video input terminal on a TV, AV<br />
receiver or amplifier, etc. (page 16).<br />
S-VIDEO – Connect with the S-Video input terminal on a TV, AV<br />
receiver or amplifier, etc. (page 16).<br />
COMPONENT VIDEO (BNC jacks) – Connect with the<br />
component video input terminals on a TV, AV receiver or<br />
amplifier, etc. (page 16).<br />
4 RS-232C terminal<br />
This terminal is not used.<br />
5 HDMI OUT terminals<br />
MAIN (KURO LINK) – Connect with an HDMI-compatible TV, AV<br />
receiver or amplifier, etc. (page 14).<br />
SUB – Connect with an HDMI-compatible TV, projector, etc.<br />
(page 14). This terminal outputs linear PCM 2-channel audio<br />
signals. Do not connect an AV receiver or amplifier to this<br />
terminal. Also note that the KURO LINK function will not work<br />
for devices connected to this terminal (page 14).<br />
6 DIGITAL OUT (COAXIAL/OPTICAL) terminals<br />
Connect with the digital audio input terminal on an AV receiver or<br />
amplifier, etc. (page 17).<br />
7 LAN (100) terminal<br />
Ethernet port for 100BASE-TX (100 Mbps) network connection<br />
(page 18).<br />
8 CONTROL IN terminal<br />
Use to control this player from the remote sensor of another <strong>Pioneer</strong><br />
component with a CONTROL OUT terminal and bearing the <br />
mark. Connect the CONTROL OUT terminal of the other component<br />
to CONTROL IN on this player using a mini-plug cord (commercially<br />
available).<br />
Caution<br />
• Be sure to connect cables for outputting the audio and video<br />
signals.<br />
• When connected via System Control, point the remote control<br />
toward the connected component (such as an AV receiver or<br />
amplifier). The remote will not work correctly when pointed at<br />
this player.<br />
• You cannot use System Control with components that do not<br />
have a System Control terminal or with components<br />
manufactured by companies other than <strong>Pioneer</strong>.<br />
12<br />
En
Chapter 2<br />
Connecting up<br />
02<br />
Be sure to turn off the power and unplug the power cord from the<br />
power outlet whenever making or changing connections.<br />
After connecting, make the settings at the Setup Navigator menu<br />
according to the type of cable connected (page 19).<br />
Also refer to the operating instructions of the device being<br />
connected.<br />
Connecting using an HDMI<br />
cable<br />
The audio and video signals can be transferred to HDMI-compatible<br />
devices as digital signals with no loss of sound or video quality.<br />
Note<br />
• Make the settings at the Setup Navigator menu according to<br />
connected HDMI-compatible device (page 19).<br />
•The HDMI indicator on the player’s front panel lights when an<br />
HDMI-compatible device is connected to an HDMI OUT (MAIN)<br />
or HDMI OUT (SUB) terminal (page 11).<br />
• 1080p video signals may not be output, depending on the HDMI<br />
cable being used.<br />
About HDMI<br />
This player incorporates High-Definition Multimedia Interface<br />
(HDMI) technology.<br />
HDMI, the HDMI logo and High-Definition Multimedia Interface are<br />
trademarks or registered trademarks of HDMI Licensing LLC.<br />
The player supports Deep Color.<br />
The conventional players can transmit a video signal with 8 bit color<br />
depth in the YCbCr 4:4:4 or RGB formats, the players supporting<br />
Deep Color can transmit a video signal with a color bit depth of<br />
greater than 8 bits per color component. Subtle color gradations<br />
can be reproduced when connected to a TV that supports Deep<br />
Color.<br />
This product is compatible with “x.v.Color” that have the capability<br />
to realize a wide-gamut color space based on the xvYCC<br />
specifications.<br />
Playing video signals conforming to “xvYCC” standards on this<br />
player when connected to an “x.v.Color”-compatible TV, etc.,<br />
expands color reproduction capabilities, allowing natural colors to<br />
be reproduced more faithfully than ever.<br />
“x.v.Color” is a promotion name given to the products that have the<br />
capability to realize a wide-gamut color space based on the<br />
international standard specifications defined as xvYCC.<br />
“x.v.Color” and<br />
are trademarks of Sony Corporation.<br />
Audio signals that can be transferred with<br />
the player’s HDMI OUT (MAIN) terminal<br />
•Dolby TrueHD<br />
•Dolby Digital Plus<br />
•Dolby Digital<br />
• DTS-HD Master Audio<br />
•DTS-HD High Resolution Audio<br />
• DTS Digital Surround<br />
• MPEG-2 AAC<br />
•Linear PCM<br />
Linear PCM audio signals meeting the following conditions can<br />
be output:<br />
– Sampling frequency: 32 kHz to 192 kHz<br />
– Number of channels: Up to 8 (up to 6 for a 192 kHz sampling<br />
frequency)<br />
For details, see About the audio output settings on page 52.<br />
About the HDMI High Speed Transmission<br />
This player outputs 1080/50p, 1080/60p and Deep Color video<br />
signals. If your TV supports 1080/50p, 1080/60p or Deep Color<br />
signals, use a High Speed HDMI cable in order to take advantage<br />
of the maximum performance the player and TV can offer. Also set<br />
HDMI High Speed Transmission to On. HDMI High Speed<br />
Transmission can be set separately for the HDMI OUT (MAIN) and<br />
HDMI OUT (SUB) terminals (page 43).<br />
High Speed HDMI cables are tested to carry signals up to 1080p.<br />
1080/50i, 1080/50p, 720/50p, 1080/24p, 1080/60i, 1080/60p and 720/<br />
60p video signals that are capable of Deep Color can also be carried.<br />
Note<br />
•Set HDMI High Speed Transmission to Off when using an<br />
HDMI cable other than a High Speed HDMI cable (a Standard<br />
HDMI cable).<br />
• The following restrictions apply when HDMI High Speed<br />
Transmission is set to Off:<br />
– Deep Color signals are not output.<br />
– If the output video resolution is set to Auto, the signals are<br />
output with a resolution of 1080/50i or 1080/60i when TV’s<br />
preferred resolution is 1080/50p or 1080/60p.<br />
– If the output video resolution is set to 576i/480i or 576p/480p<br />
when HDMI High Speed Transmission is set to Off for the<br />
HDMI OUT (MAIN) terminal, the Dolby TrueHD and DTS-HD<br />
Master Audio audio signals are output as DTS Digital<br />
Surround or linear PCM signals. 96 kHz or 192 kHz multichannel<br />
audio signals are output as linear PCM 2-channel<br />
audio signals (page 52).<br />
• When an HDMI cable with a built-in equalizer is connected, it<br />
may not operate properly.<br />
13<br />
En
LAN(100)<br />
FRONT<br />
OPTICAL<br />
DIGITAL OUT<br />
COAXIAL<br />
SUB WOOFER<br />
CENTER AUDIO OUT ( 7.1 ch )<br />
MAIN(KURO LINK)<br />
HDMI OUT<br />
SURROUND<br />
SUB<br />
RS-232 C<br />
VIDEO OUT<br />
S-VIDEO<br />
PR<br />
PB<br />
SURROUND<br />
BACK<br />
COMPONENT VIDEO<br />
VIDEO<br />
Y<br />
<br />
02<br />
14<br />
En<br />
When connected to a DVI device<br />
• It is not possible to connect DVI devices (computer displays,<br />
for example) that are not compatible with HDCP. HDCP is a<br />
specification to protect audiovisual content across the DVI/<br />
HDMI interface.<br />
• No audio signals are output. Connect using an audio cable, etc.<br />
• This player is designed for connection with HDMI-compatible<br />
devices. When connected to a DVI device, it may not operate<br />
properly depending on the DVI device.<br />
About KURO LINK function<br />
When the player is connected to a <strong>Pioneer</strong> Flat Screen TV or AV<br />
system (AV receiver or amplifier, etc.) supporting the KURO LINK<br />
function, it can be operated from the Flat Screen TV.<br />
The input switches automatically on the Flat Screen TV and AV<br />
system (AV receiver or amplifier, etc.) when playback is started on<br />
the player or the Home Menu or the Home Media Gallery is<br />
displayed. When the input is switched, the playback picture, the<br />
Home Menu or the Home Media Gallery appears on the Flat Screen<br />
TV (Auto-select function). If the Flat Screen TV’s power is being<br />
turned off at this time, it may turn on automatically (Simultaneous<br />
power function). When the language information from a connected<br />
Flat Screen TV is received, you can have the player’s on-screen<br />
display language change automatically to that of the Flat Screen TV<br />
(Unified language function). This function is available only when<br />
playback is stopped and the menu screen is not displayed.<br />
Also refer to the operating instructions of the Flat Screen TV and AV<br />
system (AV receiver or amplifier, etc.).<br />
Caution<br />
• To use the KURO LINK function, connect the Flat Screen TV and<br />
AV system (AV receiver or amplifier, etc.) to the HDMI OUT<br />
(MAIN) terminal. The KURO LINK function will not work if<br />
connected to the HDMI OUT (SUB) terminal.<br />
To use the KURO LINK function<br />
• The KURO LINK function operates when KURO LINK is set to On<br />
for all devices connected to the HDMI OUT (MAIN) terminal.<br />
Once connections and the settings of all the devices are<br />
finished, be sure to check that the player’s picture is output to<br />
the Flat Screen TV. (Also check after changing the connected<br />
devices and reconnecting HDMI cables.) The KURO LINK<br />
function may not operate properly if the player’s picture is not<br />
properly output to the Flat Screen TV.<br />
• Use High Speed HDMI cables when using the KURO LINK<br />
function. The KURO LINK function may not operate properly if<br />
other HDMI cables are used.<br />
•For some models, the KURO LINK function may be referred to as<br />
“HDMI Control”.<br />
About PQLS function<br />
The PQLS (Precision Quartz Lock System) is a transfer control<br />
technology using the KURO LINK function. The player’s output<br />
signals are controlled from the AV receiver or amplifier to achieve<br />
high quality sound playback using the quartz oscillator of AV<br />
receiver or amplifier. This eliminates the influence of the jitter<br />
generated upon transfer which can adversely affect the sound<br />
quality.<br />
• The PQLS function is only activated when a <strong>Pioneer</strong> AV receiver<br />
or amplifier compatible with the PQLS function is connected<br />
directly to the player’s HDMI OUT (MAIN) terminal using an<br />
HDMI cable.<br />
• The PQLS function is only activated when playing an audio CD<br />
(CD-DA).<br />
• The PQLS function is activated when the player is set as follows<br />
(page 43):<br />
KURO LINK: On<br />
PQLS: Auto<br />
• Also refer to the operating instructions of AV receiver or<br />
amplifier.<br />
Caution<br />
• If the output video resolution is switched when playing an audio<br />
CD (CD-DA), the PQLS function does not work. This function will<br />
work again after playback stops and restarts.<br />
Connecting a TV<br />
Connect a TV to the HDMI OUT (MAIN) terminal. Another TV or a<br />
projector can be connected to HDMI OUT (SUB). See Connecting an<br />
AV receiver or amplifier on page 15 to connect an AV receiver or<br />
amplifier using an HDMI cable.<br />
Caution<br />
• Hold the plug when connecting and disconnecting the cable.<br />
• Placing a load on the plug could result in faulty contact and no<br />
video signals being output.<br />
• The KURO LINK function will not work if connected to the HDMI<br />
OUT (SUB) terminal. To use the KURO LINK function, connect<br />
the TV to the HDMI OUT (MAIN) terminal.<br />
CONTROL<br />
IN<br />
Match the direction of<br />
the plug to the terminal<br />
and insert straight.<br />
R<br />
Direction of<br />
signal flow<br />
Player’s rear panel<br />
L R L R L<br />
HDMI cable<br />
(included)<br />
MAIN(KURO LINK)<br />
HDMI OUT<br />
TV<br />
SUB<br />
It is also possible to<br />
connect to an AV<br />
receiver or amplifier<br />
using an HDMI cable<br />
(page 15).<br />
To HDMI input terminal<br />
PR
LAN(100)<br />
FRONT<br />
OPTICAL<br />
DIGITAL OUT<br />
COAXIAL<br />
SUB WOOFER<br />
CENTER AUDIO OUT ( 7.1 ch )<br />
MAIN(KURO LINK)<br />
HDMI OUT<br />
SURROUND<br />
SUB<br />
RS-232 C<br />
VIDEO OUT<br />
S-VIDEO<br />
PR<br />
PB<br />
SURROUND<br />
BACK<br />
COMPONENT VIDEO<br />
VIDEO<br />
Y<br />
<br />
Connecting an AV receiver or<br />
amplifier<br />
Connect to an AV receiver or amplifier in order to enjoy the surround<br />
sound of Dolby TrueHD, Dolby Digital Plus, Dolby Digital, DTS-HD<br />
Master Audio, DTS-HD High Resolution Audio or DTS Digital<br />
Surround. For instructions on connecting the TV and speakers to the<br />
AV receiver or amplifier, refer to the operating instructions of AV<br />
receiver or amplifier.<br />
Caution<br />
• Hold the plug when connecting and disconnecting the cable.<br />
• Placing a load on the plug could result in faulty contact and no<br />
video signals being output.<br />
• To use the KURO LINK function, connect the AV receiver or<br />
amplifier to the HDMI OUT (MAIN) terminal. The KURO LINK<br />
function will not work if connected to the HDMI OUT (SUB)<br />
terminal.<br />
•The HDMI OUT (SUB) terminal outputs linear PCM 2-channel<br />
audio signals. Be sure to connect the AV receiver or amplifier to<br />
the HDMI OUT (MAIN) terminal.<br />
Player’s rear panel<br />
Note<br />
• When DTS-HD Master Audio and DTS-HD High Resolution<br />
Audio signals are output as linear PCM signals, the DTS Digital<br />
Surround signals are converted to linear PCM for output<br />
(page 52).<br />
•See Stretching widescreen pictures vertically (Anamorphic Zoom)<br />
on page 50 for instructions on viewing 2.35:1 movies with a front<br />
projector equipped with an anamorphic lens.<br />
Achieving better sound quality<br />
When connecting one TV (or projector) and AV amplifier to the<br />
player, connect in such a way that the video and audio signals are<br />
transferred separately in order to achieve higher quality sound.<br />
Note<br />
• Using the Pure Audio function provides high quality sound with<br />
extraneous noise eliminated (page 51).<br />
CONTROL<br />
IN<br />
R<br />
Player’s rear panel<br />
L R L R L<br />
02<br />
R<br />
L R L R L<br />
CONTROL<br />
IN<br />
HDMI OUT<br />
MAIN(KURO LINK)<br />
SUB<br />
PR<br />
MAIN(KURO LINK)<br />
HDMI OUT<br />
SUB<br />
PR<br />
Match the direction of<br />
the plug to the terminal<br />
and insert straight.<br />
HDMI cable<br />
(included)<br />
HDMI cable<br />
(commercially<br />
available)<br />
Match the direction of<br />
the plug to the terminal<br />
and insert straight.<br />
HDMI cable<br />
(included)<br />
HDMI cable<br />
(commercially<br />
available)<br />
Direction of<br />
signal flow<br />
To HDMI input<br />
terminal<br />
To HDMI input<br />
terminal<br />
AV receiver<br />
or amplifier<br />
To HDMI input terminal<br />
To HDMI input<br />
terminal<br />
AV receiver<br />
or amplifier<br />
HDMI cable<br />
(commercially<br />
available)<br />
From HDMI output terminal<br />
To HDMI input terminal<br />
Projector<br />
Do not connect using<br />
an HDMI cable.<br />
TV or<br />
projector<br />
Direction of<br />
signal flow<br />
TV<br />
15<br />
En
CONTROL<br />
IN<br />
LAN(100)<br />
FRONT<br />
OPTICAL<br />
DIGITAL OUT<br />
COAXIAL<br />
SUB WOOFER<br />
CENTER AUDIO OUT ( 7.1 ch )<br />
MAIN(KURO LINK)<br />
HDMI OUT<br />
SURROUND<br />
SUB<br />
RS-232 C<br />
VIDEO OUT<br />
S-VIDEO<br />
PR<br />
PB<br />
SURROUND<br />
BACK<br />
COMPONENT VIDEO<br />
VIDEO<br />
Y<br />
<br />
02<br />
Connecting video and<br />
audio cables<br />
Note<br />
• Make the settings in the Setup Navigator menu according to<br />
the type of cable connected (page 19).<br />
• To output video signals from this player, connect using one of<br />
the following (not including when connected using an HDMI<br />
cable): a component video cable, an S-Video cable or a video<br />
cable.<br />
Connecting a TV using a component<br />
video cable and an audio cable<br />
Player’s rear panel<br />
• Depending on the output video resolution setting, the picture<br />
may not be output (page 23).<br />
Connecting a TV using a video<br />
cable and an audio cable<br />
Caution<br />
• Connect the player’s video output directly to your TV.<br />
This player supports analog copy protection technology.<br />
Therefore the picture may not be displayed properly if connected<br />
to a TV via a DVD recorder/video deck or when playing the<br />
player’s output material that is recorded by a DVD recorder/<br />
video deck. Furthermore, the picture may not be displayed<br />
properly due to the copy protection when the player is connected<br />
to a TV with a built-in video deck. For details, contact the<br />
manufacturer of your TV.<br />
Player’s rear panel<br />
R<br />
L R L R L<br />
R<br />
L R L R L<br />
CONTROL<br />
IN<br />
R<br />
FRONT<br />
L<br />
SU<br />
RS-232 C<br />
S-VIDEO<br />
VIDEO OUT<br />
VIDEO<br />
R<br />
FRONT<br />
L<br />
SU<br />
RS-232 C<br />
S-VIDEO<br />
VIDEO OUT<br />
VIDEO<br />
COMPONENT VIDEO<br />
COMPONENT VIDEO<br />
LAN(100)<br />
DIGITAL OUT<br />
PR<br />
PB<br />
Y<br />
LAN(100)<br />
DIGITAL OUT<br />
PR<br />
PB<br />
Y<br />
16<br />
En<br />
Audio cable (commercially available)<br />
Red<br />
OPTICAL<br />
COAXIAL<br />
White<br />
It is also possible to<br />
connect to an AV<br />
receiver or amplifier.<br />
Connect the audio<br />
signals using audio<br />
cables (7.1 channels)<br />
or a digital audio cable<br />
(page 17).<br />
Direction of<br />
signal flow<br />
Use the BNC-RCA<br />
adapter (included)<br />
to connect an RCA<br />
pin type cable.<br />
Component cable or<br />
three video cables<br />
(commercially<br />
available)<br />
To audio input<br />
terminals<br />
To component<br />
video input<br />
terminals<br />
Note<br />
• When connected to the TV using a component video cable, video<br />
signals are not output with a resolution of 1080/50i, 1080/50p,<br />
720/50p, 1080/24p or 1080/60p.<br />
TV<br />
Audio cable (commercially available)<br />
Red<br />
OPTICAL<br />
COAXIAL<br />
White<br />
Direction of<br />
signal flow<br />
It is also possible to<br />
connect to an AV<br />
receiver or amplifier.<br />
Connect the audio<br />
signals using audio<br />
cables (7.1 channels)<br />
or a digital audio cable<br />
(page 17).<br />
To audio input<br />
terminal<br />
An S-Video cable (commercially<br />
available) can also be used for<br />
connection.<br />
To S-Video<br />
input<br />
terminal<br />
Note<br />
• Video signals are output with a resolution of 576/50i or 480/60i<br />
when connected using a video cable or an S-Video cable.<br />
TV<br />
Video cable<br />
(commercially available)<br />
To video<br />
input<br />
terminal<br />
Yellow
LAN(100)<br />
FRONT<br />
OPTICAL<br />
DIGITAL OUT<br />
COAXIAL<br />
SUB WOOFER<br />
CENTER AUDIO OUT ( 7.1 ch )<br />
MAIN(KURO LINK)<br />
HDMI OUT<br />
SURROUND<br />
SUB<br />
RS-232 C<br />
VIDEO OUT<br />
S-VIDEO<br />
PR<br />
COMPONENT VIDEO<br />
PB<br />
SURROUND<br />
BACK<br />
VIDEO<br />
Y<br />
<br />
LAN(100)<br />
FRONT<br />
OPTICAL<br />
DIGITAL OUT<br />
COAXIAL<br />
SUB WOOFER<br />
CENTER AUDIO OUT ( 7.1 ch )<br />
MAIN(KURO LINK)<br />
HDMI OUT<br />
SURROUND<br />
SUB<br />
RS-232 C<br />
VIDEO OUT<br />
S-VIDEO<br />
PR<br />
PB<br />
SURROUND<br />
BACK<br />
COMPONENT VIDEO<br />
VIDEO<br />
Y<br />
<br />
Connecting an AV receiver or<br />
amplifier using audio cables<br />
When connecting to a 7.1-channel compatible AV receiver or<br />
amplifier – Connect using 4 audio cables (diagram below).<br />
When connecting to a 5.1-channel compatible AV receiver or<br />
amplifier – Connect using 3 audio cables (do not connect to the<br />
surround back left and right terminals).<br />
• After connecting, set Audio Output Mode to Multi-channel<br />
(page 43).<br />
Player’s rear panel<br />
Connecting an AV receiver or<br />
amplifier using a digital audio cable<br />
Connect either an optical digital audio cable or a coaxial digital<br />
audio cable.<br />
CONTROL<br />
IN<br />
R<br />
Player’s rear panel<br />
L R L R L<br />
02<br />
R<br />
L R L R L<br />
CONTROL<br />
IN<br />
RS-232 C<br />
S-VIDEO<br />
VIDEO OUT<br />
VIDEO<br />
LAN(100)<br />
DIGITAL OUT<br />
COMPONENT VIDEO<br />
R<br />
FRONT<br />
SUB WOOFER<br />
CENTER AUDIO OUT ( 7.1 ch ) SURROUND<br />
SURROUND<br />
L R L R BACK L<br />
OPTICAL<br />
COAXIAL<br />
B<br />
PR<br />
PB<br />
Y<br />
Red<br />
LAN(100)<br />
DIGITAL OUT<br />
OPTICAL COAXIAL<br />
White<br />
MAIN(KURO LINK)<br />
HDMI OUT<br />
SUB<br />
RS-232 C<br />
VIDEO OUT<br />
S-VIDEO<br />
VIDEO<br />
COMPONENT VIDEO<br />
PR PB Y<br />
Optical digital cable<br />
(commercially available)<br />
Coaxial digital cable<br />
(commercially available)<br />
Use the BNC-RCA<br />
adapter (included)<br />
to connect an RCA<br />
pin type cable.<br />
Audio cable<br />
(commercially<br />
available)<br />
Audio cable<br />
(commercially<br />
available)<br />
To multi-channel<br />
audio input<br />
terminals<br />
Audio cable<br />
(commercially available)<br />
Audio cable<br />
(commercially<br />
available)<br />
AV receiver or amplifier<br />
Use the BNC-RCA adapter<br />
(included) to connect an<br />
RCA pin type cable.<br />
Component cable or<br />
three video cables<br />
(commercially<br />
available)<br />
To component video input<br />
terminals<br />
Direction of<br />
signal flow<br />
Note<br />
• For DTS-HD Master Audio and DTS-HD High Resolution Audio<br />
signals, the DTS Digital Surround signals are converted to linear<br />
PCM for output (page 52).<br />
To optical digital audio<br />
input terminal<br />
To coaxial digital audio<br />
input terminal<br />
AV receiver or amplifier<br />
To component video input<br />
terminals<br />
Component cable or<br />
three video cables<br />
(commercially<br />
available)<br />
Direction of<br />
signal flow<br />
Note<br />
• Dolby TrueHD signals are output as Dolby Digital signals or<br />
signals converted from Dolby TrueHD to linear PCM (page 52).<br />
• Dolby Digital Plus signals are output as Dolby Digital signals or<br />
signals converted from Dolby Digital to linear PCM (page 52).<br />
• DTS-HD Master Audio and DTS-HD High Resolution Audio<br />
signals are output as the DTS Digital Surround signals or<br />
signals converted from DTS Digital Surround to linear PCM<br />
(page 52).<br />
17<br />
En
LAN(100)<br />
FRONT<br />
OPTICAL<br />
DIGITAL OUT<br />
COAXIAL<br />
SUB WOOFER<br />
CENTER AUDIO OUT ( 7.1 ch )<br />
MAIN(KURO LINK)<br />
HDMI OUT<br />
SURROUND<br />
SUB<br />
RS-232 C<br />
VIDEO OUT<br />
S-VIDEO<br />
PR<br />
PB<br />
SURROUND<br />
BACK<br />
COMPONENT VIDEO<br />
VIDEO<br />
Y<br />
<br />
02<br />
Network connection<br />
The player’s software can be updated over the Internet (page 50).<br />
Connect an Ethernet hub (or a router with hub functionality) that is<br />
connected to the Internet to the player.<br />
Be sure to use a 100BASE-TX compatible Ethernet hub or router.<br />
Caution<br />
• Use only the included LAN cable to connect this player’s<br />
LAN (100) terminal to a network.<br />
Connecting via an Ethernet hub<br />
• <strong>Pioneer</strong> is not responsible for any malfunction of the player due<br />
to communication error/ malfunctions associated with your<br />
network connection and/or your connected equipment. Please<br />
contact your Internet service provider or network device<br />
manufacturer.<br />
Connecting the power<br />
cord<br />
Connect the power cord after all the connections between devices<br />
have been completed.<br />
Player’s rear panel<br />
If you already operate one or more PCs on a local area network, you<br />
can integrate this player by connecting it to the Ethernet hub using<br />
a LAN cable.<br />
CONTROL<br />
IN<br />
R<br />
L R L R L<br />
Player’s rear panel<br />
R<br />
L R L R L<br />
CONTROL<br />
IN<br />
URROUND<br />
BACK<br />
L<br />
<br />
CONTROL<br />
IN<br />
LAN(100)<br />
DIGITAL OUT<br />
OUT<br />
VIDEO<br />
OPTICAL<br />
COAXIAL<br />
Power cord (included)<br />
LAN cable (included)<br />
LAN<br />
3 2 1 WAN<br />
Ethernet hub<br />
(router with hub functionality)<br />
Modem<br />
Internet<br />
LAN(10/100)<br />
<br />
To wall outlet<br />
PC<br />
Note<br />
• If there is an available DHCP server in your local area network,<br />
the IP address is obtained automatically. Otherwise, set IP<br />
address manually (page 48).<br />
• For some Internet service providers, you may have to set the<br />
individual network configuration manually. In this case, see<br />
page 48.<br />
18<br />
En
Chapter 3<br />
Getting Started<br />
03<br />
Making settings using the<br />
Setup Navigator menu<br />
Be sure to perform these settings when using the player for the first<br />
time.<br />
When a <strong>Pioneer</strong> Flat Screen TV that is compatible with KURO LINK<br />
is connected to this player’s HDMI OUT (MAIN) terminal, language<br />
settings are imported from the <strong>Pioneer</strong> Flat Screen TV’s language<br />
settings before Setup Navigator begins.<br />
4 Select and set the video and audio output terminals.<br />
Select the actually connected video and audio output terminals.<br />
Use /// to select, then press ENTER.<br />
Caution<br />
TOP MENU<br />
TOOLS<br />
• Before turning on the power, check that the connections<br />
between the player and other devices are correct. Also, turn on<br />
the power of the devices connected to the player before turning<br />
on the player’s power.<br />
HOME<br />
MENU<br />
ENTER<br />
RETURN<br />
1 Turn on the TV’s power and switch the input.<br />
See the TV’s operating instructions for instructions on operating the<br />
TV.<br />
If TV Control is set, the TV can be operated with the player’s remote<br />
control (page 21).<br />
Setup Navigator<br />
BD <strong>PLAYER</strong><br />
Select the output terminals to be used for<br />
the video and audio signals of this player.<br />
2 Turn on the player’s power.<br />
Press STANDBY/ON.<br />
Video<br />
Audio<br />
HDMI MAIN<br />
HDMI MAIN<br />
STANDBY/ON<br />
TV CONTROL<br />
OPEN/CLOSE<br />
Use [ ][ ] to select video or audio, then<br />
press [ ][ ] to select the output terminal.<br />
INPUT<br />
SELECT CH VOL<br />
Check that the Setup Navigator menu is displayed.<br />
If the Setup Navigator menu is not<br />
displayed<br />
Press HOME MENU to display the Home Menu, select<br />
Initial Setup Setup Navigator Start, then press ENTER.<br />
3 Select the OSD language.<br />
Use / to select, then press ENTER.<br />
TOP MENU<br />
TOOLS<br />
Setting item<br />
Output terminal name<br />
HDMI MAIN HDMI OUT (MAIN)<br />
HDMI SUB HDMI OUT (SUB)<br />
COMPONENT/S/ VIDEO OUT COMPONENT VIDEO<br />
VIDEO<br />
S-VIDEO<br />
VIDEO<br />
HDMI MAIN HDMI OUT (MAIN)<br />
DIGITAL AUDIO DIGITAL OUT COAXIAL<br />
OPTICAL<br />
ANALOG AUDIO AUDIO OUT (7.1 ch)<br />
Video<br />
Audio<br />
HOME<br />
MENU<br />
ENTER<br />
RETURN<br />
Setup Navigator<br />
BD <strong>PLAYER</strong><br />
Please select the on-screen display language.<br />
Audio, subtitle and BDMV/DVD-Video menu<br />
language will also be set.<br />
Caution<br />
• The video and audio signals output from the set output terminals<br />
are output synchronously (lip synchronization).<br />
•When HDMI MAIN or DIGITAL AUDIO is selected at Audio,<br />
linear PCM audio signals (2 channels) are output from all<br />
terminals other than the ones selected at Audio.<br />
•When ANALOG AUDIO is selected at Audio, no audio signals<br />
are output from the HDMI OUT or DIGITAL OUT terminals.<br />
•The HDMI OUT (SUB) terminal outputs linear PCM 2-channel<br />
audio signals. HDMI SUB cannot be selected for Audio. To<br />
listen to the device connected to the HDMI OUT (SUB) terminal,<br />
select HDMI MAIN.<br />
19<br />
En
03<br />
For steps 5 to 8, the step to which you should proceed depends<br />
on the combination of the Video and Audio settings.<br />
5 Select and set the HDMI High Speed Transmission setting<br />
for the HDMI OUT (MAIN) terminal.<br />
Use / to select, then press ENTER.<br />
TOP MENU<br />
TOOLS<br />
7 Select the output video resolution from the COMPONENT<br />
VIDEO output terminals.<br />
Use / to select, then press ENTER.<br />
Setup Navigator<br />
BD <strong>PLAYER</strong><br />
Select the output video resolution at the<br />
Component video terminal.<br />
ENTER<br />
HOME<br />
MENU<br />
When HDMI High Speed Transmission for the HDMI OUT (MAIN)<br />
terminal is set to On, use a High Speed HDMI cable. The picture<br />
and sound may not be output properly if any other HDMI cable (for<br />
example a standard HDMI cable) or an HDMI cable with built-in<br />
equalizer is used.<br />
6 Select and set the HDMI High Speed Transmission setting<br />
for the HDMI OUT (SUB) terminal.<br />
Use / to select, then press ENTER.<br />
RETURN<br />
Setup Navigator<br />
BD <strong>PLAYER</strong><br />
Select the HDMI High Speed Transmission setting for HDMI MAIN.<br />
On<br />
Off<br />
Normally select [On] (Recommended).<br />
Select [Off] if the video or audio of HDMI-connected<br />
was not output in the test output.<br />
If you select [Source Direct], the output<br />
resolution is determined according to the<br />
video format of the playing source.<br />
For details on the resolution settings, see Switching the output video<br />
resolution on page 23.<br />
8 Select the aspect ratio of your TV.<br />
Use / to select, then press ENTER.<br />
Setup Navigator<br />
BD <strong>PLAYER</strong><br />
Select the screen aspect ratio to match<br />
your TV.<br />
9 Check the settings.<br />
Select Proceed, then press ENTER.<br />
TOP MENU<br />
ENTER<br />
TOOLS<br />
Setup Navigator<br />
BD <strong>PLAYER</strong><br />
Select [Proceed] if you want to start testing<br />
your audio and video settings.<br />
HOME<br />
MENU<br />
RETURN<br />
Proceed<br />
Setup Navigator<br />
BD <strong>PLAYER</strong><br />
Select the HDMI High Speed Transmission setting for HDMI SUB.<br />
On<br />
Off<br />
10 Output test tones.<br />
Use / to select Yes, then press ENTER.<br />
Normally select [On] (Recommended).<br />
Select [Off] if the video or audio of HDMI-connected<br />
was not output in the test output.<br />
When HDMI High Speed Transmission for the HDMI OUT (SUB)<br />
terminal is set to On, use a High Speed HDMI cable. The picture<br />
and sound may not be output properly if any other HDMI cable (for<br />
example a standard HDMI cable) or an HDMI cable with built-in<br />
equalizer is used.<br />
Setup Navigator<br />
BD <strong>PLAYER</strong><br />
The test tone will be output.<br />
Reduce the volume to an appropriate level.<br />
Yes<br />
No<br />
The video and/or audio may not be output under certain setup.<br />
The setup menu comes back in 30 seconds.<br />
20<br />
En<br />
Caution<br />
• The screen in step 11 and test tones are output simultaneously<br />
according to the settings in steps 4 to 8. Lower the volume of the<br />
devices connected with the player.
11 Finish the Setup Navigator menu.<br />
Use / to select Finish, then press ENTER.<br />
Setup Navigator<br />
BD <strong>PLAYER</strong><br />
Setup is complete!<br />
2 Check that the TV can be operated.<br />
STANDBY/ON<br />
TV CONTROL<br />
INPUT<br />
SELECT CH VOL<br />
OPEN/CLOSE<br />
03<br />
Finish<br />
Go Back<br />
TV Preset code list<br />
The setup menu comes back in 30 seconds.<br />
Manufacturer Code(s)<br />
To redo the settings from the start, select Go Back.<br />
Depending on the output terminal setting of step 4 or the HDMI<br />
cable being used, it may happen that no picture and/or sound is<br />
output. If this happens, the setup returns to step 4 if there is no<br />
operation for over 30 seconds. Once the setup returns to step 4, redo<br />
the settings according to the connected devices and the HDMI<br />
cable being used.<br />
Operating the TV with the<br />
player’s remote control<br />
When the manufacturer code for your brand of TV is set on the<br />
player’s remote control, the TV can be operated using the player’s<br />
remote control.<br />
Caution<br />
• For some models it may not be possible to operate the TV with<br />
the player’s remote control, even for TVs of brands listed on the<br />
manufacturer code list.<br />
• The setting may be restored to the default after the batteries are<br />
replaced. If this happens, reset it.<br />
1 Input the 2-digit manufacturer code.<br />
Press the number buttons (0 to 9) to input the code while pressing<br />
TV CONTROL .<br />
STANDBY/ON<br />
TV CONTROL<br />
INPUT<br />
SELECT CH VOL<br />
OPEN/CLOSE<br />
AUDIO SUBTITLE ANGLE FL DIMMER<br />
CLEAR<br />
AUDIO<br />
VIDEO<br />
Note<br />
• The factory setting is PIONEER 00.<br />
• If you make a mistake when inputting the code, release TV<br />
CONTROL then start over from the beginning.<br />
• When there are multiple codes for a manufacturer, try inputting<br />
them in the indicated order until the TV can be operated.<br />
ENTER<br />
OUTPUT<br />
RESOLUTION<br />
PIONEER 00, 31, 32, 07, 36, 42, 51<br />
ACURA 44<br />
ADMIRAL 31<br />
AIWA 60<br />
AKAI 32, 35, 42<br />
AKURA 41<br />
ALBA 07, 39, 41, 44<br />
AMSTRAD 42, 44, 47<br />
ANITECH 44<br />
ASA 45<br />
ASUKA 41<br />
AUDIOGONIC 07, 36<br />
BASIC LINE 41, 44<br />
BAUR 31, 07, 42<br />
BEKO 38<br />
BEON 07<br />
BLAUPUNKT 31<br />
BLUE SKY 41<br />
BLUE STAR 18<br />
BPL 18<br />
BRANDT 36<br />
BTC 41<br />
BUSH 07, 41, 42, 44, 47, 56<br />
CASCADE 44<br />
CATHAY 07<br />
CENTURION 07<br />
CGB 42<br />
CIMLINE 44<br />
CLARIVOX 07<br />
CLATRONIC 38<br />
CONDOR 38<br />
CONTEC 44<br />
CROSLEY 32<br />
CROWN 38, 44<br />
CRYSTAL 42<br />
CYBERTRON 41<br />
DAEWOO 07, 44, 56<br />
DAINICHI 41<br />
DANSAI 07<br />
DAYTON 44<br />
DECCA 07, 48<br />
DIXI 07, 44<br />
DUMONT 53<br />
ELIN 07<br />
ELITE 41<br />
ELTA 44<br />
EMERSON 42<br />
ERRES 07<br />
FERGUSON 07, 36, 51<br />
FINLANDIA 35, 43, 54<br />
FINLUX 32, 07, 45, 48, 53, 54<br />
FIRSTLINE 40, 44<br />
FISHER 32, 35, 38, 45<br />
FORMENTI 32, 07, 42<br />
FRONTECH 31, 42, 46<br />
FRONTECH/PROTECH 32<br />
FUJITSU 48<br />
FUNAI 40, 46, 58<br />
GBC 32, 42<br />
GE 00, 01, 08, 07, 10, 11, 17, 02, 28, 18<br />
GEC 07, 34, 48<br />
GELOSO 32, 44<br />
GENERAL 29<br />
GENEXXA 31, 41<br />
GOLDSTAR 10, 23, 21, 02, 07, 50<br />
GOODMANS 07, 39, 47, 48, 56<br />
GORENJE 38<br />
GPM 41<br />
GRAETZ 31, 42<br />
GRANADA 07, 35, 42, 43, 48<br />
GRADIENTE 30, 57<br />
GRANDIN 18<br />
GRUNDIG 31, 53<br />
HANSEATIC 07, 42<br />
HCM 18, 44<br />
HINARI 07, 41, 44<br />
HISAWA 18<br />
HITACHI 31, 33, 34, 36, 42, 43, 54, 06, 10,<br />
24, 25, 18<br />
HUANYU 56<br />
HYPSON 07, 18, 46<br />
ICE 46, 47<br />
IMPERIAL 38, 42<br />
INDIANA 07<br />
INGELEN 31<br />
INTERFUNK 31, 32, 07, 42<br />
INTERVISION 46, 49<br />
ISUKAI 41<br />
ITC 42<br />
ITT 31, 32, 42<br />
JEC 05<br />
JVC 13, 23<br />
KAISUI 18, 41, 44<br />
KAPSCH 31<br />
KENDO 42<br />
KENNEDY 32, 42<br />
KORPEL 07<br />
KOYODA 44<br />
LEYCO 07, 40, 46, 48<br />
LIESENK&TTER 07<br />
LOEWE 07<br />
LUXOR 32, 42, 43<br />
M-ELECTRONIC 31, 44, 45, 54, 56, 07,<br />
36, 51<br />
MAGNADYNE 32, 49<br />
MAGNAFON 49<br />
MAGNAVOX 07, 10, 03, 12, 29<br />
MANESTH 39, 46<br />
MARANTZ 07<br />
MARK 07<br />
MATSUI 07, 39, 40, 42, 44, 47, 48<br />
MCMICHAEL 34<br />
MEDIATOR 07<br />
MEMOREX 44<br />
METZ 31<br />
MINERVA 31, 53<br />
MITSUBISHI 09, 10, 02, 21, 31<br />
MULTITECH 44, 49<br />
NEC 59<br />
NECKERMANN 31, 07<br />
NEI 07, 42<br />
NIKKAI 05, 07, 41, 46, 48<br />
NOBLIKO 49<br />
NOKIA 32, 42, 52<br />
NORDMENDE 32, 36, 51, 52<br />
21<br />
En
03<br />
OCEANIC 31, 32, 42<br />
ORION 32, 07, 39, 40<br />
OSAKI 41, 46, 48<br />
OSO 41<br />
OSUME 48<br />
OTTO VERSAND 31, 32, 07, 42<br />
PALLADIUM 38<br />
PANAMA 46<br />
PANASONIC 31, 07, 08, 42, 22<br />
PATHO CINEMA 42<br />
PAUSA 44<br />
PHILCO 32, 42<br />
PHILIPS 31, 07, 34, 56, 68<br />
PHOENIX 32<br />
PHONOLA 07<br />
PROFEX 42, 44<br />
PROTECH 07, 42, 44, 46, 49<br />
QUELLE 31, 32, 07, 42, 45, 53<br />
R-LINE 07<br />
RADIOLA 07<br />
RADIOSHACK 10, 23, 21, 02<br />
RBM 53<br />
RCA 01, 10, 15, 16, 17, 18, 61, 62, 09<br />
REDIFFUSION 32, 42<br />
REX 31, 46<br />
ROADSTAR 41, 44, 46<br />
SABA 31, 36, 42, 51<br />
SAISHO 39, 44, 46<br />
SALORA 31, 32, 42, 43<br />
SAMBERS 49<br />
SAMSUNG 07, 38, 44, 46, 69, 70<br />
SANYO 35, 45, 48, 21, 14, 91<br />
SBR 07, 34<br />
SCHAUB LORENZ 42<br />
SCHNEIDER 07, 41, 47<br />
SEG 42, 46<br />
SEI 32, 40, 49<br />
SELECO 31, 42<br />
SHARP 02, 19, 27, 67, 90<br />
SIAREM 32, 49<br />
SIEMENS 31<br />
SINUDYNE 32, 39, 40, 49<br />
SKANTIC 43<br />
SOLAVOX 31<br />
SONOKO 07, 44<br />
SONOLOR 31, 35<br />
SONTEC 07<br />
SONY 04<br />
SOUNDWAVE 07<br />
STANDARD 41, 44<br />
STERN 31<br />
SUSUMU 41<br />
SYSLINE 07<br />
TANDY 31, 41, 48<br />
TASHIKO 34<br />
TATUNG 07, 48<br />
TEC 42<br />
TELEAVIA 36<br />
TELEFUNKEN 36, 37, 52<br />
TELETECH 44<br />
TENSAI 40, 41<br />
THOMSON 36, 51, 52, 63<br />
THORN 31, 07, 42, 45, 48<br />
TOMASHI 18<br />
TOSHIBA 05, 02, 26, 21, 53<br />
TOWADA 42<br />
ULTRAVOX 32, 42, 49<br />
UNIDEN 92<br />
UNIVERSUM 31, 07, 38, 42, 45, 46, 54<br />
VESTEL 07<br />
VICTOR 13<br />
VOXSON 31<br />
WALTHAM 43<br />
WATSON 07<br />
WATT RADIO 32, 42, 49<br />
WHITE WESTINGHOUSE 07<br />
YOKO 07, 42, 46<br />
ZENITH 03, 20<br />
Using the TOOLS menu<br />
Various functions can be called out according to the player’s<br />
operating status.<br />
1 Display the TOOLS menu.<br />
Press TOOLS.<br />
BD <strong>PLAYER</strong><br />
TOOLS<br />
HOME MEDIA<br />
GALLERY<br />
TOP MENU<br />
DISPLAY<br />
ENTER<br />
POPUP MENU<br />
MENU<br />
Angle<br />
Audio<br />
Subtitle<br />
Audio Adjust<br />
Video Adjust<br />
TOOLS<br />
2 Select and set the item.<br />
Use / to select, then press ENTER.<br />
Note<br />
• Items that cannot be changed are displayed in g<strong>ray</strong>. The items<br />
that can be selected depend on the player’s status.<br />
To change the setting of the selected item<br />
Use / to change.<br />
TOP MENU<br />
HOME<br />
MENU<br />
ENTER<br />
To close the TOOLS menu<br />
Press TOOLS or RETURN.<br />
TOOLS menu item list<br />
Item<br />
Description<br />
Play from Beginning Play the selected title, track or file from the<br />
start.<br />
Slideshow<br />
Play a slideshow of the image files on the<br />
selected disc or folder.<br />
Play Mode Display the Play Mode screen (page 29).<br />
Video Adjust<br />
Display the picture quality adjustment screen<br />
(page 38).<br />
Secondary Video Switch the BD-ROM’s secondary video<br />
(Picture-in-Picture) (page 28).<br />
Subtitle Switch the subtitles (page 27).<br />
Angle<br />
Switch the BD-ROM/DVD-Video disc’s camera<br />
angles (page 27).<br />
Rotate<br />
Rotate the image while playing a slideshow<br />
(page 35).<br />
Anamorphic Zoom Use to view 2.35:1 movies with a front projector<br />
equipped with an anamorphic lens (page 50).<br />
Audio Adjust Display the audio adjustment menu (page 39).<br />
Audio Switch the audio streams/channels (page 28).<br />
Secondary Audio Switch the BD-ROM’s secondary audio<br />
streams/channels (page 28).<br />
Now Playing<br />
Display the playback screen of the currently<br />
playing track or file.<br />
Original/Play List Switch the DVD-R/-RW’s (VR format) list<br />
screen between the original list and the<br />
playlist.<br />
Add to HMG Playlist Add the selected track or file to the HMG<br />
Playlist (page 36).<br />
Delete from HMG Playlist Delete the selected track or file from the HMG<br />
Playlist (page 37).<br />
Output Video Resolution Switch the output video resolution from the<br />
various output terminals (page 23).<br />
TOOLS<br />
RETURN<br />
22<br />
En
Switching the video output<br />
terminal to be viewed<br />
Use the procedure below to switch the video output signal to be<br />
viewed between the one output from the HDMI OUT (MAIN) terminal,<br />
the HDMI OUT (SUB) terminal and an analog output terminal<br />
(COMPONENT VIDEO, S-VIDEO or VIDEO output terminals).<br />
The settings below are valid for the selected video output terminal.<br />
• The output video resolution (below)<br />
• The Lip Sync function (page 40)<br />
• The Pure Audio function (page 51)<br />
<br />
Press VIDEO SELECT.<br />
• The current video output terminal is displayed on the TV screen<br />
and on the player’s front panel display.<br />
To switch the video output terminals, press VIDEO SELECT<br />
again or press /.<br />
Caution<br />
• The picture may not be displayed for a while when the video<br />
output terminal is switched.<br />
• Depending on the player’s settings, the picture of a TV<br />
connected to a terminal other than the selected video output<br />
terminal may not be properly displayed.<br />
• When Pure Audio is set to Mode 2, no picture will be output<br />
from any video output terminal other than the selected one<br />
(page 51).<br />
Switching the output<br />
video resolution<br />
Use the procedure below to switch the output video resolution from<br />
the various video output terminals.<br />
<br />
Example:<br />
Video Output Terminal<br />
SECONDARY<br />
AUDIO VIDEO<br />
VIDEO SELECT<br />
HOME MEDIA<br />
GALLERY<br />
TOP MENU<br />
PLAY MODE<br />
DISPLAY<br />
Press OUTPUT RESOLUTION.<br />
OUTPUT<br />
RESOLUTION<br />
POPUP MENU<br />
MENU<br />
TOOLS<br />
Output video resolution setting of<br />
selected video output terminal<br />
<br />
HDMI MAIN (Source Direct)<br />
<br />
CLEAR<br />
ENTER<br />
• The output video resolution depends on the video output<br />
terminal. (page 24)<br />
Example:<br />
Video resolution of the<br />
currently playing disc<br />
Output Video Resolution <br />
Source : 1080/50i<br />
Auto<br />
Current Output : 1080/50i<br />
Output video resolution<br />
from the player<br />
• The output video resolution setting can also be switched by<br />
pressing RESOLUTION on the player’s front panel.<br />
• The output video resolution setting can also be switched by<br />
selecting Output Video Resolution from the TOOLS menu.<br />
Caution<br />
• On some devices (TV, AV receiver or amplifier, etc.), the video or<br />
audio may not be output properly when the resolution is<br />
switched. If this happens, use OUTPUT RESOLUTION to set a<br />
resolution at which the video and audio are properly output.<br />
• When video signals are being output with a resolution of 1080/<br />
50i, 1080/50p, 720/50p, 1080/24p, 1080/60i, 1080/60p or 720/60p<br />
from the HDMI OUT terminals or COMPONENT VIDEO output<br />
terminals, the picture may be output with an aspect ratio of 16:9,<br />
even if the TV Aspect Ratio is set to 4:3 (Standard).<br />
• The picture may not be displayed for a while when the resolution<br />
is switched.<br />
About the frame/field frequency and NTSC/<br />
PAL TV systems<br />
By factory default setting, the frame/field frequency is set for an<br />
output of 50 Hz, and the video signal output from the S-VIDEO and<br />
VIDEO output terminals is set to be output in the PAL TV system<br />
format. When sources with a frame/field frequency of 60 or 24 Hz<br />
are played, the output frame/field frequency automatically switches<br />
to 60 Hz (or 24 Hz for HDMI, depending on the setting), and the TV<br />
system format for the video signal output from the S-VIDEO and<br />
VIDEO output terminals is set to NTSC on PAL TV. When playback<br />
is stopped, the frame/field frequency and TV system settings remain<br />
at the settings last used. The frame/field frequency and TV system<br />
settings do not change even when the power is turned off. They only<br />
switch when a video material with a different frame/field frequency<br />
is played.<br />
If the picture is not displayed on the TV when a source with a<br />
different frame/field frequency is played, use the procedure below to<br />
switch the frame/field frequency and TV system settings for the<br />
signal output from the player.<br />
Eject the disc, then press the OPEN/CLOSE button on the front<br />
panel while pressing the button to switch to a different frame/field<br />
frequency. The frame/field frequency switches between 50 Hz and<br />
60 Hz each time this operation is performed. The indicator for the<br />
frame frequency’s current setting lights on the front panel display<br />
(page 11).<br />
03<br />
SECONDARY<br />
AUDIO VIDEO<br />
OUTPUT<br />
RESOLUTION<br />
VIDEO SELECT<br />
PLAY MODE<br />
HOME MEDIA<br />
GALLERY<br />
DISPLAY<br />
POPUP MENU<br />
MENU<br />
• The current output video resolution setting is displayed on the<br />
TV screen and on the player’s front panel display.<br />
To switch the output video resolution, press OUTPUT<br />
RESOLUTION again or press /.<br />
23<br />
En
03<br />
About Film material<br />
The film material is a video signal with a frame rate of 24 frames/<br />
second. For example, these materials include 1080/24p, 720/24p,<br />
etc.<br />
Example:<br />
Video resolution of the<br />
currently playing disc<br />
Output Video Resolution <br />
Source : 1080/24p<br />
Auto<br />
Current Output : 1080/24p<br />
To output film material<br />
Output video resolution<br />
from the player<br />
To output 1080/24p film material from HDMI OUT terminals, set the<br />
output video resolution to either Auto, 1080/24p or Source Direct.<br />
Caution<br />
• 1080/24p signals can only be output from the HDMI OUT<br />
terminals. They cannot be output from other video terminals.<br />
•When Auto is selected, the picture is output at 60 frames/<br />
second if your TV is not compatible with 1080/24p signals.<br />
•When 1080/24p or Source Direct is selected, the signals are<br />
output as such, even if your TV is not compatible with 1080/24p<br />
signals. If the picture is not displayed properly, use OUTPUT<br />
RESOLUTION to set an output video resolution at which the<br />
video and audio signals are properly output.<br />
• Even if Auto, 1080/24p or Source Direct is selected, 720/24p<br />
video signals are output at 60 frames/second.<br />
•When 1080/24p is selected, the motion may be unnatural or the<br />
picture may not be clear, depending on the source. In this case,<br />
set the resolution to something other than 1080/24p.<br />
About the output video resolution<br />
The resolution setting and the resolution of the picture that is actually output differ for the different terminals. See the table below.<br />
The table below shows the output video resolution for the different terminals when the frame/field frequency of the playback source is 50 Hz<br />
on the upper line, the resolutions when the source’s frame/field frequency is 60 Hz and 24 Hz on the lower line.<br />
Output video<br />
resolution<br />
setting<br />
Auto 3<br />
HDMI MAIN, HDMI SUB 1<br />
HDMI OUT terminals COMPONENT VIDEO<br />
output terminals 2<br />
Resolution preferred by<br />
TV 4,5<br />
576/50i<br />
480/60i<br />
COMPONENT/S/VIDEO 1 —<br />
HDMI OUT terminals COMPONENT VIDEO S-VIDEO/<br />
output terminals 2 VIDEO output<br />
terminal 2<br />
— — 576/50i<br />
480/60i<br />
576i or 480i 576/50i 576/50i 576/50i<br />
480/60i 480/60i 480/60i<br />
576p or 480p 576/50p 576/50p 576/50p<br />
480/60p 480/60p 480/60p<br />
720p 720/50p 576/50p 576/50p<br />
720/60p 720/60p 720/60p 7<br />
1080i 1080/50i 576/50p 576/50p<br />
1080/60i 1080/60i 1080/60i 7<br />
1080p 3 1080/50p 8<br />
1080/60p 8<br />
— —<br />
1080/24p 3 1080/50i — —<br />
1080/24p 5,9,10<br />
Source Direct Resolution recorded on<br />
Resolution recorded on Resolution recorded on<br />
disc 5,9,11<br />
disc 9,11,12<br />
disc 9,11,12<br />
(TV system)<br />
PAL<br />
6<br />
24<br />
En<br />
1. The video output terminal set at Video in the Setup Navigator (page 19) or the video output terminal selected with VIDEO SELECT (page 23).<br />
2. Depending on the BD, the pictures may not be output.<br />
3. This cannot be selected when the video output terminal is set to COMPONENT/S/VIDEO.<br />
4. The pictures are output with the preferred output resolution of the device (TV, AV receiver or amplifier, etc.) connected to the selected video output terminal.<br />
However, if devices are connected to both HDMI MAIN and HDMI SUB, the pictures are output with a resolution which both devices support. If the devices<br />
connected to HDMI MAIN and HDMI SUB support different resolutions, turn off the power of the device not being used so that the picture is output with the<br />
optimum resolution for the device to be viewed.<br />
5. For details on the output of film material (1080/24p or 720/24p video signals), see To output film material on page 24.<br />
6. Depends on the NTSC on PAL TV setting (page 42).<br />
7. DVD-Video or DVD VR format may be output at 480/60p. BDs format may be output at 480/60p. At this time, the video signals from the HDMI OUT terminals are<br />
output at the same resolution of 480/60p as the video signals output from the COMPONENT VIDEO terminals.<br />
8. Depending on the connected HDMI cable, the video signals may not be output.<br />
9. Depending on the connected TV, the video signals may not be output.<br />
10. Sources recorded in 480/60p, 720/60p or 720/24p are output at 1080/60i.<br />
11. 720/24p film material is output at 720/60p.<br />
12. 1080/24p film material is output at 1080/60i.
Chapter 4<br />
Playback<br />
04<br />
Playing discs or files<br />
This section describes the player’s main operations.<br />
For the types of discs that can be played, see Playable discs on<br />
page 6. For the types of files that can be played, see Playable files on<br />
page 8. Video, image and audio files recorded on discs are played<br />
with Home Media Gallery (page 33).<br />
1 Press STANDBY/ON to turn on the power.<br />
Turn the TV’s power on and switch its input beforehand.<br />
2 Press OPEN/CLOSE to open the disc t<strong>ray</strong> and load the<br />
disc.<br />
Note<br />
STANDBY/ON<br />
TV CONTROL<br />
INPUT<br />
SELECT CH VOL<br />
STANDBY/ON<br />
TV CONTROL<br />
INPUT<br />
SELECT CH VOL<br />
• Load the disc with the printed side facing up.<br />
• Several dozen seconds are required to read the disc.<br />
Once reading is completed, the type of disc is<br />
displayed on the player’s front panel display.<br />
3 Press PLAY to play the disc.<br />
PLAY<br />
OPEN/CLOSE<br />
OPEN/CLOSE<br />
PREV PAUSE STOP NEXT<br />
RED GREEN YELLOW BLUE<br />
If the disc menu is displayed<br />
For some discs, the disc menu is displayed automatically when<br />
playback starts. The contents of the disc menu and the way to<br />
operate differ from disc to disc.<br />
Resuming playback from where it was<br />
stopped (resume playback function)<br />
•When STOP is pressed during playback, the point at which<br />
the disc stopped is stored in the memory. When PLAY is<br />
pressed, playback resumes from that point.<br />
• For audio CDs and audio files, playback starts from the<br />
beginning of the track/file that was playing.<br />
• If the stop mode was set while playing a slideshow of image files,<br />
playback starts from the image file last displayed.<br />
• To cancel the resume playback function, press STOP while<br />
playback is stopped.<br />
Note<br />
• The resume playback function is canceled automatically in the<br />
following cases:<br />
– When the disc t<strong>ray</strong> is opened.<br />
– When the file list window is switched.<br />
– When the power is turned off. (For BDs and DVDs this does<br />
not cancel the resume playback function.)<br />
• The resume playback function cannot be used for some discs.<br />
Forward and reverse scanning<br />
BD<br />
DVD<br />
AVCHD<br />
CD<br />
Video files<br />
Image files<br />
Audio files<br />
1 During playback, press or .<br />
To pause, press PAUSE during playback.<br />
To stop, press STOP during playback.<br />
PLAY<br />
PREV PAUSE STOP NEXT<br />
Note<br />
• Some discs start playing automatically when the disc t<strong>ray</strong> is<br />
closed.<br />
• DVD-Video discs have parental lock features. Input the<br />
password registered in the player’s settings to unlock the<br />
parental lock. For details, see page 47.<br />
• For some BD-R/-RE, playback protection is set for the disc or<br />
titles. Input the code number set for the disc to unlock the<br />
protection.<br />
•Check Troubleshooting on page 63 if video or audio signals are<br />
not being output properly.<br />
• The scanning speed switches each time the button is pressed.<br />
The speed steps depend on the disc or file (the speed is<br />
displayed on the TV screen).<br />
• Forward or reverse scanning is also possible by holding the<br />
button down. Normal playback resumes when the button is<br />
released.<br />
Note<br />
• No sound is output when scanning BDs, DVDs and video files.<br />
• Sound is output when scanning audio CDs and audio files.<br />
• For some discs, normal playback resumes automatically when<br />
the chapter switches.<br />
25<br />
En
04<br />
To resume normal playback<br />
<br />
Press PLAY.<br />
Playing specific titles, chapters or<br />
tracks<br />
BD<br />
DVD<br />
AVCHD<br />
CD<br />
Video files<br />
Image files<br />
Audio files<br />
Input the number of the title, chapter or track you want to<br />
play.<br />
• Use the number buttons (0 to 9) to input the number, then press<br />
ENTER.<br />
Playing in slow motion<br />
BD<br />
DVD<br />
AVCHD<br />
CD<br />
Video files<br />
Image files<br />
Audio files<br />
While playback is paused, press and hold / or /.<br />
PLAY<br />
PREV PAUSE STOP NEXT<br />
• The speed switches each time the button is pressed (the speed<br />
is displayed on the TV screen). The speed steps depend on the<br />
disc or file.<br />
Note<br />
• For some discs, it is not possible to specify and play titles,<br />
chapters or tracks.<br />
• Press CLEAR to clear the values you have input.<br />
Skipping content<br />
<br />
BD<br />
DVD<br />
AVCHD<br />
CD<br />
Video files<br />
Image files<br />
Audio files<br />
CLEAR<br />
SECONDARY<br />
AUDIO VIDEO<br />
Press PREV or NEXT.<br />
PLAY<br />
ENTER<br />
OUTPUT<br />
RESOLUTION<br />
Note<br />
• It is not possible to switch the speed during reverse slow motion<br />
playback.<br />
• No sound is output during slow motion playback.<br />
• For some discs, normal playback resumes automatically when<br />
the chapter switches.<br />
• Reverse slow motion playback is not possible with video files.<br />
• There are some discs for which slow motion playback is not<br />
possible.<br />
To resume normal playback<br />
<br />
Press PLAY.<br />
Step forward and step reverse<br />
BD<br />
DVD<br />
AVCHD<br />
CD<br />
Video files<br />
Image files<br />
Audio files<br />
While playback is paused, press / or /.<br />
PREV PAUSE STOP NEXT<br />
RED GREEN YELLOW BLUE<br />
PLAY<br />
•When NEXT is pressed, the playback skips ahead to the<br />
beginning of the next title/chapter/track/file.<br />
•When PREV is pressed, the playback skips back to the<br />
beginning of the currently playing title/chapter/track/file. Press<br />
twice to skip back to the beginning of the previous title/chapter/<br />
track/file.<br />
Note<br />
• There are some discs for which skipping is not possible.<br />
PREV PAUSE STOP NEXT<br />
• The picture moves a step forward or reverse each time the<br />
button is pressed.<br />
Note<br />
• For some discs, normal playback resumes automatically when<br />
the chapter switches.<br />
• Reverse step playback is not possible with video files.<br />
• There are some discs for which step forward/reverse playback is<br />
not possible.<br />
To resume normal playback<br />
<br />
Press PLAY.<br />
26<br />
En
Switching the camera angles<br />
For BD-ROM and DVD-Video discs on which multiple angles are<br />
recorded, the angles can be switched during playback.<br />
<br />
During playback, press ANGLE.<br />
• The current angle and total number of recorded angles are<br />
displayed on the TV screen and on the player’s front panel<br />
display.<br />
To switch the angles, press ANGLE again or press /.<br />
Angle<br />
<br />
1/4<br />
<br />
• The angles can also be switched by selecting Angle from the<br />
TOOLS menu.<br />
Note<br />
• For some discs, the angle can also be switched on the menu<br />
screen.<br />
• Angle mark is displayed for scenes at which multiple<br />
angles are recorded if Angle/Secondary Indicator is set to On<br />
(page 43).<br />
Switching the subtitles<br />
For discs or files on which multiple subtitles are recorded, the<br />
subtitles can be switched during playback.<br />
<br />
BD<br />
DVD<br />
AVCHD<br />
CD<br />
Example:<br />
BD<br />
DVD<br />
AVCHD<br />
CD<br />
Video files<br />
Image files<br />
Audio files<br />
Video files<br />
Image files<br />
Audio files<br />
INPUT<br />
SELECT CH VOL<br />
AUDIO SUBTITLE ANGLE FL DIMMER<br />
Current angle/Total number of<br />
recorded angles<br />
During playback, press SUBTITLE.<br />
INPUT<br />
SELECT CH VOL<br />
AUDIO SUBTITLE ANGLE FL DIMMER<br />
• The subtitles can also be switched by selecting Subtitle from<br />
the TOOLS menu.<br />
Note<br />
• In some cases the subtitle may switch or the switching screen<br />
provided on the disc may be displayed immediately, without the<br />
current subtitle or the total number of subtitles recorded on the<br />
disc being displayed.<br />
• The types of recorded subtitles depend on the disc and file.<br />
• If the subtitles are not switched when SUBTITLE is pressed,<br />
switch them from the menu screen.<br />
Turning the subtitles off<br />
<br />
Press SUBTITLE, then press CLEAR.<br />
About displaying external subtitle files<br />
while playing DivX media files<br />
In addition to the subtitles recorded in DivX media files, this player<br />
also supports the display of external subtitle files. If a file has the<br />
same name as a DivX media file aside from the file extension and the<br />
extension is one of the extensions listed below, the file is treated as<br />
an external subtitle file. Note that DivX media files and external<br />
subtitle files must be located in the same folder.<br />
Only one external subtitle file can be displayed on this player. Use a<br />
computer, etc., to delete any external subtitle files you do not want<br />
to display from the disc.<br />
.srt, .sub, .txt, .smi, .ssa, .ass<br />
If the language code is specified for the external subtitle file, the<br />
subtitles are displayed with the font corresponding to that language<br />
code. If no language code is specified, the subtitles are displayed<br />
with the font corresponding to the language code set at Subtitle<br />
Language (page 44). The same font is used for the all the languages<br />
in each of the groups below.<br />
Group 1<br />
Group 2<br />
Group 3<br />
Group 4<br />
Group 5<br />
Afrikaans(af/afr), Basque(eu/eus), Catalan(ca/cat), Danish(da/dan),<br />
Dutch(nl/nld), English(en/eng), Faroese(fo/fao), Finnish(fi/fin),<br />
French(fr/fra), Galician(gl/glg), German(de/deu), Guarani(gn/grn),<br />
Icelandic(is/isl), Irish(ga/gle), Italian(it/ita), Latin(la/lat),<br />
Norwegian(no/nor), Portuguese(pt/por), Rhaeto-Romance(rm/roh),<br />
Scots-Gaelic(gd/gla), Spanish(es/spa), Swahili(sw/swa), Swedish(sv/<br />
swe), Zulu(zu/zul)<br />
Albanian(sq/sqi), Croatian(hr/hrv), Czech(cs/ces), Hungarian(hu/<br />
hun), Polish(pl/pol), Romanian(ro/ron), Slovak(sk/slk), Slovenian(sl/<br />
slv)<br />
Belarusian(be/bel), Bulgarian(bg/bul), Macedonian(mk/mkd),<br />
Moldavian(mo/mol), Russian(ru/rus), Serbian(sr/srp), Ukrainian(uk/<br />
ukr)<br />
Greek(el/ell)<br />
Estonian(et/est), Kurdish(ku/kur), Turkish(tr/tur)<br />
04<br />
• The current subtitle and total number of recorded subtitles are<br />
displayed on the TV screen and on the player’s front panel<br />
display.<br />
To switch the subtitle, press SUBTITLE again or press /.<br />
Example:<br />
Current subtitle/Total number of<br />
recorded subtitles<br />
Note<br />
• Depending on the file, the external subtitles may not be<br />
displayed properly.<br />
Subtitle<br />
<br />
1/2 English<br />
<br />
27<br />
En
04<br />
28<br />
En<br />
Switching the audio streams/<br />
channels<br />
For discs or files on which multiple audio streams/channels are<br />
recorded, audio streams/channels can be switched during<br />
playback. Also use this procedure to switch the secondary audio for<br />
BD-ROMs on which secondary audio is recorded.<br />
<br />
BD<br />
DVD<br />
AVCHD<br />
CD<br />
Video files<br />
Image files<br />
Audio files<br />
During playback, press AUDIO.<br />
AUDIO SUBTITLE ANGLE FL DIMMER<br />
• The current audio stream/channel and total number of recorded<br />
audio streams/channels are displayed on the TV screen and on<br />
the player’s front panel display.<br />
To switch the audio streams/channels, press AUDIO again or<br />
press /.<br />
• To switch the secondary audio, press SECONDARY AUDIO.<br />
Example:<br />
Audio<br />
Dolby True HD<br />
• The audio streams/channels can also be switched by selecting<br />
Audio or Secondary Audio from the TOOLS menu.<br />
Note<br />
• The types of recorded audio streams/channels depend on the<br />
disc and file.<br />
• If the audio stream/channel is not switched when AUDIO is<br />
pressed, switch it from the menu screen.<br />
• In some cases the secondary audio may switch or the switching<br />
screen provided on the disc may be displayed immediately,<br />
without the current secondary audio or the total number of<br />
secondary audio streams recorded on the disc being displayed.<br />
• Some BD-ROMs do not include secondary audio.<br />
• Secondary audio mark is displayed for scenes at which<br />
secondary audio is recorded if Angle/Secondary Indicator is<br />
set to On (page 43).<br />
Turning the Secondary Audio off<br />
CLEAR<br />
SECONDARY<br />
AUDIO VIDEO<br />
VIDEO SELECT<br />
PLAY MODE<br />
Press SECONDARY AUDIO, then press CLEAR.<br />
ENTER<br />
OUTPUT<br />
RESOLUTION<br />
Current audio stream/Total number<br />
of recorded audio streams<br />
Audio type<br />
<br />
2/2 English<br />
96kHz 7.1ch L C R Ls Rs Lb Rb LFE<br />
<br />
Number of<br />
channels<br />
Channels recorded<br />
on disc<br />
Switching the secondary video<br />
Use the procedure below to switch the secondary video (Picture-in-<br />
Picture) recorded on the BD-ROM.<br />
<br />
During playback, press SECONDARY VIDEO.<br />
• The current secondary video stream and total number of<br />
recorded secondary video streams are displayed on the TV<br />
screen and on the player’s front panel display.<br />
To switch the secondary video streams, press SECONDARY<br />
VIDEO again or press /.<br />
Example: Current secondary video stream/Total number<br />
of recorded secondary video streams<br />
Secondary Video<br />
<br />
1/4<br />
<br />
• The secondary video streams can also be switched by selecting<br />
Secondary Video from the TOOLS menu.<br />
Note<br />
• In some cases the secondary video may switch or the switching<br />
screen provided on the disc may be displayed immediately,<br />
without the current secondary video or the total number of<br />
secondary video streams recorded on the disc being displayed.<br />
• Some BD-ROMs do not include secondary video.<br />
• Secondary video mark is displayed for scenes at which<br />
secondary video is recorded if Angle/Secondary Indicator is<br />
set to On (page 43).<br />
Turning the Secondary Video off<br />
<br />
Press SECONDARY VIDEO, then press CLEAR.<br />
Displaying the disc information<br />
<br />
BD<br />
DVD<br />
AVCHD<br />
CD<br />
BD<br />
DVD<br />
AVCHD<br />
CD<br />
Video files<br />
Image files<br />
Audio files<br />
Video files<br />
Image files<br />
Audio files<br />
Press DISPLAY.<br />
CLEAR<br />
SECONDARY<br />
AUDIO VIDEO<br />
VIDEO SELECT<br />
PLAY MODE<br />
The disc information appears on the TV screen. The information<br />
switches each time the button is pressed.<br />
The information display differs during playback and when playback<br />
is stopped.<br />
ENTER<br />
OUTPUT<br />
RESOLUTION<br />
HOME MEDIA<br />
GALLERY DISPLAY POPUP MENU<br />
VIDEO SELECT<br />
HOME MEDIA<br />
GALLERY<br />
TOP MENU<br />
PLAY MODE<br />
DISPLAY<br />
POPUP MENU<br />
MENU<br />
TOOLS
Using the Play Mode<br />
functions<br />
3 Input the time.<br />
Use the number buttons (0 to 9) or / to input the time.<br />
Use / to move the cursor.<br />
04<br />
Playing from a specific time (Time<br />
Search)<br />
CLEAR<br />
SECONDARY<br />
AUDIO VIDEO<br />
ENTER<br />
OUTPUT<br />
RESOLUTION<br />
1 During playback, press PLAY MODE to display the Play<br />
Mode screen.<br />
VIDEO SELECT<br />
HOME MEDIA<br />
GALLERY<br />
PLAY MODE<br />
DISPLAY<br />
POPUP MENU<br />
MENU<br />
VIDEO SELECT<br />
PLAY MODE<br />
TOP MENU<br />
TOOLS<br />
HOME MEDIA<br />
GALLERY<br />
DISPLAY<br />
POPUP MENU<br />
MENU<br />
TOP MENU<br />
TOOLS<br />
ENTER<br />
The Play Mode screen can also be displayed by selecting Play Mode<br />
from the TOOLS menu.<br />
HOME<br />
MENU<br />
RETURN<br />
2 Select Time Search.<br />
Use / to select, then press ENTER.<br />
TOP MENU<br />
TOOLS<br />
Time Search<br />
<br />
1 2 : 4 5 : 0 0 Search<br />
<br />
Time Search<br />
Title Search<br />
Chapter Search<br />
A-B Repeat<br />
Repeat/Random<br />
HOME<br />
MENU<br />
ENTER<br />
Play Mode<br />
RETURN<br />
Note<br />
• To play from 45 minutes, input 0, 0, 4, 5, 0 and 0, then press<br />
ENTER.<br />
• To play from 1 hour 20 minutes, input 0, 1, 2, 0, 0 and 0, then<br />
press ENTER.<br />
• Press CLEAR to clear the values you have input.<br />
4 Starting playback from the specified time.<br />
Use / to select Search, then press ENTER.<br />
Closing the Play Mode screen<br />
Press PLAY MODE or<br />
HOME MENU.<br />
Note<br />
• There are some discs for which Time Search is not available.<br />
Playing a specific title, chapter or<br />
track (Search)<br />
1 Press PLAY MODE to display the Play Mode screen.<br />
VIDEO SELECT<br />
PLAY MODE<br />
HOME MEDIA<br />
GALLERY<br />
DISPLAY<br />
POPUP MENU<br />
MENU<br />
TOP MENU<br />
TOOLS<br />
The Play Mode screen can also be displayed by selecting Play Mode<br />
from the TOOLS menu.<br />
2 Select the type of search.<br />
Use / to select, then press ENTER.<br />
29<br />
En
04<br />
See the table on page 32 for the search types.<br />
TOP MENU<br />
TOOLS<br />
1 During playback, press PLAY MODE to display the Play<br />
Mode screen.<br />
VIDEO SELECT<br />
PLAY MODE<br />
ENTER<br />
HOME MEDIA<br />
GALLERY<br />
DISPLAY<br />
POPUP MENU<br />
HOME<br />
MENU<br />
RETURN<br />
TOP MENU<br />
MENU<br />
TOOLS<br />
Time Search<br />
Title Search<br />
Chapter Search<br />
A-B Repeat<br />
Repeat/Random<br />
Play Mode<br />
3 Input the number.<br />
Use the number buttons (0 to 9) or / to input the number.<br />
Use / to move the cursor.<br />
The Play Mode screen can also be displayed by selecting Play Mode<br />
from the TOOLS menu.<br />
2 Select A-B Repeat.<br />
Use / to select, then press ENTER.<br />
Time Search<br />
Title Search<br />
Chapter Search<br />
A-B Repeat<br />
Repeat/Random<br />
Play Mode<br />
3 Select the starting point for A-B Repeat.<br />
Use / to select A (Start), then press ENTER.<br />
CLEAR<br />
SECONDARY<br />
AUDIO VIDEO<br />
ENTER<br />
OUTPUT<br />
RESOLUTION<br />
A-B Repeat A (Start) B (End) Off<br />
VIDEO SELECT<br />
HOME MEDIA<br />
GALLERY<br />
TOP MENU<br />
HOME<br />
MENU<br />
PLAY MODE<br />
DISPLAY<br />
ENTER<br />
POPUP MENU<br />
MENU<br />
TOOLS<br />
RETURN<br />
4 Select the end point for A-B Repeat.<br />
Use / to select B (End), then press ENTER.<br />
A-B Repeat playback starts.<br />
To cancel A-B Repeat play<br />
•Select Off from the Repeat/Random screen, then press ENTER.<br />
• During playback, press STOP or CLEAR.<br />
30<br />
En<br />
Title Search<br />
<br />
0 3 2 Title Search<br />
<br />
4 Starting playback from the specified title, chapter or track.<br />
Use / to select Search, then press ENTER.<br />
Note<br />
• To search for title 32, input 0, 3 and 2, then press ENTER.<br />
• There are some discs for which searching is not available.<br />
• Press CLEAR to clear the values you have input.<br />
Playing a specific section within a<br />
title or track repeatedly (A-B<br />
Repeat)<br />
Use this procedure to play a specific section within a title or track<br />
repeatedly.<br />
Note<br />
• There are some discs for which A-B Repeat play is not available.<br />
• A-B Repeat play is canceled in the following cases:<br />
– When the angle is switched (for BD-ROM and DVD-Video<br />
discs only).<br />
– When you search outside the repeat range.<br />
– When you start other Repeat Play or Random Play.<br />
Playing repeatedly (Repeat Play)<br />
Use this procedure to play the currently playing disc, title, chapter,<br />
track or file repeatedly.<br />
1 During playback, press PLAY MODE to display the Play<br />
Mode screen.<br />
VIDEO SELECT<br />
HOME MEDIA<br />
GALLERY<br />
TOP MENU<br />
PLAY MODE<br />
DISPLAY<br />
POPUP MENU<br />
MENU<br />
The Play Mode screen can also be displayed by selecting Play Mode<br />
from the TOOLS menu.<br />
TOOLS
2 Select Repeat/Random.<br />
Use / to select, then press ENTER.<br />
TOP MENU<br />
TOOLS<br />
Playing in random order (Random<br />
Play)<br />
04<br />
Use this procedure to play the tracks or files in random order.<br />
HOME<br />
MENU<br />
ENTER<br />
RETURN<br />
1 During playback, press PLAY MODE to display the Play<br />
Mode screen.<br />
VIDEO SELECT<br />
PLAY MODE<br />
Play Mode<br />
HOME MEDIA<br />
GALLERY<br />
DISPLAY<br />
POPUP MENU<br />
Time Search<br />
Title Search<br />
Chapter Search<br />
A-B Repeat<br />
Repeat/Random<br />
3 Select the type of Repeat Play.<br />
Use / to select, then press ENTER.<br />
See the table on page 32 for the types of Repeat Play.<br />
TOP MENU<br />
The Play Mode screen can also be displayed by selecting Play Mode<br />
from the TOOLS menu.<br />
2 Select Repeat/Random.<br />
Use / to select, then press ENTER.<br />
TOP MENU<br />
MENU<br />
TOOLS<br />
TOOLS<br />
Repeat/Random<br />
ENTER<br />
Off<br />
Repeat Title<br />
Repeat Chapter<br />
HOME<br />
MENU<br />
RETURN<br />
Play Mode<br />
To cancel Repeat Play<br />
• Select Off from the Repeat/Random screen, then press ENTER.<br />
• During playback, press STOP or CLEAR.<br />
Note<br />
• There are some discs and files for which Repeat Play is not<br />
available.<br />
• The type of repeat modes depends on the disc and file being<br />
played. See the table on page 32.<br />
• Repeat Play is canceled in the following cases:<br />
– When the angle is switched (for BD-ROM and DVD-Video<br />
discs only).<br />
– When you search outside the repeat range.<br />
– When you start other Repeat Play or Random Play.<br />
Time Search<br />
Track Search<br />
A-B Repeat<br />
Repeat/Random<br />
3 Select the Random Play.<br />
Use / to select, then press ENTER.<br />
Off<br />
Repeat All<br />
Repeat Track<br />
Random Track<br />
Repeat/Random<br />
To cancel Random Play<br />
•Select Off from the Repeat/Random screen, then press ENTER.<br />
• During playback, press STOP or CLEAR.<br />
Note<br />
• There are some discs and files for which Random Play is not<br />
available.<br />
• Random Play is canceled in the following cases:<br />
– When you use the search function.<br />
– When you start Repeat Play.<br />
31<br />
En
04<br />
About Play Mode types<br />
The functions that can be used differ according to the type of disc and file. In some cases, some of the functions cannot be used. Check the<br />
usable functions on the table below.<br />
Repeat Play<br />
Random Play Search<br />
Play Mode type Mark 1<br />
BD-ROM 2<br />
BD-R<br />
BD-RE<br />
DVD-<br />
Video 2<br />
DVD-R<br />
DVD-RW<br />
(VR format)<br />
1. The type of Play Mode is indicated by the mark.<br />
2. For BD-ROM and DVD-Video discs, some of the functions cannot be used with some titles.<br />
3. The original titles are played repeatedly. However, the playlist titles cannot be played repeatedly.<br />
4. The files in the folder are played repeatedly.<br />
5. The files in the folder or HMG Playlist are played repeatedly.<br />
6. The tracks in the disc or HMG Playlist are played repeatedly.<br />
<strong>Disc</strong>/file type<br />
AVCHD<br />
Video file<br />
Playing a specific section within a<br />
title or track repeatedly (A-B Repeat)<br />
<br />
Playing a title repeatedly (Title<br />
Repeat)<br />
<br />
Playing a chapter repeatedly<br />
(Chapter Repeat)<br />
<br />
Playing a track or file repeatedly<br />
(Track Repeat)<br />
<br />
Playing all the titles, tracks or files<br />
on the disc repeatedly (All Repeat)<br />
3 4 4 5 6<br />
Playing the tracks or files in random<br />
order (Random Track)<br />
<br />
Playing the tracks or files in random<br />
order (Random File) <br />
Playing from a specific time (Time<br />
Search)<br />
Image<br />
file<br />
Audio<br />
file<br />
Audio CD<br />
— <br />
Playing a specific title (Title Search) — <br />
Playing a specific chapter (Chapter<br />
Search)<br />
Playing a specific track (Track<br />
Search)<br />
— <br />
— <br />
32<br />
En
Playing from the Home<br />
Media Gallery<br />
The Home Media Gallery lets you display a list of the titles, tracks or<br />
files recorded on the disc. The discs that can be played from the<br />
Home Media Gallery are as shown below (see also page 6).<br />
•BD-R/-RE discs<br />
• DVDs recorded in VR format<br />
• Audio CDs (CD-DAs and DTS-CDs)<br />
• DVDs/CDs on which only data files of video, image or audio files,<br />
etc. are recorded<br />
Playing discs<br />
1 Press HOME MEDIA GALLERY to display the Home Media<br />
Gallery.<br />
SECONDARY<br />
AUDIO VIDEO<br />
VIDEO SELECT<br />
HOME MEDIA<br />
GALLERY<br />
TOP MENU<br />
PLAY MODE<br />
DISPLAY<br />
The Home Media Gallery can also be displayed by selecting Home<br />
Media Gallery from Home Menu then pressing ENTER.<br />
2 Select the disc.<br />
Use / to select, then press ENTER.<br />
OUTPUT<br />
RESOLUTION<br />
POPUP MENU<br />
MENU<br />
TOOLS<br />
3 Select the title or track to be played.<br />
Use / to select, then press ENTER.<br />
BD-R BDAV<br />
My Favorite TV Program<br />
1 Morning serial drama<br />
2 News at noon<br />
3 Evening movie<br />
4 Midnight variety show<br />
5 Playback protection<br />
6 World heritage<br />
7 Drama: Blank time<br />
8 Music and us<br />
10 items Title Total : 0 h 54 m 30 s<br />
Recording Date : 11/11/2008<br />
Original<br />
Playback starts.<br />
Closing the Home Media Gallery<br />
Press HOME MEDIA GALLERY or<br />
HOME MENU.<br />
Note<br />
• When playing an audio CD (CD-DA or DTS-CD), the Now Playing<br />
screen is displayed.<br />
• Some BD-R/-RE discs have playback protection. To cancel the<br />
protection, input the password set for the disc.<br />
• To play DVD-R/-RW (VR format) playlists, switch to the playlist<br />
using the Original/Play List command on the TOOLS menu<br />
(page 22).<br />
Playing video files<br />
04<br />
TOP MENU<br />
TOOLS<br />
1 Press HOME MEDIA GALLERY to display the Home Media<br />
Gallery.<br />
ENTER<br />
SECONDARY<br />
AUDIO VIDEO<br />
OUTPUT<br />
RESOLUTION<br />
HOME<br />
MENU<br />
RETURN<br />
VIDEO SELECT<br />
PLAY MODE<br />
HOME MEDIA<br />
GALLERY<br />
DISPLAY<br />
POPUP MENU<br />
MENU<br />
BD-R BDAV<br />
HMG Playlist<br />
Home Media Gallery<br />
BD <strong>PLAYER</strong><br />
TOP MENU<br />
The Home Media Gallery can also be displayed by selecting Home<br />
Media Gallery from Home Menu then pressing ENTER.<br />
2 Select the disc.<br />
Use / to select, then press ENTER.<br />
TOOLS<br />
TOP MENU<br />
TOOLS<br />
Search for the part you want to play from a list of the disc's content.<br />
ENTER<br />
HOME<br />
MENU<br />
RETURN<br />
Home Media Gallery<br />
BD <strong>PLAYER</strong><br />
DVD-RW<br />
HMG Playlist<br />
Search for the part you want to play from a list of the disc's content.<br />
33<br />
En
04<br />
3 Select Movies.<br />
Use / to select Movies, then press ENTER.<br />
Movies<br />
Photos<br />
Music<br />
DVD-RW<br />
Note<br />
• It may take a few seconds before playback starts. This is normal.<br />
• It may not be possible to play some files properly.<br />
• The number of views may be restricted (page 8).<br />
Playing image files<br />
View available movies.<br />
1 Press HOME MEDIA GALLERY to display the Home Media<br />
Gallery.<br />
SECONDARY<br />
AUDIO VIDEO<br />
OUTPUT<br />
RESOLUTION<br />
4 Select Folders or All Movies.<br />
Use / to select, then press ENTER.<br />
• Folders – The files in the selected folder are displayed.<br />
• All Movies – All the recorded files are displayed.<br />
Folders<br />
All Movies<br />
Movies<br />
DVD-RW<br />
VIDEO SELECT<br />
HOME MEDIA<br />
GALLERY<br />
TOP MENU<br />
The Home Media Gallery can also be displayed by selecting Home<br />
Media Gallery from the Home Menu then pressing ENTER.<br />
2 Select the disc.<br />
Use / to select, then press ENTER.<br />
TOP MENU<br />
PLAY MODE<br />
DISPLAY<br />
POPUP MENU<br />
MENU<br />
TOOLS<br />
TOOLS<br />
ENTER<br />
HOME<br />
MENU<br />
RETURN<br />
If you have selected All Movies, proceed to step 6.<br />
5 Select the folder containing the file you want to play.<br />
Use / to select, then press ENTER.<br />
Folders<br />
DVD-RW/Movies<br />
Movie Folder001<br />
Movie Folder002<br />
Movie Folder003<br />
Movie Folder004<br />
Movie005.divx<br />
Movie006.divx<br />
Movie007.divx<br />
Movie008.divx<br />
15 items<br />
A list of the files and folders in the selected folder is displayed.<br />
6 Select and set the file you want to play.<br />
Use / to select, then press ENTER.<br />
Movie Folder001<br />
DVD-RW/Movies/Folders<br />
Movie001.divx<br />
Movie002.divx<br />
Movie003.divx<br />
Movie004.divx<br />
Movie005.divx<br />
Movie006.divx<br />
Movie007.divx<br />
Movie008.divx<br />
20 items<br />
DVD-RW<br />
HMG Playlist<br />
Home Media Gallery<br />
BD <strong>PLAYER</strong><br />
Search for the part you want to play from a list of the disc's content.<br />
3 Select Photos.<br />
Use / to select Photos, then press ENTER.<br />
Movies<br />
Photos<br />
Music<br />
DVD-RW<br />
View available photos.<br />
34<br />
En<br />
Playback starts from the selected file, and continues until the end of<br />
the list is reached. Use / to play the previous or next file.
4 Select Folders or All Photos.<br />
Use / to select, then press ENTER.<br />
• Folders – The files in the selected folder are displayed.<br />
• All Photos – All the recorded files are displayed.<br />
Rotating images<br />
<br />
Press ANGLE while playing a slideshow.<br />
INPUT<br />
SELECT CH VOL<br />
04<br />
Folders<br />
All Photos<br />
Photos<br />
DVD-RW<br />
AUDIO SUBTITLE ANGLE FL DIMMER<br />
• The image rotates each time the button is pressed (90° <br />
180° 270° 0° ...).<br />
The image can also be rotated by selecting Rotate from the TOOLS<br />
menu.<br />
Playing audio files<br />
If you have selected All Photos, proceed to step 6.<br />
5 Select the folder containing the file you want to play.<br />
Use /// to select, then press ENTER.<br />
1 Press HOME MEDIA GALLERY to display the Home Media<br />
Gallery.<br />
SECONDARY<br />
AUDIO VIDEO<br />
OUTPUT<br />
RESOLUTION<br />
TOP MENU<br />
TOOLS<br />
VIDEO SELECT<br />
PLAY MODE<br />
HOME MEDIA<br />
GALLERY<br />
DISPLAY<br />
POPUP MENU<br />
MENU<br />
ENTER<br />
TOP MENU<br />
TOOLS<br />
HOME<br />
MENU<br />
RETURN<br />
Folders<br />
DVD-RW/Photos<br />
The Home Media Gallery can also be displayed by selecting Home<br />
Media Gallery from Home Menu then pressing ENTER.<br />
2 Select the disc.<br />
Use / to select, then press ENTER.<br />
TOP MENU<br />
TOOLS<br />
ENTER<br />
HOME<br />
MENU<br />
RETURN<br />
25 items Folder Name : My Folder<br />
A list of the files and folders in the selected folder is displayed.<br />
6 Select and set the file you want to play.<br />
Use /// to select, then press ENTER.<br />
CD-ROM<br />
HMG Playlist<br />
Home Media Gallery<br />
BD <strong>PLAYER</strong><br />
My Folder<br />
DVD-RW/Photos/Folders<br />
Search for the part you want to play from a list of the disc's content.<br />
99 items File Name : HDPhoto.jpg<br />
Resolution : 1920 × 1080<br />
Date/Time : 2008/7/1 PM0:01<br />
A slideshow starts from the selected file, and continues until the end<br />
of the list is reached. Use / to display the previous or next<br />
file.<br />
About Slideshow<br />
A display of the files on the disc or in the folder that switches<br />
automatically.<br />
3 Select Music.<br />
Use / to select Music, then press ENTER.<br />
Movies<br />
Photos<br />
Music<br />
CD-ROM<br />
View available music.<br />
35<br />
En
04<br />
4 Select Folders or All Songs.<br />
Use / to select, then press ENTER.<br />
• Folders – The files in the selected folder are displayed.<br />
• All Songs – All the recorded files are displayed.<br />
Folders<br />
All Songs<br />
Music<br />
CD-ROM<br />
If you have selected All Songs, proceed to step 6.<br />
5 Select the folder containing the file you want to play.<br />
Use / to select, then press ENTER.<br />
Folders<br />
CD-ROM/Music<br />
Music Folder001<br />
Music Folder002<br />
Music Folder003<br />
Music Folder004<br />
Music005.mp3<br />
Music006.mp3<br />
Music007.mp3<br />
Music008.mp3<br />
15 items<br />
A list of the files and folders in the selected folder is displayed.<br />
6 Select and set the file you want to play.<br />
Use / to select, then press ENTER.<br />
Music Folder001<br />
CD-ROM/Music/Folders<br />
Music001.mp3<br />
Music002.mp3<br />
Music003.mp3<br />
Music004.mp3<br />
Music005.mp3<br />
Music006.mp3<br />
Music007.mp3<br />
Music008.mp3<br />
20 items<br />
Playback starts from the selected file, and continues until the end of<br />
the list is reached. Use / to play the previous or next file. The<br />
Now Playing screen (shown below) is displayed.<br />
Elapsed time<br />
Play<br />
0.02.33<br />
Music 001.mp3<br />
DATA DISC<br />
0.05.34<br />
Currently playing<br />
file<br />
Total file playing<br />
time<br />
Playing in the desired order (HMG<br />
Playlist)<br />
The discs that can add tracks and files to the HMG (Home Media<br />
Gallery) Playlist are as shown below.<br />
• Audio CDs (CD-DAs and DTS-CDs)<br />
• DVDs/CDs on which audio files are recorded<br />
Adding tracks/files<br />
Use this procedure to add tracks and files, and create the HMG<br />
Playlist.<br />
1 Press HOME MEDIA GALLERY to display the Home Media<br />
Gallery.<br />
SECONDARY<br />
AUDIO VIDEO<br />
VIDEO SELECT<br />
HOME MEDIA<br />
GALLERY<br />
TOP MENU<br />
PLAY MODE<br />
DISPLAY<br />
The Home Media Gallery can also be displayed by selecting Home<br />
Media Gallery from Home Menu pressing ENTER.<br />
2 Select the disc.<br />
Load the disc beforehand.<br />
Use / to select, then press ENTER.<br />
TOP MENU<br />
HOME<br />
MENU<br />
ENTER<br />
3 Select the track/file to be added.<br />
Use / to select.<br />
OUTPUT<br />
RESOLUTION<br />
POPUP MENU<br />
MENU<br />
TOOLS<br />
TOOLS<br />
RETURN<br />
Home Media Gallery<br />
BD <strong>PLAYER</strong><br />
CD-ROM<br />
HMG Playlist<br />
Search for the part you want to play from a list of the disc's content.<br />
Folders<br />
CD-ROM/Music<br />
Music001.mp3<br />
Music002.mp3<br />
Music003.mp3<br />
Music004.mp3<br />
Music005.mp3<br />
Music006.mp3<br />
Music007.mp3<br />
Music008.mp3<br />
15 items<br />
36<br />
En
4 Press TOOLS to display the TOOLS menu.<br />
HOME MEDIA<br />
GALLERY<br />
TOP MENU<br />
DISPLAY<br />
POPUP MENU<br />
MENU<br />
TOOLS<br />
2 Select HMG Playlist.<br />
Use / to select, then press ENTER.<br />
Home Media Gallery<br />
BD <strong>PLAYER</strong><br />
CD-ROM<br />
HMG Playlist<br />
04<br />
ENTER<br />
5 Select Add to HMG Playlist.<br />
Use / to select, then press ENTER.<br />
Folders<br />
CD-ROM/Music<br />
Music001.mp3<br />
Music002.mp3<br />
Music003.mp3<br />
Music004.mp3<br />
Music005.mp3<br />
BD <strong>PLAYER</strong> Music006.mp3<br />
TOOLS Music007.mp3Play from Beginning<br />
Music008.mp3Add to HMG Playlist<br />
15Items<br />
Now Playing<br />
The track or file selected in step 3 is added to the HMG Playlist.<br />
To add more tracks or files, repeat steps 3 to 5.<br />
To add the currently playing track/file to<br />
the HMG Playlist<br />
While the track/file is playing, press TOOLS to display<br />
the TOOLS menu.<br />
Use / to select Add to HMG Playlist, then press ENTER.<br />
3 Select the track/file to be played.<br />
Use / to select, then press ENTER.<br />
1<br />
2<br />
3<br />
4<br />
5<br />
6<br />
7<br />
8<br />
21 items<br />
Track15.mp3<br />
Track07.mp3<br />
Track03.mp3<br />
Track16.mp3<br />
Track08.mp3<br />
Track05.mp3<br />
Track10.mp3<br />
Track03.mp3<br />
Display the HMG Playlist.<br />
HMG Playlist<br />
CD-ROM<br />
Playback starts from the selected track/file, and continues until the<br />
end of the list is reached. Use / to play the previous or next<br />
track/file. The Now Playing screen (shown below) is displayed.<br />
Currently playing<br />
track/file<br />
Note<br />
• A maximum of 24 tracks/files can be added to the HMG Playlist.<br />
• The HMG Playlist is cleared in the following cases:<br />
– When the power is turned off.<br />
– When the disc t<strong>ray</strong> is opened.<br />
Elapsed time<br />
Play<br />
0.02.33<br />
Music 001.mp3<br />
DATA DISC<br />
0.05.34<br />
HMG<br />
Total track/file<br />
playing time<br />
Playing the HMG Playlist<br />
1 Press HOME MEDIA GALLERY to display the Home Media<br />
Gallery.<br />
SECONDARY<br />
AUDIO VIDEO<br />
VIDEO SELECT<br />
HOME MEDIA<br />
GALLERY<br />
TOP MENU<br />
PLAY MODE<br />
DISPLAY<br />
OUTPUT<br />
RESOLUTION<br />
POPUP MENU<br />
MENU<br />
The Home Media Gallery can also be displayed by selecting Home<br />
Media Gallery from Home Menu pressing ENTER.<br />
TOOLS<br />
Press STOP to stop playback. When playback of an audio CD is<br />
stopped, the Now Playing screen turns off. When playback of an<br />
audio file is stopped, the HMG Playlist screen reappears.<br />
Deleting tracks/files from the HMG Playlist<br />
Select the track/file to be deleted, then press TOOLS to<br />
display the TOOLS menu.<br />
Use / to select Delete from HMG Playlist, then press<br />
ENTER.<br />
37<br />
En
05<br />
Chapter 5<br />
Adjusting audio and video<br />
Adjusting the video<br />
The quality of the playback picture can be adjusted according to the<br />
TV you are using.<br />
1 During playback, press VIDEO ADJUST to display the Video<br />
Adjust screen.<br />
RED GREEN YELLOW BLUE<br />
VIDEO ADJUST<br />
2 Select the item to be adjusted.<br />
Use / to select.<br />
Video Adjust [ Memory1 ]<br />
Prog. Motion Motion<br />
Pure Cinema<br />
Auto1<br />
YNR<br />
Off<br />
CNR<br />
Off<br />
BNR<br />
Off<br />
MNR<br />
Off<br />
Sharpness High Soft<br />
Sharpness Mid Soft<br />
Still<br />
Max<br />
Max<br />
Max<br />
Max<br />
Fine<br />
Fine<br />
The Video Adjust screen can also be displayed by selecting Video<br />
Adjust from the TOOLS menu.<br />
2 Select a preset.<br />
TOP MENU<br />
TOOLS<br />
3 Adjust the picture quality.<br />
When / are pressed, the adjustments can be made viewing the<br />
picture. The detailed settings screen reappears when ENTER is<br />
pressed.<br />
Prog. Motion<br />
Motion<br />
Still<br />
Select using / according to the TV being used.<br />
• LCD – Select this when connected to a liquid crystal display TV.<br />
• PDP – Select this when connected to a plasma TV of another<br />
brand.<br />
• <strong>Pioneer</strong> PDP – Select this when connected to a <strong>Pioneer</strong> plasma<br />
TV.<br />
• Projector – Select this when connected to a front projector.<br />
• Professional – With this setting, video signal processing is<br />
restrained. Select this when connected to a professional<br />
monitor.<br />
• Memory1 to 3 – Picture quality settings with adjusted<br />
parameters can be stored in the memory. For a description of<br />
the parameters, see When Memory1, 2 or 3 is selected below.<br />
When Memory1, 2 or 3 is selected<br />
1 Select Adjustments.<br />
Use to select Adjustments, then press ENTER.<br />
A detailed settings screen appears.<br />
HOME<br />
MENU<br />
ENTER<br />
Video Adjust<br />
PDP<br />
Adjustments<br />
RETURN<br />
• Prog.Motion – Adjust according to the type of image (moving<br />
or still image). This is effective mainly when outputting video<br />
materials as progressive images.<br />
• Pure Cinema – This setting optimizes the operation of the<br />
progressive scanning circuit for playing film materials. Normally<br />
set it to Auto1. If the picture seems unnatural, switch this to<br />
Auto 2, On or Off (page 39).<br />
• YNR – Reduces noise in the luminance (Y) signal.<br />
• CNR – Reduces noise in the chroma (C) signal.<br />
• BNR – Reduces the block noise (block-shaped distortion<br />
generated upon MPEG compression).<br />
• MNR – Reduces the mosquito noise (distortion along the<br />
contours of the picture generated upon MPEG compression).<br />
• Sharpness High – Adjusts the sharpness of the high-frequency<br />
(detailed) elements in the picture.<br />
• Sharpness Mid – Adjusts the sharpness of the mid-frequency<br />
(less detailed) elements in the picture.<br />
• Detail – Adjusts the picture’s contours.<br />
• White Level – Adjusts the level of the white portions.<br />
• Black Level – Adjusts the level of the black portions.<br />
• Black Setup – Select the black level as the setup level. Normally<br />
select 0 IRE. If the black is too dense and all the dark colors are<br />
displayed in a uniform black due to the combination with the<br />
connected TV, select 7.5 IRE.<br />
• Gamma Correction – Adjusts how the dark portions of the<br />
picture look.<br />
• Hue – Adjusts the balance between green and red.<br />
• Chroma Level – Adjusts the density of the colors.<br />
38<br />
En<br />
Note<br />
• Prog.Motion and Pure Cinema have the effect only for pictures<br />
recorded in the interlaced scan format (576i/480i or 1080i<br />
signals).<br />
• Prog.Motion is disabled when Pure Cinema is set to On.
• Black Setup has the effect only for pictures output from the<br />
VIDEO and S-VIDEO output terminals, and for NTSC signals<br />
output.<br />
• The items below do not apply to video signals output from the<br />
VIDEO and S-VIDEO output terminals, nor to 480i/576i video<br />
signals output from the COMPONENT VIDEO output terminal<br />
(except when the Output Video Resolution is set to 480i/576i<br />
(page 23)).<br />
– Sharpness High – Sharpness Mid<br />
– Detail – White Level<br />
– Black Level – Gamma Correction<br />
– Hue – Chroma Level<br />
Closing the Video Adjust screen<br />
Press<br />
HOME MENU.<br />
About Pure Cinema<br />
There are two types of video signals:<br />
• Video material – Video signals recorded at 25 or 30 frames/<br />
second<br />
• Film material – Video signals recorded at 24 frames/second<br />
“Pure Cinema” uses signal processing suited for “film material”<br />
when converting 576i/480i or 1080i interlaced video signals into<br />
progressive video signals, resulting in clear picture reproduction<br />
without losing the quality of the material.<br />
is displayed on the disc information screen when playing the<br />
“film material” pictures of BD-ROM, BD-R/-RE and DVD-Video discs<br />
(page 28).<br />
Adjusting the audio<br />
Adjusting the Audio DRC<br />
Audio DRC (Dynamic Range Control) has the effect of playing loud<br />
sounds softly and soft sounds loudly. Adjust the setting for example<br />
when viewing movies late at night and the dialogs are difficult to hear.<br />
1 During playback, display the TOOLS menu.<br />
Press TOOLS.<br />
HOME MEDIA<br />
GALLERY<br />
TOP MENU<br />
DISPLAY<br />
POPUP MENU<br />
MENU<br />
TOOLS<br />
3 Select and set Audio DRC.<br />
Use / to select, then press ENTER.<br />
4 Adjust the setting.<br />
Use / to switch between Off, Low, Medium, High and Auto.<br />
Closing the Audio DRC screen<br />
Press ENTER or<br />
Note<br />
Audio DRC<br />
Channel Level<br />
Lip Sync<br />
TOP MENU<br />
HOME<br />
MENU<br />
Audio Adjust<br />
ENTER<br />
Audio DRC<br />
Off<br />
HOME MENU.<br />
• This only affects the Dolby TrueHD, Dolby Digital Plus and Dolby<br />
Digital audio signals of BDs, DVDs and video files.<br />
•When Auto is selected, the setting has the same effect as High<br />
or Off for Dolby TrueHD signals, depending on the content. For<br />
Dolby Digital Plus and Dolby Digital, the setting has the same<br />
effect as Off.<br />
• Audio DRC affects the audio signals output from the following<br />
audio output terminals:<br />
– Analog audio signals output from the AUDIO OUT (7.1 ch)<br />
terminals.<br />
– Linear PCM audio signals output from the DIGITAL OUT<br />
terminals or HDMI OUT terminals.<br />
• The effect may be weak for some discs.<br />
Adjusting the output level of the<br />
different speakers during BD/DVD<br />
playback (Channel Level)<br />
TOOLS<br />
RETURN<br />
05<br />
ENTER<br />
2 Select and set Audio Adjust.<br />
Use / to select, then press ENTER.<br />
TOP MENU<br />
TOOLS<br />
Caution<br />
• Channel Level of the speakers set to None or No at Speaker<br />
Setup cannot be adjusted (page 45).<br />
1 During playback, display the TOOLS menu.<br />
Press TOOLS.<br />
HOME MEDIA<br />
GALLERY<br />
DISPLAY<br />
POPUP MENU<br />
ENTER<br />
MENU<br />
HOME<br />
MENU<br />
RETURN<br />
TOP MENU<br />
TOOLS<br />
BD <strong>PLAYER</strong><br />
TOOLS<br />
Audio<br />
Subtitle<br />
Audio Adjust<br />
Video Adjust<br />
Secondary Audio<br />
ENTER<br />
39<br />
En
05<br />
2 Select and set Audio Adjust.<br />
Use / to select, then press ENTER.<br />
1 During playback, display the TOOLS menu.<br />
Press TOOLS.<br />
TOP MENU<br />
TOOLS<br />
HOME MEDIA<br />
GALLERY<br />
DISPLAY<br />
POPUP MENU<br />
MENU<br />
TOP MENU<br />
TOOLS<br />
ENTER<br />
HOME<br />
MENU<br />
RETURN<br />
ENTER<br />
BD <strong>PLAYER</strong><br />
TOOLS<br />
Audio<br />
Subtitle<br />
Audio Adjust<br />
Video Adjust<br />
Secondary Audio<br />
2 Select and set Audio Adjust.<br />
Use / to select, then press ENTER.<br />
TOP MENU<br />
TOOLS<br />
3 Select and set Channel Level.<br />
Use / to select, then press ENTER.<br />
HOME<br />
MENU<br />
ENTER<br />
RETURN<br />
4 Adjust the output level.<br />
Use / to select, / to adjust.<br />
The output levels of the L, C, R, SL, SR, SBL, SBR and SW speakers<br />
can be adjusted within the range of –6.0 dB to +6.0 dB.<br />
5 Press ENTER to set.<br />
Note<br />
•The adjustment of Channel Level is only applicable to the sound<br />
output from AUDIO OUT (7.1 ch).<br />
• This cannot be adjusted when in the following cases:<br />
– Output Terminal is set to HDMI MAIN or DIGITAL AUDIO<br />
(page 42).<br />
– Audio Output Mode is set to 2 Channel (page 43).<br />
– Channel Level is set to Fix (page 43).<br />
Closing the Channel Level screen<br />
Press<br />
Audio DRC<br />
Channel Level<br />
Lip Sync<br />
HOME MENU.<br />
L<br />
C<br />
R<br />
SR<br />
SBR<br />
SBL<br />
SL<br />
SW<br />
Audio Adjust<br />
0.0 dB<br />
0.0 dB<br />
0.0 dB<br />
0.0 dB<br />
0.0 dB<br />
0.0 dB<br />
0.0 dB<br />
0.0 dB<br />
Adjusting the audio delay (Lip<br />
Sync)<br />
Adjust the audio delay for the selected video output terminal if the<br />
video and audio are not synchronized.<br />
BD <strong>PLAYER</strong><br />
TOOLS<br />
3 Select and set Lip Sync.<br />
Use / to select, then press ENTER.<br />
Audio DRC<br />
Channel Level<br />
Lip Sync<br />
4 Select Auto or Manual.<br />
Use / to select.<br />
•Auto– The player automatically adjusts the timing of the video<br />
and audio when connected to a device equipped with the HDMI<br />
Auto Lipsync Correction feature using an HDMI cable.<br />
• Manual – Adjust manually while viewing the video.<br />
If you have selected Manual, proceed to step 5.<br />
5 Adjusting the amount of audio delay.<br />
Press , then use / to adjust.<br />
100 ms<br />
Audio<br />
Subtitle<br />
Audio Adjust<br />
Video Adjust<br />
Secondary Audio<br />
Audio Adjust<br />
Lip Sync<br />
Auto<br />
Lip Sync<br />
Manual<br />
0 50 100 150 200 250<br />
The audio delay can be adjusted from 0 to 250 ms in steps of 5 ms.<br />
Note<br />
•The Lip Sync adjustment is only applicable to the output<br />
terminal set at Output Terminal (page 42).<br />
• The sound may be interrupted while setting the delay.<br />
Closing the Lip Sync screen<br />
Press ENTER or<br />
HOME MENU.<br />
40<br />
En
Chapter 6<br />
Advanced settings<br />
06<br />
Changing the settings<br />
Operating the Initial Setup screen<br />
1 When playback is stopped, display the Home Menu screen.<br />
Press HOME MENU.<br />
ENTER<br />
HOME<br />
MENU<br />
RETURN<br />
PLAY<br />
2 Select and set Initial Setup.<br />
Use / to select, then press ENTER.<br />
TOP MENU<br />
TOOLS<br />
ENTER<br />
HOME<br />
MENU<br />
RETURN<br />
Home Media Gallery<br />
Initial Setup<br />
HOME MENU<br />
BD <strong>PLAYER</strong><br />
3 Select the item and change the setting.<br />
Use /// to select, then press ENTER.<br />
TOP MENU<br />
TOOLS<br />
ENTER<br />
HOME<br />
MENU<br />
RETURN<br />
Video Out<br />
Audio Out<br />
Speakers<br />
HDMI MAIN<br />
HDMI SUB<br />
Playback<br />
Language<br />
Parental Lock<br />
Initial Setup<br />
BD <strong>PLAYER</strong><br />
TV Aspect Ratio<br />
4:3 Video Out<br />
DVD 16:9 Video Out<br />
NTSC on PAL TV<br />
16:9 (Widescreen)<br />
Full<br />
Letter Box<br />
Off<br />
Closing the Initial Setup screen<br />
Press<br />
HOME MENU.<br />
41<br />
En
06<br />
Note<br />
• Items that cannot be changed are indicated in g<strong>ray</strong>. The items that can be selected depend on the player’s status.<br />
• In Options, the factory default settings are indicated in bold.<br />
Setting Options Explanation<br />
42<br />
En<br />
Video Out<br />
Audio Out<br />
TV Aspect Ratio 16:9 (Widescreen) Select this when connected to a wide (16:9) TV.<br />
4:3 (Standard) Select this when connected to a conventional TV.<br />
4:3 Video Out Full 4:3 pictures are displayed over the entire screen.<br />
Normal<br />
4:3 pictures are displayed with vertical black bars along the sides. Select this when you<br />
cannot switch the aspect ratio to 4:3 on the TV.<br />
4:3 Video Out is only valid when TV Aspect Ratio is set to16:9 (Widescreen).<br />
DVD 16:9 Video Out Letter Box 16:9 pictures are displayed with black bars at the top and bottom when viewing on a 4:3<br />
screen.<br />
Pan & Scan The picture is displayed over the entire screen, with the left and right sides of the 16:9<br />
picture cropped. Select this to view 4:3 pictures over the entire screen. For some discs, the<br />
picture will be displayed in the Letter Box mode even if Pan & Scan is set.<br />
• DVD 16:9 Video Out is only valid when TV Aspect Ratio is set to 4:3 (Standard).<br />
• DVD 16:9 Video Out is only valid when playing 16:9 pictures of DVD-Video discs. When other 16:9 pictures are played, they are output in the Letter Box<br />
mode.<br />
NTSC on PAL TV On Select this when connected to a PAL-only TV. The picture is displayed correctly on the PALonly<br />
TV even when playing a source with a frame/field rate other than 50 Hz.<br />
Off<br />
Select this when connected to an NTSC-compatible TV.<br />
Many recent PAL TVs support the input of NTSC signals, in which case this can be set to Off. Also check your TV’s operating instructions.<br />
Output Terminal HDMI MAIN Select this to output audio signals from the HDMI OUT (MAIN) terminal.<br />
DIGITAL AUDIO Select this to output audio signals from the DIGITAL OUT terminals.<br />
ANALOG AUDIO Select this to output audio signals from the AUDIO OUT (7.1 ch) terminals.<br />
• The optimum audio signals for the audio format and the player’s settings are output from the output terminal(s) set here.<br />
• When HDMI MAIN or DIGITAL AUDIO is selected at Output Terminal, linear PCM audio signals (2 channels) are output from all terminals other than<br />
the ones selected at Output Terminal.<br />
• When ANALOG AUDIO is selected at Output Terminal, no audio signals are output from the HDMI OUT or DIGITAL OUT terminals.<br />
• To listen to the device connected to the HDMI OUT (SUB) terminal, select HDMI MAIN and turn off the power of the device connected to the HDMI<br />
OUT (MAIN) terminal.<br />
Dolby Digital Out<br />
Dolby Digital 1 Dolby Digital audio signals are output. With BD-ROMs, the secondary audio and interactive<br />
* Only valid for the DIGITAL OUT<br />
audio are mixed for output.<br />
terminals.<br />
Dolby Digital 2 Dolby Digital audio signals are output. With BD-ROMs, the signals are output without<br />
mixing the secondary audio and interactive audio signals.<br />
Dolby Digital PCM Select this when the connected AV receiver or amplifier, etc., is not compatible with Dolby<br />
Digital audio signals. The Dolby Digital audio signals are converted into linear PCM audio<br />
signals for output.<br />
DTS Out<br />
DTS 1<br />
* Only valid for the DIGITAL OUT<br />
terminals.<br />
DTS 2<br />
DTS PCM<br />
AAC Out<br />
AAC<br />
* Only valid for the DIGITAL OUT<br />
terminals.<br />
AAC PCM<br />
DTS Digital Surround audio signals are output. With BD-ROMs, the secondary audio and<br />
interactive audio are mixed for output.<br />
DTS Digital Surround audio signals are output. With BD-ROMs, the signals are output<br />
without mixing the secondary audio and interactive audio signals.<br />
Select this when the connected AV receiver or amplifier, etc., is not compatible with DTS<br />
Digital Surround audio signals. The DTS Digital Surround audio signals are converted into<br />
linear PCM audio signals for output.<br />
Select this when the connected AV receiver or amplifier, etc., is compatible with AAC audio<br />
signals. The AAC audio signals are output.<br />
Select this when the connected AV receiver or amplifier, etc., is not compatible with AAC<br />
audio signals. The AAC audio signals are converted into linear PCM audio signals for<br />
output.<br />
DTS Downmix Stereo DTS-HD Master Audio signals, DTS-HD High Resolution Audio signals or DTS Digital<br />
Surround audio signals converted to linear PCM audio signals are converted into 2-channel<br />
(stereo) signals for output.<br />
Lt/Rt<br />
DTS-HD Master Audio signals, DTS-HD High Resolution Audio signals or DTS Digital<br />
Surround audio signals converted to linear PCM audio signals are converted into 2-channel<br />
signals compatible with Dolby Surround for output (when the connected AV receiver or<br />
amplifier, etc., is compatible with Dolby Pro Logic, the AV receiver or amplifier outputs the<br />
linear PCM audio signals as surround audio signals).
Speakers<br />
HDMI MAIN/HDMI SUB<br />
Playback<br />
Setting Options Explanation<br />
Audio Output Mode<br />
* Only valid for the AUDIO OUT<br />
(7.1 ch) terminals.<br />
Speaker Setup<br />
* Only valid for the AUDIO OUT<br />
(7.1 ch) terminals.<br />
Speaker Distance<br />
* Only valid for the AUDIO OUT<br />
(7.1 ch) terminals.<br />
Channel Level<br />
* Only valid for the AUDIO OUT<br />
(7.1 ch) terminals.<br />
2 Channel Select this when the TV’s analog 2-channel (stereo) audio input terminals are connected to<br />
the player’s AUDIO OUT (7.1 ch) terminals.<br />
Multi-channel<br />
Select this when the multi-channel audio input terminals of an AV receiver or amplifier, etc.,<br />
are connected to the player’s AUDIO OUT (7.1 ch) terminals.<br />
Set whether or not speakers are connected to the AV receiver or amplifier, as well as the size of the speakers. For<br />
details, see Changing the speaker setup on page 45.<br />
Specify the distance of your speakers from your listening position (page 45).<br />
Fix<br />
The output for the various speakers is set to the maximum.<br />
Variable The output level of the various speakers is set within the range of –6.0 dB to +6.0 dB (in 0.5<br />
dB steps) (page 45).<br />
HDMI High Speed Transmission On Select this when connected with a High Speed HDMI cable (page 13).<br />
Off Select this when connected with a Standard HDMI cable (page 13).<br />
The player’s setting screen is closed if the output video resolution is switched by changing the HDMI High Speed Transmission setting.<br />
HDMI Color Space Auto Select this to automatically switch the video output between YCbCr and RGB signals<br />
according to the connected equipment.<br />
YCbCr 4:4:4<br />
Select this to output the video signals as YCbCr 4:4:4 signals.<br />
YCbCr 4:2:2<br />
Select this to output the video signals as YCbCr 4:2:2 signals.<br />
RGB (16 to 235) Select this to output the video signals as RGB signals. Choose this if the colors seem too<br />
dense and all the dark colors are displayed in a uniform black when RGB (0 to 255) is<br />
selected.<br />
RGB (0 to 255)<br />
Select this to output the video signals as RGB signals. Choose this if the colors seem too<br />
faint and the black seems too bright when RGB (16 to 235) is selected.<br />
Normally it is recommended to set this to Auto. When set to Auto, the optimum video signals for your TV are output.<br />
HDMI Audio Out<br />
* HDMI MAIN only.<br />
Auto<br />
The signals are output with as many audio channels as possible. In cases when the number<br />
of channels does not decrease when the signals are output as such without converting<br />
them to linear PCM, they are output as such (page 52).<br />
PCM<br />
Select this when you want the secondary audio and interactive audio signals to be mixed<br />
for output or when you want to output prioritizing sampling frequency over the number of<br />
channels (page 52).<br />
PQLS<br />
Auto Enables PQLS function (page 14).<br />
* HDMI MAIN only.<br />
Off Disables PQLS function (page 14).<br />
KURO LINK<br />
* HDMI MAIN only.<br />
On<br />
Off<br />
Select this to control the player with the remote control of the AV device connected using<br />
an HDMI cable. Also refer to About KURO LINK function on page 14.<br />
Select this when you do not want to control the player with the remote control of the AV<br />
device connected using an HDMI cable.<br />
Still Picture Field This eliminates instability of the picture when playback is paused.<br />
Frame<br />
This makes pictures clear when playback is paused, but instability may be observed.<br />
Auto<br />
Field or Frame is switched automatically according to the disc or file being played.<br />
Angle/Secondary Indicator On Select this to display the angle mark, secondary video mark and secondary audio mark on<br />
the TV screen (pages 27 and 28).<br />
Off<br />
Select this if you do not want to display the angle mark, secondary video mark and<br />
secondary audio mark on the TV screen.<br />
DivX VOD Registration Code Displays the player’s registration code required to play DivX VOD files (page 9).<br />
Hybrid <strong>Disc</strong> Playback BD The BD layer of hybrid discs with two or more layers (BD and DVD or CD) is played.<br />
DVD<br />
The DVD layer of hybrid discs with two or more layers (BD and DVD) is played. If there is no<br />
DVD layer, the BD layer is played.<br />
CD<br />
The CD layer of hybrid discs with two or more layers (BD and CD) is played. If there is no CD<br />
layer, the BD layer is played.<br />
Remove the disc from the disc t<strong>ray</strong> when changing the setting.<br />
BDMV/BDAV Playback Priority BDMV Select this to play the BDMV format on BD-R/-RE discs containing both BDMV and BDAV<br />
formats.<br />
BDAV<br />
Select this to play the BDAV format on BD-R/-RE discs containing both BDMV and BDAV<br />
formats.<br />
Remove the disc from the disc t<strong>ray</strong> when changing the setting.<br />
06<br />
43<br />
En
06<br />
44<br />
En<br />
Language<br />
Setting Options Explanation<br />
OSD Language English Select this to set the language of the on-screen displays to English.<br />
available languages Choose a language for the on-screen displays from the listed languages.<br />
Audio Language<br />
English<br />
Select this to set both the BD-ROM and DVD-Video default audio language to English.<br />
* For some discs, it may not be<br />
possible to change to the selected<br />
available languages Choose a language from the listed languages to set the default audio language for BD-ROM<br />
and DVD-Video playback.<br />
language.<br />
Other<br />
Continue to the next screen to set the default audio language for BD-ROM and DVD-Video<br />
playback. You can select the language name or enter the code number (see on page 53 for<br />
the code table).<br />
If a language not recorded on the BD/DVD is set, one of the recorded languages is automatically selected and played.<br />
Subtitle Language<br />
* For some discs, it may not be<br />
English<br />
Select this to set the default subtitle language for BD-ROM and DVD-Video playback to<br />
English.<br />
possible to change to the selected<br />
language.<br />
available languages Choose a language from the listed languages to set the default subtitle language for BD-<br />
ROM and DVD-Video playback.<br />
Other<br />
Continue to the next screen to set the default subtitle language for BD-ROM and DVD-Video<br />
playback. You can select the language name or enter the code number (see on page 53 for<br />
the code table).<br />
If a language not recorded on the BD/DVD is set, one of the recorded languages is automatically selected and played.<br />
BDMV/DVD-Video Menu Lang. w/Subtitle Language<br />
* For some discs, it may not be<br />
possible to change to the selected available languages<br />
language.<br />
Other<br />
Sets the language of BD-ROM and DVD-Video menus to the same as that set for the subtitle<br />
language.<br />
Choose a language from the listed languages to set the default language for BD-ROM and<br />
DVD-Video menus.<br />
Continue to the next screen to set the default menu language for BD-ROM and DVD-Video<br />
menus. You can select the language name or enter the code number (see on page 53 for<br />
the code table).<br />
If a language not recorded on the BD/DVD is set, one of the recorded languages is automatically selected and played.<br />
Subtitle Display On Select this to display the subtitles.<br />
Off<br />
Select this if you do not want to display the subtitles. Note that on some discs the subtitles<br />
are displayed by force.<br />
Set Password (Change Password) Register (change) the password for parental lock settings or for unlocking to play DVD-Video with parental lock feature<br />
(page 46).<br />
DVD-Video Parental Lock Change the player’s parental lock level (page 47).<br />
BDMV Parental Lock Change the restricted age (page 47).<br />
Country Code Change the Country/Area code (page 48).<br />
IP Address Select this to set the IP address of the player and DNS server (page 48).<br />
Proxy Server Only set the proxy server if so instructed by your Internet service provider (page 48).<br />
Display Network Configuration Select this to display a list of the network settings (page 49).<br />
Connection Test Select this to test the network connection (page 49).<br />
On Screen Display On Select this to display the operation indicators (Play, Stop, etc.) on the TV screen.<br />
Off<br />
Select this if you do not want to display the operation indicators (Play, Stop, etc.) on the TV<br />
screen.<br />
Screen Saver On The screen saver is automatically activated if there is no operation for over 1 minute after<br />
playback is stopped or paused.<br />
The screen saver is automatically activated if there is no operation for over 1 minute after<br />
the Home Menu or Home Media Gallery is displayed while playing a BD or DVD.<br />
With audio CDs and audio files, the screen saver is automatically activated if no button is<br />
operated for over 1 minute, even while the audio CD or audio file is playing.<br />
The screen saver turns off when an operation is performed on the player or remote control.<br />
Off<br />
The screen saver is not activated.<br />
Auto Power Off On Select this to turn the power off automatically (the power turns off automatically if no<br />
operation is performed for over 30 minutes).<br />
Off<br />
Select this if you do not want the power to turn off automatically.<br />
BDMV Data Erase<br />
When a BD-ROM is played, additional data may be stored in the player’s memory (local storage). If the message<br />
indicating low memory (local storage) appears, erase the BDMV data (page 49).<br />
Software Update<br />
The Software Update function can check for and download updated system software from the network server<br />
(page 50).<br />
Setup Navigator<br />
Start making the settings using the Setup Navigator menu. For details, see Making settings using the Setup Navigator<br />
menu on page 19.<br />
Parental Lock<br />
Network<br />
Options
Changing the speaker setup<br />
Set whether or not speakers are connected to the AV receiver or<br />
amplifier, as well as the size of the speakers. This setting is only valid<br />
for the AUDIO OUT (7.1 ch) terminals.<br />
Caution<br />
•The Speaker Setup cannot be selected when Audio Output<br />
Mode is set to 2 Channel. Change the setting to Multi-channel<br />
(page 43).<br />
1 Select and set Speakers Speaker Setup Next Screen.<br />
Use / to select, then press ENTER.<br />
2 Select the speaker and change the setting.<br />
Use / to select, then use / to change the setting.<br />
L/R<br />
C<br />
SL/SR<br />
SBL/SBR<br />
SW<br />
Speaker Setup<br />
BD <strong>PLAYER</strong><br />
Large<br />
Large<br />
Large<br />
Large<br />
Yes<br />
• L/R (front left and right speakers): Large/Small<br />
• C (center speaker): Large/Small/None<br />
• SL/SR (left and right surround speakers): Large/Small/None<br />
• SBL/SBR (left and right surround back speakers): Large/Small/<br />
None<br />
• SW (subwoofer): Yes/No<br />
Note<br />
• Depending on the combination of settings of the different<br />
speakers, the settings of speakers other than the one you have<br />
changed may also change automatically.<br />
Adjusting the distance of the different<br />
speakers<br />
Adjust the distance between you and the different speakers. This<br />
setting is only valid for the AUDIO OUT (7.1 ch) terminals.<br />
Caution<br />
• This cannot be selected when Audio Output Mode is set to 2<br />
Channel. Change the setting to Multi-channel (page 43).<br />
• Speaker Distance of the speakers set to None or No at Speaker<br />
Setup cannot be adjusted (above).<br />
1 Select and set Speakers Speaker Distance Next<br />
Screen.<br />
Use / to select, then press ENTER.<br />
2 Select the speaker and adjust the distance.<br />
Use / to select, then use / to adjust.<br />
L<br />
C<br />
R<br />
SR<br />
SBR<br />
SBL<br />
SL<br />
SW<br />
• The distance of all the speakers can be set to between 0.01 m<br />
and 9.00 m, in units of 0.01 m.<br />
Adjusting the output level of the different<br />
speakers (Channel Level)<br />
Adjust each output level of the different speakers by using test tones.<br />
This setting is only valid for the AUDIO OUT (7.1 ch) terminals.<br />
Caution<br />
• This cannot be selected when Audio Output Mode is set to 2<br />
Channel. Change the setting to Multi-channel (page 43).<br />
• Channel Level of the speakers set to None or No at Speaker<br />
Setup cannot be adjusted (above).<br />
• Test tones are output. Lower the volume of the device connected<br />
to the player.<br />
1 Select and set Speakers Channel Level, then Fix or<br />
Variable.<br />
Use / to select, then press ENTER.<br />
• Fix – The output level of all the speakers is set to the maximum.<br />
• Variable – The output level of all the speakers is set 6.0 dB lower<br />
than when Fix is selected. From this point, the output levels of<br />
the L, C, R, SL, SR, SBL, SBR and SW speakers can be adjusted<br />
within the range of –6.0 dB to +6.0 dB.<br />
If you have selected Variable, proceed to step 2.<br />
2 Select and set the method for switching the speaker to be<br />
adjusted.<br />
Use / to select, then press ENTER.<br />
Video Out<br />
Audio Out<br />
Speakers<br />
HDMI MAIN<br />
HDMI SUB<br />
Playback<br />
Language<br />
Parental Lock<br />
Speaker Distance<br />
BD <strong>PLAYER</strong><br />
3.00 m<br />
3.00 m<br />
3.00 m<br />
3.00 m<br />
3.00 m<br />
3.00 m<br />
3.00 m<br />
3.00 m<br />
Speaker Setup<br />
BD <strong>PLAYER</strong><br />
Test Tone Switching<br />
Select whether test tone output is<br />
switched automatically or manually.<br />
Auto<br />
Manual<br />
• Auto – Switch the speaker to be adjusted automatically.<br />
• Manual – Switch the speaker to be adjusted manually.<br />
06<br />
45<br />
En
06<br />
3 Adjust the output level.<br />
Use / to select, / to adjust.<br />
L<br />
C<br />
R<br />
SR<br />
SBR<br />
SBL<br />
SL<br />
SW<br />
Channel Level<br />
BD <strong>PLAYER</strong><br />
0.0 dB<br />
0.0 dB<br />
0.0 dB<br />
0.0 dB<br />
0.0 dB<br />
0.0 dB<br />
0.0 dB<br />
0.0 dB<br />
Registering or Changing the password<br />
Use this procedure to register or change the code number required<br />
for the Parental Lock settings.<br />
1 Select and set Parental Lock Set Password Next<br />
Screen.<br />
Use / to select, then press ENTER.<br />
2 Input the password.<br />
Use the number buttons (0 to 9) or / to input the number, then<br />
press ENTER to set.<br />
Use / to move the cursor.<br />
Note<br />
• You can also adjust while listening to the sound being played<br />
(page 39).<br />
• The volume of the test tones output from the subwoofer may<br />
seem lower than the tones output from the other channels.<br />
Adjust the subwoofer based on the sound during playback<br />
(page 39).<br />
•When Auto is selected, the speaker cannot be selected with<br />
/. In this case, test tones are not output from the subwoofer.<br />
Changing to other language at language<br />
setting<br />
CLEAR<br />
SECONDARY<br />
AUDIO VIDEO<br />
VIDEO SELECT<br />
HOME MEDIA<br />
GALLERY<br />
TOP MENU<br />
PLAY MODE<br />
DISPLAY<br />
ENTER<br />
ENTER<br />
OUTPUT<br />
RESOLUTION<br />
POPUP MENU<br />
MENU<br />
TOOLS<br />
1 Select and set Language.<br />
Use / to select, then press ENTER.<br />
HOME<br />
MENU<br />
RETURN<br />
2 Select and set Audio Language, Subtitle Language or<br />
BDMV/DVD-Video Menu Lang.<br />
Use / to select, then press ENTER.<br />
3 Select and set Other.<br />
Use / to select, then press ENTER.<br />
4 Change the language.<br />
Use / to change, then press ENTER.<br />
Video Out<br />
Audio Out<br />
Speakers<br />
HDMI MAIN<br />
HDMI SUB<br />
Playback<br />
Language<br />
Parental Lock<br />
Audio Language<br />
Language<br />
Number<br />
Initial Setup<br />
BD <strong>PLAYER</strong><br />
English<br />
0 5 1 4<br />
• The language can also be changed using the number buttons.<br />
Use / to move the cursor to Number, use the number<br />
buttons (0 to 9) to input the number, then press ENTER. Refer to<br />
Language Code Table and Country/Area Code Table on page 53.<br />
Note<br />
• If a language not recorded on the BD/DVD is set, one of the<br />
recorded languages is automatically selected and played.<br />
Video Out<br />
Audio Out<br />
Speakers<br />
HDMI MAIN<br />
HDMI SUB<br />
Playback<br />
Language<br />
Parental Lock<br />
3 Re-input the password.<br />
Use the number buttons (0 to 9) or / to input the number, then<br />
press ENTER to set.<br />
Use / to move the cursor.<br />
Video Out<br />
Audio Out<br />
Speakers<br />
HDMI MAIN<br />
HDMI SUB<br />
Playback<br />
Language<br />
Parental Lock<br />
Initial Setup<br />
BD <strong>PLAYER</strong><br />
Set Password<br />
Enter new password<br />
Set Password<br />
Enter new password<br />
Re-enter<br />
Initial Setup<br />
BD <strong>PLAYER</strong><br />
• To change the password, input the previously registered<br />
password, then input the new password.<br />
46<br />
En<br />
Note<br />
• We recommend making a note of the password.<br />
• If you forget the password, reset the player to the factory default<br />
setting, then register the password again (page 51).
Changing the Parental Lock level for<br />
viewing DVDs<br />
Some DVD-Video discs containing scenes of violence, for example,<br />
have Parental Lock levels (check the indications on the disc’s jacket<br />
or elsewhere). To restrict viewing these discs, set the player’s level<br />
to the level lower than the discs.<br />
1 Select and set Parental Lock DVD-Video Parental Lock <br />
Next Screen.<br />
Use / to select, then press ENTER.<br />
2 Input the password.<br />
Use the number buttons (0 to 9) or / to input the number, then<br />
press ENTER to set.<br />
Use / to move the cursor.<br />
Changing the Age Restriction for viewing<br />
BD-ROMs<br />
For BD-ROMs containing scenes of violence, for example, viewing<br />
can be restricted by setting an age restriction for the BD-ROMs.<br />
1 Select and set Parental Lock BDMV Parental Lock Next<br />
Screen.<br />
Use / to select, then press ENTER.<br />
2 Input the password.<br />
Use the number buttons (0 to 9) or / to input the number, then<br />
press ENTER to set.<br />
Use / to move the cursor.<br />
06<br />
CLEAR<br />
SECONDARY<br />
AUDIO VIDEO<br />
ENTER<br />
OUTPUT<br />
RESOLUTION<br />
CLEAR<br />
SECONDARY<br />
AUDIO VIDEO<br />
VIDEO SELECT PLAY MODE<br />
ENTER<br />
OUTPUT<br />
RESOLUTION<br />
VIDEO SELECT<br />
HOME MEDIA<br />
GALLERY<br />
PLAY MODE<br />
DISPLAY<br />
POPUP MENU<br />
MENU<br />
HOME MEDIA<br />
GALLERY<br />
DISPLAY<br />
POPUP MENU<br />
TOP MENU<br />
TOOLS<br />
MENU<br />
TOP MENU<br />
TOOLS<br />
ENTER<br />
ENTER<br />
HOME<br />
MENU<br />
RETURN<br />
Video Out<br />
Audio Out<br />
Speakers<br />
HDMI MAIN<br />
HDMI SUB<br />
Playback<br />
Language<br />
Parental Lock<br />
HOME<br />
MENU<br />
Initial Setup<br />
BD <strong>PLAYER</strong><br />
RETURN<br />
DVD-Video Parental Lock<br />
Enter the password<br />
3 Change the level.<br />
Use / to change, then press ENTER to set.<br />
Video Out<br />
Audio Out<br />
Speakers<br />
HDMI MAIN<br />
HDMI SUB<br />
Playback<br />
Language<br />
Parental Lock<br />
Initial Setup<br />
BD <strong>PLAYER</strong><br />
BDMV Parental Lock<br />
Enter the password<br />
3 Change the age.<br />
Use the number buttons (0 to 9) or / to input the number, then<br />
press ENTER to set.<br />
Use / to move the cursor.<br />
Video Out<br />
Audio Out<br />
Speakers<br />
HDMI MAIN<br />
HDMI SUB<br />
Playback<br />
Language<br />
Parental Lock<br />
Level<br />
Initial Setup<br />
BD <strong>PLAYER</strong><br />
DVD-Video Parental Lock<br />
Off<br />
Video Out<br />
Audio Out<br />
Speakers<br />
HDMI MAIN<br />
HDMI SUB<br />
Playback<br />
Language<br />
Parental Lock<br />
Initial Setup<br />
BD <strong>PLAYER</strong><br />
BDMV Parental Lock<br />
Age Restriction<br />
Note<br />
• The level can be set to Off or between Level1 and Level8. When<br />
set to Off, viewing is not restricted.<br />
Note<br />
•When Age Restriction is set to 255, viewing is not restricted.<br />
47<br />
En
06<br />
Changing the Country/Area code<br />
1 Select and set Parental Lock Country Code Next<br />
Screen.<br />
Use / to select, then press ENTER.<br />
2 Input the password.<br />
Use the number buttons (0 to 9) or / to input the number, then<br />
press ENTER to set.<br />
Use / to move the cursor.<br />
2 Set IP address.<br />
Use /// to set the IP address of the player or DNS server,<br />
then press ENTER.<br />
Network<br />
BD <strong>PLAYER</strong><br />
IP Address<br />
Auto Set IP Address<br />
IP Address<br />
Subnet Mask<br />
Default Gateway<br />
Auto Set DNS Server Address<br />
DNS Server (Primary)<br />
DNS Server (Secondary)<br />
Off<br />
Off<br />
<br />
48<br />
En<br />
Video Out<br />
Audio Out<br />
Speakers<br />
HDMI MAIN<br />
HDMI SUB<br />
Playback<br />
Language<br />
Parental Lock<br />
VIDEO SELECT<br />
HOME MEDIA<br />
GALLERY<br />
TOP MENU<br />
PLAY MODE<br />
DISPLAY<br />
3 Change the country/area code.<br />
Use / to change, then press ENTER to set.<br />
Video Out<br />
Audio Out<br />
Speakers<br />
HDMI MAIN<br />
HDMI SUB<br />
Playback<br />
Language<br />
Parental Lock<br />
HOME<br />
MENU<br />
CLEAR<br />
SECONDARY<br />
AUDIO VIDEO<br />
ENTER<br />
Initial Setup<br />
BD <strong>PLAYER</strong><br />
Country Code<br />
• The the country/area code can also be changed using the<br />
number buttons. Use / to move the cursor to Number, use<br />
the number buttons (0 to 9) to input the number, then press<br />
ENTER. Refer to Language Code Table and Country/Area Code<br />
Table on page 53.<br />
Setting the IP address<br />
OUTPUT<br />
RESOLUTION<br />
POPUP MENU<br />
MENU<br />
1 Select and set Network IP Configuration Next Screen.<br />
Use / to select, then press ENTER.<br />
ENTER<br />
Enter the password<br />
Country Code<br />
Code<br />
Number<br />
Initial Setup<br />
BD <strong>PLAYER</strong><br />
TOOLS<br />
RETURN<br />
• Auto Set IP Address<br />
On – The player’s IP address is obtained automatically. Select<br />
this when using a broadband router or broadband modem that<br />
has a DHCP (Dynamic Host Configuration Protocol) server<br />
function. This player’s IP address will automatically be allocated<br />
from the DHCP server.<br />
Off – The player’s IP address must be set manually. Use the<br />
number buttons (0 to 9) to input the IP address, subnet mask<br />
and default gateway.<br />
• Auto Set DNS Server Address<br />
On – The DNS server’s IP address is obtained automatically.<br />
Off – The DNS server’s IP address must be set manually. Use<br />
the number buttons (0 to 9) to input the DNS server’s IP address<br />
stipulated by your Internet service provider.<br />
Note<br />
•When Auto Set IP Address is set to Off, Auto Set DNS Server<br />
Address is also set to Off.<br />
• For information on DHCP server function, refer to the network<br />
device’s operating instructions.<br />
• You may need to contact your Internet service provider or<br />
network administrator when inputting the IP address manually.<br />
Setting the proxy server<br />
Only set the proxy server if so instructed by your Internet service<br />
provider.<br />
1 Select and set Network Proxy Server Next Screen.<br />
Use / to select, then press ENTER.<br />
2 Select and set Use or Not use at Proxy Server.<br />
Use / to change, then press .<br />
Proxy Server<br />
Proxy Server<br />
Server Select Method<br />
Server Name<br />
Port Number<br />
Network<br />
BD <strong>PLAYER</strong><br />
Use<br />
Server Name<br />
• Use – Select this when using a proxy server.<br />
• Not use – Select this when not using a proxy server.<br />
If you have selected Use, proceed to step 3.
3 Select and set Server Select Method.<br />
Use / to change, then press .<br />
When Auto Set IP Address is set to On, the values obtained<br />
automatically are displayed.<br />
Network<br />
BD <strong>PLAYER</strong><br />
06<br />
CLEAR<br />
SECONDARY<br />
AUDIO VIDEO<br />
VIDEO SELECT<br />
HOME MEDIA<br />
GALLERY<br />
PLAY MODE<br />
DISPLAY<br />
ENTER<br />
OUTPUT<br />
RESOLUTION<br />
POPUP MENU<br />
MENU<br />
Display Network Config.<br />
MAC Address<br />
IP Address<br />
Subnet Mask<br />
Default Gateway<br />
DNS Server (Primary)<br />
DNS Server (Secondary)<br />
00 - E0 - 36 - 00 - 00 - 00<br />
192 . 168 . 0 . 2<br />
255 . 255 . 255 . 0<br />
192 . 168 . 0 . 1<br />
0 . 0 . 0 . 0<br />
0 . 0 . 0 . 0<br />
TOP MENU<br />
TOOLS<br />
HOME<br />
MENU<br />
ENTER<br />
RETURN<br />
Note<br />
• “0.0.0.0” is displayed when each IP address has not been set.<br />
Testing the network connection<br />
• IP Address – Input the IP address.<br />
• Server Name – Input the server name.<br />
4 Input IP Address or Server Name.<br />
Use the number buttons (0 to 9) to input the number if you select IP<br />
address by step 3. Use / to move the cursor.<br />
Use the number buttons (0 to 9) to input characters if you select<br />
Server Name by step 3.<br />
The characters that can be input for the server name are listed on<br />
the table below. Pressing a button repeatedly cycles through the<br />
characters shown.<br />
• If you want to enter two characters in succession that are both<br />
on the same button (for example a P and an R), press after<br />
inputting the first character then input the second character.<br />
•Use CLEAR to delete the last character.<br />
•Use / to move the displayed characters when all the input<br />
characters cannot be displayed.<br />
5 Input Port Number.<br />
Press , use the number buttons (0 to 9) to input the number.<br />
6 Press ENTER to set.<br />
Key Characters Key Characters<br />
1 1 . – 6 m n o 6<br />
2 a b c 2 7 p q r s 7<br />
3 d e f 3 8 t u v 8<br />
4 g h i 4 9 w x y z 9<br />
5 j k l 5 0 0<br />
Displaying the network settings<br />
1 Select and set Network Connection Test Start.<br />
Use / to select, then press ENTER.<br />
“Network connection test completed successfully.” is displayed<br />
once the test is completed. If any other message is displayed, check<br />
the connections and/or settings (pages 18 and 48).<br />
Erasing the additional data from BD-ROMs<br />
When a BD-ROM is played, additional data may be stored in the<br />
player’s memory (local storage).<br />
If the message indicating low memory (local storage) appears, erase<br />
the BDMV data.<br />
Caution<br />
• When the BDMV data is erased, all the data of secondary video<br />
(Picture-in-Picture), secondary audio, bookmark, etc. that has<br />
been stored is erased.<br />
• It takes time to erase the BDMV data for a while. Do not unplug<br />
the power cord while the data is being erased.<br />
1 Select and set Options BDMV Data Erase Next Screen.<br />
Use / to select, then press ENTER.<br />
2 Erase the data.<br />
Use / to select Yes, then press ENTER.<br />
OK to erase additional<br />
BDMV data?<br />
Do not turn power off<br />
during erasure.<br />
Yes<br />
No<br />
1 Select and set Network Display Network Configuration<br />
Next Screen.<br />
Use / to select, then press ENTER.<br />
The MAC address, IP address, subnet mask, default gateway and<br />
DNS server (primary and secondary) settings are displayed.<br />
49<br />
En
06<br />
Software updating<br />
The software of the player can be updated by connecting it to the<br />
Internet using a LAN cable.<br />
Before updating the software, make sure that you have connected<br />
the player to the network and made the necessary settings (pages 18<br />
and 48).<br />
Caution<br />
• Do not unplug the power cord during software updating.<br />
Otherwise, the updating will be aborted and malfunction may<br />
occur with the player.<br />
• There are two processes for software updating, downloading<br />
and updating. Both processes may take a certain period of time.<br />
• Depending on the Internet connection conditions, downloading<br />
may take a long time.<br />
• Other operations are defeated during software updating.<br />
Furthermore updating process cannot be canceled.<br />
• When the front panel display is off, turn it on with FL DIMMER.<br />
When updating the player’s software with the front panel display<br />
off, do not unplug the power cord until the FL OFF indicator<br />
turns off.<br />
Stretching widescreen pictures<br />
vertically (Anamorphic Zoom)<br />
Some discs include movies, etc., with a vertical-to-horizontal picture<br />
rate of 2.35:1 recorded as 16:9 pictures with black bars at the top and<br />
bottom of the screen. Turn this function on when projecting this type<br />
of picture with a front projector equipped with an anamorphic lens.<br />
1 During playback, display the TOOLS menu.<br />
Press TOOLS.<br />
HOME MEDIA<br />
GALLERY<br />
TOP MENU<br />
2 Select and set Anamorphic Zoom.<br />
Use / to select, then use / to change the setting.<br />
TOP MENU<br />
DISPLAY<br />
ENTER<br />
POPUP MENU<br />
MENU<br />
TOOLS<br />
TOOLS<br />
Note<br />
•Steps 1 to 2 are the operations performed by the user (they are<br />
intended to download the software from the Internet).<br />
•Steps 3 to 5 are the operations performed (automatically) by the<br />
player (they are intended to update the software).<br />
HOME<br />
MENU<br />
ENTER<br />
RETURN<br />
1 Select and set Options Software Update Start.<br />
Use /// to select, then press ENTER.<br />
• If the player is already running the latest software, the message<br />
“The player’s software is up to date and does not need updating.”<br />
is displayed.<br />
2 Select and set Yes.<br />
Use / to select Yes, then press ENTER.<br />
OK to start downloading<br />
new software?<br />
Current version X.XX<br />
Latest version X.XX<br />
Downloading takes<br />
about XX minutes.<br />
Yes<br />
• The help menu is displayed if the player cannot connect to the<br />
Internet. Check the connections and settings (pages 18 and 48).<br />
3 Downloading of the software start.<br />
The software download status is displayed on the screen.<br />
• Depending on the Internet connection conditions, software<br />
downloading may take a certain period of time.<br />
4 Updating starts.<br />
The front panel display shows messages such as “DATA CHECK”,<br />
“WRT SYS1”, “WRT DRV” and “WRT FLC”.<br />
• Software updating may take a certain period of time.<br />
No<br />
BD <strong>PLAYER</strong><br />
TOOLS<br />
• On – 16:9 pictures are stretched vertically, cropping the black<br />
bars at the top and bottom of the 2.35:1 picture for output.<br />
• Off – 16:9 pictures are output as such, without stretching them<br />
vertically.<br />
Note<br />
• This is valid when TV Aspect Ratio is set to 16:9 (Widescreen)<br />
(page 42).<br />
•When set to On, the top and bottom of 16:9 pictures with no<br />
black bars at the top and bottom are also cropped.<br />
• Even when set to On, the vertical stretch is canceled and the<br />
original picture with the black bars reappears temporarily when<br />
the Video Adjust screen is displayed. For other operation<br />
screens, the top and bottom may be cropped, making the screen<br />
hard to see.<br />
To close the TOOLS menu<br />
Press TOOLS or RETURN.<br />
Output Video Resolution<br />
Play Mode<br />
Anamorphic Zoom:Off On<br />
50<br />
En<br />
5 Updating completes.<br />
The front panel display shows “DOWNLOAD OK” and the player<br />
turns off automatically.
Eliminating extraneous noise to<br />
play with high quality sound (Pure<br />
Audio)<br />
This function suppresses unnecessary signals to reduce noise and<br />
output high quality audio signals.<br />
The Pure Audio function includes the following modes:<br />
• Mode 1 – Select this when listening to audio CDs and audio<br />
files. This mode also provides higher quality sound than Mode<br />
2 when playing only the audio portion of such video sources as<br />
BDs, DVDs and video files.<br />
• Mode 2 – Select this when also viewing the video portion of<br />
such video sources as BDs, DVDs and video files.<br />
• Off – Select this to disable the Pure Audio function.<br />
Caution<br />
•When Mode 1 or Mode 2 is set, the operation is as described<br />
below.<br />
– When Mode 1 is set, only audio signals are output during<br />
playback (except when an operation is being performed and<br />
the disc menus are being displayed).<br />
– Video signals are only output from the output terminal<br />
selected with VIDEO SELECT (page 23).<br />
– Audio signals are only output from the output terminal set at<br />
Output Terminal (page 42).<br />
– The player’s front panel display turns off during playback<br />
(except when an operation is being performed and the disc<br />
menus are being displayed).<br />
– The PURE AUDIO indicator on the player’s front panel lights.<br />
Switching the Pure Audio Mode<br />
Restoring all the settings to the<br />
factory default settings<br />
1 Check that the player’s power is turned on.<br />
2 When a disc is playing, press to stop playback.<br />
Eject the disc from the player.<br />
3 While pressing , press STANDBY/ON.<br />
Operate using the buttons on the player’s front panel.<br />
Note<br />
• After restoring all the settings to the factory default settings, use<br />
Setup Navigator to reset the player (page 19).<br />
• When all the settings are restored to the factory defaults, all the<br />
data for the secondary video (Picture-in-Picture), secondary<br />
audio, bookmarks, etc., is erased.<br />
06<br />
<br />
Press PURE AUDIO on the front panel.<br />
The currently set Pure Audio mode is indicated on the player’s front<br />
panel display.<br />
The Pure Audio mode changes each time the button is pressed.<br />
“PURE MODE1” “PURE MODE2” “PURE OFF”<br />
Note<br />
• The Pure Audio mode cannot be changed during playback.<br />
51<br />
En
06<br />
About the audio output settings<br />
The audio signals that are output differ according to the audio format recorded on the disc and the player’s settings. Check on the table<br />
below.<br />
Caution<br />
•When ANALOG AUDIO is selected at Output Terminal, no audio signals are output from the HDMI OUT or DIGITAL OUT terminals<br />
(page 42).<br />
•When HDMI MAIN or DIGITAL AUDIO is selected at Output Terminal, linear PCM audio signals (2 channels) are output from all<br />
terminals other than the ones selected at Output Terminal (page 42).<br />
•The HDMI OUT (SUB) terminal outputs linear PCM 2-channel audio signals.<br />
Audio format<br />
BD-ROM Dolby Digital<br />
BD-R/<br />
-RE<br />
DVD-<br />
Video<br />
DVD (VR<br />
format)<br />
AUDIO OUT (7.1 ch) terminals DIGITAL OUT terminals HDMI OUT (MAIN) terminal<br />
2ch 1<br />
Converted to 2-<br />
channel audio<br />
Multi-channel 1<br />
5.1-channel audio<br />
Converted to<br />
linear PCM audio 2<br />
Converted to 2-<br />
channel audio<br />
Not converted to<br />
linear PCM audio 3<br />
PCM 4<br />
Auto 4<br />
5.1-channel audio Dolby Digital 6,7<br />
Dolby Digital Plus<br />
7.1-channel audio<br />
Dolby Digital 5 7.1-channel audio<br />
Dolby TrueHD 7.1-channel audio 8<br />
DTS Digital<br />
Surround<br />
DTS-HD High<br />
Resolution Audio<br />
DTS-HD Master<br />
Audio<br />
Linear PCM<br />
5.1-channel audio<br />
5.1-channel audio 11<br />
7.1-channel audio<br />
DTS Digital<br />
Surround 5<br />
Converted to 2-<br />
channel audio<br />
5.1-channel audio<br />
5.1-channel audio 11<br />
Dolby Digital<br />
Plus 6,7<br />
Dolby TrueHD 6,7,9<br />
DTS Digital<br />
Surround 6,10<br />
DTS-HD High<br />
Resolution<br />
Audio 6,8,10<br />
DTS-HD Master<br />
Audio 6,10,12<br />
7.1-channel audio 8 7.1-channel audio 8<br />
Dolby Digital Converted to 2-<br />
Converted to 2- Dolby Digital<br />
Dolby Digital 7<br />
5.1-channel audio<br />
5.1-channel audio<br />
MPEG-2 AAC channel audio<br />
channel audio MPEG-2 AAC MPEG-2 AAC<br />
MPEG<br />
2-channel audio<br />
Linear PCM<br />
Dolby Digital<br />
Dolby Digital<br />
Dolby Digital 7<br />
Converted to 2-<br />
Converted to 2-<br />
5.1-channel audio<br />
5.1-channel audio<br />
channel audio<br />
channel audio<br />
DTS Digital<br />
Surround<br />
MPEG<br />
Linear PCM<br />
Dolby Digital Converted to 2-<br />
channel audio<br />
MPEG<br />
Linear PCM<br />
5.1-channel audio<br />
Converted to 2-<br />
channel audio<br />
2-channel audio<br />
2-channel audio<br />
DTS Digital<br />
Surround<br />
DTS Digital<br />
Surround 10<br />
Dolby Digital 5.1-channel audio Dolby Digital 7<br />
52<br />
En<br />
1. When Audio Output Mode is set to 2 Channel or Multi-channel (page 43).<br />
2. When Dolby Digital Out is set to Dolby Digital PCM, DTS Out is set to DTS PCM, or AAC Out is set to AAC PCM (page 42).<br />
3. When Dolby Digital Out is set to Dolby Digital 1/Dolby Digital 2, DTS Out is set to DTS 1/DTS 2 or AAC Out is set to AAC (page 42).<br />
4. When HDMI Audio Out is set to PCM or Auto (page 43).<br />
5. When outputting Dolby Digital or DTS Digital Surround bitstream with settings of Dolby Digital 2 at Dolby Digital Out, DTS 2 at DTS Out, the secondary audio and<br />
interactive audio signals are not mixed for output.<br />
6. When outputting the bitstream of Dolby TrueHD, Dolby Digital Plus, Dolby Digital, DTS-HD Master Audio, DTS-HD High Resolution Audio or DTS Digital Surround, the<br />
secondary audio and interactive audio signals are not mixed.<br />
7. If the connected HDMI device is not compatible with Dolby TrueHD or Dolby Digital Plus bitstream, the signals are output in linear PCM (7.1 channels) or Dolby Digital<br />
bitstream.<br />
If the connected HDMI device is not compatible with Dolby Digital bitstream, the signals are output in linear PCM (2 channels).<br />
8. When the output video resolution is set to 576i/480i or 576p/480p, the signals may be output in linear PCM (2 channels), depending on HDMI High Speed<br />
Transmission setting and/or the connected HDMI device (page 13).<br />
9. When the output video resolution is set to 576i/480i or 576p/480p, the signals may be output in linear PCM (2 channels) or Dolby Digital bitstream, depending on HDMI<br />
High Speed Transmission setting and/or the connected HDMI device (page 13).<br />
10. If the connected HDMI device is not compatible with DTS-HD Master Audio or DTS-HD High Resolution Audio, the signals are output in DTS Digital Surround<br />
bitstream.<br />
If the connected HDMI device is not compatible with DTS Digital Surround bitstream, the signals are output in linear PCM (2 channels).<br />
11. DTS Digital Surround signals converted to linear PCM audio signals are output.<br />
12. When the output video resolution is set to 576i/480i or 576p/480p, the signals may be output in linear PCM (2 channels) or DTS Digital Surround bitstream, depending<br />
on HDMI High Speed Transmission setting and/or the connected HDMI device (page 13).
Note<br />
• Only compatible with 7.1-channel surround back. 6.1-channel surround back is output in 7.1 channels. In other cases, output as audio<br />
signals of 5.1-channels or less.<br />
• When outputting linear PCM audio signals, if the number of compatible channels of the connected HDMI device is lower, the signals<br />
are output with the number of channels for which the device is compatible.<br />
• The audio signals output from the HDMI OUT (SUB) and DIGITAL OUT terminals have a sampling frequency of 48 kHz (44.1 kHz for<br />
audio CDs).<br />
Language Code Table and Country/Area Code Table<br />
06<br />
Language Code Table<br />
Language name, language code, input code<br />
Abkhazian, ab/abk, 0102<br />
Frisian, fy/fry, 0625<br />
Afar, aa/aar, 0101<br />
Galician, gl/glg, 0712<br />
Afrikaans, af/afr, 0106<br />
Georgian, ka/kat, 1101<br />
Albanian, sq/sqi, 1917<br />
German, de/deu, 0405<br />
Amharic, am/amh, 0113<br />
Greek, el/ell, 0512<br />
Arabic, ar/ara, 0118<br />
Guarani, gn/grn, 0714<br />
Armenian, hy/hye, 0825<br />
Gujarati, gu/guj, 0721<br />
Assamese, as/asm, 0119<br />
Hausa, ha/hau, 0801<br />
Aymara, ay/aym, 0125<br />
Hebrew, iw/heb, 0923<br />
Azerbaijani, az/aze, 0126<br />
Hindi, hi/hin, 0809<br />
Bashkir, ba/bak, 0201<br />
Hungarian, hu/hun, 0821<br />
Basque, eu/eus, 0521<br />
Icelandic, is/isl, 0919<br />
Belarusian, be/bel, 0205<br />
Indonesian, in/ind, 0914<br />
Bengali, bn/ben, 0214<br />
Interlingua, ia/ina, 0901<br />
Bihari, bh/bih, 0208<br />
Interlingue, ie/ile, 0905<br />
Bislama, bi/bis, 0209<br />
Inupiaq, ik/ipk, 0911<br />
Breton, br/bre, 0218<br />
Irish, ga/gle, 0701<br />
Bulgarian, bg/bul, 0207<br />
Italian, it/ita, 0920<br />
Burmese, my/mya, 1325<br />
Japanese, ja/jpn, 1001<br />
Catalan, ca/cat, 0301<br />
Javanese, jw/jav, 1023<br />
Chinese, zh/zho, 2608<br />
Kalaallisut, kl/kal, 1112<br />
Corsican, co/cos, 0315<br />
Kannada, kn/kan, 1114<br />
Croatian, hr/hrv, 0818<br />
Kashmiri, ks/kas, 1119<br />
Czech, cs/ces, 0319<br />
Kazakh, kk/kaz, 1111<br />
Danish, da/dan, 0401<br />
Khmer, km/khm, 1113<br />
Dutch, nl/nld, 1412<br />
Kinyarwanda, rw/kin, 1823<br />
Dzongkha, dz/dzo, 0426<br />
Kirghiz, ky/kir, 1125<br />
English, en/eng, 0514<br />
Korean, ko/kor, 1115<br />
Esperanto, eo/epo, 0515<br />
Kurdish, ku/kur, 1121<br />
Estonian, et/est, 0520<br />
Lao, lo/lao, 1215<br />
Finnish, fi/fin, 0609<br />
Latin, la/lat, 1201<br />
Fijian, fj/fij, 0610<br />
Latvian, lv/lav, 1222<br />
Faroese, fo/fao, 0615<br />
Lingala, ln/lin, 1214<br />
French, fr/fra, 0618<br />
Lithuanian, lt/lit, 1220<br />
Country/Area Code Table<br />
Country/Area name, Country/Area code, input code<br />
Anguilla, ai, 0109<br />
Dominican Republic, do, 0415<br />
Antigua and Barbuda, ag, 0107 Estonia, ee, 0505<br />
Argentina, ar, 0118<br />
Finland, fi, 0609<br />
Armenia, am, 0113<br />
France, fr, 0618<br />
Australia, au, 0121<br />
Georgia, ge, 0705<br />
Austria, at, 0120<br />
Germany, de, 0405<br />
Azerbaijan, az, 0126<br />
Greece, gr, 0718<br />
Bahamas, bs, 0219<br />
Greenland, gl, 0712<br />
Barbados, bb, 0202<br />
Grenada, gd, 0704<br />
Belarus, by, 0225<br />
Guyana, gy, 0725<br />
Belgium, be, 0205<br />
Haiti, ht, 0820<br />
Belize, bz, 0226<br />
Hong Kong, hk, 0811<br />
Bermuda, bm, 0213<br />
Hungary, hu, 0821<br />
Brazil, br, 0218<br />
Iceland, is, 0919<br />
Bulgaria, bg, 0207<br />
India, in, 0914<br />
Canada, ca, 0301<br />
Indonesia, id, 0904<br />
Cayman Islands, ky, 1125<br />
Ireland, ie, 0905<br />
Chile, cl, 0312<br />
Israel, il, 0912<br />
China, cn, 0314<br />
Italy, it, 0920<br />
Colombia, co, 0315<br />
Jamaica, jm, 1013<br />
Croatia, hr, 0818<br />
Japan, jp, 1016<br />
Cyprus, cy, 0325<br />
Kazakhstan, kz, 1126<br />
Czech Republic, cz, 0326<br />
Korea, Republic of, kr, 1118<br />
Denmark, dk, 0411<br />
Kyrgyzstan, kg, 1107<br />
Dominica, dm, 0413<br />
Latvia, lv, 1222<br />
Macedonian, mk/mkd, 1311<br />
Malagasy, mg/mlg, 1307<br />
Malay, ms/msa, 1319<br />
Malayalam, ml/mal, 1312<br />
Maltese, mt/mlt, 1320<br />
Maori, mi/mri, 1309<br />
Marathi, mr/mar, 1318<br />
Mongolian, mn/mon, 1314<br />
Moldavian, mo/mol, 1315<br />
Nauru, na/nau, 1401<br />
Nepali, ne/nep, 1405<br />
Norwegian, no/nor, 1415<br />
Occitan, oc/oci, 1503<br />
Oriya, or/ori, 1518<br />
Oromo, om/orm, 1513<br />
Panjabi, pa/pan, 1601<br />
Persian, fa/fas, 0601<br />
Polish, pl/pol, 1612<br />
Portuguese, pt/por, 1620<br />
Pushto, ps/pus, 1619<br />
Quechua, qu/que, 1721<br />
Rhaeto-Romance, rm/roh, 1813<br />
Rundi, rn/run, 1814<br />
Russian, ru/rus, 1821<br />
Romanian, ro/ron, 1815<br />
Samoan, sm/smo, 1913<br />
Sango, sg/sag, 1907<br />
Sanskrit, sa/san, 1901<br />
Scots-Gaelic, gd/gla, 0704<br />
Serbian, sr/srp, 1918<br />
Serbo-Croatian, sh/scr, 1908<br />
Shona, sn/sna, 1914<br />
Sindhi, sd/snd, 1904<br />
Sinhalese, si/sin, 1909<br />
Liechtenstein, li, 1209<br />
Lithuania, lt, 1220<br />
Luxembourg, lu, 1221<br />
Macedonia, the Former Yugoslav<br />
Republic of, mk, 1311<br />
Malaysia, my, 1325<br />
Malta, mt, 1320<br />
Mexico, mx, 1324<br />
Moldova, Republic of, md, 1304<br />
Monaco, mc, 1303<br />
Montserrat, ms, 1319<br />
Netherlands, nl, 1412<br />
New Zealand, nz, 1426<br />
Norway, no, 1415<br />
Pakistan, pk, 1611<br />
Peru, pe, 1605<br />
Philippines, ph, 1608<br />
Poland, pl, 1612<br />
Portugal, pt, 1620<br />
Puerto Rico, pr, 1618<br />
Romania, ro, 1815<br />
Russian Federation, ru, 1821<br />
Saint Kitts and Nevis, kn, 1114<br />
Saint Lucia, lc, 1203<br />
Saint Vincent and the Grenadines, vc, 2203<br />
Slovak, sk/slk, 1911<br />
Slovenian, sl/slv, 1912<br />
Somali, so/som, 1915<br />
Sotho, Southern, st/sot, 1920<br />
Spanish, es/spa, 0519<br />
Sundanese, su/sun, 1921<br />
Swahili, sw/swa, 1923<br />
Swati, ss/ssw, 1919<br />
Swedish, sv/swe, 1922<br />
Tagalog, tl/tgl, 2012<br />
Tajik, tg/tgk, 2007<br />
Tamil, ta/tam, 2001<br />
Tatar, tt/tat, 2020<br />
Telugu, te/tel, 2005<br />
Thai, th/tha, 2008<br />
Tibetan, bo/bod, 0215<br />
Tigrinya, ti/tir, 2009<br />
Tonga (Tonga Islands), to/ton, 2015<br />
Tsonga, ts/tso, 2019<br />
Tswana, tn/tsn, 2014<br />
Turkmen, tk/tuk, 2011<br />
Turkish, tr/tur, 2018<br />
Twi, tw/twi, 2023<br />
Ukrainian, uk/ukr, 2111<br />
Urdu, ur/urd, 2118<br />
Uzbek, uz/uzb, 2126<br />
Vietnamese, vi/vie, 2209<br />
Volapük, vo/vol, 2215<br />
Welsh, cy/cym, 0325<br />
Wolof, wo/wol, 2315<br />
Xhosa, xh/xho, 2408<br />
Yiddish, ji/yid, 1009<br />
Yoruba, yo/yor, 2515<br />
Zulu, zu/zul, 2621<br />
San Marino, sm, 1913<br />
Singapore, sg, 1907<br />
Slovakia, sk, 1911<br />
Slovenia, si, 1909<br />
Spain, es, 0519<br />
Suriname, sr, 1918<br />
Sweden, se, 1905<br />
Switzerland, ch, 0308<br />
Taiwan, Province of China, tw, 2023<br />
Tajikistan, tj, 2010<br />
Thailand, th, 2008<br />
Trinidad and Tobago, tt, 2020<br />
Tunisia, tn, 2014<br />
Turkey, tr, 2018<br />
Turkmenistan, tm, 2013<br />
Turks and Caicos Islands, tc, 2003<br />
Ukraine, ua, 2101<br />
United Kingdom, gb, 0702<br />
United States, us, 2119<br />
Uruguay, uy, 2125<br />
Uzbekistan, uz, 2126<br />
Venezuela, ve, 2205<br />
Virgin Islands, British, vg, 2207<br />
53<br />
En
07<br />
Chapter 7<br />
Additional information<br />
54<br />
En<br />
Licenses<br />
The licenses for the software used on this player are shown below.<br />
libxml2<br />
The MIT License<br />
Copyright © <br />
Permission is hereby granted, free of charge, to any person obtaining a copy of this<br />
software and associated documentation files (the “Software”), to deal in the<br />
Software without restriction, including without limitation the rights to use, copy,<br />
modify, merge, publish, distribute, sublicense, and/or sell copies of the Software,<br />
and to permit persons to whom the Software is furnished to do so, subject to the<br />
following conditions:<br />
The above copyright notice and this permission notice shall be included in all<br />
copies or substantial portions of the Software.<br />
THE SOFTWARE IS PROVIDED “AS IS”, WITHOUT WARRANTY OF ANY KIND,<br />
EXPRESS OR IMPLIED, INCLUDING BUT NOT LIMITED TO THE WARRANTIES OF<br />
MERCHANTABILITY, FITNESS FOR A PARTICULAR PURPOSE AND<br />
NONINFRINGEMENT. IN NO EVENT SHALL THE AUTHORS OR COPYRIGHT<br />
HOLDERS BE LIABLE FOR ANY CLAIM, DAMAGES OR OTHER LIABILITY,<br />
WHETHER IN AN ACTION OF CONTRACT, TORT OR OTHERWISE, ARISING FROM,<br />
OUT OF OR IN CONNECTION WITH THE SOFTWARE OR THE USE OR OTHER<br />
DEALINGS IN THE SOFTWARE.<br />
OpenSSL<br />
The OpenSSL toolkit stays under a dual license, i.e. both the conditions of the<br />
OpenSSL License and the original SSLeay license apply to the toolkit.<br />
See below for the actual license texts. Actually both licenses are BSD-style Open<br />
Source licenses. In case of any license issues related to OpenSSL please contact<br />
openssl-core@openssl.org.<br />
OpenSSL License<br />
Copyright © 1998-2007 The OpenSSL Project. All rights reserved.<br />
Redistribution and use in source and binary forms, with or without modification,<br />
are permitted provided that the following conditions are met:<br />
1. Redistributions of source code must retain the above copyright notice, this list<br />
of conditions and the following disclaimer.<br />
2. Redistributions in binary form must reproduce the above copyright notice, this<br />
list of conditions and the following disclaimer in the documentation and/or<br />
other materials provided with the distribution.<br />
3. All advertising materials mentioning features or use of this software must<br />
display the following acknowledgment: “This product includes software<br />
developed by the OpenSSL Project for use in the OpenSSL Toolkit. (http://<br />
www.openssl.org/)”<br />
4. The names “OpenSSL Toolkit” and “OpenSSL Project” must not be used to<br />
endorse or promote products derived from this software without prior written<br />
permission. For written permission, please contact opensslcore@openssl.org.<br />
5. Products derived from this software may not be called “OpenSSL” nor may<br />
“OpenSSL” appear in their names without prior written permission of the<br />
OpenSSL Project.<br />
6. Redistributions of any form whatsoever must retain the following<br />
acknowledgment: “This product includes software developed by the OpenSSL<br />
Project for use in the OpenSSL Toolkit (http://www.openssl.org/)”<br />
THIS SOFTWARE IS PROVIDED BY THE OpenSSL PROJECT “AS IS” AND ANY<br />
EXPRESSED OR IMPLIED WARRANTIES, INCLUDING, BUT NOT LIMITED TO, THE<br />
IMPLIED WARRANTIES OF MERCHANTABILITY AND FITNESS FOR A<br />
PARTICULAR PURPOSE ARE DISCLAIMED. IN NO EVENT SHALL THE OpenSSL<br />
PROJECT OR ITS CONTRIBUTORS BE LIABLE FOR ANY DIRECT, INDIRECT,<br />
INCIDENTAL, SPECIAL, EXEMPLARY, OR CONSEQUENTIAL DAMAGES<br />
(INCLUDING, BUT NOT LIMITED TO, PROCUREMENT OF SUBSTITUTE GOODS OR<br />
SERVICES; LOSS OF USE, DATA, OR PROFITS; OR BUSINESS INTERRUPTION)<br />
HOWEVER CAUSED AND ON ANY THEORY OF LIABILITY, WHETHER IN<br />
CONTRACT, STRICT LIABILITY, OR TORT (INCLUDING NEGLIGENCE OR<br />
OTHERWISE) ARISING IN ANY WAY OUT OF THE USE OF THIS SOFTWARE, EVEN<br />
IF ADVISED OF THE POSSIBILITY OF SUCH DAMAGE.<br />
This product includes cryptographic software written by Eric Young<br />
(eay@cryptsoft.com).This product includes software written by Tim Hudson<br />
(tjh@cryptsoft.com).<br />
Original SSLeay License<br />
Copyright © 1995-1998 Eric Young (eay@cryptsoft.com)<br />
All rights reserved.<br />
This package is an SSL implementation written by Eric Young<br />
(eay@cryptsoft.com). The implementation was written so as to conform with<br />
Netscapes SSL.<br />
This library is free for commercial and non-commercial use as long as the following<br />
conditions are aheared to. The following conditions apply to all code found in this<br />
distribution, be it the RC4, RSA, lhash, DES, etc., code; not just the SSL code. The<br />
SSL documentation included with this distribution is covered by the same<br />
copyright terms except that the holder is Tim Hudson (tjh@cryptsoft.com).<br />
Copyright remains Eric Young’s, and as such any Copyright notices in the code are<br />
not to be removed. If this package is used in a product, Eric Young should be given<br />
attribution as the author of the parts of the library used. This can be in the form of<br />
a textual message at program startup or in documentation (online or textual)<br />
provided with the package.<br />
Redistribution and use in source and binary forms, with or without modification,<br />
are permitted provided that the following conditions are met:<br />
1. Redistributions of source code must retain the copyright notice, this list of<br />
conditions and the following disclaimer.<br />
2. Redistributions in binary form must reproduce the above copyright notice, this<br />
list of conditions and the following disclaimer in the documentation and/or<br />
other materials provided with the distribution.<br />
3. All advertising materials mentioning features or use of this software must<br />
display the following acknowledgement: “This product includes cryptographic<br />
software written by Eric Young (eay@cryptsoft.com)”<br />
The word ‘cryptographic’ can be left out if the rouines from the library being<br />
used are not cryptographic related :-).<br />
4. If you include any Windows specific code (or a derivative thereof) from the<br />
apps directory (application code) you must include an acknowledgement:<br />
“This product includes software written by Tim Hudson (tjh@cryptsoft.com)”<br />
THIS SOFTWARE IS PROVIDED BY ERIC YOUNG “AS IS” AND ANY EXPRESS OR<br />
IMPLIED WARRANTIES, INCLUDING, BUT NOT LIMITED TO, THE IMPLIED<br />
WARRANTIES OF MERCHANTABILITY AND FITNESS FOR A PARTICULAR<br />
PURPOSE ARE DISCLAIMED. IN NO EVENT SHALL THE AUTHOR OR<br />
CONTRIBUTORS BE LIABLE FOR ANY DIRECT, INDIRECT, INCIDENTAL, SPECIAL,<br />
EXEMPLARY, OR CONSEQUENTIAL DAMAGES (INCLUDING, BUT NOT LIMITED<br />
TO, PROCUREMENT OF SUBSTITUTE GOODS OR SERVICES; LOSS OF USE,<br />
DATA, OR PROFITS; OR BUSINESS INTERRUPTION) HOWEVER CAUSED AND<br />
ON ANY THEORY OF LIABILITY, WHETHER IN CONTRACT, STRICT LIABILITY, OR<br />
TORT (INCLUDING NEGLIGENCE OR OTHERWISE) ARISING IN ANY WAY OUT OF<br />
THE USE OF THIS SOFTWARE, EVEN IF ADVISED OF THE POSSIBILITY OF SUCH<br />
DAMAGE.<br />
The licence and distribution terms for any publically available version or derivative<br />
of this code cannot be changed. i.e. this code cannot simply be copied and put<br />
under another distribution licence [including the GNU Public Licence.]<br />
zlib<br />
This software is based in part on zlib see http://www.zlib.net for information.<br />
FreeType2<br />
The FreeType Project LICENSE<br />
2006-Jan-27 Copyright 1996-2002, 2006 by David Turner, Robert Wilhelm, and<br />
Werner Lemberg<br />
Introduction<br />
The FreeType Project is distributed in several archive packages; some of them may<br />
contain, in addition to the FreeType font engine, various tools and contributions<br />
which rely on, or relate to, the FreeType Project.<br />
This license applies to all files found in such packages, and which do not fall under<br />
their own explicit license. The license affects thus the FreeType font engine, the test<br />
programs, documentation and makefiles, at the very least.<br />
This license was inspired by the BSD, Artistic, and IJG (Independent JPEG Group)<br />
licenses, which all encourage inclusion and use of free software in commercial<br />
and freeware products alike. As a consequence, its main points are that:<br />
• We don’t promise that this software works. However, we will be interested in<br />
any kind of bug reports.(‘as is’ distribution)<br />
• You can use this software for whatever you want, in parts or full form, without<br />
having to pay us.(‘royalty-free’ usage)<br />
• You may not pretend that you wrote this software. If you use it, or only parts of<br />
it, in a program, you must acknowledge somewhere in your documentation<br />
that you have used the FreeType code.(‘credits’)
We specifically permit and encourage the inclusion of this software, with or<br />
without modifications, in commercial products. We disclaim all warranties<br />
covering The FreeType Project and assume no liability related to The FreeType<br />
Project.<br />
Finally, many people asked us for a preferred form for a credit/disclaimer to use in<br />
compliance with this license. We thus encourage you to use the following text:<br />
Portions of this software are copyright © The FreeType Project<br />
(www.freetype.org). All rights reserved.<br />
Please replace with the value from the FreeType version you actually use.<br />
Legal Terms<br />
0. Definitions<br />
Throughout this license, the terms ‘package’, ‘FreeType Project’, and<br />
‘FreeType archive’ refer to the set of files originally distributed by the authors<br />
(David Turner, Robert Wilhelm, and Werner Lemberg) as the ‘FreeType<br />
Project’, be they named as alpha, beta or final release.<br />
‘You’ refers to the licensee, or person using the project, where ‘using’ is a<br />
generic term including compiling the project’s source code as well as linking<br />
it to form a ‘program’ or ‘executable’. This program is referred to as ‘a program<br />
using the FreeType engine’.<br />
This license applies to all files distributed in the original FreeType Project,<br />
including all source code, binaries and documentation, unless otherwise<br />
stated in the file in its original, unmodified form as distributed in the original<br />
archive. If you are unsure whether or not a particular file is covered by this<br />
license, you must contact us to verify this.<br />
The FreeType Project is copyright (C) 1996-2000 by David Turner, Robert<br />
Wilhelm, and Werner Lemberg. All rights reserved except as specified below.<br />
1. No Warranty<br />
THE FREETYPE PROJECT IS PROVIDED ‘AS IS’ WITHOUT WARRANTY OF ANY<br />
KIND, EITHER EXPRESS OR IMPLIED, INCLUDING, BUT NOT LIMITED TO,<br />
WARRANTIES OF MERCHANTABILITY AND FITNESS FOR A PARTICULAR<br />
PURPOSE. IN NO EVENT WILL ANY OF THE AUTHORS OR COPYRIGHT<br />
HOLDERS BE LIABLE FOR ANY DAMAGES CAUSED BY THE USE OR THE<br />
INABILITY TO USE, OF THE FREETYPE PROJECT.<br />
2. Redistribution<br />
This license grants a worldwide, royalty-free, perpetual and irrevocable right<br />
and license to use, execute, perform, compile, display, copy, create derivative<br />
works of, distribute and sublicense the FreeType Project (in both source and<br />
object code forms) and derivative works thereof for any purpose; and to<br />
authorize others to exercise some or all of the rights granted herein, subject to<br />
the following conditions:<br />
• Redistribution of source code must retain this license file (‘FTL.TXT’)<br />
unaltered; any additions, deletions or changes to the original files must<br />
be clearly indicated in accompanying documentation. The copyright<br />
notices of the unaltered, original files must be preserved in all copies of<br />
source files.<br />
• Redistribution in binary form must provide a disclaimer that states that<br />
the software is based in part of the work of the FreeType Team, in the<br />
distribution documentation. We also encourage you to put an URL to the<br />
FreeType web page in your documentation, though this isn’t mandatory.<br />
These conditions apply to any software derived from or based on the FreeType<br />
Project, not just the unmodified files. If you use our work, you must<br />
acknowledge us. However, no fee need be paid to us.<br />
3. Advertising<br />
Neither the FreeType authors and contributors nor you shall use the name of<br />
the other for commercial, advertising, or promotional purposes without<br />
specific prior written permission.<br />
We suggest, but do not require, that you use one or more of the following<br />
phrases to refer to this software in your documentation or advertising<br />
materials: ‘FreeType Project’, ‘FreeType Engine’, ‘FreeType library’, or<br />
‘FreeType Distribution’.<br />
As you have not signed this license, you are not required to accept it. However,<br />
as the FreeType Project is copyrighted material, only this license, or another<br />
one contracted with the authors, grants you the right to use, distribute, and<br />
modify it. Therefore, by using, distributing, or modifying the FreeType Project,<br />
you indicate that you understand and accept all the terms of this license.<br />
4. Contacts<br />
There are two mailing lists related to FreeType:<br />
• freetype@nongnu.org<br />
<strong>Disc</strong>usses general use and applications of FreeType, as well as future and<br />
wanted additions to the library and distribution. If you are looking for<br />
support, start in this list if you haven’t found anything to help you in the<br />
documentation.<br />
• freetype-devel@nongnu.org<br />
<strong>Disc</strong>usses bugs, as well as engine internals, design issues, specific<br />
licenses, porting, etc.<br />
Our home page can be found at<br />
http://www.freetype.org<br />
libpng<br />
COPYRIGHT NOTICE, DISCLAIMER, and LICENSE:<br />
If you modify libpng you may insert additional notices immediately following this<br />
sentence.<br />
libpng versions 1.2.6, August 15, 2004, through 1.2.26, April 2, 2008, are Copyright<br />
© 2004, 2006-2008 Glenn Randers-Pehrson, and are distributed according to the<br />
same disclaimer and license as libpng-1.2.5 with the following individual added to<br />
the list of Contributing Authors<br />
Cosmin Truta<br />
libpng versions 1.0.7, July 1, 2000, through 1.2.5 - October 3, 2002, are Copyright ©<br />
2000-2002 Glenn Randers-Pehrson, and are distributed according to the same<br />
disclaimer and license as libpng-1.0.6 with the following individuals added to the<br />
list of Contributing Authors<br />
Simon-Pierre Cadieux<br />
Eric S. Raymond<br />
Gilles Vollant<br />
and with the following additions to the disclaimer:<br />
There is no warranty against interference with your enjoyment of the library or<br />
against infringement. There is no warranty that our efforts or the library will<br />
fulfill any of your particular purposes or needs. This library is provided with all<br />
faults, and the entire risk of satisfactory quality, performance, accuracy, and<br />
effort is with the user.<br />
libpng versions 0.97, January 1998, through 1.0.6, March 20, 2000, are Copyright ©<br />
1998, 1999 Glenn Randers-Pehrson, and are distributed according to the same<br />
disclaimer and license as libpng-0.96, with the following individuals added to the<br />
list of Contributing Authors:<br />
Tom Lane<br />
Glenn Randers-Pehrson<br />
Willem van Schaik<br />
libpng versions 0.89, June 1996, through 0.96, May 1997, are Copyright © 1996,<br />
1997 Andreas Dilger Distributed according to the same disclaimer and license as<br />
libpng-0.88, with the following individuals added to the list of Contributing Authors:<br />
John Bowler<br />
Kevin Bracey<br />
Sam Bushell<br />
Magnus Holmgren<br />
Greg Roelofs<br />
Tom Tanner<br />
libpng versions 0.5, May 1995, through 0.88, January 1996, are Copyright © 1995,<br />
1996 Guy Eric Schalnat, Group 42, Inc.<br />
For the purposes of this copyright and license, “Contributing Authors” is defined as<br />
the following set of individuals:<br />
Andreas Dilger<br />
Dave Martindale<br />
Guy Eric Schalnat<br />
Paul Schmidt<br />
Tim Wegner<br />
The PNG Reference Library is supplied “AS IS”. The Contributing Authors and<br />
Group 42, Inc. disclaim all warranties, expressed or implied, including, without<br />
limitation, the warranties of merchantability and of fitness for any purpose. The<br />
Contributing Authors and Group 42, Inc. assume no liability for direct, indirect,<br />
incidental, special, exemplary, or consequential damages, which may result from<br />
the use of the PNG Reference Library, even if advised of the possibility of such<br />
damage.<br />
Permission is hereby granted to use, copy, modify, and distribute this source code,<br />
or portions hereof, for any purpose, without fee, subject to the following<br />
restrictions:<br />
1. The origin of this source code must not be misrepresented.<br />
2. Altered versions must be plainly marked as such and must not be<br />
misrepresented as being the original source.<br />
3. This Copyright notice may not be removed or altered from any source or<br />
altered source distribution.<br />
The Contributing Authors and Group 42, Inc. specifically permit, without fee, and<br />
encourage the use of this source code as a component to supporting the PNG file<br />
format in commercial products. If you use this source code in a product,<br />
acknowledgment is not required but would be appreciated.<br />
A “png_get_copyright” function is available, for convenient use in “about” boxes<br />
and the like: printf(“%s”,png_get_copyright(NULL));Also, the PNG logo (in PNG<br />
format, of course) is supplied in the files “pngbar.png” and “pngbar.jpg (88x31) and<br />
“pngnow.png” (98x31).<br />
Libpng is OSI Certified Open Source Software. OSI Certified Open Source is a<br />
certification mark of the Open Source Initiative.<br />
Glenn Randers-Pehrson<br />
glennrp at users.sourceforge.net<br />
2-Apr-08<br />
07<br />
55<br />
En
07<br />
56<br />
En<br />
libjpg<br />
The Independent JPEG Group’s JPEG software<br />
README for release 6b of 27-Mar-1998<br />
This distribution contains the sixth public release of the Independent JPEG Group’s<br />
free JPEG software. You are welcome to redistribute this software and to use it for<br />
any purpose, subject to the conditions under LEGAL ISSUES, below.<br />
Serious users of this software (particularly those incorporating it into larger<br />
programs) should contact IJG at jpeg-info@uunet.uu.net to be added to our<br />
electronic mailing list. Mailing list members are notified of updates and have a<br />
chance to participate in technical discussions, etc.<br />
This software is the work of Tom Lane, Philip Gladstone, Jim Boucher, Lee Crocker,<br />
Julian Minguillon, Luis Ortiz, George Phillips, Davide Rossi, Guido Vollbeding, Ge’<br />
Weijers, and other members of the Independent JPEG Group.<br />
IJG is not affiliated with the official ISO JPEG standards committee.<br />
DOCUMENTATION ROADMAP<br />
This file contains the following sections:<br />
OVERVIEW<br />
General description of JPEG and the IJG software.<br />
LEGAL ISSUES<br />
Copyright, lack of warranty, terms of distribution.<br />
REFERENCES<br />
Where to learn more about JPEG.<br />
ARCHIVE LOCATIONS Where to find newer versions of this software.<br />
RELATED SOFTWARE Other stuff you should get.<br />
FILE FORMAT WARS Software *not* to get.<br />
TO DO<br />
Plans for future IJG releases.<br />
Other documentation files in the distribution are:<br />
User documentation:<br />
install.doc How to configure and install the IJG software.<br />
usage.doc Usage instructions for cjpeg, djpeg, jpegtran, rdjpgcom,<br />
and wrjpgcom.<br />
*.1 Unix-style man pages for programs (same info as usage.doc).<br />
wizard.doc Advanced usage instructions for JPEG wizards only.<br />
change.log Version-to-version change highlights.<br />
Programmer and internal documentation:<br />
libjpeg.doc How to use the JPEG library in your own programs.<br />
example.c Sample code for calling the JPEG library.<br />
structure.doc Overview of the JPEG library’s internal structure.<br />
filelist.doc Road map of IJG files.<br />
coderules.doc Coding style rules --- please read if you contribute code.<br />
Please read at least the files install.doc and usage.doc. Useful information can also<br />
be found in the JPEG FAQ (Frequently Asked Questions) article. See ARCHIVE<br />
LOCATIONS below to find out where to obtain the FAQ article.<br />
If you want to understand how the JPEG code works, we suggest reading one or<br />
more of the REFERENCES, then looking at the documentation files (in roughly the<br />
order listed) before diving into the code.<br />
OVERVIEW<br />
This package contains C software to implement JPEG image compression and<br />
decompression. JPEG (pronounced “jay-peg”) is a standardized compression<br />
method for full-color and g<strong>ray</strong>-scale images. JPEG is intended for compressing<br />
real-world scenes; line drawings, cartoons and other non-realistic images are not<br />
its strong suit. JPEG is lossy, meaning that the output image is not exactly identical<br />
to the input image. Hence you must not use JPEG if you have to have identical<br />
output bits. However, on typical photographic images, very good compression<br />
levels can be obtained with no visible change, and remarkably high compression<br />
levels are possible if you can tolerate a low-quality image. For more details, see the<br />
references, or just experiment with various compression settings.<br />
This software implements JPEG baseline, extended-sequential, and progressive<br />
compression processes. Provision is made for supporting all variants of these<br />
processes, although some uncommon parameter settings aren’t implemented yet.<br />
For legal reasons, we are not distributing code for the arithmetic-coding variants of<br />
JPEG; see LEGAL ISSUES. We have made no provision for supporting the<br />
hierarchical or lossless processes defined in the standard.<br />
We provide a set of library routines for reading and writing JPEG image files, plus<br />
two sample applications “cjpeg” and “djpeg”, which use the library to perform<br />
conversion between JPEG and some other popular image file formats. The library<br />
is intended to be reused in other applications.<br />
In order to support file conversion and viewing software, we have included<br />
considerable functionality beyond the bare JPEG coding/decoding capability; for<br />
example, the color quantization modules are not strictly part of JPEG decoding, but<br />
they are essential for output to colormapped file formats or colormapped displays.<br />
These extra functions can be compiled out of the library if not required for a<br />
particular application. We have also included jpegtran, a utility for lossless<br />
transcoding between different JPEG processes, and “rdjpgcom” and “wrjpgcom”,<br />
two simple applications for inserting and extracting textual comments in JFIF files.<br />
The emphasis in designing this software has been on achieving portability and<br />
flexibility, while also making it fast enough to be useful. In particular, the software<br />
is not intended to be read as a tutorial on JPEG. (See the REFERENCES section for<br />
introductory material.) Rather, it is intended to be reliable, portable, industrialstrength<br />
code. We do not claim to have achieved that goal in every aspect of the<br />
software, but we strive for it.<br />
We welcome the use of this software as a component of commercial products. No<br />
royalty is required, but we do ask for an acknowledgement in product<br />
documentation, as described under LEGAL ISSUES.<br />
LEGAL ISSUES<br />
In plain English:<br />
1. We don’t promise that this software works. (But if you find any bugs, please let<br />
us know!)<br />
2. You can use this software for whatever you want. You don’t have to pay us.<br />
3. You may not pretend that you wrote this software. If you use it in a program,<br />
you must acknowledge somewhere in your documentation that you’ve used<br />
the IJG code.<br />
In legalese:<br />
The authors make NO WARRANTY or representation, either express or implied,<br />
with respect to this software, its quality, accuracy, merchantability, or fitness for a<br />
particular purpose. This software is provided “AS IS”, and you, its user, assume the<br />
entire risk as to its quality and accuracy.<br />
This software is copyright © 1991-1998, Thomas G. Lane. All Rights Reserved<br />
except as specified below.<br />
Permission is hereby granted to use, copy, modify, and distribute this software (or<br />
portions thereof) for any purpose, without fee, subject to these conditions:<br />
(1) If any part of the source code for this software is distributed, then this<br />
README file must be included, with this copyright and no-warranty notice<br />
unaltered; and any additions, deletions, or changes to the original files must<br />
be clearly indicated in accompanying documentation.<br />
(2) If only executable code is distributed, then the accompanying documentation<br />
must state that “this software is based in part on the work of the Independent<br />
JPEG Group”.<br />
(3) Permission for use of this software is granted only if the user accepts full<br />
responsibility for any undesirable consequences; the authors accept NO<br />
LIABILITY for damages of any kind.<br />
These conditions apply to any software derived from or based on the IJG code, not<br />
just to the unmodified library. If you use our work, you ought to acknowledge us.<br />
Permission is NOT granted for the use of any IJG author's name or company name<br />
in advertising or publicity relating to this software or products derived from it. This<br />
software may be referred to only as “the Independent JPEG Group's software”.<br />
We specifically permit and encourage the use of this software as the basis of<br />
commercial products, provided that all warranty or liability claims are assumed by<br />
the product vendor.<br />
ansi2knr.c is included in this distribution by permission of L. Peter Deutsch, sole<br />
proprietor of its copyright holder, Aladdin Enterprises of Menlo Park, CA.<br />
ansi2knr.c is NOT covered by the above copyright and conditions, but instead by<br />
the usual distribution terms of the Free Software Foundation; principally, that you<br />
must include source code if you redistribute it. (See the file ansi2knr.c for full<br />
details.) However, since ansi2knr.c is not needed as part of any program generated<br />
from the IJG code, this does not limit you more than the foregoing paragraphs do.<br />
The Unix configuration script “configure” was produced with GNU Autoconf. It is<br />
copyright by the Free Software Foundation but is freely distributable. The same<br />
holds for its supporting scripts (config.guess, config.sub, ltconfig, ltmain.sh).<br />
Another support script, install-sh, is copyright by M.I.T. but is also freely<br />
distributable.<br />
It appears that the arithmetic coding option of the JPEG spec is covered by patents<br />
owned by IBM, AT&T, and Mitsubishi. Hence arithmetic coding cannot legally be<br />
used without obtaining one or more licenses. For this reason, support for<br />
arithmetic coding has been removed from the free JPEG software. (Since<br />
arithmetic coding provides only a marginal gain over the unpatented Huffman<br />
mode, it is unlikely that very many implementations will support it.) So far as we are<br />
aware, there are no patent restrictions on the remaining code.<br />
The IJG distribution formerly included code to read and write GIF files. To avoid<br />
entanglement with the Unisys LZW patent, GIF reading support has been removed<br />
altogether, and the GIF writer has been simplified to produce uncompressed GIFs.<br />
This technique does not use the LZW algorithm; the resulting GIF files are larger<br />
than usual, but are readable by all standard GIF decoders.<br />
We are required to state that<br />
“The Graphics Interchange Format(c) is the Copyright property of CompuServe<br />
Incorporated. GIF(sm) is a Service Mark property of CompuServe<br />
Incorporated.”<br />
REFERENCES<br />
We highly recommend reading one or more of these references before trying to<br />
understand the innards of the JPEG software.<br />
The best short technical introduction to the JPEG compression algorithm is<br />
Wallace, Gregory K. “The JPEG Still Picture Compression Standard”,<br />
Communications of the ACM, April 1991 (vol. 34 no. 4), pp. 30-44.<br />
(Adjacent articles in that issue discuss MPEG motion picture compression,<br />
applications of JPEG, and related topics.) If you don’t have the CACM issue handy,<br />
a PostScript file containing a revised version of Wallace’s article is available at ftp:/<br />
/ftp.uu.net/graphics/jpeg/wallace.ps.gz. The file (actually a preprint for an article<br />
that appeared in IEEE Trans. Consumer Electronics) omits the sample images that<br />
appeared in CACM, but it includes corrections and some added material. Note: the
Wallace article is copyright ACM and IEEE, and it may not be used for commercial<br />
purposes.<br />
A somewhat less technical, more leisurely introduction to JPEG can be found in<br />
The Data Compression Book by Mark Nelson and Jean-loup Gailly, published by<br />
M&T Books (New York), 2nd ed. 1996, ISBN 1-55851-434-1. This book provides good<br />
explanations and example C code for a multitude of compression methods<br />
including JPEG. It is an excellent source if you are comfortable reading C code but<br />
don’t know much about data compression in general. The book’s JPEG sample<br />
code is far from industrial-strength, but when you are ready to look at a full<br />
implementation, you’ve got one here...<br />
The best full description of JPEG is the textbook “JPEG Still Image Data<br />
Compression Standard” by William B. Pennebaker and Joan L. Mitchell, published<br />
by Van Nostrand Reinhold, 1993, ISBN 0-442-01272-1. Price US$59.95, 638 pp. The<br />
book includes the complete text of the ISO JPEG standards (DIS 10918-1 and draft<br />
DIS 10918-2). This is by far the most complete exposition of JPEG in existence, and<br />
we highly recommend it.<br />
The JPEG standard itself is not available electronically; you must order a paper copy<br />
through ISO or ITU. (Unless you feel a need to own a certified official copy, we<br />
recommend buying the Pennebaker and Mitchell book instead; it’s much cheaper<br />
and includes a great deal of useful explanatory material.) In the USA, copies of the<br />
standard may be ordered from ANSI Sales at (212) 642-4900, or from Global<br />
Engineering Documents at (800) 854-7179. (ANSI doesn’t take credit card orders,<br />
but Global does.) It’s not cheap: as of 1992, ANSI was charging $95 for Part 1 and<br />
$47 for Part 2, plus 7% shipping/handling. The standard is divided into two parts,<br />
Part 1 being the actual specification, while Part 2 covers compliance testing<br />
methods. Part 1 is titled “Digital Compression and Coding of Continuous-tone Still<br />
Images, Part 1: Requirements and guidelines” and has document numbers ISO/<br />
IEC IS 10918-1, ITU-T T.81. Part 2 is titled “Digital Compression and Coding of<br />
Continuous-tone Still Images, Part 2: Compliance testing” and has document<br />
numbers ISO/IEC IS 10918-2, ITU-T T.83.<br />
Some extensions to the original JPEG standard are defined in JPEG Part 3, a newer<br />
ISO standard numbered ISO/IEC IS 10918-3 and ITU-T T.84. IJG currently does not<br />
support any Part 3 extensions.<br />
The JPEG standard does not specify all details of an interchangeable file format.<br />
For the omitted details we follow the “JFIF” conventions, revision 1.02. A copy of the<br />
JFIF spec is available from:<br />
Literature Department<br />
C-Cube Microsystems, Inc.<br />
1778 McCarthy Blvd.<br />
Milpitas, CA 95035<br />
phone (408) 944-6300, fax (408) 944-6314<br />
A PostScript version of this document is available by FTP at ftp://ftp.uu.net/<br />
graphics/jpeg/jfif.ps.gz. There is also a plain text version at ftp://ftp.uu.net/<br />
graphics/jpeg/jfif.txt.gz, but it is missing the figures.<br />
The TIFF 6.0 file format specification can be obtained by FTP from ftp://ftp.sgi.com/<br />
graphics/tiff/TIFF6.ps.gz. The JPEG incorporation scheme found in the TIFF 6.0<br />
spec of 3-June-92 has a number of serious problems. IJG does not recommend use<br />
of the TIFF 6.0 design (TIFF Compression tag 6). Instead, we recommend the JPEG<br />
design proposed by TIFF Technical Note #2 (Compression tag 7). Copies of this<br />
Note can be obtained from ftp.sgi.com or from ftp://ftp.uu.net/graphics/jpeg/. It is<br />
expected that the next revision of the TIFF spec will replace the 6.0 JPEG design<br />
with the Note's design. Although IJG's own code does not support TIFF/JPEG, the<br />
free libtiff library uses our library to implement TIFF/JPEG per the Note. libtiff is<br />
available from ftp://ftp.sgi.com/graphics/tiff/.<br />
ARCHIVE LOCATIONS<br />
The “official” archive site for this software is ftp.uu.net (Internet address<br />
192.48.96.9). The most recent released version can always be found there in<br />
directory graphics/jpeg. This particular version will be archived as ftp://ftp.uu.net/<br />
graphics/jpeg/jpegsrc.v6b.tar.gz. If you don’t have direct Internet access, UUNET’s<br />
archives are also available via UUCP; contact help@uunet.uu.net for information<br />
on retrieving files that way.<br />
Numerous Internet sites maintain copies of the UUNET files. However, only<br />
ftp.uu.net is guaranteed to have the latest official version.<br />
You can also obtain this software in DOS-compatible “zip” archive format from the<br />
SimTel archives (ftp://ftp.simtel.net/pub/simtelnet/msdos/graphics/), or on<br />
CompuServe in the Graphics Support forum (GO CIS:GRAPHSUP), library 12 JPEG<br />
Tools. Again, these versions may sometimes lag behind the ftp.uu.net release.<br />
The JPEG FAQ (Frequently Asked Questions) article is a useful source of general<br />
information about JPEG. It is updated constantly and therefore is not included in<br />
this distribution. The FAQ is posted every two weeks to Usenet newsgroups<br />
comp.graphics.misc, news.answers, and other groups. It is available on the World<br />
Wide Web at http://www.faqs.org/faqs/jpeg-faq/ and other news.answers archive<br />
sites, including the official news.answers archive at rtfm.mit.edu: ftp://<br />
rtfm.mit.edu/pub/usenet/news.answers/jpeg-faq/. If you don't have Web or FTP<br />
access, send e-mail to mail-server@rtfm.mit.edu with body<br />
send usenet/news.answers/jpeg-faq/part1<br />
send usenet/news.answers/jpeg-faq/part2<br />
RELATED SOFTWARE<br />
Numerous viewing and image manipulation programs now support JPEG. (Quite a<br />
few of them use this library to do so.) The JPEG FAQ described above lists some of<br />
the more popular free and shareware viewers, and tells where to obtain them on<br />
Internet.<br />
If you are on a Unix machine, we highly recommend Jef Poskanzer’s free<br />
PBMPLUS software, which provides many useful operations on PPM-format image<br />
files. In particular, it can convert PPM images to and from a wide range of other<br />
formats, thus making cjpeg/djpeg considerably more useful. The latest version is<br />
distributed by the NetPBM group, and is available from numerous sites, notably<br />
ftp://wuarchive.wustl.edu/graphics/graphics/packages/NetPBM/. Unfortunately<br />
PBMPLUS/NETPBM is not nearly as portable as the IJG software is; you are likely<br />
to have difficulty making it work on any non-Unix machine.<br />
A different free JPEG implementation, written by the PVRG group at Stanford, is<br />
available from ftp://havefun.stanford.edu/pub/jpeg/. This program is designed for<br />
research and experimentation rather than production use; it is slower, harder to<br />
use, and less portable than the IJG code, but it is easier to read and modify. Also,<br />
the PVRG code supports lossless JPEG, which we do not. (On the other hand, it<br />
doesn’t do progressive JPEG.)<br />
FILE FORMAT WARS<br />
Some JPEG programs produce files that are not compatible with our library. The<br />
root of the problem is that the ISO JPEG committee failed to specify a concrete file<br />
format. Some vendors “filled in the blanks” on their own, creating proprietary<br />
formats that no one else could read. (For example, none of the early commercial<br />
JPEG implementations for the Macintosh were able to exchange compressed files.)<br />
The file format we have adopted is called JFIF (see REFERENCES). This format has<br />
been agreed to by a number of major commercial JPEG vendors, and it has become<br />
the de facto standard. JFIF is a minimal or “low end” representation. We<br />
recommend the use of TIFF/JPEG (TIFF revision 6.0 as modified by TIFF Technical<br />
Note #2) for “high end” applications that need to record a lot of additional data<br />
about an image. TIFF/JPEG is fairly new and not yet widely supported,<br />
unfortunately.<br />
The upcoming JPEG Part 3 standard defines a file format called SPIFF. SPIFF is<br />
interoperable with JFIF, in the sense that most JFIF decoders should be able to read<br />
the most common variant of SPIFF. SPIFF has some technical advantages over<br />
JFIF, but its major claim to fame is simply that it is an official standard rather than<br />
an informal one. At this point it is unclear whether SPIFF will supersede JFIF or<br />
whether JFIF will remain the de-facto standard. IJG intends to support SPIFF once<br />
the standard is frozen, but we have not decided whether it should become our<br />
default output format or not. (In any case, our decoder will remain capable of<br />
reading JFIF indefinitely.)<br />
Various proprietary file formats incorporating JPEG compression also exist. We<br />
have little or no sympathy for the existence of these formats. Indeed, one of the<br />
original reasons for developing this free software was to help force convergence on<br />
common, open format standards for JPEG files. Don’t use a proprietary file format!<br />
TO DO<br />
The major thrust for v7 will probably be improvement of visual quality. The current<br />
method for scaling the quantization tables is known not to be very good at low Q<br />
values. We also intend to investigate block boundary smoothing, “poor man’s<br />
variable quantization”, and other means of improving quality-vs-file-size<br />
performance without sacrificing compatibility.<br />
In future versions, we are considering supporting some of the upcoming JPEG Part<br />
3 extensions --- principally, variable quantization and the SPIFF file format.<br />
As always, speeding things up is of great interest.<br />
Please send bug reports, offers of help, etc. to jpeg-info@uunet.uu.net.<br />
libupnp<br />
Copyright (c) 2000-2003 Intel Corporation<br />
All rights reserved.<br />
Redistribution and use in source and binary forms, with or without modification,<br />
are permitted provided that the following conditions are met:<br />
* Redistributions of source code must retain the above copyright notice, this list<br />
of conditions and the following disclaimer.<br />
* Redistributions in binary form must reproduce the above copyright notice, this<br />
list of conditions and the following disclaimer in the documentation and/or<br />
other materials provided with the distribution.<br />
* Neither name of Intel Corporation nor the names of its contributors may be<br />
used to endorse or promote products derived from this software without<br />
specific prior written permission.<br />
THIS SOFTWARE IS PROVIDED BY THE COPYRIGHT HOLDERS AND<br />
CONTRIBUTORS<br />
“AS IS” AND ANY EXPRESS OR IMPLIED WARRANTIES, INCLUDING, BUT NOT<br />
LIMITED TO, THE IMPLIED WARRANTIES OF MERCHANTABILITY AND FITNESS<br />
FOR A PARTICULAR PURPOSE ARE DISCLAIMED. IN NO EVENT SHALL INTEL OR<br />
CONTRIBUTORS BE LIABLE FOR ANY DIRECT, INDIRECT, INCIDENTAL, SPECIAL,<br />
EXEMPLARY, OR CONSEQUENTIAL DAMAGES (INCLUDING, BUT NOT LIMITED<br />
TO, PROCUREMENT OF SUBSTITUTE GOODS OR SERVICES; LOSS OF USE,<br />
DATA, OR PROFITS; OR BUSINESS INTERRUPTION) HOWEVER CAUSED AND<br />
ON ANY THEORY OF LIABILITY, WHETHER IN CONTRACT, STRICT LIABILITY, OR<br />
07<br />
57<br />
En
07<br />
58<br />
En<br />
TORT (INCLUDING NEGLIGENCE OR OTHERWISE) ARISING IN ANY WAY OUT OF<br />
THE USE OF THIS SOFTWARE, EVEN IF ADVISED OF THE POSSIBILITY OF SUCH<br />
DAMAGE.<br />
AVC/H.264<br />
THIS PRODUCT IS LICENSED UNDER THE AVC PATENT PORTFOLIO LICENSE<br />
FOR THE PERSONAL AND NON-COMMERCIAL USE OF A CONSUMER TO (i)<br />
ENCODE VIDEO IN COMPLIANCE WITH THE AVC STANDARD (”AVC VIDEO”)<br />
AND/OR (ii) DECODE AVC VIDEO THAT WAS ENCODED BY A CONSUMER<br />
ENGAGED IN A PERSONAL AND NON-COMMERCIAL ACTIVITY AND/OR WAS<br />
OBTAINED FROM A VIDEO PROVIDER LICENSED TO PROVIDE AVC VIDEO. No<br />
LICENSE IS GRANTED OR SHALL BE IMPLIED FOR ANY OTHER USE.<br />
ADDITIONAL INFORMATION MAY BE OBTAINED FROM MPEG LA, L.L.C. SEE<br />
HTTP://MPEGLA.COM.<br />
GNU GENERAL PUBLIC LICENSE<br />
Version 2, June 1991<br />
Copyright © 1989, 1991 Free Software Foundation, Inc., 51 Franklin Street, Fifth<br />
Floor, Boston, MA 02110-1301 USA<br />
Everyone is permitted to copy and distribute verbatim copies of this license<br />
document, but changing it is not allowed.<br />
Preamble<br />
The licenses for most software are designed to take away your freedom to share<br />
and change it. By contrast, the GNU General Public License is intended to<br />
guarantee your freedom to share and change free software - to make sure the<br />
software is free for all its users. This General Public License applies to most of the<br />
Free Software Foundation’s software and to any other program whose authors<br />
commit to using it. (Some other Free Software Foundation software is covered by<br />
the GNU Lesser General Public License instead.) You can apply it to your programs,<br />
too.<br />
When we speak of free software, we are referring to freedom, not price. Our General<br />
Public Licenses are designed to make sure that you have the freedom to distribute<br />
copies of free software (and charge for this service if you wish), that you receive<br />
source code or can get it if you want it, that you can change the software or use<br />
pieces of it in new free programs; and that you know you can do these things.<br />
To protect your rights, we need to make restrictions that forbid anyone to deny you<br />
these rights or to ask you to surrender the rights. These restrictions translate to<br />
certain responsibilities for you if you distribute copies of the software, or if you<br />
modify it.<br />
For example, if you distribute copies of such a program, whether gratis or for a fee,<br />
you must give the recipients all the rights that you have. You must make sure that<br />
they, too, receive or can get the source code. And you must show them these terms<br />
so they know their rights.<br />
We protect your rights with two steps: (1) copyright the software, and (2) offer you<br />
this license which gives you legal permission to copy, distribute and/or modify the<br />
software.<br />
Also, for each author's protection and ours, we want to make certain that everyone<br />
understands that there is no warranty for this free software. If the software is<br />
modified by someone else and passed on, we want its recipients to know that what<br />
they have is not the original, so that any problems introduced by others will not<br />
reflect on the original authors’ reputations.<br />
Finally, any free program is threatened constantly by software patents. We wish to<br />
avoid the danger that redistributors of a free program will individually obtain patent<br />
licenses, in effect making the program proprietary. To prevent this, we have made<br />
it clear that any patent must be licensed for everyone’s free use or not licensed at<br />
all.<br />
The precise terms and conditions for copying, distribution and modification follow.<br />
TERMS AND CONDITIONS FOR COPYING, DISTRIBUTION AND MODIFICATION<br />
0. This License applies to any program or other work which contains a notice<br />
placed by the copyright holder saying it may be distributed under the terms of<br />
this General Public License. The “Program”, below, refers to any such program<br />
or work, and a “work based on the Program” means either the Program or any<br />
derivative work under copyright law: that is to say, a work containing the<br />
Program or a portion of it, either verbatim or with modifications and/or<br />
translated into another language. (Hereinafter, translation is included without<br />
limitation in the term “modification”.) Each licensee is addressed as “you”.<br />
Activities other than copying, distribution and modification are not covered by<br />
this License; they are outside its scope. The act of running the Program is not<br />
restricted, and the output from the Program is covered only if its contents<br />
constitute a work based on the Program (independent of having been made by<br />
running the Program). Whether that is true depends on what the Program<br />
does.<br />
1. You may copy and distribute verbatim copies of the Program’s source code as<br />
you receive it, in any medium, provided that you conspicuously and<br />
appropriately publish on each copy an appropriate copyright notice and<br />
disclaimer of warranty; keep intact all the notices that refer to this License and<br />
to the absence of any warranty; and give any other recipients of the Program<br />
a copy of this License along with the Program.<br />
You may charge a fee for the physical act of transferring a copy, and you may<br />
at your option offer warranty protection in exchange for a fee.<br />
2. You may modify your copy or copies of the Program or any portion of it, thus<br />
forming a work based on the Program, and copy and distribute such<br />
modifications or work under the terms of Section 1 above, provided that you<br />
also meet all of these conditions:<br />
a) You must cause the modified files to carry prominent notices stating that<br />
you changed the files and the date of any change.<br />
b) You must cause any work that you distribute or publish, that in whole or<br />
in part contains or is derived from the Program or any part thereof, to be<br />
licensed as a whole at no charge to all third parties under the terms of this<br />
License.<br />
c) If the modified program normally reads commands interactively when<br />
run, you must cause it, when started running for such interactive use in<br />
the most ordinary way, to print or display an announcement including an<br />
appropriate copyright notice and a notice that there is no warranty (or<br />
else, saying that you provide a warranty) and that users may redistribute<br />
the program under these conditions, and telling the user how to view a<br />
copy of this License. (Exception: if the Program itself is interactive but<br />
does not normally print such an announcement, your work based on the<br />
Program is not required to print an announcement.)<br />
These requirements apply to the modified work as a whole. If identifiable<br />
sections of that work are not derived from the Program, and can be reasonably<br />
considered independent and separate works in themselves, then this License,<br />
and its terms, do not apply to those sections when you distribute them as<br />
separate works. But when you distribute the same sections as part of a whole<br />
which is a work based on the Program, the distribution of the whole must be<br />
on the terms of this License, whose permissions for other licensees extend to<br />
the entire whole, and thus to each and every part regardless of who wrote it.<br />
Thus, it is not the intent of this section to claim rights or contest your rights to<br />
work written entirely by you; rather, the intent is to exercise the right to control<br />
the distribution of derivative or collective works based on the Program.<br />
In addition, mere aggregation of another work not based on the Program with<br />
the Program (or with a work based on the Program) on a volume of a storage<br />
or distribution medium does not bring the other work under the scope of this<br />
License.<br />
3. You may copy and distribute the Program (or a work based on it, under Section<br />
2) in object code or executable form under the terms of Sections 1 and 2 above<br />
provided that you also do one of the following:<br />
a) Accompany it with the complete corresponding machine-readable<br />
source code, which must be distributed under the terms of Sections 1<br />
and 2 above on a medium customarily used for software interchange; or,<br />
b) Accompany it with a written offer, valid for at least three years, to give any<br />
third party, for a charge no more than your cost of physically performing<br />
source distribution, a complete machine-readable copy of the<br />
corresponding source code, to be distributed under the terms of Sections<br />
1 and 2 above on a medium customarily used for software interchange;<br />
or,<br />
c) Accompany it with the information you received as to the offer to<br />
distribute corresponding source code. (This alternative is allowed only for<br />
noncommercial distribution and only if you received the program in<br />
object code or executable form with such an offer, in accord with<br />
Subsection b above.)<br />
The source code for a work means the preferred form of the work for making<br />
modifications to it. For an executable work, complete source code means all<br />
the source code for all modules it contains, plus any associated interface<br />
definition files, plus the scripts used to control compilation and installation of<br />
the executable. However, as a special exception, the source code distributed<br />
need not include anything that is normally distributed (in either source or<br />
binary form) with the major components (compiler, kernel, and so on) of the<br />
operating system on which the executable runs, unless that component itself<br />
accompanies the executable.<br />
If distribution of executable or object code is made by offering access to copy<br />
from a designated place, then offering equivalent access to copy the source<br />
code from the same place counts as distribution of the source code, even<br />
though third parties are not compelled to copy the source along with the<br />
object code.<br />
4. You may not copy, modify, sublicense, or distribute the Program except as<br />
expressly provided under this License. Any attempt otherwise to copy, modify,<br />
sublicense or distribute the Program is void, and will automatically terminate<br />
your rights under this License. However, parties who have received copies, or<br />
rights, from you under this License will not have their licenses terminated so<br />
long as such parties remain in full compliance.<br />
5. You are not required to accept this License, since you have not signed it.<br />
However, nothing else grants you permission to modify or distribute the<br />
Program or its derivative works. These actions are prohibited by law if you do<br />
not accept this License. Therefore, by modifying or distributing the Program<br />
(or any work based on the Program), you indicate your acceptance of this
License to do so, and all its terms and conditions for copying, distributing or<br />
modifying the Program or works based on it.<br />
6. Each time you redistribute the Program (or any work based on the Program),<br />
the recipient automatically receives a license from the original licensor to<br />
copy, distribute or modify the Program subject to these terms and conditions.<br />
You may not impose any further restrictions on the recipients’ exercise of the<br />
rights granted herein.<br />
You are not responsible for enforcing compliance by third parties to this<br />
License.<br />
7. If, as a consequence of a court judgment or allegation of patent infringement<br />
or for any other reason (not limited to patent issues), conditions are imposed<br />
on you (whether by court order, agreement or otherwise) that contradict the<br />
conditions of this License, they do not excuse you from the conditions of this<br />
License. If you cannot distribute so as to satisfy simultaneously your<br />
obligations under this License and any other pertinent obligations, then as a<br />
consequence you may not distribute the Program at all. For example, if a<br />
patent license would not permit royalty-free redistribution of the Program by<br />
all those who receive copies directly or indirectly through you, then the only<br />
way you could satisfy both it and this License would be to refrain entirely from<br />
distribution of the Program.<br />
If any portion of this section is held invalid or unenforceable under any<br />
particular circumstance, the balance of the section is intended to apply and<br />
the section as a whole is intended to apply in other circumstances.<br />
It is not the purpose of this section to induce you to infringe any patents or<br />
other property right claims or to contest validity of any such claims; this<br />
section has the sole purpose of protecting the integrity of the free software<br />
distribution system, which is implemented by public license practices. Many<br />
people have made generous contributions to the wide range of software<br />
distributed through that system in reliance on consistent application of that<br />
system; it is up to the author/donor to decide if he or she is willing to distribute<br />
software through any other system and a licensee cannot impose that choice.<br />
This section is intended to make thoroughly clear what is believed to be a<br />
consequence of the rest of this License.<br />
8. If the distribution and/or use of the Program is restricted in certain countries<br />
either by patents or by copyrighted interfaces, the original copyright holder<br />
who places the Program under this License may add an explicit geographical<br />
distribution limitation excluding those countries, so that distribution is<br />
permitted only in or among countries not thus excluded. In such case, this<br />
License incorporates the limitation as if written in the body of this License.<br />
9. The Free Software Foundation may publish revised and/or new versions of the<br />
General Public License from time to time. Such new versions will be similar in<br />
spirit to the present version, but may differ in detail to address new problems<br />
or concerns.<br />
Each version is given a distinguishing version number. If the Program<br />
specifies a version number of this License which applies to it and “any later<br />
version”, you have the option of following the terms and conditions either of<br />
that version or of any later version published by the Free Software Foundation.<br />
If the Program does not specify a version number of this License, you may<br />
choose any version ever published by the Free Software Foundation.<br />
10. If you wish to incorporate parts of the Program into other free programs whose<br />
distribution conditions are different, write to the author to ask for permission.<br />
For software which is copyrighted by the Free Software Foundation, write to<br />
the Free Software Foundation; we sometimes make exceptions for this. Our<br />
decision will be guided by the two goals of preserving the free status of all<br />
derivatives of our free software and of promoting the sharing and reuse of<br />
software generally.<br />
NO WARRANTY<br />
11. BECAUSE THE PROGRAM IS LICENSED FREE OF CHARGE, THERE IS NO<br />
WARRANTY FOR THE PROGRAM, TO THE EXTENT PERMITTED BY<br />
APPLICABLE LAW. EXCEPT WHEN OTHERWISE STATED IN WRITING THE<br />
COPYRIGHT HOLDERS AND/OR OTHER PARTIES PROVIDE THE PROGRAM<br />
“AS IS” WITHOUT WARRANTY OF ANY KIND, EITHER EXPRESSED OR<br />
IMPLIED, INCLUDING, BUT NOT LIMITED TO, THE IMPLIED WARRANTIES OF<br />
MERCHANTABILITY AND FITNESS FOR A PARTICULAR PURPOSE. THE<br />
ENTIRE RISK AS TO THE QUALITY AND PERFORMANCE OF THE PROGRAM<br />
IS WITH YOU. SHOULD THE PROGRAM PROVE DEFECTIVE, YOU ASSUME<br />
THE COST OF ALL NECESSARY SERVICING, REPAIR OR CORRECTION.<br />
12. IN NO EVENT UNLESS REQUIRED BY APPLICABLE LAW OR AGREED TO IN<br />
WRITING WILL ANY COPYRIGHT HOLDER, OR ANY OTHER PARTY WHO MAY<br />
MODIFY AND/OR REDISTRIBUTE THE PROGRAM AS PERMITTED ABOVE, BE<br />
LIABLE TO YOU FOR DAMAGES, INCLUDING ANY GENERAL, SPECIAL,<br />
INCIDENTAL OR CONSEQUENTIAL DAMAGES ARISING OUT OF THE USE OR<br />
INABILITY TO USE THE PROGRAM (INCLUDING BUT NOT LIMITED TO LOSS<br />
OF DATA OR DATA BEING RENDERED INACCURATE OR LOSSES<br />
SUSTAINED BY YOU OR THIRD PARTIES OR A FAILURE OF THE PROGRAM<br />
TO OPERATE WITH ANY OTHER PROGRAMS), EVEN IF SUCH HOLDER OR<br />
OTHER PARTY HAS BEEN ADVISED OF THE POSSIBILITY OF SUCH<br />
DAMAGES.<br />
END OF TERMS AND CONDITIONS<br />
How to Apply These Terms to Your New Programs<br />
If you develop a new program, and you want it to be of the greatest possible use to<br />
the public, the best way to achieve this is to make it free software which everyone<br />
can redistribute and change under these terms.<br />
To do so, attach the following notices to the program. It is safest to attach them to<br />
the start of each source file to most effectively convey the exclusion of warranty;<br />
and each file should have at least the “copyright” line and a pointer to where the<br />
full notice is found.<br />
07<br />
60<br />
En<br />
license, which gives you legal permission to copy, distribute and/or modify the<br />
library.<br />
To protect each distributor, we want to make it very clear that there is no warranty<br />
for the free library. Also, if the library is modified by someone else and passed on,<br />
the recipients should know that what they have is not the original version, so that<br />
the original author’s reputation will not be affected by problems that might be<br />
introduced by others.<br />
Finally, software patents pose a constant threat to the existence of any free<br />
program. We wish to make sure that a company cannot effectively restrict the<br />
users of a free program by obtaining a restrictive license from a patent holder.<br />
Therefore, we insist that any patent license obtained for a version of the library<br />
must be consistent with the full freedom of use specified in this license.<br />
Most GNU software, including some libraries, is covered by the ordinary GNU<br />
General Public License. This license, the GNU Lesser General Public License,<br />
applies to certain designated libraries, and is quite different from the ordinary<br />
General Public License. We use this license for certain libraries in order to permit<br />
linking those libraries into non-free programs.<br />
When a program is linked with a library, whether statically or using a shared library,<br />
the combination of the two is legally speaking a combined work, a derivative of the<br />
original library. The ordinary General Public License therefore permits such linking<br />
only if the entire combination fits its criteria of freedom. The Lesser General Public<br />
License permits more lax criteria for linking other code with the library.<br />
We call this license the “Lesser” General Public License because it does Less to<br />
protect the user's freedom than the ordinary General Public License. It also<br />
provides other free software developers Less of an advantage over competing nonfree<br />
programs. These disadvantages are the reason we use the ordinary General<br />
Public License for many libraries. However, the Lesser license provides advantages<br />
in certain special circumstances.<br />
For example, on rare occasions, there may be a special need to encourage the<br />
widest possible use of a certain library, so that it becomes a de-facto standard. To<br />
achieve this, non-free programs must be allowed to use the library. A more<br />
frequent case is that a free library does the same job as widely used non-free<br />
libraries. In this case, there is little to gain by limiting the free library to free software<br />
only, so we use the Lesser General Public License.<br />
In other cases, permission to use a particular library in non-free programs enables<br />
a greater number of people to use a large body of free software. For example,<br />
permission to use the GNU C Library in non-free programs enables many more<br />
people to use the whole GNU operating system, as well as its variant, the GNU<br />
Linux operating system.<br />
Although the Lesser General Public License is Less protective of the users’<br />
freedom, it does ensure that the user of a program that is linked with the Library<br />
has the freedom and the wherewithal to run that program using a modified version<br />
of the Library.<br />
The precise terms and conditions for copying, distribution and modification follow.<br />
Pay close attention to the difference between a “work based on the library” and a<br />
“work that uses the library”. The former contains code derived from the library,<br />
whereas the latter must be combined with the library in order to run.<br />
TERMS AND CONDITIONS FOR COPYING, DISTRIBUTION AND MODIFICATION<br />
0. This License Agreement applies to any software library or other program<br />
which contains a notice placed by the copyright holder or other authorized<br />
party saying it may be distributed under the terms of this Lesser General<br />
Public License (also called “this License”). Each licensee is addressed as<br />
“you”.<br />
A “library” means a collection of software functions and/or data prepared so<br />
as to be conveniently linked with application programs (which use some of<br />
those functions and data) to form executables.<br />
The “Library”, below, refers to any such software library or work which has<br />
been distributed under these terms. A “work based on the Library” means<br />
either the Library or any derivative work under copyright law: that is to say, a<br />
work containing the Library or a portion of it, either verbatim or with<br />
modifications and/or translated straightforwardly into another language.<br />
(Hereinafter, translation is included without limitation in the term<br />
“modification”.)<br />
“Source code” for a work means the preferred form of the work for making<br />
modifications to it. For a library, complete source code means all the source<br />
code for all modules it contains, plus any associated interface definition files,<br />
plus the scripts used to control compilation and installation of the library.<br />
Activities other than copying, distribution and modification are not covered by<br />
this License; they are outside its scope. The act of running a program using<br />
the Library is not restricted, and output from such a program is covered only<br />
if its contents constitute a work based on the Library (independent of the use<br />
of the Library in a tool for writing it). Whether that is true depends on what the<br />
Library does and what the program that uses the Library does.<br />
1. You may copy and distribute verbatim copies of the Library’s complete source<br />
code as you receive it, in any medium, provided that you conspicuously and<br />
appropriately publish on each copy an appropriate copyright notice and<br />
disclaimer of warranty; keep intact all the notices that refer to this License and<br />
to the absence of any warranty; and distribute a copy of this License along with<br />
the Library.<br />
You may charge a fee for the physical act of transferring a copy, and you may<br />
at your option offer warranty protection in exchange for a fee.<br />
2. You may modify your copy or copies of the Library or any portion of it, thus<br />
forming a work based on the Library, and copy and distribute such<br />
modifications or work under the terms of Section 1 above, provided that you<br />
also meet all of these conditions:<br />
a) The modified work must itself be a software library.<br />
b) You must cause the files modified to carry prominent notices stating that<br />
you changed the files and the date of any change.<br />
c) You must cause the whole of the work to be licensed at no charge to all<br />
third parties under the terms of this License.<br />
d) If a facility in the modified Library refers to a function or a table of data to<br />
be supplied by an application program that uses the facility, other than as<br />
an argument passed when the facility is invoked, then you must make a<br />
good faith effort to ensure that, in the event an application does not<br />
supply such function or table, the facility still operates, and performs<br />
whatever part of its purpose remains meaningful. (For example, a<br />
function in a library to compute square roots has a purpose that is entirely<br />
well-defined independent of the application. Therefore, Subsection 2d<br />
requires that any application-supplied function or table used by this<br />
function must be optional: if the application does not supply it, the square<br />
root function must still compute square roots.)<br />
These requirements apply to the modified work as a whole. If identifiable<br />
sections of that work are not derived from the Library, and can be reasonably<br />
considered independent and separate works in themselves, then this License,<br />
and its terms, do not apply to those sections when you distribute them as<br />
separate works. But when you distribute the same sections as part of a whole<br />
which is a work based on the Library, the distribution of the whole must be on<br />
the terms of this License, whose permissions for other licensees extend to the<br />
entire whole, and thus to each and every part regardless of who wrote it.<br />
Thus, it is not the intent of this section to claim rights or contest your rights to<br />
work written entirely by you; rather, the intent is to exercise the right to control<br />
the distribution of derivative or collective works based on the Library.<br />
In addition, mere aggregation of another work not based on the Library with<br />
the Library (or with a work based on the Library) on a volume of a storage or<br />
distribution medium does not bring the other work under the scope of this<br />
License.<br />
3. You may opt to apply the terms of the ordinary GNU General Public License<br />
instead of this License to a given copy of the Library. To do this, you must alter<br />
all the notices that refer to this License, so that they refer to the ordinary GNU<br />
General Public License, version 2, instead of to this License. (If a newer version<br />
than version 2 of the ordinary GNU General Public License has appeared, then<br />
you can specify that version instead if you wish.) Do not make any other<br />
change in these notices.<br />
Once this change is made in a given copy, it is irreversible for that copy, so the<br />
ordinary GNU General Public License applies to all subsequent copies and<br />
derivative works made from that copy. This option is useful when you wish to<br />
copy part of the code of the Library into a program that is not a library.<br />
4. You may copy and distribute the Library (or a portion or derivative of it, under<br />
Section 2) in object code or executable form under the terms of Sections 1 and<br />
2 above provided that you accompany it with the complete corresponding<br />
machine-readable source code, which must be distributed under the terms of<br />
Sections 1 and 2 above on a medium customarily used for software<br />
interchange.<br />
If distribution of object code is made by offering access to copy from a<br />
designated place, then offering equivalent access to copy the source code<br />
from the same place satisfies the requirement to distribute the source code,<br />
even though third parties are not compelled to copy the source along with the<br />
object code.<br />
5. A program that contains no derivative of any portion of the Library, but is<br />
designed to work with the Library by being compiled or linked with it, is called<br />
a “work that uses the Library”. Such a work, in isolation, is not a derivative work<br />
of the Library, and therefore falls outside the scope of this License.<br />
However, linking a “work that uses the Library” with the Library creates an<br />
executable that is a derivative of the Library (because it contains portions of<br />
the Library), rather than a “work that uses the library”. The executable is<br />
therefore covered by this License. Section 6 states terms for distribution of<br />
such executables.<br />
When a “work that uses the Library” uses material from a header file that is<br />
part of the Library, the object code for the work may be a derivative work of the<br />
Library even though the source code is not. Whether this is true is especially<br />
significant if the work can be linked without the Library, or if the work is itself<br />
a library. The threshold for this to be true is not precisely defined by law.<br />
If such an object file uses only numerical parameters, data structure layouts<br />
and accessors, and small macros and small inline functions (ten lines or less<br />
in length), then the use of the object file is unrestricted, regardless of whether<br />
it is legally a derivative work. (Executables containing this object code plus<br />
portions of the Library will still fall under Section 6.)
Otherwise, if the work is a derivative of the Library, you may distribute the<br />
object code for the work under the terms of Section 6. Any executables<br />
containing that work also fall under Section 6, whether or not they are linked<br />
directly with the Library itself.<br />
6. As an exception to the Sections above, you may also combine or link a “work<br />
that uses the Library” with the Library to produce a work containing portions<br />
of the Library, and distribute that work under terms of your choice, provided<br />
that the terms permit modification of the work for the customer's own use and<br />
reverse engineering for debugging such modifications.<br />
You must give prominent notice with each copy of the work that the Library is<br />
used in it and that the Library and its use are covered by this License. You must<br />
supply a copy of this License. If the work during execution displays copyright<br />
notices, you must include the copyright notice for the Library among them, as<br />
well as a reference directing the user to the copy of this License. Also, you<br />
must do one of these things:<br />
a) Accompany the work with the complete corresponding machinereadable<br />
source code for the Library including whatever changes were<br />
used in the work (which must be distributed under Sections 1 and 2<br />
above); and, if the work is an executable linked with the Library, with the<br />
complete machine-readable “work that uses the Library”, as object code<br />
and/or source code, so that the user can modify the Library and then<br />
relink to produce a modified executable containing the modified Library.<br />
(It is understood that the user who changes the contents of definitions<br />
files in the Library will not necessarily be able to recompile the<br />
application to use the modified definitions.)<br />
b) Use a suitable shared library mechanism for linking with the Library. A<br />
suitable mechanism is one that (1) uses at run time a copy of the library<br />
already present on the user’s computer system, rather than copying<br />
library functions into the executable, and (2) will operate properly with a<br />
modified version of the library, if the user installs one, as long as the<br />
modified version is interface-compatible with the version that the work<br />
was made with.<br />
c) Accompany the work with a written offer, valid for at least three years, to<br />
give the same user the materials specified in Subsection 6a, above, for a<br />
charge no more than the cost of performing this distribution.<br />
d) If distribution of the work is made by offering access to copy from a<br />
designated place, offer equivalent access to copy the above specified<br />
materials from the same place.<br />
e) Verify that the user has already received a copy of these materials or that<br />
you have already sent this user a copy.<br />
For an executable, the required form of the “work that uses the Library” must<br />
include any data and utility programs needed for reproducing the executable<br />
from it. However, as a special exception, the materials to be distributed need<br />
not include anything that is normally distributed (in either source or binary<br />
form) with the major components (compiler, kernel, and so on) of the<br />
operating system on which the executable runs, unless that component itself<br />
accompanies the executable.<br />
It may happen that this requirement contradicts the license restrictions of<br />
other proprietary libraries that do not normally accompany the operating<br />
system. Such a contradiction means you cannot use both them and the<br />
Library together in an executable that you distribute.<br />
7. You may place library facilities that are a work based on the Library side-byside<br />
in a single library together with other library facilities not covered by this<br />
License, and distribute such a combined library, provided that the separate<br />
distribution of the work based on the Library and of the other library facilities<br />
is otherwise permitted, and provided that you do these two things:<br />
a) Accompany the combined library with a copy of the same work based on<br />
the Library, uncombined with any other library facilities. This must be<br />
distributed under the terms of the Sections above.<br />
b) Give prominent notice with the combined library of the fact that part of it<br />
is a work based on the Library, and explaining where to find the<br />
accompanying uncombined form of the same work.<br />
8. You may not copy, modify, sublicense, link with, or distribute the Library except<br />
as expressly provided under this License. Any attempt otherwise to copy,<br />
modify, sublicense, link with, or distribute the Library is void, and will<br />
automatically terminate your rights under this License. However, parties who<br />
have received copies, or rights, from you under this License will not have their<br />
licenses terminated so long as such parties remain in full compliance.<br />
9. You are not required to accept this License, since you have not signed it.<br />
However, nothing else grants you permission to modify or distribute the<br />
Library or its derivative works. These actions are prohibited by law if you do not<br />
accept this License. Therefore, by modifying or distributing the Library (or any<br />
work based on the Library), you indicate your acceptance of this License to do<br />
so, and all its terms and conditions for copying, distributing or modifying the<br />
Library or works based on it.<br />
10. Each time you redistribute the Library (or any work based on the Library), the<br />
recipient automatically receives a license from the original licensor to copy,<br />
distribute, link with or modify the Library subject to these terms and<br />
conditions. You may not impose any further restrictions on the recipients'<br />
exercise of the rights granted herein. You are not responsible for enforcing<br />
compliance by third parties with this License.<br />
11. If, as a consequence of a court judgment or allegation of patent infringement<br />
or for any other reason (not limited to patent issues), conditions are imposed<br />
on you (whether by court order, agreement or otherwise) that contradict the<br />
conditions of this License, they do not excuse you from the conditions of this<br />
License. If you cannot distribute so as to satisfy simultaneously your<br />
obligations under this License and any other pertinent obligations, then as a<br />
consequence you may not distribute the Library at all. For example, if a patent<br />
license would not permit royalty-free redistribution of the Library by all those<br />
who receive copies directly or indirectly through you, then the only way you<br />
could satisfy both it and this License would be to refrain entirely from<br />
distribution of the Library. If any portion of this section is held invalid or<br />
unenforceable under any particular circumstance, the balance of the section<br />
is intended to apply, and the section as a whole is intended to apply in other<br />
circumstances.<br />
It is not the purpose of this section to induce you to infringe any patents or<br />
other property right claims or to contest validity of any such claims; this<br />
section has the sole purpose of protecting the integrity of the free software<br />
distribution system which is implemented by public license practices. Many<br />
people have made generous contributions to the wide range of software<br />
distributed through that system in reliance on consistent application of that<br />
system; it is up to the author donor to decide if he or she is willing to distribute<br />
software through any other system and a licensee cannot impose that choice.<br />
This section is intended to make thoroughly clear what is believed to be a<br />
consequence of the rest of this License.<br />
12. If the distribution and/or use of the Library is restricted in certain countries<br />
either by patents or by copyrighted interfaces, the original copyright holder<br />
who places the Library under this License may add an explicit geographical<br />
distribution limitation excluding those countries, so that distribution is<br />
permitted only in or among countries not thus excluded. In such case, this<br />
License incorporates the limitation as if written in the body of this License.<br />
13. The Free Software Foundation may publish revised and/or new versions of the<br />
Lesser General Public License from time to time. Such new versions will be<br />
similar in spirit to the present version, but may differ in detail to address new<br />
problems or concerns.<br />
Each version is given a distinguishing version number. If the Library specifies<br />
a version number of this License which applies to it and “any later version”,<br />
you have the option of following the terms and conditions either of that version<br />
or of any later version published by the Free Software Foundation. If the Library<br />
does not specify a license version number, you may choose any version ever<br />
published by the Free Software Foundation.<br />
14. If you wish to incorporate parts of the Library into other free programs whose<br />
distribution conditions are incompatible with these, write to the author to ask<br />
for permission. For software which is copyrighted by the Free Software<br />
Foundation, write to the Free Software Foundation; we sometimes make<br />
exceptions for this. Our decision will be guided by the two goals of preserving<br />
the free status of all derivatives of our free software and of promoting the<br />
sharing and reuse of software generally.<br />
NO WARRANTY<br />
15. BECAUSE THE LIBRARY IS LICENSED FREE OF CHARGE, THERE IS NO<br />
WARRANTY FOR THE LIBRARY, TO THE EXTENT PERMITTED BY APPLICABLE<br />
LAW. EXCEPT WHEN OTHERWISE STATED IN WRITING THE COPYRIGHT<br />
HOLDERS AND/OR OTHER PARTIES PROVIDE THE LIBRARY “AS IS”<br />
WITHOUT WARRANTY OF ANY KIND, EITHER EXPRESSED OR IMPLIED,<br />
INCLUDING, BUT NOT LIMITED TO, THE IMPLIED WARRANTIES OF<br />
MERCHANTABILITY AND FITNESS FOR A PARTICULAR PURPOSE. THE<br />
ENTIRE RISK AS TO THE QUALITY AND PERFORMANCE OF THE LIBRARY IS<br />
WITH YOU. SHOULD THE LIBRARY PROVE DEFECTIVE, YOU ASSUME THE<br />
COST OF ALL NECESSARY SERVICING, REPAIR OR CORRECTION.<br />
16. IN NO EVENT UNLESS REQUIRED BY APPLICABLE LAW OR AGREED TO IN<br />
WRITING WILL ANY COPYRIGHT HOLDER, OR ANY OTHER PARTY WHO MAY<br />
MODIFY AND/OR REDISTRIBUTE THE LIBRARY AS PERMITTED ABOVE, BE<br />
LIABLE TO YOU FOR DAMAGES, INCLUDING ANY GENERAL, SPECIAL,<br />
INCIDENTAL OR CONSEQUENTIAL DAMAGES ARISING OUT OF THE USE OR<br />
INABILITY TO USE THE LIBRARY (INCLUDING BUT NOT LIMITED TO LOSS OF<br />
DATA OR DATA BEING RENDERED INACCURATE OR LOSSES SUSTAINED<br />
BY YOU OR THIRD PARTIES OR A FAILURE OF THE LIBRARY TO OPERATE<br />
WITH ANY OTHER SOFTWARE), EVEN IF SUCH HOLDER OR OTHER PARTY<br />
HAS BEEN ADVISED OF THE POSSIBILITY OF SUCH DAMAGES.<br />
END OF TERMS AND CONDITIONS<br />
How to Apply These Terms to Your New Libraries<br />
If you develop a new library, and you want it to be of the greatest possible use to the<br />
public, we recommend making it free software that everyone can redistribute and<br />
change. You can do so by permitting redistribution under these terms (or,<br />
alternatively, under the terms of the ordinary General Public License).<br />
To apply these terms, attach the following notices to the library. It is safest to attach<br />
them to the start of each source file to most effectively convey the exclusion of<br />
07<br />
61<br />
En
07<br />
62<br />
En<br />
warranty; and each file should have at least the “copyright” line and a pointer to<br />
where the full notice is found.<br />
<br />
Copyright © <br />
This library is free software; you can redistribute it and/or modify it under the terms<br />
of the GNU Lesser General Public License as published by the Free Software<br />
Foundation; either version 2.1 of the License, or (at your option) any later version.<br />
This library is distributed in the hope that it will be useful, but WITHOUT ANY<br />
WARRANTY; without even the implied warranty of MERCHANTABILITY or FITNESS<br />
FOR A PARTICULAR PURPOSE. See the GNU Lesser General Public License for<br />
more details.<br />
You should have received a copy of the GNU Lesser General Public License along<br />
with this library; if not, write to the Free Software Foundation, Inc., 51 Franklin<br />
Street, Fifth Floor, Boston, MA 02110-1301 USA<br />
Also add information on how to contact you by electronic and paper mail.<br />
You should also get your employer (if you work as a programmer) or your school, if<br />
any, to sign a “copyright disclaimer” for the library, if necessary. Here is a sample;<br />
alter the names:<br />
Yoyodyne, Inc., hereby disclaims all copyright interest in the library ‘Frob’ (a<br />
library for tweaking knobs) written by James Random Hacker.<br />
, 1 April 1990<br />
Ty Coon, President of Vice<br />
That’s all there is to it!<br />
[Notice on GNU General Public License]<br />
This product include the software licensed for use under the terms of a GNU<br />
General Public License. A copy of the corresponding source code can be obtained<br />
by being charged the fee for distribution.<br />
To obtain a copy, contact your local <strong>Pioneer</strong> Customer Support Center.<br />
See the GNU website (http://www.gnu.org) for details of the GNU General Public<br />
License.<br />
Cautions on use<br />
Moving the player<br />
If you need to move this unit, first remove the disc if there’s one<br />
loaded, and close the disc t<strong>ray</strong>. Next, press STANDBY/ON to<br />
switch the power to standby, checking that the POWER OFF<br />
indication on the front panel display goes off. Wait at least 10<br />
seconds. Lastly, disconnect the power cord.<br />
Never lift or move the unit during playback — discs rotate at a high<br />
speed and may be damaged.<br />
Place of installation<br />
Select a stable place near the TV and AV system to which the unit is<br />
connected.<br />
Do not place the player on top of a TV or color monitor. Keep it away<br />
from cassette decks or other components easily affected by<br />
magnetism.<br />
Avoid the following types of places:<br />
• Places exposed to direct sunlight<br />
• Humid or poorly ventilated places<br />
• Extremely hot or cold places<br />
• Places subject to vibration<br />
•Dusty places<br />
• Places exposed to soot, steam or heat (in kitchens, etc.)<br />
Do not place objects on top<br />
Do not place objects on top of the player.<br />
Do not obstruct the ventilation holes<br />
Do not use the player on a shaggy rug, bed, or sofa, and do not cover<br />
the player with a cloth, etc. Doing so will prevent heat dissipation<br />
and could lead to damage.<br />
Keep away from heat<br />
Do not place the player on top of an amplifier or other device<br />
generating heat. When installing in a rack, to avoid the heat<br />
generated by the amplifier and other devices, place it on a shelf<br />
below the amplifier whenever possible.<br />
Turn the power off when not<br />
using the player<br />
Depending on the conditions of the TV broadcast signals, striped<br />
patterns may appear on the screen when the TV is turned on while<br />
the player’s power is turned on. This is not a malfunction with the<br />
player or TV. If this happens, turn the player’s power off. In the same<br />
way, noise may be heard in the sound of a radio.<br />
Condensation<br />
If the player is moved suddenly from a cold place into a warm room<br />
(in winter, for example) or if the temperature in the room in which<br />
the player is installed rises suddenly due to a heater, etc., water<br />
droplets (condensation) may form inside (on operating parts and the<br />
lens). When condensation is present, the player will not operate<br />
properly and playback is not possible. Let the player stand at room<br />
temperature for 1 or 2 hours with the power turned on (the time<br />
depends on the extent of condensation). The water droplets will<br />
dissipate and playback will become possible.<br />
Condensation can also occur in the summer if the player is exposed<br />
to the direct wind from an air-conditioner. If this happens, move the<br />
player to a different place.<br />
Cleaning the player<br />
Normally, wipe the player with a soft cloth. For tough dirt, apply<br />
some neutral detergent diluted in 5 to 6 parts water to a soft cloth,<br />
wring out thoroughly, wipe off the dirt, then wipe again with a dry<br />
cloth.<br />
Note that getting alcohol, thinner, benzene or insecticide on the<br />
player could cause the print and coating to peel off. Also, avoid<br />
leaving rubber or vinyl products in contact with the player for long<br />
periods of time, as this could damage the cabinet.<br />
When using chemical-impregnated wipes, etc., read the wipe’s<br />
cautions carefully.<br />
Unplug the power cord from the power outlet when cleaning the<br />
player.<br />
Caution for when the unit is<br />
installed in a rack with a glass door<br />
Do not press the OPEN/CLOSE on the remote control to open the<br />
disc t<strong>ray</strong> while the glass door is closed. The door will hamper the<br />
movement of the disc t<strong>ray</strong>, and the unit could be damaged.
Cleaning the pickup lens<br />
The player’s lens should not become dirty in normal use, but if for<br />
some reason it should malfunction due to dust or dirt, consult your<br />
nearest <strong>Pioneer</strong> authorized service center. Although lens cleaners<br />
for players are commercially available, we advise against using<br />
them since some may damage the lens.<br />
Handling discs<br />
Cleaning discs<br />
It may not be possible to play the disc if there are fingerprints or dust<br />
on it. In this case, using a cleaning cloth, etc., to wipe the disc gently<br />
from the center toward the outer edge. Do not use a dirty cleaning<br />
cloth.<br />
07<br />
Do not use damaged (cracked or warped) discs.<br />
Do not scratch the disc’s signal surface or let it get dirty.<br />
Do not load more than one disc into the player at a time.<br />
Do not glue paper or put stickers onto the disc, or use a pencil, ballpoint<br />
pen or other sharp-tipped writing instrument. These could all<br />
damage the disc.<br />
Storing discs<br />
Always store discs in their cases, and place the cases vertically,<br />
avoiding places exposed to high temperature or humidity, direct<br />
sunlight or extremely low temperatures.<br />
Be sure to read the cautions included with the disc.<br />
Troubleshooting<br />
Do not use benzene, thinner or other volatile chemicals. Also do not<br />
use record sp<strong>ray</strong> or antistatic agents.<br />
For tough dirt, apply some water to a soft cloth, wring out<br />
thoroughly, wipe off the dirt, then wipe off the moisture with a dry<br />
cloth.<br />
Specially shaped discs<br />
Specially shaped discs (heart-shaped, hexagonal, etc.) cannot be<br />
used on this player. Never use such discs, as they will damage the<br />
player.<br />
Condensation on discs<br />
If the disc is moved suddenly from a cold place into a warm room (in<br />
winter, for example), water droplets (condensation) may form on the<br />
disc surface. <strong>Disc</strong>s will not play properly if there is condensation on<br />
them. Carefully wipe off the water droplets from the disc surface<br />
before using the disc.<br />
Incorrect operation is often mistaken for trouble or malfunction. If you think that there is something wrong with this component, check the<br />
points below. Sometimes the trouble may lie in another component. Inspect the other components and electrical appliances being used. If<br />
the trouble cannot be rectified even after checking the points below, ask your nearest <strong>Pioneer</strong> authorized service center or your dealer to<br />
carry out repair work.<br />
Playback<br />
Problem Check Remedy<br />
• <strong>Disc</strong> does not play.<br />
• <strong>Disc</strong> t<strong>ray</strong> opens<br />
automatically.<br />
Is the disc one that is playable on this player?<br />
Is the file one that is playable on this player?<br />
Is the disc scratched?<br />
Is the disc dirty?<br />
Is there a piece of paper or sticker attached to the disc?<br />
Is the disc properly set in the disc t<strong>ray</strong>?<br />
Is the region number correct?<br />
Check whether the disc is one that can be played on this player<br />
(page 6).<br />
• Check whether the file is one that can be played on this<br />
player (page 8).<br />
• Check whether or not the file is damaged.<br />
It may not be possible to play scratched discs.<br />
Clean the disc (above).<br />
The disc may be warped and unplayable.<br />
• Set the disc with the printed side facing up.<br />
• Set the disc properly in the depression in the disc t<strong>ray</strong>.<br />
See About region numbers on page 8 for the region numbers of<br />
discs that can be played on this player.<br />
63<br />
En
07<br />
Problem Check Remedy<br />
Is the video cable properly connected?<br />
No picture is displayed or the<br />
picture is not displayed<br />
properly.<br />
Picture freezes and the front<br />
panel and remote control<br />
buttons stop working.<br />
Motion is unnatural or<br />
picture is not clear.<br />
No picture is displayed or<br />
picture is not output in high<br />
definition when playing BDs.<br />
• Picture is disturbed during<br />
playback.<br />
• Picture is dark.<br />
Is the video cable damaged?<br />
Is the input setting on the connected TV or AV receiver or<br />
amplifier right?<br />
Are you viewing the picture from the video output terminal<br />
selected with VIDEO SELECT?<br />
Is the output video resolution properly set?<br />
• Is the player connected with an HDMI cable other than a<br />
High Speed HDMI cable (with a Standard HDMI cable)?<br />
• Are you using an HDMI cable with built-in equalizer?<br />
Does the connected TV support the frame rate of the video<br />
signal being output by the player?<br />
• Connect the cable properly according to the connected<br />
devices (page 13).<br />
• Insert the cable firmly and all the way in.<br />
If the cable is damaged, replace it with a new one.<br />
Read the operating instructions of the connected components<br />
and switch to the proper input.<br />
Press VIDEO SELECT to switch the video output terminal to be<br />
viewed (page 23).<br />
If Pure Audio is set to Mode 2, video signals are only output<br />
from the selected output terminal (page 51).<br />
Use OUTPUT RESOLUTION to switch to a resolution at which<br />
the video and audio signals are output (page 23).<br />
1080p or Deep Color video signals may not be output properly,<br />
depending on the HDMI cable being used or the player’s<br />
settings. Press while pressing on the player’s front panel<br />
to restore the video outputs to the factory default settings. After<br />
this, if you wish to output the video signals with 1080p or Deep<br />
Color, connect the TV using a High Speed HDMI cable<br />
without built-in equalizer, then reset the player using the Setup<br />
Navigator (page 19).<br />
If the picture is not displayed when playing a disc with a frame<br />
rate that is not supported, the picture will not be displayed even<br />
when playback is stopped. In this case, use the procedure<br />
below to switch the frame rate of the video signals output from<br />
the player.<br />
Eject the disc and close the disc t<strong>ray</strong>. Then, press OPEN/<br />
CLOSE while pressing on the player’s front panel to switch<br />
to a frame rate supported by the connected TV.<br />
Is NTSC on PAL TV properly set? When viewing the video signals output from the player’s S-<br />
Video or Video terminal, set NTSC on PAL TV properly<br />
(page 42).<br />
Is Pure Audio set to Mode 1?<br />
When set to Mode 1, no picture is displayed during playback<br />
(page 51).<br />
Is a DVI device connected?<br />
The picture may not be displayed properly if a DVI device is<br />
connected.<br />
Is HDMI Color Space properly set? Change the HDMI Color Space setting (page 43).<br />
• Press STOP to stop playback, then restart playback.<br />
• If the playback cannot be stopped, press STANDBY/ON<br />
on the player’s front panel to turn off the power, then turn the<br />
power back on.<br />
• If the power cannot be turned off, press and hold<br />
STANDBY/ON on the player’s front panel for over 5<br />
seconds. The power will turn off.<br />
Is the output video resolution set to 1080/24p?<br />
• The picture may not be displayed properly, depending on the<br />
source. Set the resolution to something other than 1080/24p.<br />
• Change the Pure Cinema setting (page 38).<br />
With some discs, it may not be possible to output the video<br />
signals from the VIDEO output terminals, the S-VIDEO output<br />
terminal or the COMPONENT VIDEO output terminals. In this<br />
case, connect using an HDMI cable (page 13).<br />
• This player supports Macrovision analog copy protection<br />
technology. With some TVs (such as with built-in video deck),<br />
the picture will not be displayed properly when the copy<br />
protected DVD title is played. This is not a malfunction.<br />
• If the player and TV are connected via a DVD recorder/video<br />
deck, etc., the picture will not be displayed properly due to<br />
analog copy protection. Connect the player and TV directly.<br />
64<br />
En
Problem Check Remedy<br />
• Picture is stretched.<br />
• Picture is cropped.<br />
Is the TV’s aspect ratio properly set?<br />
Read the TV’s operating instructions and set the TV’s aspect<br />
ratio properly.<br />
• Aspect ratio cannot be Is TV Aspect Ratio properly set? Set TV Aspect Ratio properly (page 42).<br />
switched.<br />
Is 4:3 Video Out properly set? Set 4:3 Video Out properly (page 42).<br />
Is DVD 16:9 Video Out properly set? Set DVD 16:9 Video Out properly (page 42).<br />
When video signals with a resolution of 1080/50i, 1080/50p, 720/<br />
50p, 1080/24p, 1080/60i, 1080/60p or 720/60p are being output<br />
from the HDMI OUT terminals or the COMPONENT VIDEO<br />
output terminals, they may be output with an aspect ratio of<br />
16:9 even if TV Aspect Ratio is set to 4:3 (Standard) (page 42).<br />
Is Anamorphic Zoom set to On? Set Anamorphic Zoom to Off (page 50).<br />
Picture is interrupted.<br />
The picture may be interrupted when the resolution of the<br />
recorded video signal switches. Press OUTPUT RESOLUTION<br />
to select a setting other than Auto, 1080/24p or Source Direct<br />
(page 23).<br />
Sound and picture are not Is Output Terminal properly set? Set Output Terminal properly (pages 19 and 42).<br />
synchronized.<br />
Is Lip Sync properly set?<br />
Adjust the amount of audio delay with the Lip Sync setting<br />
(page 40).<br />
• No sound is output.<br />
• Sound is not output<br />
properly.<br />
Multi-channel sound is not<br />
output.<br />
Is the disc played back in slow motion?<br />
Is the disc played back in fast forward or fast reverse?<br />
Are the audio cables properly connected?<br />
Is the audio cable damaged?<br />
Are the connected components (AV receiver or amplifier, etc.)<br />
properly set?<br />
Is Output Terminal properly set?<br />
Is the output video resolution properly set?<br />
Is the AV receiver or amplifier, etc., connected to the AUDIO<br />
OUT (7.1 ch) terminals?<br />
Are the speakers properly set?<br />
Is Pure Audio set to Mode 1 or Mode 2?<br />
Is a DVI device connected?<br />
Are you playing a DTS-CD?<br />
Is Output Terminal properly set?<br />
Is the AV receiver or amplifier connected to the HDMI OUT<br />
(SUB) terminal?<br />
Is the audio output of the connected AV receiver or amplifier,<br />
etc., properly set?<br />
Is multi-channel sound selected?<br />
Is the AV receiver or amplifier, etc., connected to the AUDIO<br />
OUT (7.1 ch) terminals?<br />
No sound is output during slow motion play and forward and<br />
reverse scanning.<br />
• Connect the cable properly according to the connected<br />
devices (page 13).<br />
• Insert the cable firmly and all the way in.<br />
If the cable is damaged, replace it with a new one.<br />
Read the operating instructions of the connected components<br />
and check the volume, input, speaker settings, etc.<br />
When ANALOG AUDIO is selected at Output Terminal, no<br />
audio signals are output from the HDMI OUT or DIGITAL OUT<br />
terminals (page 42).<br />
Use OUTPUT RESOLUTION to switch to the resolution at<br />
which the video and audio signals are output (page 23).<br />
To listen to 2-channel analog audio, connect to FRONT (L/R) of<br />
the AUDIO OUT (7.1 ch) terminals (page 12) and set Audio<br />
Output Mode to 2 Channel (page 43).<br />
When the AV receiver or amplifier, etc., is connected to the<br />
AUDIO OUT (7.1 ch) terminals and Audio Output Mode is<br />
set to Multi-channel, set Speaker Setup properly (page 45).<br />
If set to Mode 1 or Mode 2, signals are only output from the<br />
output terminal set at Output Terminal (page 51).<br />
The sound will not be output from the HDMI OUT terminals if a<br />
DVI device is connected. Connect the device to a DIGITAL OUT<br />
terminals or the AUDIO OUT (7.1 ch) terminals (page 16).<br />
To output the sound of DTS-CDs from the HDMI OUT (SUB)<br />
terminal, set HDMI Audio Out to PCM (page 43).<br />
For some BDs, audio signals are only output from DIGITAL<br />
OUT terminals or the HDMI OUT terminals.<br />
Linear PCM (2-channel) audio signals are output from output<br />
terminals other than the one set at Output Terminal under<br />
Audio Out. Set Output Terminal properly (page 42).<br />
The HDMI OUT (SUB) terminal outputs linear PCM 2-channel<br />
audio signals. Be sure to connect the AV receiver or amplifier<br />
to the HDMI OUT (MAIN) terminal.<br />
Read the operating instructions of the connected AV receiver<br />
or amplifier and check the audio output settings of AV receiver<br />
or amplifier.<br />
Use the menu screen or AUDIO to switch the disc’s sound to<br />
multi-channel.<br />
When the AV receiver or amplifier, etc., is connected to the<br />
AUDIO OUT (7.1 ch) terminals, set Audio Output Mode to<br />
Multi-channel (page 43). Also, set Speaker Setup properly<br />
(page 45).<br />
07<br />
65<br />
En
07<br />
Problem Check Remedy<br />
Noise can be heard when<br />
outputting DTS Digital<br />
Surround signals from the<br />
DIGITAL OUT terminals.<br />
192 kHz or 96 kHz digital<br />
audio signals cannot be<br />
output from the DIGITAL<br />
OUT terminals.<br />
Secondary audio or<br />
interactive audio is not<br />
output.<br />
Sound is fast or slow.<br />
After a disc is inserted,<br />
Loading stays displayed and<br />
playback does not start.<br />
is displayed in file names,<br />
etc.<br />
A message indicating low<br />
memory (local storage)<br />
appears while playing a<br />
BD-ROM disc.<br />
The DVD layer of BD and DVD<br />
hybrid discs cannot be<br />
played.<br />
The CD layer of BD and CD<br />
hybrid discs cannot be<br />
played.<br />
The BDMV format on BD-R/<br />
-RE discs cannot be played.<br />
Is the connected AV receiver or amplifier compatible with DTS<br />
Digital Surround?<br />
Is HDMI Audio Out properly set?<br />
Are Dolby Digital Out and DTS Out properly set?<br />
When an HDMI cable is connected, are audio signals being<br />
output from devices connected with cables other than HDMI<br />
cables?<br />
Are there too many files recorded on the disc?<br />
If an AV receiver or amplifier that is not compatible with DTS<br />
Digital Surround is connected to the DIGITAL OUT terminals,<br />
set DTS Out to DTS PCM (page 42).<br />
It is not possible to output 192 kHz or 96 kHz digital audio<br />
signals from this player’s DIGITAL OUT terminals. The signals<br />
are automatically converted to 48 kHz or less for output.<br />
When listening to the sound from an HDMI OUT (MAIN)<br />
terminal, set HDMI Audio Out to PCM (page 43).<br />
When listening to the sound from an DIGITAL OUT terminal,<br />
set Dolby Digital Out to Dolby Digital 1, DTS Out to DTS 1<br />
(page 42).<br />
When a <strong>Pioneer</strong> AV receiver or amplifier compatible with the<br />
PQLS function is connected directly to the player’s HDMI OUT<br />
(MAIN) terminal using an HDMI cable, the PQLS function is<br />
activated when playing an audio CD (CD-DA). Because of this,<br />
the sound output from components other than the ones<br />
connected by HDMI cable may be fast or slow. If this happens,<br />
set PQLS to Off (page 43).<br />
When a disc on which files are recorded is inserted, depending<br />
on the number of files recorded on the disc, loading may take<br />
several dozen minutes.<br />
The characters that cannot be displayed on this player are<br />
displayed in .<br />
Erase the BDMV data (page 49).<br />
Is Hybrid <strong>Disc</strong> Playback properly set? Set Hybrid <strong>Disc</strong> Playback to DVD (page 43).<br />
Is Hybrid <strong>Disc</strong> Playback properly set? Set Hybrid <strong>Disc</strong> Playback to CD (page 43).<br />
To play the BDMV format on BD-R/-RE discs containing both<br />
BDMV and BDAV formats, set BDMV/BDAV Playback<br />
Priority to BDMV (page 43).<br />
Software updating<br />
Problem Check Remedy<br />
“Connection to the software<br />
updating server failed” is<br />
displayed when you try to<br />
update the software.<br />
Software updating is slow.<br />
• “WRT NG ****” is displayed<br />
on the front panel display<br />
during software updating.<br />
(**** meaning any<br />
characters)<br />
• “WRT FAILED” is displayed<br />
on the front panel display<br />
during software updating.<br />
Perform Connection Test (page 49). If “Network connection<br />
test completed successfully.” is displayed, check the proxy<br />
server settings (page 48). Also there may be a problem with the<br />
Internet connection. Contact your Internet service provider.<br />
Depending on the Internet connection and other conditions,<br />
some time may be required to update the software.<br />
The message is displayed when software updating has failed.<br />
Check again whether it can be updated properly.<br />
66<br />
En
Problem Check Remedy<br />
Is “LAN cable not connected” displayed?<br />
A message other than<br />
“Network connection test<br />
completed successfully” is<br />
displayed when Connection<br />
Test is performed.<br />
• Is “IP address cannot be obtained.” displayed?<br />
• Is “No response from the gateway.” displayed?<br />
Is “IP address is overlapped.” displayed?<br />
Is the Ethernet hub (or router with hub functionality) operating<br />
properly?<br />
Check that this player and Ethernet hub (or router with hub<br />
functionality) are properly connected.<br />
• If the IP address is obtained using the DHCP server function,<br />
check the setting is correct at the Display Network<br />
Configuration (page 49). For details on the DHCP server<br />
function, see the operating instructions of the Ethernet hub (or<br />
router with hub functionality).<br />
• Set the IP address manually.<br />
• Check the operation and settings of the DHCP server<br />
function of the Ethernet hub (or router with hub functionality).<br />
For details on the DHCP server function, see the operating<br />
instructions of the Ethernet hub (or router with hub<br />
functionality).<br />
• If this player’s has been set manually, reset the IP address of<br />
this player or other components.<br />
• Check the settings and operation the Ethernet hub (or router<br />
with hub functionality). For details, see the operating<br />
instructions of the Ethernet hub.<br />
• Reboot the Ethernet hub (or router with hub functionality).<br />
07<br />
KURO LINK<br />
Problem Check Remedy<br />
KURO LINK function does<br />
not work.<br />
• Is the HDMI cable properly connected?<br />
• Are you connected to the HDMI OUT (SUB) terminal?<br />
To use the KURO LINK function, connect the Flat Screen TV<br />
and AV system (AV receiver or amplifier, etc.) to the HDMI OUT<br />
(MAIN) terminal (page 14).<br />
Is the HDMI cable you are using a High Speed HDMI cable? Use a High Speed HDMI cable. The KURO LINK function<br />
may not work properly if HDMI cable other than a High Speed<br />
HDMI cable is used.<br />
Is KURO LINK set to On on the player? Set KURO LINK to On on the player (page 43).<br />
Does the connected device support the KURO LINK function? • The KURO LINK function will not work with devices<br />
manufactured by companies other than <strong>Pioneer</strong>, even when<br />
connected using an HDMI cable.<br />
• The KURO LINK function will not work if devices that do not<br />
support the KURO LINK function or devices manufactured by<br />
companies other than <strong>Pioneer</strong> are connected between the<br />
KURO LINK-compatible device and the player.<br />
• Even when connected to a <strong>Pioneer</strong> product compatible with<br />
the KURO LINK function, some of the functions may not work.<br />
Also refer to the operating instructions of the connected<br />
device.<br />
Is KURO LINK set to On on the connected device?<br />
Set KURO LINK to On on the connected device. The KURO<br />
LINK function operates when KURO LINK is set to On for all<br />
devices connected to the HDMI OUT (MAIN) terminal.<br />
Once connections and settings of all the devices are finished,<br />
be sure to check that the player’s picture is output to the Flat<br />
Screen TV. (Also check after changing the connected devices<br />
and connecting and/or disconnecting HDMI cables.) If the<br />
player’s picture is not being output to the Flat Screen TV, the<br />
KURO LINK function may not work properly.<br />
For details, refer to the operating instructions of the connected<br />
device.<br />
Are multiple players connected?<br />
The KURO LINK function may not work if three or more players,<br />
including this player, are connected by HDMI cable.<br />
67<br />
En
07<br />
Others<br />
Problem Check Remedy<br />
The player’s power turns off<br />
automatically.<br />
Is Auto Power Off set to On?<br />
If Auto Power Off is set to On, the player’s power turns off<br />
automatically if no operation is performed for over 30 minutes<br />
(page 44).<br />
The player’s power turns on<br />
or off automatically.<br />
Player cannot be operated<br />
with remote control.<br />
Input of connected TV and AV<br />
system switches<br />
automatically.<br />
Settings you have made have<br />
been cleared.<br />
“Processing failed.” is<br />
displayed.<br />
Is KURO LINK set to On?<br />
Is an AV receiver or amplifier connected to the CONTROL IN<br />
terminal on the player’s rear panel?<br />
Are you operating the remote control from a point too far away<br />
from the player?<br />
The player’s power may turn on and off together with the power<br />
of the TV connected to the HDMI OUT (MAIN) terminal. If you<br />
do not want the player’s power to turn on and off when the TV’s<br />
power is turned on and off, set KURO LINK to Off (page 43).<br />
Operate with the remote control of the device connected to the<br />
CONTROL IN terminal.<br />
Operate from within 7 m of the remote control sensor.<br />
Are the batteries dead? Replace the batteries (page 5).<br />
Is KURO LINK set to On?<br />
The input of the TV and AV system (AV receiver or amplifier,<br />
etc.) connected to the HDMI OUT (MAIN) terminal may<br />
automatically switch to the player when playback starts on the<br />
player or the menu screen (Home Media Gallery, etc.) is<br />
displayed. If you do not want the inputs of the connected TV<br />
and AV system (AV receiver or amplifier, etc.) to switch<br />
automatically, set KURO LINK to Off (page 43).<br />
• Have you disconnected the power cord while the player’s<br />
power was on?<br />
• Has there been a power failure?<br />
Always press STANDBY/ON on the player’s front panel or<br />
STANDBY/ON on the remote control and check that<br />
POWER OFF has turned off from the player’s front panel<br />
display before disconnecting the power cord. Be particularly<br />
careful when the power cord is connected to the AC outlet on<br />
another device because the player turns off in conjunction with<br />
the device.<br />
If the message appears repeatedly, please ask your nearest<br />
<strong>Pioneer</strong> authorized service center or your dealer to carry out<br />
repair work.<br />
Glossary<br />
Aspect ratio<br />
The ratio of a TV screen’s width to its height. Conventional TVs have<br />
an aspect ratio of 4:3, while high definition (HD) and widescreen TVs<br />
have an aspect ratio of 16:9.<br />
Audio language<br />
Multiple audio tracks, for example the original sound and the<br />
dubbed sound, can be recorded on BD-ROM or DVD-Video discs. Up<br />
to 32 languages (32 audio tracks) can be recorded on BD-ROM<br />
discs, up to 8 languages (8 audio tracks) on DVD-Video discs, so you<br />
can select the desired language when viewing the disc.<br />
AVCHD (Advanced Video Codec High<br />
Definition)<br />
The AVCHD is a high definition (HD) digital video camera recorder<br />
format recording high-definition onto certain media by using highly<br />
efficient codec technologies.<br />
BD-J<br />
With BD-ROMs, it is possible to use Java applications to create<br />
highly interactive titles, for example including games.<br />
Java and all Java-based trademarks and logos are trademarks or<br />
registered trademarks of Sun Microsystems, Inc. in the U.S. and other<br />
countries.<br />
BDAV<br />
Of the BD format, the Audio Visual Format Specifications for HD<br />
digital broadcast recording is referred to as BDAV on this player and<br />
in this operating instructions.<br />
BDMV<br />
Of the BD format, the Audio Visual Format Specifications designed<br />
for pre-packaged high definition (HD) movie contents is referred to<br />
as BDMV on this player and in this operating instructions.<br />
68<br />
En
Component video output<br />
This video output terminal provides clearer pictures when<br />
connected to a TV equipped with component inputs. Component<br />
video signals consist of three signals, Y, PB and PR.<br />
Composite video output<br />
Signals mixing the luminance signal (Y) and the color signal (C) so<br />
they can be transferred on a single cord are output from this<br />
terminal.<br />
Deep Color<br />
This is one of the capabilities of HDMI. The players supporting<br />
Deep Color can transmit a video signal with a color bit depth of<br />
greater than 8 bits per color component. Subtle color gradations<br />
can be reproduced when connected to a TV that supports Deep<br />
Color.<br />
Default Gateway<br />
A default gateway is a communication device such as a router<br />
which passes data between networks. It is used to direct data to<br />
networks on which the destination gateway is not explicitly<br />
specified.<br />
DHCP (Dynamic Host Configuration<br />
Protocol)<br />
This protocol provides configuration parameters (IP address, etc.)<br />
for computers and other devices connected to the network.<br />
DivX<br />
DivX is a media technology developed by DivX, Inc. DivX media files<br />
include moving picture data.<br />
DNS (Domain Name System)<br />
This is a system for associating Internet host names with IP<br />
addresses.<br />
Dolby Digital<br />
Dolby Digital is an audio format to record the sound in up to 5.1<br />
channels with a fraction of the amount of data as compared to linear<br />
PCM audio signals.<br />
Dolby Digital Plus<br />
Dolby Digital Plus is an audio format for high-definition media. Built<br />
on Dolby Digital, it combines the efficiency and flexibility to provide<br />
high quality multi-channel audio. With BD-ROMs, up to 7.1<br />
channels of digital sound can be recorded.<br />
Dolby TrueHD<br />
Dolby TrueHD is an audio format using lossless coding. With BD-<br />
ROMs, up to 8 channels can be recorded at 96 kHz/24 bits, or up to<br />
6 channels at 192 kHz/24 bits.<br />
DRM<br />
A technology for protecting copyrighted digital data. Digitized<br />
videos, images and audio retain the same quality even when they<br />
are copied or transferred repeatedly. DRM is a technology for<br />
restricting the distribution or playback of such digital data without<br />
the authorization of the copyright holder.<br />
DTS Digital Surround<br />
DTS Digital Surround is an audio format to record 48 kHz/24 bits<br />
audio signals in 5.1 channels.<br />
DTS-HD High Resolution Audio<br />
DTS-HD High Resolution Audio is an audio format using lossy<br />
coding. It can record 7.1 channels at 96 kHz/24 bits.<br />
DTS-HD Master Audio<br />
DTS-HD Master Audio is an audio format using lossless coding.<br />
With BD-ROMs, 7.1 channels can be recorded at 96 kHz/24 bits, or<br />
5.1 channels at 192 kHz/24 bits.<br />
Dynamic range<br />
This refers to the difference between the maximum and minimum<br />
level of the sound. The dynamic range is measured in units of<br />
decibels (dB).<br />
When the dynamic range is compressed (Audio DRC), the minimum<br />
signal level is increased and the maximum signal level decreased.<br />
This way, the volume of loud sounds such as explosions is reduced,<br />
while the sounds with a low level, such as human voices, are easier<br />
to listen to.<br />
Ethernet<br />
A standard for local area networks (LANs) used to connect multiple<br />
computers, etc. in the same location. This player supports<br />
100BASE-TX.<br />
Frames and fields<br />
A frame is the unit for one of the still pictures which compose<br />
motion pictures. One frame consists of a picture of odd lines and a<br />
picture of even lines called fields in video signal with interlaced scan<br />
method (576i, 1080i, etc.).<br />
HDCP (High-bandwidth Digital Content<br />
Protection)<br />
HDCP is a specification to protect audiovisual content across the<br />
DVI/HDMI interface.<br />
HDMI (High-Definition Multimedia<br />
Interface)<br />
A digital interface standard for next-generation TVs expanding the<br />
DVI (Digital Video Interface) terminal used for example for computer<br />
displays. It allows transfer of non-compressed digital video and<br />
audio signals (Dolby TrueHD, Dolby Digital Plus, Dolby Digital, DTS-<br />
HD Master Audio, DTS-HD High Resolution Audio, DTS Digital<br />
Surround, MPEG-2 AAC, linear PCM, etc.) with a single connector.<br />
Interactive audio<br />
The audio signals recorded in the titles of BD-ROMs. They include<br />
for example the clicking sound made when the menu screen is<br />
operated.<br />
Interlaced scan<br />
With this method, one picture is displayed by scanning it twice. The<br />
odd lines are displayed in the first pass, the even lines are displayed<br />
in the second, to form a single picture (frame). Interlaced scan is<br />
indicated in this player and operating instructions by an “i” after the<br />
resolution value (for example, 576i).<br />
IP address<br />
An address that identifies a computer or other device connected to<br />
the Internet or local area network. It is represented a number in four<br />
sections.<br />
07<br />
69<br />
En
07<br />
70<br />
En<br />
Linear PCM<br />
This is referred as the audio signals that are not compressed,<br />
frequently used for DVD-Video discs containing musicals or music<br />
concerts. This can also be indicated “48 kHz/16 bit”, “96 kHz”, etc.<br />
MAC (Media Access Control) address<br />
A hardware identification number assigned specifically to the<br />
network device (LAN card, etc.).<br />
MPEG (Moving Picture Experts Group)<br />
The name of a family of standards used to encode video and audio<br />
signals in a digital compressed format. The video encoding<br />
standards include MPEG-1 Video, MPEG-2 Video, MPEG-4 Visual,<br />
MPEG-4 AVC, etc. The audio encoding standards include MPEG-1<br />
Audio, MPEG-2 Audio, MPEG-2 AAC, etc.<br />
Multi angle<br />
Up to 9 camera angles can be recorded simultaneously on BD-ROM<br />
or DVD-Video discs, letting you view the same scene from different<br />
angles.<br />
Parental Lock<br />
Playback of the contents of some BD-ROM or DVD-Video discs can<br />
be restricted, for example for discs containing scenes of violence.<br />
With BD-ROM discs, an age restriction can be set to restrict<br />
playback. Playing DVD-Video title can be restricted by setting the<br />
parental lock level.<br />
Picture-in-Picture (P-in-P)<br />
This is a function for superimposing a sub video on the main video.<br />
Some BD-ROMs include secondary video, which can be<br />
superimposed on the primary video.<br />
Port number<br />
This is a sub-address provided below the IP address for<br />
simultaneously connecting to multiple parties during Internet<br />
communications.<br />
Progressive scan<br />
With this method, one picture is consisted of a single picture,<br />
without dividing it in two pictures. Progressive scan provides clear<br />
pictures with no flicker, in particular for still pictures that contain<br />
much text, graphics, or horizontal lines. Progressive scan is<br />
indicated in this player and operating instructions by a “p” after the<br />
resolution value (for example, 576p).<br />
Proxy server<br />
This is a relay server for ensuring fast access and safe<br />
communications when connecting to the Internet from an internal<br />
network.<br />
Region number<br />
A number assigned to <strong>Blu</strong>-<strong>ray</strong> <strong>Disc</strong> Players, BD-ROM and DVD-<br />
Video discs according to the region in which they are sold. A disc<br />
can be played if the region numbers indicated on the disc include<br />
the number set for the player or if “ALL” is indicated.<br />
S-Video output<br />
An output terminal for transmitting separate luminance (Y) and<br />
color (C) signals over a single cord. It offers clearer pictures than the<br />
composite video output.<br />
Secondary audio<br />
Some BD-ROMs include sub audio streams mixed with the main<br />
audio. These sub audio streams are called “secondary audio”. On<br />
some discs this secondary audio is recorded as the audio for the<br />
secondary video.<br />
Secondary video<br />
Some BD-ROMs include sub videos superimposed on the main<br />
videos using the Picture-in-Picture function. These sub videos are<br />
called “secondary video”.<br />
Subnet mask<br />
This is used to identify which part of the IP address corresponds to<br />
the subnet (a separately managed network). The subnet mask is<br />
expressed as ‘255.255.255.0’.<br />
Subtitle language<br />
This refers to the language of the subtitles often used on movies. Up<br />
to 255 languages (255 types of subtitles) can be recorded on BD-<br />
ROM discs, 32 languages (32 types of subtitles) on DVD-Video discs,<br />
so you can select the desired subtitle when viewing the disc.<br />
VC-1<br />
A video codec developed by Microsoft and standardized by the<br />
Society of Motion Picture and Television Engineers (SMPTE). Some<br />
BDs include videos encoded in this codec.<br />
x.v.Color<br />
“x.v.Color” is a promotion name given to the products that have the<br />
capability to realize a wide-gamut color space based on the<br />
international standard specifications defined as xvYCC.<br />
A wider range of colors than before can be reproduced by playing<br />
video signals conforming to “xvYCC” standards on this player when<br />
connected to an “x.v.Color”-compatible TV, etc.
Specifications<br />
07<br />
Model<br />
Type<br />
Rated voltage<br />
Rated frequency<br />
Power consumption<br />
Power consumption (standby)<br />
Weight<br />
External dimensions (including projecting parts)<br />
BDP-LX91<br />
<strong>Blu</strong>-<strong>ray</strong> <strong>Disc</strong> <strong>PLAYER</strong><br />
AC 220 V to 240 V<br />
50 Hz/60 Hz<br />
59 W<br />
0.3 W<br />
14.3 kg<br />
Tolerable operating temperature +5 °C to +35 °C<br />
Tolerable operating humidity<br />
Output terminals<br />
420 mm (W) x 143 mm (H) x 365 mm (D)<br />
5 % to 85 % (no condensation)<br />
HDMI<br />
2 sets, 19-pin: 5 V, 250 mA (Total value for the HDMI OUT<br />
(MAIN) and HDMI OUT (SUB) terminals)<br />
Video outputs Video 1 set, RCA jack: 1.0 Vp-p (75 Ω)<br />
S-Video<br />
1 set, S-Video jack:<br />
Y (luminance): 1.0 Vp-p (75 Ω)<br />
C (color): 0.300 Vp-p (75 Ω, PAL), 0.286 Vp-p (75 Ω, NTSC)<br />
Component video<br />
1 set, BNC jacks:<br />
Y: 1.0 Vp-p (75 Ω)<br />
PB, PR: 0.7 Vp-p (75 Ω)<br />
Audio outputs 7.1-channel (multi-channel: front left/ 1 set, Number of channels: 8, RCA jacks<br />
right, surround left/right, center,<br />
surround back left/right, subwoofer)<br />
Audio output level<br />
200 mVrms (1 kHz, –20 dB)<br />
Frequency response<br />
4 Hz to 88 kHz (192 kHz sampling)<br />
S/N ratio<br />
115 dB<br />
Dynamic range<br />
103 dB<br />
Total harmonic distortion 0.0015 %<br />
Wow & flutter<br />
Below measurable limits (±0.001 % W. PEAK)<br />
Digital audio outputs Optical 1 set, Optical digital jack<br />
Coaxial<br />
1 set, RCA jack<br />
LAN<br />
1 set, Ethernet jack (100BASE-TX)<br />
Control Input 1 set, Minijack (3.5 ø)<br />
Note<br />
• The specifications and design of this product are subject to change without notice.<br />
• This product includes FontAvenue ® fonts licensed by NEC Corporation. FontAvenue is a registered trademark of NEC Corporation.<br />
71<br />
En
PIONEER CORPORATION<br />
4-1, Meguro 1-Chome, Meguro-ku, Tokyo 153-8654, Japan<br />
PIONEER ELECTRONICS (USA) INC.<br />
P.O. BOX 1540, Long Beach, California 90801-1540, U.S.A. TEL: (800) 421-1404<br />
PIONEER ELECTRONICS OF CANADA, INC.<br />
300 Allstate Parkway, Markham, Ontario L3R 0P2, Canada TEL: 1-877-283-5901, 905-479-4411<br />
PIONEER EUROPE NV<br />
Haven 1087, Keetberglaan 1, B-9120 Melsele, Belgium TEL: 03/570.05.11<br />
PIONEER ELECTRONICS ASIACENTRE PTE. LTD.<br />
253 Alexandra Road, #04-01, Singapore 159936 TEL: 65-6472-7555<br />
PIONEER ELECTRONICS AUSTRALIA PTY. LTD.<br />
178-184 Boundary Road, Braeside, Victoria 3195, Australia, TEL: (03) 9586-6300<br />
PIONEER ELECTRONICS DE MEXICO S.A. DE C.V.<br />
Blvd.Manuel Avila Camacho 138 10 piso Col.Lomas de Chapultepec, Mexico,D.F. 11000 TEL: 55-9178-4270<br />
K002_B_En<br />
Published by <strong>Pioneer</strong> Corporation.<br />
Copyright © 2008 <strong>Pioneer</strong> Corporation.<br />
All rights reserved.<br />
<br />
<br />
Printed in Japan