Installation Instructions - Rampage Products
Installation Instructions - Rampage Products
Installation Instructions - Rampage Products

You also want an ePaper? Increase the reach of your titles
YUMPU automatically turns print PDFs into web optimized ePapers that Google loves.
RAMPAGE<br />
P R O D U C T S<br />
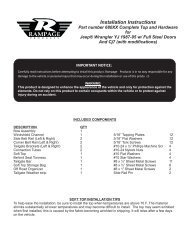
<strong>Installation</strong> <strong>Instructions</strong><br />
Part number 1094XX Frameless Soft Top<br />
for<br />
Jeep® Wrangler YJ 1992-1995<br />
with Half Doors<br />
NOTE: <strong>Installation</strong> of the top in warm weather is optimal for ease of installation. Ideal installation temperature<br />
should not be less than 70˚ (21C). Initial installation is the most difficult as the fabric has not been stretched.<br />
The top will loosen slightly with use and warm temperature. Allow about at least an hour for the initial<br />
installation.<br />
***Please follow instructions for ease of installation and correct fit.***<br />
Included:<br />
1 x Top components (Top, side windows, Rear window, window storage bag, Door skins)<br />
1 x Left Door surround assembly<br />
1 x Right Door surround assembly<br />
2 x Roll bar clamps w/Hex head bolts<br />
Required Tools:<br />
1/2” or 13mm combination wrench or socket.<br />
Phillips screw driver.<br />
Step 1.<br />
Step 2.<br />
Step 3.<br />
Step 4.<br />
Step 5.<br />
Remove existing soft top. For OEM (original/factory) soft tops: remove header bar, remove tube frame<br />
hardware from roll bar, and remove the rear window/tailgate bar and set it aside for the new top. Keep the<br />
rear bar mounting hardware in place on the body as the rear bar will be re-used.<br />
Install a <strong>Rampage</strong> Windshield Channel per installation instructions.<br />
Use the included hardware to attach the clamp to the folding door surrounds. Look for the hole on the top<br />
section near the pivot, the clamp installs on the opposite side from the snaps. The knob installs from the<br />
top.<br />
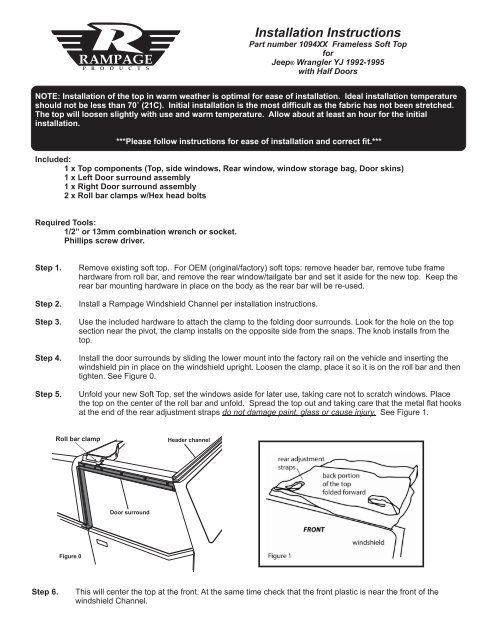
Install the door surrounds by sliding the lower mount into the factory rail on the vehicle and inserting the<br />
windshield pin in place on the windshield upright. Loosen the clamp, place it so it is on the roll bar and then<br />
tighten. See Figure 0.<br />
Unfold your new Soft Top, set the windows aside for later use, taking care not to scratch windows. Place<br />
the top on the center of the roll bar and unfold. Spread the top out and taking care that the metal flat hooks<br />
at the end of the rear adjustment straps do not damage paint, glass or cause injury. See Figure 1.<br />
Roll bar clamp<br />
Header channel<br />
Door surround<br />
Figure 0<br />
Step 6.<br />
This will center the top at the front. At the same time check that the front plastic is near the front of the<br />
windshield Channel.
Step 7.<br />
Insert front plastic into the groove of the Windshield Channel. The ends will match nearly to each end of<br />
the Windshield Channel. From the front of the vehicle, check to make sure that the top is even from side<br />
to side. Check the door surround sides and push the top towards the rear to make sure the fabric is<br />
seated tightly around the front corners. Now snap the front snaps on the door surrounds. See Figure 2.<br />
NOTE: If you have difficulty putting<br />
the plastic strip into the channel, try<br />
hooking the strap from the<br />
soundbar/roll bar to the footman<br />
loop first. This will give some<br />
tension across the channel and help<br />
keep the front of the top in place.<br />
Step 8.<br />
Sitting in either front seat; find the center adjustment strap near the roll bar. Pull the strap around the back<br />
of the rollbar then toward the front. Thread the webbing through the factory footman loop above the<br />
windshield and tighten snug at the strap adjuster. Tighten snugly so there is some tension on this strap.<br />
NOTE: So as not to over tighten, do not use any tools to tighten this strap. See Figure 3 & 4.<br />
Step 9.<br />
Locate the ceiling adjustment straps (at rear corners on ceiling panel). Gently pull the strap over the<br />
rollbar, and around the seatbelt stud (toward the inside) and back up to the strap adjustment buckle.<br />
Tighten snug, and perform same procedure on the other side. Check top for evenness from side to side.<br />
See Figures 5, 6, 7, & 8.
...now feed into<br />
buckle and pull<br />
up tight<br />
Over outside of roll<br />
bar, back under seat<br />
belt stud...<br />
Step 10.<br />
Step 11.<br />
Step 12.<br />
Step 13.<br />
Step 14.<br />
Step 15.<br />
Install the side windows by mating the zippers. Loosely attach the rear window to the three straps on top<br />
rear. Mate the rear window zippers to the top on both sides and zip the sliders down about 6”.<br />
Continue attaching the Belt Rail plastic of the side windows from front to back, starting on the back top of<br />
the door surrounds. Hook the Belt Rail plastic to the back section of the door surround.<br />
Prior to continuing; make sure rear door zippers have been started on both sides. Set the Belt Rail plastic<br />
even with the factory weather strip at the body gutter – directly behind the door. Continue fastening the<br />
plastic under the Belt Rail lip of the body until the top is fully attached around the back corners of the body.<br />
Slide rear bar into the tube plastic on the bottom of the rear window. Insert the Tailgate Bar into the side<br />
clips, check for evenness from side to side. Rotate the bar towards the inside to lock it in place same as<br />
the factory installation. Zip the rear window and pull the Hook and Loop a.k.a. “Velcro” closed.<br />
On top of the rear part of the roll bar pull the side to side adjustment straps snug, do not over tighten. Pull<br />
the three rear window straps snug.<br />
Pull the roof top down. Handle the metal hooks on the end of the straps with care to avoid damage or<br />
injury. Attach the flat hooks under the Belt Rail at the reinforced patches on each side of tailgate, and pull<br />
the straps down snug (WITH ONE HAND, NO TOOLS). While holding the straps in-line and secured to the<br />
hook and loop, close the cam buckle into the locked position.<br />
The Front Bow inserts<br />
The fiberglass bows in the front section of the top are intended primarily to keep water from pooling on the front section<br />
of the top in heavy rains. Without the bows it is possible for water to pool in the front section of the top and cause<br />
issues with the seams because of the weight. They will also keep the top from fluttering if it is installed properly. The<br />
bows are easily removed by flexing the inner rod and removing from the pockets. The top will function normally without<br />
them, however It is recommended they be used in heavy rains when parked.<br />
Rear window bows<br />
The fiberglass bows in the rear side windows are included to keep tension on the rear panels and improve fit. The front<br />
portion should rest on the door surround and the rear against the rear roll bar.<br />
Storing Windows<br />
To store your windows, begin by removing the hooks from the rear Belt Rail and flipping the top to expose the storage<br />
bag. Again, take care not to fling the top to avoid metal hooks causing damage or injury. Remove the windows and<br />
store them in the bag utilizing the window separation panels to protect the window.
Door Skin <strong>Installation</strong><br />
Step 1. After removing skins from packaging, leave the Door Skins out in<br />
the sunlight for at least 1 hour.<br />
Step 1<br />
Step 2. Unzip the Door Skin Window.<br />
Step 3. Insert the frame into the upper rear corner of the door skin and then insert the Frame into the upper<br />
front corner of the Door Skin. Press down the Velcro to secure the frame bar.<br />
Step 3<br />
Step 4. Insert the lower front corner of the Frame into the Door Skin (tight fit).<br />
Step 4<br />
Step 5. Wrap the Velcro around the Frame that runs the length of the bottom and secure.<br />
Step 6. Make sure the three legs of the Frame are seated in the 3 cut-away parts of the Door Skin. Close the<br />
2 large and 1 small flaps on the bottom of the Door Skin. Door Skin is now assembled.
Important Care <strong>Instructions</strong>:<br />
Convertible tops and accessories require special care if you want to get the maximum usage and enjoyment from them.<br />
The following recommendations, if followed carefully, can extend the life of your top or accessory.<br />
Hand wash using a mild non-detergent soap such as ivory. Use a non-abrasive cloth or sponge. Rinse thoroughly.<br />
Do not wash in direct sunlight and avoid automatic car washes<br />
When your top is clean, we recommend using “Ragg Topp” or “303 Protectant” on both the vinyl top and windows.<br />
This product contains a sunscreen that helps protect from the sun’s damaging rays. Stay away from products<br />
containing alcohol, as it will cause the fabric and windows to lose their elasticity, thus reducing the life of your top or<br />
accessory. If you are unable to locate “RaggTopp” Please call 1-800-377-4700 for a distributor near you. For “303<br />
Protectant”, please call 1-800-223-4303 for a distributor near you.<br />
Direct sunlight and heat are the biggest enemies of the windows. Park in the shade whenever possible. If you must<br />
park in the sunlight, rotate the direction that you park every few days so all windows get even exposure.<br />
Our tops are designed so that you may roll up and/or store the rear curtain and side curtains. To prevent scratching of<br />
the windows, be sure that windows are completely clean and free of dust particles. Even a little dirt will badly scratch<br />
the windows. You may want to use a soft cloth when rolling up or storing your windows. Heat may build up on rolled<br />
up windows, so be sure to unroll them frequently. If you roll up the windows at the beginning of summer and leave<br />
them, they may be ruined by fall.<br />
Do not open or roll up windows at temperatures below 45 degrees F this could cause them to crack or break.<br />
Zipper Care.<br />
DO NOT use pliers or other tools to pull on zippers. If the zipper requires more force than pulling with your fingers<br />
something is most likely out of alignment or improperly installed. Be sure the top is up to a temperature of 70 deg.,<br />
and that the components are installed correctly and in the correct sequence to ensure protection of the zipper.<br />
Zippers require periodic cleaning and lubrication to ensure longevity and ease of use. Clean by wiping with a towel<br />
soaked in soap and water, DO NOT USE HARSH CHEMICALS. Zipper lubricants are available at sporting goods<br />
stores and online for wetsuits. An occasional use will keep the zipper slides operating as new.<br />
Warranty Information<br />
<strong>Rampage</strong> products, Inc. warrants to the original purchaser of any top it manufactures, that the top will be free of defects in material<br />
or workmanship for a period of 2 year from date of purchase. Such obligations under this warranty shall be limited to the repair or<br />
replacement, at <strong>Rampage</strong> products discretion, of any assembly or parts which, upon examination by <strong>Rampage</strong> products, Inc. proves<br />
to be defective. All defective items must be returned with proof of purchase to <strong>Rampage</strong> products, Inc., freight prepaid. This<br />
warranty does not cover damage resulting from abuse, misuse, alteration, accident or damage in transit. <strong>Rampage</strong> products<br />
obligations under this warranty are limited to the aforementioned repair or replacement of warranty defects for which the return<br />
authorization has been received during the warranty period, and <strong>Rampage</strong> products, Inc. shall not be liable for any incidental or<br />
consequential damages arising from breech of this or any implied warranty.<br />
<strong>Rampage</strong> <strong>Products</strong> 22420 Temescal Canyon Rd. Ste “C”, Corona, CA 92883 Phone: (951) 277-4949<br />
Fax: (951) 277-2295<br />
www.rampageproducts.net<br />
Made in China