sailor sp3110 the portable vhf transceiver for gmdss - Polaris-as.dk
sailor sp3110 the portable vhf transceiver for gmdss - Polaris-as.dk
sailor sp3110 the portable vhf transceiver for gmdss - Polaris-as.dk
- No tags were found...

Create successful ePaper yourself
Turn your PDF publications into a flip-book with our unique Google optimized e-Paper software.
LO<br />
VOL<br />
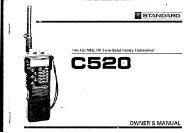
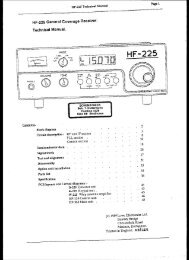
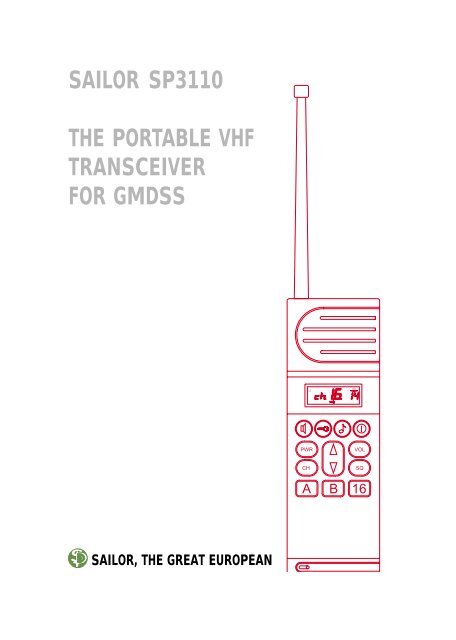
SAILOR SP3110<br />
THE PORTABLE VHF<br />
TRANSCEIVER<br />
FOR GMDSS<br />
PWR<br />
VOL<br />
CH<br />
SQ<br />
A B 16<br />
SAILOR, THE GREAT EUROPEAN
SP3110
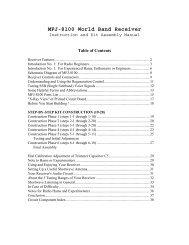
Monitor switch <strong>for</strong> listening-in on<br />
a channel, irrespective of <strong>the</strong><br />
squelch level setting.<br />
MONITOR<br />
LAMP<br />
Backlight switch, used to turn-on<br />
<strong>the</strong> illumination of <strong>the</strong> display<br />
and/or <strong>the</strong> keyboard, depending<br />
on programming.<br />
PTT<br />
PTT switch.<br />
CALL<br />
(Call switch, <strong>for</strong> selective calling.)<br />
28442A<br />
Microphone<br />
SP3110
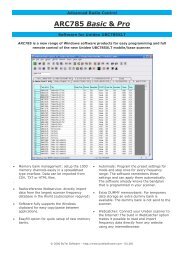
Display read-out<br />
1 2 3 4 5<br />
HI<br />
LO<br />
TX<br />
DUP<br />
VOL<br />
28443<br />
SQ<br />
12 11 10 9 8 7 6<br />
1. HIgh - LOw, TX power level indicators.<br />
2. TX on indicator, (carrier is transmitted).<br />
3. DUPlex channel indicator.<br />
4. Volume indicator, on in high level AF<br />
power mode.<br />
5. VOLume sign, <strong>the</strong> two digits below indicate<br />
<strong>the</strong> actual volume setting.<br />
6. 8 alpha-numeric digits, used <strong>for</strong> channel<br />
number indication etc.<br />
7. Squelch sign, <strong>the</strong> two digits above indicate <strong>the</strong><br />
actual squelch setting.<br />
8. Battery low indicator.<br />
9. Keyboard lock indicator.<br />
10.Individual call alarm indicator.*<br />
11.AF-mute indicator.*<br />
12.Tone system ON indicator.*<br />
* Functional only in conjunction with<br />
optional tone module <strong>for</strong> selective calling.<br />
SP3110
Contents<br />
Page<br />
Introduction 1<br />
Emergency 3<br />
Batteries 4<br />
Operator's guide 5<br />
Quick channel programming 7<br />
Additional features 8<br />
Installation 10<br />
Rechargeable batteries 11<br />
Mounting of clip 13<br />
Removing clip 14<br />
SP3110
Introduction<br />
SP3110, your new VHF-<strong>transceiver</strong>, is approved<br />
to fulfil <strong>the</strong> GMDSS-requirements to <strong>portable</strong><br />
VHF-<strong>transceiver</strong>s, and so it is a part of <strong>the</strong><br />
required safety equipment to be used in an<br />
emergency situation.<br />
However, <strong>the</strong> best way to guarantee functionality<br />
in an emergency, is to use <strong>the</strong> equipment in<br />
<strong>the</strong> daily work on-board, <strong>as</strong> a useful communication<br />
media.<br />
This is possible, due to a unique concept, with<br />
<strong>the</strong> PRIMARY EMERGENCY BATTERY, stored<br />
<strong>for</strong> <strong>the</strong> emergency, and a SECONDARY RE-<br />
CHARGEABLE BATTERY <strong>for</strong> daily use of your<br />
new <strong>portable</strong> VHF-<strong>transceiver</strong>.<br />
This concept secures at le<strong>as</strong>t 8 hours operation<br />
time, even at minus 20 C° at sea.<br />
ECI h<strong>as</strong> developed <strong>the</strong> first <strong>portable</strong> VHF<strong>transceiver</strong><br />
to be used <strong>as</strong> you normally use a<br />
telephone.<br />
This feature gives you a much better communication<br />
quality in noisy surroundings.<br />
1 SP3110
Fur<strong>the</strong>rmore, you have all <strong>the</strong> international<br />
simplex channels, quick selection of distress ch.<br />
16 and two additional user programmable<br />
channels, and a lot of o<strong>the</strong>r useful features.<br />
SP3110 2
Emergency<br />
Procedure <strong>for</strong> SP3110.<br />
If an emergency situation <strong>for</strong>ces you to leave <strong>the</strong><br />
ship, do <strong>as</strong> follows:<br />
1. Remove <strong>the</strong> top-seal of <strong>the</strong> orange emergency<br />
battery package.<br />
2. Insert <strong>the</strong> battery package into <strong>the</strong> handheld<br />
<strong>transceiver</strong> unit.<br />
3. Push <strong>the</strong> - button,<br />
until <strong>the</strong> radio turns on, indicated by channel<br />
read-out in <strong>the</strong> display.<br />
4. Push <strong>the</strong> 16 - button to ensure that <strong>the</strong><br />
channel <strong>for</strong> distress traffic is active.<br />
NOTE !<br />
Due to battery storage effects, <strong>the</strong> turn-on time<br />
may be extended compared to normal conditions.<br />
If Battery seal is broken <strong>for</strong> test, fill in label<br />
on battery.<br />
3 SP3110
Batteries<br />
This unit h<strong>as</strong> been delivered with two types of<br />
battery packages :<br />
* An orange PRIMARY EMERGENCY BAT-<br />
TERY package, to be used in an emergency,<br />
<strong>as</strong> indicated by its colour.<br />
* A black SECONDARY RE-CHARGEABLE<br />
BATTERY <strong>for</strong> daily use of <strong>the</strong> equipment.<br />
Replacement of battery package :<br />
* Press <strong>the</strong> two stainless steel locks on each<br />
side of <strong>the</strong> battery package with your thumb<br />
and indexfinger and pull out <strong>the</strong> battery.<br />
28468<br />
* Insert <strong>the</strong> new battery package into <strong>the</strong><br />
bottom of <strong>the</strong> <strong>transceiver</strong> and press it<br />
upwards until it snaps in with a “click”.<br />
SP3110 4
Operator's guide<br />
Press.....<br />
Until unit turns ON/OFF, indicated by <strong>the</strong><br />
display readout.<br />
To lock keyboard, indicated by<br />
To unlock keyboard, disappears.<br />
To select loudspeaker operation, .<br />
To select telephone-mode operation.<br />
To turn on keyboard beep-function.<br />
To turn off keyboard beep-function.<br />
To change setting of a selected function,<br />
Default: Volume level function.<br />
PWR<br />
To select Tx power level function.<br />
CH<br />
To select Channel selection function.<br />
SQ<br />
To select Squelch level function.<br />
VOL<br />
To select Volume level function.<br />
5 SP3110
A To select quick channel A.<br />
B To select quick channel B.<br />
16 To select distress channel 16.<br />
SP3110 6
Quick channel programming<br />
The two quick channel keys A and B can<br />
e<strong>as</strong>ily be programmed <strong>for</strong> single touch selection<br />
of any of <strong>the</strong> channels contained in <strong>the</strong><br />
equipment.<br />
These keys may be programmed <strong>as</strong> follows:<br />
Press CH , use <strong>the</strong> key to select <strong>the</strong><br />
wanted channel number, which must be shown<br />
in <strong>the</strong> display.<br />
<strong>the</strong>n<br />
Press <strong>the</strong><br />
key (less than 1 sec.) followed by<br />
<strong>the</strong> key you want to programme, A or B , <strong>for</strong><br />
more than 1 sec.<br />
7 SP3110
Additional features<br />
Your SP3110 h<strong>as</strong> some o<strong>the</strong>r features which<br />
may show up to be useful in daily use.<br />
On <strong>the</strong> side of <strong>the</strong> <strong>transceiver</strong> you will find <strong>the</strong><br />
following switches (look inside <strong>the</strong> cover of this<br />
folder):<br />
“Backlight” switch <strong>for</strong> turning on/off <strong>the</strong> keyboard<br />
and display illumination (if you <strong>for</strong>get to<br />
turn off <strong>the</strong> illumination, it will be done automatically<br />
after approx. 30 seconds to incre<strong>as</strong>e battery<br />
life time). The backlight function may be<br />
programmed to operate in o<strong>the</strong>r ways, ple<strong>as</strong>e<br />
contact your S.P.Radio distributor.<br />
“Monitor” switch <strong>for</strong> e<strong>as</strong>y listening-in on <strong>the</strong><br />
selected channel, irrespective of <strong>the</strong> squelch<br />
setting.<br />
Keyboard operated facilities:<br />
“Auto squelch” setting. Press SQ <strong>for</strong> more<br />
than one second, <strong>the</strong> <strong>transceiver</strong> will automatically<br />
find an appropriate level to mute <strong>the</strong><br />
receiver.<br />
SP3110 8
Programmable functions:<br />
“Tx power level” preset value. Select <strong>the</strong><br />
wanted power level and press “PWR” <strong>for</strong> more<br />
than 1 second.<br />
“Volume level” preset value. Select <strong>the</strong> wanted<br />
level and press “VOL” <strong>for</strong> more than 1 second.<br />
Alarm functions:<br />
“Battery warning” facility. When <strong>the</strong> battery<br />
capacity h<strong>as</strong> decreaced to a few percent of full<br />
load, an audible alarm is heard in <strong>the</strong> loudspeaker<br />
and a battery sign will be shown in <strong>the</strong><br />
display. At <strong>the</strong> same time <strong>the</strong> transmitter power<br />
level will automatically be set to LOw level, to<br />
extend <strong>the</strong> remaining operation time of <strong>the</strong><br />
battery.<br />
An audible alarm is heard each 10 seconds until<br />
<strong>the</strong> display readout shows “charGe”, and <strong>the</strong> set<br />
is switched off automatically.<br />
9 SP3110
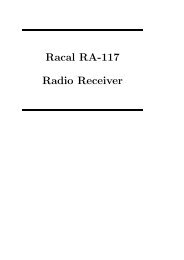
Installation<br />
With your SP3110 you have got a combined holder/<br />
charger. If <strong>the</strong> <strong>transceiver</strong> NOT is used in <strong>the</strong> daily<br />
work, <strong>the</strong> primary emergency battery may be<br />
stored in <strong>the</strong> holder. If however <strong>the</strong> charger is used<br />
frequently, <strong>the</strong> emergency battery must be stored<br />
in ano<strong>the</strong>r place, due to charger heating.<br />
The charger may be connected to 110/230 VAC,<br />
OR a DC source 10.8 -> 31.8 VDC.<br />
AC<br />
OR<br />
10,8 - 32V DC<br />
+<br />
-<br />
ON / OFF CHAR<br />
BATTERY CHARGER SP3911<br />
28469<br />
The charger will automatically detect <strong>the</strong> type of<br />
battery in <strong>the</strong> <strong>transceiver</strong>, <strong>the</strong> charging process<br />
will start when you press <strong>the</strong> „Char“-button and<br />
<strong>the</strong> red charging indicator turns on. A complete<br />
charge cycle is finished after 13 1/2 hour,<br />
indicated by a green coloured charge indicator.<br />
Ple<strong>as</strong>e refer to part „Rechargeable batteries“ <strong>for</strong><br />
proper use of secondary batteries.<br />
SP3110 10
Rechargeable batteries<br />
Be<strong>for</strong>e taken into operation, <strong>the</strong> NiCd battery<br />
included, must be fully charged.<br />
The battery can be stored at room temperature<br />
in any charge condition, without any risk of<br />
damage to <strong>the</strong> battery. However, if <strong>the</strong> battery<br />
h<strong>as</strong> been stored <strong>for</strong> an unknown period of time,<br />
it must be fully charged be<strong>for</strong>e used.<br />
The only maintenance needed <strong>for</strong> your NiCd<br />
battery is to keep it charged and with clean<br />
terminals. The battery must be at normal room<br />
temperature when it is charged, and <strong>the</strong> <strong>transceiver</strong><br />
must be switched off.<br />
WARNING<br />
The battery may explode if it is exposed to open<br />
fire.<br />
11 SP3110
MEMORY EFFECT. Your NiCd battery may<br />
show a memory effect, indicated by a reduced<br />
charging capability.<br />
This effect will typically arise if your battery<br />
repeatedly is charged after a partly discharge.<br />
A battery with memory effect is not in optimum<br />
working condition.<br />
How to avoid memory effect:<br />
Use your <strong>transceiver</strong> until <strong>the</strong> battery is fully<br />
discharged, indicated by <strong>the</strong> equipment. Then<br />
fully recharge <strong>the</strong> battery once a week.<br />
How to brake down a memory effect:<br />
Use your <strong>transceiver</strong> until <strong>the</strong> battery is fully<br />
discharged <strong>the</strong>n complete a charge cycle.<br />
Repeat this procedure at le<strong>as</strong>t three times.<br />
NOTE!<br />
As an option, S.P.Radio can offer a special<br />
charger, which includes a quick-charger and a<br />
special recycle feature with me<strong>as</strong>urement and<br />
readout of actual battery capacity.<br />
Contact your S.P.Radio distributor <strong>for</strong> fur<strong>the</strong>r<br />
in<strong>for</strong>mation<br />
SP3110 12
Mounting of clip<br />
28457A<br />
13 SP3110
Removing clip<br />
SP3110 14
15 SP3110
Ple<strong>as</strong>e note<br />
Any responsibility or liability <strong>for</strong> loss or damage in connection<br />
with <strong>the</strong> use of this product and <strong>the</strong> accompanying documentation<br />
is disclaimed. The in<strong>for</strong>mation in this manual is<br />
furnished <strong>for</strong> in<strong>for</strong>mational use only, is subject to change<br />
without notice, may contain errors or inaccuracies, and<br />
represents no commitment whatsoever. This agreement is<br />
governed by <strong>the</strong> laws of Denmark.<br />
Doc. No.: B3110GB0 Issue: F/9941