RTS200 RFID Test Set - RFID Webshop
RTS200 RFID Test Set - RFID Webshop
RTS200 RFID Test Set - RFID Webshop

Create successful ePaper yourself
Turn your PDF publications into a flip-book with our unique Google optimized e-Paper software.
TAGnology <strong>RFID</strong> GmbH | Grazer Vorstadt 142 | 8570 Voitsberg | AUSTRIA<br />
phone: +43 (0)3142/ 28 9 28-10 | fax: +43 (0)3142/28 9 28-20 | office@tagnology.com | www.tagnology.com<br />
<strong>RTS200</strong> <strong>RFID</strong> <strong>Test</strong> <strong>Set</strong><br />
User´s Guide<br />
IBERWAVE<br />
©2009 TAGnology <strong>RFID</strong> GmbH; reserves the right to change specification without notice at any time<br />
>><br />
your premium <strong>RFID</strong>-partner
Document Info<br />
DOCUMENT NAME<br />
DESCRIPTION<br />
FILE NAME<br />
<strong>RTS200</strong> <strong>RFID</strong> <strong>Test</strong> <strong>Set</strong><br />
RTS100 Software description. USER MODE Program Version 3.0 and later.<br />
<strong>RTS200</strong> user guide.odt<br />
CODE 001.0036<br />
VERSION 1<br />
STATUS<br />
Draft<br />
CREATED BY JCPM DATE 9/1/07<br />
APROVED BY<br />
DATE<br />
HISTORY Version 1.0 Original version
T a b le of Contents<br />
1 INTRODUCTION..................................................................................................................................................................... 4<br />
1.1 Version 3.0 new features.................................................................................................................................................. 4<br />
2 GETTING STARTED.............................................................................................................................................................. 5<br />
2.1 Software <strong>Set</strong>up................................................................................................................................................................. 5<br />
2.2 USB Installation................................................................................................................................................................ 5<br />
2.2.1 Hardware Connection................................................................................................................................................. 5<br />
2.2.2 Driver Installation........................................................................................................................................................ 5<br />
2.2.3 Software Configuration............................................................................................................................................... 7<br />
2.2.4 Communication Verification........................................................................................................................................ 7<br />
2.3 Ethernet Installation.......................................................................................................................................................... 7<br />
2.3.1 Hardware Connection ................................................................................................................................................ 7<br />
2.3.2 IP Address / Port......................................................................................................................................................... 7<br />
2.3.3 Ping............................................................................................................................................................................. 7<br />
2.3.4 Deviceinstaller............................................................................................................................................................ 8<br />
2.3.5 Software Configuration............................................................................................................................................. 10<br />
2.4 Configuration................................................................................................................................................................... 11<br />
2.4.1 Opening a New Form................................................................................................................................................ 11<br />
2.4.2 Selecting the Communication Interface ................................................................................................................... 12<br />
2.4.3 Configuring the System............................................................................................................................................ 12<br />
3 MENU OPTIONS.................................................................................................................................................................. 13<br />
3.1 Context Sensitive Menu.................................................................................................................................................. 13<br />
3.2 Window Main Menu........................................................................................................................................................ 13<br />
3.2.1 Firmware update....................................................................................................................................................... 13<br />
3.2.2 Global <strong>Test</strong> Options.................................................................................................................................................. 14<br />
4 TAG ANALYSIS.................................................................................................................................................................... 17<br />
4.1 Tag Analyzer Screen...................................................................................................................................................... 17<br />
4.1.1 Display Section......................................................................................................................................................... 18<br />
4.1.2 Chart Options Menu.................................................................................................................................................. 20<br />
4.1.3 Results Section......................................................................................................................................................... 20<br />
4.1.4 Control Section......................................................................................................................................................... 22<br />
4.1.5 File formats............................................................................................................................................................... 23<br />
5 TEST SETUP........................................................................................................................................................................ 24<br />
5.1 <strong>Test</strong> types....................................................................................................................................................................... 26<br />
5.2 <strong>Test</strong> Arrangement........................................................................................................................................................... 26<br />
5.3 Machine Interface Configuration..................................................................................................................................... 27<br />
6 ONLINE TEST SCREEN....................................................................................................................................................... 28<br />
6.1 Control Section............................................................................................................................................................... 28<br />
6.1.1 Yield Section............................................................................................................................................................. 29<br />
6.1.2 Statistical Information Section.................................................................................................................................. 29<br />
6.1.3 <strong>Test</strong> Result Section................................................................................................................................................... 30<br />
6.1.4 report Section........................................................................................................................................................... 30<br />
6.1.5 Generated files......................................................................................................................................................... 31<br />
ANNEX 1 TEST REPORT FILE FORMAT............................................................................................................................... 32<br />
ANNEX 2 TEST PROPERTIES............................................................................................................................................... 33<br />
Annex 2.1 Write Format Definition......................................................................................................................................... 35<br />
ANNEX 3 ERROR CODES...................................................................................................................................................... 36<br />
Pag: 3 Document: <strong>RTS200</strong> <strong>RFID</strong> <strong>Test</strong> <strong>Set</strong> Code: 001.0036 Version: 1
1 Intr o d uction<br />
The <strong>RTS200</strong> is the evolution of the RTS100 <strong>RFID</strong> <strong>Test</strong> <strong>Set</strong>. It includes new features, as USB<br />
interface, higher RF power, improved receiver sensitivity, and UHF resonant frequency<br />
measurement.<br />
The controlling application, running under Windows © , includes system configuration, test setup,<br />
test suite automation, report generation, or graphical display of tag characteristics in time and<br />
frequency domains.<br />
1 .1 Ve rsion 3.0 new features<br />
The description in this document applies to software versions 3.0 and later. Some new features<br />
have been included:<br />
●<br />
●<br />
●<br />
●<br />
●<br />
●<br />
●<br />
●<br />
Improved report generation (see description in section Chart Options Menu)<br />
Improved Q factor determination (more stable and robust)<br />
USB support<br />
Printing and export of graphical information<br />
Improvement in communication (more robust)<br />
Debugging of identified problems in previous versions<br />
Change in installation folder (now under standard PROGRAM FILES folder)<br />
PDF documentation accessible from HELP menu option<br />
Pag: 4 Document: <strong>RTS200</strong> <strong>RFID</strong> <strong>Test</strong> <strong>Set</strong> Code: 001.0036 Version: 1
2 Getting Star t e d<br />
2 .1 Softw a re <strong>Set</strong>up<br />
To install the system in your computer, run the setup file provided.<br />
The files are installed into the windows PROGRAM FILES/IBW_RTS folder. The main files<br />
installed are:<br />
FILE TYPE COMMENT<br />
RTS100 DEV Application This is the main application program<br />
RTS100 USER Application Application for user mode with simplified user interface to be used in production line<br />
LOADER .H86 Loader file for <strong>RTS200</strong> firmware updates<br />
* .PRO Several project files (.PRO) containing application and communication configuration<br />
information. There are project files for USB, Ethernet, RS232, ... This file also contains the<br />
test suite to be loaded when running the application.<br />
VERSION Text file Version information<br />
Sof<strong>RFID</strong>ProtM .DLL Windows library implementing the communication protocol<br />
RTS100 .INI Contains the name of the .PRO file to be loaded at startup<br />
/TEST_DATA Folder Default directory for report generation<br />
/TEST_SETUP Folder Default directory containing pre-defined tests (.TST) and test suites (.TSU) files.<br />
/RTS_FIRM Folder Contains <strong>RTS200</strong> firmware versions<br />
/TEST_SETUP/<br />
RTS100<br />
.CFG<br />
Configuration file for RF characteristics of the RTS model, antenna models and calibration<br />
constants<br />
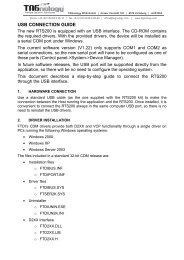
2 .2 USB Installation<br />
The new <strong>RTS200</strong> is equipped with an USB interface (this is the default interface after the<br />
application is installed). The CD-ROM contains the required drivers. With the provided drivers, the<br />
device will be installed as a serial COM port under Windows.<br />
2.2.1 Hardware Connection<br />
Use a standard USB cable (as the one supplied with the <strong>RTS200</strong> kit) to make the connection<br />
between the Host running the application and the <strong>RTS200</strong>. Once installed, it is convenient to<br />
connect the <strong>RTS200</strong> always in the same computer USB port, so there is no need to reinstall the<br />
USB drivers.<br />
2.2.2 Driver Installation<br />
FTDI’s CDM drivers provide both D2XX (direct drivers) and VCP (virtual port) functionality through<br />
a single driver on PCs running the following Windows operating systems:<br />
• Windows 2000<br />
• Windows XP<br />
• Windows Server 2003<br />
The files included in a standard 32-bit CDM release are:<br />
• Installation files<br />
<br />
FTDIBUS.INF<br />
Pag: 5 Document: <strong>RTS200</strong> <strong>RFID</strong> <strong>Test</strong> <strong>Set</strong> Code: 001.0036 Version: 1
FTDIPORT.INF<br />
• Driver files<br />
FTDIBUS.SYS<br />
FTSER2K.SYS<br />
• Uninstaller<br />
FTDIUNIN.EXE<br />
FTDIUN2K.INI<br />
• D2XX Interface<br />
FTD2XX.DLL<br />
FTD2XX.LIB<br />
FTD2XX.H<br />
For latest driver versions, please, consult the manufacturer web page:<br />
http://www.ftdichip.com/FTDrivers.htm<br />
The driver installation procedure consists of the following steps:<br />
a.-<br />
Connect the <strong>RTS200</strong> through the USB serial port to the computer<br />
b1.- If windows recognizes the new hardware, a message will appear with a text similar to “your<br />
new hardware is ready to be used”.<br />
b2.- If windows does not recognize the device, it will ask for a driver. You´ll have to select the<br />
Driver folder in the supplied CDROM.<br />
c.- The operating system will select one virtual serial port. To check the port configuration, and<br />
change it if needed, open Control Panel->System->Hardware->Device manager. The new serial<br />
port will appear under PORTS (COM & LPT):<br />
Pag: 6 Document: <strong>RTS200</strong> <strong>RFID</strong> <strong>Test</strong> <strong>Set</strong> Code: 001.0036 Version: 1
2.2.3 Software Configuration<br />
The IBW_RTS software has to be configured to use the USB port. To do that, run the software,<br />
and open the corresponding pre-defined project, default_USB.pro with the File->Open Project<br />
option in the application main menu.<br />
The System Config screen for the USB connection should look something like:<br />
2.2.4 Communication Verification<br />
It is possible to check the communication between the host and the <strong>RTS200</strong> with a terminal<br />
application, like Windows HYPERTERMINAL. Run the application, and select the virtual serial<br />
port, as configured by Windows (check it in Windows Control Panel if needed). Once the<br />
connection is opened, write the characters:<br />
$GV<br />
Followed by ENTER. This corresponds to the GET VERSION command in the <strong>RTS200</strong> protocol,<br />
and there should be an answer from the <strong>RTS200</strong> in the HYPERTERMINAL screen.<br />
2 .3 Ethernet Installation<br />
2.3.1 Hardware Connection<br />
There are two ways to connect the <strong>RTS200</strong> to a host through the ETHERNET interface.<br />
• Direct connection with a crossover cable<br />
• Connection through a hub or switch with a straight cable<br />
2.3.2 IP Address / Port<br />
The <strong>RTS200</strong> is factory shipped with a fixed IP Address (192.168.1.33). The default IP Port is<br />
15001. Depending on the network configuration these settings may not be valid, and have to be<br />
changed. The procedure to change the default IP settings is described in the following sections.<br />
2.3.3 Ping<br />
The first verification can be done by sending a ping to the <strong>RTS200</strong> IP Address:<br />
ping 192.168.1.33<br />
If there is answer from the <strong>RTS200</strong>, it means that the hardware connection is right, and that the IP<br />
Address is valid, so it is possible to skip the following sections and go to the section describing the<br />
APPLICATION CONFIGURATION.<br />
Pag: 7 Document: <strong>RTS200</strong> <strong>RFID</strong> <strong>Test</strong> <strong>Set</strong> Code: 001.0036 Version: 1
2.3.4 Deviceinstaller<br />
If there is no answer for the ping, it probably means that the IP Address is not reachable from the<br />
host, and it has to be changed. The way to do it is using an external utility from LANTRONIX (the<br />
manufacturer of the <strong>RTS200</strong> Ethernet interface component, the XPORT). This utility is included in<br />
the installation CD-ROM, and can also be downloaded for free from the LANTRONIX web page:<br />
http://www.lantronix.com/support/downloads.html<br />
This configuration utility has to be installed and run. The following screen appears:<br />
The steps to follow to change the <strong>RTS200</strong> IP Address are as follows:<br />
• Press the Search button in the Deviceinstaller screen<br />
• The <strong>RTS200</strong> IP address will appear after some seconds. Attention: If the computer is<br />
equipped with local network and wireless (wi-fi) network connection, or in general, if it is<br />
connected to more than one network, it is important to select the right connection (usually<br />
local network, that is, cable connection) by clicking in the main menu Tools->Options.<br />
Pag: 8 Document: <strong>RTS200</strong> <strong>RFID</strong> <strong>Test</strong> <strong>Set</strong> Code: 001.0036 Version: 1
• If it does not appear it usually means that there is a problem (hardware, cables, ...)<br />
• If it appears in black font, the <strong>RTS200</strong> is reachable (as in the screen above), and there is no<br />
need to change the IP Address<br />
• Usually (if the ping test was not successful), the address will appear in red font, meaning that<br />
a <strong>RTS200</strong> has been found, but the address range is not accessible from the host. The<br />
<strong>RTS200</strong> IP Address has to be changed.<br />
• To change the <strong>RTS200</strong> IP Address, select the XPORT device whose address is to be<br />
changed in the right side of the Deviceinstaller screen, and press the Assign IP Address<br />
button. The following screen appears:<br />
• Select the Assign a specific IP address option, and press NEXT:<br />
Pag: 9 Document: <strong>RTS200</strong> <strong>RFID</strong> <strong>Test</strong> <strong>Set</strong> Code: 001.0036 Version: 1
• <strong>Set</strong> a IP address valid according to your computer and network configuration (subnet mask),<br />
and press NEXT.<br />
• Press the Assign button. The <strong>RTS200</strong> will be configured with the new address.<br />
• Pressing the Search button again, will make the new address to be displayed, this time it will<br />
be in black font if the address was properly selected.<br />
• If you don´t know which IP Address is right for your network configuration, you can select the<br />
Obtain an IP address automatically. This option will give you a valid IP Address. As the<br />
<strong>RTS200</strong> application needs a fixed IP Address, this automatically generated IP Address will<br />
have to be manually assigned again, following the same procedure described above.<br />
2.3.5 Software Configuration<br />
Once the <strong>RTS200</strong> IP Address is valid, the IP Address on the application controlling the RTS100<br />
needs also to be changed accordingly. To do that, click on the <strong>RTS200</strong> image on the System<br />
Config form:<br />
Pag: 10 Document: <strong>RTS200</strong> <strong>RFID</strong> <strong>Test</strong> <strong>Set</strong> Code: 001.0036 Version: 1
The Object Inspector form (in the left hand side of the screen shown above) shows the IP Address<br />
that the application will use to establish contact with the <strong>RTS200</strong>. This value will be changed to the<br />
new <strong>RTS200</strong> address, pressing ENTER at the end, to make the change take immediate effect.<br />
The connection in the graphic between the <strong>RTS200</strong> and the host has to be (as in the screen<br />
above) made between the LAN connections in the graphical representation of both elements. If it<br />
has to be changed, you have to right-click anywhere in the free space of this form, and some<br />
drawing tools will appear, choose the arrow (select option) to be able to move the host, the<br />
<strong>RTS200</strong> or the connecting line.<br />
To check the communication with the new parameters (and once the <strong>RTS200</strong> is connected), press<br />
the Get <strong>Test</strong> button on the tag analyzer screen. The signal should appear on the screen. (If the<br />
address is not properly configured, the application might seem to stall, as it will be waiting for some<br />
time to the answer from the operating system).<br />
After the communication is established, and in order to save the configuration, choose the File-<br />
>Save As options in the main screen menu, and choose a name for the new configuration (project<br />
file). The application will start with the latest saved or loaded configuration.<br />
2 .4 Configuration<br />
The RTS100 software stores the configuration (hardware connection and software status) in a<br />
project file (*.PRO). There are several sample project files in the installation directory that can be<br />
used to get familiar with the different configuration options. The results of loading the different files<br />
are graphically shown in the software configuration screen. The steps to start a project from<br />
scratch are described next.<br />
2.4.1 Opening a New Form<br />
First of all it is necessary to create a form, that is, a container where all the elements are going to<br />
be displayed. To do it, just press the New Form button on the screen. A default form appears (if<br />
the toolbar is not displayed, press Toolbar->Files to make it appear).<br />
In the configuration form, the Master Controller represents the controlling computer (the computer<br />
where the software application is running). A computer image appears showing the four interface<br />
options (Serial 1, Serial 2, USB and LAN).<br />
Pag: 11 Document: <strong>RTS200</strong> <strong>RFID</strong> <strong>Test</strong> <strong>Set</strong> Code: 001.0036 Version: 1
The other element in the configuration window represents the <strong>RTS200</strong> itself, showing also the<br />
different interface options. There should be one <strong>RTS200</strong> block for every real device to be<br />
controlled from the same host. To add a new <strong>RTS200</strong>, right-click on the form, and select Load<br />
Block, or in the menu, select Drawing Tools->Load Block. After that, a mouse click on the form will<br />
make the library file selection appear, where it is possible to choose between the different<br />
elements to include. The blocks are usually under the /LIB folder.<br />
2.4.2 Selecting the Communication Interface<br />
After the display matches the hardware configuration, it is very simple to choose the<br />
communication interface. Select the Draw Line in the menu (or in the context menu right-clicking<br />
on the form), or press the corresponding button in the toolbox. Then click on the host interface to<br />
be used (for instance USB), and drag to the <strong>RTS200</strong> interface (USB also in this case). Both the<br />
Host and the <strong>RTS200</strong> will use the selected interface. To change the interface is only a matter of<br />
selecting the line, and graphically changing the connection.<br />
2.4.3 Configuring the System<br />
Once the system hardware configuration is established, it is possible to configure the behaviour of<br />
each module. The modules or blocks are not just images. They have associated properties, that<br />
allow to select their operating parameters. To do it, click on the module image so the property<br />
editor shows the property values for the device. The main properties of the <strong>RTS200</strong> are:<br />
Property<br />
Block_Type<br />
Name<br />
LAN_IP_Address<br />
LAN_IP_Port<br />
Explanation<br />
The type of the block. Can not be changed<br />
Choose a name for the unit and a caption to show when the module is selected<br />
LAN IP Address for Ethernet communication<br />
LAN IP Port for Ethernet communication<br />
Pag: 12 Document: <strong>RTS200</strong> <strong>RFID</strong> <strong>Test</strong> <strong>Set</strong> Code: 001.0036 Version: 1
3 Menu Options<br />
3 .1 Context Sensitive Menu<br />
The <strong>RTS200</strong> module displays a context sensitive menu when right-clicked. The controller module<br />
displays a menu with the following options:<br />
Option<br />
Reset Unit<br />
Tag Analyzer<br />
Firmware Update<br />
Explanation<br />
Performs a soft reset to the unit<br />
Opens a new window with all the RF and tag test controls. All the manual and automatic tests are<br />
controlled and configured from this window, so it will be described in detail in the next chapter<br />
Programs new firmware versions into the <strong>RTS200</strong><br />
3 .2 Window Main Menu<br />
This main menu shows the option described below.<br />
Option<br />
File<br />
Drawing Tools<br />
Toolbars<br />
Windows<br />
Help<br />
Explanation<br />
Shows file operations, like opening a new project, a new text file, an existing project or text file, save<br />
projects and text files, print operations, and exit from the program. Also the Global <strong>Test</strong> Options form<br />
can be accessed from here<br />
Tools for drawing into the system configuration form, adding or deleting blocks, wires, changing<br />
colours ... The same options can be reached from the toolbar if the corresponding toolbar section is<br />
active.<br />
Shows or hides the different toolbar sections (File, Drawing tools, Program control, Window<br />
management and Help). It is useful to keep maximum screen space for operation if needed.<br />
Window management. Ordering in cascade, tile horizontal or vertical, minimize or arrange. Also<br />
selection of a particular window from the list.<br />
Activation of the help documentation, and about box, with version information. The HELP files are<br />
organized as .PDF documents that can be accessed from this menu option.<br />
3.2.1 FIRMWARE UPDATE<br />
To update the <strong>RTS200</strong> firmware, select the corresponding option in the device contextual menu in<br />
the configuration window. The following screen appears:<br />
Pag: 13 Document: <strong>RTS200</strong> <strong>RFID</strong> <strong>Test</strong> <strong>Set</strong> Code: 001.0036 Version: 1
The first line shows the Serial Number and Firmware versions as received from the <strong>RTS200</strong>. If the<br />
communication is not properly configured, a “Not Found” message appears instead.<br />
The firmware update procedure is as follows:<br />
• Click the Browse button, and select the .h86 (firmware) file supplied by the manufacturer<br />
• Click the Update Unit Firmware button<br />
• If the unit is being programmed through the serial port, press and release the programming<br />
button. This button is accessible through a hole in one side of the device. (if the unit is<br />
programmed through the Ethernet interface, there is no need to press this button)<br />
• Reset the unit (power supply off-on) to go back to normal operation<br />
3.2.2 GLOBAL TEST OPTIONS<br />
This option in the main window menu has been included to allow customization of some<br />
parameters of the program, like for instance the drop down menu for efficiency control in on-line<br />
mode, or the fields to be included in the generated reports.<br />
To access the parameters a password will be required, if it has been configured as non-empty.<br />
The following window appears:<br />
The first Tab Report Generation is provided to configure the fields to be included in each record in<br />
the generated report in on-line mode. Checking an option means that the corresponding field will<br />
be included. The additional option Include Efficiency Records makes it possible to include records<br />
Pag: 14 Document: <strong>RTS200</strong> <strong>RFID</strong> <strong>Test</strong> <strong>Set</strong> Code: 001.0036 Version: 1
corresponding to this option, according to the efficiency measurements settings in the tab<br />
described next.<br />
In the Efficiency Measurements tab, the operation of the efficiency measurement is defined.<br />
If the Enable Automatic Stop option is checked, a dropdown menu will appear automatically when<br />
in online mode after the time defined in the Time for Stop has elapsed without detecting any tag.<br />
This situation is considered a stop of the machine, and the operator will have to provide a reason<br />
for the pause. The option texts are defined in this screen. This text will also appear in the report if<br />
the Include Efficiency Records option in the previous tab is checked.<br />
The dropdown menu that appears for the efficiency control is shown as:<br />
To continue working, the operator will have to include a value for identification, and a reason for<br />
the stop, to be selected from the available options. This information is included in the report if the<br />
corresponding option in the Report Generation Tab is checked.<br />
The next tab Password <strong>Set</strong>tings is used to handle the password to access this window. To modify<br />
the password, the old password has to be typed.<br />
Pag: 15 Document: <strong>RTS200</strong> <strong>RFID</strong> <strong>Test</strong> <strong>Set</strong> Code: 001.0036 Version: 1
The <strong>Test</strong> Grids <strong>Set</strong>up tab control allows configuration of the elements accessible to the operator in<br />
the test setup screen on the tag analyzer window. If an option is checked, the corresponding<br />
element is open for the operator to change:<br />
Pag: 16 Document: <strong>RTS200</strong> <strong>RFID</strong> <strong>Test</strong> <strong>Set</strong> Code: 001.0036 Version: 1
4 Ta g Analysis<br />
The Tag Analyzer window is shown by selecting the option in the context sensitive menu (rightclick<br />
on the <strong>RTS200</strong> module image on the screen).<br />
The purpose of this window is to provide the user the control over all the relevant parameters in<br />
the tag testing process, both manually and on-line. It is possible to present three different screens<br />
on this window, by pressing the three buttons on the top-right:<br />
Button<br />
Tag Analyzer<br />
On-Line <strong>Test</strong><br />
<strong>Test</strong> <strong>Set</strong>up<br />
Explanation<br />
Provides direct control over the test conditions (frequencies, levels, protocol, ...) in manual mode<br />
Operations related to Online <strong>Test</strong>s<br />
Provides access to test suites and individual tests, where the conditions and parameters of the<br />
tests are defined<br />
The three screens and their associated procedures are defined in following sections.<br />
4 .1 Tag Analyzer Screen<br />
The appearance of the screen is shown below.<br />
It is divided into three different sections. The Display section shows graphically the result of the<br />
measurement or data test. Sometimes it will display the results in the time domain and some other<br />
times it will be in the frequency domain, depending on the state of the other parameters in the<br />
screen. The X and Y axis titles and labels show the corresponding values and units.<br />
Pag: 17 Document: <strong>RTS200</strong> <strong>RFID</strong> <strong>Test</strong> <strong>Set</strong> Code: 001.0036 Version: 1
The Results Section below displays the numerical results of the test, along with the test<br />
identification, and test conditions, as defined in the corresponding test file.<br />
The Control Section in the middle contains all the buttons needed to operate the screen.<br />
The three sections are described in detail next.<br />
4.1.1 Display Section<br />
In the left part of the display section, the RF controls are shown. It is possible to change all the RF<br />
parameters (the values usually shown in white), by two different procedures. Where continuous<br />
values are shown (frequencies, for instance), it is possible to edit the value with the keyboard.<br />
Where only discrete values are allowed (BW filter, for instance), the change will be made by right<br />
(increase the parameter value) and left (decrease the parameter value) clicking on the value.<br />
There are three sets of parameters. Those related to the RF generator are on top. The parameters<br />
related with the Receiver come next, and finally the antenna selection control. The list of<br />
parameters and their meaning are described below.<br />
It is possible to specify the magnitudes in different units. A frequency parameter can be specified<br />
in terms of Hz, KHz or Mhz.<br />
A RF level value can be specified in voltage units, both logarithmic (dBm) or linear (V, mV, uV),<br />
and if the antenna and antenna-tag distance is specified, also in terms of Magnetic Field at the tag<br />
(A/m, mA/m or uA/m). The <strong>RTS200</strong> software performs all the conversions needed to generate<br />
the specified field at the given distance.<br />
Frequency Generator<br />
Parameter<br />
Frequency<br />
RF Level<br />
Mod Index<br />
Tracking<br />
Explanation<br />
The frequency output by the RF generator. Continuous value. The parameter is also used as the<br />
carrier frequency for the functional tests<br />
The output level of the RF generator. It is a continuous value.<br />
The Modulation Index to be used in the RF generator for <strong>RTS200</strong>-TAG communication. Continuous<br />
value in % between 0 and 99.<br />
Used to enable/disable the Tracking (RF Generator sweep). Discrete value. It can only be Enabled or<br />
Pag: 18 Document: <strong>RTS200</strong> <strong>RFID</strong> <strong>Test</strong> <strong>Set</strong> Code: 001.0036 Version: 1
RF Output<br />
Disabled (the value of this parameter is always defined in the test file, according to the type of test there<br />
is no reason to change it manually in normal operation).<br />
Used to enable/disable the RF output. Discrete value. It can only be Enabled or Disabled (the value of<br />
this parameter is always defined in the test file, according to the type of test there is no reason to<br />
change it manually in normal operation).<br />
Receiver<br />
Parameter<br />
Mode<br />
Freq. Span<br />
Ref. Level<br />
Explanation<br />
Discrete value. It can be Single Freq. or Sweep. The single frequency mode (0 span) is used for<br />
functional tests, while the Sweep mode is used for electrical tests (the value of this parameter is always<br />
defined in the test file, according to the type of test there is no reason to change it manually in normal<br />
operation).<br />
This is a continuous frequency value. It is only shown when the Receiver mode is set to sweep. It<br />
controls the distance in frequency between the lower and upper frequency in the sweep.<br />
It is equivalent to the Ref Level control in a conventional spectrum analyzer. It defines the level that<br />
corresponds to the maximum to be measured. It is a discrete value. It can be 1mV-10mV (in 1mV<br />
steps), 30mV and 100mV.<br />
BW Filter IF Bandwith. The possible values are 2 Mhz, 200 Khz, 150 Khz, 100 Khz, 75 Khz, 50 Khz, 25 Khz, 10<br />
Khz, 1 Khz, and 100 Hz (the value of this parameter is usually defined in the test file, according to the<br />
selected protocol in functional tests, there is usually no need to change it manually in normal<br />
operation).<br />
HP Filter<br />
Video Filter<br />
Scale<br />
Samples<br />
Tag<br />
Demodulation high pass filter. Digital value from 1 to 15 (the value of this parameter is usually defined<br />
in the test file, according to the selected protocol in functional tests, there is usually no need to change<br />
it manually in normal operation).<br />
Video Filter. It is a discrete value and can be Enabled or Disabled. It is implemented as a FIR filter in<br />
the high level software used to smooth the signal in the spectrum analyzer display. The filter<br />
characteristics are automatically selected in the high level software for each span and centre<br />
frequency.<br />
It defines if the measurement is going to be made on the linear signal or on the logarithmic signal (the<br />
value of this parameter is always defined in the test file, according to the type of test there is no reason<br />
to change it manually in normal operation).<br />
It defines the number of samples to be taken in the measurement. In functional tests, this value<br />
corresponds to the necessary samples to have the whole signal to be demodulated. In electrical tests,<br />
it defines the frequency resolution of the measurement. It is a continuous value.<br />
Defines the protocol to be used to communicate with the tag. The options available for this version are<br />
shown below. The actual enabled protocols will depend on the system and device configuration.<br />
Available protocols in the current version are:<br />
ISO_15693<br />
ISO14443_A_MIFARE<br />
PHILIPS_ICODE<br />
UHF_EPC_CLASS_1_SLOW<br />
UHF_EPC_CLASS_1_FAST<br />
UHF_ISO_18000_6B<br />
UHF_EPC_GEN2<br />
UHF_EM4222<br />
Antenna<br />
Parameter<br />
<strong>Test</strong> Antenna<br />
Explanation<br />
Discrete value. It defines the type of antenna for the measurement. The value affects to the Magnetic<br />
Field magnitude to RF voltage correlation calculation. The antenna set and calibration constants are<br />
defined in a configuration file (RTS100.cfg) . In this software version the antenna set is:<br />
HTP100<br />
UTP100<br />
UTP200<br />
HTP200<br />
Pag: 19 Document: <strong>RTS200</strong> <strong>RFID</strong> <strong>Test</strong> <strong>Set</strong> Code: 001.0036 Version: 1
GENERIC<br />
(The values TESPR1000 and TESPR1006_UHF are maintained for backward compatibility, but they<br />
correspond to the HTP100 and UTP100 antenna models respectively)<br />
Distance<br />
Tag-Antenna distance in mm. The value affects to the Magnetic Field magnitude to RF voltage<br />
correlation calculation<br />
The graphical display shows the waveform (time or frequency domains, depending on the settings<br />
or the selected test), and some additional information, as marker and cursor positions, or axis<br />
limits. It is possible to make some operations directly on the display:<br />
Operation<br />
Zoom<br />
Pan<br />
Full View<br />
Explanation<br />
Click on the top-left part of the area to be displayed, and drag to the bottom-right. The selected area will<br />
be adjusted to fit in the whole display zone<br />
Right click and drag on the display to the desired position<br />
Click and drag starting from the bottom-right and finishing in the top-left<br />
It is also possible to write values in the lower part of this screen section, in the Start, Stop and<br />
Centre fields.<br />
4.1.2 Chart Options Menu<br />
The lower part of the Display Section shows the new Chart Options Menu. When clicked, a menu<br />
appears with options related to report generation and printing of measurement results:<br />
The operation of this menu allows automation of some measurement tasks. It is possible to select<br />
one or several options in the menu, that will be performed all at once by clicking in the Do It! label<br />
on the right. The idea is to simplify the report generation task by saving the relevant information to<br />
disk in an organized way, with a single mouse click. The following options are available:<br />
Menu Option<br />
Save Chart Data<br />
Save Image Data (bmp)<br />
Save Image Data (jpg)<br />
Print Chart<br />
Preview Chart<br />
Copy Chart to Clipboard<br />
Explanation<br />
Saves the numerical information corresponding to the graph that is being displayed, that is, the X-Y<br />
values of the curve that is displayed on the screen<br />
The Display Section image is saved as a bitmap file<br />
The Display Section image is saved as a jpeg file<br />
The Display Section image is sent to the system active printer<br />
There is a preview prior to sending the image to printer. It is possible to select another printer, or to<br />
change the printing options<br />
The Display Section image is sent to the clipboard. It is possible to Paste this image into any other<br />
Windows application (word processor, for instance). The graph colours are optimized for printing<br />
4.1.3 Results Section<br />
Pag: 20 Document: <strong>RTS200</strong> <strong>RFID</strong> <strong>Test</strong> <strong>Set</strong> Code: 001.0036 Version: 1
The test results section shows the results of the manual test performed. If it is a functional test, it<br />
displays the data read or written from/to the tag:<br />
In the case of an electrical test, it also displays the measurement value:<br />
The operation to be performed is selected in the <strong>Test</strong> Parameter Section (see description below).<br />
This operation will be performed once pressing the Single button, or continuously pressing the<br />
Cont button. The test result will be reflected in the results zone.<br />
If the Table button is down, and pressing the Get <strong>Test</strong> button, a special table format will be kept in<br />
the results area, allowing easy comparison between a set of tests:<br />
In this case, the Counter field reflects the number of tests performed.<br />
The Clear button clears all the information from the test results area.<br />
Pressing the Store button will make all the subsequent results to be appended, without clearing<br />
the previous information. The result is as follows:<br />
Pag: 21 Document: <strong>RTS200</strong> <strong>RFID</strong> <strong>Test</strong> <strong>Set</strong> Code: 001.0036 Version: 1
While the Store button is pressed the test results are stored in memory. When it is released, all the<br />
stored information is written into a file (see file formats section below in this chapter).<br />
4.1.4 Control Section<br />
In this section it is possible to choose between the different tests defined in the <strong>Test</strong> <strong>Set</strong>up screen<br />
(see description below in this document). Once a test from those included in the current test suite<br />
is selected (with the Select button), the Get <strong>Test</strong> button transfers all the test parameters to the<br />
corresponding Display Section parameters, that is, to the current settings on the screen. This is a<br />
very convenient way to select the right parameters for a particular test, as it is performed using the<br />
conditions defined in the test file.<br />
As an example, to make the <strong>RTS200</strong> perform a read test on an ISO15693 tag, instead of manually<br />
adjusting all the parameters (frequency, output level, number of samples ...), it is more convenient<br />
to select the pre-defined ISO15693 read test, where all those conditions are already defined.<br />
Pressing the Get <strong>Test</strong> button will also make the selected test to be performed.<br />
It is important to notice that the changes in the test will not be automatically saved to the test file.<br />
To do it, it is necessary to access to the <strong>Test</strong> <strong>Set</strong>up screen, substitute the old parameters with the<br />
new values, and save the test file and/or the test suite. This has been made to prevent accidental<br />
change of the test file contents.<br />
The Do All <strong>Test</strong>s button performs all the tests of the test suite in the manual operation mode. All<br />
the results will be displayed in the results section of this screen. All the limits defined in the test will<br />
also be checked, and a PASS/NO-PASS indication will be shown.<br />
Selecting Manual Operation makes it is possible to change any test parameter directly from the<br />
display section, and perform the test in the resulting condition.<br />
It is also possible to modify a test condition or test limit in the test setup window (see description in<br />
later section), and even without saving the test, the new test conditions will be taken into account,<br />
but will not be saved into the test file unless the save operation is performed (pressing the Save<br />
<strong>Test</strong> button).<br />
The Marker controls allow to display or hide a marker with the On button, to find the maximum with<br />
the Peak button, or to move the marker frequency to the centre of the display with the M->CF<br />
button.<br />
Pag: 22 Document: <strong>RTS200</strong> <strong>RFID</strong> <strong>Test</strong> <strong>Set</strong> Code: 001.0036 Version: 1
The Traces controls in this section are provided to control the displayed signal on the display<br />
section.<br />
Three traces have been defined (A, B and C). It is possible to show / hide any of them, with the<br />
View and Clear buttons. This mode of operation allows storing and displaying up to 2 reference<br />
data, to compare with the current waveform. The View and Clear buttons operates on the<br />
waveform selected by the A, B or C buttons.<br />
4.1.5 File formats<br />
There are several different file formats, resulting from the different operations in the Tag Analyzer<br />
screen. All files generated are stored in the /<strong>Test</strong> Data folder. Each new file generated is assigned<br />
a name starting with the date and time when the file is created, and followed by an identifier of the<br />
type of file.<br />
Save Chart Data<br />
The Save Chart Data option from the Chart Options menu generates a file with as many lines or<br />
records as samples displayed in the graph. Each line contains an X-Y pair of the form:<br />
...<br />
13000000 -58.159<br />
13010000 -58.159<br />
13020000 -58.373<br />
13030000 -58.346<br />
13040000 -58.239<br />
13050000 -58.266<br />
13060000 -58.293<br />
13070000 -58.293<br />
13080000 -58.213<br />
13090000 -58.186<br />
...<br />
This file section corresponds to a resonance curve. It means that, for instance, at 13000000 (that<br />
is, 13MHz), the signal value is -58.159 (in this case dBm).<br />
The file identifier, in this case, is the letter E for electrical tests or F for functional tests. For<br />
instance, the name of this file is:<br />
080110124756_E.txt<br />
It means that it was created on 10/01/08 at 12:47:56, and it corresponds to an electrical test<br />
(frequency in X Axis).<br />
Store Button<br />
Pag: 23 Document: <strong>RTS200</strong> <strong>RFID</strong> <strong>Test</strong> <strong>Set</strong> Code: 001.0036 Version: 1
When the Store Button is pressed, the test results are stored into memory, and when it is released,<br />
all this information is saved into a file. It is a text file, with all the fields separated by semicolon, so it<br />
can be easily imported into most spreadsheets.<br />
The file format is:<br />
Q Factor;<br />
<strong>Test</strong> Limits:;;;;;;;;;13 MHz;15 MHz;0.05 mV;-10 dBm;10 ;190 ;<br />
Tag;Status;Frequency;Unit;Amplitude;Unit;Gen.Amp.Lev;Unit;Qfac;Min Frq;Max Frq;Min Amp;Max Amp;Min<br />
Qfa;Max Qfa;<br />
0000;PASS;13850000;Hz;-41;dBm;4; mA/m;35;PASS;PASS;PASS;PASS;PASS;PASS;<br />
0001;PASS;13840000;Hz;-41;dBm;4; mA/m;35;PASS;PASS;PASS;PASS;PASS;PASS;<br />
0002;PASS;13850000;Hz;-41;dBm;4; mA/m;35;PASS;PASS;PASS;PASS;PASS;PASS;<br />
0003;PASS;13850000;Hz;-41;dBm;4; mA/m;35;PASS;PASS;PASS;PASS;PASS;PASS;<br />
...<br />
When imported into a spreadsheet, the appearance is:<br />
Q Factor<br />
<strong>Test</strong> Limits: 13 MHz 15 MHz 0.05 mV -10 dBm 10 190<br />
Tag Status Frequency Unit Amplitude Unit Gen.Amp.Lev Unit Qfac Min Frq Max Frq Min Amp Max Amp Min Qfa Max Qfa<br />
0 PASS 13850000 Hz -41 dBm 4 mA/m 35 PASS PASS PASS PASS PASS PASS<br />
1 PASS 13840000 Hz -41 dBm 4 mA/m 35 PASS PASS PASS PASS PASS PASS<br />
2 PASS 13850000 Hz -41 dBm 4 mA/m 35 PASS PASS PASS PASS PASS PASS<br />
3 PASS 13850000 Hz -41 dBm 4 mA/m 35 PASS PASS PASS PASS PASS PASS<br />
If there are several tests made at once (with the Do All button, for instance) a different file is<br />
generated for each test.<br />
The naming of the files follow the same rule as described above. The name is composed of the<br />
date and time, and then the type of test (the Identification parameter as defined in the test file). For<br />
instance, the name of this file could be:<br />
080116131720_Q Factor.txt<br />
5 <strong>Test</strong> <strong>Set</strong>up<br />
The type and characteristics of the test to be performed during the online test operation are<br />
configured in the <strong>Test</strong> <strong>Set</strong>up screen. All the tests are arranged in <strong>Test</strong> Suites.<br />
A test suite is a set of individual tests to be performed online to a particular type of tag and in a<br />
particular machine.<br />
For instance, a test suite could comprise a read functional test and a resonant frequency and Q<br />
electrical tests. Every test inside a test suite has its own conditions (parameters), and limits for<br />
validity.<br />
The <strong>Test</strong> <strong>Set</strong>up screen is included for the configuration of the tests to be performed in online<br />
operations. The selected test suite is saved in the project file, so opening the project will make the<br />
corresponding test suite to be automatically loaded. The <strong>Test</strong> <strong>Set</strong>up screen can be seen in the<br />
next image:<br />
Pag: 24 Document: <strong>RTS200</strong> <strong>RFID</strong> <strong>Test</strong> <strong>Set</strong> Code: 001.0036 Version: 1
The test suite structure is described in the tree on the left of the screen. The root of the tree is the<br />
test suite (Read_Data_ISO15693 in the example), while the branches correspond to individual<br />
tests (Read Tag Data, Resonant Frequency and Q Factor in the example).<br />
There is also a machine interface configuration file, which includes all the information needed for<br />
the <strong>RTS200</strong> to interface with the machine where it is operating. Parameters defining the hardware<br />
signals used to control the operation, time characteristics …<br />
Selecting an item on the tree (the test suite or an individual test), makes it possible to see in the<br />
right side of the window the properties associated with the element. There are three different types<br />
of properties. They can be seen selecting the corresponding tab page on the screen.<br />
Property Type<br />
Identification<br />
<strong>Test</strong> Conditions<br />
<strong>Test</strong> Limits<br />
Explanation<br />
The name, date, comments, ... corresponding to the test suite or individual test are defined here. The<br />
parameter name and number are open, so the user can add as many identificative properties as<br />
needed.<br />
The conditions of the test are described here. This corresponds to values needed for some operating<br />
parameters. For instance, the RX frequency, the number of samples to take, ... The conditions also<br />
correspond to configuration parameters on the Tag Analyzer screen.<br />
These are the limits to consider a test result to be valid or not. When the test result falls between the<br />
limits, a PASS indication appear in Tag Analyzer mode, and the result is considered valid in Online<br />
mode. Other parameters defined here are used to control the appearance of the data results in the<br />
online test screen.<br />
The <strong>Test</strong> conditions and <strong>Test</strong> limits have special Keywords for the parameters. The keywords can<br />
not be changed. ANNEX 2 describes those pre-defined keywords. More keywords can be added in<br />
the future if more parameters have to be changed for different tests.<br />
Pag: 25 Document: <strong>RTS200</strong> <strong>RFID</strong> <strong>Test</strong> <strong>Set</strong> Code: 001.0036 Version: 1
The toolbar on top of the window allows performing the different operations to configure a test:<br />
Open and Save of a test suite, Adding, or removing new or existing tests to a test suite ... The<br />
caption on the buttons are self-explaining. It is important to mention that, when adding a new test,<br />
a test template will be required. The test templates are files with the extension .TPL, with default<br />
values for all the required parameters. In any case, it is usually simpler to use a pre-defined test,<br />
modify the required values, and save it with another name.<br />
The same operations can be carried out with a context-sensitive menu opened when right-clicking<br />
the selected tree items.<br />
After a test file has been selected, it is possible to transfer the settings (conditions) to the Tag<br />
Analyzer screen (see description of the Get button in the <strong>Test</strong> Parameter section of the Tag<br />
Analyzer screen description).<br />
5 .1 Te s t t yp e s<br />
There are two different types of tests attending to the test purpose:<br />
• Characterisation tests To be performed in manual mode, the purpose of the<br />
characterisation tests is to provide all the relevant electrical and functional test parameters.<br />
The emphasis is put into the accuracy, so they are not optimized for speed.<br />
• Production tests To be performed mainly in online mode, the purpose of the<br />
production tests is to provide a way to reject all transponders not meeting a specific criteria or<br />
performance limit. They are optimized for speed.<br />
There are different default folders for the different type of tests. Characterisation tests are usually<br />
under <strong>Test</strong>_<strong>Set</strong>up/<strong>Test</strong>_Characterisation, while Production tests are under<br />
<strong>Test</strong>_<strong>Set</strong>up/<strong>Test</strong>_Production. (the SETUPDIR global constant has been defined with the path of<br />
the <strong>Test</strong>_<strong>Set</strong>up directory). Please, note that the tests provided with the installation CD-ROM, are<br />
generic tests. The user may need to modify them to adapt the RTS operation to their specific<br />
requirements. It is very common, for example, to change the RF level, or the frequency for a<br />
particular test to work with a certain type of tag.<br />
There are two different types of tests attending to the test characteristics:<br />
• Electrical tests Measurement of electrical characteristics of the transponder.<br />
Resonant Frequency or Q factor are examples of Electrical tests.<br />
• Functional tests To check the transponder operation. Reading data or Writing<br />
information into the tag memory are examples of functional tests.<br />
Electrical and functional test characteristics are defined by a different set of parameters. ANNEX 2<br />
shows the detail of the parameters allowed in the different type of tests.<br />
5 .2 Te s t A rrangement<br />
All the test parameters can be defined in both the test suite of the individual test file. The test suite<br />
parameters will be read first, and if the same parameter is defined again in the individual test, this<br />
value will overwrite the previous parameter value.<br />
It is a good practice (and the default test files included in the installable make use of this<br />
philosophy), to use test files that are common for all the test suites, in order to minimize the<br />
number of test files to be defined.<br />
Pag: 26 Document: <strong>RTS200</strong> <strong>RFID</strong> <strong>Test</strong> <strong>Set</strong> Code: 001.0036 Version: 1
All the common test files are usually together under the /common folder in the<br />
<strong>Test</strong>_<strong>Set</strong>up/<strong>Test</strong>_Characterisation or <strong>Test</strong>_setup/<strong>Test</strong>_Production directories. A test suite is<br />
usually composed of one or several common test files, defining all the standard parameters, being<br />
the parameters specific for this test suite, defined in the test suite file.<br />
It is important to understand that if a parameter is defined in the file corresponding to an individual<br />
test, the scope of this parameter will only be this particular test. All the previous and later tests<br />
make use of the parameter defined in the test suite.<br />
5 .3 Machine Interface Configuration<br />
There is an additional type of file that defines the interface between the <strong>RTS200</strong> and the machine<br />
where it runs in online mode. This file includes information about some special parameters to<br />
describe the operation of the hardware interface with the machine, that is, the polarities and timing<br />
of the signals sent from the machine to the <strong>RTS200</strong> to start the test or from the <strong>RTS200</strong> to the<br />
machine to signal the end of the test or its result. (See RTS HARDWARE MANUAL for a<br />
description of the hardware interface).<br />
This option has been included to provide flexible hardware interface, having in mind the diverse<br />
specification of the interfaces in different machines. The configuration parameters that have been<br />
introduced are described in ANNEX 2.<br />
The interface is synchronous parallel. The machine sends a SOT (Start of <strong>Test</strong>) to signal the<br />
<strong>RTS200</strong> that the transponders are in place for the test. The <strong>RTS200</strong> shows the result of the test in<br />
the Result line. Then it activates the EOT (End of <strong>Test</strong>) signal as an indication of finished test.<br />
As an example, see the parameters for the drawing below:<br />
Start of <strong>Test</strong> (SOT)<br />
Tag In<br />
Place<br />
Tag In<br />
Place<br />
Tag In<br />
Place<br />
Tag In<br />
Place<br />
Result (R)<br />
End of <strong>Test</strong> (EOT)<br />
PASS FAIL PASS PASS<br />
Valid data Valid data Valid data Valid data<br />
<strong>Test</strong> Time<br />
The parameter definition for this interface would be:<br />
Parameter Value Explanation<br />
RESULT_FAIL_LEVEL 0 High Level when active<br />
EOT_ACTIVE_EDGE RISING Rising edge for EOT signal<br />
TRIGGER_ACTIVE_EDGE FALLING Falling edge for SOT (Trigger) signal<br />
RESULT_ACTIVE FAIL The result line is active in the FAIL condition<br />
T_RESULT_ACTIVE 0 The EOT and RESULT signals are active till next trigger<br />
The machine configuration file is specific for each machine where the <strong>RTS200</strong> is operating, and it is<br />
usually located in the SETUPDIR/Machine_Config directory.<br />
Pag: 27 Document: <strong>RTS200</strong> <strong>RFID</strong> <strong>Test</strong> <strong>Set</strong> Code: 001.0036 Version: 1
6 ONLINE TEST SCREEN<br />
The Online test screen is designed to provide control over the online-test process, showing also<br />
the results of the test being performed. The screen appearance is shown here:<br />
6 .1 Control Section<br />
The control section is used to start/stop the online-test operation. To start a test, just press the<br />
Run button. The label box should display the message Running if the operation was successful,<br />
that is, if the <strong>RTS200</strong> is now in online test mode. To stop this mode, press again the same button.<br />
When the run button is pressed, the window shown below appears, asking the operator to type the<br />
reel identification code. The buttons included are intended to start the test or to cancel the test<br />
(close the window). There is an option check to initialize statistics (yield and statistical information).<br />
The operator will also be able to introduce a text field for Run. This could be needed when the<br />
same reel has to be processed several times.<br />
Pag: 28 Document: <strong>RTS200</strong> <strong>RFID</strong> <strong>Test</strong> <strong>Set</strong> Code: 001.0036 Version: 1
The Pause button is used to make adjustments on the system; the trigger point ... The <strong>RTS200</strong><br />
keeps operating in online mode, but the host software will discard all the data coming from the<br />
reader, so it will not affect the yield or appear on the report files. The display goes to the Manual<br />
Screen, where it is possible to test performance, or change parameters. After the Pause button is<br />
pressed again, the test continues from the situation when it was stopped.<br />
6.1.1 YIELD SECTION<br />
The yield value of the current run, is shown in numerical and graphical formats. The total, pass<br />
and fail numbers are also shown. Two yield values are shown. One is for the whole run (long term<br />
yield), and the other is for a defined number of the last tags (short term yield used to describe<br />
tendencies). The number of tags taken into account for this Short Term Yield is defined in the<br />
Machine Configuration file. The parameter is ST_YIELD_SAMPLES, and the default value is 16.<br />
The counters and values are reset by means of the Initialize Statistics option in the Reel<br />
Identification window.<br />
There is a configurable minimum value for the yield, so the Yield indication will go red is the value<br />
is lower to what is expected. This is only an indication to the operator, as the program does<br />
nothing in this event.<br />
6.1.2 STATISTICAL INFORMATION SECTION<br />
This section shows some real time Statistical Process Control information derived from one of the<br />
Electrical Measurement tests included in the test suite.<br />
Pag: 29 Document: <strong>RTS200</strong> <strong>RFID</strong> <strong>Test</strong> <strong>Set</strong> Code: 001.0036 Version: 1
The display shows the graph of the statistical distribution of the parameter selected in the Graph<br />
Selection box (resonant frequency in this case), as a bar chart with the number of occurrences of<br />
the different parameter values. The upper and lower limits for the chart and the number of bars are<br />
controlled by means of the parameters MIN_GRAPH, MAX_GRAPH and NUM_GRAPH in the<br />
test definition file.<br />
6.1.3 <strong>Test</strong> Result Section<br />
This section presents the results of the last tests performed in online mode in a grid.<br />
The following fields are shown:<br />
Field<br />
Index<br />
Gerror<br />
Serror_x<br />
Tries<br />
Date, Time<br />
Explanation<br />
Shows the ordinal number of the processed transponder in the current run<br />
General Error. It is 0 if there is no error in any of the tests performed. A non-zero value means that an<br />
error has been produced in at least one of the tests of the test suite. The list of possible values for<br />
Gerror is described in ANNEX 3<br />
Specific error code for an individual test. A non-zero value means that an error has happened in the<br />
test number x.The list of possible values for this parameter is described in ANNEX 3<br />
Number of tries that have been necessary for the test to give the PASS condition. The maximum<br />
number of tries is defined for each individual test. This value can be enabled or disabled in the<br />
Global <strong>Test</strong> Option screen, and it provides indication of how often the test is giving wrong results<br />
The date and time of the test carried out<br />
There are additional fields for each test showing the result of the test. For instance, the serial<br />
number of the tag chip, or the value obtained for the resonant frequency.<br />
6.1.4 REPORT SECTION<br />
The name of the Reel as introduced by the operator is shown here.<br />
The Open File button opens the report file generated by the whole operation, where the results for<br />
all the transponders processed are stored.<br />
Pag: 30 Document: <strong>RTS200</strong> <strong>RFID</strong> <strong>Test</strong> <strong>Set</strong> Code: 001.0036 Version: 1
6.1.5 GENERATED FILES<br />
There are two types of files generated by the application when online mode:<br />
• Report File A file containing the results of the test for each individual<br />
transponder. It is described in detail in ANNEX 1.<br />
• Exchange File A file to be used by other applications needing real time information<br />
for synchronization. The name of the file is exchange.dat, and it is located in the <strong>Test</strong>_data<br />
directory. The file contents format is shown in the line:<br />
C:\Ibw_Rts\test_data\123_12.txt,100,100,2,EFBD4C0000000001D608,EFBD4C0000000<br />
001D608, EFBD4C0000000001D608<br />
This single line includes, separated by commas, the following fields:<br />
• The file being generated C:\Ibw_Rts\test_data\123_12.txt<br />
• The long term yield 100<br />
• The short term yield 100<br />
• The N_RESULT_DELAY parameter 2<br />
• The last 3 serial numbers EFBD4C0000000001D608<br />
EFBD4C0000000001D608<br />
EFBD4C0000000001D608<br />
Pag: 31 Document: <strong>RTS200</strong> <strong>RFID</strong> <strong>Test</strong> <strong>Set</strong> Code: 001.0036 Version: 1
ANNEX 1<br />
T EST REPORT F ILE FORMAT<br />
A report is generated for every online test run. The file name is the reel name introduced by the<br />
operator. If several tests are performed with the same reel number, the characters _xx are<br />
appended to the file name, where xx is a number between 00 and 99. The file format is shown<br />
next:<br />
;****************************************************************<br />
;<strong>Test</strong> Suite = SETUPDIR\\test_production\testpr_1000\data_test_icode.tsu (Data_<strong>Test</strong>_ICODE)<br />
;<strong>Test</strong> 0 = SETUPDIR\\test_production\common\data_test.tst (Data <strong>Test</strong>)<br />
;Start of test = 15/12/3 12:54<br />
;Roll ID = 123<br />
;Run =<br />
;Chip = PHILIPS_ICODE<br />
;<strong>Test</strong>erID = RTS100 – IberWave SLL Ver 1.01 SN - 010.0001.0.0006<br />
;Antenna Type = TESPR1000<br />
;Suite Identification = ICODE Data test<br />
;Suite Created By = FN<br />
;Suite Date = 14/12/03<br />
;Suite Reference = -<br />
;Fields = Index, GError,Data <strong>Test</strong>, SError_1, Tries, Date, Time<br />
;****************************************************************<br />
0,00,3FF28001000000018C1E,00,01,15/12/2003,12:54:31<br />
1,00,3FF28001000000018C1E,00,01,15/12/2003,12:54:31<br />
2,00,3FF28001000000018C1E,00,01,15/12/2003,12:54:31<br />
3,00,3FF28001000000018C1E,00,01,15/12/2003,12:54:31<br />
4,00,3FF28001000000018C1E,00,01,15/12/2003,12:54:31<br />
5,00,3FF28001000000018C1E,00,01,15/12/2003,12:54:31<br />
6,00,3FF28001000000018C1E,00,01,15/12/2003,12:54:31<br />
7,00,3FF28001000000018C1E,00,01,15/12/2003,12:54:31<br />
8,00,3FF28001000000018C1E,00,01,15/12/2003,12:54:32<br />
9,00,3FF28001000000018C1E,00,01,15/12/2003,12:54:32<br />
13,00,3FF28001000000018C1E,00,01,15/12/2003,12:54:32<br />
14,00,3FF28001000000018C1E,00,01,15/12/2003,12:54:32<br />
.....<br />
334,00,3FF28001000000018C1E,00,01,15/12/2003,12:54:44<br />
335,00,3FF28001000000018C1E,00,01,15/12/2003,12:54:44<br />
;****************************************************************<br />
;Total number of tags processed = 336<br />
;Pass = 258<br />
;Fail = 78<br />
;Yield = 76 %<br />
;Number of failures at Data <strong>Test</strong> test = 78;<br />
;End of test = 15/06/05 12:54<br />
;Elapsed time = 0:19 (minutes:seconds)<br />
;****************************************************************<br />
The file is composed of three sections:<br />
• Header Showing the test identification information.<br />
• <strong>Test</strong>s Showing the test result for each different test performed<br />
• Footer Showing statistics of tests performed for each antenna and the<br />
accumulated values.<br />
The example shows a run with only one data test defined. If more than one test is performed,<br />
additional fields will be included to show the individual results and error codes.<br />
Pag: 32 Document: <strong>RTS200</strong> <strong>RFID</strong> <strong>Test</strong> <strong>Set</strong> Code: 001.0036 Version: 1
ANNEX 2<br />
T EST PROPERT IES<br />
The next table shows the set of properties defined for the current <strong>RTS200</strong> version for electrical<br />
tests.<br />
Property name Description Comments<br />
TEST CONDITIONS<br />
TEST_TYPE<br />
Type of test to be<br />
performed<br />
* <strong>Test</strong>s marked with (*) are not<br />
implemented in the firmware.<br />
They are only intended for<br />
laboratory use<br />
TST_RES_FRQ<br />
TST_UN_RES_FRQ (*)<br />
TST_LO_RES_FRQ (*)<br />
TST_Q<br />
Resonant frequency test<br />
Unloaded resonant frequency test<br />
Loaded resonant frequency test<br />
Q test<br />
START_FREQ Lower freq. For the test In Hz, KHz or MHz<br />
STOP_FREQ Upper freq. For the test In Hz , KHz or MHz<br />
RF_LEVEL RF level for the test In terms of field (mA/m, A/m , ...) or voltage (V, mV, uV)<br />
N_SAMPLES Samples Number of measuring points between low and up. Freq<br />
TRIES Number of times to test Repeats until NTRIES if the test is not successful. 0 means Level Trigger, that is, the test<br />
will be repeated until a good result is obtained or the trigger signal goes back to its<br />
original state.<br />
TEST_PERIOD Periodicity of test The test is performed every TEST_PERIOD tests<br />
POSDET_FILTER<br />
IF_BANDWIDTH<br />
VIDEO_FILTER (for<br />
compatibility reasons)<br />
Post-detection filter The post-detection filter bandwidth. It can take the values 100 Hz, 1 KHz, 10 KHz, 25<br />
KHz, 50 KHz, 75 KHz, 100 KHz, 150 KHz or 200 Khz.<br />
(Any of the three property names are valid and equivalent)<br />
REFERENCE_LEVEL Analyzer ref. Level In voltage units (V, mV, uV, ...)<br />
HP Filter Demod. High Pass filter Selection of filter. Digital value from 1 to 15<br />
DETECTOR Demodulator Only Linear option can be selected here<br />
TEST_ANTENNA_TYPE Model of antenna to use TESPR1000,TESPR1001,TESPR1002,TESPR1003<br />
DISTANCE_TO_ANTENNA Antenna-tag distance Used to control Field level in tag with precision<br />
TRACKING_GENERATOR Enabling of tracking ON/OFF<br />
RF_GENERATOR_ENABLED<br />
YIELD_THRESHOLD_LT<br />
YIELD_THRESHOLD_ST<br />
TEST LIMITS<br />
Enabling of tracking<br />
generator<br />
Long term yield threshold<br />
(defined in test suite)<br />
Short term yield threshold<br />
(defined in test suite)<br />
ON/OFF<br />
For lower values of LT yield, a red alarm indication appears on screen<br />
For lower values of ST yield, a red alarm indication appears on screen<br />
RESULT TYPE Type of result of the test Int, string, bool<br />
MIN_GRAPH Lower limit for SPC graph Should be minimum expected value for measurement<br />
MAX_GRAPH Upper limit for SPC graph Should be maximum expected value for measurement<br />
NUM_GRAPH<br />
Number of points in SPC<br />
graph<br />
LIMIT_MIN_FRQ Freq. Lower limit for test Minimum frequency measurement to consider the test valid<br />
LIMIT_MAX_FRQ Freq. Upper limit for test Maximum frequency measurement to consider the test valid<br />
LIMIT_MIN_LEV Level lower limit for test Minimum level measurement to consider the test valid<br />
LIMIT_MAX_LEV Level upper limit for test Maximum level measurement to consider the test valid<br />
LIMIT_MIN_Q Lower limit for Q In electrical measurements<br />
Pag: 33 Document: <strong>RTS200</strong> <strong>RFID</strong> <strong>Test</strong> <strong>Set</strong> Code: 001.0036 Version: 1
The next table shows the set of properties defined for the current <strong>RTS200</strong> version for functional<br />
tests.<br />
Property name Description Comments<br />
TEST CONDITIONS<br />
TEST_TYPE<br />
Type of test to be performed<br />
TST_READ_TAG<br />
Read test<br />
* <strong>Test</strong>s marked with (*) are not<br />
implemented in the firmware.<br />
They are only intended for<br />
laboratory use<br />
TST_FAST_READ<br />
TST_WRITE_TAG<br />
Fast read test (no decoding)<br />
Write test<br />
TST_READ_THRS*<br />
Read Threshold<br />
TAG_TYPE Type of chip (protocol) to use ISO_15693, ISO14443_A_MIFARE, PHILIPS_ICODE,<br />
UHF_EPC_CLASS_1_SLOW, UHF_EPC_CLASS_1_FAST,<br />
UHF_ISO_18000_6B<br />
INICADDR Initial address The starting tag memory address<br />
LENGTH Length in bytes Number of bytes in tag memory to perform the test<br />
TX_FREQ Carrier frequency for the test Sometimes not the standard carrier, but the optimal for the tag<br />
RX_FREQ Reception frequency Frequency where the receiver is tuned (See note below)<br />
MOD_INDEX Modulation Index Selected modulation index for the test<br />
N_SAMPLES Samples Number of samples to digitize the tag answer<br />
TRIES Number of times to test Repeats until NTRIES if the test is not successful. 0 means Level Trigger, that is, the<br />
test will be repeated until a good result is obtained or the trigger signal goes back to its<br />
original state.<br />
TEST_PERIOD Periodicity of test The test is performed every TEST_PERIOD tests<br />
POSDET_FILTER<br />
IF_BANDWIDTH<br />
VIDEO_FILTER (for<br />
compatibility reasons)<br />
Post-detection filter The post-detection filter bandwidth. It can take the values 100 Hz, 1 KHz, 10 KHz, 25<br />
KHz, 50 KHz, 75 KHz, 100 KHz, 150 KHz or 200 Khz.<br />
(Any of the three property names are valid and equivalent)<br />
REFERENCE_LEVEL Analyzer ref. Level In voltage units (V, mV, uV, ...)<br />
DEMOD_GAIN Gain of the demodulator In dB<br />
ATTENUATOR Input attenuator Selection of input attenuator. 0dB-70dB in 10dB steps<br />
DETECTOR Demodulator Only Linear option can be selected here<br />
IF_BANDWIDTH IF filter bandwidth Only 100KHz option can be selected here<br />
TEST_ANTENNA_TYPE Model of antenna to use TESPR1000,TESPR1001,TESPR1002,TESPR1003<br />
DISTANCE_TO_ANTENNA Antenna-tag distance Used to control Field level in tag with precision<br />
TRACKING_GENERATOR Enabling of tracking ON/OFF<br />
RF_GENERATOR_ENABLED<br />
Enabling of tracking<br />
generator<br />
ON/OFF<br />
WRITE_DATA<br />
Data to be written into the tag For personalization. See below for format description<br />
CHECK_CRC<br />
YIELD_THRESHOLD_LT<br />
YIELD_THRESHOLD_ST<br />
TEST LIMITS<br />
Enable or disable CRC<br />
checking<br />
Long term yield threshold<br />
(defined in test suite)<br />
Short term yield threshold<br />
(defined in test suite)<br />
To be used for debugging purposes, or when the tag has not been initialized with the<br />
right CRC value.<br />
For lower values of LT yield, a red alarm indication appears on screen<br />
For lower values of ST yield, a red alarm indication appears on screen<br />
RESULT TYPE Type of result of the test Int, string, bool (usually string for functional tests)<br />
LIMIT_MIN_FRQ Freq. Lower limit for test Minimum frequency measurement to consider the test valid<br />
LIMIT_MAX_FRQ Freq. Upper limit for test Maximum frequency measurement to consider the test valid<br />
LIMIT_MIN_LEV Level lower limit for test Minimum level measurement to consider the test valid<br />
LIMIT_MAX_LEV Level upper limit for test Maximum level measurement to consider the test valid<br />
Pag: 34 Document: <strong>RTS200</strong> <strong>RFID</strong> <strong>Test</strong> <strong>Set</strong> Code: 001.0036 Version: 1
The next table shows the test conditions in the Machine Configuration files.<br />
Property name Description Comments<br />
TEST CONDITIONS<br />
RESULT_FAIL_LEVEL<br />
Level of RESULT signal when<br />
FAIL condition<br />
Binary number with 8 bits. Each bit describes the polarity of the result line for the<br />
corresponding antenna<br />
EOT_ACTIVE_EDGE Active edge for EOT signal FALLING or RISING are possible values<br />
TRIGGER_ACTIVE_EDGE Edge active for trigger signal FALLING or RISING are possible values<br />
RESULT_ACTIVE<br />
T_RESULT_ACTIVE<br />
N_RESULT_DELAY<br />
ST_YIELD_SAMPLES<br />
RESULT2_LEVEL<br />
N_RESULT2_DELAY<br />
Condition of result to become<br />
active<br />
Time the RESULT signals<br />
remain active<br />
Delay for output in number of<br />
tags<br />
Tags to be considered for<br />
Short term yield calculation<br />
Active level for RESULT2<br />
signal<br />
Delay for output 2 in number<br />
of tags<br />
PASS, FAIL, BOTH or NONE are possible values<br />
In ms<br />
Describes the delay in terms of number of tags for the corresponding output signal to<br />
be generated after the test has been made<br />
The system will consider the last ST_YIELD_SAMPLES transponder for short term<br />
yield calculation<br />
HIGH or LOW to activate the RESULT2 signal (additional FAIL indication) to 1 or to<br />
0 when there is a FAIL condition<br />
Same meaning as N_RESULT_DELAY for RESULT2 output (additional FAIL<br />
indication)<br />
A nnex 2.1 Write Format Definition<br />
Some protocols include the possibility of encoding the information into the tag chip memory. For<br />
instance, the <strong>RTS200</strong> current version supports ISO15693 and ISO14443-A writing operations.<br />
There are two <strong>Test</strong> Suites supplied as example for writing:<br />
• Write_Mifare.tsu<br />
• Write_ISO15693.tsu<br />
One block of information is written. The data to be written is specified as a string of hexadecimal<br />
information, in the parameter WRITE_DATA of the test suite:<br />
WRITE_DATA<br />
05A1A2A3A4<br />
The first hexadecimal byte (05 in the example) defines the block number to write (block 5 in this<br />
case), while the rest of the string defines the actual data to write (hexadecimal bytes A1, A2, A3<br />
and A4 in this case).<br />
There are some special cases for information that is not mapped in the memory chip address<br />
space. For instance, to activate or deactivate the SLI EAS bit, the block number has to be<br />
specified as FF, and the data has to be FF to activate and 00 to deactivate the bit.<br />
If writing more than one block is needed, it is possible to build a special test suite including as<br />
many test files (.tst) as needed. Each test file has to include one WRITE_DATA parameter with the<br />
information to write on a particular block (remember that the parameter in the test has precedence<br />
over the same parameter if it is defined on the test suite also).<br />
Pag: 35 Document: <strong>RTS200</strong> <strong>RFID</strong> <strong>Test</strong> <strong>Set</strong> Code: 001.0036 Version: 1
ANNEX 3<br />
E RROR CODES<br />
Global error (for the test suite), in the “ERROR CODE” field<br />
OK 0 <strong>Test</strong> result correct<br />
FAIL 1 Fail in read operation<br />
Individual error (for the individual test), in each field, bitwise format<br />
OK 0 <strong>Test</strong> result correct<br />
FAIL 1 Fail in read operation<br />
UPPER_FREQ 2 The frequency is higher that upper freq. limit<br />
LOWER_FREQ 4 The frequency is lower than lower freq. limit<br />
MAX_AMPLITUDE 8 The amplitude is higher that upper limit<br />
MIN_AMPLITUDE 16 The amplitude is lower than lower limit<br />
Q MIN 32 The Q is higher than higher limit<br />
Q MAX 64 The Q is lower than lower limit<br />
READ FAIL 128 Fail in read operation<br />
WRITE FAIL 256 Fail in write operation<br />
CRC ERROR 512 Fail in CRC in functional test<br />
FORMAT ERROR 1024 Format error (protocol specific)<br />
Pag: 36 Document: <strong>RTS200</strong> <strong>RFID</strong> <strong>Test</strong> <strong>Set</strong> Code: 001.0036 Version: 1