Installation Manual - Navman Marine
Installation Manual - Navman Marine
Installation Manual - Navman Marine

Create successful ePaper yourself
Turn your PDF publications into a flip-book with our unique Google optimized e-Paper software.
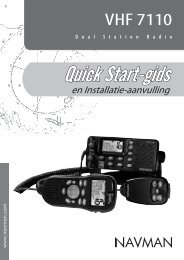
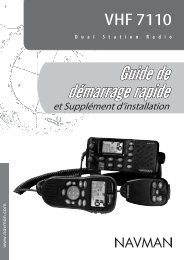
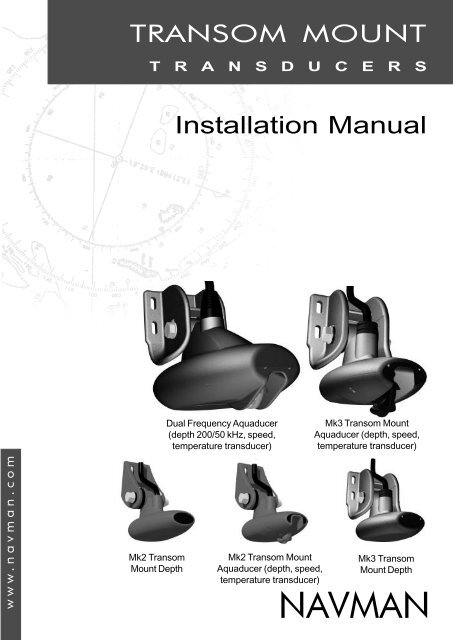
TRANSOM MOUNT<br />
T R A N S D U C E R S<br />
<strong>Installation</strong> <strong>Manual</strong><br />
Dual Frequency Aquaducer<br />
(depth 200/50 kHz, speed,<br />
temperature transducer)<br />
Mk3 Transom Mount<br />
Aquaducer (depth, speed,<br />
temperature transducer)<br />
www.navman.com<br />
Mk2 Transom<br />
Mount Depth<br />
Mk2 Transom Mount<br />
Aquaducer (depth, speed,<br />
temperature transducer)<br />
Mk3 Transom<br />
Mount Depth<br />
NAVMAN
FCC Statement<br />
Note: This equipment has been tested and found to comply with the limits for a<br />
Class B digital device, pursuant to Part 15 of the FCC Rules. These limits are<br />
designed to provide reasonable protection against harmful interference in a normal<br />
installation. This equipment generates, uses and can radiate radio frequency energy<br />
and, if not installed and used in accordance with the instructions, may cause<br />
harmful interference to radio communications. However, there is no guarantee<br />
that interference will not occur in a particular installation. If this equipment does<br />
cause harmful interference to radio or television reception, which can be determined<br />
by turning the equipment off and on, the user is encouraged to try to correct the<br />
interference by one or more of the following measures:<br />
Reorient or relocate the receiving antenna.<br />
Increase the separation between the equipment and receiver.<br />
Connect the equipment into an output on a circuit different from that to<br />
which the receiver is connected.<br />
Consult the dealer or an experienced technician for help.<br />
A shielded cable must be used when connecting a peripheral to the serial ports.<br />
2<br />
NAVMAN<br />
Transom Mount Transducers <strong>Installation</strong> <strong>Manual</strong>
Introduction<br />
This manual describes how to install NAVMAN’s<br />
Transom Mount Transducers:<br />
Dual Frequency Aquaducer (depth 200/50<br />
kHz, speed, temperature transducer).<br />
Mk3 Transom Mount Aquaducer (depth,<br />
speed, temperature transducer).<br />
Mk3 Transom Mount Depth Transducer.<br />
Mk2 Transom Mount Aquaducer (depth,<br />
speed, temperature transducer).<br />
Mk2 Transom Mount Depth Transducer.<br />
What comes with a transducer<br />
Transducer with mounting bracket and<br />
cable [Mk2 and Mk3 Aquaducer cable 26 ft<br />
(8 m), Dual Frequency Aquaducer and<br />
depth only transducer cable 33 ft (10 m)].<br />
Important<br />
It is the owner’s sole responsibility to install and use NAVMAN’s transducers in a manner that will<br />
not cause accidents, personal injury or property damage. The user of this product is solely<br />
responsible for observing safe boating practices.<br />
Transducer installation: The choice, location and angle of the transducer is the most critical part<br />
of installation. If installation is not correct, the unit can not perform at its designed potential. If in<br />
doubt, consult your NAVMAN dealer. Ensure that any holes cut are in a safe position and will not<br />
weaken the boat’s structure. If in doubt, consult a qualified boatbuilder.<br />
NAVMAN NZ LIMITED DISCLAIMS ALL LIABILITY FOR ANY USE OF THIS PRODUCT IN A WAY<br />
THAT MAY CAUSE ACCIDENTS, DAMAGE OR THAT MAY VIOLATE THE LAW.<br />
Governing Language: This statement, any instruction manuals, user guides and other information<br />
relating to the product (Documentation) may be translated to, or has been translated from, another<br />
language (Translation). In the event of any conflict between any Translation of the Documentation,<br />
the English language version of the Documentation will be the official version of the Documentation.<br />
This manual represents the transducer installation procedures as at the time of printing.<br />
<strong>Navman</strong> NZ Limited reserves the right to make changes to specifications without notice.<br />
Copyright © 2002 <strong>Navman</strong> NZ Limited, New Zealand. All rights reserved. NAVMAN is a registered<br />
trademark of <strong>Navman</strong> NZ Limited.<br />
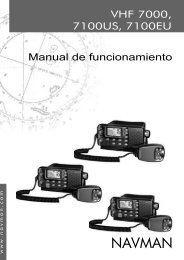
Position of transducer<br />
Transom mount transducers are suitable for planing hulls less<br />
than 26 ft (8 m) long, with outboard or stern-drive power. They<br />
are unsuitable for boats with propellers forward of the transom,<br />
prominent keels or displacement hulls.<br />
Select a position for the transducer that will:<br />
• Be away from the propellers or propeller wash and on the<br />
downstroke side of the propeller/s (normally the starboard<br />
side).<br />
• Have a smooth, clear flow of water at all times, which<br />
means that the transducer should not be in line with<br />
any hull projections, openings or planing strakes.<br />
Four mounting screws for transducer.<br />
Bag with cable cover, two cable clamps<br />
and their four mounting screws.<br />
This installation manual.<br />
Spare parts<br />
These spare parts are available from your<br />
NAVMAN dealer:<br />
Mk3 and Dual Frequency Aquaducer<br />
Transom Mounting bracket.<br />
Mk2 Transom Mounting bracket.<br />
Aquaducer paddlewheel.<br />
Mk2 and Mk3 Aquaducer extension cable<br />
13 ft (4 m).<br />
Dual Frequency Aquaducer extension<br />
cable 13 ft (4 m).<br />
Poor location<br />
Stepped<br />
hull<br />
Poor location<br />
Good location<br />
Transom Mount Transducers <strong>Installation</strong> <strong>Manual</strong><br />
NAVMAN<br />
3
• Always have the entire bottom face of the transducer under<br />
water, when the boat is stopped or at speed.<br />
Not interfere with, or be damaged by, launching or retrieving if the<br />
boat is trailered.<br />
Be convenient for the cable to go through the transom into the boat.<br />
Installing<br />
Important: Do not cut the transducer cable<br />
to shorten it.<br />
1 Select a suitable position for the<br />
transducer (see Position of transducer -<br />
previous page).<br />
2 Tear the drilling template from inside the<br />
back cover of this manual and cut to size.<br />
3 Hold the drilling template in place on the<br />
transom.<br />
Mark four screw holes through the template<br />
so that they will be positioned in the middle<br />
of the transducer bracket’s slots:<br />
• For fibreglass (GRP) or wooden hulls,<br />
ensure the entire bottom face of the<br />
transducer will always be<br />
approximately 1/4" (6 mm) (dual<br />
frequency transducer 1/2" (12 mm))<br />
beneath the surface of the water,<br />
including when the boat is at speed.<br />
• For aluminium hulls, ensure the entire<br />
bottom face of the transducer will<br />
always be approximately 1/2" (12 mm)<br />
(dual frequency transducer 3/4" (18<br />
mm)) beneath the surface of the water,<br />
including when the boat is at speed.<br />
Note: Locating the screws at the midpoints<br />
in the slots enables the transducer<br />
to be moved up or down later.<br />
4 Drill the four screw holes 5/64" (2 mm)<br />
diameter and at right angles to the<br />
transom, so that when the screws are<br />
tightened the screw heads sit flat.<br />
Drill 5/64" (2 mm), apply<br />
sealant in holes (after<br />
adjusting and testing)<br />
Screw transducer onto<br />
transom<br />
5 Attach the mounting bracket with the four<br />
longer stainless screws provided, slide the<br />
bracket up or down until the screws are in<br />
the middle of the slots, then tighten the<br />
screws temporarily.<br />
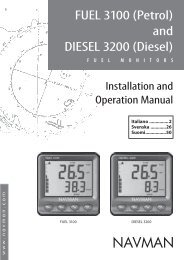
6 If necessary, loosen the transducer pivot<br />
bolt so that the transducer can rotate.<br />
Note: the transducer rotates in ‘clicks’ of<br />
7 degrees.<br />
Parallel<br />
Fit the transducer<br />
so that its axis is<br />
vertical.<br />
1/4" (6 mm) or<br />
1/2" (12 mm) or<br />
3/4" (18 mm)<br />
Push end down<br />
1 click<br />
7 Hold a straight edge on the bottom of the<br />
hull and rotate the transducer so that the<br />
bottom surface of the transducer is parallel<br />
to the bottom of the hull (to the closest click).<br />
8 Push the end of the transducer down by one<br />
click. Tighten the pivot bolt until the rubber<br />
washer on the pivot bolt starts to compress,<br />
then add another 1/4 turn. If the transducer<br />
kicks up when at speed, then tighten the pivot<br />
bolt more.<br />
Note: The face of the transducer should<br />
face forward by about 7 degrees when the<br />
boat is moving.<br />
Pivot bolt<br />
4<br />
NAVMAN<br />
Transom Mount Transducers <strong>Installation</strong> <strong>Manual</strong>
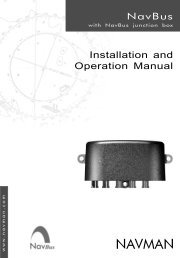
If the cable is to pass through the transom:<br />
1<br />
2 Cable clamp<br />
Drill 3/4"<br />
(19 mm)<br />
hole in<br />
transom<br />
Insert cable<br />
through hole<br />
Drill 7/64"<br />
(3 mm), apply<br />
sealant in<br />
holes<br />
Fit screws<br />
3<br />
Cable cover<br />
Mark holes,<br />
Drill 7/64"<br />
(3 mm)<br />
Apply sealant<br />
Fit screws<br />
Drill the hole a safe<br />
distance above water line.<br />
If you are unsure where to<br />
put the hole, consult a<br />
qualified boatbuilder.<br />
Do not cut the cable.<br />
Wiring<br />
Cleaning and maintenance<br />
Transom Mount Transducers <strong>Installation</strong> <strong>Manual</strong><br />
Fit one or two cable clamps on transom to<br />
hold cable.<br />
Important: Fit a cable clamp close to the<br />
transducer. This may prevent the<br />
transducer from causing damage should<br />
the bracket break while the boat is moving.<br />
The transducer has a cable to connect it to the<br />
navigation instrument. When fitting this cable:<br />
• Keep the cable away from other cables and<br />
equipment (for example fluorescent lights,<br />
power inverters and VHF transmitters).<br />
• Do not cut the cable.<br />
• If necessary, extend the cable by adding a<br />
NAVMAN 13 ft (4 m) extension cable (a<br />
Adjusting and testing<br />
Adjust and test the transducer after the<br />
transducer and instrument have been installed<br />
and with the boat in at least 6 ft (2 m) of water.<br />
1 With the boat moving slowly, turn the<br />
instrument on. If the depth does not<br />
display, follow the troubleshooting<br />
instructions in the instrument manual.<br />
2 Gradually increase boat speed. If the<br />
depth does not display then:<br />
i Remove any oil from the transducer by<br />
wiping the face of the transducer with<br />
mild detergent on a cloth.<br />
ii Adjust the angle of the transducer by<br />
pushing the end down another click.<br />
iii Loosen the screws then slide the<br />
transducer mounting bracket down or<br />
up in steps of 0.1" (2.5 mm) to achieve<br />
NAVMAN<br />
Fit cable cover over cable hole<br />
in transom.<br />
Fill the following with sealant:<br />
• Cable hole in transom.<br />
• Inside the cable cover.<br />
• The screw holes.<br />
maximum of one cable can be used).<br />
Ensure no cable connectors lay in the bilge.<br />
Note: There is no extension cable<br />
available for the FISH 4100.<br />
Secure the cable at regular intervals.<br />
Refer to the navigation instrument’s<br />
installation manual for instructions on how<br />
to connect the cable to the instrument.<br />
best high speed performance. Several<br />
adjustments might be required to find<br />
the optimum position.<br />
iv Review the position of the transducer<br />
(see Position of transducer at the<br />
beginning of this manual).<br />
3 Once adjustments are completed, ensure<br />
that all screws are tight, the pivot bolt is<br />
tight and all holes are filled with sealant.<br />
Note i: If the transducer kicks up at high<br />
speed then the pivot bolt needs to be tighter.<br />
Note ii: If you find that your transducer is<br />
causing a ‘Rooster tail’ then the likely<br />
cause is the transducer being mounted too<br />
deep. Lifting the transducer mounting on<br />
the transom should solve the problem.<br />
Clean a transducer with a damp cloth or mild detergent. Avoid abrasive cleaners and petrol or other<br />
solvents. When repainting the hull, cover or remove any transducers. Do not paint the transducer. Do<br />
not use a high pressure water blast on a speed sensor paddlewheel as it may damage the bearings.<br />
5
How to contact us<br />
NORTH AMERICA ASIA<br />
Vietnam<br />
NAVMAN USA INC. China<br />
Haidang Co. Ltd.<br />
18 Pine St. Ext.<br />
Peaceful <strong>Marine</strong> Electronics Co. Ltd.<br />
16A/A1E, Ba thang hai St.<br />
Nashua, NH 03060.<br />
Hong Kong, Guangzhou,<br />
District 10, Hochiminh City.<br />
Ph: +1 603 577 9600 Shanghai, Qindao, Dalian.<br />
Ph: +84 8 86321 59<br />
e-mail: sales@navmanusa.com E210, Huang Hua Gang Ke Mao<br />
e-mail: sales@haidangvn.com<br />
Street, 81 Xian Lie Zhong Road,<br />
Website: www.haidangvn.com<br />
OCEANIA<br />
510070 Guangzhou, China. MIDDLE EAST<br />
New Zealand<br />
Ph: +86 20 3869 8784 Lebanon and Syria<br />
Absolute <strong>Marine</strong> Ltd. e-mail: sales@peaceful-marine.com Letro, Balco Stores,<br />
Unit B, 138 Harris Road, Website: www.peaceful-marine.com Moutran Street, Tripoli VIA Beirut.<br />
East Tamaki, Auckland.<br />
India<br />
Ph: +961 6 624512<br />
Ph: +64 9 273 9273<br />
Access India Overseas Pvt e-mail: balco@cyberia.net.lb<br />
e-mail:<br />
A-98, Sector 21, Noida, India United Arab Emirates<br />
navman@absolutemarine.co.nz<br />
Ph: +91 120 244 2697 Kuwait, Oman, Iran & Saudi Arabia<br />
Papua New Guinea<br />
Email: vkapil@del3.vsnl.net.in Abdullah Moh’d Ibrahim<br />
Lohberger Engineering<br />
Indonesia<br />
Trading, opp Creak Rd.<br />
Lawes Road, Konedobu<br />
Polytech Nusantara<br />
Baniyas Road, Dubai.<br />
PO Box 810<br />
Graha Paramita 2nd Floor Ph: +971 4 229 1195<br />
Port Moresby<br />
Jln Denpasar Raya Blok D2 Kav e-mail: mksq99@email.com<br />
Ph: +675 321 2122<br />
8 Kuningan, Jakarta 12940<br />
Email: loheng@online.net.pg<br />
AFRICA<br />
Tel: 021 252 3249 South Africa<br />
Australia<br />
Korea<br />
Pertec (Pty) Ltd Coastal,<br />
NAVMAN AUSTRALIA PTY<br />
Kumhomarine Technology Co., Ltd. Division No.16 Paarden Eiland Rd.<br />
Limited<br />
#604-842, 2F, 1118-15, Paarden Eiland, 7405<br />
Unit 6 / 5-13 Parsons St,<br />
Janglim1-Dong, Saha-Gu Postal Address: PO Box 527,<br />
Rozelle, NSW 2039, Australia.<br />
Busan, Korea<br />
Paarden Eiland 7420<br />
Ph: +61 2 9818 8382<br />
Ph: +82 51 293 8589 Cape Town, South Africa.<br />
e-mail: sales@navman.com.au<br />
e-mail: info@kumhomarine.com Ph: +27 21 511 5055<br />
SOUTH AMERICA Website: www.kumhomarine.com e-mail: info@kfa.co.za<br />
Argentina<br />
Maldives<br />
EUROPE<br />
Costanera UNO S.A.<br />
Maizan Electronics Pte. Ltd. France, Belgium and<br />
Av Presidente R Castillo y 8 Sosunmagu Male<br />
Switzerland<br />
Calle 13<br />
Ph: +960 78 2444<br />
PLASTIMO INTERNATIONAL<br />
1425 Buenos Aires, Argentina. Email: ahmed@maizan.com.mv 15, rue Ingénieur Verrière,<br />
Ph: +54 11 4312 4545 Singapore<br />
BP435,<br />
e-mail:<br />
RIQ PTE Ltd.<br />
56325 Lorient Cedex.<br />
purchase@costanerauno.com.ar 81, Defu Lane 10, Hah Building, Ph: +33 2 97 87 36 36<br />
Website:<br />
#02-00 Singapore 539217 e-mail: plastimo@plastimo.fr<br />
www.costanerauno.ar Ph: +65 6741 3723 Website: www.plastimo.fr<br />
Brazil<br />
e-mail: riq@postone.com Germany<br />
REALMARINE<br />
Taiwan<br />
PLASTIMO DEUTSCHLAND<br />
Estrada do Joa 3862, Seafirst International Corporation 15, rue Ingénieur Verrière<br />
CEP2611-020,<br />
No.281, Hou-An Road<br />
BP435- 56325 Lorient Cedex.<br />
Barra da Tijuca, Rio de Janeiro, Chien-Chen Dist.<br />
Ph: +49 6105 92 10 09<br />
Brasil.<br />
Kaohsiung, Taiwan R.O.C.<br />
+49 6105 92 10 10<br />
Ph: +55 21 2483 9700 Ph: +886 7 831 2688<br />
+49 6105 92 10 12<br />
e-mail:<br />
e-mail: seafirst@seed.net.tw e-mail:<br />
vendas@marinedepot.com.br Thailand<br />
plastimo.international@plastimo.fr<br />
Equinautic Com Imp Exp de Thong Electronics (Thailand) Website: www.plastimo.de<br />
Equip Nauticos Ltda.<br />
Company Ltd.<br />
Italy<br />
Av. Diario de Noticias 1997 CEP 923/588 Thaprong Road, PLASTIMO ITALIA<br />
90810-080, Bairro Cristal, Porto Mahachai,<br />
Nuova Rade spa, Via del Pontasso 5<br />
Alegre - RS, Brasil.<br />
Muang, Samutsakhon 74000, I-16015 CASELLA SCRIVIA (GE).<br />
Ph: +55 51 3242 9972 Thailand.<br />
Ph: +39 1096 8011<br />
e-mail:<br />
Ph: +66 34 411 919 e-mail: info@nuovarade.com<br />
equinautic@equinautic.com.br e-mail: thonge@cscoms.com Website: www.plastimo.it<br />
Transom Mount Transducers <strong>Installation</strong> <strong>Manual</strong><br />
NAVMAN<br />
www.navman.com.<br />
Holland<br />
PLASTIMO HOLLAND BV.<br />
Industrieweg 4-6,<br />
2871 RP SCHOONHOVEN.<br />
Ph: +31 182 320 522<br />
e-mail: info@plastimo.nl<br />
Website: www.plastimo.nl<br />
United Kingdom<br />
PLASTIMO Mfg. UK Ltd.<br />
School Lane - Chandlers Ford<br />
Industrial Estate,<br />
EASTLEIGH - HANTS S053 ADG.<br />
Ph: +44 23 8026 3311<br />
e-mail: sales@plastimo.co.uk<br />
Website: www.plastimo.co.uk<br />
Sweden, Denmark or Finland<br />
PLASTIMO NORDIC AB.<br />
Box 28 - Lundenvägen 2,<br />
47321 HENAN.<br />
Ph: +46 304 360 60<br />
e-mail: info@plastimo.se<br />
Website: www.plastimo.se<br />
Spain<br />
PLASTIMO ESPAÑA, S.A.<br />
Avenida Narcís Monturiol, 17<br />
08339 VILASSAR DE DALT,<br />
(Barcelona).<br />
Ph: +34 93 750 75 04<br />
e-mail: plastimo@plastimo.es<br />
Website: www.plastimo.es<br />
Portugal<br />
PLASTIMO PORTUGAL<br />
Avenida de India N°40<br />
1300-299 Lisbon<br />
Ph: +351 21 362 04 57<br />
e-mail:<br />
plastimo@siroco-nautica.pt<br />
Other countries in Europe<br />
PLASTIMO INTERNATIONAL<br />
15, rue Ingénieur Verrière<br />
BP435<br />
56325 Lorient Cedex, France.<br />
Ph: +33 2 97 87 36 59<br />
e-mail:<br />
plastimo.international@plastimo.fr<br />
Website: www.plastimo.com<br />
REST OF WORLD /<br />
MANUFACTURERS<br />
<strong>Navman</strong> NZ Limited<br />
13-17 Kawana St. Northcote.<br />
P.O. Box 68 155 Newton,<br />
Auckland, New Zealand.<br />
Ph: +64 9 481 0500<br />
e-mail:<br />
marine.sales@navman.com<br />
Website: www.navman.com<br />
15
5/64" (2 mm)<br />
Made in New Zealand<br />
MN000163D<br />
TRANSOM MOUNT TRANSDUCERS<br />
Mk3<br />
Dual Frequency<br />
Aquaducer<br />
5/64" (2 mm)<br />
Lon 174° 44.535'E<br />
Lat 36° 48.404'S<br />
Mk2<br />
NAVMAN