YDP-161/141 Owner's Manual - Yamaha Downloads
YDP-161/141 Owner's Manual - Yamaha Downloads
YDP-161/141 Owner's Manual - Yamaha Downloads

Create successful ePaper yourself
Turn your PDF publications into a flip-book with our unique Google optimized e-Paper software.
<strong>YDP</strong>-<strong>161</strong><br />
<strong>YDP</strong>-<strong>141</strong><br />
<strong>Owner's</strong> <strong>Manual</strong><br />
For information on assembling the keyboard stand, refer to the instructions at the end of this manual.<br />
IMPORTANT — Check your power supply — (<strong>YDP</strong>-<strong>161</strong>)<br />
Make sure that your local AC mains voltage matches the voltage specified on the name plate on the bottom<br />
panel. In some areas a voltage selector may be provided on the bottom panel of the main keyboard unit near the<br />
power cord. Make sure that the voltage selector is set for the voltage in your area. The voltage selector is set at<br />
240V when the unit is initially shipped.<br />
To change the setting use a "minus" screwdriver to rotate the selector dial so that the correct voltage appears<br />
next to the pointer on the panel.<br />
EN
ENGLISH<br />
2
ENGLISH<br />
3
PRECAUTIONS<br />
ENGLISH<br />
PLEASE READ CAREFULLY BEFORE PROCEEDING<br />
* Please keep this manual in a safe place for future reference.<br />
WARNING<br />
Always follow the basic precautions listed below to avoid the possibility of serious injury or even death from electrical<br />
shock, short-circuiting, damages, fire or other hazards. These precautions include, but are not limited to, the following<br />
Power supply/Power cord/AC power adaptor<br />
• Do not place the power cord near heat sources such as heaters or<br />
radiators, and do not excessively bend or otherwise damage the cord,<br />
place heavy objects on it, or place it in a position where anyone could<br />
walk on, trip over, or roll anything over it.<br />
• Only use the voltage specified as correct for the instrument. The required<br />
voltage is printed on the name plate of the instrument.<br />
• (<strong>YDP</strong>-<strong>141</strong>)Use the specified adaptor (page 38) only. Using the wrong<br />
adaptor can result in damage to the instrument or overheating.<br />
• (<strong>YDP</strong>-<strong>161</strong>)Use only the supplied power cord/plug.<br />
• Check the electric plug periodically and remove any dirt or dust which<br />
may have accumulated on it.<br />
Do not open<br />
• This instrument contains no user-serviceable parts. Do not open the<br />
instrument or attempt to disassemble or modify the internal components<br />
in any way. If it should appear to be malfunctioning, discontinue use<br />
immediately and have it inspected by qualified <strong>Yamaha</strong> service<br />
personnel.<br />
Water warning<br />
• Do not expose the instrument to rain, use it near water or in damp or wet<br />
conditions, or place containers on it containing liquids which might spill<br />
into any openings. If any liquid such as water seeps into the instrument,<br />
turn off the power immediately and unplug the power cord from the AC<br />
outlet. Then have the instrument inspected by qualified <strong>Yamaha</strong> service<br />
personnel.<br />
• Never insert or remove an electric plug with wet hands.<br />
Fire warning<br />
• Do not put burning items, such as candles, on the unit.<br />
A burning item may fall over and cause a fire.<br />
If you notice any abnormality<br />
• When one of the following problems occur, immediately turn off the<br />
power switch and disconnect the electric plug from the outlet. Then have<br />
the device inspected by <strong>Yamaha</strong> service personnel.<br />
• The power cord or plug becomes frayed or damaged.<br />
• It emits unusual smells or smoke.<br />
• Some object has been dropped into the instrument.<br />
• There is a sudden loss of sound during use of the instrument.<br />
4<br />
<strong>YDP</strong>-<strong>161</strong>/<strong>141</strong><br />
Owner’s <strong>Manual</strong><br />
(7)-1 1/2
CAUTION<br />
Always follow the basic precautions listed below to avoid the possibility of physical injury to you or others, or damage<br />
to the instrument or other property. These precautions include, but are not limited to, the following:<br />
Power supply/Power cord/AC power adaptor<br />
• Do not connect the instrument to an electrical outlet using a multipleconnector.<br />
Doing so can result in lower sound quality, or possibly cause<br />
overheating in the outlet.<br />
• When removing the electric plug from the instrument or an outlet, always<br />
hold the plug itself and not the cord. Pulling by the cord can damage it.<br />
• Remove the electric plug from the outlet when the instrument is not to be<br />
used for extended periods of time, or during electrical storms.<br />
Assembly<br />
• Read carefully the attached documentation explaining the assembly<br />
process. Failure to assemble the instrument in the proper sequence might<br />
result in damage to the instrument or even injury.<br />
Location<br />
• Do not place the instrument in an unstable position where it might<br />
accidentally fall over.<br />
• Before moving the instrument, remove all connected cables.<br />
• When setting up the product, make sure that the AC outlet you are using<br />
is easily accessible. If some trouble or malfunction occurs, immediately<br />
turn off the power switch and disconnect the plug from the outlet. Even<br />
when the power switch is turned off, electricity is still flowing to the<br />
product at the minimum level. When you are not using the product for a<br />
long time, make sure to unplug the power cord from the wall AC outlet.<br />
Handling caution<br />
• Do not insert a finger or hand in any gaps on the key cover or instrument.<br />
Also take care that the key cover does not pinch your finger.<br />
• Never insert or drop paper, metallic, or other objects into the gaps on the<br />
key cover, panel or keyboard.<br />
• Do not rest your weight on, or place heavy objects on the instrument, and<br />
do not use excessive force on the buttons, switches or connectors.<br />
• Do not use the instrument/device or headphones for a long period of time<br />
at a high or uncomfortable volume level, since this can cause permanent<br />
hearing loss. If you experience any hearing loss or ringing in the ears,<br />
consult a physician.<br />
Using the bench (If included)<br />
• Do not place the bench in an unstable position where it might<br />
accidentally fall over.<br />
• Do not play carelessly with or stand on the bench. Using it as a tool or<br />
stepladder or for any other purpose might result in accident or injury.<br />
• Only one person should sit on the bench at a time, in order to prevent the<br />
possibility of accident or injury.<br />
• If the bench screws become loose due to extensive long-term use, tighten<br />
them periodically using the included tool.<br />
ENGLISH<br />
Connections<br />
• Before connecting the instrument to other electronic components, turn off<br />
the power for all components. Before turning the power on or off for all<br />
components, set all volume levels to minimum.<br />
• Be sure to set the volumes of all components at their minimum levels and<br />
gradually raise the volume controls while playing the instrument to set<br />
the desired listening level.<br />
<strong>Yamaha</strong> cannot be held responsible for damage caused by improper use or modifications to the instrument, or data that is lost or destroyed.<br />
Always turn the power off when the instrument is not in use.<br />
<strong>YDP</strong>-<strong>141</strong><br />
Even when the power switch is in the “Standby” position, electricity is still flowing to the instrument at the minimum level. When you are not using the<br />
instrument for a long time, make sure you unplug the power cord from the wall AC outlet.<br />
<strong>YDP</strong>-<strong>161</strong>/<strong>141</strong><br />
The serial number of this product may be found on the<br />
bottom of the unit. You should note this serial number in<br />
the space provided below and retain this manual as a<br />
permanent record of your purchase to aid identification<br />
in the event of theft.<br />
Model No.<br />
Serial No.<br />
(bottom)<br />
(7)-1 2/2<br />
<strong>YDP</strong>-<strong>161</strong>/<strong>141</strong> Owner’s <strong>Manual</strong> 5
About this Owner’s <strong>Manual</strong><br />
ENGLISH<br />
Thank you for purchasing the <strong>Yamaha</strong> Digital Piano! We recommend that you read this manual carefully so that you can<br />
take full advantage of the advanced and convenient functions of your new digital piano.<br />
We also recommend that you keep this manual in a safe, convenient place for future reference.<br />
The following instructional materials come with your digital piano<br />
Included Documents<br />
Owner’s <strong>Manual</strong> (this book)<br />
Quick Operation Guide (separate sheet)<br />
This Guide explains detailed operation of the functions assigned to the buttons and keyboard.<br />
Online Materials (Downloadable from the web)<br />
The following instructional materials are available for downloading from the <strong>Yamaha</strong> <strong>Manual</strong> Library. Access the<br />
<strong>Yamaha</strong> <strong>Manual</strong> Library, then enter your model name (<strong>YDP</strong>-<strong>161</strong>, for example) in the Model Name area to search the<br />
manuals.<br />
<strong>Yamaha</strong> <strong>Manual</strong> Library http://www.yamaha.co.jp/manual/<br />
Data List<br />
The Data List contains MIDI related information, such as the MIDI Data Format and MIDI Implementation chart.<br />
MIDI Basics (only in English, French, German and Spanish)<br />
If you want to know more about MIDI and how to use it, refer to this introductory book.<br />
NOTICE<br />
To avoid the possibility of damage to the product, data or other property, follow the notices below.<br />
■ Handling and Maintenance<br />
• Do not use the instrument in the vicinity of a TV, radio, stereo equipment, mobile phone, or other electric devices.<br />
Otherwise, the instrument, TV, or radio may generate noise.<br />
• Do not expose the instrument to excessive dust or vibrations, or extreme cold or heat (such as in direct sunlight, near a<br />
heater, or in a car during the day) to prevent the possibility of panel disfiguration or damage to the internal components.<br />
• Do not place vinyl, plastic or rubber objects on the instrument, since this might discolor the panel or keyboard.<br />
• When cleaning the instrument, use a soft, dry or slightly damp cloth. Do not use paint thinners, solvents, cleaning fluids,<br />
or chemical-impregnated wiping cloths.<br />
• During extreme changes in temperature or humidity, condensation may occur and water may collect on the surface of the<br />
instrument. If water is left, the wooden parts may absorb the water and be damaged. Make sure to wipe any water off<br />
immediately with a soft cloth.<br />
■ Saving data<br />
Saved data may be lost due to malfunction or incorrect operation. Save important data to external device such as a<br />
computer.<br />
Information<br />
■ About copyrights<br />
• Copying of the commercially available musical data including but not limited to MIDI data and/or audio data is strictly<br />
prohibited except for your personal use.<br />
• This product incorporates and bundles computer programs and contents in which <strong>Yamaha</strong> owns copyrights or with<br />
respect to which it has license to use others' copyrights. Such copyrighted materials include, without limitation, all<br />
computer software, style files, MIDI files, WAVE data, musical scores and sound recordings. Any unauthorized use of<br />
such programs and contents outside of personal use is not permitted under relevant laws. Any violation of copyright has<br />
legal consequences. DON'T MAKE, DISTRIBUTE OR USE ILLEGAL COPIES.<br />
■ About functions/data bundled with the instrument<br />
• Some of the preset songs have been edited for length or arrangement, and may not be exactly the same as the original.<br />
■ About this manual<br />
• The illustrations as shown in this manual are for instructional purposes only, and may appear somewhat different from<br />
those on your instrument.<br />
• Windows is a registered trademark of Microsoft(R) Corporation in the United States and other countries.<br />
• The company names and product names in this manual are the trademarks or registered trademarks of their respective<br />
companies.<br />
6 <strong>YDP</strong>-<strong>161</strong>/<strong>141</strong> Owner’s <strong>Manual</strong>
Table of Contents<br />
Introduction<br />
About this Owner’s <strong>Manual</strong>.................... 6<br />
Table of Contents ................................... 7<br />
Features .................................................. 8<br />
Recording Your Performance .............. 23<br />
Recording Your Performance ....................................... 23<br />
Playing Back Recorded Performance Data.................... 25<br />
Erasing Recorded Performance Data............................ 25<br />
Listening to a Specified Part /<br />
Practicing a One-Hand Part ................. 26<br />
ENGLISH<br />
Accessories.............................................. 8<br />
Panel Controls and Terminals ................ 9<br />
Before Using the Digital Piano............. 10<br />
Key Cover.................................................................... 10<br />
Music Rest................................................................... 10<br />
Turning the Power On................................................. 11<br />
Setting the Volume...................................................... 12<br />
Using Headphones ...................................................... 12<br />
Reference<br />
Listening to the Demo Songs............... 13<br />
Listening to 50 Piano Preset Songs...... 14<br />
Listening to Songs Loaded<br />
from the Computer .............................. 15<br />
Selecting & Playing Voices ................... 16<br />
Selecting Voices........................................................... 16<br />
Using the Pedals.......................................................... 17<br />
Damper Resonance (<strong>YDP</strong>-<strong>161</strong>)..................................... 17<br />
Adding Variations to the Sound – Reverb..................... 18<br />
Layering Two Voices (Dual mode)................................ 19<br />
Transposition............................................................... 20<br />
Fine-tuning the Pitch ................................................... 20<br />
Using the Metronome ................................................. 21<br />
Adjusting the Keyboard Touch (Touch Sensitivity)........ 22<br />
Connecting MIDI Instruments............. 27<br />
About MIDI ................................................................. 27<br />
MIDI’s Capability......................................................... 27<br />
Connecting the Digital Piano to a Computer............... 28<br />
Transmitting Song Data between the Computer<br />
and the Digital Piano................................................... 28<br />
Backing up Data and Initializing the Settings............... 29<br />
MIDI Functions..................................... 30<br />
MIDI Transmit/Receive Channel Selection.................... 30<br />
Local Control ON/OFF................................................. 30<br />
Program Change ON/OFF........................................... 31<br />
Control Change ON/OFF ............................................ 31<br />
Troubleshooting................................... 32<br />
Options................................................. 32<br />
Keyboard Stand Assembly ................... 33<br />
INDEX................................................... 37<br />
Appendix<br />
Specifications ....................................... 38<br />
<strong>YDP</strong>-<strong>161</strong>/<strong>141</strong> Owner’s <strong>Manual</strong> 7
Features<br />
ENGLISH<br />
■ AWM Dynamic Stereo Sampling<br />
The <strong>Yamaha</strong> <strong>YDP</strong>-<strong>161</strong>/<strong>141</strong> digital piano offers a rich and versatile range of sounds, which are created using<br />
<strong>Yamaha</strong>’s proprietary sampling tone-generation system, “AWM Dynamic Stereo Sampling.”<br />
The AWM (Advanced Wave Memory) is a sampling system which creates sound close to that of an acoustic<br />
instrument by using digital technology to record the instrument sound and applying high-quality digital filter<br />
technology to the recorded audio samples.<br />
The waveform of the sound created by playing the key of an acoustic piano differs depending on the playing<br />
strength from pianissimo to fortissimo. The AWM Dynamic Stereo Sampling can produce such dynamic nuances<br />
by recording samples of various playing strengths. The greater the number of samples used, the higher the<br />
expressive quality and potential becomes.<br />
■ GH (Graded Hammer) keyboard and GHS (Graded Hammer Standard) keyboard<br />
A special Graded Hammer keyboard on the <strong>YDP</strong>-<strong>161</strong>, and Graded Hammer Standard keyboard on the <strong>YDP</strong>-<br />
<strong>141</strong>, feature graded key weight and response throughout the keyboard range. They respond to a heavier touch<br />
in the low range of the keyboard and a lighter touch in the higher range of the keyboard, thus providing natural<br />
grand-piano type playability.<br />
The Graded Hammer keyboard also offers superb playability for tremolo and other repetitive-striking<br />
techniques.<br />
■ Useful function for practicing<br />
Your digital piano features a Part Cancel Function. You can record your left-hand and right-hand parts, and then<br />
play them separately; left- and right-hand part. You can also practice a one-hand part while playing the otherhand<br />
part from one of the 50 preset songs.<br />
A built-in metronome is a convenient practice tool to help you develop accurate timing.<br />
Accessories<br />
❏ Owner’s <strong>Manual</strong> (this book)<br />
❏ Bench* 2<br />
❏ Quick Operation Guide (separate sheet)<br />
❏ AC Power cord (<strong>YDP</strong>-<strong>161</strong>)<br />
❏ “50 Greats for the Piano” (music book)<br />
❏ AC Power adaptor (<strong>YDP</strong>-<strong>141</strong>)* 2<br />
❏ My <strong>Yamaha</strong> Product User Registration* 1<br />
*1 The PRODUCT ID on the sheet will be needed when you fill out the User Registration form.<br />
*2 Included or optional depending on locale.<br />
■ Tuning<br />
Unlike an acoustic piano, this instrument does not need to be tuned. It always stays perfectly in tune.<br />
■ Transporting<br />
If you move to another location, you can transport this instrument along with your other belongings. You can move the<br />
unit as it is (assembled) or you can disassemble the unit before moving.<br />
Transport the keyboard horizontally. Do not lean it up against a wall or stand it up on its side. Do not subject the<br />
instrument to excessive vibration or shock.<br />
8 <strong>YDP</strong>-<strong>161</strong>/<strong>141</strong> Owner’s <strong>Manual</strong>
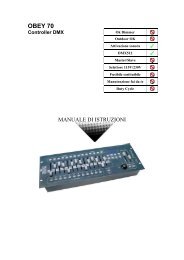
Panel Controls and Terminals<br />
<br />
<br />
<br />
<br />
ENGLISH<br />
<br />
<br />
<br />
<br />
<br />
<br />
<br />
<br />
<strong>YDP</strong>-<strong>161</strong><br />
PHONES<br />
Front (keyboard side)<br />
Right (higher key side)<br />
OUT<br />
Rear side<br />
MIDI<br />
IN<br />
<br />
PEDAL<br />
<br />
Left (lower key side)<br />
<br />
<strong>YDP</strong>-<strong>141</strong><br />
Front (keyboard side)<br />
[ ] switch ............................................page 11<br />
Power switch(<strong>YDP</strong>-<strong>161</strong>) / Standby/On switch(<strong>YDP</strong>-<strong>141</strong>)<br />
This switch turns the power to the unit on ( ) or off<br />
(<strong>YDP</strong>-<strong>161</strong>), standby (<strong>YDP</strong>-<strong>141</strong>) ( ).<br />
[DEMO/SONG] button .......................... page 13<br />
Listen to the playback of a demo song for each voice<br />
and 50 piano preset songs.<br />
[PIANO/VOICE] button ......................... page 16<br />
This button enables you to select any voice from10<br />
(<strong>YDP</strong>-<strong>161</strong>) or 6 (<strong>YDP</strong>-<strong>141</strong>) voices. You can also layer<br />
two voices, or select a type of reverb.<br />
[METRONOME] button......................... page 21<br />
Control the metronome functions.<br />
[+ R], [– L] buttons ..................page 13, 16, 23<br />
These buttons enable you to select a preset song to<br />
play back. They also enable you to change the voice<br />
or tempo.<br />
During song playback, pressing the [+ R] or [– L]<br />
button while holding down the [PLAY] button will<br />
toggle a part in the song on or off.<br />
[REC] button......................................... page 23<br />
Record your performance.<br />
[PLAY] button ........................................page 25<br />
Play back your recorded performance.<br />
[MASTER VOLUME] control.................page 12<br />
Adjust the volume level using this control.<br />
[FUNCTION] ...................................page 20, 30<br />
While holding down the [DEMO/SONG] and [PIANO/<br />
VOICE] buttons, press the specified keys to set MIDI<br />
or Transpose parameters.<br />
[PHONES] jack ......................................page 12<br />
A set of standard stereo headphones can be plugged<br />
in here for private practice.<br />
MIDI [IN] [OUT] terminals .....................page 27<br />
Connect a MIDI device to this connector to use<br />
various MIDI functions.<br />
[PEDAL] jack .........................................page 35<br />
Connect the pedal cord.<br />
[AC IN] (<strong>YDP</strong>-<strong>161</strong>),<br />
DC IN (<strong>YDP</strong>-<strong>141</strong>) jack............................page 35<br />
(<strong>YDP</strong>-<strong>161</strong>) Connect the included power cord here.<br />
(<strong>YDP</strong>-<strong>141</strong>) Connect the included power adaptor here.<br />
Pedals ....................................................page 17<br />
Use these pedals when you want notes to sustain<br />
longer or to sound softer and round.<br />
<strong>YDP</strong>-<strong>161</strong>/<strong>141</strong> Owner’s <strong>Manual</strong> 9
Before Using the Digital Piano<br />
ENGLISH<br />
Key Cover<br />
To open the key cover:<br />
Lift the cover slightly, then push and slide it open.<br />
To close the key cover:<br />
Slide the cover toward you and gently lower the<br />
cover over the keys.<br />
CAUTION<br />
Be careful to avoid catching your fingers<br />
when opening or closing the cover.<br />
CAUTION<br />
• Hold the cover with both hands when opening or closing it. Do not release it until it is fully opened or closed. Be careful to<br />
avoid catching fingers (yours or others, especially children’s) between the cover and main unit.<br />
• Do not place objects, such as a piece of metal or paper, on top of the key cover. Small objects placed on the key cover<br />
may fall inside the unit when the cover is opened and may be nearly impossible to remove. This could cause electric<br />
shock, short circuit, fire or other serious damage to the instrument. If this happens, turn off the power immediately and<br />
unplug the power cord from the AC outlet. Then have the instrument inspected by qualified <strong>Yamaha</strong> service personnel.<br />
Music Rest<br />
To raise the music rest:<br />
1 Pull the music rest up and toward yourself as<br />
far as it will go.<br />
2 Flip down the two metal supports at the left<br />
and right on the rear of the music rest.<br />
3 Lower the music rest so that it rests on the<br />
metal supports.<br />
To lower the music rest:<br />
1 Pull the music rest toward yourself as far as it<br />
will go.<br />
2 Raise the two metal supports (at the rear of the<br />
music rest).<br />
3 Gently lower the music rest backward until it is<br />
all the way down.<br />
CAUTION<br />
• Do not try to use the music rest in a half-raised position. When lowering the music rest, do not release your hands from<br />
the music rest until it is all the way down.<br />
10 <strong>YDP</strong>-<strong>161</strong>/<strong>141</strong> Owner’s <strong>Manual</strong>
Before Using the Digital Piano<br />
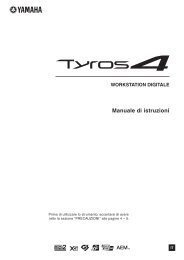
Turning the Power On<br />
1 Make sure that the [ ] switch is turned off.<br />
2 Make sure that the power cord is connected to the rear panel connector (page 35).<br />
3 Insert the plug on the other end of the power cord into a standard AC outlet.<br />
4 Press the [ ] switch on the right end of the keyboard to turn on the power to the unit.<br />
The power indicator located below the left end of the keyboard lights up.<br />
ENGLISH<br />
[ ] switch<br />
(<strong>YDP</strong>-<strong>161</strong>) Power switch<br />
(<strong>YDP</strong>-<strong>141</strong>) Standby/On switch<br />
Power indicator<br />
Press the [ ] switch again to turn off the power to the unit.<br />
The power indicator turns off.<br />
WARNING (<strong>YDP</strong>-<strong>161</strong>)<br />
• Make sure your digital piano is rated for the AC voltage supplied in the area in which the piano will be used. (The voltage<br />
rating appears on the name plate on the bottom panel). In some areas, a voltage selector may be provided on the bottom<br />
panel of the main keyboard unit near the power cord. Make sure that the voltage selector is set for the voltage in your<br />
area. Connecting the unit to an inappropriate AC supply can seriously damage the internal circuitry and may even pose<br />
a shock hazard!<br />
• Use only the AC power cord supplied with the instrument. If the supplied power cord is lost or damaged and needs to be<br />
replaced, contact your <strong>Yamaha</strong> dealer. The use of an inappropriate replacement can pose a fire and shock hazard!<br />
• The type of AC power cord provided with the instrument may be different depending on the country in which the<br />
instrument was purchased. (In some areas a plug adaptor may be provided to match the pin configuration of the AC wall<br />
outlets in your area.) Do NOT modify the plug provided with the instrument. If the plug will not fit the outlet, have a proper<br />
outlet installed by a qualified electrician.<br />
WARNING (<strong>YDP</strong>-<strong>141</strong>)<br />
• Be sure to use an appropriate AC outlet.<br />
• Be sure to use a specified power adaptor. Using a different power adaptor may cause malfunction, overheating, or fire.<br />
CAUTION (<strong>YDP</strong>-<strong>161</strong>/<strong>141</strong>)<br />
• A small amount of electrical current remains even after the [ ] switch has been turned off.<br />
• If you plan not to use the instrument for an extended period of time, or if there is a possibility of lightning, be sure to<br />
unplug the instrument from the AC outlet.<br />
<strong>YDP</strong>-<strong>161</strong>/<strong>141</strong><br />
Owner’s <strong>Manual</strong><br />
11
Before Using the Digital Piano<br />
ENGLISH<br />
Setting the Volume<br />
When you start playing, adjust the [MASTER VOLUME] control to the most comfortable listening level.<br />
The level<br />
decreases.<br />
The level<br />
increases.<br />
CAUTION<br />
• Do not use this instrument at a high volume level for a long period of time, or your hearing may be damaged.<br />
Using Headphones<br />
Connect a pair of headphones to one of the [PHONES] jacks.<br />
Two [PHONES] jacks are provided.<br />
You can connect two sets of standard stereo headphones. (If you are<br />
using only one pair of headphones, you can plug them into either jack.)<br />
The speakers are automatically shut off when a plug is inserted into this<br />
jack.<br />
CAUTION<br />
Do not listen to the instrument at a high volume level through headphones<br />
for a long period of time, or your hearing may be damaged.<br />
Using the headphone hanger (for <strong>YDP</strong>-<strong>161</strong> only)<br />
You can hang the headphones on this instrument. Refer to “Keyboard<br />
Stand Assembly” on page 36 for instructions on installing the headphone<br />
hanger.<br />
Bottom of the keyboard<br />
PHONES<br />
NOTICE<br />
Do not hang anything other than the headphones on the hanger.<br />
Otherwise, this instrument or the hanger may be damaged.<br />
Standard stereo phone plug<br />
12 <strong>YDP</strong>-<strong>161</strong>/<strong>141</strong> Owner’s <strong>Manual</strong>
Listening to the Demo Songs<br />
Demo songs are provided that effectively demonstrate each of this instrument’s voices.<br />
1 Press the [DEMO/SONG] button to start playback.<br />
The [PLAY] button indicator lights up, and the demo song for the currently-selected<br />
voice starts playing.<br />
Starting with the selected song, the playback of the demo songs will continue in the<br />
following sequence: other voice demo songs, followed by 50 piano preset songs,<br />
and any songs loaded from the computer. The sequence then returns to the first<br />
demo song and repeats until you stop it.<br />
Selecting a demo song.<br />
While a demo song is playing, press the [+ R] or [– L] button to select and play the<br />
next or previous demo song.<br />
If you wish to select a particular demo song from 10 (<strong>YDP</strong>-<strong>161</strong>) or 6 (<strong>YDP</strong>-<strong>141</strong>) voice<br />
demo songs, press and hold down the [DEMO/SONG] button, then press one of the<br />
C1–A1 (<strong>YDP</strong>-<strong>161</strong>) or C1–F1 (<strong>YDP</strong>-<strong>141</strong>) keys.<br />
For more information on how<br />
to adjust the tempo of the<br />
demo song playback, see<br />
page 21.<br />
The demo songs will not be<br />
transmitted via MIDI.<br />
Demo songs cannot be used<br />
with the Part select function.<br />
ENGLISH<br />
The lowest key C1 F1 A1<br />
2 Press the [DEMO/SONG] or [PLAY] button to stop playback.<br />
The [PLAY] button indicator turns off.<br />
Demo songs<br />
<strong>YDP</strong>-<strong>161</strong><br />
<strong>YDP</strong>-<strong>141</strong><br />
Key Voice Name Key Voice Name<br />
C1 Grand Piano 1 C1 Grand Piano 1 Salut d'amour, op.12 E. Elagr<br />
C ♯ 1 Grand Piano 2 C ♯ 1 Grand Piano 2 Original Original<br />
D1 E.Piano 1 D1 E.Piano Original Original<br />
D ♯ 1 E.Piano 2 Original Original<br />
E1 Harpsichord 1 D ♯ 1 Harpsichord<br />
F1 Harpsichord 2<br />
“Original” songs are <strong>Yamaha</strong> originals (©2010 <strong>Yamaha</strong> Corporation).<br />
Demo songs excluding “Original” songs are re-arranged excerpts from the original compositions.<br />
Title<br />
Concerto a cembalo<br />
obbligato, 2 violini, viola e<br />
continuo No.7, BWV.1058<br />
Gigue, Französische<br />
Suiten Nr.5, BWV.816<br />
Composer<br />
J.S.Bach<br />
J.S.Bach<br />
F ♯ 1 Vibraphone Original Original<br />
G1 Church Organ 1 E1 Church Organ<br />
Herr Christ, der ein'ge<br />
Gottes-Sohn, BWV.601<br />
J.S.Bach<br />
G ♯ 1 Church Organ 2 Triosonate Nr.6, BWV.530 J.S.Bach<br />
A1 Strings F1 Strings Original Original<br />
<strong>YDP</strong>-<strong>161</strong>/<strong>141</strong> Owner’s <strong>Manual</strong> 13
Listening to 50 Piano Preset Songs<br />
ENGLISH<br />
This digital piano provides performance data for 50 piano songs as well as voice demo songs. You can simply listen to<br />
these songs. You can also refer to the included “50 Greats for the Piano” that contains scores for 50 piano preset songs.<br />
1 Pick the number of the song that you want to play back from<br />
the included “50 Greats for the piano.”<br />
The number of each piano preset song is assigned to the C2–C ♯ 6 keys.<br />
2 While holding down the [DEMO/SONG] button, press one of<br />
the C2–C ♯ 6 keys to select a song to play back.<br />
Song:<br />
On this instrument,<br />
performance data is called<br />
a “Song.” This includes<br />
demo songs and 50 piano<br />
preset tunes.<br />
The [PLAY], [+ R] and [– L] button indicators light up, and the selected piano song<br />
starts playing.<br />
Starting with the selected song, the playback of the piano preset songs will continue<br />
in the following sequence: other piano preset songs, followed by songs loaded from<br />
a computer (if any), and then voice demo songs. The sequence then returns to the<br />
first piano preset song and repeats until you stop it.<br />
To play all preset songs and songs loaded from the computer (if any) consecutively<br />
in sequence, hold down the [DEMO/SONG] button, and press the D6 key.<br />
Turning part playback on<br />
and off<br />
The 50 preset songs feature<br />
independent left-hand and<br />
right-hand parts. You can<br />
focus on practicing one of the<br />
parts on the keyboard while<br />
playing back only the other<br />
part.(page 26)<br />
1st song 10th song 20th song 30th song 40th song<br />
50th song(C ♯ 6)<br />
You can play the keyboard<br />
along with the preset song.<br />
You can change the voice<br />
playing on the keyboard.<br />
C2<br />
C3 C4 C5<br />
While a song is playing, press the [+ R] or [– L] button to change to the next or<br />
previous song.<br />
3 Press the [DEMO/SONG] or [PLAY] button to stop playback.<br />
The [PLAY], [+ R] and [– L] button indicators turn off.<br />
Consecutive<br />
playback(D6)<br />
The highest<br />
key(C7)<br />
For more information on how<br />
to adjust the tempo of the<br />
preset song playback, see<br />
page 21.<br />
The default tempo is<br />
automatically selected<br />
whenever a new preset song<br />
is selected, and when a new<br />
preset song begins playback.<br />
When you select a different<br />
song (or a different song is<br />
selected during chained<br />
playback), an appropriate<br />
reverb type will be selected<br />
accordingly.<br />
The 50 piano preset songs will<br />
not be transmitted via MIDI.<br />
14 <strong>YDP</strong>-<strong>161</strong>/<strong>141</strong> Owner’s <strong>Manual</strong>
Listening to Songs Loaded from the Computer<br />
You can transfer song data from your computer to this instrument and play back the songs. (See page 28 for more<br />
information on loading song data from the computer.)<br />
1 While holding down the [DEMO/SONG] button, press one of<br />
the D ♯ 6–C7 keys to select a song to play back.<br />
Song numbers (1 through 10) are assigned to the D ♯ 6–C7 keys (see the illustration<br />
below).<br />
The [PLAY], [+ R] and [– L] button indicator lights up, and the selected song starts<br />
playing.Starting with the selected song, the playback of the songs loaded from the<br />
computer will continue in the following sequence: any other songs loaded from the<br />
computer, followed by demo songs, and 50 piano preset songs. The sequence then<br />
returns to the first songs loaded from the computer and repeats until you stop it.<br />
1st song<br />
While a song is playing, press the [+ R] or [– L] button to change to the next or<br />
previous song.<br />
D ♯ 6<br />
10th song<br />
C7(The highest key)<br />
You can load up to 10 songs<br />
or up to 845 KB of data from<br />
the computer.<br />
Use the following table to write<br />
down the song titles you<br />
loaded from the computer.<br />
Key<br />
D ♯ 6<br />
E6<br />
F6<br />
F ♯ 6<br />
G6<br />
G ♯ 6<br />
A6<br />
A ♯ 6<br />
B6<br />
C7<br />
Song title<br />
ENGLISH<br />
2 Press the [DEMO/SONG] or [PLAY] button to stop playback.<br />
Selecting a Song Playback Channel<br />
If a song loaded from the computer uses a voice that is not supported by this<br />
instrument, the originally-assigned voice may not be reproduced accurately. In this<br />
case, switching the song playback channel from “All” to “1 + 2” may improve the<br />
tone to more natural sound.<br />
Selecting 1 + 2 song playback channels:<br />
While pressing and holding down the [DEMO/SONG] button and the [PIANO/<br />
VOICE] button simultaneously, press the C7 key.<br />
Channels 1 + 2 will produce the sound.<br />
C7<br />
The highest key<br />
Selecting all song playback channels:<br />
While pressing and holding down the [DEMO/SONG] button and the [PIANO/<br />
VOICE] button simultaneously, press the B6 key.<br />
All channels 1 through 16 will produce the sound.<br />
B6<br />
Turning part playback on<br />
and off<br />
You can focus on practicing<br />
one of the parts on the<br />
keyboard while playing back<br />
only the other part.(page 26)<br />
Default setting:<br />
Channels 1+2<br />
The “Default setting” refers to<br />
the factory setting obtained<br />
when you turn on the power to<br />
this instrument for the first<br />
time.<br />
To adjust the tempo of the<br />
song playback, see page 21.<br />
When “1&2” is selected,<br />
channels 3 – 16 will be<br />
transmitted via MIDI.<br />
When “ALL” is selected,<br />
no channel will be transmitted<br />
via MIDI.<br />
The highest key<br />
<strong>YDP</strong>-<strong>161</strong>/<strong>141</strong> Owner’s <strong>Manual</strong> 15
Selecting & Playing Voices<br />
ENGLISH<br />
Selecting Voices<br />
Press and release the [PIANO/VOICE] button to select the Grand Piano 1 voice.<br />
Press and release the [PIANO/VOICE] button, then press the [+ R] or [– L] button to<br />
select a different voice.<br />
If you wish to select a particular voice directly, press and hold down the [PIANO/VOICE]<br />
button, then press one of the C1–A1 (<strong>YDP</strong>-<strong>161</strong>) or C1–F1 (<strong>YDP</strong>-<strong>141</strong>) keys.<br />
Turn the [MASTER VOLUME] control to adjust the volume level while playing the keyboard.<br />
C ♯ 1 D ♯ 1 F ♯ 1 G ♯ 1<br />
To understand the<br />
characteristics of various<br />
voices, listen to demo songs<br />
for each voice (page 13).<br />
Voice:<br />
On this instrument, a voice<br />
means a “tone” or “tonal<br />
color.”<br />
The lowest key<br />
C1 D1 E1 F1 G1 A1<br />
Selecting a voice<br />
automatically engages the<br />
best-suited reverb type and<br />
depth (page 18) for that<br />
particular voice.<br />
<strong>YDP</strong>-<strong>161</strong><br />
Key Voice Name Description<br />
C1 Grand Piano 1<br />
<strong>YDP</strong>-<strong>141</strong><br />
Recorded samples from a full concert grand piano. Perfect for classical<br />
compositions as well as any other style that requires acoustic piano.<br />
C ♯ 1 Grand Piano 2 Spacious and clear piano with bright reverb. Good for popular music.<br />
D1 E.Piano 1 An electronic piano sound created by FM synthesis. Good for popular music.<br />
D ♯ 1 E.Piano 2<br />
E1 Harpsichord 1<br />
The sound of an electric piano using hammer-struck metallic “tines.” Soft tone when<br />
played lightly, and an aggressive tone when played hard.<br />
The definitive instrument for baroque music. Since the strings of a harpsichord are<br />
plucked, there is no touch response.<br />
F1 Harpsichord 2 Mixes the same voice an octave higher for a more brilliant tone.<br />
F ♯ 1 Vibraphone The sound of a vibraphone played with relatively soft mallets.<br />
G1 Church Organ 1<br />
G ♯ 1 Church Organ 2<br />
A1<br />
Strings<br />
This is a typical pipe organ sound (8 feet + 4 feet + 2 feet). Good for sacred music<br />
from the Baroque period.<br />
This is the organ’s full coupler sound, often associated with Bach’s “Toccata and<br />
Fugue”.<br />
Spacious and large-scale string ensemble. Try combining this voice with piano in<br />
DUAL mode.<br />
Key Voice Name Description<br />
C1 Grand Piano 1<br />
Recorded samples from a full concert grand piano. Perfect for classical<br />
compositions as well as any other style that requires acoustic piano.<br />
C ♯ 1 Grand Piano 2 Spacious and clear piano with bright reverb. Good for popular music.<br />
D1 E.Piano An electronic piano sound created by FM synthesis. Good for popular music.<br />
D ♯ 1<br />
E1<br />
F1<br />
Harpsichord<br />
Church Organ<br />
Strings<br />
The definitive instrument for baroque music. Since the strings of a harpsichord are<br />
plucked, there is no touch response.<br />
This is a typical pipe organ sound (8 feet + 4 feet + 2 feet). Good for sacred music<br />
from the Baroque period.<br />
Spacious and large-scale string ensemble. Try combining this voice with piano in<br />
DUAL mode.<br />
16 <strong>YDP</strong>-<strong>161</strong>/<strong>141</strong> Owner’s <strong>Manual</strong>
Selecting & Playing Voices<br />
Using the Pedals<br />
Damper (Right) pedal<br />
The damper pedal functions in the same way as a<br />
damper pedal on an acoustic piano. When the damper<br />
pedal is pressed, notes sustain longer. Releasing the<br />
pedal immediately stops (damps) any sustained notes.<br />
The damper pedal features a half-pedal function.<br />
Sostenuto (Center) pedal<br />
If you play a note or chord on the keyboard and press<br />
the sostenuto pedal while the note(s) are held, those<br />
notes will sustain as long as you hold the pedal (as if the<br />
damper pedal had been pressed) but all subsequently<br />
played notes will not be sustained. This makes it<br />
possible to sustain a chord, for example, while other<br />
notes are played “staccato.”<br />
<br />
̇<br />
When you press the damper<br />
pedal here, the notes you play<br />
before you release the pedal<br />
sustain longer.<br />
When you press the sostenuto<br />
pedal here while holding the<br />
note, the note will sustain as<br />
long as you hold the pedal.<br />
̇<br />
̇<br />
If the damper pedal doesn’t<br />
work, make sure that the<br />
pedal cord is properly<br />
plugged into the main unit<br />
(page 35).<br />
What is the half-pedal<br />
function?<br />
This function allows the<br />
sustain length to vary<br />
depending on how far the<br />
pedal is pressed. The<br />
farther you press the pedal,<br />
the more the sound<br />
sustains. For example, if<br />
you press the damper pedal<br />
and all notes you are<br />
playing sound a bit murky<br />
and loud with too much<br />
sustain, you can release the<br />
pedal half way to subdue<br />
the sustain (murkiness)<br />
Organ and string voices will<br />
continue to sound for as long<br />
as the sostenuto pedal is<br />
depressed.<br />
ENGLISH<br />
Soft (Left) pedal<br />
The soft pedal reduces the volume and slightly changes the timbre of notes played while<br />
the pedal is pressed. The soft pedal will not affect notes that are already playing when it is<br />
pressed.<br />
Damper Resonance (<strong>YDP</strong>-<strong>161</strong>)<br />
The Damper Resonance effect simulates the sustain sound of the damper pedal on a grand piano, as if you were pressing<br />
the damper pedal and playing the keyboard. This effect is applied to the entire sound of the instrument.<br />
Turning the Damper Resonance effect on or off<br />
While holding down the [PIANO/VOICE] button, press the G ♯ 2 key to turn Damper<br />
Resonance “ON”.<br />
While holding down the [PIANO/VOICE] button, press the G2 key to turn Damper<br />
Resonance “OFF”.<br />
Default setting: ON<br />
The lowest key<br />
G2<br />
(Off)<br />
G ♯ 2<br />
(On)<br />
<strong>YDP</strong>-<strong>161</strong>/<strong>141</strong><br />
Owner’s <strong>Manual</strong><br />
17
Selecting & Playing Voices<br />
ENGLISH<br />
Adding Variations to the Sound – Reverb<br />
This control enables you to select various digital reverb effects that add extra depth and expression to the sound to create<br />
a realistic acoustic ambience.<br />
Selecting a reverb type<br />
While holding down the [PIANO/VOICE] button, press one of the C2–E2 keys to select a<br />
reverb type.<br />
C ♯ 2 D ♯ 2<br />
The lowest key<br />
C2 D2 E2<br />
Key Reverb Type Description<br />
C2<br />
C ♯ 2<br />
D2<br />
Room<br />
Hall1<br />
Hall2<br />
This setting adds a continuous reverb effect to the sound,<br />
similar to the acoustic reverberation you would hear in a<br />
room.<br />
For a “bigger” reverb sound, use the HALL 1 setting. This<br />
effect simulates the natural reverberation of a small-size<br />
concert hall.<br />
For a truly spacious reverb sound, use the HALL 2 setting.<br />
This effect simulates the natural reverberation of a large<br />
concert hall.<br />
D ♯ 2 Stage Simulates the reverb of a stage environment.<br />
E2 Off No effect is applied.<br />
Adjusting reverb depth<br />
Adjust the reverb depth for the selected voice by pressing one of the C3–G ♯ 4 keys while<br />
holding down the [PIANO/VOICE] button. The depth range is from 0 through 20.<br />
G ♯ 4: depth 20<br />
The default reverb type<br />
(including OFF) and depth<br />
settings are different for each<br />
voice.<br />
The lowest key C3: depth 0<br />
A4<br />
Reverb depth range:<br />
0 (no effect)-20 (maximum<br />
depth)<br />
The depth value increases as you<br />
press higher keys.<br />
While holding down the [PIANO/VOICE] button, press the A4 key to set the reverb to the<br />
depth most suitable for the selected voice.<br />
18 <strong>YDP</strong>-<strong>161</strong>/<strong>141</strong> Owner’s <strong>Manual</strong>
Selecting & Playing Voices<br />
Layering Two Voices (Dual mode)<br />
You can layer two voices and play them simultaneously to create a thicker and suppler sound.<br />
1 Engage Dual mode.<br />
While holding down the [PIANO/VOICE] button, press two keys in the range of C1<br />
through A1 (<strong>YDP</strong>-<strong>161</strong>) or C1 through F1 (<strong>YDP</strong>-<strong>141</strong>) simultaneously (or press and<br />
hold down one key, then press another) to select the two desired voices.<br />
Refer to “Selecting Voices” (page 16) for information on the voices that are assigned<br />
to the keys.<br />
You cannot assign the same<br />
voice to Voice 1 and Voice 2<br />
simultaneously in Dual mode.<br />
ENGLISH<br />
The lowest key<br />
C1 F1 A1<br />
The voice assigned to the lower key will be designated as Voice 1, and the voice<br />
assigned to the higher key will be designated as Voice 2.<br />
You can make the following settings for Voices 1 and 2 in Dual mode:<br />
Setting the octave<br />
You can shift the pitch up and down in octave steps for Voice 1 and Voice 2<br />
independently.<br />
Depending on which voices you combine in Dual mode, the combination may<br />
sound better if one of the voices is shifted up or down an octave.<br />
While holding down the [PIANO/VOICE] button, press one of the C5–F5 keys.<br />
Reverb in Dual mode<br />
The reverb type assigned to<br />
Voice 1 will take priority. (If the<br />
reverb assigned to Voice 1 is<br />
set to OFF, the reverb<br />
assigned to Voice 2 will be in<br />
effect.)<br />
C5<br />
F5<br />
The highest key<br />
Voice 1<br />
C5 –1<br />
C ♯ 5 0<br />
D5 +1<br />
Voice 2<br />
D ♯ 5 –1<br />
E5 0<br />
F5 +1<br />
Setting the balance<br />
You can adjust the volume balance between two voices. For example, you can set<br />
one voice as the main voice with a louder setting, and make the other voice softer.<br />
While holding down the [PIANO/VOICE] button, press one of the F ♯ 5–F ♯ 6 keys. A<br />
setting of “0” produces an equal balance between the two Dual mode voices.<br />
Settings below “0” increase the volume of Voice 2 in relation to Voice 1, and settings<br />
above “0” increase the volume of Voice 1 in relation to Voice 2.<br />
F ♯ 5<br />
C6<br />
F ♯ 6<br />
-6 -4 -2 +1 +3 +6<br />
-5 -3 -1 0 +2 +4 +5<br />
The highest key<br />
2 Exit Dual mode and return to normal play mode.<br />
To return to single-voice play mode, press the [PIANO/VOICE] button.<br />
<strong>YDP</strong>-<strong>161</strong>/<strong>141</strong><br />
Owner’s <strong>Manual</strong><br />
19
Selecting & Playing Voices<br />
ENGLISH<br />
Transposition<br />
Your digital piano’s Transpose function makes it possible to shift the pitch of the entire keyboard up or down in semitone<br />
intervals up to a maximum of six semitones, and lets you easily match the pitch of the keyboard to the range of a singer or<br />
other instruments.<br />
For example, if you set the transposition amount to “5,” playing key C produces pitch F. In this way, you can play a song as<br />
though it were in C major, and this instrument will transpose it to F major.<br />
Setting the amount of transposition<br />
While holding down the [DEMO/SONG] and [PIANO/VOICE] buttons, press one of the F ♯ 2–<br />
F ♯ 3 keys to set the desired amount of transposition.<br />
F ♯ 2<br />
C3<br />
F ♯ 3<br />
-6 -4 -2 +1 +3 +6<br />
Transpose:<br />
Changing the key signature.<br />
On this instrument,<br />
transposing shifts the pitch<br />
of the entire keyboard.<br />
-5 -3 -1 0 +2 +4 +5<br />
The lowest key<br />
Transpose down.<br />
Transpose up.<br />
To transpose the pitch down (in semitone steps)<br />
While holding down the [DEMO/SONG] and [PIANO/VOICE] buttons, press any key<br />
between F ♯ 2 and B2.<br />
To transpose the pitch up (in semitone steps)<br />
While holding down the [DEMO/SONG] and [PIANO/VOICE] buttons, press any key<br />
between C ♯ 3 and F ♯ 3.<br />
To restore the normal pitch<br />
While holding down the [DEMO/SONG] and [PIANO/VOICE] buttons, press the C3 key.<br />
Fine-tuning the Pitch<br />
You can fine-tune the pitch of the entire instrument. This function is useful when you play the digital piano along with other<br />
instruments or CD music.<br />
Setting the pitch<br />
Normal pitch.<br />
To tune up (in about 0.2Hz steps):<br />
Press and hold down the [DEMO/SONG] and [PIANO/VOICE] buttons simultaneously, and<br />
press the [+ R] button.<br />
Hz (Hertz):<br />
This unit of measurement<br />
refers to the frequency of a<br />
sound and represents the<br />
number of times a sound<br />
wave vibrates in a second.<br />
To tune down (in about 0.2Hz steps):<br />
Press and hold down the [DEMO/SONG] and [PIANO/VOICE] buttons simultaneously, and<br />
press the [– L] button.<br />
Setting range:<br />
427.0–453.0 Hz<br />
Standard pitch:<br />
440.0 Hz<br />
To restore standard pitch:<br />
Press and hold down the [DEMO/SONG] and [PIANO/VOICE] buttons simultaneously, and<br />
press the [+ R] and [– L] buttons simultaneously.<br />
20 <strong>YDP</strong>-<strong>161</strong>/<strong>141</strong> Owner’s <strong>Manual</strong>
Selecting & Playing Voices<br />
Using the Metronome<br />
Your digital piano features a built-in metronome (a device that keeps an accurate tempo) that is convenient for practicing.<br />
1 Press the [METRONOME] button to turn on the metronome.<br />
Start the metronome.<br />
Determining the time signature<br />
While holding down the [METRONOME] button, press one of the C3–F3 keys.<br />
The first beat is accented with a bell sound and the rest with clicks. Default set is 0/<br />
4 (C3). In this setting, clicks sound in all beats.<br />
C ♯ 3 D ♯ 3<br />
C3<br />
D3<br />
E3 F3<br />
The highest key<br />
Key<br />
Time<br />
signature<br />
C3 0/4<br />
C ♯ 3 2/4<br />
D3 3/4<br />
D ♯ 3 4/4<br />
E3 5/4<br />
F3 6/4<br />
ENGLISH<br />
Adjusting the tempo<br />
The tempo of the metronome and preset song playback can be set from 32 to 280<br />
beats per minute.<br />
Increasing the tempo value in steps of one:<br />
While the metronome is playing, press the [+ R] button. Alternatively, press and<br />
hold down the [METRONOME] button, and press the C ♯ 5 key.<br />
Decreasing the tempo value in steps of one:<br />
While the metronome is playing, press the [–] button. Alternatively, press and hold<br />
down the [METRONOME] button, and press the B4 key.<br />
Increasing the tempo value in steps of ten:<br />
Press and hold down the [METRONOME] button, and press the D5 key.<br />
Decreasing the tempo value in steps of ten:<br />
Press and hold down the [METRONOME] button, and press the A ♯ 4 key.<br />
A number is assigned to each of the following keys.<br />
While holding down the [METRONOME] button, press a sequence of C4–A4 keys to<br />
specify a three-digit number.<br />
Select a number starting from the left-most digit. For example, to set the tempo “95,”<br />
press the C4 (0), A4 (9) and F4 (5) keys in sequence.<br />
A ♯ 4<br />
C ♯ 5<br />
METRONOME<br />
1 3<br />
6 8<br />
0 2 4 5 7 9<br />
C4<br />
F4 A4 B4 C5 D5<br />
The highest key<br />
<strong>YDP</strong>-<strong>161</strong>/<strong>141</strong><br />
Owner’s <strong>Manual</strong><br />
21
Selecting & Playing Voices<br />
ENGLISH<br />
Resetting the tempo to default:<br />
While the metronome is playing, press the [+ R] and [– L] buttons simultaneously.<br />
Alternatively, press and hold down the [METRONOME] button, and press the C5<br />
key.<br />
Adjusting the volume<br />
You can change the volume of the metronome sound.<br />
While holding down the [METRONOME] button, press one of the C1–G2 keys to<br />
determine the volume.<br />
2 4 7 9 11<br />
14 16 19<br />
1 3 5 6 8 10 12 13 15 17 18 20<br />
To reset the tempo to default<br />
value of 120 while the<br />
metronome is stopped, press<br />
the [METRONOME], [+ R]<br />
and [– L] buttons<br />
simultaneously.<br />
Setting range:<br />
C1 (1) ~ G2 (20)<br />
Default setting:<br />
G ♯ 1 (10)<br />
The lowest key C1 G2<br />
The volume level increases as you press higher keys.<br />
2 Press the [METRONOME] button to stop the metronome.<br />
Adjusting the Keyboard Touch (Touch Sensitivity)<br />
You can adjust the volume level, which changes depending on how fast or strong you hit<br />
the keys (keyboard touch). Select an appropriate keyboard touch for the voices, songs or<br />
your taste. (This setting does not change the weight of the keyboard.)<br />
Key<br />
A6<br />
A ♯ 6<br />
B6<br />
C7<br />
Touch Sensitivity<br />
Setting<br />
Fixed<br />
Soft<br />
Medium<br />
Hard<br />
Description<br />
The volume level does not change at all regardless of<br />
whether you play the keyboard soft or hard.<br />
The volume level does not change much when you play<br />
the keyboard soft or hard.<br />
This is the standard piano touch response. (This is the<br />
default setting.)<br />
The volume level changes very widely from pianissimo to<br />
fortissimo to facilitate dynamic and dramatic expression.<br />
You have to hit the keys hard to produce a loud sound.<br />
While holding down the [PIANO/VOICE] button, press one of the A6–C7 keys to select the<br />
desired touch sensitivity.<br />
This setting is disabled with<br />
some voices, such as an<br />
organ sound.<br />
Default setting:<br />
B6 (Medium)<br />
A6<br />
C7<br />
22 <strong>YDP</strong>-<strong>161</strong>/<strong>141</strong> Owner’s <strong>Manual</strong>
Recording Your Performance<br />
Your digital piano’s recording function enables you to record your performance of one song. The recorded performance is<br />
called the “user song.”<br />
You can record up to two parts separately. For example, you can record the left-hand and right-hand parts separately.<br />
Or, you can create a duet piece by recording each part one at a time and then playing them together.<br />
Follow the steps below to record and play back your performance.<br />
ENGLISH<br />
Recording Your Performance<br />
1 Make all initial settings.<br />
Before you begin to record, select the voice that you want to use for recording. (See<br />
page16.)<br />
Make any other desired settings (reverb, etc.) as well.<br />
Use the [MASTER VOLUME] control to adjust the volume to a comfortable listening<br />
level. You can also use the [MASTER VOLUME] control to adjust the volume level<br />
during playback.<br />
2 Select a part and engage Record Ready mode.<br />
Hold down the [REC] button and press the [+ R] or [– L] button for the part you<br />
want to record to engage Record Ready mode.<br />
If you press the [REC] button and play both parts without specifying the recording<br />
part, the performance will automatically be recorded to the right part ([+ R]).<br />
Recording does not actually start yet.<br />
Recording the right part ([+ R])<br />
NOTICE<br />
Be careful not to erase the<br />
recorded data!<br />
When you finish recording<br />
your performance, the<br />
indicator for the part button<br />
([+ R] and/or [– L]) lights up.<br />
Recording another<br />
performance while this<br />
indicator remains on will<br />
overwrite the existing<br />
recorded data.<br />
You cannot engage Record<br />
mode while a demo song is<br />
playing.<br />
The User song will not be<br />
transmitted via MIDI.<br />
or<br />
Recording capacity<br />
“Recording capacity” is the<br />
maximum amount of<br />
performance data that you<br />
can record. This instrument’s<br />
recording capacity is 100 KB<br />
(approximately 11,000 notes).<br />
Recording the left part ([– L])<br />
The [REC] button indicator and the selected part button indicator will flash at the<br />
currently-selected tempo. (It may take a moment before the indicator starts to flash.)<br />
Press the [REC] button again if you wish to cancel Record mode.<br />
Turning the playback part on and off<br />
If data has already been recorded in the [+ R] and/or [– L] part, the indicator for<br />
the part(s) will light up, and the data in the part(s) will start playing back as soon as<br />
you start recording your performance.<br />
If you do not want to hear the part playback, hold down the [PLAY] button and press<br />
the button ([+ R] or [– L]) for the part you want to mute.<br />
Its indicator will turn off.<br />
Pressing the part buttons toggles part playback on and off.<br />
<strong>YDP</strong>-<strong>161</strong>/<strong>141</strong> Owner’s <strong>Manual</strong> 23
Recording Your Performance<br />
3 Start recording.<br />
ENGLISH<br />
Recording starts as soon as you play the keyboard. Alternatively, press the [PLAY]<br />
button to start recording.<br />
The [REC] button indicator lights up steadily, and the indicator for the recording part<br />
flashes at the current tempo.(If data exists in the part you are not recording, the<br />
corresponding part indicator lights up.)<br />
4 Press either the [REC] or [PLAY] button to stop recording.<br />
When recording is stopped, all indicators (for the [REC], [PLAY], [+ R] and [– L]<br />
buttons) will flash, indicating that the recorded data is being saved to the<br />
instrument. After the data is saved, the button indicator for the recorded part will<br />
light up steadily, indicating that the part now contains data. Record Ready mode will<br />
automatically be cancelled.<br />
Changing the settings for the recorded user song<br />
The initial settings (data recorded at the beginning of a song) can be changed after<br />
recording.<br />
If you wish to change the voice of the user song, before pressing the [REC] button,<br />
select a different voice. Then, simultaneously press the [REC] button and the button<br />
for the part whose initial settings you want to change. The unit enters Record mode.<br />
Without playing the keyboard, press the [REC] button again to apply the change(s)<br />
to the song. If you wish to change the tempo, do so after the unit enters Record<br />
mode.<br />
Individual Parts<br />
• Voice selection<br />
• Reverb depth<br />
• Dual voices<br />
• Damper/soft pedal depth<br />
Entire Song<br />
• Tempo<br />
• [REVERB] type (including OFF)<br />
NOTICE<br />
Do not turn off the power to<br />
this instrument while it is<br />
recording the data in its<br />
internal memory (that is, while<br />
all button indicators are<br />
flashing). Otherwise, all<br />
recorded data, including the<br />
data being recorded, will be<br />
lost.<br />
If the metronome was on when<br />
you started recording, you’ll<br />
be able to keep time with the<br />
metronome while recording,<br />
but the metronome sound will<br />
not be recorded.<br />
You can save the recorded<br />
user song to a computer. You<br />
can also load the user song<br />
data from a computer and<br />
play it back on this instrument.<br />
(See page 28.)<br />
The user song is saved as a<br />
Standard MIDI file (SMF).<br />
(page 28)<br />
24 <strong>YDP</strong>-<strong>161</strong>/<strong>141</strong> Owner’s <strong>Manual</strong>
Recording Your Performance<br />
Playing Back Recorded Performance Data<br />
1 Press the [PLAY] button.<br />
The [PLAY] button indicator and the indicator for the part that contains data light up,<br />
and the recorded part starts playing back.<br />
If the user song contains no<br />
data, pressing the [PLAY]<br />
button will not start playback.<br />
ENGLISH<br />
The parts can be turned on or off individually during playback. Refer to the<br />
procedure on page 26.<br />
2 Press the [PLAY] button to stop the playback<br />
When the user song finishes playing back, this instrument automatically returns to<br />
the previous mode.<br />
To stop playback in the middle of a song, press the SONG [PLAY] button.<br />
Erasing Recorded Performance Data<br />
You can erase the entire recorded user song (including both [+ R] and [– L] part).<br />
1 Press the [REC] button to engage Record Ready mode.<br />
The [REC] and [+ R] button indicators flash.<br />
If the left part ([– L]) contains data, [– L] button indicator lights up.<br />
2 While holding down the [PLAY] button, press the [REC] button<br />
to engage Erase Ready mode.<br />
The [REC], [PLAY], [+ R] and [– L] button indicators flash.<br />
To cancel the erase operation, press any button whose indicator is NOT flashing<br />
(such as the [DEMO/SONG], [PIANO/VOICE] or [METRONOME] button).<br />
3 Press the [REC], [PLAY], [+ R] or [– L] button to erase<br />
recorded performance data.<br />
The [REC], [PLAY], [+ R] and [– L] button indicators light up in turn from top to<br />
bottom.<br />
All button indicators turn off after data is erased.<br />
Erasing individual part data<br />
Hold down the [REC] button and press the [+ R] or [– L] button to engage Part Record<br />
Ready mode. (See step 2 on page 23.)<br />
Press the [PLAY] button to start recording. Without playing the keyboard, press the<br />
[PLAY] or [REC] button to stop recording. All data previously recorded for the<br />
selected part will be erased.<br />
The button indicator turn off.<br />
<strong>YDP</strong>-<strong>161</strong>/<strong>141</strong><br />
Owner’s <strong>Manual</strong><br />
25
ENGLISH<br />
Listening to a Specified Part /<br />
Practicing a One-Hand Part<br />
The following songs feature separate right- ([+ R]) and left-hand ([– L]) parts on individual channels. You can turn the<br />
right- ([+ R]) and left-hand ([– L]) parts on or off as desired, in order to practice on the keyboard the corresponding part<br />
(the part that is turned off).<br />
• 50 Piano Preset Songs (page 14)<br />
The right-hand part is played by [+ R] and the left-hand part is played by [– L]. You can<br />
play back songs with each part turned on or off individually.<br />
• Songs loaded from the computer (page 15)<br />
Channel 1 is played by [+ R] and Channel 2 is played by [– L]. You can play back<br />
songs with each channel turned on or off individually.<br />
• User songs recorded in the instrument (page 23)<br />
User songs that you recorded to the instrument using the record function. You can play<br />
back these songs with each recorded part turned on or off individually.<br />
Demo song (page 13) cannot<br />
be used with the Part select<br />
function.<br />
1 Play back the song you wish to practice.<br />
Refer to the page listed above for information on playing back songs.<br />
2 Turn part playback on and off.<br />
While a song is playing back, hold down the [PLAY] button and press the [+ R] or<br />
[– L] button.<br />
or<br />
When you play back a song<br />
that enables you to select an<br />
individual part or channel, the<br />
indicators for the parts that<br />
contain data light up (either<br />
[+ R] or [– L], or both).<br />
You can select a part to play<br />
or mute only during song<br />
playback.<br />
The corresponding button indicator turns off and the corresponding part playback<br />
is muted.<br />
Pressing the buttons repeatedly toggles playback on and off.<br />
3 Stop playback.<br />
Canceling the part<br />
playback setting<br />
When you select a different<br />
song (or when a different song<br />
is selected during chained<br />
playback), the part or channel<br />
playback setting is<br />
automatically canceled.<br />
To stop playback in the middle of a song, press the [PLAY] button.<br />
When playback is complete or stopped, the part playback setting is automatically<br />
canceled.<br />
26 <strong>YDP</strong>-<strong>161</strong>/<strong>141</strong> Owner’s <strong>Manual</strong>
POWER<br />
Connecting MIDI Instruments<br />
Your digital piano features MIDI connectors. Using the MIDI functions enables you to access a variety of musical genres.<br />
About MIDI<br />
MIDI (Musical Instrument Digital Interface) is a global format standard for performance data transmission and reception<br />
between electronic musical instruments.<br />
Connecting musical instruments that support MIDI via MIDI cables enables you to transfer performance and setting data<br />
between multiple musical instruments. Using MIDI, you can also achieve more advanced performances than using just a<br />
single musical instrument.<br />
Since MIDI data that can be<br />
MIDI<br />
transmitted or received varies<br />
OUT<br />
IN<br />
depending on the type of MIDI<br />
devices. Please check the<br />
“MIDI Implementation Chart”<br />
on the web (please refer to<br />
“Data List” on page 6) to find<br />
out what MIDI data and<br />
commands your devices can<br />
transmit or receive.<br />
ENGLISH<br />
You need a dedicated MIDI<br />
cable (optional) to make a<br />
MIDI connection. You can<br />
purchase MIDI cables at<br />
musical instrument stores.<br />
MIDI’s Capability<br />
MIDI functions enable you to transfer performance data between MIDI devices, load song data from a connected computer<br />
to your instrument, and transmit and save user song data to a computer.<br />
Transferring performance data to and from another MIDI device<br />
Your digital piano<br />
MIDI [OUT]<br />
connector<br />
MIDI [IN]<br />
connector<br />
MIDI IN<br />
connector<br />
Optional MIDI OUT<br />
MIDI cables connector<br />
MIDI instrument<br />
You cannot transmit the voice<br />
demo songs, 50 piano preset<br />
songs, or user song from this<br />
instrument to another MIDI<br />
device.<br />
Transferring MIDI data to and from a computer<br />
Computer<br />
USB port<br />
UX16 (optional)<br />
OUT<br />
IN<br />
MIDI IN<br />
connector<br />
MIDI OUT<br />
connector<br />
Your digital piano<br />
For more information on the<br />
transmission and reception of<br />
song data, refer to<br />
“Transmitting Song Data<br />
between the Computer and<br />
the Digital Piano” on page 28.<br />
<strong>YDP</strong>-<strong>161</strong>/<strong>141</strong> Owner’s <strong>Manual</strong> 27
POWER<br />
Connecting MIDI Instruments<br />
ENGLISH<br />
Connecting the Digital Piano to a Computer<br />
Connecting the digital piano to a computer using the MIDI connectors enables you to transfer MIDI data between the piano<br />
and the computer. This connection requires that you have appropriate application software installed on the computer.<br />
Also, installing Musicsoft Downloader on the computer enables you to transfer song data between the piano and the<br />
computer. (see next section)<br />
Connecting this instrument to the USB port on a computer<br />
Use an optional USB-MIDI interface (such as a <strong>Yamaha</strong> UX16) to connect this instrument’s<br />
MIDI connectors to the computer’s USB port.<br />
You must install the USB-MIDI driver on the computer correctly so that you can control<br />
your MIDI instrument from the computer. The USB-MIDI driver is a software application<br />
that enables MIDI signals to be transmitted between the sequence software on the<br />
computer and the connected MIDI instrument. For more information, refer to the user’s<br />
manual that came with the USB interface device.<br />
Computer<br />
OUT<br />
MIDI<br />
IN<br />
Before you connect this<br />
instrument to a computer, first<br />
turn off the power to both this<br />
instrument and the computer.<br />
After you make the<br />
connections, turn on the<br />
power to the computer first,<br />
then turn on the power to this<br />
instrument.<br />
When this instrument is used<br />
as a tone module,<br />
performance data with voices<br />
that are not found on this<br />
instrument will not be played<br />
correctly.<br />
Your digital piano<br />
Transmitting Song Data between the Computer and<br />
the Digital Piano<br />
In addition to the demo songs and the 50 piano preset songs stored in this instrument, you can play data for another song<br />
by loading it from a connected computer.<br />
You can save data from this instrument (such as recorded songs, etc.) to a computer, as<br />
well as load saved data back to the instrument from the computer.<br />
To be able to use this function, you must first download Musicsoft Downloader (free<br />
software) from <strong>Yamaha</strong> website at the following URL, and install it on your computer.<br />
http://music.yamaha.com/download/<br />
Please visit the URL above to get the information on the computer system requirement for<br />
Musicsoft Downloader.<br />
For more information on transferring data, please refer to “Transferring Data Between the<br />
Computer and Instrument (for unprotected data)” in the Help file that came with Musicsoft<br />
Downloader.<br />
SMF (Standard MIDI File)<br />
This file features a popular<br />
sequence format (for<br />
recording performance<br />
data). This file is sometimes<br />
called a “MIDI file.” The file<br />
extension is MID. You can<br />
play the SMF format song<br />
using music software or a<br />
sequencer that supports<br />
SMF. This instrument also<br />
supports SMF.<br />
28 <strong>YDP</strong>-<strong>161</strong>/<strong>141</strong> Owner’s <strong>Manual</strong>
Connecting MIDI Instruments<br />
Requirements for song data that can be loaded from a computer to this instrument<br />
• Number of songs: Up to 10 songs plus one user song<br />
• Maximum data size: 845KB plus 100KB (user)<br />
• Data format: SMF Format 0 & 1<br />
• Backup data:10<strong>YDP</strong>.BUP (loaded from instrument)<br />
You can play the loaded songs (page 15) and loaded user song (page 25).<br />
NOTICE<br />
• Do not turn off the power to this instrument or unplug the instrument during data<br />
transmission. Otherwise, the data being transmitted will not be saved. Furthermore,<br />
flash memory operation may become unstable, causing the entire memory to be<br />
erased when you turn the power to the instrument on or off.<br />
Data you can transfer from this instrument to a computer<br />
• User song : USERSONG1.MID<br />
• Back up data : 10<strong>YDP</strong>.BUP<br />
• Song data (once it has been loaded from the computer)<br />
While Musicsoft Downloader is<br />
operating, the [REC] and<br />
[PLAY] button indicators on<br />
the piano light up.<br />
Before you use this<br />
instrument, close the<br />
Musicsoft Downloader window<br />
and quit the application.<br />
Do not manually change the<br />
file name by using a<br />
computer; doing so will render<br />
the file unloadable as the user<br />
song.<br />
ENGLISH<br />
Backing up Data and Initializing the Settings<br />
Backing up data to flash memory<br />
The following items will be stored in flash memory on this instrument. This data will be kept<br />
after you turn off the power to the instrument.<br />
Metronome volume<br />
Metronome time signature<br />
Touch sensitivity<br />
Tuning<br />
Backup data<br />
Backup data for metronome<br />
volume and time signature,<br />
touch sensitivity, and tuning is<br />
included in the file named<br />
“10<strong>YDP</strong>.BUP” and stored in<br />
this instrument. You can<br />
transfer the backup data<br />
between the instrument and a<br />
computer.<br />
Recorded performance data (user song)<br />
Song data once loaded from a computer<br />
Initializing the settings<br />
When you initialize the settings, all data, excluding the songs loaded from a computer, will<br />
be initialized and reset to the factory default settings.<br />
While holding down the C7 (the highest) key, turn on the power to the instrument. The data<br />
(excluding the data for the songs loaded from a computer) will be initialized.<br />
C7<br />
If this instrument somehow<br />
becomes disabled or<br />
malfunctions, turn off the<br />
power to the instrument, then<br />
perform the initialization<br />
procedure.<br />
The highest key<br />
NOTICE<br />
• Do not turn off the power to this instrument while it is initializing the data in its internal<br />
memory (that is, while the [REC] and [PLAY] button indicators are flashing).<br />
• Please note that initializing the settings will erase your recorded song (user song).<br />
<strong>YDP</strong>-<strong>161</strong>/<strong>141</strong><br />
Owner’s <strong>Manual</strong><br />
29
MIDI Functions<br />
ENGLISH<br />
You can make detailed adjustments to MIDI settings.<br />
MIDI Transmit/Receive Channel Selection<br />
In any MIDI control setup, the MIDI channels of the transmitting and receiving equipment must be matched for proper data<br />
transfer.<br />
This parameter enables you to specify the channel on which the digital piano transmits or receives MIDI data.<br />
Setting the transmit channel<br />
While holding down the [DEMO/SONG] and [PIANO/VOICE] buttons simultaneously, press<br />
one of the C1–E2 keys.<br />
Setting the receive channel<br />
While holding down the [DEMO/SONG] and [PIANO/VOICE] buttons simultaneously, press<br />
one of the C4–F5 keys.<br />
C1<br />
D ♯ E2<br />
2<br />
C4<br />
E5<br />
F5<br />
In Dual mode, Voice 1 data is<br />
transmitted on its specified<br />
channel and Voice 2 data is<br />
transmitted on the next greater<br />
channel number relative to the<br />
specified channel. In this<br />
mode, no data is transmitted if<br />
the transmit channel is set to<br />
“OFF.”<br />
The lowest key<br />
2 4 7 9 11 14 16<br />
2 4 7 9 11 14 16<br />
1 3 5 6 8 10121315 1 3 5 6 8 1012 1315 1+2<br />
For setting the<br />
transmit channels.<br />
(C1–D ♯ 2)<br />
OFF<br />
For setting the<br />
receive channels.<br />
(C4–F5)<br />
ALL<br />
Program change and other<br />
like channel messages<br />
received will not affect this<br />
instrument’s panel settings or<br />
the notes you play on the<br />
keyboard.<br />
MIDI receive channel is ALL:<br />
A “Multi-timbre” Receive mode is available. In this mode, this instrument receives<br />
different parts from the connected MIDI device on any or all 16 MIDI channels and<br />
plays multi-channel song data.<br />
MIDI receive channel is 1+2:<br />
A “1+2” Receive mode is available. It allows simultaneous reception on channels 1<br />
and 2 only, enabling this instrument to play 1 and 2 channel song data received from a<br />
music computer or sequencer.<br />
Data for the demo song,<br />
50 piano preset songs and<br />
user song cannot be<br />
transmitted via MIDI.<br />
Local Control ON/OFF<br />
“Local Control” refers to the fact that, normally, the keyboard of this digital piano controls its internal tone generator,<br />
allowing the internal voices to be played directly from the keyboard. This situation is “Local Control On,” since the internal<br />
tone generator is controlled locally by its own keyboard.<br />
Local control can be turned OFF, however, so that the keyboard of this digital piano does not play the internal voices, but<br />
the appropriate MIDI information is still transmitted via the MIDI [OUT] connector when notes are played on the keyboard.<br />
At the same time, the internal tone generator responds to MIDI information received via the MIDI [IN] connector.<br />
While holding down the [DEMO/SONG] and [PIANO/VOICE] buttons<br />
simultaneously, press the C6 key.<br />
Pressing the C6 key repeatedly toggles between Local Control On and Off.<br />
C6<br />
When Local control is turned<br />
OFF, the keyboard of this<br />
instrument does not play the<br />
internal voices.<br />
Default setting: ON<br />
The highest key<br />
30 <strong>YDP</strong>-<strong>161</strong>/<strong>141</strong> Owner’s <strong>Manual</strong>
MIDI Functions<br />
Program Change ON/OFF<br />
Normally this instrument will respond to MIDI program change numbers received from an external keyboard or other MIDI<br />
device, causing the correspondingly-numbered voice to be selected on the corresponding channel (the keyboard voice<br />
does not change). This instrument will normally also send a MIDI program change number whenever one of its voices is<br />
selected, causing the correspondingly-numbered voice or program to be selected on the external MIDI device if the device<br />
is set up to receive and respond to MIDI program change numbers.<br />
This function makes it possible to cancel program change number reception and transmission so that voices can be<br />
selected on this instrument without affecting the external MIDI device.<br />
ENGLISH<br />
While holding down the [DEMO/SONG] and [PIANO/VOICE] buttons<br />
simultaneously, press the C ♯ 6 key. Pressing the C ♯ 6 key repeatedly toggles between<br />
Program Change On and Off.<br />
C ♯ 6<br />
For information on program<br />
change numbers for each<br />
voice, check the MIDI Data<br />
Format on the web (please<br />
refer to “Data List” on page 6).<br />
The highest key<br />
Control Change ON/OFF<br />
MIDI Control Change data refers to MIDI information related to performance expression (such as damper pedal<br />
information).<br />
You can transmit MIDI Control Change data from this instrument to control the operation of the connected MIDI device. (For<br />
example, if you operate this instrument’s damper pedal, this instrument will transmit MIDI Control Change data.)<br />
On the other hand, MIDI performance data of this instrument will respond to MIDI Control Change data received from the<br />
connected MIDI device. (At this time, the voice you are playing on the keyboard will not be affected by the Control Change<br />
data.)<br />
The ability to transmit and receive MIDI Control Change data is sometimes very useful. Turn Control Change On if it is<br />
convenient for you to have this capability. Turn Control Change Off if you rather prefer not to have this capability.<br />
While holding down the [DEMO/SONG] and [PIANO/VOICE] buttons<br />
simultaneously, press the D6 key. Pressing the D6 key repeatedly toggles between<br />
Control Change On and Off.<br />
Default setting: ON<br />
D6<br />
The highest key<br />
For information on control<br />
changes that can be used<br />
with this instrument, check the<br />
MIDI Data Format on the web<br />
(please refer to “Data List” on<br />
page 6).<br />
<strong>YDP</strong>-<strong>161</strong>/<strong>141</strong><br />
Owner’s <strong>Manual</strong><br />
31
Troubleshooting<br />
ENGLISH<br />
Problem<br />
This instrument does not turn on.<br />
Possible Cause and Solution<br />
This instrument has not been plugged in properly. (<strong>YDP</strong>-<strong>161</strong>) Securely<br />
insert the female plug into the socket on this instrument, and the male<br />
plug into a proper AC outlet (page 35).<br />
(<strong>YDP</strong>-<strong>141</strong>) Securely insert the adaptor plug into the socket on this<br />
instrument, and the adaptor plug into a proper AC outlet (page 35).<br />
Noise from the speakers or headphones is<br />
audible.<br />
The noise may be due to interference caused by the use of a mobile<br />
phone in close proximity to this instrument. Turn off the mobile phone,<br />
or move it further away from this instrument.<br />
The overall volume is low, or no sound is<br />
heard.<br />
The Master Volume is set too low. Set it to an appropriate level using<br />
the [MASTER VOLUME] control.<br />
Make sure a pair of headphones is not connected to the headphones<br />
jack (page 12).<br />
Make sure that Local Control (page 30) is ON.<br />
The damper pedal has no effect.<br />
The pedal cord may not be securely connected to the [PEDAL] jack.<br />
Be sure to insert the pedal cord all the way until the metal part of the<br />
cord plug disappears from view (page 35).<br />
The damper pedal has little effect.<br />
The damper pedal was pressed when the power was turned on. This<br />
is not a malfunction; release the pedal and press it again to reset the<br />
function.<br />
Options<br />
BC-100 Bench<br />
A comfortable bench styled to match your <strong>Yamaha</strong> digital piano.<br />
UX16<br />
USB-MIDI interface<br />
HPE-150<br />
Headphones<br />
32 <strong>YDP</strong>-<strong>161</strong>/<strong>141</strong> Owner’s <strong>Manual</strong>
Keyboard Stand Assembly<br />
CAUTION<br />
• Be careful not to confuse parts, and be sure to install all parts in the correct direction. Please assemble in accordance<br />
with the sequence given below.<br />
• Assembly should be carried out by at least two persons.<br />
• Assemble the stand on a hard and flat floor with ample space.<br />
• Be sure to use the included screws only, and insert screws of the correct size in the correct hole locations. Use of<br />
incorrect screws can cause damage or malfunction of the product.<br />
• Be sure to tighten up all screws upon completing assembly of each unit.<br />
• To disassemble, reverse the assembly sequence given below.<br />
ENGLISH<br />
Have a Phillips-head (+) screwdriver ready<br />
1 Attach (finger-tighten) C to D and E.<br />
Remove all parts from the package and make sure you<br />
have all of the items.<br />
A<br />
E<br />
1-2<br />
D<br />
B<br />
E<br />
C<br />
D<br />
Bundled pedal cord<br />
inside<br />
C<br />
AC Power cord (<strong>YDP</strong>-<strong>161</strong>)<br />
AC Power adaptor (<strong>YDP</strong>-<strong>141</strong>)<br />
1-3<br />
1-1<br />
L<br />
Assembly Parts<br />
1-1 Untie and straighten out the bundled pedal cord.<br />
Don’t discard the vinyl tie. You will need it later in<br />
step 6.<br />
6 × 20 mm long screws × 4<br />
4 × 20 mm tapping screws ×4<br />
6 ×16 mm short screws × 4<br />
Cord holders × 2<br />
1-2 Align D and E with each end of C.<br />
1-3 Attach D and E to C by finger-tightening the long<br />
screws (6 × 20mm).<br />
4 ×12 mm thin screws ×2<br />
Headphone hanger set (<strong>YDP</strong>-<strong>161</strong> only)<br />
4 ×10 mm thin screws × 2<br />
Headphone hanger<br />
<strong>YDP</strong>-<strong>161</strong>/<strong>141</strong> Owner’s <strong>Manual</strong> 33
Keyboard Stand Assembly<br />
ENGLISH<br />
2 Attach B.<br />
Depending on the model of digital piano you<br />
purchased, the surface color of one side of B may be<br />
different from the other side. In this case, position B so<br />
that the side of the surface color similar to D and E<br />
faces the player.<br />
2-1 Place the lower side of B on each foot of D and E,<br />
then attach the upper side to D and E.<br />
2-2 Attach the top of B to D and E by finger-tightening<br />
the thin screws (4 × 12mm).<br />
2-3 While pushing the lower part of D and E from<br />
outside, secure the bottom ends of B using two<br />
tapping screws (4 × 20mm).<br />
2-4 Insert the other two tapping screws (4 × 20mm)<br />
into the other two screw holes to secure B.<br />
2-5 Securely tighten the screws on the top of B that<br />
were attached in Step 2-2.<br />
2-1<br />
E 2-2, 2-5<br />
4 Mount A.<br />
At least<br />
10 cm<br />
E<br />
A<br />
At least<br />
10 cm<br />
B<br />
Be sure to place your hands at least<br />
10 cm from either end of the main unit<br />
when positioning it.<br />
CAUTION<br />
• Fingers can become pinched between the main<br />
unit and the rear or side panels, be extra careful<br />
so as not to drop the main unit.<br />
• Do not hold the keyboard in any position other<br />
than the position shown in the illustration.<br />
D<br />
Place the<br />
bottom ends<br />
of the rear<br />
panel on<br />
each foot.<br />
R<br />
B<br />
D<br />
5 Secure A.<br />
2-3<br />
2-4<br />
L<br />
2-3<br />
5-1 Adjust the position of A so that the left and right<br />
ends of A will project beyond D and E equally<br />
when seen from the front.<br />
5-2 Secure A by tightening the short screws <br />
(6 × 16mm) from the front.<br />
5-1<br />
3 Securely tighten the screws on C that were<br />
attached in Step 1-3.<br />
Projection<br />
of A<br />
B<br />
A<br />
C<br />
3<br />
5-2<br />
34<br />
<strong>YDP</strong>-<strong>161</strong>/<strong>141</strong><br />
Owner’s <strong>Manual</strong>
Keyboard Stand Assembly<br />
6 Connect the pedal cord.<br />
6-1 Insert the pedal cord plug to the [PEDAL] jack<br />
from the rear.<br />
6-2 Attach the cord holders to the rear panel as<br />
shown, then clip the cord into the holders.<br />
6-3 Use a vinyl tie to take up any slack in the pedal cord.<br />
6-1<br />
<strong>YDP</strong>-<strong>141</strong><br />
7-1 Connect the DC plug of the power adaptor to<br />
the rear panel connector, and loop cord<br />
slack onto the cord hook so that the plug will<br />
not be disconnected accidentally.<br />
ENGLISH<br />
6-2<br />
6-3<br />
CAUTION<br />
• Do not bend the cord tightly when you hang the<br />
cord on the cord hook. Otherwise, a short-circuit or<br />
fire may result.<br />
7 Connect the power cord (for <strong>YDP</strong>-<strong>161</strong>) or<br />
power adaptor (for <strong>YDP</strong>-<strong>141</strong>) to the unit.<br />
<strong>YDP</strong>-<strong>161</strong><br />
7-1 Set the voltage selector (for models that<br />
feature a voltage selector).<br />
Voltage Selector<br />
Before connecting the AC power cord, check the<br />
setting of the voltage selector which is provided in<br />
some areas. To set the selector for 110V, 127V, 220V<br />
or 240V main voltages, use a “minus” screwdriver to<br />
rotate the selector dial so that the correct voltage for<br />
your region appears next to the pointer on the<br />
panel. The voltage selector is set at 240V when the<br />
unit is initially shipped. After the proper voltage has<br />
been selected, connect the AC power cord to the<br />
[AC IN] jack and an AC wall outlet. A plug adaptor<br />
may be also provided in some areas to match the<br />
pin configuration of the AC wall outlets in your area.<br />
WARNING<br />
• An improper voltage setting can cause serious damage<br />
to this instrument or result in improper operation.<br />
■Connecting the pedal cord<br />
Insert the pedal cord securely until the metal part of the<br />
cord plug disappears from view. Otherwise, the pedal<br />
may not function properly.<br />
MIDI<br />
Insert the cord all the<br />
way until the metal part<br />
of the plug disappears<br />
from view.<br />
7-2 Connect the plug on the power cord to the<br />
rear panel connector.<br />
7-2<br />
220<br />
127<br />
110<br />
7-1<br />
240<br />
<strong>YDP</strong>-<strong>161</strong>/<strong>141</strong><br />
Owner’s <strong>Manual</strong><br />
35
Keyboard Stand Assembly<br />
8 Set the adjuster.<br />
■ After completing the assembly, please<br />
check the following.<br />
ENGLISH<br />
Rotate the adjuster until it comes in firm contact with<br />
the floor surface.<br />
9 Attach the headphone hanger. (for <strong>YDP</strong>-<strong>161</strong><br />
only)<br />
Use the included two screws (4 × 10mm) to attach<br />
the hanger as shown in the illustration below.<br />
• Are there any parts left over?<br />
Review the assembly procedure and correct any<br />
errors.<br />
• Is this instrument clear of doors and other movable<br />
fixtures?<br />
Move the instrument to an appropriate location.<br />
• Does this instrument make a rattling noise when you<br />
shake it?<br />
Tighten all screws.<br />
• Does the pedal box rattle or give way when you step<br />
on the pedals?<br />
Turn the adjuster so that it is set firmly against the<br />
floor.<br />
• Are the pedal and power cords inserted securely into<br />
the sockets?<br />
Check the connection.<br />
• If the main unit creaks or is otherwise unsteady when<br />
you play on the keyboard, refer to the assembly<br />
diagrams and retighten all screws.<br />
PHONES<br />
When moving the instrument after assembly, always<br />
hold the bottom of the main unit.<br />
Key cover<br />
Top portion<br />
Hold here<br />
Do not<br />
hold here<br />
Do not<br />
hold here<br />
CAUTION<br />
Do not hold the key cover or top portion. Improper<br />
handling can result in damage to the instrument or<br />
personal injury.<br />
36<br />
<strong>YDP</strong>-<strong>161</strong>/<strong>141</strong><br />
Owner’s <strong>Manual</strong>
INDEX<br />
Numerics<br />
50 Piano Preset Songs .............................................. 14<br />
A<br />
AC IN ........................................................................ 9<br />
Accessories ............................................................... 8<br />
Adjust<br />
Keyboard Touch ............................................... 22<br />
Reverb Depth ................................................... 18<br />
Tempo (metronome) .......................................... 21<br />
Volume (metronome) ......................................... 22<br />
Assembly ................................................................ 33<br />
B<br />
Backup ................................................................... 29<br />
C<br />
Connecting a Computer ............................................ 28<br />
Control Change ........................................................ 31<br />
D<br />
Damper Pedal .......................................................... 17<br />
Damper Resonance .................................................. 17<br />
DC IN ........................................................................ 9<br />
Default setting .......................................................... 15<br />
DEMO/SONG ....................................................... 9, 13<br />
Dual mode ............................................................... 19<br />
E<br />
Erase recorded song ................................................ 25<br />
H<br />
Half-pedal ................................................................ 17<br />
Headphone .............................................................. 12<br />
Headphone hanger ............................................. 12, 36<br />
I<br />
Initializing the Settings .............................................. 29<br />
K<br />
Key Cover ................................................................ 10<br />
Keyboard Stand ....................................................... 33<br />
L<br />
Layering Two Voices (Dual mode) .............................. 19<br />
Local Control ........................................................... 30<br />
M<br />
MASTER VOLUME ................................................ 9, 12<br />
METRONOME ...................................................... 9, 21<br />
MIDI ........................................................................ 27<br />
MIDI cables ............................................................. 27<br />
MIDI connectors ....................................................... 27<br />
MIDI Data Format ....................................................... 6<br />
MIDI Implementation Chart .......................................... 6<br />
MIDI IN/OUT .............................................................. 9<br />
Music Rest ............................................................... 27<br />
Musicsoft Downloader ............................................... 28<br />
O<br />
Options ................................................................... 32<br />
P<br />
Part ................................................................... 23, 26<br />
PEDAL .......................................................... 9, 17, 35<br />
PHONES ............................................................. 9, 12<br />
PIANO/VOICE ...................................................... 9, 16<br />
PLAY .................................................................. 9, 25<br />
Playing Back Recorded Performance Data .................. 25<br />
POWER ............................................................... 9, 11<br />
Preset songs<br />
50 Piano Preset Songs ................................... 14<br />
Program Change ...................................................... 31<br />
R<br />
REC .................................................................... 9, 23<br />
Recording your Performance ..................................... 23<br />
Reverb .................................................................... 18<br />
S<br />
SMF ........................................................................ 28<br />
Soft Pedal ................................................................ 17<br />
Song ....................................................................... 13<br />
Song Playback Channel ............................................ 15<br />
Songs Loaded from the Computer .............................. 15<br />
Sostenuto Pedal ....................................................... 17<br />
Specifications .......................................................... 38<br />
Standard MIDI File .................................................... 28<br />
Start/Stop playback<br />
50 Piano Preset Songs ....................................... 14<br />
Demo Songs ..................................................... 13<br />
Songs Loaded from the Computer ...................... 15<br />
User Song ........................................................ 25<br />
T<br />
Tempo .................................................................... 21<br />
Touch Sensitivity ...................................................... 22<br />
Transmitting Song Data ............................................. 28<br />
Transporting .............................................................. 8<br />
Transposition ........................................................... 20<br />
Troubleshooting ....................................................... 32<br />
Tuning<br />
Fine tuning of Pitch ........................................ 20<br />
U<br />
User Song ............................................................... 23<br />
V<br />
Voice ...................................................................... 16<br />
ENGLISH<br />
<strong>YDP</strong>-<strong>161</strong>/<strong>141</strong> Owner’s <strong>Manual</strong> 37
Specifications<br />
Specifications<br />
ENGLISH<br />
FRANÇAIS ESPAÑOL<br />
Size/Weight<br />
Control<br />
Interface<br />
Cabine<br />
Voices<br />
Effects<br />
Songs<br />
Functions<br />
Storage and<br />
Connectivity<br />
Amplifiers<br />
and<br />
Speakers<br />
Accessories<br />
<strong>YDP</strong>-<strong>161</strong><br />
Width 1357mm [53-7/16"]<br />
Height (with music rest) 815mm [32-1/16"] (969mm [38-1/8"])<br />
Depth 422mm [16-5/8"]<br />
<strong>YDP</strong>-<strong>141</strong><br />
Weight 42kg (92 lbs., 10oz) 37kg (81 lbs., 9oz)<br />
Keyboard<br />
Pedal<br />
Number of Keys 88<br />
Type<br />
Touch Sensitivity<br />
GH(Graded Hammer) keyboard<br />
Hard/Medium/Soft/Fixed<br />
Number of Pedals 3<br />
Half Pedal<br />
Functions<br />
Yes<br />
Damper , Sostenuto, Soft<br />
Panel Language English<br />
Key Cover<br />
Music Rest<br />
Tone<br />
Generation<br />
Polyphony<br />
Tone Generating<br />
Technology<br />
Number of Dynamic<br />
Levels<br />
Number of<br />
Polyphony (Max.)<br />
Sliding<br />
Yes<br />
AWM Dynamic Stereo Sampling<br />
3<br />
GHS(Graded Hammer Standard)<br />
keyboard with<br />
matte black keytops<br />
128 64<br />
Preset Number of Voices 10 6<br />
Types<br />
Reverb<br />
Damper Resonance Yes --<br />
Part Dual Yes<br />
Preset<br />
Recording<br />
Compatible<br />
Data<br />
Format<br />
Overall<br />
Controls<br />
Storage<br />
Connectivity<br />
Number of Preset<br />
Songs<br />
Yes<br />
10 Demo Songs, 50 Piano Preset Songs 6 Demo Songs, 50 Piano Preset Songs<br />
Number of Songs 1<br />
Number of Tracks 2<br />
Data Capacity<br />
Recording Function<br />
One Song 100KB (approx.11,000 notes)<br />
Playback Standard MIDI File (SMF) Format 0 & 1<br />
Recording Standard MIDI File (SMF) Format 0<br />
Metronome<br />
Yes<br />
Yes<br />
Tempo Range 32 - 280<br />
Transpose -6 - 0 - +6<br />
Tuning<br />
Internal Memory<br />
Yes<br />
User song : One song 100KB<br />
Loading song data from a computer : Up to 10 songs; Total maximum size 845KB<br />
Headphones ×2<br />
MIDI<br />
IN/OUT<br />
Amplifiers 20W×2 6W×2<br />
Speakers Oval (12 cm × 6 cm) × 2<br />
Owner’s <strong>Manual</strong>, 50 greats for the Piano (Music Book), Quick Operation Guide,<br />
Bench (included or optional depending on locale), My <strong>Yamaha</strong> Product User Registration<br />
AC Power Cord<br />
AC Power Adaptor (included or optional<br />
depending on locale)<br />
PA-150 or an equivalent<br />
• Specifications and descriptions in this owner’s manual are for information purposes only. <strong>Yamaha</strong> Corp. reserves the right<br />
to change or modify products or specifications at any time without prior notice. Since specifications, equipment or<br />
options may not be the same in every locale, please check with your <strong>Yamaha</strong> dealer.<br />
38 <strong>YDP</strong>-<strong>161</strong>/<strong>141</strong> Owner’s <strong>Manual</strong>
Information for Users on Collection and Disposal of Old Equipment<br />
This symbol on the products, packaging, and/or accompanying documents means that used<br />
electrical and electronic products should not be mixed with general household waste.<br />
For proper treatment, recovery and recycling of old products, please take them to applicable<br />
collection points, in accordance with your national legislation and the Directives 2002/96/EC.<br />
By disposing of these products correctly, you will help to save valuable resources and prevent any<br />
potential negative effects on human health and the environment which could otherwise arise from<br />
inappropriate waste handling.<br />
For more information about collection and recycling of old products, please contact your local<br />
municipality, your waste disposal service or the point of sale where you purchased the items.<br />
[For business users in the European Union]<br />
If you wish to discard electrical and electronic equipment, please contact your dealer or supplier for<br />
further information.<br />
[Information on Disposal in other Countries outside the European Union]<br />
This symbol is only valid in the European Union. If you wish to discard these items, please contact<br />
your local authorities or dealer and ask for the correct method of disposal.<br />
(weee_eu)<br />
<strong>YDP</strong>-<strong>161</strong><br />
IMPORTANT NOTICE FOR THE UNITED KINGDOM<br />
Connecting the Plug and Cord<br />
IMPORTANT. The wires in this mains lead are coloured in<br />
accordance with the following code:<br />
BLUE :NEUTRAL<br />
BROWN :LIVE<br />
As the colors of the wires in the mains lead of this<br />
apparatus may not correspond with the colored makings<br />
identifying the terminals in your plug proceed as follows:<br />
The wire which is colored BLUE must be connected to<br />
the terminal which is marked with the letter N or colored<br />
BLACK.<br />
The wire which is colored BROWN must be connected<br />
to the terminal which is marked with the letter L or<br />
colored RED.<br />
Making sure that neither core is connected to the earth<br />
terminal of the three pin plug.<br />
<strong>YDP</strong>-<strong>141</strong><br />
OBSERVERA!<br />
Apparaten kopplas inte ur växelströmskällan (nätet) så<br />
länge som den ar ansluten till vägguttaget, även om<br />
själva apparaten har stängts av.<br />
ADVARSEL: Netspændingen til dette apparat er IKKE<br />
afbrudt, sålænge netledningen sidder i en stikkontakt,<br />
som er tændt — også selvom der er slukket på<br />
apparatets afbryder.<br />
VAROITUS: Laitteen toisiopiiriin kytketty käyttökytkin ei<br />
irroita koko laitetta verkosta.<br />
(standby)<br />
• This applies only to products distributed by <strong>Yamaha</strong>-<br />
Kemble Music (U.K.) Ltd.<br />
(2 wires)<br />
<strong>YDP</strong>-<strong>161</strong>/<strong>141</strong> Owner’s <strong>Manual</strong> 39
For details of products, please contact your nearest <strong>Yamaha</strong><br />
representative or the authorized distributor listed below.<br />
Pour plus de détails sur les produits, veuillez-vous adresser à <strong>Yamaha</strong> ou<br />
au distributeur le plus proche de vous figurant dans la liste suivante.<br />
Die Einzelheiten zu Produkten sind bei Ihrer unten aufgeführten<br />
Niederlassung und bei <strong>Yamaha</strong> Vertragshändlern in den jeweiligen<br />
Bestimmungsländern erhältlich.<br />
Para detalles sobre productos, contacte su tienda <strong>Yamaha</strong> más<br />
cercana o el distribuidor autorizado que se lista debajo.<br />
EKB50<br />
NORTH AMERICA<br />
CANADA<br />
<strong>Yamaha</strong> Canada Music Ltd.<br />
135 Milner Avenue, Scarborough, Ontario,<br />
M1S 3R1, Canada<br />
Tel: 416-298-1311<br />
U.S.A.<br />
<strong>Yamaha</strong> Corporation of America<br />
6600 Orangethorpe Ave., Buena Park, Calif. 90620,<br />
U.S.A.<br />
Tel: 714-522-9011<br />
CENTRAL & SOUTH AMERICA<br />
MEXICO<br />
<strong>Yamaha</strong> de México S.A. de C.V.<br />
Calz. Javier Rojo Gómez #1149,<br />
Col. Guadalupe del Moral<br />
C.P. 09300, México, D.F., México<br />
Tel: 55-5804-0600<br />
BRAZIL<br />
<strong>Yamaha</strong> Musical do Brasil Ltda.<br />
Rua Joaquim Floriano, 913 - 4' andar, Itaim Bibi,<br />
CEP 04534-013 Sao Paulo, SP. BRAZIL<br />
Tel: 011-3704-1377<br />
ARGENTINA<br />
<strong>Yamaha</strong> Music Latin America, S.A.<br />
Sucursal de Argentina<br />
Olga Cossettini 1553, Piso 4 Norte<br />
Madero Este-C1107CEK<br />
Buenos Aires, Argentina<br />
Tel: 011-4119-7000<br />
PANAMA AND OTHER LATIN<br />
AMERICAN COUNTRIES/<br />
CARIBBEAN COUNTRIES<br />
<strong>Yamaha</strong> Music Latin America, S.A.<br />
Torre Banco General, Piso 7, Urbanización Marbella,<br />
Calle 47 y Aquilino de la Guardia,<br />
Ciudad de Panamá, Panamá<br />
Tel: +507-269-5311<br />
EUROPE<br />
THE UNITED KINGDOM/IRELAND<br />
<strong>Yamaha</strong> Music U.K. Ltd.<br />
Sherbourne Drive, Tilbrook, Milton Keynes,<br />
MK7 8BL, England<br />
Tel: 01908-366700<br />
GERMANY<br />
<strong>Yamaha</strong> Music Europe GmbH<br />
Siemensstraße 22-34, 25462 Rellingen, Germany<br />
Tel: 04101-3030<br />
SWITZERLAND/LIECHTENSTEIN<br />
<strong>Yamaha</strong> Music Europe GmbH<br />
Branch Switzerland in Zürich<br />
Seefeldstrasse 94, 8008 Zürich, Switzerland<br />
Tel: 01-383 3990<br />
AUSTRIA<br />
<strong>Yamaha</strong> Music Europe GmbH Branch Austria<br />
Schleiergasse 20, A-1100 Wien, Austria<br />
Tel: 01-60203900<br />
CZECH REPUBLIC/SLOVAKIA/<br />
HUNGARY/SLOVENIA<br />
<strong>Yamaha</strong> Music Europe GmbH Branch Austria<br />
Schleiergasse 20, A-1100 Wien, Austria<br />
Tel: 01-602039025<br />
POLAND/LITHUANIA/LATVIA/ESTONIA<br />
<strong>Yamaha</strong> Music Europe GmbH<br />
Branch Sp.z o.o. Oddzial w Polsce<br />
ul. 17 Stycznia 56, PL-02-146 Warszawa, Poland<br />
Tel: 022-868-07-57<br />
THE NETHERLANDS/<br />
BELGIUM/LUXEMBOURG<br />
<strong>Yamaha</strong> Music Europe Branch Benelux<br />
Clarissenhof 5-b, 4133 AB Vianen, The Netherlands<br />
Tel: 0347-358 040<br />
FRANCE<br />
<strong>Yamaha</strong> Musique France<br />
BP 70-77312 Marne-la-Vallée Cedex 2, France<br />
Tel: 01-64-61-4000<br />
ITALY<br />
<strong>Yamaha</strong> Musica Italia S.P.A.<br />
Viale Italia 88, 20020 Lainate (Milano), Italy<br />
Tel: 02-935-771<br />
SPAIN/PORTUGAL<br />
<strong>Yamaha</strong> Música Ibérica, S.A.<br />
Ctra. de la Coruna km. 17, 200, 28230<br />
Las Rozas (Madrid), Spain<br />
Tel: 91-639-8888<br />
GREECE<br />
Philippos Nakas S.A. The Music House<br />
147 Skiathou Street, 112-55 Athens, Greece<br />
Tel: 01-228 2160<br />
SWEDEN<br />
<strong>Yamaha</strong> Scandinavia AB<br />
J. A. Wettergrens Gata 1, Box 30053<br />
S-400 43 Göteborg, Sweden<br />
Tel: 031 89 34 00<br />
DENMARK<br />
YS Copenhagen Liaison Office<br />
Generatorvej 6A, DK-2730 Herlev, Denmark<br />
Tel: 44 92 49 00<br />
FINLAND<br />
F-Musiikki Oy<br />
Kluuvikatu 6, P.O. Box 260,<br />
SF-00101 Helsinki, Finland<br />
Tel: 09 618511<br />
NORWAY<br />
Norsk filial av <strong>Yamaha</strong> Scandinavia AB<br />
Grini Næringspark 1, N-1345 Østerås, Norway<br />
Tel: 67 16 77 70<br />
ICELAND<br />
Skifan HF<br />
Skeifan 17 P.O. Box 8120, IS-128 Reykjavik, Iceland<br />
Tel: 525 5000<br />
RUSSIA<br />
<strong>Yamaha</strong> Music (Russia)<br />
Office 4015, entrance 2, 21/5 Kuznetskii<br />
Most street, Moscow, 107996, Russia<br />
Tel: 495 626 0660<br />
OTHER EUROPEAN COUNTRIES<br />
<strong>Yamaha</strong> Music Europe GmbH<br />
Siemensstraße 22-34, 25462 Rellingen, Germany<br />
Tel: +49-4101-3030<br />
<strong>Yamaha</strong> Corporation,<br />
Asia-Pacific Music Marketing Group<br />
Nakazawa-cho 10-1, Naka-ku, Hamamatsu,<br />
Japan 430-8650<br />
Tel: +81-53-460-2312<br />
TURKEY/CYPRUS<br />
<strong>Yamaha</strong> Music Europe GmbH<br />
Siemensstraße 22-34, 25462 Rellingen, Germany<br />
Tel: 04101-3030<br />
OTHER COUNTRIES<br />
<strong>Yamaha</strong> Music Gulf FZE<br />
LOB 16-513, P.O.Box 17328, Jubel Ali,<br />
Dubai, United Arab Emirates<br />
Tel: +971-4-881-5868<br />
HEAD OFFICE<br />
AFRICA<br />
MIDDLE EAST<br />
ASIA<br />
THE PEOPLE’S REPUBLIC OF CHINA<br />
<strong>Yamaha</strong> Music & Electronics (China) Co.,Ltd.<br />
2F, Yunhedasha, 1818 Xinzha-lu, Jingan-qu,<br />
Shanghai, China<br />
Tel: 021-6247-2211<br />
HONG KONG<br />
Tom Lee Music Co., Ltd.<br />
11/F., Silvercord Tower 1, 30 Canton Road,<br />
Tsimshatsui, Kowloon, Hong Kong<br />
Tel: 2737-7688<br />
INDIA<br />
<strong>Yamaha</strong> Music India Pvt. Ltd.<br />
5F Ambience Corporate Tower Ambience Mall Complex<br />
Ambience Island, NH-8, Gurgaon-122001, Haryana, India<br />
Tel: 0124-466-5551<br />
INDONESIA<br />
PT. <strong>Yamaha</strong> Music Indonesia (Distributor)<br />
PT. Nusantik<br />
Gedung <strong>Yamaha</strong> Music Center, Jalan Jend. Gatot<br />
Subroto Kav. 4, Jakarta 12930, Indonesia<br />
Tel: 21-520-2577<br />
KOREA<br />
<strong>Yamaha</strong> Music Korea Ltd.<br />
8F, 9F, Dongsung Bldg. 158-9 Samsung-Dong,<br />
Kangnam-Gu, Seoul, Korea<br />
Tel: 080-004-0022<br />
MALAYSIA<br />
<strong>Yamaha</strong> Music Malaysia, Sdn., Bhd.<br />
Lot 8, Jalan Perbandaran, 47301 Kelana Jaya,<br />
Petaling Jaya, Selangor, Malaysia<br />
Tel: 3-78030900<br />
PHILIPPINES<br />
Yupangco Music Corporation<br />
339 Gil J. Puyat Avenue, P.O. Box 885 MCPO,<br />
Makati, Metro Manila, Philippines<br />
Tel: 819-7551<br />
SINGAPORE<br />
<strong>Yamaha</strong> Music Asia Pte., Ltd.<br />
#03-11 A-Z Building<br />
140 Paya Lebor Road, Singapore 409015<br />
Tel: 747-4374<br />
TAIWAN<br />
<strong>Yamaha</strong> KHS Music Co., Ltd.<br />
3F, #6, Sec.2, Nan Jing E. Rd. Taipei.<br />
Taiwan 104, R.O.C.<br />
Tel: 02-2511-8688<br />
THAILAND<br />
Siam Music <strong>Yamaha</strong> Co., Ltd.<br />
4, 6, 15 and 16th floor, Siam Motors Building,<br />
891/1 Rama 1 Road, Wangmai,<br />
Pathumwan, Bangkok 10330, Thailand<br />
Tel: 02-215-2626<br />
OTHER ASIAN COUNTRIES<br />
<strong>Yamaha</strong> Corporation,<br />
Asia-Pacific Music Marketing Group<br />
Nakazawa-cho 10-1, Naka-ku, Hamamatsu,<br />
Japan 430-8650<br />
Tel: +81-53-460-2317<br />
OCEANIA<br />
AUSTRALIA<br />
<strong>Yamaha</strong> Music Australia Pty. Ltd.<br />
Level 1, 99 Queensbridge Street, Southbank,<br />
Victoria 3006, Australia<br />
Tel: 3-9693-5111<br />
NEW ZEALAND<br />
Music Works LTD<br />
P.O.BOX 6246 Wellesley, Auckland 4680,<br />
New Zealand<br />
Tel: 9-634-0099<br />
COUNTRIES AND TRUST<br />
TERRITORIES IN PACIFIC OCEAN<br />
<strong>Yamaha</strong> Corporation,<br />
Asia-Pacific Music Marketing Group<br />
Nakazawa-cho 10-1, Naka-ku, Hamamatsu,<br />
Japan 430-8650<br />
Tel: +81-53-460-2312<br />
<strong>Yamaha</strong> Corporation, Pro Audio & Digital Musical Instrument Division<br />
Nakazawa-cho 10-1, Naka-ku, Hamamatsu, Japan 430-8650<br />
Tel: +81-53-460-3273<br />
U.R.G., Pro Audio & Digital Musical Instrument Division,<strong>Yamaha</strong> Corporation<br />
© 2010 <strong>Yamaha</strong> Corporation<br />
WS59960 003APGR-02B0<br />
Printed in Indonesia