Wiring Instructions - Seymour Duncan
Wiring Instructions - Seymour Duncan
Wiring Instructions - Seymour Duncan

Create successful ePaper yourself
Turn your PDF publications into a flip-book with our unique Google optimized e-Paper software.
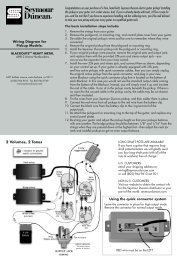
<strong>Wiring</strong> Diagram for<br />
Pickup Models:<br />
AJJ-1 Pro-Active TM<br />
for Jazz Bass ®<br />
AJJ-2 Lightnin’ Rods<br />
for Jazz Bass ®<br />
AJB-1b Pro-Active TM for<br />
Jazz Bass ® , bridge only<br />
AJB-2 Lightnin’ Rods for<br />
Jazz Bass ® , bridge only<br />
AJB-5 Active 5-String for<br />
Jazz Bass ®<br />
5427 hollister avenue, santa barbara, ca 93111<br />
tel 805.964.9610 fax 805.964.9749<br />
www.seymourduncan.com<br />
Congratulations on your purchase of a fine, hand-built, Basslines bass guitar pickup! Installing this pickup<br />
in your bass isn’t rocket science. And, if you’re already handy with tools, it’ll be a snap for you–and fun<br />
too! But if you have no experience handling red-hot soldering irons, you’d be well advised to take your<br />
new pickup and your trusty bass to a qualified guitar tech.<br />
The basic steps for installation include:<br />
1. Remove the strings from your guitar.<br />
2. Remove the control plate and flip it over.<br />
3. De-solder the original pickup’s wires from the controls, and make sure to remember where<br />
they were connected.<br />
4. Remove the original pickup from the pickup cavity.<br />
5. If your original pickups were passive (no wires connecting from the pickups to a battery),<br />
remove the original pots and output jack, and replace them with the provided 100k pots<br />
and stereo output jack---you will re-use the capacitor from your original tone control.<br />
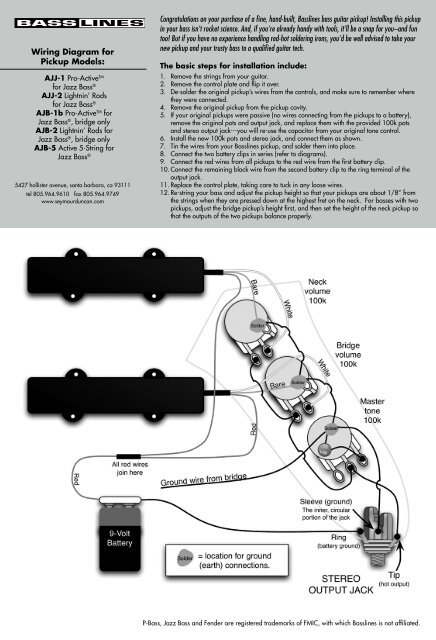
6. Install the new 100k pots and stereo jack, and connect them as shown.<br />
7. Tin the wires from your Basslines pickup, and solder them into place.<br />
8. Connect the two battery clips in series (refer to diagrams).<br />
9. Connect the red wires from all pickups to the red wire from the first battery clip.<br />
10. Connect the remaining black wire from the second battery clip to the ring terminal of the<br />
output jack.<br />
11. Replace the control plate, taking care to tuck in any loose wires.<br />
12. Re-string your bass and adjust the pickup height so that your pickups are about 1/8” from<br />
the strings when they are pressed down at the highest fret on the neck. For basses with two<br />
pickups, adjust the bridge pickup’s height first, and then set the height of the neck pickup so<br />
that the outputs of the two pickups balance properly.<br />
P-Bass, Jazz Bass and Fender are registered trademarks of FMIC, with which Basslines is not affiliated.
<strong>Wiring</strong> Diagram for Pickup Models:<br />
APB-1 Pro-Active TM for P-Bass ® , APB-2 Lightnin’ Rods for P-Bass ®<br />
P/N 501035-100 Rev. B<br />
<strong>Wiring</strong> Diagram for Pickup Models:<br />
APJ-1 Pro-Active TM for P-J (P-neck, J-bridge), APJ-2 Lightnin’ Rods for P-J (P-neck, J-bridge)