Arrivederci! 2 IWB Software USER'S MANUAL - Edilingua
Arrivederci! 2 IWB Software USER'S MANUAL - Edilingua
Arrivederci! 2 IWB Software USER'S MANUAL - Edilingua

You also want an ePaper? Increase the reach of your titles
YUMPU automatically turns print PDFs into web optimized ePapers that Google loves.
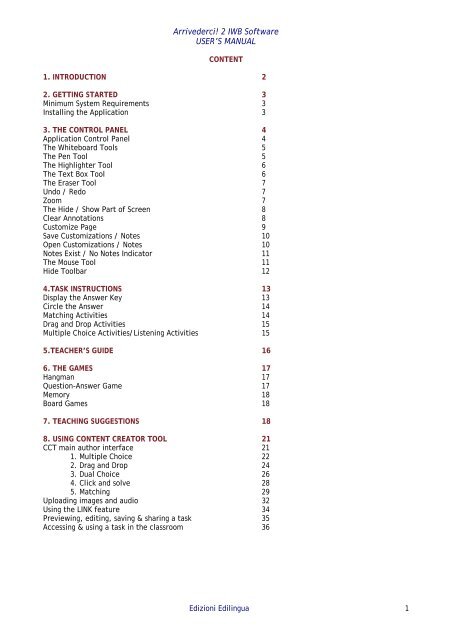
<strong>Arrivederci</strong>! 2 <strong>IWB</strong> <strong>Software</strong><br />
USER’S <strong>MANUAL</strong><br />
CONTENT<br />
1. INTRODUCTION 2<br />
2. GETTING STARTED 3<br />
Minimum System Requirements 3<br />
Installing the Application 3<br />
3. THE CONTROL PANEL 4<br />
Application Control Panel 4<br />
The Whiteboard Tools 5<br />
The Pen Tool 5<br />
The Highlighter Tool 6<br />
The Text Box Tool 6<br />
The Eraser Tool 7<br />
Undo / Redo 7<br />
Zoom 7<br />
The Hide / Show Part of Screen 8<br />
Clear Annotations 8<br />
Customize Page 9<br />
Save Customizations / Notes 10<br />
Open Customizations / Notes 10<br />
Notes Exist / No Notes Indicator 11<br />
The Mouse Tool 11<br />
Hide Toolbar 12<br />
4.TASK INSTRUCTIONS 13<br />
Display the Answer Key 13<br />
Circle the Answer 14<br />
Matching Activities 14<br />
Drag and Drop Activities 15<br />
Multiple Choice Activities/Listening Activities 15<br />
5.TEACHER’S GUIDE 16<br />
6. THE GAMES 17<br />
Hangman 17<br />
Question-Answer Game 17<br />
Memory 18<br />
Board Games 18<br />
7. TEACHING SUGGESTIONS 18<br />
8. USING CONTENT CREATOR TOOL 21<br />
CCT main author interface 21<br />
1. Multiple Choice 22<br />
2. Drag and Drop 24<br />
3. Dual Choice 26<br />
4. Click and solve 28<br />
5. Matching 29<br />
Uploading images and audio 32<br />
Using the LINK feature 34<br />
Previewing, editing, saving & sharing a task 35<br />
Accessing & using a task in the classroom 36<br />
Edizioni <strong>Edilingua</strong> 1
<strong>Arrivederci</strong>! 2 <strong>IWB</strong> <strong>Software</strong><br />
USER’S <strong>MANUAL</strong><br />
1. INTRODUCTION<br />
The software for Interactive Whiteboard (<strong>IWB</strong>) is intended for classrooms using the <strong>Arrivederci</strong>! 2 course<br />
books.<br />
It is a high quality and high performance program on a single disc and is packed with a wealth of content,<br />
including:<br />
• Audio material (most tracks are available in two speeds – natural and slow – to facilitate<br />
comprehension);<br />
• Teacher’s Guide (PDF files downloadable from the software);<br />
• Games (Quiz Game, Hangman, Memory and two Board Games) which allow students to reinforce<br />
and fully review all of the main Student Book content;<br />
• A Content Creator Tool which allows the teacher to create their own tasks quickly and easily<br />
(Multiple Choice, Drag&Drop, True/False, Matching, Click and Solve) and use them with different<br />
groups and at any time during lessons.<br />
<strong>Edilingua</strong>'s <strong>IWB</strong> engages both students and teachers with a fresh approach to learning!<br />
Teachers<br />
• can employ all the possibilities offered by the teaching aids (interactive audio, video, online<br />
activities and the Student Book) which are integrated on a single DVD;<br />
• can interact more dynamically with all their students, can take a new approach to lesson<br />
planning and can focus more on the learner and their needs;<br />
• can create new teaching tasks using new media to increase attention and participation levels and<br />
to encourage mutual support and cooperation between students;<br />
• can develop and present teaching activities directly in the software integrated with the <strong>IWB</strong>.<br />
Photocopies are no longer necessary thanks to the multimedia material (photos, audios, videos)<br />
available on the <strong>IWB</strong>.<br />
Students<br />
• become the focus of the learning process and make every lesson a truly memorable experience;<br />
• will find familiar tools and methods (links, multimedia material etc.) in the classroom;<br />
• will learn and have fun at the same time.<br />
This manual will present the features of the application and familiarize you with the functions of each<br />
button on the control panel. The teaching suggestions made here represent only a fraction of the ways in<br />
which you can use this software, and you will no doubt discover your own ways of presenting the material<br />
according to the needs of your class.<br />
Edizioni <strong>Edilingua</strong> 2
<strong>Arrivederci</strong>! 2 <strong>IWB</strong> <strong>Software</strong><br />
USER’S <strong>MANUAL</strong><br />
2. GETTING STARTED<br />
Minimum system requirements<br />
Windows<br />
• Intel® Pentium® III processor (Pentium 4 recommended)<br />
• Microsoft® Windows® XP Home, Professional, or Tablet PC Edition with Service Pack 2 or 3, Windows<br />
Server® 2003, Windows Vista® Home Premium, Business, Ultimate, or Enterprise (including 64-bit<br />
editions) with Service Pack 1, or Windows 7 or later<br />
• 512MB of RAM (1GB recommended)<br />
Macintosh<br />
• Intel Core Duo or faster processor<br />
• Mac OS X v10.4, v10.5 or v10.6<br />
• 512MB of RAM (1GB recommended)<br />
Installing the application<br />
The application will run automatically when you insert the DVD ROM in your system’s drive. Accept the<br />
installation.<br />
If your system displays security warnings that prompt you to confirm that you allow the installation,<br />
please do so.<br />
If the installation does not start automatically, please follow these steps:<br />
Windows:<br />
1. Go to START>My computer (Windows XP), or START>Computer (Windows Vista / 7).<br />
2. In the window that opens, locate your CD<br />
drive. Right-click on the drive and select Explore.<br />
3. In the window that opens, locate the <strong>Arrivederci</strong>2_Installer.exe and double-click it.<br />
Macintosh:<br />
1. Locate the file <strong>Arrivederci</strong>2_Installer (below) and execute it.<br />
Edizioni <strong>Edilingua</strong> 3
<strong>Arrivederci</strong>! 2 <strong>IWB</strong> <strong>Software</strong><br />
USER’S <strong>MANUAL</strong><br />
3. THE CONTROL PANEL<br />
Application control panel<br />
At the bottom of your screen or your <strong>IWB</strong>, you will find the application control panel. The control panel is<br />
divided into two main toolbars: the application toolbar (the top one) and the whiteboard<br />
toolbar (the bottom one).<br />
The application tools will help you navigate through units and tasks, display or hide answers to exercises,<br />
view videos, control audio, etc.<br />
The whiteboard tools offer several whiteboard functions (pen, highlighter, zoom, etc.) and they may be<br />
used independently of any whiteboard manufacturer’s default set of tools.<br />
UNIT MENU<br />
Return to<br />
unit menu<br />
NEXT<br />
Go to next<br />
task<br />
CHECK ALL<br />
Check all answers to this task<br />
RESET<br />
Restart this task<br />
SHOW ALL<br />
Display or hide all answers to<br />
this task<br />
BACK<br />
Go back to<br />
previous<br />
task<br />
MAIN MENU<br />
Return to main menu<br />
SHOW / HIDE TEXT<br />
Show/hide text that is<br />
relevant to this task<br />
At any time it’s possible to play video,<br />
show the Extra Activities or play games.<br />
Some of the application tools (such as the “Main Menu” navigation button) are available for the majority<br />
of the time. Others, such as the “Show/Hide Audioscript” or “Show/Hide Text” buttons, are available for<br />
certain tasks only.<br />
Unavailable tools appear greyed-out.<br />
You can see what the buttons do by hovering the mouse pointer (either on your computer or on the<br />
whiteboard above) over them for a few seconds. Helpful tool tips like the one below will appear.<br />
Edizioni <strong>Edilingua</strong> 4
<strong>Arrivederci</strong>! 2 <strong>IWB</strong> <strong>Software</strong><br />
USER’S <strong>MANUAL</strong><br />
The Whiteboard Tools<br />
The whiteboard tools are always available, and therefore may be used to create notes and perform other<br />
tasks on the application pages.<br />
Hide<br />
Toolbar<br />
Undo/Redo<br />
Clear Notes<br />
Create your<br />
Content<br />
Pen<br />
Hide Page<br />
Highlighter<br />
Customize<br />
Mouse<br />
Text<br />
Zoom<br />
Save<br />
Customization<br />
Eraser<br />
Show Page<br />
Open<br />
Customization<br />
The Pen Tool<br />
Click to select pen color.<br />
Click to select pen thickness.<br />
Click to access pen thickness selection.<br />
1 Click to access pen tool.<br />
Click to access pen color palette.<br />
Edizioni <strong>Edilingua</strong> 5
<strong>Arrivederci</strong>! 2 <strong>IWB</strong> <strong>Software</strong><br />
USER’S <strong>MANUAL</strong><br />
The Highlighter Tool<br />
Click to select highlighter color.<br />
Click to select highlighter thickness.<br />
Click to access highlighter thickness selection.<br />
1 Click to access highlighter tool.<br />
Click to access highlighter color palette.<br />
The Text Box Tool<br />
Type here.<br />
Click and drag on this bar to move text box.<br />
2 Click and drag to create box.<br />
Increase/decrease font size.<br />
bold, italic, Underline<br />
Bullet points<br />
Select background color.<br />
1 Click to access text box tool.<br />
Select text color.<br />
Edizioni <strong>Edilingua</strong> 6
<strong>Arrivederci</strong>! 2 <strong>IWB</strong> <strong>Software</strong><br />
USER’S <strong>MANUAL</strong><br />
The Eraser Tool<br />
Select eraser thickness.<br />
1 Click to access eraser tool.<br />
Undo/Redo<br />
Click to undo last action.<br />
Click to redo last undone action.<br />
Zoom<br />
Click to zoom into center of screen.<br />
Click to zoom out of center of screen.<br />
Click to select an area to zoom into by clicking and dragging.<br />
Click to cancel zoom.<br />
1 Click to access zoom tool.<br />
Edizioni <strong>Edilingua</strong> 7
<strong>Arrivederci</strong>! 2 <strong>IWB</strong> <strong>Software</strong><br />
USER’S <strong>MANUAL</strong><br />
The Hide / Show Part of the Screen Tools<br />
Click to access Hide Part<br />
of Screen Tool.<br />
Click to access Show Part of Screen Too l.<br />
You can hide different parts of the screen.<br />
Click and drag to create the opaque box,<br />
then use red handlebars to adjust size.<br />
Click and drag to select area that will remain visible,<br />
then use red handlebars to adjust size.<br />
Clear Annotation<br />
Click to clear all written text/notes on current page (can be undone).<br />
Edizioni <strong>Edilingua</strong> 8
<strong>Arrivederci</strong>! 2 <strong>IWB</strong> <strong>Software</strong><br />
USER’S <strong>MANUAL</strong><br />
Customize Page<br />
Click to create a new page to go with current task.<br />
Custom page counter<br />
Click to exit customization.<br />
Use the whiteboard tools to<br />
annotate the page.<br />
Use these buttons to navigate<br />
through custom pages.<br />
Click to remove<br />
current page.<br />
Click to add another page.<br />
Edizioni <strong>Edilingua</strong> 9
<strong>Arrivederci</strong>! 2 <strong>IWB</strong> <strong>Software</strong><br />
USER’S <strong>MANUAL</strong><br />
Save Customizations / Notes<br />
1 Click to save customizations and annotations.<br />
pag. 45<br />
2 Type file name or<br />
select file to replace.<br />
3 Click Salva to save the annotation<br />
or Cancella to exit without saving.<br />
Open Customizations / Annotations<br />
1 Click to load customizations and annotations.<br />
Seleziona il file da caricare<br />
pag. 45<br />
pag. 45<br />
pag. 38<br />
pag.<br />
pronomi<br />
38<br />
pronomi<br />
unità 4<br />
unità<br />
preposizioni<br />
4<br />
articolate<br />
preposizioni articolate<br />
Select a file and click on Carica (Load),<br />
or click on Cancella (Cancel) to exit.<br />
Edizioni <strong>Edilingua</strong> 10
<strong>Arrivederci</strong>! 2 <strong>IWB</strong> <strong>Software</strong><br />
USER’S <strong>MANUAL</strong><br />
Notes Exist / No Notes Indicator<br />
This indicator is here to help you remember whether you have created customizations for a page. These<br />
may be notes on the same page, in which case you see them as soon as you navigate to that page. The<br />
indicator will be highlighted as in the graphic shown below.<br />
Or they may be customizations, i.e. additional pages that you have created to go wit<br />
h that task. These will be available through the Customize Page function. (page 9)<br />
When the indicator appears greyed-out, this means there are no annotations or customizations for this<br />
page.<br />
The Mouse tool<br />
Use the Mouse Tool button to exit the following modes:<br />
• Pen<br />
• Highlighter<br />
• Text<br />
• Eraser<br />
• Zoom<br />
• Hide / Show part of screen<br />
and regain control of the main application tools (back, forward, reset etc.) as well as the functions within<br />
each task.<br />
Edizioni <strong>Edilingua</strong> 11
<strong>Arrivederci</strong>! 2 <strong>IWB</strong> <strong>Software</strong><br />
USER’S <strong>MANUAL</strong><br />
Hide Toolbar<br />
Use this button to hide the toolbar.<br />
When the toolbar is hidden, the button changes and moves to the right side of the screen. Click it to<br />
make the toolbar reappear.<br />
Edizioni <strong>Edilingua</strong> 12
<strong>Arrivederci</strong>! 2 <strong>IWB</strong> <strong>Software</strong><br />
USER’S <strong>MANUAL</strong><br />
4.TASK INSTRUCTIONS<br />
Display the Answer Key<br />
To display the answer to a question, click on the pencil icon beside the question.<br />
Edizioni <strong>Edilingua</strong> 13
<strong>Arrivederci</strong>! 2 <strong>IWB</strong> <strong>Software</strong><br />
USER’S <strong>MANUAL</strong><br />
Circle the answers<br />
To circle answer choices in a circling task, click on them. Click the Check button to solve the exercise in<br />
one click, or to show and evaluate answers.<br />
Matching Activities<br />
Drag flashing buttons to draw lines and match the sentences correctly. Click on the Check button to get<br />
the feedback, or click on Mostra le soluzioni to get the exercise in one click.<br />
Edizioni <strong>Edilingua</strong> 14
<strong>Arrivederci</strong>! 2 <strong>IWB</strong> <strong>Software</strong><br />
USER’S <strong>MANUAL</strong><br />
Drag and Drop Activities<br />
To complete Drag and Drop activities, drag and drop the lozenge to the correct place. Click on the Check<br />
button to show and evaluate answers.<br />
Multiple Choice / Listen Activities<br />
To answer multiple choice activities, just select one (or more) of the options. Click the Check button to<br />
solve the exercise in one click or to evaluate answers.<br />
Sometimes the multiple choice activity is related to an audio track. The buttons that enable you to listen<br />
to, pause or stop the audio are at the far right of the Whiteboard tool. If the button Lento (Slow) is<br />
active, it is possible to listen to the dialogue in slow mode to facilitate comprehension.<br />
To play the audio clip in slow mode, you have to click the play button as well.<br />
Edizioni <strong>Edilingua</strong> 15
<strong>Arrivederci</strong>! 2 <strong>IWB</strong> <strong>Software</strong><br />
USER’S <strong>MANUAL</strong><br />
5. TEACHER’S GUIDE<br />
In the software for <strong>IWB</strong> of <strong>Arrivederci</strong>! 2 you can find the complete Teacher’s Guide to the textbook. Click<br />
on the Guida button and you will be taken to a screen showing all the book units. These are available in<br />
PDF format and can be downloaded and used for lessons. See previous point on how to view PDF files.<br />
Edizioni <strong>Edilingua</strong> 16
<strong>Arrivederci</strong>! 2 <strong>IWB</strong> <strong>Software</strong><br />
USER’S <strong>MANUAL</strong><br />
6. GAMES<br />
The software for <strong>IWB</strong> of <strong>Arrivederci</strong>!2 has a special section just for educational games which allow<br />
learners to review what they have learnt in the unit in a fun, collaborative way!<br />
Hangman<br />
The traditional word-guessing game is perfect for vocabulary review. The game is played by two teams<br />
which have 1 minute to guess the word, often referring to Italian culture and ways of life.<br />
Question-answer game<br />
It’s similar to a Quiz game, perfect for a rapid overview of the main issues of the unit.<br />
Edizioni <strong>Edilingua</strong> 17
<strong>Arrivederci</strong>! 2 <strong>IWB</strong> <strong>Software</strong><br />
USER’S <strong>MANUAL</strong><br />
Memory<br />
Learners have to click on cards which have been placed face-down and create logical pairs that go<br />
together. They can either match words to images, images to images, or words to words.<br />
Board Games<br />
Three “Facciamo il punto?” sections (after Unit 4, 8 and 12), feature a big board game which acts as a<br />
review of the main issues of the previous units. It has a classic layout and can be played by 2, 3 or 4<br />
pairs/teams. All they have to do is roll the dice and play!<br />
Each square has a question: if the team answers correctly, its pawn will remain on the square, if not the<br />
pawn will go back to the square it moved from.<br />
Edizioni <strong>Edilingua</strong> 18
<strong>Arrivederci</strong>! 2 <strong>IWB</strong> <strong>Software</strong><br />
USER’S <strong>MANUAL</strong><br />
7. TEACHING SUGGESTIONS<br />
The following suggestions are only a small fraction of what you can do by combining the main application<br />
with the whiteboard tools; you will undoubtedly come up with your own ideas on how to use the<br />
application to your students’ benefit.<br />
a. Creating your own fill-in-the-blank tasks<br />
You can use the pen tool with suitable thickness to create additional fill-in-the-blanks tasks.<br />
Edizioni <strong>Edilingua</strong> 19
<strong>Arrivederci</strong>! 2 <strong>IWB</strong> <strong>Software</strong><br />
USER’S <strong>MANUAL</strong><br />
b. Zoom and highlight important sections<br />
Combine the zoom and highlight tools to help learners focus their attention on important sections.<br />
You can use the Hide/Show Part of the Screen Tool as well.<br />
Edizioni <strong>Edilingua</strong> 20
<strong>Arrivederci</strong>! 2 <strong>IWB</strong> <strong>Software</strong><br />
USER’S <strong>MANUAL</strong><br />
8. USING THE CONTENT CREATION TOOL<br />
The Content Creation Tool allows you to create your own tasks quickly and easily. The tasks you create<br />
are stored with the already included task that you want to expand on, and are readily accessible with a<br />
single click.<br />
The CCT button at the far right of the toolbar gives you access to two major functions:<br />
1. ADD TASK: This opens up the author interface so you can create a new task.<br />
2. EXTRA TASKS: This lets you access tasks you have already made.<br />
Extra task available<br />
Add Tasks<br />
It is very important that you click the correct half of the icon depending on the function you want to<br />
employ: creating a new task (below) or viewing tasks you have already created (upper side with stars).<br />
By using the CCT you can create tasks that are associated either with a particular item in the <strong>Arrivederci</strong>!<br />
2 content or tasks that are available with menus and sub-menus that you access before navigating to a<br />
particular item.<br />
CCT main author interface<br />
When you click on the CCT button, the following sub-menu appears:<br />
Nuova attività: create a new task.<br />
Apri: open a task you previously made.<br />
Inizia: try out the task you are currently creating in order to see how it works.<br />
Salva: save the task you are currently creating.<br />
Salva una copia: save a copy of the task you are currently creating.<br />
Condividi: Allows you to share the tasks you have made with colleagues.<br />
Edizioni <strong>Edilingua</strong> 21
<strong>Arrivederci</strong>! 2 <strong>IWB</strong> <strong>Software</strong><br />
USER’S <strong>MANUAL</strong><br />
Creating a task<br />
The following task types can be authored using the World Wonders Content Creation Tool:<br />
Each of these types seen at the top of your screen have several sub-types. In the following pages you will<br />
see how to create your own exercises using the CCT.<br />
1 Multiple choice<br />
Click Nuova attività (New Task), then click Scelta Multipla (Multiple Choice).<br />
The multiple choice settings screen appears:<br />
ABC are typical multiple choice tasks.<br />
Sì / No / Non presente are multiple choice tasks in which students are asked to<br />
decide if a statement is correct (Sì), incorrect (No), or there is not enough<br />
information to answer it (Non presente) based on the information given in the<br />
text.<br />
Bottoni per la risposta creates multiple choice tasks much like<br />
ABC, but the whole answer<br />
is clickable.<br />
Choose the type of button<br />
you want.<br />
You can make answer choices<br />
appear in random order by selecting<br />
this option (ABC and Answer buttons<br />
type only).<br />
Click Fatto (Done) to<br />
continue<br />
Set scoring options here. To create a score for a task select Grafico (Graphic) and/or Percentuale<br />
(Percentage) depending on how you want the scoring to be displayed.<br />
Edizioni <strong>Edilingua</strong> 22
<strong>Arrivederci</strong>! 2 <strong>IWB</strong> <strong>Software</strong><br />
USER’S <strong>MANUAL</strong><br />
Click inside this field and type the desired name for your task (e.g. “Lessico – ristorante”).<br />
Click to add an image<br />
which will be<br />
available throughout<br />
your task. See page<br />
34 for more details Click to add a sound which<br />
will be available throughout<br />
your task.<br />
See page 35 for more details.<br />
Click inside this field and type<br />
your instructions for the task<br />
(i.e. Rispondi alle domande<br />
scegliendo l’opzione giusta)<br />
Click to navigate<br />
through items in this<br />
task.<br />
Type answer choices<br />
in these fields.<br />
Click to return to the settings<br />
screen.<br />
Click to include one or more links<br />
with your task. These can be web<br />
links or links to a local location on<br />
your system.<br />
Click to type the stem of your<br />
question.<br />
Indicate the correct answer<br />
choice by selecting the box next<br />
to it.<br />
Click to undo / redo an action.<br />
Click to delete this<br />
task. You will be<br />
asked for<br />
confirmation.<br />
Click to move this<br />
task up / down in<br />
the list of available<br />
tasks for this<br />
location.<br />
Click to navigate through available<br />
tasks for this location.<br />
Remove this<br />
activity.<br />
Edizioni <strong>Edilingua</strong> 23
<strong>Arrivederci</strong>! 2 <strong>IWB</strong> <strong>Software</strong><br />
USER’S <strong>MANUAL</strong><br />
2. Drag and Drop<br />
Click Nuova attività, then click Drag & Drop.<br />
The task creation screen is displayed.<br />
Categories you have added in the Digita le risposte fields will appear here. Use the downward arrow next<br />
to the Scegli la categoria field to select a category, then p add items to it by typing into the Digita gli<br />
elementi field and pressing OK.<br />
This task creation engine<br />
produces a drag and drop<br />
task. If you wish,<br />
you may add sounds that<br />
will be played each time<br />
a correct or ncorrect<br />
answer is given.<br />
Type inside these fields to create categories. You may create up to 6 categories. Click the Bene button<br />
next to each field to enter the category, or the (-) button to delete it. Once a category has been entered<br />
it will appear in the blue Scegli la categoria field on the right.<br />
Edizioni <strong>Edilingua</strong> 24
<strong>Arrivederci</strong>! 2 <strong>IWB</strong> <strong>Software</strong><br />
USER’S <strong>MANUAL</strong><br />
Below is an example of a user-created Drag and Drop task.<br />
Type inside these fields to create categories. Click on bene to confirm.<br />
Title of task<br />
The categories you have added appears here.<br />
Select a category and type the matching<br />
items here.<br />
The items appear<br />
in the grey fields<br />
below.<br />
At any time you can try out the task you are currently creating to see how it works.<br />
Just click Inizia l’attività.<br />
Edizioni <strong>Edilingua</strong> 25
<strong>Arrivederci</strong>! 2 <strong>IWB</strong> <strong>Software</strong><br />
USER’S <strong>MANUAL</strong><br />
This is the preview of the activity:<br />
The items are on the top.<br />
As we have decided to match<br />
two items per category, the<br />
boxes under the categories are<br />
two.<br />
3. Dual choice<br />
Click Nuova attività, then click Scelta Doppia.<br />
The settings screen for the Dual choice task types appears:<br />
Choose the type of dual choice<br />
exercise here.<br />
Vero/Falso: tasks allow you to<br />
enter sentences which can then<br />
be marked as true or false:<br />
Sì/No: these tasks work<br />
similarly to True / False tasks<br />
with small changes in style.<br />
Sottolinea: these tasks allow<br />
you to enter a sentence, a part<br />
of which is written in two ways:<br />
correctly and incorrectly.<br />
Learners then have to underline<br />
the<br />
correct word / phrase.<br />
Edizioni <strong>Edilingua</strong> 26
<strong>Arrivederci</strong>! 2 <strong>IWB</strong> <strong>Software</strong><br />
USER’S <strong>MANUAL</strong><br />
Creating a Sottolinea task:<br />
Click inside this<br />
field and type the<br />
desired name for<br />
your task.<br />
Type item here.<br />
Indicate correct<br />
answer by checking<br />
one of these boxes.<br />
To have a preview of the task, click Inizia l’attività.<br />
Preview:<br />
Edizioni <strong>Edilingua</strong> 27
<strong>Arrivederci</strong>! 2 <strong>IWB</strong> <strong>Software</strong><br />
USER’S <strong>MANUAL</strong><br />
4. Click and solve<br />
Click Nuova attività, then click Clicca e risolvi.<br />
Click and Solve tasks display a question on the screen, and display the answer with one click.<br />
Here is an example of a user-created Click and Solve task:<br />
Type the desired name for your task, then type the questions and the related answers:<br />
questions<br />
answers<br />
Edizioni <strong>Edilingua</strong> 28
<strong>Arrivederci</strong>! 2 <strong>IWB</strong> <strong>Software</strong><br />
USER’S <strong>MANUAL</strong><br />
This is the preview of the activity so far:<br />
5. Matching<br />
Click Nuova attività, then click Abbina.<br />
You can create text-to-text and image-to-text matching tasks with the CCT.<br />
In the settings screen, apart from having the usual scoring and correct/incorrect sound options, you can<br />
select whether you want to create a text-to-text, or text-to- image task. You can include up to four pairs<br />
of items to be matched in one matching task.<br />
Edizioni <strong>Edilingua</strong> 29
<strong>Arrivederci</strong>! 2 <strong>IWB</strong> <strong>Software</strong><br />
USER’S <strong>MANUAL</strong><br />
Text-to-text task: Type items to be matched in the fields. The application will jumble the items<br />
automatically for use in the classroom.<br />
Edizioni <strong>Edilingua</strong> 30
<strong>Arrivederci</strong>! 2 <strong>IWB</strong> <strong>Software</strong><br />
USER’S <strong>MANUAL</strong><br />
Adding new items, you can preview the activity as shown below:<br />
Text-to-image matching task: Upload image for each item. Type text to be matched to images in these<br />
fields. The application will jumble the items automatically for use in the classroom.<br />
Edizioni <strong>Edilingua</strong> 31
<strong>Arrivederci</strong>! 2 <strong>IWB</strong> <strong>Software</strong><br />
USER’S <strong>MANUAL</strong><br />
Preview:<br />
Uploading images and audio<br />
You can upload audio and image files from your computer to the CCT. The supported file types are jpg,<br />
png and gif for images, and mp3 and wav for sounds.<br />
To upload an image / sound anywhere in the application, use these buttons.<br />
Navigate to the location of the image / sound and open it from the dialogue window.<br />
Uploading an image:<br />
Edizioni <strong>Edilingua</strong> 32
<strong>Arrivederci</strong>! 2 <strong>IWB</strong> <strong>Software</strong><br />
USER’S <strong>MANUAL</strong><br />
Uploading a sound:<br />
You can preview sounds from the CCT using this button.<br />
You can remove an uploaded image or sound using these buttons.<br />
This action can be undone.<br />
Edizioni <strong>Edilingua</strong> 33
<strong>Arrivederci</strong>! 2 <strong>IWB</strong> <strong>Software</strong><br />
USER’S <strong>MANUAL</strong><br />
The CCT always displays thumbnails of images. Click on an image to enlarge it, then click it again to<br />
restore thumbnail size.<br />
Please note that thumbnails might occasionally appear “cropped”; full-size images will display correctly.<br />
The remove image / sound buttons are only available when you have uploaded an image or sound. When<br />
no image or sound has been uploaded, they appear greyed out.<br />
Note: uploading images and sounds that are reasonably sized and not larger than 10MB is recommended.<br />
The CCT will work with larger files, but the greater the file size, the greater the demand placed on your<br />
computer’s RAM and CPU.<br />
Creating your own audio files<br />
The CCT will work with all properly structured audio files. For your audio creation needs, the open-source<br />
and free-to-use program Audacity is highly recommended. Audacity may be downloaded from:<br />
http://audacity.sourceforge.net/.<br />
About royalty–free audio files<br />
The CCT will play all correctly structured MP3 and WAV sounds, but it will not load sounds with incorrect<br />
sample rates. Therefore, some sounds freely available on the internet may not work. If you experience<br />
this, please try again with a different file, preferably downloaded from a different website.<br />
Using the LINK feature<br />
You can include up to four links to web pages or to locally stored (e.g. videos) to accompany the tasks you<br />
create.<br />
To do this, click on the LINK button next to the task instruction box. This will bring up the Enter<br />
Link(s) tool. Type the desired link(s) into the field(s), then click Fatto (Done).<br />
Edizioni <strong>Edilingua</strong> 34
<strong>Arrivederci</strong>! 2 <strong>IWB</strong> <strong>Software</strong><br />
USER’S <strong>MANUAL</strong><br />
Type the desired link(s) into the field(s), then click Fatto (Done).<br />
Important notice:<br />
To link to a local<br />
file, type file:///<br />
and then enter the<br />
path to the folder<br />
where the file is<br />
contained and the<br />
filename.<br />
If you are unsure<br />
what the path to the<br />
local file is, locate<br />
it, right-click it,<br />
select PROPERTIES<br />
and go to the<br />
DETAILS<br />
tab. Scroll down<br />
until you see the<br />
field “Path to<br />
folder”.<br />
Copy the contents of<br />
that field and past<br />
them into the CCT<br />
link field. Place your<br />
cursor at the end of<br />
the path, and add<br />
the filename with its<br />
extension.<br />
Web links can be typed or copy-pasted into the from your web browser URL address bar. Make sure that<br />
the URL address starts with http:// e.g. http://www.myaddress.com.<br />
Preview, editing, saving and sharing a task<br />
As you have seen at page 25, the sub-menu of “Crea un’attività” has three features:<br />
Vedi l’anteprima, correggi: click on this button to preview a task and see how it works.<br />
Salva l’attività: Click Salva to save your task. To rename your task, please change its name in<br />
this field.<br />
Salva una copia dell’attività: this creates a duplicate of your task so you can use it as a<br />
template to create a new one. The task will be saved with “Copy of...” in front of its current<br />
filename.<br />
Salva e condividi l’attività: To share the tasks you have created with<br />
colleagues, or to simply use them on another machine, please follow these steps:<br />
Edizioni <strong>Edilingua</strong> 35
<strong>Arrivederci</strong>! 2 <strong>IWB</strong> <strong>Software</strong><br />
USER’S <strong>MANUAL</strong><br />
1. Go to DOCUMENTS.<br />
2. Locate folder ProgettoItaliano1.CUSTOM<br />
3. COPY the whole folder or OPEN it and SELECT THE UNITS / LESSONS / TASKS you wish to COPY.<br />
4. PASTE the content into your preferred storage device (floppy drive, external USB hard<br />
disk, etc.).<br />
5. TRANSFER (COPY-PASTE) the content to DOCUMENTS/ <strong>Arrivederci</strong>2.CUSTOM folder on any other<br />
computer that has <strong>Arrivederci</strong>2 with CCT install led.<br />
Accessing and using a task in the classroom<br />
The CCT saves each task you create so that it appears with the <strong>Arrivederci</strong>! 2 task you were viewing when<br />
you accessed the CCT.<br />
Edizioni <strong>Edilingua</strong> 36
<strong>Arrivederci</strong>! 2 <strong>IWB</strong> <strong>Software</strong><br />
USER’S <strong>MANUAL</strong><br />
Tasks created with<br />
this task will become<br />
available through<br />
this button when you<br />
this button when you<br />
navigate to this task.<br />
Similarly, tasks you create on the Table of Contents (TOC) page will be available there, and tasks you<br />
create on subsequent menu pages will be available with those pages. When you click Apri l’attività, the<br />
application displays a list of items you have created in this location. Click on the task you want to use.<br />
… Enjoy the lesson!<br />
Edizioni <strong>Edilingua</strong> 37