INSTALLATION MANUAL
INSTALLATION MANUAL
INSTALLATION MANUAL

You also want an ePaper? Increase the reach of your titles
YUMPU automatically turns print PDFs into web optimized ePapers that Google loves.
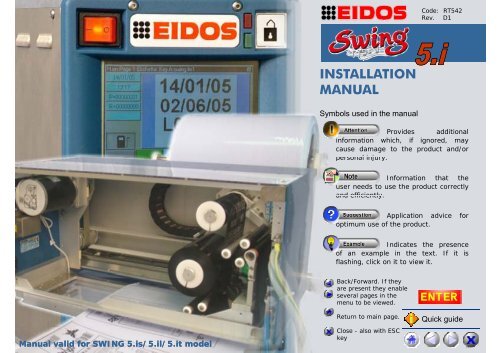
Code: RT542<br />
Rev. D1<br />
<strong>INSTALLATION</strong><br />
<strong>MANUAL</strong><br />
Symbols used in the manual<br />
Provides additional<br />
information which, if ignored, may<br />
cause damage to the product and/or<br />
personal injury.<br />
Information that the<br />
user needs to use the product correctly<br />
and efficiently.<br />
Application advice for<br />
optimum use of the product.<br />
Indicates the presence<br />
of an example in the text. If it is<br />
flashing, click on it to view it.<br />
Back/Forward. If they<br />
are present they enable<br />
several pages in the<br />
menu to be viewed.<br />
Manual valid for SWING 5.is/5.il/5.it model<br />
Return to main page.<br />
Close - also with ESC<br />
key<br />
1<br />
Quick guide
General information<br />
Contacts<br />
Guide<br />
Contents<br />
t<br />
1. Contents t of standard d package<br />
2. Positioning printer<br />
3. Mechanical assembly<br />
4. System connections<br />
5. Pneumatic connections<br />
6. Setting up printer<br />
7. Switching on printer<br />
8. Creating labels and files management<br />
9. Connecting to computer and data exchange<br />
Swing 5.i - Installation manual<br />
2
General information<br />
Contacts<br />
Guide<br />
1. Contents t of standard d package<br />
PRINT UNIT<br />
with PRINT SURFACE<br />
+ roll of thermal test<br />
ribbon<br />
ELECTRONIC<br />
UNIT<br />
OPERATOR<br />
<strong>MANUAL</strong><br />
+ EASYCODE CD<br />
USB MEMORY<br />
KEY<br />
POWER CABLE<br />
CONNECTING<br />
CABLES<br />
CLEANING<br />
KIT<br />
Swing 5.i – Contents of standard package<br />
3
General information<br />
Contacts<br />
Guide<br />
2. Positioning i printer<br />
Recommended d installation ti positions:<br />
1) With print surface in position below<br />
2) With print surface in position above*<br />
(2*)<br />
• Increase in print pressure requested (+0.5 bar greater than value set with print surface on lower side).<br />
• If the packaging g film is dirty, these particles may be deposited on the print head, which will detract from<br />
print quality.<br />
• Through the force of gravity, the carriage may tend to jam the packaging film on its return from the home<br />
position. The film must therefore always be kept taut.<br />
Swing 5.i – Positioning printer<br />
4
General information<br />
Contacts<br />
Guide<br />
3) With the print carriage performing a vertical movement<br />
Assembly permitted but ONLY with the use of<br />
pneumatic balancing devices of the weight of the<br />
carriage.<br />
49KMS50 for Swing 5i.s<br />
49KMS49 for Swing 5i.l<br />
49KMS51 for Swing 5i.t<br />
Swing 5.i – Positioning printer<br />
5
General information<br />
Contacts<br />
Guide<br />
Permitted but not recommended d installation ti positions:<br />
1) With print surface in vertical position<br />
Ribbon loading reels– upper side-<br />
• The print head unit does not work in the most stable conditions because of its weight.<br />
• The ribbon could rewind with difficulty and incorrectly.<br />
• There could be creases on the printed surface.<br />
Swing 5.i – Positioning printer<br />
6
General information<br />
Contacts<br />
Guide<br />
FORBIDDEN installation ti positions:<br />
1) With the ribbon loading reels on the lower part of the printer<br />
Ribbon loading reels – lower side-<br />
Swing 5.i – Positioning printer<br />
7
General information<br />
Contacts<br />
Guide<br />
Remember !<br />
Positioning.<br />
If it is not possible to install the printer with the print surface integral with it, the print surface should be<br />
installed with the rubber at a maximum distance of 2.5-3mm from the head profile. Allow provision for<br />
setting the print surface with respect to the head so as to facilitate the search for the optimum print<br />
condition. Leave sufficient space for internal maintenance of the machine (rear cover). If this<br />
accessibility cannot be guaranteed, fit the machine to a support that enables the operator to rotate it or<br />
slide it to a comfortable position. To clean the head, the printer does not need to be moved away from<br />
the print head. This operation is on the other hand recommended if the print head has to be replaced.<br />
Support.<br />
The print unit support must be robust enough to minimize rocking or vibrations.<br />
Ambient temperature and humidity.<br />
The machine must also be installed in an environment where the temperature is not above 40°C (away<br />
from any drying kilns, etc.) and not below +5°C and with humidity not above 70%.<br />
Swing 5.i – Positioning printer<br />
8
General information<br />
Contacts<br />
Guide<br />
Obey these notices carefully to avoid creases forming on the printed surface<br />
A<br />
B<br />
The print unit print must be fixed to the packaging line. Position<br />
the two points [A] and [B] parallel. Check with a spirit level!<br />
The printer does not need to<br />
be in a completely horizontal<br />
position. But it is VERY<br />
important that the two sides<br />
are parallel to one another.<br />
Swing 5.i – Positioning printer<br />
9
General information<br />
Contacts<br />
Guide<br />
Recalibrate the print surface in relation to the line of the print<br />
head profile. Run the following tests on the points marked [C]<br />
and [D].<br />
D<br />
C<br />
Press the print<br />
head support<br />
manually in the<br />
central position<br />
until the profile of<br />
the head comes<br />
into contact with<br />
the print surface.<br />
To check that the print head profile and the print surface are parallel at point [C], adjust the 4 screws<br />
located on the right side that are used to fix the right side of the print surface to the printer. To check that<br />
the print head profile and the print surface are parallel atpoint[D],adjustthe4screws located on the left<br />
side that are used to fix the left side of the print surface to the printer.<br />
After setting, tighten the screws and check alignment on points [C] and [D] again.<br />
Swing 5.i – Positioning printer<br />
10
General information<br />
Contacts<br />
Guide<br />
3. Mechanical assembly<br />
The print unit needs to be fixed mechanically to an external support bracket (made and supplied by the<br />
customer). There are 10 fixing points so as to enable great configuration liberty.<br />
In particular, there are three standard ways of fixing to the machine (refer to overall dimension drawings):<br />
a) fixing upper face of printer by means of 4 screws in the threaded M6 holes<br />
b) fixing onto the two right and left sides of the printer by means of 4 screws in the threaded M6 holes<br />
c) fixing the printer on a rear crosspiece by means of 2 screws in the 6.5-mm diameter through holes.<br />
The printer must print only on the print surface supplied by EIDOS.<br />
Rules to be followed during the phase of installation of the printer and the print surface:<br />
a) the distance between the head profile and the print surface must be about 2.5 - 3mm. The maximum<br />
possible range for the head is 8 mm with respect to the rest position.<br />
b) Make sure that the film to be printed touches the print surface, thus reducing the so-called “suction”<br />
effects.<br />
It is advisable to maintain a distance of about 1mm between the film and the print surface.<br />
If the printer is going to be used in particularly humid environments (for example cheese<br />
factories) the electronic unit should be placed inside an IP65- grade sealed container to<br />
prevent ambient humidity from gradually reducing the reliability of the electronic parts.<br />
Swing 5.i – Mechanical assembly<br />
11
General information<br />
Contacts<br />
Guide<br />
4. System connections<br />
Connecting electronic unit and print unit<br />
• Power cable and controls<br />
print unit , 62-way HD<br />
• Print head signals cable, 44-way HD<br />
• Earth connection cable<br />
between the two units. DO NOT ground. 1<br />
3<br />
1<br />
2<br />
2<br />
3<br />
Swing 5.i – System connections<br />
12
General information<br />
Contacts<br />
Guide<br />
Connecting to main power supply<br />
• Main power cable<br />
Connectthepowercabletoalinethatcancarry400VAmaximumvoltage<br />
with voltage fluctuation that must never exceed 10% of nominal voltage.<br />
• Power: max 400 VA<br />
• Voltage and frequency: pay attention to the adhesive label on the rear of<br />
the printer and on the power supply.<br />
• 230V ONLY means min 200, max 260 Vac (50Hz)<br />
• 115V ONLY means min 100, max 130 Vac (60Hz)<br />
• The Electronic Unit model High power (EUHxx) is NOT autoranging.<br />
Swing 5.i – Connecting to main power supply<br />
13
General information<br />
Contacts<br />
Guide<br />
5. Pneumatic connections<br />
Compressed air supply<br />
• Compressed air pipe 8mm ø external<br />
• Pressure: 6 bar steady upstream of the adjuster<br />
• Filtered<br />
• Not lubricated or delubricated<br />
• Flow at least 15NL/min<br />
• Quick-fitting air pipe<br />
6 bar<br />
Adjust to<br />
3-4 bar<br />
max<br />
Swing 5.i – Pneumatic connections<br />
14
General information<br />
Contacts<br />
Guide<br />
6. Setting up printer<br />
Loading thermal ribbon roll<br />
see [operator manual]<br />
Swing 5.i – Setting up printer<br />
15
General information<br />
Contacts<br />
Guide<br />
7. Switching on printer<br />
Electronic Unit: operating area<br />
1. Title bar. The name of the active label file is<br />
described.<br />
2. Date, time, current number, previous number,<br />
type<br />
of emulation active, line-speed indicator.<br />
3. Image window of label to be printed.<br />
4. Tool bar<br />
ribbon reserve warning light<br />
5. Fault message and warning bar .<br />
6. Touch screen restore button. This is a<br />
protection to prevent unwanted operations<br />
being run because the screen has been<br />
unintentionally touched.<br />
7. Start key.<br />
7<br />
6<br />
automatic mode<br />
manual mode<br />
system information: sw release on<br />
board, head drift meter counter and<br />
actual print counter<br />
1<br />
2 3<br />
load new label/change batch<br />
go to operate menu<br />
4<br />
display label image<br />
5<br />
Fault warning.<br />
Press to release alarm<br />
Swing 5.i – Switching on printer<br />
16
General information<br />
Contacts<br />
Guide<br />
How to activate on-line Help window<br />
How to activate on-line zoom function<br />
The electronic unit is provided with Help on Line<br />
that gives information on all the tasks that can<br />
be performed, including configuration of the<br />
parameters.<br />
It can be displayed by pressing the bar of the<br />
title inside the desired page.<br />
Press on the right-hand side of the screen and<br />
when it appears drag the cursor up or down to<br />
alter zoom parameters.<br />
The enlarged image can be moved inside the<br />
display area in order to be able to see the part<br />
that is of interest.<br />
To override the zoom, drag the cursor down until<br />
OFF appears.<br />
Swing 5.i – Switching on printer<br />
17
General information<br />
Contacts<br />
Guide<br />
Manual mode (MAN)<br />
In MAN mode the printer does not run commands from outside (SYNC<br />
24) and enables access to the Operate menu.<br />
To enter the Set-up menu:<br />
1. Make sure that printer is in MAN position<br />
2. Press the key<br />
From this window the printer can be managed completely manually:<br />
• Service position<br />
Positions the carriage in the “service” zone, where the ribbon can be<br />
changedandtheheadcanbecleaned<br />
• Ribbon position<br />
Tensions thermal ribbon by rewinding it<br />
• Test print<br />
Runs a test print<br />
• Printer Parameters [see following pages]<br />
• Label parameters<br />
Checks dimensions, type of reprocessing, photocell threshold and<br />
space between labels<br />
• Print shift adjustment<br />
Adjusts shift of print image from set value<br />
• File management [see following pages]<br />
• Diagnosis [see maintenance manual]<br />
• Carriage position<br />
Repositions carriage onhomesensor<br />
Swing 5.i – Switching on printer<br />
18
General information<br />
Contacts<br />
Guide<br />
• Pi Printer Parameters<br />
• Printing speed<br />
• Intensity correction<br />
• Intelligence correction<br />
• Shift from home<br />
• Head fall delay<br />
• Head rest delay<br />
•Type of print step<br />
• Print number<br />
• Number of repetitions<br />
• Distance of repetitions<br />
• Print start delay<br />
• Movement speed<br />
• Carriage return speed<br />
• Carriage return wait<br />
• Character outline<br />
• Thermal coefficient<br />
•Drift<br />
• Saving backwards<br />
• Ribbon saving automatic<br />
calculation<br />
• Thermal head type<br />
• Mirror printing<br />
• Reverse printing<br />
• SATO emulation<br />
• SATO emulation mode<br />
• Number check in descending order<br />
• Consecutive number parameters<br />
• Consecutive line number<br />
parameters<br />
• Consecutive number<br />
• Consecutive line number<br />
• Absolute consecutive number<br />
•Number in descendingd order<br />
• Check STB-STA<br />
• STA only front<br />
• FAP pulsed<br />
• Reversed inputs<br />
•Only I/O print<br />
• Piece present<br />
• Enable I/O page<br />
• Serial parameters<br />
• Wait/ready protocol<br />
• Optical reader function<br />
• Barcode check function<br />
• Advanced parameters<br />
• Date<br />
•Time<br />
• Language<br />
• Enable password<br />
• Password<br />
• Enable sound<br />
• Rotate LCD by 180°<br />
• Enable capacity sensor<br />
• Enable operator Help<br />
• LCD contrast<br />
Swing 5.i – Switching on printer<br />
19
General information<br />
Contacts<br />
Guide<br />
Parameter setting<br />
Analogue parameter setting by means of numeric keyboard: print speed<br />
Main Page<br />
MAN<br />
Printer<br />
Parameters<br />
Set Printer Parameters Printer Parameters 1<br />
Minimum<br />
value<br />
Increase by 1<br />
unit<br />
Increase by10<br />
units<br />
Cancel<br />
operation and<br />
exit<br />
Unit of<br />
measurement<br />
Maximum value<br />
Decrease by 1<br />
unit<br />
Decrease by 10<br />
units<br />
Set default value<br />
Delete all<br />
entries<br />
Next<br />
page<br />
Confirm<br />
entries<br />
Cancel last entry<br />
Confirm entries and exit<br />
When there are white boxes on the display that contain values, click on the box to access<br />
a keyboard from which the values can be set.<br />
Swing 5.i – Switching on printer<br />
20
General information<br />
Contacts<br />
Guide<br />
ENABLE/DISABLE parameter setting: automatic application function<br />
Main Page<br />
MAN<br />
Printer<br />
Parameters<br />
Set Printer Parameters<br />
Application parameters1…<br />
When there is a checkbox<br />
on the display you can<br />
select ON (black)/OFF<br />
(white).<br />
Parameter setting with guided selection option: select language<br />
Main Page<br />
MAN<br />
Printer<br />
Parameters<br />
Set date-time-language<br />
Date, Time, Language<br />
When there is a “radio<br />
button” on the display<br />
(round box) you can<br />
make an exclusive<br />
selection.<br />
Swing 5.i – Switching on printer<br />
21
General information<br />
Contacts<br />
Guide<br />
• File management<br />
Main Page<br />
MAN<br />
File<br />
management<br />
Function unavailable<br />
Click on the menu items to display or hide<br />
the parameters list<br />
Swing 5.i – Switching on printer<br />
22
General information<br />
Contacts<br />
Guide<br />
8. Creating labels l and files management<br />
Load the label to be printed in one of the following ways:<br />
a) From hard disk<br />
Select TEMP label from hard disk [Flash disk C] and set desired parameters.<br />
b) From Easycode software<br />
Create the label on the PC using the previously installed Easycode software.<br />
-For label-creating operations, see Easycode guide – (Help on Line)<br />
If you are using the USB memory key, copy the label onto it and then call it up from the file<br />
management menu: load the new Flash A label (Flash Memory Key disk).<br />
See next chapter for information on exchanging computer data in other ways.<br />
c) From EIDOS libraries<br />
Eidos supplies the libraries (ELIB32) wich support the programmer, in the editing of custom<br />
programs for the data exchange and label files, between Pc and printer (by serial or network<br />
connection). These libraries are functions easily supplementable in programs drawn up in Visual<br />
Basic and Visual C++.<br />
It is advisable to ask Eidos the cd with the libraries functions and the use examples.<br />
-See ELIB32 Libraries Manual.<br />
d) From Starcode software<br />
Use the serial connection to call up the label from the computer in which the software is installed.<br />
The Starcode software enables centralised management of production data.<br />
-See Starcode manual.<br />
Swing 5.i – Creating labels<br />
23
General information<br />
Contacts<br />
Guide<br />
9. Connecting to computer and data exchange<br />
Connection to the central computer (which has customized<br />
management software or Easycode or Starcode) can be achieved<br />
by serial port - RS232 to 115200 baud - or USB port.<br />
Connections by means of USB adapter devices for wireless<br />
802.11g, or Ethernet are also possible.<br />
Managing files and data exchange can occur in the following<br />
manner:<br />
EASYCOD<br />
E<br />
PC<br />
a) Exchanging data with USB memory<br />
b) Serial connection<br />
c) Connecting via Ethernet<br />
d) Connecting via Wireless network<br />
RS232<br />
USB-ETHERNET<br />
USB-WIRELESS<br />
Not all USB adapters are usable<br />
because there is no guarantee that the<br />
printer can manage their driver.<br />
Consult Eidos to create LAN and WLAN<br />
networks.<br />
USB MEMORY<br />
ELECTRONIC<br />
UNIT<br />
Swing 5.i – Connecting to computer and data exchange<br />
24
General information<br />
Contacts<br />
Guide<br />
a) Exchanging data with USB memory<br />
The label texts drawn up on a PC outside the printer by means of software (EASYCODE) are communicated<br />
to the Printess by means of the USB memory key, which can also be used as a local data archive. The USB<br />
memory key does not need to be installed and can be considered to be an extra hard disk.<br />
CONNECTOR<br />
FOR USB<br />
MEMORY<br />
Swing 5.i – Connecting to computer and data exchange<br />
25
General information<br />
Contacts<br />
Guide<br />
b) Serial connection<br />
With the printer in position and the serial cable connected:<br />
1) select printer parameters<br />
2) set communication parameters<br />
• External connection: enable COM<br />
• Serial parameters: set transmission speed of serial line. Recommended: 115200 (n,8,1,p) baud<br />
• Wait/Ready protocol: enable<br />
Wait/Ready protocol<br />
When the printer starts the print phase, send the character “W” to the serial line; at the end of the<br />
application cycle, send character "R". This occurs both in single print-cycle mode and in the double-print<br />
cycle.<br />
In the caseof the double cycle, the character “W” is senttothe startof the first cycle and the character<br />
“R” is sent to the end of the second application cycle. If the printer goes into fault status during the cycle,<br />
it sends the character “R” to the serial line. At this point it is possible to request (^?) status and check<br />
machine status.<br />
This W/R protocol management is also valid if the bar checker is enabled. The characters "W" and "R" are<br />
sent online only if the signals CTS and DSR are active. If these signals are missing, the characters are not<br />
sent.<br />
Swing 5.i – Connecting to computer and data exchange<br />
26
General information<br />
Contacts<br />
Guide<br />
c) Connecting via Ethernet t LAN 10/100<br />
By connecting the printer (Usb-Device port) to an Ethernet/USB adapter, it is possible to connect to an<br />
Ethernet network and then access the print data.<br />
Technical features of connection:<br />
Port: 30000<br />
Subnet mask: adjustable (default= 255.255.0.0)<br />
IP address: adjustable<br />
Communication mode: client/server<br />
EIDOS printer is acting like Server and is staying in stand-by<br />
(on the port) for the requirements from client .<br />
USB port<br />
RJ45<br />
Ethernet/USB<br />
adapter<br />
Company network<br />
LAN 10/100<br />
Ethernet – name of a protocol for local networks. Data travel at 100 Mbps over the Ethernet (100 million bits per<br />
second.<br />
Swing 5.i – Connecting to computer and data exchange<br />
27
General information<br />
Contacts<br />
Guide<br />
d) Connecting via Wireless networks<br />
CONSIDERATIONS ON THE SAFETY OF THE WI-FI NETWORKS:<br />
The EIDOS printers do not support the cryptography protocols (es. WEP, WPA) often used to increase the<br />
safety of the wireless networks against hackers.<br />
For the management of the EIDOS printers in WI-FI networks, EIDOS advises the following operations:<br />
1) to create a local Wlan EIDOS network (SSID=EIDOS) independent from the network (LAN/WLAN)<br />
already existing in the company.<br />
2) to enable the “Mac Filtering” option in the Access Point parameters. This filter will avoid that other wi-fi<br />
devices with MAC address not presents in the list could communicate with the EIDOS Wlan network,<br />
reducing the risk of hackers attack.<br />
AP (Access point) – device of a local wireless network in which the data converge that come from the devices connected<br />
by the specified protocol (e.g:WI-FI).<br />
LAN (Local Area Network) - a LAN consists of a series of devices that are connected together that share resources and<br />
peripherals.<br />
MAC Address (Media Access Control address) - in computer networking is a unique identifier attached to most forms of<br />
networking equipment.<br />
SSID (Service Set IDentifier) – the wireless network has its own identifying address called SSID, that the wireless cards<br />
have to recognise in order to be able to be connected. A device that has no SSID cannot log into the network.<br />
WI-FI (Wireless Fidelity) – certification of the products for wireless networks that conform to Ethernet compatibility<br />
specifications. WI-FI technology, which is also known as 802.11b IEEE wireless technology, uses the same Ethernet<br />
standards (cabled networks).<br />
WLAN – network consisting of wireless devices.<br />
Swing 5.i – Connecting to computer and data exchange<br />
28
General information<br />
Contacts<br />
Guide<br />
NOTES ON ALL RECOMMENDED CONFIGURATIONS:<br />
• The PC does not need to be connected to the company network; it can also be stand-alone<br />
• If the PC is connected to the company network, EASYCODE, STARCODE and other programmes can use<br />
the customer database or the archive of labels resident in a disc of the company network.<br />
• Assigning the SSID isolates the local EIDOS WLAN network from any other WI-FI networks current in the<br />
company or to be installed in future. Even if IP addresses that are already in use on other WLAN networks<br />
are assigned to the EIDOS printers the different SSID will make the network units separate from one<br />
another.<br />
• Using a laptop and a USB to WI-FI converter (configured with the same network SSID and an IP address<br />
that is not assigned to another - PC, AP unit EIDOS printers – of the network) it is possible to<br />
communicate in WI-FI with the different connected printers without any need to connect via cable or to<br />
use other APs.<br />
• In order to increase the communication distance between AP and EIDOS printers, it is possible to fit the AP<br />
with higher-performance direction or bipolst antennas instead of the 2 antennas provided. In this way,<br />
(theoretical) distances of 100-150m can be reached.<br />
IP –unique numeric address of the device connected to the network. The numbers of an IP address are used to identify a<br />
network and a particular host (each terminal connected to the network that hosts application level programmes).<br />
Swing 5.i – Connecting to computer and data exchange<br />
29
General information<br />
Contacts<br />
Guide<br />
Configuration 1<br />
Recommended in the following cases:<br />
• Company PC housed in a room thatt can act as a screen for the radiofrequency. The Ethernett cable thatt<br />
connects the PC and the Access Point enables radiofrequency filtering barriers to be overcome.<br />
Network features:<br />
• The WLAN network is a local network and is isolated from other networks by means of the SSID identifier<br />
that is settable both on the printers and on the Access Point. The IP WLAN addresses of the printers, of the<br />
Access Point and of the company PC can be defined by the EIDOS installer without any need to request<br />
free company IP addresses. It is recommended that 10.0.y.x IP addresses be used (where 0 x 255 and<br />
1 y 254).<br />
• If the PC is also connected to the company network it will therefore have 2 IP addresses. One will be the<br />
network address assigned by the company (e.g. 192.168.0.39) for the LAN connection, the other will be<br />
an IP address of the type 10.0.0.2 with SSID = EIDOS for the WI-FI connection to the local EIDOS<br />
connection.<br />
• Access Point connected to the PC by “crossed” Ethernet cable. In order to intervene on the customer’s PC<br />
to add a second Ethernet LAN card, an external USB – Ethernet converter should be used.<br />
• On the company PC the following management programmes of the EIDOS printers can be installed:<br />
a) EASYCODE<br />
b) STARCODE<br />
c) a custom programme that uses the EIDOS E-LIB libraries<br />
d) programmes for creating different labels that interface with the EIDOS printer by means of the SATO<br />
driver.<br />
Swing 5.i – Connecting to computer and data exchange<br />
30
General information<br />
Contacts<br />
Guide<br />
• The Access Point should be positioned at the point of gravity with relation to the printers.<br />
SCREENED<br />
AREA<br />
"crossed" Ethernet<br />
cable<br />
max 15m<br />
+<br />
USB to Ethernet<br />
adapter<br />
Access Point<br />
max 15m<br />
max 15m<br />
EIDOS WLAN<br />
Swing 5.i – Connecting to computer and data exchange<br />
31
General information<br />
Contacts<br />
Guide<br />
Configuration 2<br />
Recommended in the following cases:<br />
• Company PC thatt is nofurther than 15 m from the “Access Point” (Fig. 2.1)<br />
• Between the company PC and the Access Point there must not be any barriers screening the<br />
radiofrequency.<br />
• If the PC and the printers are more than 15m away (but less than 100m) from the Access Point provide<br />
the Access Point with 2 dipolar antennas (Fig. 2.2) that enable a distance up to 100m to be covered.<br />
max 15m<br />
max 15m<br />
max 15m<br />
+<br />
Access Point<br />
max 15m<br />
Fig 2-1<br />
max 15m<br />
Swing 5.i – Connecting to computer and data exchange<br />
32
General information<br />
Contacts<br />
Guide<br />
+<br />
USB WI-FI<br />
adapter<br />
max 100m<br />
max 100m<br />
+ USB WI-FI<br />
adapter<br />
max 100m<br />
max 100m<br />
+<br />
+ USB WI-FI<br />
adapter<br />
USB WI-FI<br />
adapter<br />
Access Point<br />
max 100m<br />
+<br />
USB WI-FI<br />
adapter<br />
Fig 2-2<br />
• The Access Point should be positioned at the point of gravity in relation to the printers and to the PC.<br />
• This configuration can also be used by the technician who wishes to communicate in radiofrequency with<br />
the EIDOS printers that he is installing.<br />
Swing 5.i – Connecting to computer and data exchange<br />
33
General information<br />
Contacts<br />
Guide<br />
How to configure the Eidos printer<br />
IP address :<br />
Printer Parameters> Set communication Parameters> Communication parameters 2 > IP Wireless LAN.<br />
SSID:<br />
Printer Parameters> Set communication Parameters> Communication parameters 2 > Name Lan Wireless<br />
(ESSID)<br />
Search function of AP:<br />
Printer Parameters> Set communication Parameters> Communication parameters 2 > Scanning WLAN<br />
Swing 5.i – Connecting to computer and data exchange<br />
34
General information<br />
Contacts<br />
Guide<br />
Installation recommendations<br />
• How to find optimal network configuration<br />
Preliminary operations (before embarking on installation on site):<br />
Request a scale plan of the premises on which the network will be installed that specifies:<br />
- the position of the PC and of the EIDOS printers to be connected to the network<br />
- the presence and location of metal obstacles on the company premises.<br />
In this way an approximate configuration of the WLAN network can already be made.<br />
Equipment required to carry out installation:<br />
1laptopPC<br />
1 Access Point device.<br />
n USB-TO-WI-FI converters for all the printers (more than 1 may have to be used on the company PC)<br />
1 Ethernet cable harness, connectors and pliers for crimping cable<br />
2 direction antennas<br />
2 dipolar omnidirectional antennas<br />
2 coaxial cables measuring 3 metres to connect the antennas to the Access Point<br />
1 Devolo converter with USB port.<br />
1 Devolo converter with Ethernet port (RJ-45).<br />
Swing 5.i – Connecting to computer and data exchange<br />
35
General information<br />
Contacts<br />
Guide<br />
• Proceeding with installation<br />
Position and switch on the Access Point at the centre of gravity with the printers.<br />
With the laptop PC and a USB to Wireless converter installed on board, check Link Quality and signal<br />
strength in the zones where the printers will be installed and in the zone where the PC is located.<br />
The Link Quality and Signal Strength bars indicate the quality of the wireless section. The minimum<br />
acceptable values of these two parameters are around 60-70%<br />
Swing 5.i – Connecting to computer and data exchange<br />
36
General information<br />
Contacts<br />
Guide<br />
• In order to check the quality of the link the command “ping nnn.nnn.nnn.nnn – t” should also be run from<br />
the Ms-Dos prompt of Windows. nnn.nnn.nnn.nnn is the IP address of the Access Point and enables the<br />
send/receive test of 32-byte packets between the PC and the Access Point to be tested, showing dispatch<br />
and return times.<br />
The monitor displays the result of each ping command prompt:<br />
Ping (Packet InterNet Groper i.e. "Internet package searcher") is a programme that is available in the main operating<br />
systems that measures the time, expressed in milliseconds taken by one or more ICMP packets (transmission protocols)<br />
to reach another computer or network server (whether Internet or LAN) and return to the origin.Itisinfactaservice<br />
run by the server, locally or via Internet, to find out whether the server is operating.<br />
Swing 5.i – Connecting to computer and data exchange<br />
37
General information<br />
Contacts<br />
Guide<br />
• Key in Ctrl-C to interrupt the operation and obtain statistical data on the test:<br />
•Average acceptable durations of pings are 0 - 20 ms.<br />
•If after these tests some devices do not have good transmission quality, replace the antennas with which<br />
the Access Point are provided, in order to expand their capacity. The choice between omnidirectional<br />
antennas and directional antennas depends on the number of printers to be installed and on their<br />
arrangement.<br />
If the number of printers is reduced and it is possible to arrange them at a short distance from one another,<br />
direction antennas are recommended. If on the other hand there is a large number and/or the printers are<br />
arranged on an extended surface, it is preferable to use a pair of dipolar antennas.<br />
Attachments:<br />
• Configuring g the Access Point<br />
• Configuring the WI-FI<br />
Swing 5.i – Connecting to computer and data exchange<br />
38
General information<br />
General information<br />
All rights to this manual are reserved. The reproduction, even partial, of this manual in any form is forbidden unless<br />
express written permission is given by Eidos S.p.A.<br />
The contents of this manual may be modified and improved without prior notice.<br />
Every effort has been made to ensure the accuracy of the contents.<br />
Please report any errors and/or inaccuracies to Eidos S.p.A. in order to make the manual as exhaustive as possible.<br />
Eidos S.p.A. accepts no liability for any accidental error or for any consequent harm arising from the supply,<br />
performance or use of this manual.<br />
Documentation supplied<br />
A series of tool that are supplied with the product and that simplify its use are an integral part of this manual:<br />
Help on Line and Error Messages – on machine. Help on Line provides information on the specific selected<br />
operations. Display must be enabled by the printer’s setup menu. The error messages provide an immediate<br />
explanation of the error that has occurred and indicate the measures that must be taken to eliminate it.<br />
Operator Manual – This is the paper document and it is designed to inform and assist the machine operator in matters<br />
of routine operation and maintenance.<br />
System Description and Configuration Manual – It is in hypertext format and contains the description of the<br />
system and basic instructions on its operation.<br />
Installation Manual – It is written for the installation technician in hypertext format. It indicates the procedures to be<br />
carried out for correct installation and commissioning of the machine.<br />
Maintenance Manual – It is written for electricians and fitters in hypertext form. It provides the information required<br />
to perform special maintenance, diagnostics, updating and all the tasks that are not part of normal operation.<br />
Easycode Programme – The demonstration version of the label management software is provided.<br />
39
Contacts<br />
How to contact t<br />
us<br />
Via dell’Industria, 11<br />
ZI Z.I. Fontaneto<br />
10023 Chieri (TO) ITALY<br />
Tel. +39 011 947 781<br />
Fax +39 011 947 7865<br />
E-mail: eidos@eidos.eueu<br />
Web: www.eidos.eu<br />
40
Guide<br />
Guide<br />
Surfing<br />
Contents<br />
t From the contents t page youcanchoose a topic orsection of this manual.<br />
Forwards/backwards if there are several pages in the menu.<br />
Return to main page.<br />
Close – also with ESC.<br />
How to print<br />
Use the right mouse key to open the menu from which it is possible to set and carry out printing.<br />
Connecting<br />
Events link: Text in green indicates an event that is active on the page.<br />
Active links: The underlined green text indicates an active connection to a different page.<br />
Animation: [show] starts animation.<br />
Press this flashing symbol to start an animation.<br />
This symbol invites the reader to contact EIDOS for greater information on solutions and particular products.<br />
41