Swisscom TV Setup
Swisscom TV Setup
Swisscom TV Setup

You also want an ePaper? Increase the reach of your titles
YUMPU automatically turns print PDFs into web optimized ePapers that Google loves.
<strong>Swisscom</strong> (Switzerland) AG<br />
Contact Center<br />
CH-3050 Bern<br />
www.swisscom.ch<br />
126457 12/2010<br />
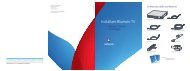
<strong>Swisscom</strong> <strong>TV</strong> <strong>Setup</strong><br />
<strong>Swisscom</strong> <strong>TV</strong> box<br />
and cables
Contents<br />
Preparations for <strong>Swisscom</strong> <strong>TV</strong> – Position devices<br />
Where do I position the <strong>Swisscom</strong> <strong>TV</strong> box? 1<br />
What else do I need to watch out for? 1<br />
Installing <strong>Swisscom</strong> <strong>TV</strong><br />
1. Check the router 2<br />
2. Connect the <strong>Swisscom</strong> <strong>TV</strong> box and router 3<br />
3. Connect the <strong>Swisscom</strong> <strong>TV</strong> box to your <strong>TV</strong> 4<br />
4. Switch on the <strong>Swisscom</strong> <strong>TV</strong> box 5<br />
5. Switch on and operate <strong>Swisscom</strong> <strong>TV</strong> 6<br />
Pack contents<br />
<strong>Swisscom</strong> <strong>TV</strong> box with mains adapter<br />
First steps – Operating <strong>Swisscom</strong> <strong>TV</strong><br />
The most important <strong>Swisscom</strong> <strong>TV</strong> buttons 7<br />
Changing the screen language 8<br />
Changing the screen aspect ratio 9<br />
Further devices<br />
Connecting the stereo system 10<br />
Connecting the home-cinema system 11<br />
Remote control<br />
Operate two devices with only one remote control 12<br />
Synchronizing the remote control 12<br />
Useful information<br />
Buttons on the <strong>Swisscom</strong> <strong>TV</strong> box 13<br />
<strong>Swisscom</strong> <strong>TV</strong> box connections 14<br />
Troubleshooting<br />
No picture and sound? 15<br />
One 15 m Ethernet cable (white)<br />
<strong>Swisscom</strong> <strong>TV</strong> remote control<br />
and batteries<br />
SCART cable<br />
HDMI cable<br />
Help<br />
Help and contact 16<br />
Safety instructions 17<br />
<strong>Swisscom</strong> <strong>TV</strong> <strong>Setup</strong>Using <strong>Swisscom</strong> <strong>TV</strong><br />
<strong>Swisscom</strong> <strong>TV</strong> box<br />
and cables<br />
Guides:<br />
> <strong>Swisscom</strong> <strong>TV</strong> <strong>Setup</strong><br />
> Using <strong>Swisscom</strong> <strong>TV</strong><br />
> Quick Install Guide<br />
Note: You can fold out the left and right cover<br />
pages of this guide.
Preparations for <strong>Swisscom</strong> <strong>TV</strong> Position devices<br />
Where do I position the <strong>Swisscom</strong> <strong>TV</strong> box?<br />
Your <strong>Swisscom</strong> <strong>TV</strong> box must be connected to the following devices by cable:<br />
> to your <strong>TV</strong><br />
> to your router<br />
Preparation<br />
Place your <strong>Swisscom</strong> <strong>TV</strong> box directly beside your <strong>TV</strong>.<br />
Ethernet cable<br />
<strong>TV</strong>-Box<br />
First steps<br />
Installation<br />
Router<br />
Note on cable length: If the 15 m Ethernet cable is not long enough, you can<br />
purchase a longer cable from the <strong>Swisscom</strong> Shop. The length of cable does not<br />
affect the quality of transmission. Furthermore, the <strong>Swisscom</strong> Online Shop also<br />
stocks two connection kits as alternatives to the Ethernet cable.<br />
Booking a technician<br />
Should you wish, you can arrange for a service technician to come to your house to<br />
> install <strong>Swisscom</strong> <strong>TV</strong>,<br />
> set up WLAN for your computer<br />
> and to lay all the cables correctly.<br />
Call us on freephone 0800 800 800 to arrange an appointment. You will be charged for these<br />
services (depending on cost and time).<br />
Further devices<br />
Help<br />
What else do I need to watch out for?<br />
When the <strong>Swisscom</strong> <strong>TV</strong> box is operated for the first time, a software update is automatically<br />
downloaded and installed. This takes around 30 minutes.<br />
Note: The most important functions of <strong>Swisscom</strong> <strong>TV</strong> are explained briefly in<br />
the «Using <strong>Swisscom</strong> <strong>TV</strong>» guide. You can find detailed operating instructions at<br />
www.swisscom.ch/manuals > <strong>TV</strong>.<br />
1
.<br />
1 2<br />
1 2<br />
Installing <strong>Swisscom</strong> <strong>TV</strong><br />
1. Check the router<br />
2. Connect the <strong>Swisscom</strong> <strong>TV</strong> box and router<br />
Switch the router on now if it is still switched off.<br />
Note: In order to connect the <strong>Swisscom</strong> <strong>TV</strong> box, you must already have a suitable<br />
router for <strong>Swisscom</strong> <strong>TV</strong> installed at home. If you do not have a router installed yet,<br />
please install it following the «Internet <strong>Setup</strong>» guide or make arrangements for a<br />
visit from a service technician.<br />
Connect the <strong>Swisscom</strong> <strong>TV</strong> box and the router using either of the Ethernet cables.<br />
15 m Ethernet cable (white)<br />
< ><br />
1 2 3 4<br />
NETWORK<br />
Router<br />
HDMI<br />
L-AUDIO<br />
R-AUDIO<br />
VIDEO<br />
S-VIDEO<br />
OPTICAL<br />
Ethernet cable (white)<br />
VCR<br />
<strong>TV</strong><br />
<strong>Swisscom</strong> <strong>TV</strong> Box<br />
POWER<br />
+12VDC<br />
Preparation<br />
Help Further devices First steps Installation<br />
Note: The left-hand page of the cover of this guide<br />
contains a general diagram of the complete cable arrangement<br />
for <strong>Swisscom</strong> <strong>TV</strong>.<br />
3
3. Connect the <strong>Swisscom</strong> <strong>TV</strong> box and <strong>TV</strong><br />
If you have an HD <strong>TV</strong> with HDMI connection, connect the <strong>Swisscom</strong> <strong>TV</strong> box (HDMI)<br />
and the <strong>TV</strong> using the HDMI cable.<br />
4. Switch on the <strong>Swisscom</strong> <strong>TV</strong> box<br />
4.1 Switch your <strong>TV</strong> on.<br />
Connect the adapter to the <strong>Swisscom</strong> <strong>TV</strong> box and insert it into the socket.<br />
<strong>Swisscom</strong> <strong>TV</strong> Box<br />
Preparation<br />
<strong>Swisscom</strong> <strong>TV</strong> Box<br />
NETWORK<br />
HDMI<br />
L-AUDIO<br />
R-AUDIO<br />
VIDEO<br />
S-VIDEO<br />
OPTICAL<br />
or<br />
If you have an older <strong>TV</strong>, connect the <strong>Swisscom</strong> <strong>TV</strong> box (SCART OUT) and the <strong>TV</strong> (AV)<br />
using the SCART cable.<br />
Note: If possible, use the AV1 port on your <strong>TV</strong>.<br />
VCR<br />
<strong>TV</strong><br />
HDMI cable<br />
POWER<br />
+12VDC<br />
NETWORK<br />
HDMI<br />
L-AUDIO<br />
R-AUDIO<br />
VIDEO<br />
S-VIDEO<br />
OPTICAL<br />
VCR<br />
<strong>TV</strong><br />
adapter<br />
4.2 The <strong>Swisscom</strong> <strong>TV</strong> box starts automatically and downloads a software update.<br />
4.3 As soon as the green button<br />
flashes, it will take approx. 5 minutes<br />
before <strong>Swisscom</strong> <strong>TV</strong> is ready<br />
to use.<br />
POWER<br />
+12VDC<br />
Help Further devices First steps Installation<br />
SCART cable<br />
L-AUDIO<br />
VIDEO<br />
ETWORK<br />
HDMI<br />
OPTICAL<br />
VCR<br />
<strong>TV</strong><br />
POWER<br />
+12VDC<br />
R-AUDIO<br />
S-VIDEO<br />
<strong>Swisscom</strong> <strong>TV</strong> Box<br />
NETWORK<br />
HDMI<br />
L-AUDIO<br />
VIDEO<br />
OPTICAL<br />
VCR<br />
<strong>TV</strong><br />
R-AUDIO<br />
S-VIDEO<br />
POWER<br />
+12VDC<br />
5
5. Switch on and operate <strong>Swisscom</strong> <strong>TV</strong><br />
First steps – Operating <strong>Swisscom</strong> <strong>TV</strong><br />
The most important <strong>Swisscom</strong> <strong>TV</strong> buttons<br />
Installation<br />
Preparation<br />
5.1 Insert the batteries into the <strong>Swisscom</strong> <strong>TV</strong> remote control.<br />
5.2 Point the <strong>Swisscom</strong> <strong>TV</strong> remote<br />
control at the <strong>Swisscom</strong> <strong>TV</strong> box<br />
and press Menu.<br />
If the <strong>Swisscom</strong> <strong>TV</strong> menu does not<br />
appear, switch over to the AV channel<br />
(or HDMI channel).<br />
Note: The button you have to press to switch over to the AV channel<br />
depends on your <strong>TV</strong>. (Otherwise, switch over to your VCR or DVD player<br />
applying the same principle.)<br />
Press the<br />
Press<br />
MENU button on the <strong>Swisscom</strong> <strong>TV</strong> remote control to open the menu.<br />
OK to confirm a menu selection.<br />
Press the arrow buttons to scroll through the menu:<br />
> up and down with the up/down buttons<br />
> left and right with the left/right buttons<br />
The BACK button always takes you to the higher-level menu or to the previous<br />
menu option.<br />
Press the EXIT TO <strong>TV</strong> button to exit the menu and return to the last programme<br />
watched (channel, own recording or video on demand).<br />
First steps<br />
Further devices<br />
Help<br />
Take your <strong>TV</strong> remote control and<br />
> keep pressing «AV» until the menu appears,<br />
> or keep pressing « » until the menu appears,<br />
> or call up your <strong>TV</strong> menu and select the AV (or HDMI) channel.<br />
If an error message appears, follow the instructions on the screen. If necessary,<br />
call us on freephone 0800 800 800.<br />
Hinweis: You can find further explanatory notes on operating the <strong>Swisscom</strong> <strong>TV</strong> in<br />
the «Using <strong>Swisscom</strong> <strong>TV</strong>» guide.<br />
5.3 Well done! Enjoy watching <strong>Swisscom</strong> <strong>TV</strong>. Press the EXIT TO <strong>TV</strong> button<br />
to return to the current programme.<br />
7
Changing the screen language<br />
Changing the screen aspect ratio<br />
The screen language allows you to specify which language you wish menu commands and<br />
menu lists to appear in on the screen. The options are German, French and Italian.<br />
1 Press the MENU button to open<br />
the menu.<br />
2 Select by pressing arrow<br />
right.<br />
3 Select General and press OK to<br />
confirm.<br />
4 Select Screen language and press<br />
OK to confirm.<br />
5 Scroll to the required language option<br />
using the arrow up/down buttons.<br />
Press the OK button. The<br />
check mark indicates the selected<br />
language.<br />
6 Select Save and press OK to confirm.<br />
Adjust the picture size to the best setting for your <strong>TV</strong>. Refer to the user guide for<br />
your television to find out which is the best aspect ratio for your <strong>TV</strong>. N.B. Your <strong>TV</strong><br />
must be set to the same screen aspect ratio.<br />
Choose between the following aspect ratio:<br />
> Standard ratio 4:3<br />
> Widescreen ratio 16:9<br />
> for HD <strong>TV</strong>s, connected with an HDMI cable (see page 5):<br />
> HD (720p)<br />
> HD (1080i)<br />
1 Press the MENU button to open<br />
the menu.<br />
2 Select by pressing arrow<br />
right.<br />
3 Select General and press OK to<br />
confirm.<br />
4 Select Screen aspect ratio and press<br />
OK to confirm.<br />
5 Select either standard (4:3), widescreen<br />
(16:9), HD (720p), or HD<br />
(1080i) and press OK to confirm.<br />
The check mark indicates the selected<br />
aspect ratio.<br />
Help Further devices First steps Installation Preparation<br />
Note: If you select «HD 720p» or «HD 1080i», a test pattern appears. If you<br />
see the test pattern, press OK to confirm.<br />
6 Select Save and press OK to confirm.<br />
9
Connecting further devices<br />
Connecting the stereo system<br />
Connecting the home-cinema system<br />
Note: The right-hand page of the cover of<br />
this guide contains a general diagram of the<br />
cable arrangement for additional devices.<br />
Connect your stereo system to the <strong>Swisscom</strong> <strong>TV</strong> box if you would like the sound to<br />
be played though the stereo system.<br />
To do this, connect your stereo system and the <strong>Swisscom</strong> <strong>TV</strong> Box using a Cinch<br />
cable (audio). (The cable is not included in the pack.)<br />
Connect your home-cinema system to the <strong>Swisscom</strong> <strong>TV</strong> box and enjoy a better quality of<br />
sound.<br />
Use an optical cable or a coaxial cable to connect your home-cinema system. (These cables<br />
are not included in the pack.)<br />
Preparation<br />
Installation<br />
<strong>Swisscom</strong> <strong>TV</strong> Box<br />
NETWORK<br />
HDMI<br />
L-AUDIO<br />
VIDEO<br />
OPTICAL<br />
VCR<br />
<strong>Swisscom</strong> <strong>TV</strong> Box<br />
First steps<br />
<strong>TV</strong><br />
R-AUDIO<br />
S-VIDEO<br />
POWER<br />
+12VDC<br />
NETWORK HDMI<br />
NETWORK HDMI<br />
L-AUDIO VIDEO<br />
R-AUDIO S-VIDEO<br />
L-AUDIO VIDEO<br />
OPTICAL<br />
OPTICAL<br />
VCR<br />
VCR<br />
<strong>TV</strong><br />
POWER<br />
+12VDC<br />
<strong>TV</strong><br />
Optical<br />
Optical cable<br />
NETWORK<br />
HDMI<br />
L-AUDIO<br />
R-AUDIO<br />
VIDEO<br />
S-VIDEO<br />
OPTICAL<br />
VCR<br />
<strong>TV</strong><br />
POWER<br />
+12VDC<br />
Further devices<br />
R-AUDIO<br />
S-VIDEO<br />
POWER<br />
+12VDC<br />
Cinch cable<br />
Help<br />
Note: If you have a stereo or home-cinema system connected, you can play the<br />
<strong>Swisscom</strong> <strong>TV</strong> radio without having to switch on or connect the <strong>TV</strong>. You can find<br />
further information about this in the «Using <strong>Swisscom</strong> <strong>TV</strong>» guide.<br />
11
Synchronize the remote control<br />
Operate two devices with only one remote control<br />
Would you like to be able to operate your <strong>Swisscom</strong> <strong>TV</strong> box and your television with just one<br />
remote control? To do so, you can synchronise your <strong>Swisscom</strong> <strong>TV</strong> remote control with your<br />
television set.<br />
<strong>Swisscom</strong> <strong>TV</strong> box<br />
Television<br />
<strong>Swisscom</strong><br />
<strong>TV</strong> remote control<br />
Synchronizing:<br />
Harmonize the frequencies between<br />
the <strong>Swisscom</strong> <strong>TV</strong> remote<br />
control and the <strong>TV</strong>.<br />
Useful information<br />
Buttons on the <strong>Swisscom</strong> <strong>TV</strong> box<br />
a<br />
b<br />
c<br />
POWER button: To put the <strong>Swisscom</strong> <strong>TV</strong> box in standby mode.<br />
(The <strong>Swisscom</strong> <strong>TV</strong> box never switches off completely.)<br />
MENU button: To fade the menu in and out.<br />
Arrow buttons: To scroll through the channels.<br />
Special case: If the menu is on the screen, use the arrow buttons<br />
to navigate through the menu.<br />
Press the OK button briefly to confirm the selection.<br />
Preparation<br />
Installation<br />
First steps<br />
Synchronize the remote control<br />
1 Switch on your <strong>TV</strong>.<br />
2 Press the <strong>TV</strong>-MODE button on the <strong>Swisscom</strong> <strong>TV</strong> remote control for at least two seconds<br />
until the <strong>TV</strong> LED on the top of the <strong>Swisscom</strong> <strong>TV</strong> remote control flashes twice.<br />
3 Press the digit sequence 0 0 1 within five seconds (the <strong>TV</strong> LED flashes twice to confirm<br />
this).<br />
4 Keep the POWER button on the <strong>Swisscom</strong> <strong>TV</strong> remote control pressed in until your<br />
<strong>TV</strong> switches off. This may take a few minutes. The <strong>TV</strong> LED will continue to flash during<br />
this time. Attention: Release the button as soon as your <strong>TV</strong> switches off.<br />
5 Click OK to confirm the synchronization.<br />
6 Switch on your <strong>TV</strong>.<br />
7 Test the <strong>Swisscom</strong> <strong>TV</strong> remote control by changing the volume.<br />
a<br />
b<br />
c<br />
Further devices<br />
Help<br />
Note: If the synchronization does not work, refer to the list of codes for <strong>TV</strong>s which can be<br />
found at www.swisscom.ch/manuals > <strong>TV</strong> > Using the <strong>Swisscom</strong> <strong>TV</strong> remote control for the<br />
television.<br />
13
<strong>Swisscom</strong> <strong>TV</strong> box connections<br />
Troubleshooting<br />
No picture and sound?<br />
a Network: Connect the router (Ethernet cable)<br />
b HDMI: Connect your HD-<strong>TV</strong> (HDMI cable)<br />
c L-Audio/R-Audio: Connect your <strong>TV</strong> to analog audio inputs (audio cable, cinch)<br />
d Video: Connect your <strong>TV</strong> or monitor (video cable, cinch)<br />
e S-video: Connect your <strong>TV</strong> (S-video cable)<br />
f Optical: Connect older-generation HD-ready <strong>TV</strong>s (YUV/RGB component<br />
cable)<br />
g VCR: Connect your DVD player or VCR (SCART cable)<br />
h <strong>TV</strong>: Connect your <strong>TV</strong> or monitor (SCART cable)<br />
POWER<br />
i Power: Power connection (adapter)<br />
a b<br />
c d<br />
f g h i<br />
NETWORK<br />
HDMI<br />
L-AUDIO<br />
VIDEO<br />
OPTICAL<br />
VCR<br />
MENU<br />
<strong>TV</strong><br />
OK<br />
POWER<br />
+12VDC<br />
Check your <strong>TV</strong><br />
1 Is the <strong>TV</strong> switched on?<br />
No > Switch on the <strong>TV</strong>.<br />
2 Is your <strong>TV</strong> set to the AV channel?<br />
No > Press the AV button on your <strong>TV</strong> remote control, or switch the <strong>Swisscom</strong><br />
<strong>TV</strong> box off and then on again. (Most <strong>TV</strong>s then automatically switch to the<br />
right channel.)<br />
Check the displays on the <strong>Swisscom</strong> <strong>TV</strong> box<br />
3 Is the POWER button illuminated on the <strong>TV</strong> box (green light)?<br />
No > Insert the power cable or check the mains connections. Make sure<br />
that the <strong>Swisscom</strong> <strong>TV</strong> box is switched on (see page 6).<br />
It‘s still not illuminated > Press the POWER button to switch on the<br />
<strong>Swisscom</strong> <strong>TV</strong> box.<br />
4 Is the green LED illuminated on the <strong>Swisscom</strong> <strong>TV</strong> box?<br />
No > The <strong>Swisscom</strong> <strong>TV</strong> box is not connected properly to the router. Check<br />
the cables (see page 4).<br />
POWER<br />
4<br />
MENU<br />
OK<br />
Further devices First steps Installation Preparation<br />
R-AUDIO<br />
S-VIDEO<br />
e<br />
Help<br />
Check the router (the connection to the Internet)<br />
5 Is the «Power» LED illuminated on the router?<br />
No > Check the mains connections and ensure that the router is switched on<br />
(see page 3).<br />
NETWORK<br />
HDMI<br />
L-AUDIO<br />
R-AUDIO<br />
VIDEO<br />
S-VIDEO<br />
OPTICAL<br />
VCR<br />
<strong>TV</strong><br />
POWER<br />
+12VDC<br />
6 Is there at least one «Ethernet» LED illuminated on the router?<br />
No > Your <strong>Swisscom</strong> <strong>TV</strong> box is not correctly connected to the router. Check<br />
the cables (see page 4).<br />
7 Is the «DSL» LED illuminated on the router?<br />
No > The router is not correctly connected to the phone socket, or the connection<br />
to the Internet has been lost. Check the cables (see the «Internet <strong>Setup</strong>»<br />
guide).<br />
15
.<br />
Connect the <strong>Swisscom</strong> <strong>TV</strong> box<br />
NETWORK<br />
HDMI<br />
L-AUDIO<br />
3<br />
VIDEO<br />
OPTICAL<br />
VCR<br />
<strong>TV</strong><br />
POWER<br />
+12VDC<br />
R-AUDIO<br />
S-VIDEO<br />
HDMI cable<br />
<strong>Swisscom</strong> <strong>TV</strong> Box<br />
NETWORK<br />
HDMI<br />
L-AUDIO<br />
VIDEO<br />
OPTICAL<br />
VCR<br />
<strong>TV</strong><br />
R-AUDIO<br />
S-VIDEO<br />
POWER<br />
+12VDC<br />
2<br />
Ethernet cable<br />
1<br />
Router<br />
< ><br />
1 2 3 4<br />
1 2<br />
1 2<br />
4.1<br />
Adapter
.<br />
Connect further devices<br />
Stereo system<br />
Cinch cable (audio)<br />
<strong>Swisscom</strong> <strong>TV</strong> Box<br />
Home-cinema system<br />
NETWORK<br />
HDMI<br />
L-AUDIO<br />
VIDEO<br />
OPTICAL<br />
VCR<br />
<strong>TV</strong><br />
R-AUDIO<br />
S-VIDEO<br />
POWER<br />
+12VDC<br />
NETWORK<br />
NETWORK<br />
HDMI<br />
HDMI<br />
L-AUDIO<br />
L-AUDIO<br />
R-AUDIO<br />
R-AUDIO<br />
VIDEO<br />
VIDEO<br />
S-VIDEO<br />
S-VIDEO<br />
OPTICAL<br />
OPTICAL<br />
VCR<br />
VCR<br />
<strong>TV</strong><br />
<strong>TV</strong><br />
POWER<br />
+12VDC POWER<br />
+12VDC<br />
Router<br />
Optical<br />
Computer<br />
< ><br />
1 2 3 4<br />
1 2<br />
1 2<br />
Ethernet cable<br />
(first <strong>Swisscom</strong> <strong>TV</strong> box)<br />
Ethernet cable<br />
Optical cable (audio)
Help and contact<br />
Phone: Contact us on freephone 0800 800 800.<br />
Safety instructions<br />
Please read the following safety instructions and keep them somewhere close to the<br />
<strong>Swisscom</strong> <strong>TV</strong> box.<br />
> Read all the instructions supplied before beginning to use the device.<br />
Technician:<br />
You can also call our freephone number to arrange for a technician to come<br />
out and perform the <strong>Swisscom</strong> <strong>TV</strong> installation and setup for you in your<br />
home.<br />
Position the devices<br />
> Do not block any of the ventilation openings and install the device in accordance<br />
with this guide.<br />
> The <strong>Swisscom</strong> <strong>TV</strong> box must be positioned at least 5 cm from all other devices.<br />
> Do not place the <strong>Swisscom</strong> <strong>TV</strong> box<br />
> upright,<br />
> close to sources of heat,<br />
> in direct sunlight,<br />
> close to electrical devices which can cause motorized or magnetic interference.<br />
> Do not stand any objects on the box, in particular vessels filled with liquid, such<br />
as vases or bottles.<br />
> The box may not be operated outdoors.<br />
> Lay all the cable safely. Avoid risks of tripping. Pay particular attention to the<br />
plugs and sockets on the device and on the wall.<br />
> Disconnect the box from the mains in the event of a storm or if it is out of use<br />
for a lengthy period of time.<br />
Care and repair<br />
> Only clean the device with a dry cloth.<br />
> The device may only be repaired by <strong>Swisscom</strong>. Repairs will be necessary if<br />
> the power cables or plugs used are damaged,<br />
> liquid or objects get inside the device,<br />
> the device has been exposed to rain or moisture,<br />
> it doesn‘t work normally<br />
> or it is dropped.<br />
Attention: Do not place any devices on the <strong>Swisscom</strong> <strong>TV</strong> box.<br />
Correct<br />
Incorrect