Honigum Mono - DMG America
Honigum Mono - DMG America
Honigum Mono - DMG America

Create successful ePaper yourself
Turn your PDF publications into a flip-book with our unique Google optimized e-Paper software.
<strong>Honigum</strong> <strong>Mono</strong><br />
QuadFast<br />
<strong>DMG</strong> Chemisch-Pharmazeutische Fabrik GmbH<br />
Elbgaustraße 248 · 22547 Hamburg · www.dmg-dental.com<br />
091842/#1_2012-12<br />
Instructions for use<br />
English<br />
Product description<br />
<strong>Honigum</strong>-<strong>Mono</strong> QuadFast is a monophase impression material based on addition<br />
curing silicones. The material is available in the Automix safety cartridge.<br />
Indications<br />
• Crown and bridge impressions<br />
• Inlay and onlay impressions<br />
• Functional impressions<br />
• Pressure point identification<br />
• All types of pickup impressions, e.g. for implants and telescopes<br />
Basic safety instructions<br />
• For dental use only!<br />
• Keep away from children!<br />
Advice on application<br />
• The working times (refer to section “Technical data”) apply at a room temperature<br />
of 73 °F and a normal relative air humidity of 50%. Higher temperatures<br />
shorten, lower temperatures increase these times.<br />
• Rinse off residues of retraction solutions thoroughly with water because they<br />
can increase the setting time in some instances.<br />
• Never allow the impression to come into contact with organic solvents or<br />
liquids containing solvents as this may result in a swelling of the material and<br />
may therefore lead to inaccuracies in the cast.<br />
• Never allow the impression material to come into contact with latex gloves.<br />
<strong>DMG</strong> recommends the use of PVC or PE based gloves.<br />
• Do not mix <strong>Honigum</strong>-<strong>Mono</strong> QuadFast with condensation curing silicone or<br />
polyether impression materials.<br />
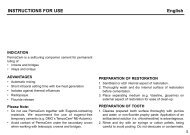
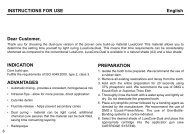
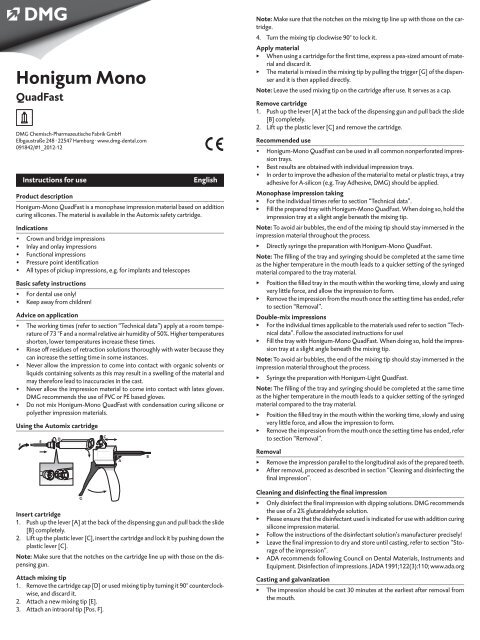
Using the Automix cartridge<br />
F<br />
E<br />
D<br />
G<br />
C<br />
A<br />
Insert cartridge<br />
1. Push up the lever [A] at the back of the dispensing gun and pull back the slide<br />
[B] completely.<br />
2. Lift up the plastic lever [C], insert the cartridge and lock it by pushing down the<br />
plastic lever [C].<br />
Note: Make sure that the notches on the cartridge line up with those on the dispensing<br />
gun.<br />
Attach mixing tip<br />
1. Remove the cartridge cap [D] or used mixing tip by turning it 90° counterclockwise,<br />
and discard it.<br />
2. Attach a new mixing tip [E].<br />
3. Attach an intraoral tip [Pos. F].<br />
B<br />
Note: Make sure that the notches on the mixing tip line up with those on the cartridge.<br />
4. Turn the mixing tip clockwise 90° to lock it.<br />
Apply material<br />
▸▸<br />
When using a cartridge for the first time, express a pea-sized amount of material<br />
and discard it.<br />
▸▸<br />
The material is mixed in the mixing tip by pulling the trigger [G] of the dispenser<br />
and it is then applied directly.<br />
Note: Leave the used mixing tip on the cartridge after use. It serves as a cap.<br />
Remove cartridge<br />
1. Push up the lever [A] at the back of the dispensing gun and pull back the slide<br />
[B] completely.<br />
2. Lift up the plastic lever [C] and remove the cartridge.<br />
Recommended use<br />
• <strong>Honigum</strong>-<strong>Mono</strong> QuadFast can be used in all common nonperforated impression<br />
trays.<br />
• Best results are obtained with individual impression trays.<br />
• In order to improve the adhesion of the material to metal or plastic trays, a tray<br />
adhesive for A-silicon (e.g. Tray Adhesive, <strong>DMG</strong>) should be applied.<br />
<strong>Mono</strong>phase impression taking<br />
▸▸<br />
For the individual times refer to section “Technical data”.<br />
▸▸<br />
Fill the prepared tray with <strong>Honigum</strong>-<strong>Mono</strong> QuadFast. When doing so, hold the<br />
impression tray at a slight angle beneath the mixing tip.<br />
Note: To avoid air bubbles, the end of the mixing tip should stay immersed in the<br />
impression material throughout the process.<br />
▸▸<br />
Directly syringe the preparation with <strong>Honigum</strong>-<strong>Mono</strong> QuadFast.<br />
Note: The filling of the tray and syringing should be completed at the same time<br />
as the higher temperature in the mouth leads to a quicker setting of the syringed<br />
material compared to the tray material.<br />
▸▸<br />
Position the filled tray in the mouth within the working time, slowly and using<br />
very little force, and allow the impression to form.<br />
▸▸<br />
Remove the impression from the mouth once the setting time has ended, refer<br />
to section “Removal”.<br />
Double-mix impressions<br />
▸▸<br />
For the individual times applicable to the materials used refer to section “Technical<br />
data”. Follow the associated instructions for use!<br />
▸▸<br />
Fill the tray with <strong>Honigum</strong>-<strong>Mono</strong> QuadFast. When doing so, hold the impression<br />
tray at a slight angle beneath the mixing tip.<br />
Note: To avoid air bubbles, the end of the mixing tip should stay immersed in the<br />
impression material throughout the process.<br />
▸▸<br />
Syringe the preparation with <strong>Honigum</strong>-Light QuadFast.<br />
Note: The filling of the tray and syringing should be completed at the same time<br />
as the higher temperature in the mouth leads to a quicker setting of the syringed<br />
material compared to the tray material.<br />
▸▸<br />
Position the filled tray in the mouth within the working time, slowly and using<br />
very little force, and allow the impression to form.<br />
▸▸<br />
Remove the impression from the mouth once the setting time has ended, refer<br />
to section “Removal”.<br />
Removal<br />
▸▸<br />
Remove the impression parallel to the longitudinal axis of the prepared teeth.<br />
▸▸<br />
After removal, proceed as described in section “Cleaning and disinfecting the<br />
final impression”.<br />
Cleaning and disinfecting the final impression<br />
▸▸<br />
Only disinfect the final impression with dipping solutions. <strong>DMG</strong> recommends<br />
the use of a 2% glutaraldehyde solution.<br />
▸▸<br />
Please ensure that the disinfectant used is indicated for use with addition curing<br />
silicone impression material.<br />
▸▸<br />
Follow the instructions of the disinfectant solution’s manufacturer precisely!<br />
▸▸<br />
Leave the final impression to dry and store until casting, refer to section “Storage<br />
of the impression”.<br />
▸▸<br />
ADA recommends following Council on Dental Materials, Instruments and<br />
Equipment. Disinfection of impressions. JADA 1991;122(3):110; www.ada.org<br />
Casting and galvanization<br />
▸▸<br />
The impression should be cast 30 minutes at the earliest after removal from<br />
the mouth.<br />
Hg<strong>Mono</strong>QuadFast_091842_V1_2012-12.indd 1-2 11.12.12 15:25
<strong>DMG</strong> recommends using special purpose hard plaster (ISO 6873, Type 3; e.g. Moldano,<br />
Bayer) for the cast and an ultra hard dental plaster for the forms (ISO 6873,<br />
Type 4; e.g. Fujirock II, GC). The impression can be copper or silver-plated.<br />
Storage of the impression<br />
▸▸<br />
Store the impression in a dry place at room temperature (59– 77 °F).<br />
▸▸<br />
Protect against exposure to direct sunlight!<br />
The impression is stable and can be cast even after months without loss of accuracy.<br />
Technical data<br />
Working time 1 [min] ≤ 1:30<br />
Intraoral working time 2 [min] ≤ 0:30<br />
Time in the mouth [min] ≥ 2:00<br />
Dimensional change after 24h ≤ 0.40<br />
Compression set [%] ≤ 0.35<br />
Strain in compression [%] ≈ 2.8<br />
1 <br />
The times apply at a room temperature of 73 °F and a normal relative air humidity of 50%. Higher<br />
temperatures shorten, lower temperatures increase these times.<br />
The working time describes the period from the start of mixing until the time by which the tray<br />
must be positioned in the patient’s mouth.<br />
2 <br />
The times apply from start of mixing time for a temperature of 95 °F.<br />
Disinfection of the Automix-Dispenser<br />
The Automix-Dispenser is reusable after disinfection, although it should be replaced<br />
if visible signs of wear appear.<br />
Disinfection can be carried out using a commercially available dipping disinfectant.<br />
<strong>DMG</strong> recommends using only disinfecting solutions listed by the RKI (Robert Koch<br />
Institute). The Automix-Dispenser can also be autoclaved.<br />
Composition<br />
Vinyl polysiloxanes, silicium dioxide, pigments, additives, platinum catalyst<br />
Classification<br />
ISO 4823:2000, type 2: Medium-bodied consistency<br />
Storage and shelf-life<br />
▸▸<br />
Store in a dry place at room temperature (59– 77 °F).<br />
▸▸<br />
Do not store in a refrigerator or freezer!<br />
▸▸<br />
Protect against exposure to direct sunlight!<br />
▸▸<br />
Leave the used mixing tip on the cartridge after use. It serves as a cap.<br />
▸▸<br />
Do not use after the expiration date!<br />
Available product sizes<br />
4 cartridges @ 50 ml paste, 8 Automix-Tips, 8 Intraoral-<br />
Tips<br />
REF 999839<br />
Exclusively distributed in the USA and Canada by: <strong>DMG</strong> <strong>America</strong> LLC Englewood,<br />
New Jersey 07631, U.S., Phone: (800)662-6383.<br />
Caution: US Federal Law restricts this device to sale by, or on the order of a dentist,<br />
or other practitioner licensed by law of the state in which he or she practices<br />
to use or order the use of this device.<br />
Only available in the USA! Made in Germany.<br />
Hg<strong>Mono</strong>QuadFast_091842_V1_2012-12.indd 3-4 11.12.12 15:25