

PDF Download - Glidewell Dental Labs
PDF Download - Glidewell Dental Labs
PDF Download - Glidewell Dental Labs

Create successful ePaper yourself
Turn your PDF publications into a flip-book with our unique Google optimized e-Paper software.
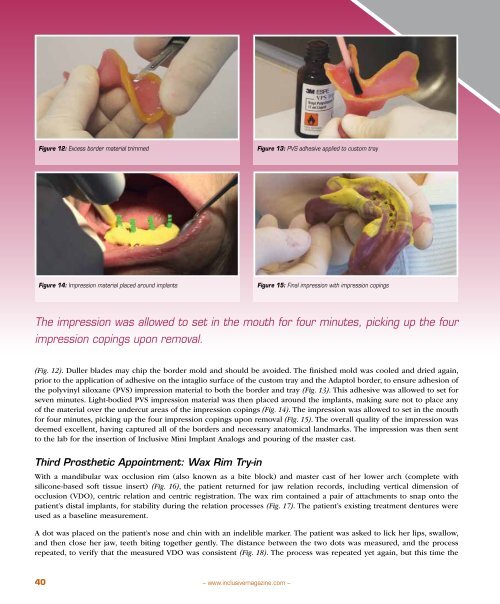
Figure 12: Excess border material trimmed<br />
Figure 13: PVS adhesive applied to custom tray<br />
Figure 14: Impression material placed around implants<br />
Figure 15: Final impression with impression copings<br />
The impression was allowed to set in the mouth for four minutes, picking up the four<br />
impression copings upon removal.<br />
(Fig. 12). Duller blades may chip the border mold and should be avoided. The finished mold was cooled and dried again,<br />
prior to the application of adhesive on the intaglio surface of the custom tray and the Adaptol border, to ensure adhesion of<br />
the polyvinyl siloxane (PVS) impression material to both the border and tray (Fig. 13). This adhesive was allowed to set for<br />
seven minutes. Light-bodied PVS impression material was then placed around the implants, making sure not to place any<br />
of the material over the undercut areas of the impression copings (Fig. 14). The impression was allowed to set in the mouth<br />
for four minutes, picking up the four impression copings upon removal (Fig. 15). The overall quality of the impression was<br />
deemed excellent, having captured all of the borders and necessary anatomical landmarks. The impression was then sent<br />
to the lab for the insertion of Inclusive Mini Implant Analogs and pouring of the master cast.<br />
Third Prosthetic Appointment: Wax Rim Try-in<br />
With a mandibular wax occlusion rim (also known as a bite block) and master cast of her lower arch (complete with<br />
silicone-based soft tissue insert) (Fig. 16), the patient returned for jaw relation records, including vertical dimension of<br />
occlusion (VDO), centric relation and centric registration. The wax rim contained a pair of attachments to snap onto the<br />
patient’s distal implants, for stability during the relation processes (Fig. 17). The patient’s existing treatment dentures were<br />
used as a baseline measurement.<br />
A dot was placed on the patient’s nose and chin with an indelible marker. The patient was asked to lick her lips, swallow,<br />
and then close her jaw, teeth biting together gently. The distance between the two dots was measured, and the process<br />
repeated, to verify that the measured VDO was consistent (Fig. 18). The process was repeated yet again, but this time the<br />
40<br />
– www.inclusivemagazine.com –


