QWL 3.0 Panel Gateway Replacement -- PDF - TCS Basys Controls
QWL 3.0 Panel Gateway Replacement -- PDF - TCS Basys Controls
QWL 3.0 Panel Gateway Replacement -- PDF - TCS Basys Controls

You also want an ePaper? Increase the reach of your titles
YUMPU automatically turns print PDFs into web optimized ePapers that Google loves.
<strong>QWL</strong> <strong>3.0</strong> <strong>Panel</strong> <strong>Gateway</strong> <strong>Replacement</strong><br />
<strong>TCS</strong> Technical Bulletin<br />
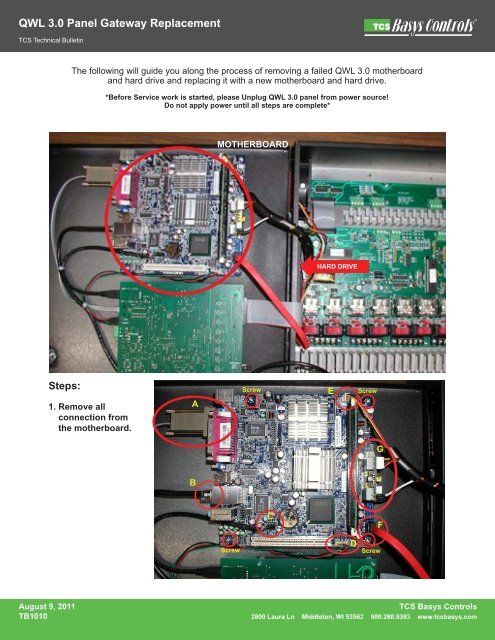
The following will guide you along the process of removing a failed <strong>QWL</strong> <strong>3.0</strong> motherboard<br />
and hard drive and replacing it with a new motherboard and hard drive.<br />
*Before Service work is started, please Unplug <strong>QWL</strong> <strong>3.0</strong> panel from power source!<br />
Do not apply power until all steps are complete*<br />
MOTHERBOARD<br />
HARD DRIVE<br />
Steps:<br />
1. Remove all<br />
connection from<br />
the motherboard.<br />
A<br />
Screw<br />
E<br />
Screw<br />
G<br />
B<br />
C<br />
F<br />
Screw<br />
D<br />
Screw<br />
August 9, 2011<br />
TB1010<br />
<strong>TCS</strong> <strong>Basys</strong> <strong>Controls</strong><br />
2800 Laura Ln Middleton, WI 53562 800.288.9383 www.tcsbasys.com
<strong>QWL</strong> <strong>3.0</strong> <strong>Panel</strong> <strong>Gateway</strong> <strong>Replacement</strong><br />
<strong>TCS</strong> Technical Bulletin<br />
A. Remove the<br />
QD1010 cord<br />
B. Remove the ethernet cord.<br />
D. Remove power switch - CPU Light<br />
C. Remove USB-Zigbee Port<br />
E. Remove CPU Fab Cable F. Remove Hard Drive<br />
Cable<br />
G. Remove power (press in as shown to pull out<br />
and release)<br />
August 9, 2011<br />
TB1010<br />
<strong>TCS</strong> <strong>Basys</strong> <strong>Controls</strong><br />
2800 Laura Ln Middleton, WI 53562 800.288.9383 www.tcsbasys.com
<strong>QWL</strong> <strong>3.0</strong> <strong>Panel</strong> <strong>Gateway</strong> <strong>Replacement</strong><br />
<strong>TCS</strong> Technical Bulletin<br />
2. Remove the motherboard, attached to the <strong>QWL</strong> <strong>3.0</strong> panel with four secure screws. (picture)<br />
August 9, 2011<br />
TB1010<br />
<strong>TCS</strong> <strong>Basys</strong> <strong>Controls</strong><br />
2800 Laura Ln Middleton, WI 53562 800.288.9383 www.tcsbasys.com
<strong>QWL</strong> <strong>3.0</strong> <strong>Panel</strong> <strong>Gateway</strong> <strong>Replacement</strong><br />
<strong>TCS</strong> Technical Bulletin<br />
3. Remove the hard<br />
drive. Detach<br />
all the cords from<br />
current hard drive<br />
A. Remove Power<br />
D. Fold back ribbon cable out of the way of the<br />
hard drive<br />
B. Slide removed cords out of the way gently to<br />
obtain access to the ribbon cable<br />
E. Remove power from hard drive<br />
C. Remove ribbon cable<br />
F. Remove hard drive cable (seta)<br />
August 9, 2011<br />
TB1010<br />
<strong>TCS</strong> <strong>Basys</strong> <strong>Controls</strong><br />
2800 Laura Ln Middleton, WI 53562 800.288.9383 www.tcsbasys.com
<strong>QWL</strong> <strong>3.0</strong> <strong>Panel</strong> <strong>Gateway</strong> <strong>Replacement</strong><br />
<strong>TCS</strong> Technical Bulletin<br />
G. Put cords out of the way to gain access to<br />
hard drive<br />
4. *IMPORTANT* Prior to mounting new hard<br />
drive, attach adhesive pad to back of hard drive<br />
as shown. Pad must be put in place to insure<br />
hard drive does not touch metal panel.<br />
H. Remove hard drive by removing secures<br />
screws as shown.*Please note the back of<br />
the hard drive with be sticky so give it some<br />
force when taking it out*<br />
A.<br />
B.<br />
C. D.<br />
August 9, 2011<br />
TB1010<br />
<strong>TCS</strong> <strong>Basys</strong> <strong>Controls</strong><br />
2800 Laura Ln Middleton, WI 53562 800.288.9383 www.tcsbasys.com
<strong>QWL</strong> <strong>3.0</strong> <strong>Panel</strong> <strong>Gateway</strong> <strong>Replacement</strong><br />
<strong>TCS</strong> Technical Bulletin<br />
5. Carefully align replacement hard drive to<br />
screw holes prior to adhering side of<br />
<strong>QWL</strong> <strong>3.0</strong> panel<br />
C.<br />
D.<br />
6. Reattach cords to hard drive as shown.<br />
A.<br />
E.<br />
B.<br />
F.<br />
August 9, 2011<br />
TB1010<br />
<strong>TCS</strong> <strong>Basys</strong> <strong>Controls</strong><br />
2800 Laura Ln Middleton, WI 53562 800.288.9383 www.tcsbasys.com
<strong>QWL</strong> <strong>3.0</strong> <strong>Panel</strong> <strong>Gateway</strong> <strong>Replacement</strong><br />
<strong>TCS</strong> Technical Bulletin<br />
7. Attach new motherboard to panel door with 4<br />
secure screws as shown<br />
B. Reattach power<br />
C. Plug 12 Volt Video cable into PWR1<br />
A. *Important!* Before installing new motherboard,<br />
please attach12 Volt Video cable into the power<br />
pico<br />
(Power Pico)<br />
August 9, 2011<br />
TB1010<br />
<strong>TCS</strong> <strong>Basys</strong> <strong>Controls</strong><br />
2800 Laura Ln Middleton, WI 53562 800.288.9383 www.tcsbasys.com
<strong>QWL</strong> <strong>3.0</strong> <strong>Panel</strong> <strong>Gateway</strong> <strong>Replacement</strong><br />
<strong>TCS</strong> Technical Bulletin<br />
D. Reattach hard drive cable<br />
G. Reattach USB - Zigbee Port<br />
E. Reattach CPU Fan<br />
H. Reattach ethernet cable<br />
F. Reattach power switch CPU light<br />
I. Reattach QD1010 cord<br />
August 9, 2011<br />
TB1010<br />
<strong>TCS</strong> <strong>Basys</strong> <strong>Controls</strong><br />
2800 Laura Ln Middleton, WI 53562 800.288.9383 www.tcsbasys.com
<strong>QWL</strong> <strong>3.0</strong> <strong>Panel</strong> <strong>Gateway</strong> <strong>Replacement</strong><br />
<strong>TCS</strong> Technical Bulletin<br />
Final New <strong>Panel</strong><br />
August 9, 2011<br />
TB1010<br />
<strong>TCS</strong> <strong>Basys</strong> <strong>Controls</strong><br />
2800 Laura Ln Middleton, WI 53562 800.288.9383 www.tcsbasys.com