WL76* Digital Series YL76* Digital Series - Toshiba-OM.net
WL76* Digital Series YL76* Digital Series - Toshiba-OM.net
WL76* Digital Series YL76* Digital Series - Toshiba-OM.net

Create successful ePaper yourself
Turn your PDF publications into a flip-book with our unique Google optimized e-Paper software.
CONTROLS AND FEATURES<br />
English<br />
Picture controls<br />
Most of the picture controls and functions are<br />
available in both digital and analogue modes.<br />
PLEASE NOTE: Features not available will be greyed<br />
out or hidden.<br />
This television offers the choice of personalising the picture<br />
style.<br />
AutoView, Dynamic, Standard, Hollywood 1, Hollywood<br />
2, Store, Game and PC are preset options and affect many<br />
features/settings within the television.<br />
NOTE:<br />
• Because the AutoView mode automatically adjusts picture<br />
settings based on ambient light conditions and input signal<br />
content, the Auto Brightness Sensor and Expert Mode<br />
menus are greyed out when it is selected.<br />
• Store mode is only available when Location is set to Store.<br />
• Game mode is available in external input mode (other than<br />
aerial input). When you select Game mode, suitable<br />
widescreen formats will be selected.<br />
• PC mode is available in RGB/PC input mode or HDMI input<br />
mode.<br />
a<br />
b<br />
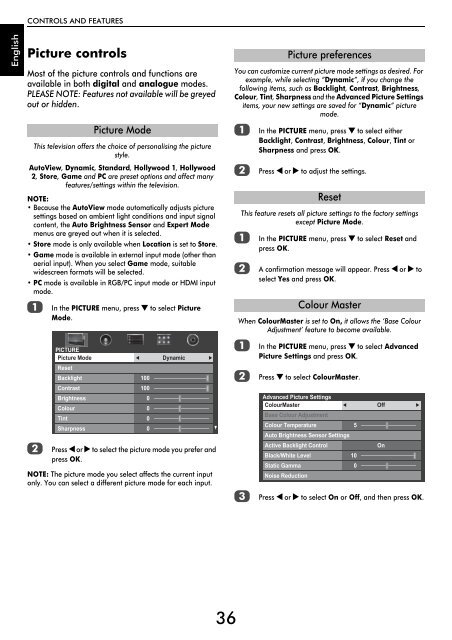
Picture Mode<br />
In the PICTURE menu, press b to select Picture<br />
Mode.<br />
PICTURE<br />
Picture Mode<br />
Reset<br />
Backlight<br />
Contrast<br />
Brightness<br />
Colour<br />
Tint<br />
Sharpness<br />
100<br />
100<br />
0<br />
0<br />
0<br />
0<br />
Dynamic<br />
Press C or c to select the picture mode you prefer and<br />
press OK.<br />
NOTE: The picture mode you select affects the current input<br />
only. You can select a different picture mode for each input.<br />
You can customize current picture mode settings as desired. For<br />
example, while selecting “Dynamic”, if you change the<br />
following items, such as Backlight, Contrast, Brightness,<br />
Colour, Tint, Sharpness and the Advanced Picture Settings<br />
items, your new settings are saved for “Dynamic” picture<br />
mode.<br />
a<br />
b<br />
In the PICTURE menu, press b to select either<br />
Backlight, Contrast, Brightness, Colour, Tint or<br />
Sharpness and press OK.<br />
Press C or c to adjust the settings.<br />
This feature resets all picture settings to the factory settings<br />
except Picture Mode.<br />
a<br />
b<br />
In the PICTURE menu, press b to select Reset and<br />
press OK.<br />
A confirmation message will appear. Press C or c to<br />
select Yes and press OK.<br />
When ColourMaster is set to On, it allows the ‘Base Colour<br />
Adjustment’ feature to become available.<br />
a<br />
b<br />
c<br />
Picture preferences<br />
Reset<br />
Colour Master<br />
In the PICTURE menu, press b to select Advanced<br />
Picture Settings and press OK.<br />
Press b to select ColourMaster.<br />
Advanced Picture Settings<br />
ColourMaster<br />
Base Colour Adjustment<br />
Colour Temperature<br />
Auto Brightness Sensor Settings<br />
Active Backlight Control<br />
Black/White Level<br />
10<br />
Static Gamma<br />
0<br />
Noise Reduction<br />
Press C or c to select On or Off, and then press OK.<br />
5<br />
Off<br />
On<br />
36