STENCIL IT! - Hobby Lobby
STENCIL IT! - Hobby Lobby
STENCIL IT! - Hobby Lobby

Create successful ePaper yourself
Turn your PDF publications into a flip-book with our unique Google optimized e-Paper software.
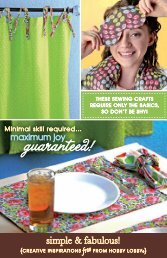
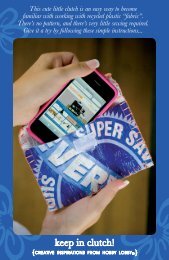
SPELL <strong>IT</strong>...NUMBER <strong>IT</strong>...<br />
<strong>STENCIL</strong> <strong>IT</strong>!<br />
Take your style from sweet to<br />
urban chic—all with our extensive<br />
selection of letter and number<br />
stencils. Check out these fun project<br />
ideas to get you started.<br />
the art of stenciling<br />
{CREATIVE INSPIRATIONS<br />
free<br />
FROM HOBBY LOBBY®}
1<br />
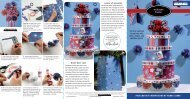
I. GRAFF<strong>IT</strong>I ME: The writing on this edgy, graffiti-inspired wall comes from basic stencils. Add letters and numbers a layer at a time,<br />
using lighter brush strokes (and less paint) for rubber stamp-style fade. To avoid smudges, allow ample dry time for each layer.<br />
Tip: Love the background? We achieved the effect by dragging various colors across the surface using an industrial bristle broom.<br />
2. I SEE LONDON: If the perfect letters don’t jump off the shelf, you can rescue your project with stencil blanks. Find a font you love<br />
and trace it onto the clear, flexible plastic. Then cut out the letters with a craft knife or a heated stencil cutter (available in the Craft<br />
Department). Tip: We didn’t make a stencil for the flag. We simply taped off the lines with painter’s tape.<br />
2<br />
THE SHORT LIST<br />
Load up on these supplies to pull off a basic stencil job.<br />
Stencils: Choose from our extensive selection of alphas and numbers.<br />
Stencil Tape or Stencil Adhesive: These products hold the stencil to your project as you work. Acrylic Paint: It comes in a<br />
staggering selection of colors and finishes. Applicator: We carry a variety of brushes, sponges and daubers.<br />
2 <strong>Hobby</strong> <strong>Lobby</strong> Product Inspirations
3<br />
4<br />
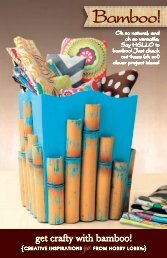
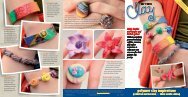
3. PLANTER BANTER: Here’s a quick (and<br />
easy) way to open the door to stenciled<br />
décor: Create a personalized welcome mat!<br />
It’s as simple as off-the-shelf letter and<br />
number stencils and acrylic craft paint. If<br />
you go with a fibrous mat, like this basic coir<br />
mat, you’ll want to use a protective finish to<br />
protect it from wear and the elements.<br />
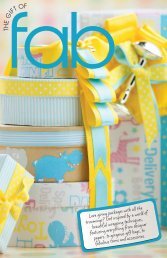
4. WELCOME HOME: What’s the plan for that<br />
been-around-the-block planter? You’ll<br />
bring it back to life with a handful of<br />
well-chosen words! For the<br />
look shown here, choose<br />
ready-to-go alphabet<br />
stencils in a nice variety<br />
of sizes and fonts.<br />
<strong>Hobby</strong> <strong>Lobby</strong> Product Inspirations 3
5<br />
6<br />
4 <strong>Hobby</strong> <strong>Lobby</strong> Product Inspirations<br />
7<br />
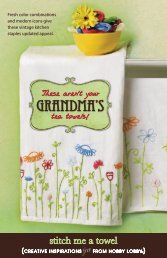
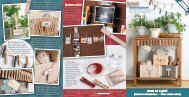
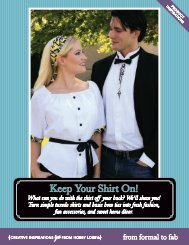
5. ORDER UP: Some projects<br />
are larger than life. That’s why we have you<br />
covered with a handy selection of jumbo letter<br />
and number stencils. They’re great for large<br />
furniture, like this table from the Home Accents<br />
Department. We turned it on its side and<br />
dressed it up as a row of super-sized cookbooks.<br />
6. MADE IN THE SHADE: We didn’t want the<br />
window to miss out on the fun, so we decked a<br />
simple Roman shade with an adorable<br />
kitchen-friendly design. To keep fabric projects<br />
like this one functional (meaning flexible and<br />
washable) mix your paint with a textile medium<br />
before you stencil it on. You’ll find the handy<br />
stuff on the same aisle as the craft acrylics.<br />
7. CHERRY DELIGHT: Stencil before you stuff—<br />
that’s our motto! To embellish a basic pillow<br />
cover, slide a piece of cardboard under the<br />
fabric to keep the paint from bleeding through.<br />
Stencil the letters first, and then use a brush to<br />
fill in details like dots or contrasting outlines.<br />
Tip: We made our own cherry stencils with clip<br />
art and a stencil blank.
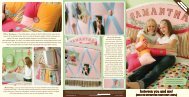
PRECIOUS L<strong>IT</strong>TLE<br />
You can start your angel off in style with a roomful of sweet-as-can-be<br />
stenciled décor. That means going absolutely gaga with personalized art, adorably appointed storage and even a oneof-a-kind<br />
rug. Has any little bundle of joy ever had a better room? Baby, we think not!<br />
<strong>Hobby</strong> <strong>Lobby</strong> Product Inspirations 5
1<br />
2<br />
1. BUCKET BY NUMBERS: If you’re counting on cute storage for your little one’s space, try a trio of numbered pails. Tip: For curved<br />
surfaces, use a paint pen or a fine brush to trace the outline of the design. Then remove the stencil before filling in the color.<br />
2. HOOP HYPE: State those sweet baby stats with stencils. Simply paint a collection of wooden embroidery hoops (available in the<br />
Needle Art Department), and then fill them with hand-stenciled fabric scraps. It’s instant art—and it’s personalized!<br />
3. LOVE BUG RUG: This baby love rug is a square of basic canvas fabric. We added a ribbon border, but we thought it needed more.<br />
That’s right—stencils! The letters are off-the-shelf and so are the hearts. We did the handprints with clip art and a stencil blank.<br />
3<br />
©2011 <strong>Hobby</strong> <strong>Lobby</strong>® - Photography by Sanford Mauldin • Crafts - 182063<br />
www.hobbylobby.com • • www.getinspiredbyhl.com<br />
DO NOT ALLOW CHILDREN TO COMPLETE PROJECTS ALONE. ADULT SUPERVISION REQUIRED.