Outline installation & maintenance instructions
Outline installation & maintenance instructions
Outline installation & maintenance instructions

Create successful ePaper yourself
Turn your PDF publications into a flip-book with our unique Google optimized e-Paper software.
1<br />
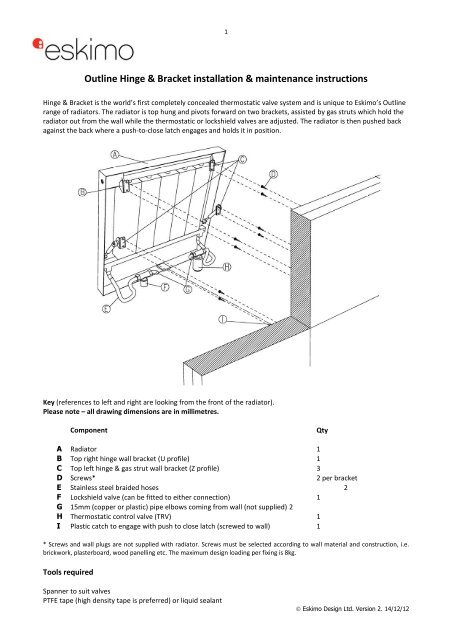
<strong>Outline</strong> Hinge & Bracket <strong>installation</strong> & <strong>maintenance</strong> <strong>instructions</strong><br />
Hinge & Bracket is the world’s first completely concealed thermostatic valve system and is unique to Eskimo’s <strong>Outline</strong><br />
range of radiators. The radiator is top hung and pivots forward on two brackets, assisted by gas struts which hold the<br />
radiator out from the wall while the thermostatic or lockshield valves are adjusted. The radiator is then pushed back<br />
against the back where a push-to-close latch engages and holds it in position.<br />
Key (references to left and right are looking from the front of the radiator).<br />
Please note – all drawing dimensions are in millimetres.<br />
Component<br />
Qty<br />
A Radiator 1<br />
B Top right hinge wall bracket (U profile) 1<br />
C Top left hinge & gas strut wall bracket (Z profile) 3<br />
D Screws*<br />
2 per bracket<br />
E Stainless steel braided hoses 2<br />
F Lockshield valve (can be fitted to either connection) 1<br />
G 15mm (copper or plastic) pipe elbows coming from wall (not supplied) 2<br />
H Thermostatic control valve (TRV) 1<br />
I Plastic catch to engage with push to close latch (screwed to wall) 1<br />
* Screws and wall plugs are not supplied with radiator. Screws must be selected according to wall material and construction, i.e.<br />
brickwork, plasterboard, wood panelling etc. The maximum design loading per fixing is 8kg.<br />
Tools required<br />
Spanner to suit valves<br />
PTFE tape (high density tape is preferred) or liquid sealant<br />
© Eskimo Design Ltd. Version 2. 14/12/12