Acumed Ulna Shortening System.pdf - Osteosyntese
Acumed Ulna Shortening System.pdf - Osteosyntese
Acumed Ulna Shortening System.pdf - Osteosyntese

You also want an ePaper? Increase the reach of your titles
YUMPU automatically turns print PDFs into web optimized ePapers that Google loves.
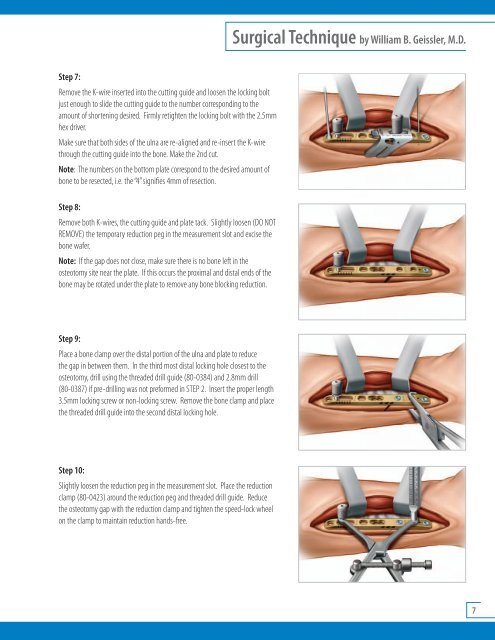
Surgical Technique by William B. Geissler, M.D.<br />
Step 7:<br />
Remove the K-wire inserted into the cutting guide and loosen the locking bolt<br />
just enough to slide the cutting guide to the number corresponding to the<br />
amount of shortening desired. Firmly retighten the locking bolt with the 2.5mm<br />
hex driver.<br />
Make sure that both sides of the ulna are re-aligned and re-insert the K-wire<br />
through the cutting guide into the bone. Make the 2nd cut.<br />
Note: The numbers on the bottom plate correspond to the desired amount of<br />
bone to be resected, i.e. the “4” signifies 4mm of resection.<br />
Step 8:<br />
Remove both K-wires, the cutting guide and plate tack. Slightly loosen (DO NOT<br />
REMOVE) the temporary reduction peg in the measurement slot and excise the<br />
bone wafer.<br />
Note: If the gap does not close, make sure there is no bone left in the<br />
osteotomy site near the plate. If this occurs the proximal and distal ends of the<br />
bone may be rotated under the plate to remove any bone blocking reduction.<br />
Step 9:<br />
Place a bone clamp over the distal portion of the ulna and plate to reduce<br />
the gap in between them. In the third most distal locking hole closest to the<br />
osteotomy, drill using the threaded drill guide (80-0384) and 2.8mm drill<br />
(80-0387) if pre-drilling was not preformed in STEP 2. Insert the proper length<br />
3.5mm locking screw or non-locking screw. Remove the bone clamp and place<br />
the threaded drill guide into the second distal locking hole.<br />
Step 10:<br />
Slightly loosen the reduction peg in the measurement slot. Place the reduction<br />
clamp (80-0423) around the reduction peg and threaded drill guide. Reduce<br />
the osteotomy gap with the reduction clamp and tighten the speed-lock wheel<br />
on the clamp to maintain reduction hands-free.<br />
7