audiolab - HiFix
audiolab - HiFix
audiolab - HiFix

You also want an ePaper? Increase the reach of your titles
YUMPU automatically turns print PDFs into web optimized ePapers that Google loves.
Audiolab<br />
IAG House,<br />
Sovereign Court,<br />
Ermine Business Park,<br />
Huntingdon PE29 6XU<br />
Tel: 01480 447700<br />
Fax: 01480 431767<br />
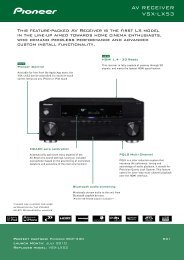
8000Q<br />
8000P<br />
8000M<br />
User Instructions<br />
<strong>audiolab</strong>
8: Warranty<br />
Audiolab limited warranty<br />
Audiolab Ltd. warrants this product, subject to the terms and<br />
conditions below, to be free from defects in materials and<br />
workmanship. During the warranty period Audiolab will repair or<br />
replace (at Audiolab's option) this product, or any defective part in<br />
this product, if it is found to be defective due to faulty materials,<br />
workmanship or function. The warranty period may vary from<br />
country to country.<br />
Terms and conditions:<br />
The warranty starts on the date of purchase (or the date of delivery<br />
if this is later).<br />
You must provide proof of purchase / delivery before work can be<br />
carried out. Without this proof, any work carried out will be<br />
chargeable to you.<br />
All work will be carried out by Audiolab or its authorised agents or<br />
distributors. Any unauthorised repair or modification will void this<br />
warranty.<br />
If any part is no longer available it will replaced with a functional<br />
replacement part.<br />
Any parts that are replaced will become the property of Audiolab.<br />
Any repair or replacement under this warranty will not extend the<br />
period of warranty.<br />
This warranty is valid only in the country of purchase, applies only to<br />
the first purchaser and is not transferable.<br />
The following are not covered:<br />
<br />
<br />
<br />
<br />
<br />
<br />
Products on which the serial number has been removed,<br />
altered or otherwise made illegible.<br />
Normal wear and tear and cosmetic damage.<br />
Transportation or installation of the product.<br />
Accidental damage, faults caused by commercial use, acts of<br />
God, incorrect installation, connection or packaging, misuse,<br />
neglect or careless operation or handling of the product which<br />
is not in accordance with Audiolab's user instructions.<br />
Equipment that has been operated in conjunction with<br />
unsuitable, inappropriate or faulty apparatus.<br />
Repairs or alterations carried out by parties other than<br />
<br />
<br />
<br />
Audiolab or its authorised agents or distributors.<br />
Products not purchased from an Audiolab authorised dealer.<br />
Products that were not new at the time of original purchase.<br />
Products sold 'as is', 'as seen' or 'with all faults'.<br />
Repairs or replacements as provided under this warranty are the<br />
exclusive remedy of the consumer. Audiolab shall not be liable for<br />
any incidental or consequential damages for breach of any express<br />
or implied warranty in this product. Except to the extent prohibited<br />
by law, this warranty is exclusive and in lieu of all other warranties<br />
whatsoever, both express and implied, including, but not limited<br />
to, the warranty of merchantability and fitness for a practical<br />
purpose.<br />
This warranty provides benefits that are additional to and do not<br />
affect your statutory rights as a consumer.<br />
Some countries and US states do not allow the exclusion or<br />
limitation of incidental or consequential damages or implied<br />
warranties so the exclusions in the paragraph above may not<br />
apply to you. This warranty gives you specific legal rights, and you<br />
may have other statutory rights, which vary from state to state or<br />
country to country.<br />
How to claim:<br />
To obtain warranty service contact the Audiolab authorised dealer<br />
from which you purchased this product. Do not despatch goods<br />
without the prior agreement of the dealer, Audiolab or their<br />
authorised distributors.<br />
If asked to return products for inspection and/or repair, pack<br />
carefully, preferably in the original cartons or packaging affording<br />
an equal degree of protection, and return prepaid. If unsuitable<br />
packaging is used, Audiolab may make a charge for the supply of<br />
new packaging.<br />
Insurance is recommended as goods are returned at owner's risk.<br />
Audiolab or their authorised distributors cannot be held liable for<br />
loss or damage in transit.<br />
Packing, insurance and freight on the return journey will be paid by<br />
Audiolab or their authorised agents or distributor if corrective work<br />
proves to be necessary.
1: Statutory & Safety Information<br />
CAUTION!<br />
RISK OF ELECTRIC SHOCK<br />
DO NOT OPEN<br />
TO REDUCE THE RISK OF ELECTRIC SHOCK DO NOT REMOVE COVER<br />
NO USER -REMOVEABLE PARTS INSIDE<br />
REFER SERVICING TO QUALIFIED PERSONNEL<br />
ADVERTISSEMENT : RISQUE DE CHOC ELECTRIQUE-<br />
NE PAS OUVRIR<br />
This symbol indicates that there are important<br />
operating and maintenance instructions in the<br />
literature accompanying this unit.<br />
This symbol indicates that dangerous voltage<br />
constituting a risk of electric shock is present<br />
within this unit.<br />
4ead these instructions.<br />
Keep these instructions. In the event that you pass the product to a third<br />
party this instruction manual should be provided along with the product.<br />
Heed all warnings.<br />
Follow all instructions.<br />
Do not use this apparatus near water.<br />
Clean only with dry cloth.<br />
Do not block any ventilation openings.<br />
Install in accordance with the manufacturer's instructions.<br />
Do not install near any heat sources such as radiators, heat registers,<br />
stoves, or other apparatus (including amplifiers) that produce heat.<br />
Do not defeat the safety purpose of the polarized or grounding type plug.<br />
A polarized plug has two blades with one wider than the other. A<br />
grounding type plug has two blades and a third grounding prong. The<br />
wider blade or the third prong are provided for your safety. If the provided<br />
plug does not fit into your outlet, consult an electrician for replacement of<br />
the obsolete outlet.<br />
Protect the power cord from being walked on or pinched, particularly at<br />
plugs, convenience receptacles, and the point where they exit from the<br />
apparatus.<br />
Use only attachments/accessories specified by the manufacturer.<br />
Use only with a cart, stand, tripod, bracket, or table<br />
specified by the manufacturer, or sold with the apparatus.<br />
When a cart is used, use caution when moving the<br />
cart/apparatus combination to avoid injury from tip-over.<br />
Unplug this apparatus during lightning storms or when unused for long<br />
periods of time.<br />
Refer all servicing to qualified service personnel. Servicing is required<br />
when the apparatus has been damaged in any way, such as powersupply<br />
cord or plug is damaged, liquid has been spilled or objects have<br />
fallen into the apparatus, the apparatus has been exposed to rain or<br />
moisture, does not operate normally, or has been dropped.<br />
Warning: To reduce the risk of fire or electrical shock, do not expose this<br />
product to rain or moisture. The product must not be exposed to dripping<br />
and splashing and no object filled with liquids such as a vase of flowers<br />
should be placed on the product.<br />
No naked flame sources such as candles should be placed on the<br />
product.<br />
Caution: Changes or modifications not expressly approved by the<br />
manufacturer could void the user's authority to operate this device.<br />
8000Q: This equipment has been tested and found to comply with the<br />
limits for a Class B digital device, pursuant to part 15 of the FCC rules.<br />
These limits are designed to provide reasonable protection against<br />
harmful interference in a residential installation. This equipment<br />
generates, uses and can radiate radio frequency energy and, if not<br />
installed and used in accordance with the instructions, may cause<br />
harmful interference to radio or television reception, which can be<br />
determined by tuning the equipment off and on, the user is encouraged to<br />
try to correct the interference by one or more of the following measures:<br />
Re-orientate or re-locate the receiving antenna. Increase the separation<br />
between the equipment and the receiver. Connect the equipment into an<br />
outlet on a circuit different from that to which the receiver is connected.<br />
Consult the dealer or an experienced radio/TV technician for help.<br />
Important Note: The batteries supplied with the 8000Q handset should<br />
be treated with care and not punctured or damaged. Used batteries<br />
should be disposed of in full conformity with recycling regulations in your<br />
area. NEVER dispose of batteries in a fire or in the general rubbish.<br />
Mains supply and safety<br />
Mains Supply: The mains voltage of Audiolab units is shown on the rear<br />
panel. If this does not match the voltage in your area, consult your dealer.<br />
The mains supply fuse is on the rear panel. If it has broken, check for any<br />
obvious cause before replacing the fuse with one of the correct rating and<br />
type. The fuses for all areas are type T (time lag ) AL 20mm.<br />
The fuse values are:<br />
8000Q: 220-240V: 1.0A 100-120V: 1.6A<br />
8000M: 220-240V: 3.15A 100-120V: 5.0A<br />
8000P: 220-240V: 4.0A 100-120V: 5.0A<br />
Fuse Carrier<br />
The fuse is located in a slide-in<br />
carrier which also contains a spare<br />
fuse. The carrier can only be pulled<br />
out after the IEC power cord is<br />
unplugged. When the carrier is<br />
opened the first fuse is the spare.<br />
Remove and safely dispose of the<br />
IEC Mains Connector blown fuse before replacing it.<br />
Class II construction double insulated. These products must not<br />
be connected to earth.<br />
Power Cord: An AC power cord is normally supplied with a mains plug<br />
suitable for your area. If you have any doubts, consult your dealer about<br />
obtaining a suitable power cord.<br />
Important notice to UK users<br />
The appliance cord is terminated with a UK approved mains plug fitted<br />
with a 5A fuse. If the fuse needs to be replaced, an ASTA or BSI approved<br />
BS1362 fuse rated at 5A must be used. If you need to change the mains<br />
plug, remove the fuse and dispose of this plug safely immediately after<br />
cutting it from the cord.<br />
Connecting a Mains Plug<br />
Thewiresinthemainsleadarecolouredinaccordancewiththecode:<br />
Blue:NEUTRAL; Brown:LIVE:<br />
As these colours may not correspondto the coloured markingsidentifying<br />
theterminalsinyourplug,proceedasfollows:<br />
The BLUE wire must be connected<br />
to the terminal marked with the<br />
letter N or coloured BLUE or<br />
BLACK. The BROWN wire must be<br />
connectedto the terminalmarked<br />
with the letter L or coloured<br />
BROWNorRED.<br />
BLUE<br />
(Neutral)<br />
5A FUSE<br />
BS 1362<br />
BROWN<br />
(Live)<br />
7: Specifications<br />
8000Q Pre-amplifier<br />
Inputs: Gain and Sensitivity<br />
CD, TUNER, AUX, VIDEO, TAPE 1, TAPE 2: IMPEDANCE: 20k<br />
GAIN: Adjustable by 3dB steps 0 -15dB., corresponding to<br />
SENSITIVITY(nom.): 100, 140mV, 200mV, 283mV, 400mV, 562mV<br />
HEADPHONES: Gain adjustable 18dB - 33dB in 3dB steps<br />
Signal To Noise Ratio (IHF, rel. 0.5V output)<br />
Any input, any gain setting: 97dB<br />
Headphones: 80dB<br />
Frequency Response<br />
10 Hz-20 kHz ±0.2 dB: 1 Hz-75 kHz -3 dB.<br />
Total Harmonic Distortion & Noise<br />
Less than 0.007 % ref 7.7V rms, 20Hz - 20kHz<br />
Channel Balance<br />
Within 1 dB<br />
Channel Separation<br />
Better than100 dB @ 1 kHz any input, any setting<br />
Pre-amp Output<br />
Max. Output >7.7 V RMS (20dBm); Output impedance 75<br />
Headphone Output<br />
>7.7Vrms;100 (for headphones 8 -2 k impedance)<br />
Record Output<br />
VIDEO OUT, TAPE 1 OUT, TAPE 2 OUT: Gain 0 dB (x1); 100<br />
Muting<br />
Attenuation>63 dB, controlled automatically<br />
Operating Temperature Range<br />
10-35 °C<br />
Power Requirements (Depending on Region)<br />
50-60Hz 100V, 110-120V, and 220-240V models available<br />
Maximum Power Consumption: 15 VA<br />
Dimensions (WXHXD)<br />
445x74x335 mm - including feet, terminals and controls<br />
445 x 64 x 302 mm- excluding feet, terminals and controls<br />
Weight<br />
Net: 6 kg Shipping:7.3 kg<br />
8000P Power Amplifier<br />
Rated Output Power<br />
100W (20dBW) /Channel into 8 both channels driven<br />
Input<br />
1V rms for 100W into 8<br />
Input Impedance: 50k<br />
Load<br />
Connected in parallel with INPUT<br />
Gain<br />
29.0 dB at1kHz<br />
Signal To Noise Ratio (IHF, rel. 0.dBW)<br />
Better than 95 dB<br />
Frequency Response<br />
20 Hz-20 kHz ±0.3 dB<br />
0.1 Hz-75 kHz -3 dB.<br />
Total Harmonic Distortion & Noise<br />
Less than 0.05 %<br />
Channel Balance<br />
Within 1 dB<br />
Polarity (Phase)<br />
Non-Inverting<br />
Muting<br />
Muting controlled automatically<br />
Operating Temperature Range<br />
10-35 °C<br />
Power Requirements (Depending on Region)<br />
50-60 Hz 100V, 110-120V, and 220-240V models available<br />
Maximum Power Consumption: 500 VA<br />
Dimensions (WXHXD)<br />
445x74x337 mm - including feet, terminals and controls<br />
445 x 64 x 302 mm- excluding feet, terminals and controls<br />
Weight<br />
Net: 8.7 kg Shipping:10 kg<br />
8000M Power Amplifier<br />
Rated Output Power<br />
125W (21dBW) /Channel into 8 , 20Hz - 20kHz<br />
Input Sensitivity<br />
1.12V rms for 120W into 8<br />
Input Impedance: 50k<br />
Load<br />
Connected in parallel with INPUT<br />
Gain<br />
29.0 dB at1kHz<br />
Signal To Noise Ratio (IHF, rel. 0.dBW)<br />
Better than 96 dB<br />
Frequency Response<br />
20 Hz-20 kHz ±0.3 dB<br />
0.1 Hz-75 kHz -3 dB.<br />
Total Harmonic Distortion & Noise<br />
Less than 0.05 %<br />
Polarity (Phase)<br />
Non-Inverting<br />
Muting<br />
Muting controlled automatically<br />
Operating Temperature Range<br />
10-35 °C<br />
Power Requirements (Depending on Region)<br />
50-60Hz 100V, 110-120V, and 220-240V models available<br />
Maximum Power Consumption: 300 VA<br />
Dimensions (WXHXD)<br />
445x74x337 mm - including feet, terminals and controls<br />
445 x 64 x 302 mm- excluding feet, terminals and controls<br />
Weight<br />
Net: 8.2 kg Shipping:9.6 kg<br />
Audiolab reserves the right to alter design and specification without notice.<br />
Specification may vary for different countries.<br />
Audiolab is a member of the International Audio Group.
5: Operation<br />
Switching On<br />
Make sure all the signal and loudspeaker connections to and from<br />
the amp are secure and correctly made.<br />
Plug the power cords into the pre-amplifier and the power<br />
amplifier/s and then into the wall socket .<br />
Switch on at the mains and then switch on the pre-amlifier<br />
followed by the power amplifier/s.<br />
The power indicators on all the units will light showing the system<br />
is operational.<br />
The 8000Q pre-amplifier may be operated via the front panel or<br />
the remote handset.<br />
When you have finished using the equipment switch off all the<br />
power amplifiers. Some enthusiasts prefer to leave the preamplifier<br />
permanently switched on. If you do this, ensure that the<br />
pre-amplifier is set to mute with the volume control at minimum.<br />
Phase<br />
It is essential that the loudspeaker connections are secure and with<br />
the positive and negative terminals correctly connected.<br />
This becomes especially important in bi-wired and bi-amplified<br />
systems where the effects of one or more incorrectly connected (out<br />
of phase) loudspeakers may severely impair the sound and yet be<br />
difficult to detect.<br />
If the sound appears muddled and lacking clarity this may be<br />
because one or more speaker connections are not correctly made.<br />
Always check loudspeaker connections carefully when you have<br />
made any alteration to your system.<br />
Maintaining Connections<br />
Connections should be checked periodically. If necessary the plugs<br />
should cleaned with a proprietary cleaner or, in the case of<br />
loudspeaker connections, freshly re-made.<br />
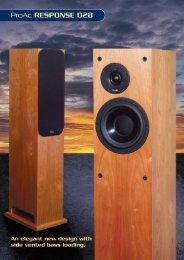
Bi-Amplified connection- 8000Q with four 8000M power amplifiers<br />
6: Service<br />
Care & Cleaning<br />
While cleaning is in progress the AC power<br />
cord must be unplugged from the AC<br />
power supply socket.<br />
Grease or dirt on the equipment may be<br />
removed with a soft, lint-free cloth slightly<br />
moistened with a mild solution of warm<br />
water and detergent or washing-up liquid.<br />
Do not use any other solutions or solvents.<br />
If you have any queries regarding the use<br />
of Audiolab equipment, consult your<br />
dealer.<br />
Servicing<br />
Servicing of Audiolab products should only<br />
be carried out by authorised service<br />
agents. If service is required the<br />
equipment should be returned, securely<br />
packaged, preferably using original<br />
packaging, to your dealer.<br />
In the UK equipment may be returned to<br />
the IAG Service Centre. In the USA<br />
equipment may be returned to the Service<br />
address shown on this page.<br />
Always telephone before returning any<br />
equipment.<br />
A note should be enclosed giving your<br />
name, address, telephone number, and a<br />
brief description of the reason for return.<br />
If you require Service outside the Warranty<br />
period, do not hesitate to contact your<br />
dealer.<br />
Service Address - UK<br />
IAG Service Centre<br />
Unit 4<br />
St Margaret’s Way<br />
Stukeley Meadows Industrial Estate<br />
Huntingdon<br />
Cambs<br />
PE29 6EB<br />
England<br />
Tel:+44 (0)1480 452561<br />
Fax: +44 (0)1480 13403<br />
Service Address - USA<br />
IAG America, Inc.<br />
15 Walpole Park South<br />
Walpole<br />
MA 02081<br />
USA<br />
Tel: +1 508 850 3950<br />
Fax +1 508 850 3905<br />
RIGHT<br />
LEFT<br />
2a: Introduction- 8000Q<br />
800Q<br />
HEADPHONE<br />
SOCKET<br />
GAIN<br />
SWITCH<br />
VOLUME<br />
CONTROL<br />
INPUT<br />
SELECTOR<br />
RECORD<br />
SELECTOR<br />
REMOTE<br />
CONTROL SENSOR<br />
MUTE LED<br />
RED=Mute On<br />
POWER LED<br />
RED=Power On<br />
POWER<br />
SWITCH<br />
Unpacking<br />
Unpack the product fully. The carton should contain<br />
The Audiolab 8000Q<br />
One IEC power cord suitable for your area<br />
One Remote Handset with two AA batteries<br />
This instruction manual<br />
Report any damage or shortage to your dealer as soon as possible.<br />
Retain the packing if possible. If you dispose of the packing, do so<br />
with regard to any recycling regulations in your area.<br />
Inserting Batteries in the Handset<br />
The battery compartment is on the rear of the handset. Unwrap the<br />
batteries, open the compartment cover and insert the batteries.<br />
Follow polarity indications in the battery compartment. Replace<br />
batteries in pairs. Use new batteries of the same type and rating.<br />
Controls and Functions<br />
Power Switch<br />
When power is switched on the 8000Q is muted for 3 seconds.<br />
Input Selector<br />
Turn to select the listening source. The 8000Q mutes briefly when a<br />
new input is selected.<br />
Gain Switch<br />
This enables you to operate the volume control over a wide area<br />
while minimising noise. For initial installations, set gain to 9dB.<br />
REDUCE Gain: high sensitivity loudspeakers, low level listening.<br />
INCREASE Gain: low sensitivity loudspeakers, low output sources.<br />
When changing gain the 8000Q will briefly mute.<br />
Altering the gain will not affect the Record Outputs.<br />
Volume Control<br />
Adjusts playing volume. Always turn the volume up gradually.<br />
Turn the volume down before changing inputs.<br />
Record Selector<br />
Turn to select source to record to Tape 1, Tape 2 or Video. You can<br />
record to any CD, tape or other recorder with analogue inputs.<br />
Record selector and input selector operate independently. It is<br />
possible to record from any source whilst listening to another.<br />
Mute (available on the Remote Handset)<br />
Toggles the pre-amp output On/Off. Recording is unaffected.<br />
Headphone Socket<br />
Socket for connection of headphones. Unplug headphones when<br />
not in use. Connecting headphones mutes the 8000Q.<br />
Remote Handset<br />
Buttons shown in white control the 8000Q.<br />
Buttons shown in grey operate Audiolab CD<br />
players and have no effect on the 8000Q.<br />
As the handset uses RC5 coding it will operate<br />
many CD players. Check with your dealer.<br />
Mute<br />
Toggles mute On/off.<br />
Input<br />
Press to select listening source. The INPUT<br />
selector on the front panel turns.<br />
If you wish to record, the record input must be<br />
selected manually.<br />
Volume<br />
Press to raise or lower the volume. The<br />
VOLUME control on the front panel turns.
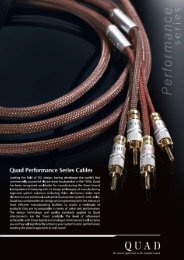
3a: Connections- 8000Q<br />
Switch power off when making connections<br />
FUSE<br />
HOLDER<br />
MAINS<br />
INPUT<br />
TAPE 2<br />
TAPE 1<br />
VCR<br />
CDR,ETC<br />
PRE-<br />
AMPLIFIER<br />
OUTPUTS<br />
AUX<br />
CD, DVD<br />
8000Q Connections<br />
CD, TUNER, AUX, VIDEO IN, TAPE 1 IN, TAPE 2 IN<br />
The six inputs may be used for connecting any line level source.<br />
VIDEO OUT, TAPE 1 OUT, TAPE 2 OUT<br />
Three sets of record outputs for connection of up to three stereo<br />
audio recorders, e.g. tape recorder, CD recorder, audio<br />
recording input of VCR ,DVD, MP3, MiniDisc recorder, etc.<br />
PRE-AMP OUT 1 & 2<br />
Low impedance (100 ohm) pre-amplifier outputs for driving<br />
external power amplifiers, sub-woofers or signal processors.<br />
Long cables may be used if required. Pre-amp outputs are<br />
switched off when integrated mode is selected or whenever<br />
amplifier is muted.<br />
GROUND<br />
Use only if phono pre-amplifier and turntable are used and<br />
both are Class II double insulated (no earth connection). In this<br />
case the ground terminal can be connected to the metalwork of<br />
these units to eliminate residual hum. The ground terminal<br />
must not be used as a safety earth. If in doubt consult your<br />
dealer.<br />
Running In the 8000Q<br />
<br />
Before first use, run the 8000Q for a few hours set either<br />
to mute or with the volume control turned to minimum.<br />
This enables the components to ‘burn in’.<br />
Connecting the 8000Q to the 8000P - Standard Speaker Connection<br />
Connecting the 8000Q to the 8000P - Bi-Wired Speaker Connection<br />
3b: Connections- 8000P & 8000M<br />
Switch power off when making connections<br />
8000P<br />
FUSE<br />
HOLDER<br />
8000M<br />
MAINS<br />
INPUT<br />
LOUDSPEAKER<br />
TERMINALS<br />
RIGHT CHANNEL<br />
POWER<br />
AMPLIFIER<br />
INPUT<br />
OUTPUT<br />
TO 2ND<br />
AMPLIFIER<br />
LOUDSPEAKER<br />
TERMINALS<br />
LEFT CHANNEL<br />
FUSE<br />
HOLDER<br />
MAINS<br />
INPUT<br />
LOUDSPEAKER<br />
TERMINALS<br />
POWER<br />
AMPLIFIER<br />
INPUT<br />
OUTPUT<br />
TO 2ND<br />
AMPLIFIER<br />
Input<br />
For connecting a pre-amplifier or other line level source. Do not<br />
connect directly to a CD player or other source unless the source has<br />
its own fully adjustable volume control.<br />
Load<br />
Connected in parallel with the input. Use to connect a second power<br />
amplifier, either to bi-amplify or to run remote loudspeakers.<br />
Loudspeaker Terminals - 8000P<br />
Each channel has two sets of loudspeaker terminals connected in<br />
parallel. The second pair is to facilitate bi-wiring, etc.<br />
Loudspeaker Terminals - 8000M<br />
There are two sets of loudspeaker terminals connected in parallel.<br />
Good Practice<br />
<br />
<br />
Use good quality screened interconnects for signal connections<br />
When running long connections between pre-amplifier and<br />
power amplifier, ensure the pre-amplifier has a low output<br />
impedance (
4: Connecting Loudspeakers<br />
Switch power off when making connections<br />
8000M - Standard Loudspeaker Connection<br />
If you are stacking the 8000M, by convention the Left Channel is the upper connection<br />
RIGHT<br />
Pre-Amp Left Output<br />
LEFT<br />
Pre-Amp Right Output<br />
8000M - Bi-Wired Loudspeaker Connection<br />
Bi-wiring offers improved sound quality because high and low frequency signals are carried individually to the loudspeaker drive units.<br />
RIGHT<br />
Pre-Amp Left Output<br />
LEFT<br />
Connecting Loudspeakers<br />
Switch power off when connecting loudspeakers.<br />
Use good quality low resistance loudspeaker cable.<br />
Connect the Positive RED (+) terminal of the amplifier to the Positive (+) RED<br />
terminal of the loudspeaker. Connect the Negative (-) BLACK terminals similarly.<br />
Tighten the loudspeaker terminals securely by hand. Make there are no loose<br />
strands of wire which could cause shorts.<br />
When bi-wiring loudspeakers, make sure you remove the straps connecting the HF<br />
and LF terminal pairs.<br />
7mm<br />
Speaker<br />
Cables<br />
Pre-Amp Right Output<br />
20mm<br />
RED<br />
BLACK<br />
8000P - Bi-Amplified Loudspeaker Connection<br />
The principle of Bi-wiring can be extended by using a dedicated power amplifier for each loudspeaker drive unit<br />
Pre-Amp<br />
Output<br />
Connecting<br />
Cables<br />
Standard and Bi-Wired loudspeaker connections using the 8000P are shown in Section 3a.<br />
2b: Introduction- 8000P & 8000M<br />
8000P<br />
8000M<br />
POWER LED RED=Power On<br />
POWER SWITCH<br />
POWER LED RED=Power On<br />
POWER SWITCH<br />
Unpacking<br />
Unpack the product fully. Each carton should contain<br />
The appropriate Audiolab Power Amplifer<br />
One IEC power cord suitable for your area<br />
This instruction manual<br />
Report any damage or shortage to your dealer as soon as possible.<br />
Retain the packing if possible. If you dispose of the packing, do so<br />
with regard to any recycling regulations in your area.<br />
Power Switch<br />
When any Audiolab power amplifier is switched on, the output<br />
remains muted for 8 seconds. After 8 seconds you will hear the<br />
safety relay switch on and the system will now be operational.<br />
When the amplifier is powered the red power indicator will light.<br />
Power Amplifier Protection Circuits<br />
Short Circuit Protection: If the output terminals are connected together or there<br />
is a short caused by a faulty speaker or connecting lead, the amplifier will mute and<br />
un-mute until the fault condition is removed.<br />
DC Offset Protection: If there is an internal or external fault which may cause DC<br />
voltage to be presented to the loudspeaker, the amplifier will mute and stay muted<br />
until the fault is removed.<br />
Thermal Protection: If the amplifier is driven excessively for long periods, or the<br />
output devices are pushed beyond their safe operating area, the amplifier will<br />
switch off and then switch back on again when it has cooled down.<br />
In all cases, if the amplifier does not respond to remedial action, consult your dealer.