Installation Manual - Ready Remote
Installation Manual - Ready Remote
Installation Manual - Ready Remote

You also want an ePaper? Increase the reach of your titles
YUMPU automatically turns print PDFs into web optimized ePapers that Google loves.
Congratulations on your purchase of Lights On!. Lights On! automatically<br />
turns on your lights when it gets dark or visibility is reduced —<br />
and more importantly, turns off your lights after you leave your car.<br />
Lights On! automatically Turns On your headlights, parking lights and tail<br />
lights:<br />
- When Darkness falls.<br />
- In tunnels or parking garages.<br />
- Anytime your windshield wipers are on.<br />
After Lights On! has been activated, your headlights, tailights and parking<br />
lights automatically turn off a minute after:<br />
- You enter bright daylight.<br />
- You turn off your windshield wipers.<br />
Lights On! can even be used to leave your headlights on for 20 (or 40)<br />
seconds after you turn off your ignition. This helps light your way for<br />
safety and convenience.<br />
CONTENTS:<br />
1 Lights On! Automatic Headlight Control System with 20 amp<br />
fuse, fuse holder, Power connector and Photo cell Tube.<br />
1 Headlight Plug Adapter<br />
2 Mounting Screws<br />
5 Blue Scotch Lock Wire Connectors<br />
4 Cable Ties<br />
1 Extra 20 Amp Fuse<br />
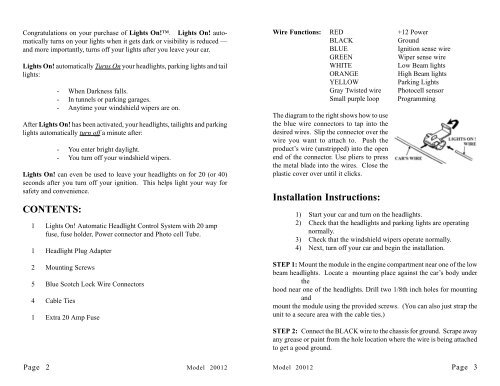
Wire Functions: RED +12 Power<br />
BLACK<br />
Ground<br />
BLUE<br />
Ignition sense wire<br />
GREEN<br />
Wiper sense wire<br />
WHITE<br />
Low Beam lights<br />
ORANGE<br />
High Beam lights<br />
YELLOW<br />
Parking Lights<br />
Gray Twisted wire Photocell sensor<br />
Small purple loop Programming<br />
The diagram to the right shows how to use<br />
the blue wire connectors to tap into the<br />
desired wires. Slip the connector over the<br />
wire you want to attach to. Push the<br />
product’s wire (unstripped) into the open<br />
end of the connector. Use pliers to press<br />
the metal blade into the wires. Close the<br />
plastic cover over until it clicks.<br />
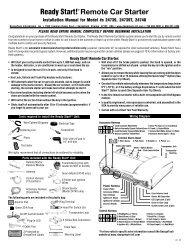
<strong>Installation</strong> Instructions:<br />
1) Start your car and turn on the headlights.<br />
2) Check that the headlights and parking lights are operating<br />
normally.<br />
3) Check that the windshield wipers operate normally.<br />
4) Next, turn off your car and begin the installation.<br />
STEP 1: Mount the module in the engine compartment near one of the low<br />
beam headlights. Locate a mounting place against the car’s body under<br />
the<br />
hood near one of the headlights. Drill two 1/8th inch holes for mounting<br />
and<br />
mount the module using the provided screws. (You can also just strap the<br />
unit to a secure area with the cable ties.)<br />
STEP 2: Connect the BLACK wire to the chassis for ground. Scrape away<br />
any grease or paint from the hole location where the wire is being attached<br />
to get a good ground.<br />
Page 2 Model 20012<br />
Model 20012 Page 3