Alltech FKM BO_CO Drive Gear O&M Manual - WES Dosing Products
Alltech FKM BO_CO Drive Gear O&M Manual - WES Dosing Products
Alltech FKM BO_CO Drive Gear O&M Manual - WES Dosing Products

Create successful ePaper yourself
Turn your PDF publications into a flip-book with our unique Google optimized e-Paper software.
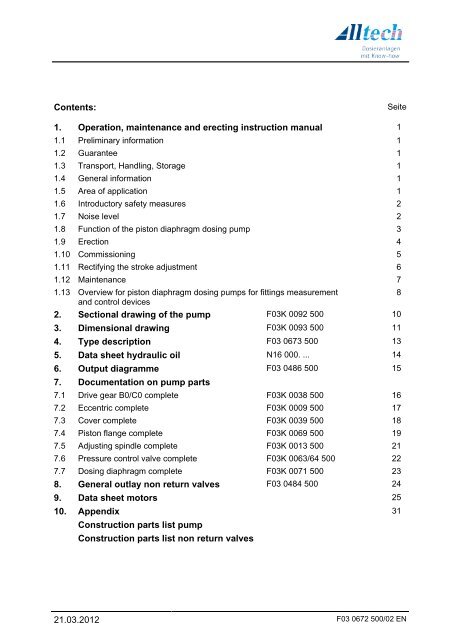
Contents:<br />
Seite<br />
1. Operation, maintenance and erecting instruction manual 1<br />
1.1 Preliminary information 1<br />
1.2 Guarantee 1<br />
1.3 Transport, Handling, Storage 1<br />
1.4 General information 1<br />
1.5 Area of application 1<br />
1.6 Introductory safety measures 2<br />
1.7 Noise level 2<br />
1.8 Function of the piston diaphragm dosing pump 3<br />
1.9 Erection 4<br />
1.10 Commissioning 5<br />
1.11 Rectifying the stroke adjustment 6<br />
1.12 Maintenance 7<br />
1.13 Overview for piston diaphragm dosing pumps for fittings measurement<br />
8<br />
and control devices<br />
2. Sectional drawing of the pump F03K 0092 500 10<br />
3. Dimensional drawing F03K 0093 500 11<br />
4. Type description F03 0673 500 13<br />
5. Data sheet hydraulic oil N16 000. ... 14<br />
6. Output diagramme F03 0486 500 15<br />
7. Documentation on pump parts<br />
7.1 <strong>Drive</strong> gear B0/C0 complete F03K 0038 500 16<br />
7.2 Eccentric complete F03K 0009 500 17<br />
7.3 Cover complete F03K 0039 500 18<br />
7.4 Piston flange complete F03K 0069 500 19<br />
7.5 Adjusting spindle complete F03K 0013 500 21<br />
7.6 Pressure control valve complete F03K 0063/64 500 22<br />
7.7 <strong>Dosing</strong> diaphragm complete F03K 0071 500 23<br />
8. General outlay non return valves F03 0484 500 24<br />
9. Data sheet motors 25<br />
10. Appendix 31<br />
Construction parts list pump<br />
Construction parts list non return valves<br />
21.03.2012 F03 0672 500/02 EN
1. Operation, maintenance and erecting instruction manual<br />
1.1 Preliminary information<br />
This Instruction <strong>Manual</strong> contains important information on operation, maintenance and erection<br />
of the pump. It is compulsory that the service personnel and the persons in charge should read<br />
it prior to starting erection and commissioning and that it is made available to these persons at<br />
all times.<br />
In case of inquiries and spare part orders please indicate our Confirmation of Order<br />
no. , type of the pump as well as item no. You will find these indications in the<br />
enclosed documentation. If the documentation is not available please indicate the<br />
formations you see at the pump tag.<br />
1.2 Guarantee<br />
The guarantee specified in the Supply Conditions will apply. During the guarantee period all<br />
modifications and/or repair works on the supplied is done by our service personnel. Any<br />
deviation thereto needs our written approval.<br />
1.3 Transport, Handling, Storage<br />
During transportation the whole unit should be protected against damage, humidity, heat and<br />
low temperature. Ambient temperature during transportation and storage should not be higher<br />
than + 70 °C or lower than - 15 ° C. During transportation and storage of the unit, all openings<br />
are to be secured and protected against penetration of foreign substances such as packing<br />
material.<br />
It is compulsory to respect the signs on the packing, which inform you on the method of<br />
transportation, handling and storage and that the unit is fragile.<br />
1.4 General information<br />
The piston diaphragm dosing pumps are tested high quality products and correspond to the CE<br />
Standards and EN 809 Standards. They are used in the areas of production and environment<br />
protection.<br />
1.5 Area of application<br />
The piston diaphragm dosing pumps are used to meter fluids within a process and within an<br />
exactly defined time limit. Metering can be done continuously or discontinuously. <strong>Dosing</strong> time<br />
and quantity per each time limit can be selected freely. To guarantee good function, it is<br />
imperative to respect the operation, maintenance and erection instructions.<br />
<br />
<br />
The dosing pump may only be used to meter liquids!<br />
The pump is not designed for use with gaseous liquids or solids!<br />
21.03.2012 1 F03 0672 500/02 EN
1.6 Introductory safety measures<br />
General information<br />
Caution!<br />
The piston diaphragm dosing pumps should be erected and connected only by such competant<br />
persons, who master the safety regulations and the rules for erecting this equipment. Repair<br />
and maintenance works must be performed also by qualified and competant persons with<br />
knowledge of the complete maintenance and operation manual.<br />
Competant persons are those, who<br />
- have adequate professional training and experience<br />
- know the measures and rules in force on accident prevention<br />
- recognize and avoid danger.<br />
Warning:<br />
Assembly, connection or maintenance work on electrical or mobile parts may be<br />
carried out only after the pump is made tension-free and secured against accidental<br />
re-starting.<br />
Danger:<br />
Before dismounting the protection devices (example touch-proof devices) please<br />
make sure that the pump is made tension-free and secured against accidental restarting.<br />
Check whether the pump is tension-free prior to starting maintenance or<br />
repair work and prior to dismounting the protection devices. To switch on again, reinstall<br />
first the protection devices dismounted previously.<br />
Caution: Do not dismount the indication and warning shields. To work with chemicals,<br />
please follow the product specifications set by the manufacturer with regard to handling<br />
and safety!<br />
Prior to any maintenance works, wetted parts such as conduits, pump parts and fittings have to<br />
be rinsed.<br />
1.7 Noise emission<br />
Piston diaphragm dosing pumps have an average sound intensity level of < 70 dB (A) according<br />
with<br />
DIN EN ISO (reproducibility 2nd determination of sound intensity level)<br />
PR DIN EN 12639 (noise measurement of liquid pumps)<br />
DIN 45635-24 (noise measurement of machines)<br />
21.03.2012 2 F03 0672 500/02 EN
1.8 Function of the piston diaphragm dosing pump<br />
(Items in brackets see Page 10)<br />
Function<br />
Method of functioning of the pump is described in the attached drawing (page 10). Driving gear<br />
(3) and piston flange (6.1) are filled with a hydraulic liquid (15). The hydraulic connection is<br />
done through the hollow piston (7) provided with pilot holes. The distributing slide (6.2) encloses<br />
the piston.<br />
By each stroke the hydraulic fluid(15) is displaced in the piston flange (6.1), by the piston (7)<br />
and gets back in the driving gear (3) when the pilot holes of the piston are shut by the fixed<br />
distributing slide. Now starts the dosing via the elastic diaphragm (10.1).<br />
By means of spindle (8.1) you can adjust position of the distributing slide (6.2) delicately and<br />
linearly in the range of 0-100 %.<br />
If the eccentric (4) is turned from it’s highest point to it’s lowest point, suction stroke will take<br />
place. The piston (7) returns to it’s zero point by means of the piston spring (6.4). <strong>Dosing</strong><br />
medium will be primed as long as distributing slide (6.2) obturates the pilot holes.<br />
During the suction stroke valve 13a opens and valve 13b closes. During pressure stroke valve<br />
13a closes and valve 13b opens. This function is done in alternation and with each rotation of<br />
the eccentric.<br />
.<br />
Pressure valve<br />
To prevent damages that occur due to an excess of operation pressure, the pressure valve (9)<br />
is generally mounted onto the piston flange (6.1). In the factory, the pressure is adjusted exactly<br />
to correspond to that of the pump. The pressure valve starts to function then, when the valves<br />
installed on the suction or pressure sides are closed, or when the suction or pressure conduits<br />
are blocked. This over-pressure valve is considered as a short - term safety organ. All<br />
occurring disturbances that trigger the pressure valve should be immediately removed.<br />
<br />
<br />
The Pressure relief valve is only designed to protect the motor and the gears from<br />
inadmissible positive pressure created by the pump!<br />
The Pressure relief valve may not be used to bypass a metering stoppage while the pump<br />
is running. It is a safety component!<br />
The Pressure relief valve may not be used to protect the system. It can’t protect the<br />
system.<br />
All other applications or modifications are prohibited.<br />
<br />
<br />
You must observe the instructions in this operating instructions manual and the “General<br />
operating instructions for <strong>Alltech</strong> metering pumps and hydraulic accessories” on assembly,<br />
installation and maintenance.<br />
The pump must be operated by appropriately trained and authorised personnel.<br />
21.03.2012 3 F03 0672 500/02 EN
1.9 Erection<br />
(Items in brackets see Page 10)<br />
Before erecting the piston diaphragm dosing pump it is necessary to remove all packing<br />
materials and check the tags of the pump and of the motor and made sure whether these datas<br />
correspond to the local regulations.<br />
Connect the motor (1) abiding the Regulations set by the local authorities and in accordance<br />
with the clamp terminal diagramme as well as the motor tag. Sense of the rotation is towards<br />
the right - as seen onto the fan wheel. To protect the motor it is important to install a motor<br />
protection which corresponds to the nominal current of the motor.<br />
Suggestions for the installation of the equipment can be found in this documentation<br />
(Chap.1.13, F03 0431 506).<br />
For dosing non-gaseous products and under consideration of their specific weight you can have<br />
a suction of max 2 m w/c. However, it is important to have the conduit sufficiently dimensioned.<br />
When installing armatures, make sure their inner diameter corresponds to that of the conduit.<br />
For the flexible hose connections please make sure that the nozzles are sufficiently<br />
dimensioned. Union nuts made of plastic material should be fastened by hand to avoid<br />
damaging them.<br />
Remarks:<br />
Between pressure valve (13b) and suction valve (13a) of the dosing pump there should be a<br />
continuous positive pressure of at least 10 m w/c. This is even more important, when the pumps<br />
are connected - suction side - onto a conduit being under pressure. If the pressure difference is<br />
less than 10 m w/c., then a back pressure valve should be installed in the dosing conduit.<br />
Rate of the flow should not exceed 0,3 m/s in the suction conduit and 2,5 m/s in the pressure<br />
conduit. For suspensions please refer to the special informations. For reasons of sedimentation<br />
the flow speed should not fall below 0,2 m/s.<br />
Oscillating, positive-displacement pumps create a pulsating flow. With each stroke the flow in<br />
the pipes should accelerate from standstill to peak speed. The peak speed of single-head<br />
pumps is 3,2 times higher than that of a pump of the same size with homogenous flow (example<br />
centrifugal pumps). Please consider this when dimensioning the conduits and armatures.<br />
We generally recommend to install a pulsation damper in the suction and pressure conduits. For<br />
exact dimensioning of the pulsation damper please refer to the special instructions.<br />
Fasten the dosing pump onto a base-plate or a bracket by means of the fastening grooves on<br />
the driving gear (3).<br />
21.03.2012 4 F03 0672 500/02 EN
1.10 Commissioning<br />
(Items in brackets see Page 10)<br />
Before start-up make sure to fill in the hydraulic oil supplied with the pump. Remove ventilation<br />
screw (3.6) or the ventilation filter (2.0) of the driving gear. Release completely insert piece (9.1)<br />
of the pressure valve (9). Set the adjusting screw (8.2) on "0" so that the hydraulic liquid can<br />
flow into the piston flange (6.1) via the pilot holes (7).<br />
Fill in hydraulic oil in the driving gear slowly until the oil-level reaches ¾ of the oil level eye.<br />
After that no more oil must be filled in. After a couple of minutes the hydraulic oil must be visible<br />
on valve seat of the pressure valve (9). Check level of the oil and if necessary pour in more oil.<br />
(Level of oil ¾ ).<br />
Now the insert piece of the pressure valve (9.1) and the ventilation screw of the air filter should<br />
be fully fastened.<br />
On initial start-up it is recommended to flood the pump with the medium. If there is no input<br />
pressure on the pump, you can back-up the initial suction process by removing pressure valve<br />
(13b) and filling the dosing head (11) with medium.<br />
Afterward the pressure valve (13b) will be fastened again (pay attention to the flow direction!),<br />
connect the pressure line and start the motor and by means of the adjusting screw (8.2) adjust<br />
the dosing output up to 100 %. After it has run 1-2 minutes, use the adjusting screw (8.2) to<br />
adjust the dosing output to the desired rate. After running a couple of hours, we recommend to<br />
ventilate the hydraulic by means of the over-pressure valve (9).<br />
Ventilation of the hydraulic is done by unscrewing the regulating screw (9.1) and lifting the seal<br />
(9.5). Then the regulating screw (9.1) has to be reset.<br />
21.03.2012 5 F03 0672 500/02 EN
1.11 Rectifying the stroke adjustment<br />
(Items in brackets see Page 10)<br />
Unless otherwise specified in the contract, the zero-point (zero dosing) of the pump is set in the<br />
manufacturer’s workshop, according to the pressure relief valve (f.e. red back pressure valve =<br />
10 bars). If the actual operating pressure is above or below this rate, then rectifying the zeropoint<br />
will lead to the exact rate of dosing output. For this, a measuring pipe will be installed onto<br />
the suction side as shown in the drawing.<br />
measuring pipe<br />
Injection unit<br />
non-return valve<br />
Ball valve<br />
<strong>Dosing</strong> pump<br />
For re-adjusting purposes, the dosing output will be set to approx. 15 % and the measuring pipe<br />
filled with dosing medium. The dosing pump is switched on and the adjusting screw (8.2)<br />
rotating clockwise until the process of dosing observed in the measuring pipe stops. By this, the<br />
zero-point is exactly adjusted and corresponds to the actual operating pressure.<br />
Now is the thread bolt (8.9) loosened and the dosing scale (8.3) turned as long, until the zeroline<br />
of the scale equals the coloured marking on the drive gear. After that, fasten the threaded<br />
bolt (8.9) lightly.<br />
Adjusting is now completed and the suction conduit can be connected to the system and the<br />
operation begin.<br />
Re-adjusting of the pump must be carried out after the pressure conduit is connected and the<br />
pressure of the system normal.<br />
21.03.2012 6 F03 0672 500/02 EN
1.12 Maintenance<br />
(Items in brackets see Page 10)<br />
Change the hydraulic oil of the dosing pump every 8000 hours of service. Use only type of oil<br />
recommended by the manufacturer! As precaution change also the dosing diaphragm (10.1). To<br />
do this, drain the oil by loosening screw (3.3) and collect it in a bucket. When through, replace<br />
the screw (3.3) and fasten it. Attention: Change seal (3.4) also!<br />
Oil remaining in the pressurized area of the piston flange (6.1) is drained when plug (6.5) is<br />
loosened and the oil collected. Replace the plug and fasten it. Attention: Change seal (6.8)<br />
also!.<br />
If the pump is required to operate with oil that is safe for foodstuffs ensure that the<br />
correct type of oil is refilled.<br />
To change the dosing diaphragm (10.1), loosen dosing head (11). To do this, the suction and<br />
pressure side of the dosing system conduits must be shut and loosened. As soon as dosing<br />
head (11) and screws (12) are removed, you can remove the dosing diaphragm (10.1) along<br />
with the diaphragm holding plate (10.2). Piston flange (6.1), piston (7) and piston retaining<br />
spring (6.4) are not influenced by this operation.<br />
Loosen cap nut (10.4) and diaphragm spring (10.3) to dismount and exchange the dosing<br />
diaphragm (10.1). Put the new dosing diaphragm onto the diaphragm holding plate (10.2) and<br />
fasten it by means of the diaphragm spring and cap nut!<br />
Insert diaphragm with diaphragm holding plate into dosing head. The dosing head (11) will be<br />
fastened by means of screws. Arrows of the valves (13a and 13b) must show to the top. For<br />
dosing heads made of plastic material be careful when fastening screws (12) so as to avoid<br />
damages.<br />
After completing this work, re-fill hydraulic oil and start operating the pump as described in<br />
"commissioning".<br />
If output of the pump is slowing, valves (13a and 13b) could be dirty or blocked and must be<br />
exchanged. For cleaning purposes, loosen the valves and use a screw driver to loosen also the<br />
valve parts. You can now loosen the ball and the seat. After cleaning, replace the parts<br />
backwards. All damaged parts should be exchanged.<br />
For replacing the valve, pay attention to the direction of flow (as shown by the arrow). Important<br />
is also that the 0-rings are clean and placed in the correspondent nut. Fasten the valves by<br />
hand.<br />
21.03.2012 7 F03 0672 500/02 EN
1.13 Overview for piston diaphragm dosing pumps for fittings measurement<br />
and control devices / F03 0431 506<br />
21.03.2012 8 F03 0672 500/02 EN
21.03.2012 9 F03 0672 500/02 EN
2. Sectional drawing of the pump<br />
F03K 0092 500<br />
21.03.2012 10 F03 0672 500/02 EN
3. Dimensional drawing<br />
F03K 0093 500<br />
21.03.2012 11 F03 0672 500/02 EN
Dimensions<br />
<strong>Dosing</strong> head<br />
Ident.-No. G D2 L2 L3 H2<br />
F03 0101 06/30/32/82<br />
62 36<br />
F03 0118 82<br />
150<br />
F03 0746 06/30/32/82<br />
1 1/4“<br />
58 32<br />
F03 0748 82<br />
204<br />
F03 0102 03/30/32/82 178 70 44 232<br />
F03 0747 06/30/32/82 65 35<br />
F03 0117 06/30/32/82<br />
F03 0730 06/30/32/82<br />
198 88 49 278<br />
F03 0313 06/30/32/82<br />
2“<br />
90 53 300<br />
220<br />
F03 0332 06/30/32/82 88 49 300<br />
F03 0736 06/30/32/82 250 100 55 330<br />
Piston flange<br />
Ident.-Nr.<br />
Piston <strong>Dosing</strong> diaphragm L1<br />
<br />
material<br />
F03K 0069 101 / 121 / 123 32 CSM+FPM+PTFE<br />
104 / 122 / 124 45<br />
106 / 128<br />
52<br />
240<br />
108<br />
CSM+FPM<br />
58<br />
110<br />
65<br />
F03K 0069 111<br />
80<br />
112<br />
90<br />
CSM+FPM 274<br />
113<br />
95<br />
F03K 0069 203 / 227<br />
45<br />
205 / 229<br />
52<br />
207<br />
PTFE 245<br />
58<br />
209<br />
65<br />
PTFE 279<br />
F03K 0069 213 95 PTFE 281<br />
F03K 0069 211<br />
80<br />
212<br />
90<br />
<strong>Drive</strong> gear<br />
Motor<br />
Ident.-No. L4 L5 B1 B2 B3 H3 H4<br />
F03K 0038<br />
101 / 102 / 105<br />
150 210 190 160 40 120 232<br />
F03K 0038<br />
103 / 104 / 106<br />
150 220 190 160 44 150 291<br />
Ident.-No. D1 H1 L6<br />
E01 0037 04 842 0,37kW 140 205 110<br />
E01 0110 04 843 1,1kW 175 245 135<br />
E01 0060 04 001 0,6 kW 139 212 112,5<br />
21.03.2012 12 F03 0672 500/02 EN
4. Type discription<br />
F03 0673 500<br />
<strong>FKM</strong> - 0080 008 L 2 T 045 S<br />
FDH - 010 010 R 3 H S<br />
<strong>FKM</strong> =<br />
Piston-diaphragm<br />
pump for dosing<br />
of liquids<br />
FDH =<br />
Hydraulic unit<br />
Dummy:<br />
H = high pressure pump<br />
U = casing<br />
V = viscous products<br />
F = frequency control<br />
<strong>FKM</strong><br />
<strong>Dosing</strong> output<br />
0001 = 1 l/h<br />
0137 = 137 l/h<br />
FDH<br />
Piston diameter<br />
010 = 10<br />
014 = 14<br />
.<br />
.<br />
095 = 95<br />
100 = 100<br />
<strong>Dosing</strong> head<br />
(Material)<br />
2 = PVC<br />
3 = 1.4571<br />
5 = PPH<br />
6 = PVDF<br />
<strong>Dosing</strong> diaphragm<br />
(Material)<br />
H = Hypalon (CSM)<br />
N = Nitril (NBR)<br />
P = Teflon (PTFE/TFM)<br />
T = Teflon (PTFE)<br />
V = Viton (FPM)<br />
Specialdesign<br />
<strong>Dosing</strong>-Piston<br />
TRW A0 / B0 / C0<br />
045 = 45mm<br />
100 = 100mm<br />
Pressure range<br />
008 = 8 bar<br />
100 = 100 bar<br />
<strong>Dosing</strong> head<br />
L = Left side design<br />
R = Right side design<br />
21.03.2012 13 F03 0672 500/02 EN
5. Data sheet hydraulic oil<br />
DIVINOL DHG ISO 68 (N16 0003)<br />
Bottle of 1 litre oil: N16 0006<br />
Bottle of 5 litre oil: N16 0007 01<br />
Bottle of 6 litre oil: N16 0007 02<br />
Characteristics:<br />
Alternative Oil:<br />
Density 15°C 0,870 g/cm³ ARAL Degol BMB 100<br />
Viscosity 40°C 68 mm²/s (DIN 51562) BP Energol GR-XP 100<br />
Inflammable point 230°C (DIN ISO 2592E) ESSO Spartan EP 100<br />
Pour point -25°C (DIN ISO 3016) FINA Saturna MM 100<br />
TEXA<strong>CO</strong> Meropa 100<br />
SHELL Omala 100<br />
21.03.2012 14 F03 0672 500/02 EN
6. Output diagramme<br />
F03 0486 500<br />
21.03.2012 15 F03 0672 500/02 EN
7. Documentation on pump parts<br />
7.1 <strong>Drive</strong> gear B0/C0 complete<br />
F03K 0038 500<br />
List of spare parts drive gear B0/C0 complete<br />
Pos. Quantity Description/ -Material Pos. Quantity Description/ -Material<br />
3.1 1 piece Housing 3.10 4 piece Washer 8,4, DIN 125<br />
3.2 1 piece Bearing flange 3.11 4 piece Set screw M6 x 6<br />
3.3 1 piece Screw plug R 1/2“ 3.12 1 piece <strong>Dosing</strong> worm<br />
3.4 1 piece Gasket 21 x 27 x 2 x 3.13 1 piece Coupling<br />
3.5 1 piece Oil level glass R 1/2“ 3.14 1 piece Thrust piece<br />
3.6 1 piece Screw plug R 3/4“ 3.15 1 piece Retention ring<br />
3.7 1 piece<br />
3.8 1 piece<br />
O-ring 21,82x3,5<br />
-CSM<br />
O-ring 110x3<br />
-NBR<br />
x 3.16 2 piece Tapered roller bearing<br />
3.17 1 piece Feather key<br />
3.9 4 piece Hexagon screw x 4 1 piece Eccentric<br />
X = Wearing part<br />
21.03.2012 16 F03 0672 500/02 EN
7.2 Eccentric complete<br />
F03K 0009 500<br />
List of spare parts Eccentric complete<br />
Pos. Quantity Description/ -Material<br />
4.1 2 piece Groove bearing<br />
4.3 1 piece Worm wheel<br />
4.7 2 piece Circlip<br />
4.9 1 piece Needle bearing<br />
4.10 1 piece Eccentric<br />
4.11 1 piece Circlip<br />
4.12 2 piece Adjusting ring<br />
4.13 1 piece Feather key<br />
X = Wearing part<br />
21.03.2012 17 F03 0672 500/02 EN
7.3 Cover complete<br />
F03K 0039 500<br />
List of spare parts Cover complete<br />
Pos. Quantity Description/ -Material<br />
5.1 1 piece Cover for driving gear<br />
5.2 1 piece<br />
O-ring 130x3<br />
-NBR<br />
x<br />
5.3 4 piece Hexagon screw M12x40, DIN 933<br />
5.4 4 piece Washer 13, DIN 125<br />
X = Wearing part<br />
21.03.2012 18 F03 0672 500/02 EN
7.4 Piston flange complete<br />
F03K 0069 500<br />
21.03.2012 19 F03 0672 500/02 EN
List of spare parts piston flange complete<br />
Pos. Quantity Description/ -Material<br />
6.1 1 piece Piston flange<br />
6.2 1 piece Distributing regulator<br />
6.3 1 piece Fixing plate<br />
6.4 1 piece Spring for piston<br />
6.5 1 piece Vent plug<br />
6.7 1 piece<br />
6.8 1 piece<br />
6.9 1 piece<br />
O-ring<br />
-NBR<br />
O-ring<br />
-NBR<br />
O-ring 130x3<br />
-NBR<br />
x<br />
x<br />
x<br />
6.10 6 piece Hex. socket head cap screw M5x12, DIN 912<br />
6.11 2 piece Set screw M6x6, DIN 551<br />
6.12 4 piece Threaded bolt M12x65<br />
6.14 4 piece Washer 13, DIN 125<br />
6.15 4 piece Spring washer B12, DIN 127<br />
6.16 4 piece Hexagon cup nuts M12, DIN 917<br />
6.21 1 piece<br />
O-ring<br />
-NBR<br />
x<br />
7 1 piece Piston<br />
8 1 piece Adjusting spindle cpl.<br />
X = Wearing part<br />
21.03.2012 20 F03 0672 500/02 EN
7.5 Adjusting spindle complete<br />
F03K 0013 500<br />
List of spare parts Adjusting spindle complete<br />
Pos. Quantity Description/ -Material<br />
8.1 1 piece Adjusting spindle<br />
8.2 1 piece Adjusting button<br />
8.3 1 piece Scale<br />
8.4 1 piece Stop pin<br />
8.6 1 piece Feather key 6x6x22, DIN 6885<br />
8.7 2 piece<br />
O-ring 13x2,5<br />
-NBR<br />
x<br />
8.9 1 piece Set screw M6x6, DIN 551<br />
8.10 1 piece<br />
Slotted pan head screws M6x10,<br />
DIN 921<br />
8.11 1 piece Washer 8.4, DIN 9021<br />
X = Wearing part<br />
21.03.2012 21 F03 0672 500/02 EN
7.6 Pressure control valve complete<br />
F03K 0063 500 F03K 0064 500<br />
List of spare parts Pressure control valve complete<br />
Pos. Quantity Description/ -Material<br />
9.1 1 piece Adjusting screw<br />
9.2 1 piece Valve body<br />
9.3 1 piece<br />
9.4 1 piece<br />
9.5 1 piece<br />
O-ring<br />
-NBR<br />
O-ring<br />
-NBR<br />
O-ring<br />
-NBR<br />
x<br />
x<br />
x<br />
9.6 1 piece Valve seat<br />
9.7 1 piece Valve lock<br />
9.8 1 piece Pressure spring<br />
X = Wearing part<br />
21.03.2012 22 F03 0672 500/02 EN
7.7 <strong>Dosing</strong> diaphragm complete<br />
F03K 0071 500<br />
List of spare parts dosing diaphragm complete<br />
Pos. Quantity Description/ -Material<br />
10.1 1 piece<br />
Diaphragm<br />
(-CSM / -FPM / -PTFE)<br />
x<br />
10.2 1 piece Diaphragm support<br />
10.3 1 piece Diaphragm spring x<br />
10.4 1 piece Hexagon cap nuts M6, DIN 917<br />
10.5 1 piece Washer 6,4, DIN 125<br />
X = Wearing part<br />
21.03.2012 23 F03 0672 500/02 EN
8. General outlay non return valves<br />
F03 0484 500<br />
21.03.2012 24 F03 0672 500/02 EN
9. Data sheet motors<br />
Operation instructions motors<br />
Connection<br />
When connecting the electric motors to the available supply, the information on the rating plate<br />
must be observed and compared with the enclosed connection diagram. One speed motor<br />
normally has a terminal box containing a terminal board with 6 terminals.<br />
This Voltage given 380/230V<br />
means:<br />
Star connection for higher voltage.<br />
Example: 380V<br />
Delta connection for lower voltage.<br />
Example: 230V<br />
A.C. motor<br />
Every motor is provided with a connection diagram in the terminal box.<br />
Connection of the supply must be carried out by an expert. Choose cable crosssections<br />
in accordance with the rated current. Supply cables must be stress relieved.<br />
Earth leads must be connected to the marked earth screw in accordance with VDE<br />
0100. Use original gaskets when closing the terminal box. Cable entries which are not<br />
to be used must be sealed up dust and watertight.<br />
21.03.2012 25 F03 0672 500/02 EN
Direction of rotation<br />
The motors are generally suitable for both directions of rotation. Should a motor be suitable for<br />
only one direction of rotation, this is marked by an arrow.<br />
Three phase motor:<br />
Reverse direction of the rotation by exchanging any 2 of the supply cables.<br />
A.C. motors:<br />
Reverse direction of rotation by fixing the bridges horizontal.<br />
Motor protection<br />
The following protection can be chosen to protect the winding against thermal overload caused<br />
by locking, overloading and 2 phase operation:<br />
Item. 1: PTC temperature sensor in the stator winding together with a tripping device.<br />
Some motors are not protected against short-circuiting resulting from stalling of<br />
the rotor. (Further details on inquiry). For this reason, an additional motor<br />
protection switch should be fitted, if necessary.<br />
Item. 2: Winding protection contacts in the form of normally closed, or normally open,<br />
contacts in the stator winding. For this reason, an additional motor protection switch<br />
should be fitted, if necessary.<br />
Item. 3: Motor protection switch with bimetal tripping device.<br />
Protection measures provided must be connected before putting the motor into<br />
operation.<br />
Maintenance<br />
Work on the motors can only be carried out when switched off i.e. no current flowing.<br />
Secure motors against accidental restarting.<br />
Ball bearings<br />
The bearings have a life-time lubrication. The grooved ball bearing in standard motors upto<br />
frame size 200 are covered up on both sides. Approx. 20 000. operating hours are reached for a<br />
4 pole motor at normal coupling operation and approx. 10 000 operating hours for a 2 pole<br />
motor.<br />
Should the operating conditions be more arduous than normal, heavy alternating and/or<br />
increased bearing loads, coolant temperature over 40°C, vibrations etc., then the operating life<br />
of the bearing is correspondingly shorter. This is also valid for high humidity and extreme dirt. It<br />
is generally recommended that the grease be renewed or bearings replaced after approx. 5<br />
years.<br />
Lubrication<br />
Lithium Saponified antrifriction bearing grease K3K in acc. with DIN 51 502 is used as lubricant.<br />
Application point -20°C up to +120°C.<br />
Melting point approx. +185°C.<br />
E.G. Shell, Alvania-Fett R3,<br />
Calypsol H443GF.<br />
Should noisy bearings or an unusually high lubrication leakage be noticed then the bearings<br />
should be replaced. Sliding seals, axial or radial should be regreased at regular intervals.<br />
21.03.2012 26 F03 0672 500/02 EN
Supplementary note for EExe II motors.<br />
Application<br />
Installation and operation of these motors must comply with<br />
DIN 57 165/VDE 0165/9.83 regulations.<br />
The appropriate supervising authority must ascertain the degree of risk of explosion.<br />
Motor protection<br />
In accordance with VDE 0165 every motor must be protected, by a monitoring<br />
system, against undue temperature rise caused by overloading. Should the motor be<br />
monitored by an overload protection device with a current-dependent delayed tripping<br />
device in acc. with VDE 0660 (e.g. motor protection switch) then all poles must be<br />
protected.<br />
The current-dependent delayed tripping device, or relay, must be adjusted to the rated current<br />
of the motor. Such a device must be chosen so that the motor is also thermally protected during<br />
short-circuitting. This requirement is fulfilled when the delay-time action, which can be seen in<br />
the tripping charatectistic (initial temperature 20°C ) for the ratio I A /I N is not larger than the given<br />
temperature rise time t E for the respective ignition class.<br />
Delta connected windings should be protected so that the tripping device or relay is connected<br />
in series with the winding phase. The important factor when choosing a tripping device is the<br />
rated value of the phase current, i.e. 0,58 multiplied by the motor rated current. If the tripping<br />
device is fitted in the power supply wire, then preventative measures must be taken to ensure<br />
enough motor protection if a phase falls out.<br />
Multi-speed motors must have current-dependent delayed tripping devices, or relays, for each<br />
speed which must be interlocked with each other. Should the temperature monitoring, to protect<br />
the motor, be carried out by PTC temperature sensors only, then this construction of the motor<br />
must be specially certified.<br />
The motors are only to be used for continuous operation and for normal, not repeatedly<br />
recurring starts, by which no unusual temperature rise during starting occurs.<br />
Installation<br />
EExe II motors of the design types IM V1, IM V5, IM V18 (with shaft pointing down-wards) are<br />
always supplied with a protection cowl to offer protection against small solid foreign bodies<br />
>1mm Ø falling into the fan cowl.<br />
Motors of the design type IM V3, IM V6, IM V19 (with shaft pointing upwards) must be installed<br />
in such a manner that foreign bodies cannot enter the fan cowl e.g. a suitable cover<br />
incorporated in the machine. This must not impair ventilation of the motor. The customer is<br />
responsible for correct installation. Approval of the local technical inspection authority must be<br />
obtained.<br />
Repairs<br />
Repair works or modifications to explosion-proof motors may only be carried out by<br />
authorized workshops. Only general maintenance work which would not endanger<br />
the protection against explosion may be carried out without consulting an expert.<br />
Example: Replacement of bearings, fan cowl, fan, gaskets, terminal board.<br />
21.03.2012 27 F03 0672 500/02 EN
Motor cpl.<br />
Pos.<br />
Description<br />
1 Stator<br />
2 Rotor<br />
3 Terminal-system<br />
3a<br />
3b<br />
Terminal box lid<br />
Terminal box<br />
-Gasket - lid/box<br />
-Gasket - box/stator<br />
3c Terminal block<br />
3d connection plate<br />
4 Endshild IMB3 - drive end<br />
5 Flange IMB5 or IMB14<br />
6 Endshild non-drive end<br />
7 Equalizing disc for ball bearings<br />
8 Ball bearings drive end (6204-2Z-C3)<br />
9 Ball bearings non-drive end (6204-2Z-C3)<br />
10 Oil seal<br />
11 Circlip<br />
12 Tolerance ring non-drive end<br />
13 Fan<br />
14 Fan cowl<br />
15 Bolt<br />
16 Key (not illustrated)<br />
When placing purchase order for spare<br />
parts, please quote motor type, motor<br />
serial number and spare parts list<br />
number.<br />
21.03.2012 28 F03 0672 500/02 EN
Technisches Datenblatt / Technical Data / Notes téchniques<br />
Drehstrommotor / Three-phase motor / Moteur triphasé<br />
Nennleistung / Rated output / Puissance nominale: E01 0037 04 842<br />
P=0,37 kW<br />
Frequenz<br />
Frequency<br />
Fréquence:<br />
Nennspannung<br />
Nominal voltage<br />
Tension nominale:<br />
Nennstrom<br />
Rated current<br />
Courant nominal:<br />
Drehzahl<br />
Speed<br />
Vitesse:<br />
Upm<br />
rpm<br />
tpm<br />
Leistungsfaktor<br />
Power factor<br />
Facteur de puissance:<br />
50Hz<br />
380-420 V<br />
220-240 V<br />
1,03 A<br />
1,8 A<br />
60Hz<br />
380-460 V<br />
220-266 V<br />
1,02 A<br />
1,8 A<br />
1370 1670<br />
cos 0,80 cos 0,78<br />
Schutzart/ Type of Protection/ Type de Protection: IP 55<br />
Bauform/ Design/ Design:<br />
IM V1<br />
Verhältnis I A /I N / Starting current/ Courant démarrage: 4,2<br />
Isoklasse/ Insulation class/ Classe d´isolation:<br />
F<br />
Gewicht/ Weight/ Poids:<br />
6,8 kg<br />
Nennleistung / Rated output / Puissance nominale: E01 0060 04 001<br />
P=0,60 kW<br />
Frequenz<br />
Frequency<br />
Fréquence:<br />
Nennspannung<br />
Nominal voltage<br />
Tension nominale:<br />
Nennstrom<br />
Rated current<br />
Courant nominal:<br />
50Hz<br />
380-415 V<br />
220-240 V<br />
1,6 A<br />
2,8 A<br />
60Hz<br />
380-460 V<br />
1,6 A<br />
Drehzahl<br />
Speed<br />
Vitesse:<br />
Upm<br />
rpm<br />
tpm<br />
Leistungsfaktor<br />
Power factor<br />
Facteur de puissance:<br />
1350 1655<br />
cos 0,79 cos 0,78<br />
Schutzart/ Type of Protection/ Type de Protection: IP 55<br />
Bauform/ Design/ Design:<br />
IM V1<br />
Isoklasse/ Insulation class/ Classe d´isolation:<br />
F<br />
Gewicht/ Weight/ Poids:<br />
8,2 kg<br />
21.03.2012 29 F03 0672 500/02 EN
Nennleistung / Rated output / Puissance nominale: E01 0110 04 843<br />
P=1,1 kW<br />
Frequenz<br />
Frequency<br />
Fréquence:<br />
Nennspannung<br />
Nominal voltage<br />
Tension nominale:<br />
Nennstrom<br />
Rated current<br />
Courant nominal:<br />
Drehzahl<br />
Speed<br />
Vitesse:<br />
Upm<br />
rpm<br />
tpm<br />
Leistungsfaktor<br />
Power factor<br />
Facteur de puissance:<br />
50Hz<br />
380-420 V<br />
220-242 V<br />
2,8 A<br />
4.8 A<br />
60Hz<br />
380-460 V<br />
220-265 V<br />
2,6 A<br />
4,5 A<br />
1400 1700<br />
cos 0,80 cos 0,84<br />
Schutzart/ Type of Protection/ Type de Protection: IP 55<br />
Bauform/ Design/ Design:<br />
IM V1<br />
Verhältnis I A /I N / Starting current/ Courant démarrage: 5,0<br />
Isoklasse/ Insulation class/ Classe d´isolation:<br />
F<br />
Gewicht/ Weight/ Poids:<br />
12,0 kg<br />
21.03.2012 30 F03 0672 500/02 EN
10. Appendix<br />
21.03.2012 31 F03 0672 500/02 EN