Dual Speed Microfocuser for WO focusers - William Optics
Dual Speed Microfocuser for WO focusers - William Optics
Dual Speed Microfocuser for WO focusers - William Optics

Create successful ePaper yourself
Turn your PDF publications into a flip-book with our unique Google optimized e-Paper software.
<strong>William</strong> <strong>Optics</strong> 2-<strong>Speed</strong> <strong>Microfocuser</strong><br />
Search Cloudy<br />
Nights<br />
Advanced<br />
Home / <strong>William</strong> <strong>Optics</strong> 2-<strong>Speed</strong> <strong>Microfocuser</strong><br />
by Timm Bottoni 12/20/05 | Email Author<br />
Voice your opinion about this topic in the <strong>for</strong>ums<br />
Search<br />
Wednesday, April<br />
26, 2006<br />
Cloudy Nights<br />
Supporters<br />
Astronomics<br />
www.astronomics.<br />
com<br />
<strong>William</strong> <strong>Optics</strong> 2-speed 1:10 <strong>Microfocuser</strong> Retrofit<br />
The quality of a telescope is often first judged by its optics, but other parts of the telescope play an<br />
important role in the user's satisfaction with the scope. The focuser is a critical part of the overall<br />
experience. Who hasn't tried to view through a scope where the focuser is so rough, and sticky, that it<br />
becomes nearly impossible to get the object in clean focus? It makes the entire viewing process<br />
completely frustrating, especially at high power where even the slightest movement seems to overcorrect<br />
the last adjustment! And <strong>for</strong> photographic work, the ability to precisely focus (and stay focused) is<br />
essential <strong>for</strong> even the most basic work. When I got my <strong>William</strong> <strong>Optics</strong> Megrez 80 II SD, one of the first<br />
things I noticed was the high quality 2" fully rotatable focuser; how nicely it focused, how smooth it felt,<br />
and how solid it was. But with every mechanical item, there is nearly always room <strong>for</strong> improvement. This<br />
brings us to the <strong>WO</strong> 2-speed <strong>Microfocuser</strong> Retrofit, which is a user installable upgrade attachment, with<br />
a dual speed, two knob assembly that is custom designed to fit and match the existing <strong>WO</strong> focuser.<br />
Initial Inspection<br />
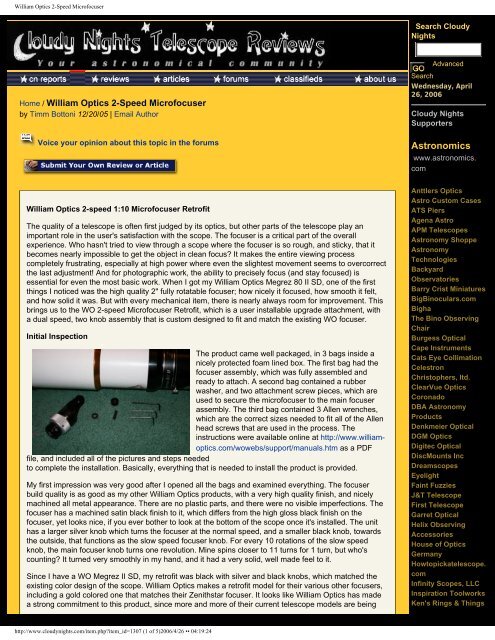
The product came well packaged, in 3 bags inside a<br />
nicely protected foam lined box. The first bag had the<br />
focuser assembly, which was fully assembled and<br />
ready to attach. A second bag contained a rubber<br />
washer, and two attachment screw pieces, which are<br />
used to secure the microfocuser to the main focuser<br />
assembly. The third bag contained 3 Allen wrenches,<br />
which are the correct sizes needed to fit all of the Allen<br />
head screws that are used in the process. The<br />
instructions were available online at http://www.williamoptics.com/wowebs/support/manuals.htm<br />
as a PDF<br />
file, and included all of the pictures and steps needed<br />
to complete the installation. Basically, everything that is needed to install the product is provided.<br />
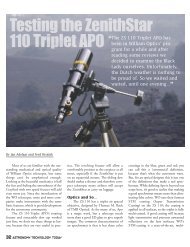
My first impression was very good after I opened all the bags and examined everything. The focuser<br />
build quality is as good as my other <strong>William</strong> <strong>Optics</strong> products, with a very high quality finish, and nicely<br />
machined all metal appearance. There are no plastic parts, and there were no visible imperfections. The<br />
focuser has a machined satin black finish to it, which differs from the high gloss black finish on the<br />
focuser, yet looks nice, if you ever bother to look at the bottom of the scope once it's installed. The unit<br />
has a larger silver knob which turns the focuser at the normal speed, and a smaller black knob, towards<br />
the outside, that functions as the slow speed focuser knob. For every 10 rotations of the slow speed<br />
knob, the main focuser knob turns one revolution. Mine spins closer to 11 turns <strong>for</strong> 1 turn, but who's<br />
counting? It turned very smoothly in my hand, and it had a very solid, well made feel to it.<br />
Since I have a <strong>WO</strong> Megrez II SD, my retrofit was black with silver and black knobs, which matched the<br />
existing color design of the scope. <strong>William</strong> <strong>Optics</strong> makes a retrofit model <strong>for</strong> their various other <strong>focusers</strong>,<br />
including a gold colored one that matches their Zenithstar focuser. It looks like <strong>William</strong> <strong>Optics</strong> has made<br />
a strong commitment to this product, since more and more of their current telescope models are being<br />
Anttlers <strong>Optics</strong><br />
Astro Custom Cases<br />
ATS Piers<br />
Agena Astro<br />
APM Telescopes<br />
Astronomy Shoppe<br />
Astronomy<br />
Technologies<br />
Backyard<br />
Observatories<br />
Barry Crist Miniatures<br />
BigBinoculars.com<br />
Bigha<br />
The Bino Observing<br />
Chair<br />
Burgess Optical<br />
Cape Instruments<br />
Cats Eye Collimation<br />
Celestron<br />
Christophers, ltd.<br />
ClearVue <strong>Optics</strong><br />
Coronado<br />
DBA Astronomy<br />
Products<br />
Denkmeier Optical<br />
DGM <strong>Optics</strong><br />
Digitec Optical<br />
DiscMounts Inc<br />
Dreamscopes<br />
Eyelight<br />
Faint Fuzzies<br />
J&T Telescope<br />
First Telescope<br />
Garret Optical<br />
Helix Observing<br />
Accessories<br />
House of <strong>Optics</strong><br />
Germany<br />
Howtopickatelescope.<br />
com<br />
Infinity Scopes, LLC<br />
Inspiration Toolworks<br />
Ken's Rings & Things<br />
http://www.cloudynights.com/item.php?item_id=1307 (1 of 5)2006/4/26 •• 04:19:24
<strong>William</strong> <strong>Optics</strong> 2-<strong>Speed</strong> <strong>Microfocuser</strong><br />
offered with the 2-speed focuser as standard.<br />
Installation<br />
The installation was done by me, all alone, and while it<br />
did not appear to be difficult, I took my time, and read<br />
through the instructions first to make sure I knew what I<br />
was getting into. Start to finish takes between 5 minutes<br />
and 15 minutes depending on how familiar you are with<br />
the product, and your scope.<br />
In my mind the installation breaks down into 3 basic<br />
steps, but the actual instructions go into much more<br />
detail, with many more steps, and since they are<br />
available online, they won't be repeated here.<br />
1. Remove the existing focuser knob from either<br />
side ? you can choose which side you want it on,<br />
I chose the left side since that makes the most<br />
sense <strong>for</strong> my existing mount, but it's easy enough<br />
to switch if you change your mind later on.<br />
1. Attach the focuser retrofit in place of the removed<br />
original focuser knob, by sliding it onto the shaft,<br />
aligning things and tightening it all up.<br />
1. Adjust the focuser tension until it's smooth, but<br />
not too tight, yet doesn't slip under the weight of<br />
heavy eyepieces or photography gear.<br />
LXD55.com<br />
Mag 1 Instruments<br />
Meade<br />
Mercury Systems<br />
Support<br />
Optical Mechanics<br />
Particle Wave<br />
Technologies<br />
Pier-Tech<br />
ScopeGuard Cases<br />
Scope'n'Skies<br />
Scopes4rent<br />
ScopeStuff<br />
Shoestring<br />
Astronomy<br />
Software Bisque<br />
Starbuckets<br />
Starmaster<br />
Stellar Optical<br />
Stellarvue<br />
Sun River Nature<br />
Center<br />
Telescope Solutions<br />
Tele Vue<br />
Teeter's Telescopes<br />
Telescope<br />
Warehouse<br />
Think Astronomy<br />
TeleTrade<br />
TMB Optical<br />
Tscopes<br />
Ultra Darklight<br />
University <strong>Optics</strong><br />
Walt's Observing<br />
Chairs<br />
<strong>William</strong> <strong>Optics</strong><br />
Woden <strong>Optics</strong><br />
The original focuser itself is not disassembled, and the retrofit simply replaces one of the original focuser<br />
knobs. This retrofit is a bolt-on retrofit providing the original focuser with a way to turn the shaft at 1/10 th<br />
of the original speed, that's all it is. I would say it doesn't sound like much from that description, but it's<br />
an ingeniously engineered product, that works exactly like you would expect it to. I discovered several<br />
important things in the installation process, which I am happy to share with all who choose to install the<br />
retrofit themselves. I think that most people can do this installation themselves. This installation does not<br />
require you to do anything complex, do any sort of strange balancing, nor does it even require an extra<br />
pair of hands, or even an extremely small pair of hands. Many of these tips are actually already in the<br />
instructions, but I hope to emphasize the things that I feel are particularly important, and add a few tips of<br />
my own that I think will help anyone who is interested in buying this or is already installing it.<br />
Tip 1: Make sure you have a soft clean surface to work on, and that you have plenty of light or a small<br />
flashlight on hand so that you can easily see the small set screws you have to work with. You might want<br />
your reading glasses too, if you use them.<br />
Tip 2: Removing the existing focuser knob is easy, but it might require a bit more "oomph" than you<br />
would think to loosen the Allen screw, so be careful holding everything. Mine was quite tight.<br />
Tip 3: You will need to place the rubber washer in the inset of the microfocuser housing, and while it<br />
appears as though the washer is too big, that is the way it's supposed to work (as the instructions point<br />
out), and is needed to allow the microfocuser to tighten to the focuser without scratching or marring the<br />
finish, after it has been slid onto the shaft. I only dropped the washer twice be<strong>for</strong>e I realized I could get it<br />
http://www.cloudynights.com/item.php?item_id=1307 (2 of 5)2006/4/26 •• 04:19:24
<strong>William</strong> <strong>Optics</strong> 2-<strong>Speed</strong> <strong>Microfocuser</strong><br />
stay stuck inside the inset if I compressed it slightly with my fingers, and then carefully slid the<br />
microfocuser in place on the focuser shaft.<br />
Tip 4: You also need to make sure you line up the flat edge of the steel focuser shaft with the Allen head<br />
tightening screw, when you slide on the microfocuser onto the steel focuser shaft. It's easy to tell when<br />
the flat side is up, since the remaining focuser knob has its set screw facing up when it's on top. It took<br />
me a bit of fidgeting to get it slid on, and I have since removed mine and replaced it <strong>for</strong> picture taking and<br />
to write these tips, and it's easy to do this now that I am used to it, but the first time I remember thinking it<br />
just wouldn't slide together. It is a very snug fit, so just be patient. The instructions tell you all this and if<br />
they are followed, it should fit together exactly as pictured.<br />
Tip 5: The Allen set screw holding the retrofit to the shaft needs to be tightened very securely as well,<br />
once you have everything in place. If this critical step is ignored, you will end up with a poorly behaved<br />
focuser, which exhibits backlash. I was afraid to over tighten it, and on my first attempt I didn't have it<br />
tight enough and I could feel one side move slightly while the other didn't. I tightened it further, and the<br />
backlash went away, but care should be taken to not over tighten these tiny set screws. Again, it's the<br />
flat part of the shaft that should be what you are tightening it against.<br />
Tip 6: THE MOST CRITICAL STEP - The hardest part of this installation is adjusting the focuser tension.<br />
The instructions clearly show how everything gets assembled, but you need to be willing to experiment a<br />
little with the different types of screws that affect the adjustment of the focuser. If you have a tripod or<br />
mount to put it on <strong>for</strong> this part you might find it helpful, since it will let you tilt the scope upright to<br />
determine if you need more tension to prevent the smoothly sliding focuser tube from sliding on its own<br />
due to the weight of accessories.<br />
There are three things that now work together to adjust the focuser.<br />
First, the large silver knob is used to lock the focuser, and is a nylon tipped screw that goes all the way<br />
through to the focuser tube, and makes contact with the tube when tightened. This screw locks the<br />
focuser from moving, and does NOT do anything to adjust the tension of the focuser. CRITICAL STEP: It<br />
should be completely loose during all focuser adjustments, or you will NOT be able to adjust your<br />
focuser tension correctly.<br />
Second, the original small silver tension screw was replaced during the installation with a longer black<br />
tension screw. This is the screw that tightens down onto the pressure plate that puts tension on the shaft<br />
that turns the focuser. If it's too loose, the shaft won't turn the focuser at all, or it may not put enough<br />
tension on the shaft to keep the focuser from sliding out on its own when you have the scope pointed<br />
upward.<br />
Third, the black thumb screw that tightens the microfocuser to the base of the focuser screws onto the<br />
new longer black tension screw mentioned above. This serves only to securely hold the microfocuser in<br />
place.<br />
HERES THE MOST IMPORTANT PART ? the black thumb screw must be tight! How tight? VERY<br />
TIGHT! In order <strong>for</strong> my focuser to work smoothly, it has to be as tight as I can get it by hand, which is<br />
very tight. If it's not tight, the microfocuser will not operate smoothly, and will seem to have easy and<br />
hard feeling zones as you turn it. If the focuser feels this way, you have to get the black thumb screw<br />
tighter. Part of the difficulty however, is that because the black thumb screw threads onto the black<br />
tension adjustment screw, whenever you loosen the tension screw, you also might be accidentally<br />
loosening the black thumb screw. Are you confused yet? Well don't feel bad, once you have it in your<br />
hand you will see how it works. TIP ? put on some leather gloves to help grip the machined black thumb<br />
screw, since its edges are nicely machined, and you might find that it hurts your fingers to get it really<br />
tight, and avoid any sort of pliers that might ruin its finish.<br />
So the easy way to adjust it, in my opinion is to start with the silver locking thumb screw completely<br />
loose, and the black tension screw only slightly tight. With it loose, or removed, the focuser slides<br />
smoothly (and quickly out if the focuser is pointed down). Mine slid out so quickly it caught me a bit off<br />
guard. It won't come out completely, but will stop with a loud clunk when it reaches the end of its travel.<br />
The focuser rides on a set of bearing like wheels, so it rolls very smoothly. Now thread on the black<br />
thumb screw as tight as you can get it. Don't even attempt to judge how the focuser feels without the<br />
black thumb screw tight ? it will feel awful with it loose!<br />
Now, you will need to carefully tighten or loosen the black adjusting screw, in tiny amounts, making sure<br />
the black thumb screw is tight, after every adjustment. Remember, this black thumb screw MUST be<br />
VERY tight at the conclusion of the adjustment process, or your microfocuser will end up feeling like<br />
http://www.cloudynights.com/item.php?item_id=1307 (3 of 5)2006/4/26 •• 04:19:24
<strong>William</strong> <strong>Optics</strong> 2-<strong>Speed</strong> <strong>Microfocuser</strong><br />
there are hard and easy zones of travel on it, that match up with each revolution of the larger 1:1 knobs.<br />
Take your time here. Testing with the extra weight of the diagonal and eyepiece is easy to do, and worth<br />
the time to avoid having it too loose or too tight when you actually plan to use it. With the microfocuser in<br />
place, the adjustment needed to go from too tight/loose to perfect might only be a fraction of a turn of the<br />
tension focuser screw. And remember, things change with temperature, they can expand and contract.<br />
Don't be afraid to carry the allen wrench with you in the field (if you lose it, a whole set will only cost you<br />
a couple of dollars), in case the tension needs readjusting to keep it perfectly working at different<br />
temperatures, especially if you live in a very cold climate like I do. I have found it to work extremely well,<br />
even at 10 degrees F in winter.<br />
Tip 7: IMPORTANT - When my focuser was completely assembled, and properly adjusted, there was a<br />
noticeable increase in resistance while turning the single speed knob over the way the focuser felt<br />
originally. This is due to the fact that the single speed focuser now not only moves the focuser shaft, but<br />
ALSO spins the slow speed knob 10 revolutions <strong>for</strong> every one revolution. So it's simply going to take<br />
more ef<strong>for</strong>t to turn the regular speed knob, and there<strong>for</strong>e feel stiffer, and harder to turn that what you<br />
were used. Don't worry, you will get used to it, and it's a worthwhile trade off.<br />
Tip 8: If you have it setup on a tripod, don't <strong>for</strong>get that you can rotate the focuser! This allows you to<br />
bring the adjustment screws to the top, making it much easier to work on. If you plan on doing<br />
photography, now would be a good time to also test it with the weight of the camera gear attached. Once<br />
you have the tension set correctly, make sure that the silver locking knob will lock the focuser when<br />
tightened <strong>for</strong> use with a camera to prevent the focuser from moving while taking pictures.<br />
My Impressions so far after using it inside (in the basement focusing on the wall) and outside<br />
several times (temperatures have been cold, below freezing the entire time outside)<br />
First, I will say that I have to admit that the original <strong>William</strong> <strong>Optics</strong> cray<strong>for</strong>d style focuser is very nice, and<br />
remember, you aren't changing the mechanics of the focuser, simply replacing one of the 1:1 focusing<br />
knobs, with a 1:10 focusing knob. For many people, especially visual observers, this upgrade might<br />
seem like a luxury. It has taken me a few observing sessions to get use to it, but now that I am<br />
com<strong>for</strong>table with it, I love it. You have the ability to get that last little bit of perfect focus if you are trying to<br />
squeeze the details out of the moon, or a planet, or even a double star or globular cluster. Its wonderful<br />
to be almost in focus, and then smoothly turn the slow speed knob back and <strong>for</strong>th, finding the perfect<br />
focus point, especially <strong>for</strong> high power viewing or photographic use. It works well in even very cold<br />
weather (8 degrees F is the coldest I have braved so far) and seems to be another good product from<br />
<strong>William</strong> <strong>Optics</strong>.<br />
For visual observers: Where it really seems to be the most benefit is on Lunar and planetary observing,<br />
or other high power observing. I think it's a worthwhile upgrade <strong>for</strong> visual use, and really helps the most<br />
at high powers.<br />
For photographic users: Focusing my DSLR is challenging. The microfocuser provides a huge<br />
improvement in precise focusing that really helps. As long as the focuser has been adjusted correctly<br />
(see the tips on adjusting it above) the focuser will not move around with the silver locking knob<br />
tightened. This makes getting that critical focusing easier, and I would say that once you try photography<br />
with this microfocuser you will not want to be without it.<br />
Are there any negatives aspects of the product?<br />
The cost of the product, while its reasonable priced at $148 US (at least its reasonable compared to<br />
some of the other microfocuser products on the market) might place it lower on the list of needed<br />
accessories <strong>for</strong> some users.<br />
There is one other thing that I became aware of when I got all done with the installation. When I went to<br />
put the scope back in its custom foam lined backpack bag, I realized that the foam would no longer fit the<br />
new larger and longer focuser. But I can certainly live with that! I was able to rotate the scope in the bag<br />
<strong>for</strong> now, but I think I will cut the foam <strong>for</strong> a better fit, which is fine, since I can't imagine ever not having<br />
the microfocuser now that I have it.<br />
One Final Reminder: If the focuser ever feels like its tension is too tight, or it has hard and easy zones<br />
as you rotate it, you will likely need to tighten the black thumb screw, or perhaps start over and do the<br />
adjustment process again. Don't be afraid to try adjusting the tension until you have it working perfectly.<br />
http://www.cloudynights.com/item.php?item_id=1307 (4 of 5)2006/4/26 •• 04:19:24