
You also want an ePaper? Increase the reach of your titles
YUMPU automatically turns print PDFs into web optimized ePapers that Google loves.
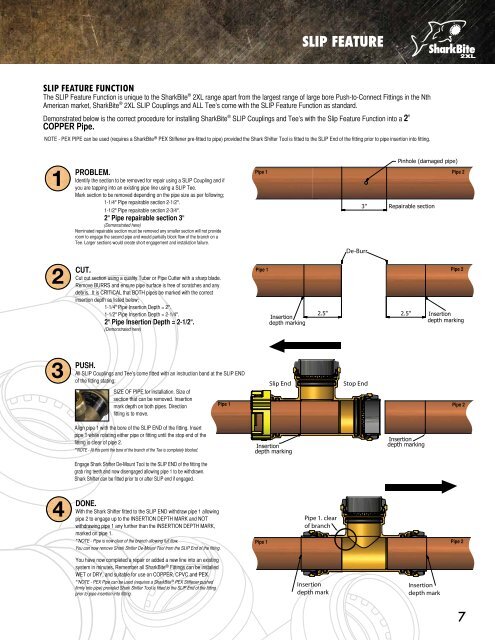
SLIP FEATURE<br />
SLIP FEATURE FUNCTION<br />
The SLIP Feature Function is unique to the SharkBite ® <strong>2XL</strong> range apart from the largest range of large bore Push-to-Connect Fittings in the Nth<br />
American market, SharkBite ® <strong>2XL</strong> SLIP Couplings and ALL Tee’s come with the SLIP Feature Function as standard.<br />
Demonstrated below is the correct procedure for installing SharkBite ® SLIP Couplings and Tee’s with the Slip Feature Function into a 2"<br />
COPPER Pipe.<br />
NOTE - PEX PIPE can be used (requires a SharkBite ® PEX Stiffener pre-fitted to pipe) provided the Shark Shifter Tool is fitted to the SLIP End of the fitting prior to pipe insertion into fitting.<br />
1<br />
PROBLEM.<br />
Identify the section to be removed for repair using a SLIP Coupling and if<br />
you are tapping into an existing pipe line using a SLIP Tee.<br />
Mark section to be removed depending on the pipe size as per following;<br />
1-1/4" Pipe repairable section 2-1/2".<br />
1-1/2" Pipe repairable section 2-3/4".<br />
2" Pipe repairable section 3"<br />
(Demonstrated here)<br />
Nominated repairable section must be removed any smaller section will not provide<br />
room to engage the second pipe and would partially block flow of the branch on a<br />
Tee. Larger sections would create short engagement and installation failure.<br />
Pipe 1<br />
De-Burr<br />
Pipe 2<br />
2<br />
CUT.<br />
Cut out section using a quality Tuber or Pipe Cutter with a sharp blade.<br />
Remove BURRS and ensure pipe surface is free of scratches and any<br />
debris. It is CRITICAL that BOTH pipes be marked with the correct<br />
insertion depth as listed below;<br />
1-1/4" Pipe Insertion Depth = 2".<br />
1-1/2" Pipe Insertion Depth = 2-1/4".<br />
2" Pipe Insertion Depth = 2-1/2".<br />
(Demonstrated here)<br />
Pipe 1<br />
Pipe 2<br />
3<br />
PUSH.<br />
All SLIP Couplings and Tee’s come fitted with an instruction band at the SLIP END<br />
of the fitting stating;<br />
SIZE OF PIPE for installation. Size of<br />
section that can be removed. Insertion<br />
mark depth on both pipes. Direction<br />
fitting is to move.<br />
Pipe 1<br />
Slip End<br />
Stop End<br />
Pipe 2<br />
Align pipe 1 with the bore of the SLIP END of the fitting. Insert<br />
pipe 1 while rotating either pipe or fitting until the stop end of the<br />
fitting is clear of pipe 2.<br />
**NOTE - At this point the bore of the branch of the Tee is completely blocked.<br />
Engage Shark Shifter De-Mount Tool to the SLIP END of the fitting the<br />
grab ring teeth and now disengaged allowing pipe 1 to be withdrawn.<br />
Shark Shifter can be fitted prior to or after SLIP end if engaged.<br />
4<br />
DONE.<br />
With the Shark Shifter fitted to the SLIP END withdraw pipe 1 allowing<br />
pipe 2 to engage up to the INSERTION DEPTH MARK and NOT<br />
withdrawing pipe 1 any further than the INSERTION DEPTH MARK,<br />
marked on pipe 1.<br />
**NOTE - Pipe is now clear of the branch allowing full flow.<br />
You can now remove Shark Shifter De-Mount Tool from the SLIP End of the fitting.<br />
Pipe 1<br />
Pipe 1. clear<br />
of branch<br />
Pipe 2<br />
You have now completed a repair or added a new line into an existing<br />
system in minutes. Remember all SharkBite ® Fittings can be installed<br />
WET or DRY, and suitable for use on COPPER, CPVC and PEX.<br />
**NOTE - PEX Pipe can be used (requires a SharkBite ® PEX Stiffener pushed<br />
firmly into pipe) provided Shark Shifter Tool is fitted to the SLIP End of the fitting<br />
prior to pipe insertion into fitting.<br />
Insertion<br />
depth mark<br />
Insertion<br />
depth mark<br />
7