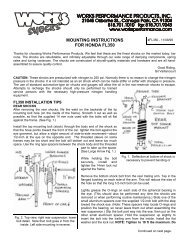
BMW R100GS/R/PD Special Mounting and ... - Works Shocks
BMW R100GS/R/PD Special Mounting and ... - Works Shocks
BMW R100GS/R/PD Special Mounting and ... - Works Shocks

You also want an ePaper? Increase the reach of your titles
YUMPU automatically turns print PDFs into web optimized ePapers that Google loves.
SPECIAL MOUNTING AND CLEARANCE<br />
INSTRUCTIONS FOR THE<br />
<strong>BMW</strong> <strong>R100GS</strong>/R/<strong>PD</strong><br />
#<strong>BMW</strong>2 - 06/29/98<br />
CAUTION: This shock is pressurized to 250 psi nitrogen. This pressure is not an adjustable<br />
feature of the shock. Unless there is a leak, the shock should not normally lose pressure. If the<br />
shock damping becomes soft or mushy (after an extended period of time or number of miles) the<br />
shock may need to be serviced which includes shock oil <strong>and</strong> a nitrogen charge. In this situation,<br />
re-pressurizing the shock alone may not improve the action of the shock. The shock should be<br />
returned to <strong>Works</strong> Performance Products, Inc., or to a qualified shop that has the appropriate<br />
tools, training <strong>and</strong> nitrogen h<strong>and</strong>ling equipment.<br />
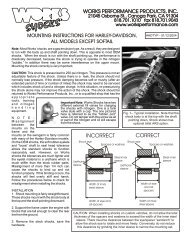
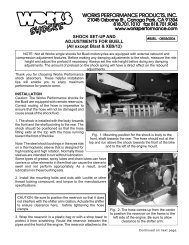
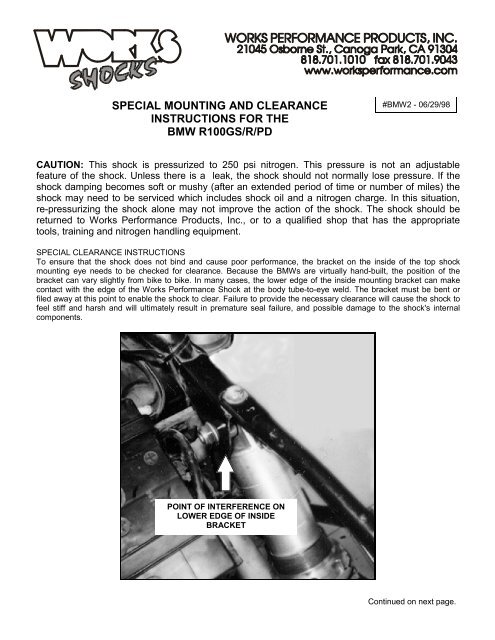
SPECIAL CLEARANCE INSTRUCTIONS<br />
To ensure that the shock does not bind <strong>and</strong> cause poor performance, the bracket on the inside of the top shock<br />
mounting eye needs to be checked for clearance. Because the <strong>BMW</strong>s are virtually h<strong>and</strong>-built, the position of the<br />
bracket can vary slightly from bike to bike. In many cases, the lower edge of the inside mounting bracket can make<br />
contact with the edge of the <strong>Works</strong> Performance Shock at the body tube-to-eye weld. The bracket must be bent or<br />
filed away at this point to enable the shock to clear. Failure to provide the necessary clearance will cause the shock to<br />
feel stiff <strong>and</strong> harsh <strong>and</strong> will ultimately result in premature seal failure, <strong>and</strong> possible damage to the shock's internal<br />
components.<br />
POINT OF INTERFERENCE ON<br />
LOWER EDGE OF INSIDE<br />
BRACKET<br />
Continued on next page.
<strong>BMW</strong> <strong>R100GS</strong>/R/<strong>PD</strong> Instructions, continued Page 2<br />
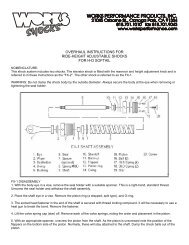
PRELOAD ADJUSTMENT—<br />
On the <strong>Works</strong> shocks for <strong>R100GS</strong>, R <strong>and</strong> <strong>PD</strong> models, a threaded preload is st<strong>and</strong>ard. This allows the adjustment of<br />
the ride height of the motorcycle. The preload is changed by turning the threaded nut down (higher ride height) or up<br />
(lower ride height) on the threaded part of the shock.The nut is a right-h<strong>and</strong> thread. It is used primarily to set the ride<br />
height for solo riding, but should be employed when adding a passenger or extra weight.<br />
CHECKING RIDE HEIGHT—<br />
1. With the bike on the center st<strong>and</strong>, have an assistant measure from a point on the gear housing at the axle (center<br />
point) to a point on the frame, or bodywork directly above it. Record this measurement.<br />
2.With the bike off the st<strong>and</strong> <strong>and</strong> the rider in the seat, bounce on the suspension <strong>and</strong> let the bike settle. Have the<br />
assistant measure from the same two points. Subtract the second measurement from the first.<br />
3. For these models (equipped with the stock length shock) the difference should be between 1-3/4 inches (minimum)<br />
<strong>and</strong> 2-1/4 inches (maximum). (R model <strong>and</strong> <strong>Works</strong> short shocks should range from 1-1/4 inch to 1-5/8 inch.)<br />
4. If the difference is less than the minimum, reduce the spring preload by turning the nut to the left (down) one full<br />
turn. Measure the distance again starting with Step 2. Adjust again if necessary.<br />
5. If the difference is more than the maximum, increase the spring preload by turning the nut to the right (up) one full<br />
turn. Measure the distance again starting with Step 2. Adjust again if necessary.<br />
Note: If the ride height is too low, the shock will bottom unnecessarily, resulting in a harsh ride. If it is too high, the<br />
shock will “top out” too easily when rebounding from a bump or under hard acceleration.