H-24 H-25 ZI-1200 Front R1 - Meijer
H-24 H-25 ZI-1200 Front R1 - Meijer
H-24 H-25 ZI-1200 Front R1 - Meijer

You also want an ePaper? Increase the reach of your titles
YUMPU automatically turns print PDFs into web optimized ePapers that Google loves.
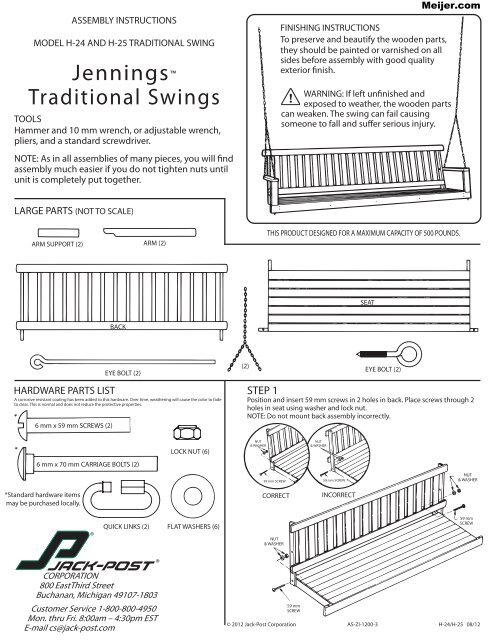
ASSEMBLY INSTRUCTIONS<br />
MODEL H-<strong>24</strong> AND H-<strong>25</strong> TRADITIONAL SWING<br />
Jennings <br />
Traditional Swings<br />
TOOLS<br />
Hammer and 10 mm wrench, or adjustable wrench,<br />
pliers, and a standard screwdriver.<br />
NOTE: As in all assemblies of many pieces, you will find<br />
assembly much easier if you do not tighten nuts until<br />
unit is completely put together.<br />
FINISHING INSTRUCTIONS<br />
To preserve and beautify the wooden parts,<br />
they should be painted or varnished on all<br />
sides before assembly with good quality<br />
exterior finish.<br />
<strong>Meijer</strong>.com<br />
WARNING: If left unfinished and<br />
exposed to weather, the wooden parts<br />
can weaken. The swing can fail causing<br />
someone to fall and suffer serious injury.<br />
LARGE PARTS (NOT TO SCALE)<br />
ARM SUPPORT (2) ARM (2)<br />
THIS PRODUCT DESIGNED FOR A MAXIMUM CAPACITY OF 500 POUNDS.<br />
SEAT<br />
BACK<br />
HARDWARE PARTS LIST<br />
EYE BOLT (2)<br />
A corrosive resistant coating has been added to this hardware. Over time, weathering will cause the color to fade<br />
to clear. This is normal and does not reduce the protective properties.<br />
6 mm x 59 mm SCREWS (2)<br />
(2)<br />
EYE BOLT (2)<br />
STEP 1<br />
Position and insert 59 mm screws in 2 holes in back. Place screws through 2<br />
holes in seat using washer and lock nut.<br />
NOTE: Do not mount back assembly incorrectly.<br />
6 mm x 70 mm CARRIAGE BOLTS (2)<br />
*Standard hardware items<br />
may be purchased locally.<br />
QUICK LINKS (2)<br />
LOCK NUT (6)<br />
FLAT WASHERS (6)<br />
NUT<br />
& WASHER<br />
59 mm SCREW<br />
CORRECT<br />
NUT<br />
& WASHER<br />
NUT<br />
& WASHER<br />
59 mm SCREW<br />
INCORRECT<br />
NUT<br />
& WASHER<br />
59 mm<br />
SCREW<br />
CORPORATION<br />
800 East Third Street<br />
Buchanan, Michigan 49107-1803<br />
Customer Service 1-800-800-4950<br />
Mon. thru Fri. 8:00am – 4:30pm EST<br />
E-mail cs@jack-post.com<br />
59 mm<br />
SCREW<br />
© 2012 Jack-Post Corporation AS-<strong>ZI</strong>-<strong>1200</strong>-3<br />
H-<strong>24</strong>/H-<strong>25</strong> 08/12
STEP 2<br />
Attach each arm to back by placing<br />
70 mm carriage bolt through chain, then<br />
through the hole in tapered end of the arm<br />
(straight edge of the arm facing in), then<br />
attach to back with a washer and a nut.<br />
<strong>Meijer</strong>.com<br />
NUT<br />
& WASHER<br />
WARNING:<br />
Before using the chain, inspect each link<br />
in the chain to make sure all are welded<br />
closed and secure. Failure of the chain<br />
could cause serious injury. Should any<br />
defect be found, contact Customer<br />
Service for a free replacement.<br />
70 mm<br />
CARRIAGE<br />
BOLT<br />
STEP 3<br />
Place arm supports between each arm and<br />
seat at the front of the swing. Hook link of<br />
chain on each side on 12" eye bolts and<br />
slide eye bolts through arms, supports, and<br />
seat as shown. Using nuts and washers,<br />
tighten eye bolts until they indent the surface.<br />
This will prevent the chain from coming<br />
loose from the eye.<br />
LONG<br />
LENGTH<br />
CHAIN<br />
12" EYE BOLT<br />
NOTE: Make sure that the two<br />
short, equal lengths of chain<br />
connect to the swing arm while<br />
the longer length of chain<br />
attaches the swing to the ceiling<br />
or swing frame.<br />
SHORT<br />
LENGTHS<br />
NUT<br />
& WASHER<br />
NOTE: To avoid a possible hazard,<br />
please cut off eye bolts flush with the<br />
bottom of the nuts after assembly<br />
is complete.<br />
STEP 4<br />
Your package contains two eyebolts. These should be screwed into a<br />
solid material (ceiling joists) as shown in Figure A. The screws should<br />
be spaced 46 inches apart for the H-<strong>24</strong>, and 58 inches apart for the<br />
H-<strong>25</strong>. Drill a 1/4 inch pilot hole for each eyebolt and lubricate the<br />
threads with wax, oil, or soap for easiest installation. Be sure to screw<br />
the ceiling hook completely into the ceiling joists so that no threads<br />
are visible.<br />
NOTE: If the desired location of the swing does not match the NOTE<br />
overhead joist location, a suitable 2x4 header should be attached to POSITION OF<br />
the joists. The hooks may then be screwed into the header as shown THE EYEBOLT<br />
in Figure B.<br />
WARNING: Periodically check the swing chain, ceiling hooks, and all<br />
hardware for signs of wear and possible metal fatigue that could<br />
allow the swing to fall and cause serious injury. Check all hardware<br />
to be sure bolts and nuts are tight. Call our Customer Service<br />
Department for replacement parts.<br />
CORRECT<br />
FIGURE A<br />
INCORRECT<br />
JOISTS<br />
HEADER<br />
FIGURE B<br />
NOTE: The quick link is used to attach<br />
the chain to the eyebolt. In its open<br />
position, it should be passed through<br />
the chain and the eyebolt. The nut<br />
portion should be turmed onto the<br />
threads completely; then tightened<br />
with pliers or a wrench.<br />
© 2012 Jack-Post Corporation <strong>ZI</strong>-<strong>1200</strong>-3<br />
H-<strong>24</strong>/H-<strong>25</strong> 08/12